Downloading Windows Updates does not always go smoothly as you can encounter several issues like the “Some updates did not finish downloading, We will keep trying, Error code 0x80246007” error. In fact, this error can also occur on other Windows applications like OneNote.
According to security experts, this error happens for many reasons. For one, it could be that the Windows Update database is corrupted. It could also be that there is another process that’s in conflict with the Windows Update components or there might be some issue with the Background Intelligent Transfer Service (BITS). Whichever the cause may be, you can fix it by following the solutions given below.
Option 1 – Delete the contents in the Temporary folder
You can also try deleting the contents in the Temporary folder – all the downloaded, pending, or failed Windows 10 updates. You can do that using the simple and easy steps below.
- Tap the Win + R keys to open the Run dialog box.
- Then type “%temp%” in the field and press Enter to open the Temporary folder.
- After that, select all the folders and files within the Temp folder and delete all of them.
Option 2 – Try running the Windows Update Troubleshooter
Running the built-in Windows Update troubleshooter is one of the things you can first check out as it is known to automatically resolve any Windows Update errors like Error code 0x80246007. To run it, go to Settings and then select Troubleshoot from the options. From there, click on Windows Update and then click the “Run the troubleshooter” button. After that, follow the next on-screen instructions and you should be good to go.
Option 3 – Try renaming or removing the pending .xml file
The problem might be due to some pending .xml file so you need to rename or remove it. To do so, just go to C:/Windows/WinSxS folder. From there, look for a pending .xml file – you can either rename it or delete it. This will allow the Windows Update to delete any pending tasks and build a new and fresh update check.
Option 4 – Restart the Background Intelligent Transfer Service (BITS)
The Background Intelligent Transfer Service or BITS is a part of the Windows Update service that manages the background download of Windows Update, as well as scans for new updates and so on. Thus, if your Windows Update fails a couple of times, you might want to restart BITS. For you to do that, make sure that you have admin privileges.
- Press the Win + R keys to open the Run dialog box.
- Then type “msc” in the field and hit Enter to open Services.
- After opening Services, look for the Background Intelligent Transfer Service from the list of services and then double click on it to open Properties.
- Next, set the Startup type to Manual and click on the Start button. If it doesn’t help, you can try setting it to Automatic (Delayed) and then reboot your PC.
Option 5 – Run the DISM tool
Running the DISM Tool helps in repairing the Windows System Image as well as the Windows Component Store in Windows 10. Using this built-in tool, you have various options such as the “/ScanHealth”, “/CheckHealth”, and “/RestoreHealth”.
- Open the Command Prompt with admin privileges.
- Then type in the following commands and make sure to hit Enter right after you type each one of them:
- Dism /Online /Cleanup-Image /CheckHealth
- Dism /Online /Cleanup-Image /ScanHealth
- exe /Online /Cleanup-image /Restorehealth
- Do not close the window if the process takes a while as it will probably take a few minutes to finish.
Option 6 – Delete the files from the Software Distribution folder
The downloaded Windows Updates are placed in a folder called “SoftwareDistribution”. The files downloaded in this folder are automatically deleted once the installation is completed. However, if the files are not clean up or if the installation is still pending, you can delete all the files in this folder after you pause the Windows Update service. For complete instructions, refer to the steps below.
- Open the WinX Menu.
- From there, open Command Prompt as admin.
- Then type in the following command – don’t forget to hit Enter right after typing each one of them.
net stop wuauserv
net start cryptSvc
net start bits
net start msiserver
- After entering these commands, it will stop the Windows Update Service, Background Intelligent Transfer Service (BITS), Cryptographic, and the MSI Installer
- Next, go to the C:/Windows/SoftwareDistribution folder and get rid of all the folders and files thereby tapping the Ctrl + A keys to select them all and then click on Delete. Note that if the files are in use, you won’t be able to delete them.
Option 7 – Reset the Catroot2 folder
After resetting the SoftwareDistribution folder, you need to reset the Catroot2 folder to restart the services you just stopped. To do that, follow these steps:
- Type each one of the following commands.
net start wuauserv
net start cryptSvc
net start bits
net start msiserver
- After that, exit Command Prompt and restart your computer, and then try to run Windows Update once more.

 In command prompt type sfc /scannow and press ENTER
 Inside personalization, click on the Lock Screen tab.
 On the right screen, under the picture, you will find Windows spotlight, click on it to bring a drop-down menu up.
 Your choice is presented as a single picture for background or slideshow, a series of pictures that are going to be looped in a given time interval.
If you would like just a single picture for your background, choose that and click on it.
Your choice is presented as a single picture for background or slideshow, a series of pictures that are going to be looped in a given time interval.
If you would like just a single picture for your background, choose that and click on it.
 Once you are in choose picture dialog, click on the browse button and navigate to the picture on your storage which you would like to have as a background.
If however, you fancy slideshow as your lock screen background, click on the background drop-down menu and choose the slideshow. Next, click on add a folder and navigate to a folder where you have pictures that you would like to have as a slideshow for your Windows lock screen.
Once you are in choose picture dialog, click on the browse button and navigate to the picture on your storage which you would like to have as a background.
If however, you fancy slideshow as your lock screen background, click on the background drop-down menu and choose the slideshow. Next, click on add a folder and navigate to a folder where you have pictures that you would like to have as a slideshow for your Windows lock screen.


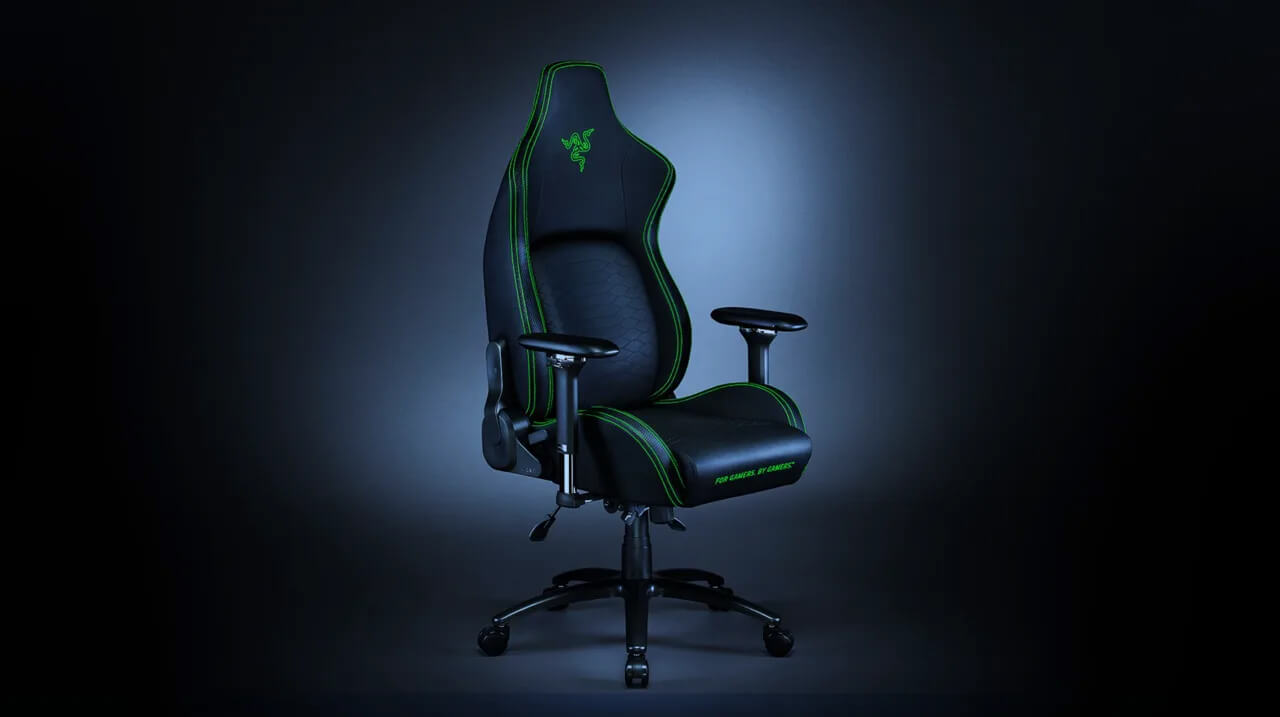 It seems that last few days we were riding some Razer bandwagon but rest assured that we are not sponsored by them in any way, truth is that simply they come up with some interesting accessories which I believe are worth covering.
Gaming Chair itself comes in two colors, fully black and green black combination and it is not really an entry-level chair if we are talking about price. The chair itself is around 600USD depending on the distributor and considering that price range it is placed in more top cream of gaming chairs but it is worth every dime.
It seems that last few days we were riding some Razer bandwagon but rest assured that we are not sponsored by them in any way, truth is that simply they come up with some interesting accessories which I believe are worth covering.
Gaming Chair itself comes in two colors, fully black and green black combination and it is not really an entry-level chair if we are talking about price. The chair itself is around 600USD depending on the distributor and considering that price range it is placed in more top cream of gaming chairs but it is worth every dime.