Everything You Need to Know About Disk Partitioning
Disk partitioning is a concept that’s been around for so long, but is still only familiar to few. If done right, it can help get your computer in perfect order.
Today we bring you a simple definition of disk partitioning, its pros and cons, and a quick tip on how to do it properly to reap its full benefit!
Definition and purpose
The simplest way to define disk partitioning would be: it’s exactly what it sounds like. It means taking a hard disk drive and separating it into different segments. These segments are called partitions. You can visualize it as cutting a cake into smaller pieces - not necessarily of the same size, though.
So what is the purpose of these pieces?
Well, when you first get a hard drive, it’s basically just a bunch of unallocated storage space. Until there’s at least one partition, this space is unusable to your operating system. Once you create a partition, your OS will recognize it as usable storage space.
You can choose to create a single partition and use it for all your files, from program files to personal data. A lot of off-the-shelf computers come with one primary partition like this and a small secondary one reserved for recovery purposes.
Whether or not you want to split your disk into more than one segment is up to you. We would generally recommend it, though. The whole point of partitioning is for each segment to have its own purpose.
So treating all your storage space as a single unit containing different file types would be like constructing an office building with only one massive room for everything - day-to-day work, conferences, interviews, etc. And all of this for different departments of the company. You can see how this might get a little messy.
Creating multiple partitions eliminates the task of running several different types of files from the same place. This takes a heavy load off the entire process of accessing data.
Disk partitioning also brings a ton of other benefits to the table. An important disclaimer, though: there are disadvantages too. We will walk you through both sides to help you get an objective idea and make an informed decision.
Source Kina on Unsplash
What are the benefits of disk partitioning?
1. Better file organization
This is the most obvious and perhaps the biggest advantage of partitioning your hard drive.
As we already mentioned, partitioning allows you to create separate segments for different file and data types. You wouldn’t want to use the same partition for your system files and for games, would you?
If organization and time management are important to you, then multiple partitions are the right solution. Searching for specific files will be much easier overall. Say you have one hard drive, but three partitions: C for the system files alone, D for multimedia files and documents, and E for games and apps. Your computer loads the system from C without interference from the other two, and you know exactly where to look when searching for a file.
2. Easy reinstallation
File management isn’t the only thing made faster and simpler thanks to partitioning. If you opt for creating multiple segments on your drive, reinstalling Windows will be easy peasy.
That’s because all you need to do is format the partition your system is on. Then you reinstall the OS on it, and there you go. Now you have a clean installation, with all your files saved on other partitions intact. You can even make a copy of your system partition, so you can revisit the exact same installation in the future if you want. And the whole time your pictures, music, documents stay exactly where you left them.
Source Andrew M on Unsplash
3. Possibility of using multiple file systems
By now you’ve understood that partitions function completely separately. This means that, if for some reason you need multiple file system capabilities, partitioning will allow that.
One segment could be used for, say, an NTFS file system, while another could run ext or APFS.
4. Running different OSes
You’re an avid Windows user but need to use Linux on the side? No problem. You don’t need to buy a separate computer or anything. The possibility of running different file systems also means you can use partitioning to run multiple operating systems.
Doesn’t that sound enticing? One machine for multiple totally different uses!
5. Backup and recovery made simple
Data loss can happen on any disk, partitioned or not. However, it’s much easier to get it back on a partitioned one. You know where you stored what, and each partition can be backed up exactly as it is. It’s also a lot faster to back up single partitions than entire hard drives.
Ultimately this also means a faster path to recovery. If you lose or accidentally delete important files and data, you might want to use a recovery tool like Recuva to scan for them and get them back. Recuva is even powerful enough to recover data from damaged hard drives. But no matter how powerful, scanning a whole drive is strenuous for any recovery tool. Scanning independent partitions is a lot more convenient than that, and will get you to your goal more efficiently.
6. Optimized performance
Now, let’s keep in mind that computer performance is influenced by a number of factors. Partitioning alone isn’t what makes it better or worse. However, it can contribute to optimization. It’s easier for your computer to scan, say, a 40 GB partition to fetch the system file it needs than scanning the entire capacity of your drive.
7. Improved security (possibly*)
Separate partitions can help make your system more secure. Firstly, they minimize file corruption. If one partition gets corrupted, the others should remain unaffected. And keeping in mind the previous point about backup and recovery, ‘fixing’ the damaged partition would be much easier than fixing the entire hard drive.
Partitioning also improves security in terms of malware protection. A malicious attack on one partition is easier to deal with than malware on the whole drive. If your system partition gets infected, you can simply reinstall your OS and that should do the trick.
*Do keep in mind that partitioning can’t defend you against more advanced attacks. So make sure not to give in to a false sense of security.
What are the disadvantages of partitioning?
1. Data is still vulnerable
Yes, it’s easier to back up and recover data from independent partitions. And yes, partitioning may help protect separated files and data to a higher degree. But remember: everything is still on a single physical drive. So while digital errors and issues may be easier to deal with on partitioned drives, physical damage obviously won’t be.
If your hard drive is destroyed in some way, all data on it will be gone. That’s why, if you have crucial files on your PC, it’s important to give them the proper backup treatment before it’s too late.
2. Disbalance of space
Allocating storage space on separate partitions may be a little more tricky than you think. You may fill up one partition a lot faster than another. So on one side you’re struggling with space, and on another you have too much of it to spare. Imagine nearly filling up your system partition and then it turns out you need a lot more space for its updates than you thought.
That’s why you really have to be sure you actually have enough files of different types that you need help managing efficiently. Otherwise you’ll just create a struggle and disbalance in terms of storage.
3. Increased risk of error
If done incorrectly, partitioning can lead to more harm than good. Aside from space disbalance, there is an increased risk of incorrect partition sizes and formatting. Plus, human error is also a factor: in a moment of distraction, you may erase one partition when you meant another. Undoing such mistakes will definitely be tedious and time-consuming.
4. SSDs eliminate the need of partitioning
SSDs (solid-state drives) don’t function in the same way that HDDs do. They have faster read times and can organize files on their own. This quite literally eliminates the need for organization on your part.
Partitioning: yes or no?
The bottom line is that multiple partitions might not be necessary for the average user. But if you’re planning on storing many file types or different file and operating systems on the same PC, then you should give it a shot. It’s also an excellent solution for businesses, of course.
And if our pros and cons list isn’t enough to help you decide, you can always send us a message and we’ll help you make the right choice.
Decided to partition your hard drive?
If you’ve decided to give it a go, you definitely should make sure to do it right.
The two most effective and reliable ways to partition are using the built-in options on Windows or investing in a dedicated partitioning tool, like the EaseUS Partition Master. Which one you'll opt for depends on your specific needs.
Option 1 may be more suitable for users with at least some level of experience. In this case, you’d have to know exactly which steps to take without making errors. This is done in Disk Management on Windows 10/11. From there, you can select the partitions you’d like to split into different volumes of selected sizes.
If this is your first time partitioning, we highly suggest you either consult professionals for this or move on to option 2. The EaseUS partitioning software is specifically designed for beginners, with an intuitive interface helping you succeed in the process. All you need to do is pick the Partition Master package tailored to your needs and follow their guide.
Each package offers technical support as well, and even free upgrades (to varying degrees based on your subscription). Plus, all of this is valid for not one, but two PCs.
It’s the perfect solution for a smooth and error-free partitioning process. If you want to organize your hard drives efficiently and make the most of all your space without doing irreparable damage, it’s definitely worth the investment.
Windows updates have become a regular occurrence in our digital lives. They are frequent and have become quite necessary. Most of the time they bring us quality content like fixed security, resolved bugs, and even new features but from time to time update itself can be not downloaded properly or it can have some issues when installing. Windows Update Error 0x800F0825 is one of these update errors that will be reported seemingly after applying the update.
Altho annoying error it is nothing system breaking and can be easily resolved.
Hello and welcome everyone, today we will provide you with solutions on how to resolve error 0x800F0825 when trying to complete a Windows update.
Run Windows troubleshooter
Built-in Windows troubleshooter can help a lot in resolving these issues and we will try it as a first solution because of its simplicity and ease of use.
Click on START
Click on settings
Navigate to Update & Security > Troubleshoot > Additional Troubleshooter > Windows Update
Click on Run the troubleshooter
Follow onscreen instructions and let the troubleshooter try to solve the issue
Clear contents of SoftwareDistribution & Catroot2 folders
Altho SoftwareDistribution and Catroot2 folders are essential for the update process it can happen that badly downloaded updates or similar corruption can be stored there and thus producing this error.
Open file explorer and locate these two folders, go inside and delete content inside them
Try updating again to see if corruption inside folders was the issue.
Update manually
If the previous two solutions have not produced a result and the error is still present then go to the official Microsoft Update Catalog and download the update manually
The catalog is here.
Search for updates from the Windows Update Catalog In the Search box, type your search terms. You can carry out a full-text search, using a keyword, KB article, MSRC bulletin, driver manufacturer, driver model, driver version, product, and a classification. Select the appropriate version of Windows. Search or click on Advanced Search if you want to refine your search. A list will be displayed. Select the updates that you want to download. Click Add for each selection to add it to the download basket.
Download the updates. You may be asked to install an Active-X download control to be able to download files from this site
Double-click on the downloaded updates to install them
Administrators can download updates from the Microsoft Download Center or the Windows Update Catalog to deploy to multiple computersIf you are running Windows Server Update Services (WSUS) 3.0, System Center Essentials (SCE), or System Center Configuration Manager (SCCM) you can import updates directly into these applications. Security updates, critical updates, service packs, update rollups, definition updates, and critical drivers can be configured to synchronize with your server automatically. You can still import these updates into your application by using Microsoft Update Catalog; however, depending on how you configure WSUS, SCE, and SCCM, you may not need to import the updates.
Disable system protection
In some rare cases, antivirus or firewall could interfere with both downloads and execution of certain files. If each previous solution failed disable temporarily your security software and try executing the update again.
In 27 European countries for some time it has been considered for introducing a law that would force phones, tablets, laptops, and other mobile devices to use a single USB Type-C connector.
The European Parlament announced that a provisional agreement has been reached and that it was voted that a single charging solution is USB Type-C. The current agreement applies and covers the next devices: phones, tablets, Readers, earbuds, digital cameras, headphones, headsets, handheld consoles, and portable speakers. All currently existing devices can still be sold without issues but starting in the fall of 2024 all-new products must support USB Type-C charging.
The agreement will also hit Laptops but not on the same date, How is USB Type-C currently not enough for charging laptops, all new laptops that will have to use it are scheduled for fall of 2025.
Although the agreement is reached the EU Parliament and Council still have to formally approve everything.
Apple targeted the most
Apple has been targeted as the main target for rules since their iPhones are still using Apple's proprietary Lightning charging port. Apple sells a lot of iPhones in Europe and even though iPad Pro and iPad Air along with all MacBooks have moved to USB Type-C, iPhones are still struggling with the Lightning port.
Apple criticized the EU’s charger rules when they were first proposed in 2021, telling the BBC, “We remain concerned that strict regulation mandating just one type of connector stifles innovation rather than encouraging it, which in turn will harm consumers in Europe and around the world.” The European Union has said in response that it will update its rules as new technology arrives.
Why was this proposed?
The main problem in Europe that led to this proposition was electronic waste which reached 11 000 metric tons in 2018. European union is afraid that this will keep rising as chargers become larger and heavier in order to accommodate faster-charging speeds. More electronic waste means more hardware slowly decomposing in landfills that will contribute to climate change affecting everyone on the planet, not just the people living in Europe.
Fix Microsoft Visual C++ Runtime Library Error, Microsoft Windows operating system supports a form of shared libraries that are known as DLL (Dynamic-link libraries). These are also known as code libraries that are used by multiple processes while one copy is loaded into memory.
Runtimes are also code libraries that are loaded by applications when the application is called to run on the system. The most common runtime libraries that are used today are Visual C++ Runtime Library and Java Runtime Environment.
These libraries are practically used for nearly every single application you run on your system. Therefore it is very important that these libraries are in good working order.
Microsoft Visual C++ Runtime Library Error occurs when this runtime library becomes corrupted.
When Microsoft Visual C++ Runtime Library Error occurs, the applications powered by this runtime library fail to run smoothly, resulting in locking you out of those applications and hampering your ability to work on them.
Generally speaking, this error indicates system instability and poor PC maintenance. If this error is not fixed timely it can expose your system to serious PC damages like system freeze, crashes, and data loss.
Solution
Error Causes
Microsoft Visual C++ Runtime Library Error is triggered for numerous reasons. These include:
Poor program installation
Disk fragmentation
Missing and damaged .dll files
Registry corruption
Malware invasion
In a nutshell, it can be said that the deep-rooted cause of the Microsoft Visual C++ Runtime Library Error is the registry. All the causes listed above are associated with the registry.
For simplification, the registry is the main database of your system that stores all the activities executed on the computer in the RAM, the hard disk.
This includes both the important data and junk files such as temporary files, internet history, bad registry keys, invalid registry entries, and also the files from the uninstalled programs.
If these files are not removed from the registry frequently, it overloads the hard disk and leads to obscure error message displays on your system like the Microsoft Visual C++ Runtime Library Error as warning signs.
Sometimes, rebooting the system may fix the Microsoft Visual C++ Runtime Library Error. However, this is temporary. Error message pops again after some time. So, instead of seeking out a temporary solution, it is advisable to look for a solution that can repair this error for the longest time.
Further Information and Manual Repair
There are two ways to fix the Microsoft Visual C++ Runtime Library Error code. One is to reinstall the Visual C++ runtime libraries. This can be a complex task if you are not a computer programmer or technically sound.
However, the second way, or let’s just say the best and easiest way to resolve this problem is to download Restoro.
This is truly an easy way as it requires no technical expertise or programming knowledge to repair the Microsoft Visual C++ Runtime Library Error.
Restoro is an advanced, user-friendly, and multi-functional repair tool integrated with profound powerful utilities like an intuitive registry cleaner, system stability scanner, and anti-virus.
It has a smooth interface, easy navigation, and a simple layout making it easy for users and even novices to operate it to resolve the Microsoft Visual C++ Error in seconds.
The registry cleaner scans your entire PC for registry issues. It wipes out all the invalid, unnecessary, and obsolete files clearing up your disk space. In addition to this, it repairs fragmented disks, damaged .dll files (runtime code library), and repairs the registry.
Along with these benefits, Restoro also functions as a system optimizer thus boosting the performance of your system. It can be downloaded by all PC Windows users as it is compatible with all Windows versions.
Click here to download Restoro on your PC to resolve the Microsoft Visual C++ Runtime Library Error code and to ensure optimum PC performance and health.
Sndvol32.exe is actually an important part of the Windows operating system.
Responsible for managing the sound-card volume and running programs properly, the problem occurs when error messages appear. The user will be unable to listen to music on the system. Usually, Windows XP users encounter the Sndvol32.exe error.
Solution
Error Causes
Sndvol32.exe error can be caused by any one or several of the reasons listed below.
Accidental deletion of the DLL file from the system
Damage to the DLL file due to spyware or virus infection
Improper removal of software
Unintentional overwriting on the DLL file by a mismatched version
Obsolete hardware drivers
Several obsolete/invalid registry entries
Corrupt registry entries
Regardless of what triggers the Sndvol32.exe error, it is of utmost importance to take immediate measures to fix the problem and to keep it from occurring again.
Further Information and Manual Repair
If you are looking for ways to fix this error manually, the Windows functionality of System Restore will come into play in this particular scenario.
In case the error is caused by a damaged or corrupt file, performing System Restore is an ideal choice as it will allow you to not only get a fresh copy of the operating system, it will be possible for you to remove the error at the same time as well. The procedure for performing System Restore is outlined below as follows.
Click on the Start menu and type ‘System Restore’ in the search box.
When the icon for ‘System Restore’ appears, click on it.
Now type ‘Restore’ in the search box that appears on the start menu.
The window for the System Restore center will now appear.
Now you have two options. You can either opt for “Recommend Restore” which is the case where the system itself will choose a restore point for you or you can select “Choose a different restore point”. Users are advised to choose the latter option as it is more customizable.
Users can now select from a list of restore points that have been created before. If you observe closely, you will realize that one of the restore points is prior to the occurrence of the Sndvol32.exe error.
Click on the restore point. Once you have confirmed your selection, your system will restart and it will roll back to its previously selected restore point.
One recommendation is to perform the system restore in Windows Safe Mode. This is just to ensure that the System Restore is performed smoothly and any potential problems are kept at bay.
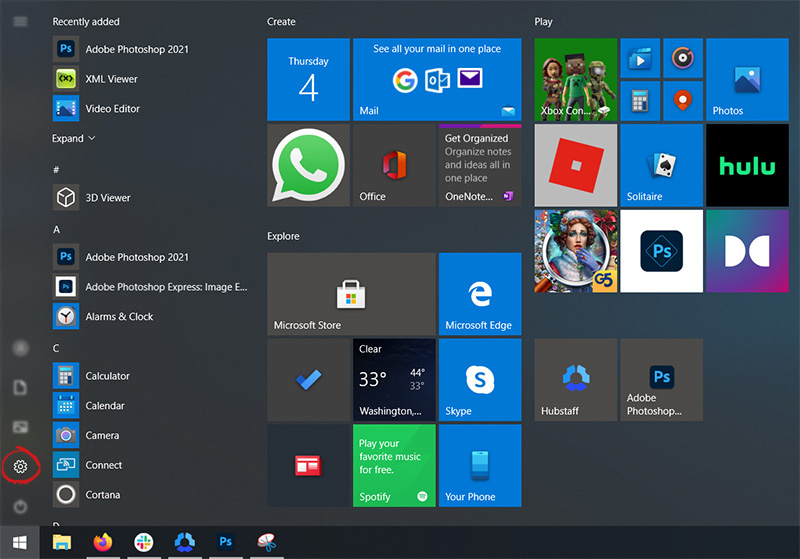
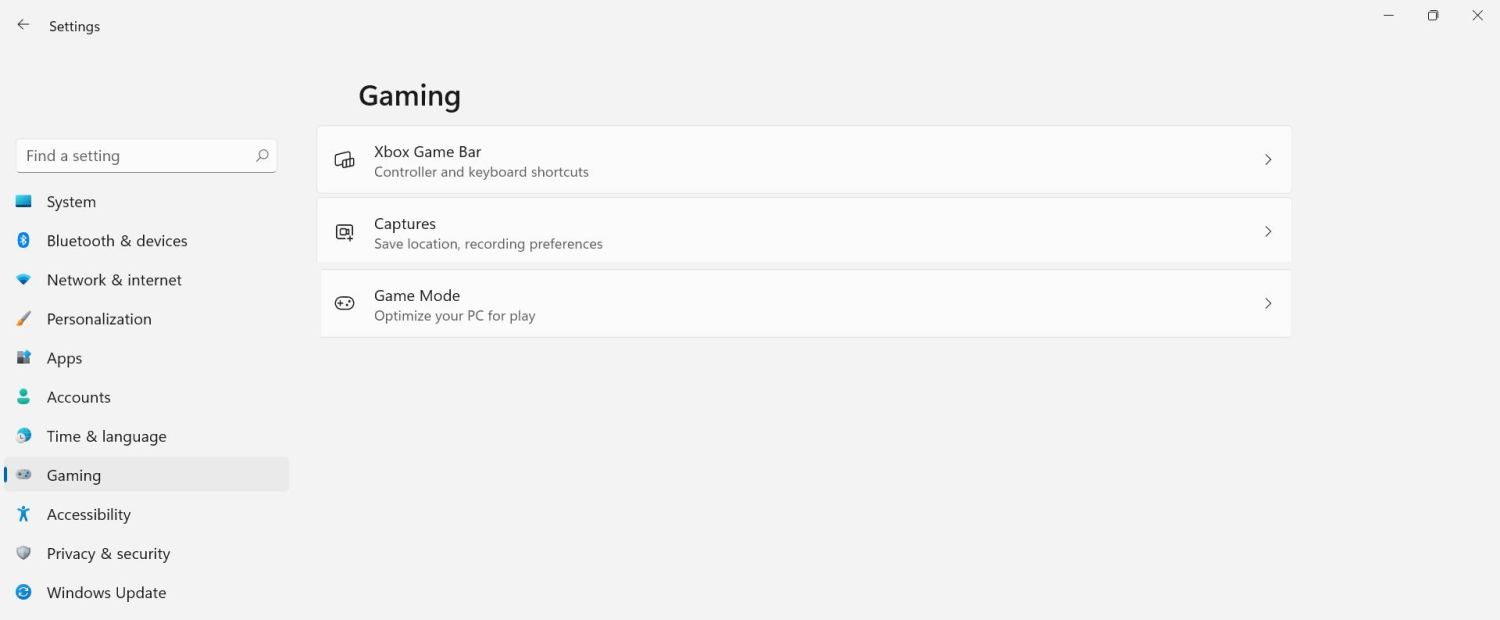
Among other things and innovations, Windows 11 brings to the table is the game mode. The game mode is a system designed to release some resources and optimize your system when Windows 11 detects that you are playing games. It also turns off automatic updates while the game is active.
The game mode is active at all times and usually, everything works great but in some instances, it can sadly cause some performance issues. If you are one of these unlucky people where game mode is not working as supposed to do, don’t panic, we have a quick guide for you on how to turn it off.
Press ⊞ WINDOWS + I to open settings
Inside click on Gaming
Select Game mode
Click switch beside Game mode to turn it off
Close settings
Everything will be automatically saved and applied and you should not have any issues from now on. If for any reason you wish to turn game mode back ON, just follow the same steps and turn the switch to ON.
As you know, the Videos folder can be found under “This PC” by default on your Windows 10 computer. However, as per the reports of some users, there are a few occasions where it somehow gets replaced by the Documents folder. In other words, the Videos folders are replaced by a duplicated copy of the Documents folder. Out of the two Documents folder, one Document folder will contain all the usual files and subfolders while the second one is empty. Although when you click the Documents icon on your Desktop (if you have a shortcut), it will still take you to the right Documents folder.
To fix this particular issue and get the Videos folder back in the File Explorer, here are some potential fixes that should help.
Option 1 – Run System Restore
The first thing you can try to do to resolve the problem is to run System Restore. This can help you go back to the previous state of your computer before the issue with the Videos and Documents folder.
Tap the Win + R keys to open the Run dialog box.
After that, type in “sysdm.cpl” in the field and tap Enter.
Next, go to the System Protection tab then click the System Restore button. This will open a new window where you have to select your preferred System Restore point.
After that, follow the on-screen instructions to finish the process and then restart your computer and check if the problem is fixed or not.
Option 2 – Try to restore Defaults
The next thing you can do is to restore Defaults. How? Refer to these steps:
Open File Explorer and then right-click on any of the two Documents folders.
After that, select the Properties option from the context menu and switch to the Location tab and click on Find target.
Next, copy the address and paste it in the field above the “Find target” option, and then click the “Restore Default” button.
Option 3 – Try to change the Registry Path
Tap the Win + R keys to open the Run dialog box.
Then type “Regedit” in the field and tap Enter to open the Registry Editor.
Next, navigate to this registry path: HKEY_CURRENT_USERSoftwareMicrosoftWindowsCurrentVersionExplorerUser Shell Folders
After that, edit the path for {35286A68-3C57-41A1-BBB1-0EAE73d76C95} under the “User Shell Folders” key to match the path shown for My Videos: %USERPROFILE%Videos.
Once you’re done, open the folder under “This PC” that has the Documents icon and tap Shift + right-click in the folder background, and then select the “Open PowerShell window here” option to fix the naming of the Documents folder. The path should read: “C:users<UserName>Documents.
Next, execute this command: ri desktop.ini –force
The command you entered will delete the files and folders and so when added for Documents, it will get rid of the empty Documents folder.
Now all you that’s left to do is to find where the target location is going to be for both folders and check if anyone foes to the user name location.
Then delete the one which goes to the incorrect location.
CinematicFanatic (by MyWay) is a browser extension for Google Chrome that may come bundled with other free software that you download off of the Internet. When installed CinematicFanatic will set the homepage and search engine for your web browser to http://search.myway.com
While browsing the internet with this extension installed, you will see additional ads, sponsored content, and even pop-up ads throughout your browsing sessions.
While CinematicFanatic is active, it will log user information, visited websites, product categories. This information is later used/sold to better display targeted ads through your web pages as sponsored content and banner ads.
CinematicFanatic has been marked as a Browser Extension by several popular anti-malware scanners, and due to its information-gathering behavior, it is recommended to remove it from your computer.
About Browser Hijackers
Browser hijack is a very common type of internet fraud where your web browser configurations are modified to allow it to do things you never intend. Browser hijacker malware is developed for many different reasons. These are typically used to force visitors to predetermined sites, manipulating web traffic to generate ad revenue. Even though it may seem naive, all browser hijackers are dangerous and thus always regarded as security risks. They not only screw up your web browsers, but browser hijackers can even modify the computer registry to make your PC susceptible to other forms of hacking.
How to know if your internet browser is hijacked
There are several symptoms of browser hijacking. Here are a few of them:
1. home-page is modified2. bookmark and the new tab are likewise changed3. The default search page of your browser is altered4. you’ll see multiple toolbars in your internet browser5. you will find random pop-ups start showing regularly6. websites load slowly and often incomplete7. You simply can’t access particular sites, particularly anti-malware websites.
How they get into your computer or laptop
Browser hijackers could use drive-by downloads or file-sharing websites or perhaps an e-mail attachment in order to reach a targeted computer. Many web browser hijackings originate from add-on programs, i.e., browser helper objects (BHO), toolbars, or plug-ins added to browsers to provide them additional functionality. A browser hijacker could also come bundled up with some freeware which you unintentionally download to your PC, compromising your internet security. Some of the well-known hijackers are CinematicFanatic, Babylon Toolbar, Conduit Search, Sweet Page, OneWebSearch, and CoolWebSearch.
Browser hijackers could disrupt the user’s web surfing experience greatly, keep track of the websites visited by users and steal financial information, cause difficulty in connecting to the net, and ultimately create stability issues, making applications and systems crash.
Browser hijacker removal
Certain browser hijacking could be easily reversed by discovering and removing the corresponding malware software through your control panel. Having said that, many hijackers are really tenacious and need specialized tools to eliminate them. Additionally, manual removals demand deep system understanding and thus can be a very difficult job for inexperienced computer users.
You might opt for automatic browser hijacker removal by simply installing and running an efficient anti-malware program. One of the top tools for fixing browser hijacker infections is SafeBytes Anti-Malware. It assists you to get rid of any pre-existing malware on your system and gives you real-time monitoring and protection from new threats. Together with the antivirus tool, a system optimizer, such as SafeBytes’s Total System Care, will help you in removing all related files and modifications in the computer registry automatically.
What To Do When You Cannot Download Safebytes Anti-Malware?
Viruses could cause a lot of damage to your PC. Some malware is designed to interfere with or block things that you’d like to do on your personal computer. It may not allow you to download anything from the net or it will stop you from accessing a few or all of the sites, especially the antivirus sites. If you’re reading this, chances are you’re stuck with a malware infection that is preventing you to download and/or install the Safebytes Anti-Malware program on your PC. Refer to the instructions below to remove malware in alternate ways.
Install in Safe Mode
In Safe Mode, you can change Windows settings, uninstall or install some applications, and get rid of hard-to-delete viruses and malware. In case the malicious software is set to load automatically when the PC starts, shifting into this particular mode may prevent it from doing so. In order to get into Safe Mode or Safe Mode with Networking, press the F8 key while the computer is starting up or run MSCONFIG and look for the “Safe Boot” options under the “Boot” tab. Once you’re in safe mode, you can try to install your anti-malware software program without the hindrance of the virus. Now, you can run the anti-malware scan to remove viruses and malware without hindrance from another application.
Switch to an alternate browser
Web-based malware could be environment-specific, targeting a particular browser or attacking specific versions of the browser. If you appear to have a virus attached to Internet Explorer, then switch to a different browser with built-in safety features, such as Firefox or Chrome, to download your preferred antivirus program – Safebytes.
Install and run anti-virus from the USB drive
Another solution is to store and operate an antivirus software program entirely from a Thumb drive. Adopt these measures to use a USB drive to clean your corrupted PC.
1) Download the anti-malware on a virus-free PC.2) Plug the Flash drive into the uninfected computer.3) Double-click the Setup icon of the anti-malware software to run the Installation Wizard.4) When asked, select the location of the pen drive as the place where you would like to put the software files. Follow the instructions on the computer screen to finish off the installation process.5) Transfer the USB drive from the uninfected computer to the infected computer.6) Double-click the EXE file to run the Safebytes program right from the pen drive.7) Hit the “Scan Now” button to start the malware scan.
SafeBytes Anti-Malware - More Protection For You
If you’re looking to purchase anti-malware for your computer, there are various brands and utilities for you to consider. A few of them are excellent, some are ok types, and some will damage your computer themselves! While looking for antivirus software, choose one that provides reliable, efficient, and complete protection against all known viruses and malware. Amongst few good applications, SafeBytes Anti-Malware is the highly recommended software for the security-conscious user.
SafeBytes can be described as a highly effective, real-time antivirus application that is created to assist the regular computer end user in protecting their computer from malicious threats. This tool can easily identify, remove, and protect your PC from the most advanced malware intrusions including spyware, adware, trojan horses, ransomware, worms, PUPs, parasites along other potentially harmful software applications.
SafeBytes carries a variety of features that can help you protect your PC from malware attacks and damage. A few of them are given as below:
Best AntiMalware Protection: By using a critically acclaimed malware engine, SafeBytes offers multilayered protection that is designed to catch and remove viruses and malware that are concealed deep inside your computer system.
Real-Time Protection: SafeBytes gives round-the-clock protection for your computer limiting malware attacks instantly. This utility will always monitor your PC for suspicious activity and updates itself regularly to keep abreast of the latest threats.
Safe Browsing: Safebytes allots all websites a unique safety score that helps you to get an idea of whether the website you’re about to visit is safe to view or known to be a phishing site.
Fast Multi-threaded Scanning: SafeBytes’s virus scan engine is one of the fastest and most efficient within the industry. It's targeted scanning tremendously increases the catch rate for viruses that are embedded in various computer files.
Light-weight Tool: SafeBytes is a lightweight and easy-of-use antivirus and anti-malware solution. As it uses minimal computer resources, this application leaves the computer’s power exactly where it belongs to: with you.
Premium Support: You will get 24/7 technical support to quickly resolve any issue with your security tool.
SafeBytes will keep your computer safe from most advanced malware threats automatically with hardly any input needed from you again. Now you may understand that this software does more than just scan and remove threats on your PC. If you’re trying to find a comprehensive anti-malware program that’s still simple enough to use, SafeBytes Anti-Malware is exactly what you will need!
Technical Details and Manual Removal (Advanced Users)
If you don’t want to use a malware removal software and prefer to get rid of CinematicFanatic manually, you may do so by going to the Windows Add/Remove Programs menu in the Control Panel and delete the offending program; in cases of web browser plug-ins, you could remove it by going to the browser’s Add-on/Extension manager. It is also recommended to factory reset your web browser settings to their default state.
Lastly, check your hard drive for all of the following and clean your registry manually to get rid of leftover application entries after uninstallation. Please note that only professional users should try to manually edit the registry because removing any single critical system file leads to a serious problem or even a system crash. In addition, some malware is capable of replicating itself or preventing its deletion. It is advised that you do the removal process in Windows Safe Mode.
Windows 11 has arrived and it is being adopted all around the globe as we are writing this article. People are adapting it daily and today we will take a look at some advanced security features of the new Windows and do you really need an antivirus in it.
It is not a secret that Windows 11 is the most secure Windows ever created, well at least up until now. It is packed with advanced security features like S-mode, Secure Boot, and Trusted Platform Module (TMP 2.0). All these new security features that Microsoft has advertised made people question are enough for security or do you still need third-party Antivirus software.
In order to get an answer to this question, let us first take a detailed look at what each one of them does, and then we will give you our opinion on a given subject.
Windows S mode
For everyday home use, Windows 11 S mode is the most secure feature to have on your PC. This is a safety protocol where only apps from Microsoft Store are allowed to be installed. This eliminates the risk of installing third-party apps that may contain viruses or malware. Furthermore, S-mode protects your web browsing activity through the Microsoft Edge browser. S-mode does not allow you to use other browsers for security reasons. If you are using Windows 11 in S-mode, your PC and data will be secure in most parts. You need not buy antivirus when using Windows 11 in S-mode.
Windows Defender
The inbuilt security suite, Windows Defender was launched for the first time in 2006. Earlier to that it had existed and was known as Microsoft AntiSpyWare. Windows Defender has undergone significant improvements over the years. In its latest version available with Windows 11, Windows Defender offers a comprehensive range of security features. It is available under the Windows Security system. Some key security features include real-time virus and threat protection, account protection, firewall & network protection, app and browser control, parental controls, and device (hardware) security. This is comparable to security features offered by third-party antivirus programs.
Microsoft Account
In Windows 11, it is necessary to use a Microsoft account that will be linked to your device. This ensures the security of your data in case your device is lost or stolen. You just need to make sure that you have set a strong password for your device. Windows 11 also has Bitlocker that keeps your data in encrypted form.
Ransomware protection
In view of rising cases of ransomware, Microsoft has introduced dedicated ransomware protection in Windows 11. It works by stopping apps from carrying out unauthorized changes to files and folders. Users can choose their important files and folders that they want to be protected from ransomware.
Conclusion
As we went through Windows 11 security features, we can clearly see that it is packed heavily with many security features that aim to protect your data and your identity. Looking at them, one can clearly come to the conclusion that you do not really need any third-party software and that Windows itself can catch and protect most of the issues, and they would be right.
If you use Windows 11 carefully, meaning that you go only to trusted websites, do not open suspicious emails, and click on suspicious links, if you do not use extensively external USB devices or mass media you really do not need any kind of third party protection, Windows built-in tools will do well and keep you protected.
However, if you do come in contact with other people's USB devices if you surf over the net, and overall if you really want to be at peace of mind that you are protected you will still need a well-established third-party software protection solution.
Windows 11 has great security features, best so far in any Windows but it is still far from being a solution that does not require dedicated protection solution. So do yourself a favor and grab one.
We recently had a top antivirus software review, find the article here and pick one that is best for you.
https://errortools.com/viruses/the-best-antivirus-software-of-2021/
If you suddenly find your Windows 10 computer stuck on the “Preparing to configure” screen for quite a long time now after you run Windows Update, read on as you will be guided on how you can fix that issue in this post.
During an update process, there’s a lot of things that go on in the background which is why Windows Updates take quite a while before it finishes. It can be at 25%, 50%, or even 100% but the only message you’re going to see on your screen is the “Preparing to configure Windows, Don’t turn off your computer”. However, if you notice that the Windows Update is taking a longer time than it’s supposed to, the first option is to wait some more but if it’s still the same, then there’s definitely something wrong. This kind of issue occurs when Windows Update fails to configure in short correctly download and install the update. When this happens, it will revert all the changes which are why you were advised to wait for a couple of hours.
There are two possibilities why your computer is stuck on the “Preparing to configure Windows, Don’t turn off your computer” screen. The first one is that the Windows 10 operating system is installing any updates. The second one is when the user profile takes time to load or encounters an error. There are several options you can try to fix the problem. You can try running System Restore or boot your computer in Safe Mode or repair the corrupted profile via Registry Editor. You might also want to try using installation media to boot and repair your computer if the other options didn’t work.
Option 1 – Perform System Restore
Tap the Win + R keys to open the Run dialog box.
After that, type in “sysdm.cpl” in the field and tap Enter.
Next, go to the System Protection tab then click the System Restore button. This will open a new window where you have to select your preferred System Restore point.
After that, follow the on-screen instructions to finish the process and then restart your computer and check if the problem is fixed or not.
Note: If you can’t boot into the desktop of your computer, you can run System Restore in the Advanced Startup Options by following these steps:
Boot your computer into the Advanced Startup Options screen.
From there, you will see some options to troubleshoot when you can’t log in to Windows in the usual way.
Now select Troubleshoot > Advanced Options > Command Prompt.
After that, type “rstrui” and hit Enter to execute the command which will start the System Restore process.
Once it’s done, restart your computer.
Option 2 – Boot your computer in Safe Mode
You can try to tap the F8 key if you have it enabled in your Windows 10 computer, as you start your system to boot into Safe Mode. Once your computer is in Safe Mode, you can access the Start Menu and the Mouse and Keyboard. Aside from that, you can also access your files and other built-in tools in Windows such as Command Prompt, PowerShell, Computer Manager, Device Manager, Event Log Viewer, and many more. On the other hand, if you haven’t enabled the F8 key, you can just go to the Advanced Startup options to boot your computer into Safe Mode. Once you’re there, select Troubleshoot > Advanced Options > Startup Settings > Restart > Tap the number 4 key. After that, your computer will restart in Safe Mode. If you want to reboot into Safe Mode with Networking instead, you can tap the number 5 key and for Safe Mode with Command Prompt, tap the number 6 key. Once your computer is in Safe Mode, you can use any of the built-in tools to restore your computer or troubleshoot the problem that’s causing your computer to get stuck at the “Preparing to configure” screen.
Option 3 – Try to repair your corrupted profile via Registry
In this third option, you can try to repair the corrupted profile using the Registry but before you proceed, take note that you can only try this if you can boot into your desktop and if you can, make sure to create a System Restore Point and then follow the steps below.
Tap the Win + R keys to open the Run dialog box.
Then type “Regedit” in the field and hit Enter or click OK to open the Registry Editor.
Next, go to this registry key: ComputerHKEY_LOCAL_MACHINESOFTWAREMicrosoftWindows NTCurrentVersionProfileList
Once you’ve opened the registry key, you should see a list of all the user profiles on your computer. Now click on each S-1-5 folder and look for the “ProfileImagePath” entry and double click on it to check which user account it is related to. You will see a path like “CUsersACK” where “ACK” is the username.
You should know which of the user account is corrupted. Just look for a key named “RefCount” and change its Value data to “0” and click OK. And if it isn’t available, simply right-click on the right pane and create it.
After that, double click on the key named “State” and make sure that the Value data is “0” and click OK.
Exit the Registry Editor and restart your computer to apply the changes made.
Option 4 – Try to use installation media to boot and repair your computer
Another thing you can try to resolve the issue is to use the Windows installation bootable media so you can boot and repair the operating system. To use it, follow these steps:
You need to first create an installation media which has the dame version of the operating system installed in your computer.
After that, once you reach the Install Windows screen, click on the “Repair your computer” link.
Wait until the repair is completed and then shut down your computer
Now once your computer has restarted, check if it can now boot properly.
C00002lA Fatal System Error is a blue screen of death error that may occur when you start your Windows NT 4.0 based computer. This error causes the screen to turn blue and the system also shuts down.
The stop C000021A error message is displayed in the following format:
Stop c000021a {Fatal System Error} The session manager initialization system process terminated unexpectedly with a status of 0xc0000017 (0x00000000, 0x0000000) The system has been shut down.
Error Causes
The stop C000021A error occurs when either Crsrss.exe or Winlogon.exe fails. When the Windows NT kernel identifies that either of these processes has failed, it stops and the error code stop C000021A appears on the computer screen.
Here are some of the underlying causes for the stop C0000021A error:
The incompatible third-party program
Hard disk issues
Service pack installation has failed
Mismatched system files have been installed
Bad and invalid registry keys
Further Information and Manual Repair
To resolve the stop C000021A Fatal System Error on your PC try the following solutions:
Remove Incompatible Third Party Programs
If the error occurred after you recently installed a new program, then it is advisable to remove that program. The error occurs due to the incompatibility of the program.
To remove the program go to the start menu and click on the control panel. Now click on Add/Remove Program tab and double click on the program name that you recently installed and remove it from the list.
Once removed, not reboot your PC. Reinstall a compatible program and run it. It is most likely to resolve the issue. However, if the stop C000021A error still occurs, then it means the problem is critical. It is related to the registry.
Repair and Restore the Registry
This procedure is slightly long and tricky.
To try it, you need to be technically sound. Here’s what you have to do: first create a parallel installation of Windows NT.
Start your PC to the parallel installation and then open the Registry Editor. On the Registry Editor’s Windows menu click HKEY_LOCAL_MACHINE on Local Machine and then click Load Hive.
Now type the path %systemroot%system32configsystem into the System hive of the prior installation. Then click open. Here you will be prompted to enter the name of the key, type TEST.
Note the setting for the current DWord value in the preceding registry key. This is 0x1 and is denoted by CURRENT:Reg_Dword: 0x1.
This value indicated that the Current Control Set for your original Windows NT installation corresponds to ControlSet001 in this window. Now if the value is 2, it indicated that the Current Control Set corresponds to ControlSet002.
Now locate the following registry key:
HKEY_LOCAL_MACHINETESTControlSetXXXControlSession Manager. XXX is the Current Control Set Value. And delete any pending file rename operation entries. Then click TEST hive and then click Unload Hive. After that again repeat the process, open the registry menu and click load hive, here type the path %systemroot%system32configSoftware to the Software hive of the prior installation and then click open.
Now you type TEST 2 when you are prompted for the name of the key. Remove any pending file rename operations entries in the following registry keys:
HKEY_LOCAL_MACHINETEST2MicrosoftWindowsCurrentVersionRunOnceHKEY_LOCAL_MACHINETEST2MicrosoftWindowsCurrentVersionRunOnceEx
Now click TEST2 hive and then click unload hive. Quit the Registry Editor and then restart your original installation.
This will resolve the stop C000021A error.


 The game mode is active at all times and usually, everything works great but in some instances, it can sadly cause some performance issues. If you are one of these unlucky people where game mode is not working as supposed to do, don’t panic, we have a quick guide for you on how to turn it off.
 It is not a secret that Windows 11 is the most secure Windows ever created, well at least up until now. It is packed with advanced security features like S-mode, Secure Boot, and Trusted Platform Module (TMP 2.0). All these new security features that Microsoft has advertised made people question are enough for security or do you still need third-party Antivirus software.
In order to get an answer to this question, let us first take a detailed look at what each one of them does, and then we will give you our opinion on a given subject.
It is not a secret that Windows 11 is the most secure Windows ever created, well at least up until now. It is packed with advanced security features like S-mode, Secure Boot, and Trusted Platform Module (TMP 2.0). All these new security features that Microsoft has advertised made people question are enough for security or do you still need third-party Antivirus software.
In order to get an answer to this question, let us first take a detailed look at what each one of them does, and then we will give you our opinion on a given subject.