Logo

Windows PC advantages over Apple Mac

In the last article, we have covered various advantages of Apple hardware over Windows PC, however, PC has their own strengths and advantages over MACs as well. Join us as we explore why would you choose Windows PC over MAC.

Windows PC

Hardware customization

If you like to customize and build your own hardware and customize your existing computer then MACs are out of the picture, on other hand, computers based on Windows operating system are much more flexible in terms of customization.

While Apple hardware is locked and only allows small changes to it, computers running on Windows are free and open to various upgrades and modifications so if you like to play with hardware Windows is your platform.

Gaming

There are games on MAC true but their numbers can not compare to games available for the Windows platform. On top of that, most latest and best gaming hardware is not even available on Apple platforms so if you plan to game in high resolutions and play the latest games there really is no option other than Windows.

Windows Platforms also has multiple emulators that you can use to play games from other older platforms and Microsoft since it owns Xbox has some great plans for both PC and Xbox gaming.

Software back compatibility

Since the introduction of the new MAC OS X, apple really lost a lot of application back compatibility, and a lot of old legacy software can not be run on modern Apple computers. Windows on the other hand have always tried and succeeded in keeping maximum compatibility with older and legacy software.

Also on the Windows platform, there is a lot of community support for old and legacy software so even if it is not officially supported it is backed up by the community.

Software variability

In terms of where can you find the most different software, you need to look no further than the Windows platform. How Windows itself has great backward compatibility and a lot of developers are using it to create new software thanks to Visual Studio and .NET Windows has cemented itself as a platform with the most available software.

The popularity of Windows as the home operating system and as a gaming platform has made it quite interesting in eyes of various developers and tons of small applications are made daily for it. Windows 11 has also brought native android support to it and that has just expanded its already impressive catalog of applications.

Freedom of choice

Overall Windows PC is most appealing for users that like to be able to choose everything, from hardware components to software they would like to use. No other platform will give you larger freedom of choice and better personalization options.

Do You Need Help with Your Device?

Our Team of Experts May Help
Troubleshoot.Tech Experts are There for You!
Replace damaged files
Restore performance
Free disk space
Remove Malware
Protects WEB browser
Remove Viruses
Stop PC freezing
GET HELP
Troubleshoot.Tech experts work with all versions of Microsoft Windows including Windows 11, with Android, Mac, and more.

Share this article:

You might also like

Your account has been disabled error
If you are trying to log into your user account on your Windows 10 computer but encountered an error message instead that says, “Your account has been disabled, Please see your system administrator”, read on as this post will guide you on how you can fix this problem. In this kind of scenario, you won’t be able to access your data unless you have access to the administrator account. This problem could be caused by several problems. It is possible that malware has infected your computer and has changed some settings in your computer, especially if your system has been under a malware attack not too long ago. The malware could’ve changed the “Account is disabled” option. The only thing you can do to resolve this kind of problem is to log into your computer using another administrator account and then change the setting. However, if you don’t have a second administrator account, you can just enable the built-in hidden administrator account on your computer. You shouldn’t have any problem enabling the hidden administrator account as it is quite easy when you can log into your account. And in this post, you will be guided on how you can enable the hidden administrator account using the Registry Editor to fix the “Your account has been disabled, Please see your system administrator” error.

To get started, follow the instructions given below.

  1. First, you need to start your computer and ensure that you are on the error screen. From there, you will see the Power options located on the right-hand side.
  2. Click on the Power options and tap and hold the Shift key and then select Restart.
  3. After that, the Advanced Boot Options will appear and from there select Troubleshoot > Command Prompt.
  4. Next, you have to select your user account and enter the user account’s password to open Command Prompt.
  5. After opening Command Prompt, open your screen and type “Regedit” and then tap Enter on your keyboard.
  6. Now select the HKEY_LOCAL_MACHINE in the Registry Editor and go to File > Load Hive.
  7. Afterward, you have to open the Windows installation drive and go to the location – WindowsSystem32Config
  8. From there, you should find a file named “SAM” – select this file and click the Open button.
  9. Next, you have to enter a key name. You can just input whatever you prefer.
  10. Once done, navigate to this path: HKEY_LOCAL_MACHINEkey_nameSAMDomainsAccountUsers
  11. From this path, you will see a key named “000001F4” – select this key and double click on the “F” entry that you can find on the right-hand side of the screen.
  12. After that, look for the value data line labeled “0038” which should show 11 in the first column. You have to replace it with 10.
  13. Once done, click on the OK button and close the Registry Editor and the Command Prompt to restart your computer.
  14. Now once your computer has restarted, sign in to the Administrator account and open the Computer Management window. You can just search for it using the search bar in the Taskbar.
  15. After you open Computer Management, go to Local Users and Groups > Users – where you can find all the user accounts. Look for your deleted user account and right-click on it and select Properties and then unmark the checkbox that says “Account is disabled”. This should fix the problem.
Read More
How to Get Rid of GifsGalore

The GifsGalore Toolbar from Mindspark Interactive Network, Inc. is proposed to active Web users who like to embed GIFs into their emails and share entertaining GIFs with friends via social media services. The GifsGalore software can be added to your Internet client for free but you need to be using Google Chrome, Internet Explorer or Mozilla Firefox for the GifsGalore Toolbar to be activated.

When installed it hijacks your New tab page and default search engine changing them to search.myway.com. This extension also monitors user browsing activity recording information such as: visited websites, clicked links, viewed products, etc. This information is later used to better target ads. While browsing the internet with this extension enabled you will see additional pop-up ads, as well as sponsored links and injected ads throughout your browsing session, especially in search results.

About Browser Hijackers

Browser hijacking is actually a form of unwanted software program, often a browser add-on or extension, which causes modifications in web browser’s settings. There are various reasons why you may experience an internet browser hijack; however commercial, advertising, and marketing are definitely the main reasons for their creation. The idea would be to force users to visit specific sites that are aiming to improve their site visitor traffic and generate higher ad earnings. It could seem naive, but most of these sites are not legitimate and could present a serious risk to your online safety. Browser hijackers can even let other vicious programs without your knowledge further damage the computer.

Find out how to identify a browser hijack

When your web browser is hijacked, the following can happen: the browser’s homepage is modified; bookmark and the new tab are also changed; the default search engine has been changed and your browser security settings have been lowered without your knowledge; you see unwanted new toolbars added; unstoppable flurries of popup ads appear on your computer screen; your web browser gets sluggish, buggy, crashes very often; you are prohibited access to particular web pages, including the site of an anti-malware software developer like SafeBytes.

How browser hijacker finds its way onto your computer system

Browser hijackers might use drive-by downloads or file-sharing networks or perhaps an email attachment to reach a targeted computer. They may also come from any BHO, browser extension, toolbar, add-on, or plug-in with malicious purpose. Other times you might have unintentionally accepted a browser hijacker as part of an application package (usually freeware or shareware). Examples of well-known browser hijackers are Fireball, CoolWebSearch. save, Ask Toolbar, RocketTab, and Babylon Toolbar.

Removal

Some browser hijacking could be quite easily reversed by discovering and removing the corresponding malware software from your control panel. Yet, certain hijackers are far harder to find or eliminate since they might get themselves associated with some crucial computer files that enable them to operate as a necessary operating system process. Additionally, manual removals demand deep system knowledge and therefore can be a very difficult job for novices. Installing and running an anti-malware program on the affected computer could automatically erase browser hijackers and other malicious applications. Safebytes Anti-Malware has a sophisticated anti-malware engine to help you prevent browser hijacking in the first place, and mop up any pre-existing problems. And use a PC optimizer, like Total System Care, to get rid of all related files in the registry and repair browser issues.

What you can do if Malware Stops You From Downloading Or Installing Anything?

All malware is bad, but certain types of malware do a lot more damage to your computer than others. Some malware is created to restrict or prevent things that you want to do on your PC. It may well not let you download anything from the internet or stop you from accessing some or all websites, particularly the antivirus websites. If you’re reading this article, you may have infected by a virus that stops you from installing security software such as Safebytes Antimalware on your PC. There are some actions you can take to circumvent this problem.

Remove malware in Safe Mode

The Windows OS includes a special mode known as “Safe Mode” in which just the bare minimum required programs and services are loaded. If the malware is obstructing internet access and affecting the computer, launching it in Safe Mode allows you to download anti-virus and run a scan whilst limiting possible damage. To enter into Safe Mode or Safe Mode with Networking, press the F8 key while the computer is starting up or run MSConfig and find the “Safe Boot” options in the “Boot” tab. After you restart into Safe Mode with Networking, you can download, install, as well as update the anti-malware program from there. At this point, you could run the antivirus scan to remove computer viruses and malware without any interference from another application.

Download the security software using an alternate web browser

Web-based viruses can be environment-specific, aiming for a particular browser or attacking specific versions of the browser. If you are not able to download the anti-malware software program using Internet Explorer, it means the virus could be targeting IE’s vulnerabilities. Here, you should switch over to a different browser like Firefox or Chrome to download the Safebytes Anti-malware program.

Install and run antivirus from your USB drive

Another solution is to create a portable anti-malware program onto your USB stick. Adopt these measures to run the antivirus on the affected computer system. 1) Make use of another virus-free computer to download Safebytes Anti-Malware. 2) Plug the Thumb drive into the uninfected computer. 3) Double click on the executable file to run the installation wizard. 4) Select flash drive as the place when the wizard asks you where you wish to install the software. Do as instructed on the screen to finish up the installation process. 5) Now, transfer the USB drive to the infected computer system. 6) Double click the Safebytes Anti-malware icon on the thumb drive to run the software. 7) Click on “Scan Now” to run a complete scan on the affected computer for malware.

How SafeBytes Anti-Malware Keep your Computer Virus Free

If you’re planning to purchase anti-malware for your desktop, there are plenty of brands and utilities for you to consider. A few of them are good but there are lots of scamware applications that pretend as legit anti-malware programs waiting around to wreak havoc on your computer. You need to go with a tool that has obtained a strong reputation and detects not only viruses but other kinds of malware as well. Amongst few good applications, SafeBytes Anti-Malware is the strongly recommended software program for the security-conscious individual. SafeBytes anti-malware is a trusted tool that not only protects your PC completely but is also extremely user-friendly for people of all ability levels. With its cutting-edge technology, this application can help you remove multiples types of malware which include viruses, trojans, PUPs, worms, ransomware, adware, and browser hijackers.

SafeBytes anti-malware provides a myriad of enhanced features that sets it aside from all others. Below are a few of the good ones:

Robust, Anti-malware Protection: Built upon a greatly acclaimed anti-virus engine, this malware removal tool can identify and remove several stubborn malware threats like browser hijackers, PUPs, and ransomware that other common antivirus software will miss. Live Protection: SafeBytes gives you round-the-clock protection for your personal computer restricting malware intrusions instantly. They’re extremely effective in screening and removing numerous threats because they are regularly improved with new updates and alerts. Web Filtering: SafeBytes inspects the links present on a web page for possible threats and alerts you whether the website is safe to browse or not, through its unique safety ranking system. Fast Scan: SafeBytes’s virus scan engine is one of the quickest and most efficient in the industry. It's targeted scanning greatly increases the catch rate for viruses which is embedded in various computer files. Very Low CPU and RAM Usage: SafeBytes is a lightweight and easy-of-use anti-virus and anti-malware solution. Since it uses low computer resources, this application leaves the computer power exactly where it belongs to: with you. 24/7 Premium Support: You will get 24/7 technical support to quickly resolve any issue with your security tool. To sum it up all, SafeBytes Anti-Malware offers superb protection combined with very low system resource usage with both great malware detection and prevention. You now may realize that this particular software does more than just scan and eliminate threats from your computer. You’ll get the best all-around protection for the money you spend on SafeBytes AntiMalware subscription, there isn’t any doubt about it.

Technical Details and Manual Removal (Advanced Users)

To remove GifsGalore manually, go to the Add or Remove programs list in the Windows Control Panel and select the program you want to get rid of. For internet browser extensions, go to your web browser’s Addon/Extension manager and choose the add-on you would like to remove or disable. You’ll probably also want to reset your web browser. If you choose to manually delete the system files and registry entries, use the following list to make sure you know precisely what files to remove before undertaking any actions. However, editing the registry is usually a difficult task that only experienced users and professionals should try to fix it. Moreover, some malware is capable of replicating or preventing deletion. Carrying out this malware-removal process in Safe Mode is recommended.
Files: %LOCALAPPDATA%\GifsGaloreTooltab %UserProfile%\Local Settings\Application Data\GifsGaloreTooltab %UserProfile%\Local Settings\Application Data\Google\Chrome\User Data\Default\Sync Extension Settings\fnjgjdfhhakkbojkgmiihabbbjhgbchh %UserProfile%\Local Settings\Application Data\Google\Chrome\User Data\Default\Extensions\fnjgjdfhhakkbojkgmiihabbbjhgbchh %LOCALAPPDATA%\Google\Chrome\User Data\Default\Sync Extension Settings\fnjgjdfhhakkbojkgmiihabbbjhgbchh Registry: HKEY_LOCAL_MACHINE\Software\[APPLICATION]\Microsoft\Windows\CurrentVersion\Uninstall..Uninstaller GifsGaloreTooltab Uninstall Internet Explorer HKEY_CURRENT_USER\Software\Microsoft\Internet Explorer\LowRegistry\DOMStorage\gifsgalore.dl.tb.ask.com HKEY_CURRENT_USER\Software\Microsoft\Internet Explorer\LowRegistry\DOMStorage\gifsgalore.dl.myway.com HKEY_CURRENT_USER\Software\GifsGalore
Read More
TeamViewer stuck on Initializing Display
One of the popular tools that allow a user to offer or obtain remote assistance on a computer is the TeamViewer. It is available on all the major computer and mobile platforms which makes it a lot useful to every kind of user, even on the go. If you are one of the users who frequently use TeamViewer, then you must be familiar with this one sentence that states, “Initializing display parameters”. In common cases, this sentence will appear for a second and load the other user’s screen. However, some users reported that TeamViewer gets stuck on that stage and did not move ahead even a bit. If you experience the same problem, read on as this post will guide you in fixing this issue with TeamViewer on your Windows 10 computer. At the time of writing, the cause of this issue is still unclear. It could be due to the quality of internet connection, conflicts in process, misconfiguration of Remote Access, and many more. To fix this issue, you can try to update TeamViewer for both the users or have it reinstalled with Unattended Remote Access, or reconfigure the Remote Access. You can also try to kill any conflicting processes or optimize your internet connection. For more details, refer to the given options below.

Option 1 – Reboot your router

The first thing you can try to do to fix the error is to simply restart your router. All you need to do is reboot the router from its Admin panel or you can also turn it off manually and turn it back on after a couple of seconds so that it can completely reboot. Once you’re done, try accessing your server again and see if the error is now fixed.

Option 2 – Try to update TeamViewer on both users’ end

You might have to update the TeamViewer on both ends and to do that, you need to start the TeamViewer installer again. Once it is installed, run the program and click on the Help option in the Menu ribbon and then select the “Check for updates…” option. If an update is found, you will be notified within a couple of seconds through a pop-up mini window. From there, click on Update and then follow the next onscreen instructions that appear and choose your TeamViewer version to update.

Option 3 – Try reinstalling TeamViewer via the Unattended Remote Access

If the first two given options didn’t work, you might have to reinstall TeamViewer from the Windows 10 Settings app or Control Panel.
  • Tap the Win + R keys to launch the Run utility and type “regedit” in the field and hit Enter to open the Registry Editor.
  • Here, navigate to this registry key: Computer HKEY_LOCAL_MACHINE SOFTWARE Wow6432Node TeamViewer
  • Next, look for the TeamViewer key and right-click on it, and select Delete.
  • After that, restart your PC to apply the changes made and then start TeamViewer again, and then click on Connection > Open Management Console.
  • Then sign in or sign up to get registered and select the Add new device radio button under Add > Add computer located on the top-right corner and then select the Download now option.
  • Now follow the next onscreen instructions that appear to complete the installation and then check if it fixes the problem or not.

Option 4 – Try reconfiguring the Remote Access

You can also try to reconfigure Remote Access in case there is some misconfiguration that might have caused the problem with TeamViewer.
  • On your Desktop, right-click on This PC and click on Properties.
  • Next, go to the left side of the navigation panel and click on Remote Settings.
  • From there, make sure that the “Allow Remote Assistance Connections to this computer” checkbox is checked under the Remote Assistance section.
  • Once done, click on the Advanced button. This will open a new mini window where you’ll have to check the “Allow this computer to be controlled remotely” option under the Remote Control section.
  • Then click on OK and see if it fixed the problem.

Option 5 – Try to kill any conflicting processes

  • Tap the Ctrl + Shift + Esc key combination to open the Task Manager.
  • Then navigate to the Processes tab and right-click on the BGInfo process.
  • Now select the End Task option to kill its process and then start TeamViewer again and check if the problem is resolved.

Option 6 – Try to optimize the quality of connection

You need to take care of two things under this option – first, you have to disable the loading of the Wallpaper of the computer which is the one that you’re trying to access remotely. To do that, you have to select the Extras menu from the menu ribbon and then select Options. And under the Remote Control section, check the “Remove remote wallpaper” option. The next thing you have to do is to optimize the quality for the speed by selecting the “Optimize Speed” for the menu of Quality still under the Remote Control section.
Read More
Fix Windows Script Host in Windows startup
In case you don’t know, the Windows Script Host provides capabilities such as batch files but it also includes many other features like it can be used by a user manual as well as created by the operating system to automate the flow of operations in the system. However, there are a lot of errors that could take place in such a process. One of them is the following error:
“Script: <PATH of the VBS Script> Line: x Char: x Error: The description of the error. Code: xxxxxxxx Source: (Source of the error)”
At the time of writing, it isn’t clear yet what the root cause of the error really is but there are several potential fixes you can check out to fix it. You can try to run the System File Checker or set the default value for the .vbs key, or troubleshoot the problem in a Clean Boot State. You could also try to repair Install Windows 10 or scan your computer for malware. For more detailed instructions refer to the following options.

Option 1 – Try to run a System File Checker scan

  • In the Windows Start Search, type “command prompt” and right-click on Command Prompt from the search results, and then select the “Run as administrator” option.
  • After opening Command Prompt with admin privileges, type the “sfc /scannow” and tap Enter to execute it.
  • Once the scan is finished, restart your computer and see if the Windows Script Host error.

Option 2 – Try setting the default value for the .vbs key

  • Tap the Win + R keys to open the Run dialog box and type “Regedit” in the field and tap Enter to open the Registry Editor.
  • Next, navigate to this registry path: ComputerHKEY_CLASSES_ROOT.vbs
  • From there, double click on the default string and change its Value data to “VBSFile”.
  • Exit the Registry Editor and restart your computer for the changes to take effect.

Option 3 – Try troubleshooting the problem in a Clean Boot State

Setting your computer in a Clean Boot State can help you diagnose and later troubleshoot the problems in your computer. During this state, the system will start with a minimal number of drivers and startup programs that help in isolating the problem with the interfering software. To put your computer in a Clean Boot State, follow the given steps below.
  • Log onto your computer as an administrator.
  • Type in MSConfig in the Start Search to open the System Configuration utility.
  • From there, go to the General tab and click “Selective startup”.
  • Clear the “Load Startup items” check box and make sure that the “Load System Services” and “Use Original boot configuration” options are checked.
  • Next, click the Services tab and select the “Hide All Microsoft Services” check box.
  • Click Disable all.
  • Click on Apply/OK and restart your PC. (This will put your PC into a Clean Boot State. And configure Windows to use the usual startup, just simply undo the changes.)
  • From there, start to isolate the problem by checking which one of the programs you installed recently is the root cause of the problem.

Option 4 – Try to repair install Windows 10

  • First, you have to click this link and then click the Download Tool Now button.
  • Next, click the “Use the tool to create installation media (USB flash drive, DVD, or ISO file)…” option and follow the next given instructions on the screen.
  • Now select the ISO file option in step 5.
  • After that, you should now have an ISO file.
  • Next, go to the location where you’ve downloaded the ISO file.
  • Then right-click on the Windows 10 ISO file and select the Open with option and then select File Explorer.
  • Now click on “setup.exe” and follow the next instructions that appear on the screen. When asked, you have to select either Nothing (clean install) or Keep personal files only option. Take note that you must not select the “Keep personal files, apps, and Windows settings”.

Option 5 – Try scanning your computer using Windows Defender

It is possible that your computer is infected with malware which could be why you’re getting the Windows Host Script error. Thus, you need to scan your computer using Windows Defender.
  • Tap the Win + I keys to open Update & Security.
  • Then click on the Windows Security option and open Windows Defender Security Center.
  • Next, click on Virus & threat protection > Run a new advanced scan.
  • Now make sure that Full Scan is selected from the menu and then click the Scan Now button to get started.
Read More
How to Fix Error Code 0xc00007b in Windows 10

Error Code 0xc00007b – What is it?

Error code 0xc00007b usually manifests itself via the inability to start an application properly. It can occur when users attempt to run a game or other programs on their computer. In such a case, the application will not start and a message box will pop up stating that error code 0xc00007b has occurred. The error code is likely to occur when users attempt to run a program in the incorrect or inappropriate bit. For instance, if you try to load a 32bit location with a 64bit location.

Solution

Restoro box imageError Causes

Error code 0xc00007b affects various versions of the Windows operating system, including Windows 7, 8, 8.1, and Windows 10. In the case of error code 0xc00007b for Windows 10, the error may be caused by issues related to software you’ve installed on your machine. This may cause software conflict resulting in the need to install programs like DirectX. Left unchecked, error code 0xc00007b could incite other error codes in Windows 10, such as error code 0xc004f034.

Further Information and Manual Repair

To repair error code 0xc00007b for Windows 10 devices, users will need to implement at least one manual repair procedure. Manual repair methods are effective in combating these issues as they can address the issues causing the error in the first place, thus fixing the problem.

The manual repair procedures for fixing error code 0xc00007b are very straightforward and can be implemented with little technical knowledge. However, you may need to contact a Windows repair technician if you have difficulty fixing the error code after completing the manual repair methods listed below.

Method One: Install Microsoft DirectX

Microsoft DirectX is an application usually included in the Microsoft operating system. It enables users to access high-speed gaming and multimedia on their PC. The latest version of this Windows technology is available on Microsoft’s official site.

Visit the Microsoft website and search for DirectX End-User Runtime Web Installer. Once you have located the latest version of the program, select the preferred language you would like DirectX to run in, and then click download. Run the program, then be sure to reboot your computer.

Note that this solution should only be applied if you are having issues running or displaying a gaming or multimedia application. Once you’ve correctly installed the latest version of DirectX, it should be able to fix underlying issues that may be causing error code 0xc00007b to occur. If you are still unable to run applications after completing this manual repair procedure, however, you will need to apply another method to fix error code 0xc00007b for Windows 10.

Method Two: Install Latest Version of .NET Framework

.NET Framework, a framework developed by Microsoft, provides solutions for users who may be having problems with applications. To download the latest version of the .NET framework, follow the steps listed below.

  • Step one: Open your favorite web browser
  • Step two: Enter www.microsoft.com/net
  • Step three: Click Downloads
  • Step four: Select the latest version of the .NET Framework by clicking the framework at the top of the list. (Currently, the latest version is .NET Framework 4.6.2.)
  • Step five: Select preferred language, then download
  • Step six: Run software.

To ensure you successfully download the latest version of the .NET Framework, verify your computer is properly connected to the Internet while downloading the software. Also, follow the instructions provided on the Microsoft website.

After completing the download process, reboot your computer then check if you have successfully resolved error code 0xc00007b for Windows 10. If this manual repair method is successful, you will be able to access your gaming and multimedia programs. Otherwise, the error code message box will reoccur, stating that the application error code is present on your device. Apply the next manual repair procedure to correct the error code if this reoccurs.

Method Three: Install Windows Updates

In certain instances, application error codes like error code 0xc00007b affect PC users who fail to install the most current Windows updates on their device. That is why it’s important to check your system and ensure you have installed all the latest updates.

The updates, if any are available, will automatically be installed on your PC once you access Windows Update in Settings. Reboot your computer then check if you are able to run programs that previously would not open due to error code 0xc00007b. If problems persist resulting in the reoccurrence of the error code, reinstall the applications you are unable to open or get help from a Windows repair technician.

Method Four: Download an Automated Tool

If you wish to always have at your disposal a utility tool to fix these Windows 8 and other related issues when they do arise, download and install a powerful automated tool.
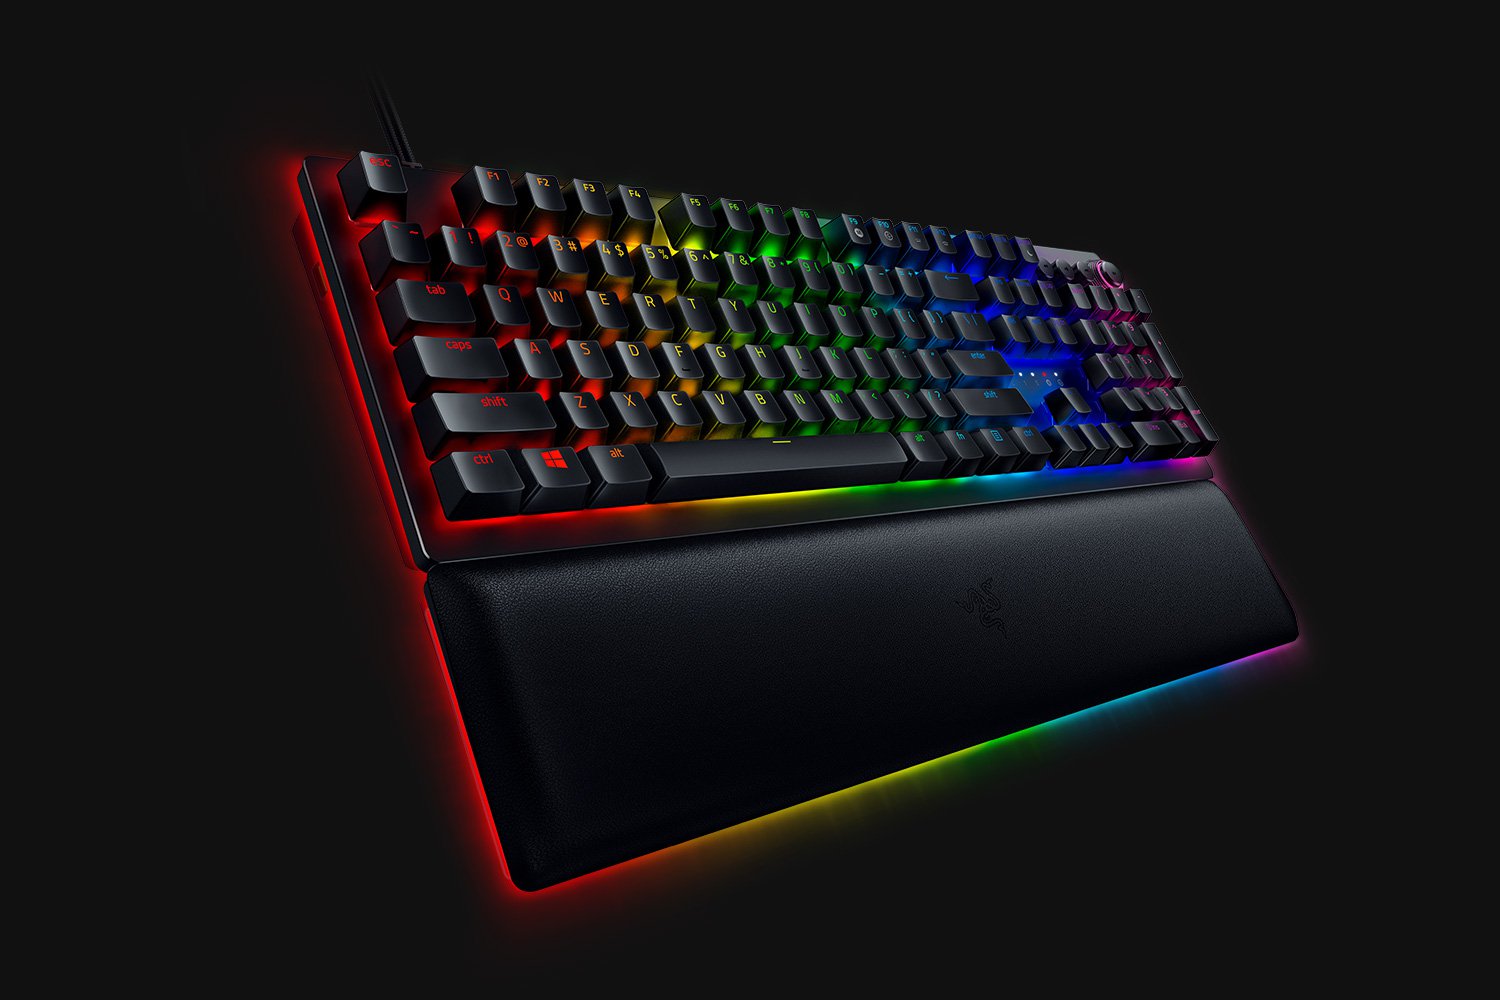
Read More
An Easy Guide to Fixing Error Code 14

Error Code 14 - What is it?

Generated due to temporary device and Window system conflicts, Error code 14 is a typical Device Manager error.  This error code can pop up anytime and usually displayed in the following format:

“This device cannot work properly until you restart your computer. (Code 14)”

Though it is not a fatal error code like the infamous Blue Screen of Death and runtime error codes, nonetheless it is still advisable to repair it immediately before any delay to avoid inconvenience.

It can lower your PC’s performance and hamper you from using certain hardware devices as a result of driver problems.

Solution

driverfix boxError Causes

Error 14 is triggered when your system is unable to correctly read the files and settings which is important for running a certain piece of your PC hardware. Now this conflict may occur due to reasons like outdated, corrupted, or poorly installed drivers. Other causes may include corrupted registry entries.

Simply put, Error code 14 is a good reminder that PC users should pay attention to updating device drivers to ensure healthy systems and optimum PC performance.

Further Information and Manual Repair

The good news is that error code 14 is quite easy to resolve. You don’t have to spend hundreds of dollars to hire a professional programmer to get it fixed. To repair, simply follow the DIY methods listed below.

We have compiled some of the best, proven, and easy to perform solutions for PC users to resolve Device Manager error codes like error code 14. Follow the instructions here to resume the functionality of your PC.

Let’s get started:

Method 1 - Reboot Your System

Sometimes, an action as simple as rebooting your PC can also resolve technical problems like error code 14. So, before you try any other method, try giving this a shot.

The moment the error code pops on your screen, simply close all the programs running on your system and restart your PC. This refreshes your system settings, processes and services allowing it to run smoothly.

However, if the error still persists, then try other methods given below.

Method 2 - Delete the Corrupted Registry Entries

Corrupted registry entry can also trigger error code 14. To resolve delete the corrupted registry entries. For this, go to the start menu and type Regedit. A dialog box will open. Now navigate through the HKEY_LOCAL_MACHINE key. Expand further to locate HKEY_LOCAL_MACHINESYSTEMCurrentControlSetControlClass. Once located, now in the right pane click upper filters and then click delete on the edit menu. Click yes when prompted to confirm the deletion.

Now in the right pane, click lower filters. Repeat the same steps as performed to delete upper filters. Confirm deletion and then exit the registry editor. To activate changes, restart your PC. This will hopefully resolve the issue. If the error code pops up on your computer screen, then try method 3.

Method 3 - Update Corrupted/Outdated Drivers

Drivers are basically software applications that communicate and provide instructions to your system to operate hardware devices.

When these become corrupt or outdated, you start experiencing problems like error code 14. To resolve, locate corrupted drivers and update them. You can do it both manually and automatically. We’ll discuss both ways.

For a manual driver update, go to the start menu, control panel, and then Device Manager. Now go through all devices listed to locate problematic drivers. To identify problematic drivers, look for yellow exclamation marks next to each device. Devices with yellow exclamation marks indicate that driver issues. To repair, right-click on each hardware device and select update driver.

Method 4 - Install DriverFIX - Alternative to Manual Driver Update

Updating each driver separately and manually is a stressful and frustrating task. This can take a lot of your time. Sometimes, you may also have to download new driver versions from the internet to install perform updates. To avoid the hassle and save time, it is advisable to install a program like DriverFIX.

This user-friendly and intuitive software is based on sophisticated technology featuring an intelligent programming system that automatically detects all your PC drivers in seconds.

Once you install this software on your system, it instantly identifies problematic drivers and matches them to the latest versions. It updates PC drivers immediately thereby resolving the error code 14 problem in a few seconds. It enables accurate installations and ensures that your PC runs at its optimum level.

More importantly, with this software installed on your PC, you don’t have to worry about keeping track of your driver updates anymore. The software updates drivers on a regular basis with new and compatible versions ensuring that your PC functions properly and you don’t experience any type of Device Manager error code. It is easy to use and install. It is compatible with all Windows versions.

Click here to download DriverFIX to resolve error code 14 on your system right away.

Read More
Fix SPECIAL POOL DETECTED MEMORY CORRUPTION
If you suddenly encounter the SPECIAL POOL DETECTED MEMORY CORRUPTION Blue Screen error with a bug check value of “0x000000C1” while you are using your computer then it might be due to some problem with the hardware of your Windows 10 computer. According to security experts, it is most likely caused by the physical RAM which could be due to some error in the Realtek driver for Wireless USB 2.0 as well as corruption of the files inside the RAM, and so on. This kind of problem indicates that the driver wrote to an invalid section of the special pool. On the other hand, system files like the rtwlanu.sys or nvlddmkm.sys can also trigger the SPECIAL_POOL_DETECTED_MEMORY_CORRUPTION Blue Screen error. To resolve this Blue Screen error, you can use the options provided below as reference but before you do that, make sure to create a System Restore point first. After you have that covered, proceed to the given options below.

Option 1 – Delete the settings of the Driver Verifier Manager

  • Open the Driver Verifier Manager using the Start search.
  • After that, select or click on the “Delete existing settings” option and then click on Finish.
  • Reboot your computer and see if it fixes the Blue Screen error or not.

Option 2 – Try to update or rollback your Network driver

If you have updated the driver software as of late and you suddenly got this BSOD error, you might have to roll back the device driver – in other words, switch back to the previous working version. To do that, follow these steps:
  • Tap the Win + R keys to launch the Run window and then type in the “msc” command and hit Enter to open the Device Manager window.
  • Under the Device Manager, you will see a list of drivers. From there, look for the Network Adapters and expand it.
  • From the list of Network Drivers, look for “Realtek <Model> Wireless LAN 802.11n PCI-E NIC” and then right-click on it and select Update Driver.
  • Restart your PC and see if it helped in fixing the BSOD error.
Note: If you see any of the following entries under the Network drivers, you might want to download their latest available versions from each one of their manufacturer’s websites.
  • Realtek High-Definition (HD) Audio Driver
  • Realtek Card Reader Driver
  • Realtek Local Area Network (LAN) Driver
On the other hand, if updating the Network driver didn’t help, you can also try to roll back to its previous version.
  • Open the Device Manager again and then look for Network Drivers.
  • Next, select Realtek <Model> Wireless LAN 802.11n PCI-E NIC from the list of Network Drivers and then double click to open a new mini window.
  • After that, make sure that you’re on the Driver tab and if you are not, just navigate to it then click the Roll Back Driver button to switch back to the previous version of the Realtek driver.
  • Now restart your computer to successfully apply the changes made.

Option 3 – Try running the ChkDsk utility

You can also run the ChkDsk utility to fix the SPECIAL_POOL_DETECTED_MEMORY_CORRUPTION Blue Screen error.
  • First, open This PC and right-click on your operating system partition for Windows.
  • Next, click on Properties and navigate to the Tools tab.
  • Then click on Check under the Error Checking section.
  • After that, a new mini window will be opened and from there click on Scan drive and let it scan your disk drive partition for any errors and then restart your computer.

Option 4 – Use the Windows Memory Diagnostics

Since the problem has something to do with the physical RAM, you need to use Windows Memory Diagnostics. To run it, refer to these steps:
  • Tap the Win + R keys to open Run and type exe and hit Enter to open the Windows Memory Diagnostic Tool.
  • After that, it will give two options such as:
    • Restart now and check for problems (Recommended)
    • Check for problems the next time I start my computer
  • Once your computer has restarted, perform a basic scan or you could also go for the “Advanced” options such as “Test mix” or “Pass count”. Simply tap the F10 key to start the test.
Note: After you select the option, your PC will restart and check for memory-based issues. If it finds any issues, it will automatically fix them.

Option 5 – Run the Blue Screen Troubleshooter

The Blue Screen troubleshooter is a built-in tool in Windows 10 that helps users in fixing BSOD errors like SPECIAL_POOL_DETECTED_MEMORY_CORRUPTION. It can be found in the Settings Troubleshooters page. To use it, refer to these steps:
  • Tap the Win + I keys to open the Settings panel.
  • Then go to Update & Security > Troubleshoot.
  • From there, look for the option called “Blue Screen” on your right-hand side and then click the “Run the troubleshooter” button to run the Blue Screen Troubleshooter and then follow the next on-screen options. Note that you might have to boot your PC into Safe Mode.
Read More
Fix Windows Update Error Code 0x8e5e0147
As you already know, the Windows Update mechanism in Windows 10 is a bit complex as it depends on thousands of files and services in order to properly function. There are DLL files and services that support this mechanism’s proper functioning. And so if there is any malfunction with any of these files or services, it will result in some errors when running Windows Update. One of these errors is the error code 0x8e5e0147 which has the following error message: “There was a problem installing some updates, but we’ll try again later. If you keep seeing this and want to search the web or contact support for information, this may help – Error 0x8e5e0147” To fix this error, there are several methods you can try. You can run the Windows Update troubleshooter or reset the Windows Update components manually or clear the SoftwareDistribution folder and install the update manually. You could also reset the Windows Update Agent to default using a command in PowerShell.

Option 1 – Try to run the Windows Update troubleshooter

The first thing you can do to fix the Windows Update error code 0x8e5e0147 is to run the Windows Update Troubleshooter. To run it, go to Settings and then select Troubleshoot from the options. From there, click on Windows Update and then click the “Run the troubleshooter” button. After that, follow the next on-screen instructions and you should be good to go.

Option 2 – Try to reset the Windows Update components

If by any chance that the third option didn’t work, you can also try resetting the Windows Update components as it could also help you resolve the Windows Update error. How? Refer to the following steps:
  • Open Command Prompt with admin privileges.
  • After that, type each one of the following commands and hit Enter after you key in one after the other.
    • net stop wuauserv
    • net stop cryptsvc
    • net stop bits
    • net stop msiserver
Note: The commands you entered will stop the Windows Update components such as Windows Update service, Cryptographic services, BITS and MSI Installer.
  • After disabling WU components, you need to rename both the SoftwareDistribution and Catroot2 folders. To do that, type each one of the following commands below and don’t forget to hit Enter after you type one command after the other.
    • ren C:/Windows/SoftwareDistribution/SoftwareDistribution.old
    • ren C:/Windows/System32/catroot2/Catroot2.old
  • Next, restart the services you’ve stopped by entering another series of commands. Don’t forget to hit Enter after you key in one command after the other.
    • net start wuauserv
    • net start cryptsvc
    • net start bits
    • net start msiserver
  • Close Command Prompt and reboot your PC.

Option 3 – Try downloading and installing the Windows Updates manually

Windows Update error code 0x8e5e0147 might be due to a Windows Update that has failed. So if it is not a feature update and only a cumulative update, you can download the Windows Update and install it manually. But first, you need to find out which update has failed, and to do so, refer to the following steps:
  • Go to Settings and from there go to Update and Security > View Update History.
  • Next, check which particular update has failed. Note that Updates that have failed to install will be displayed under the Status column which has a label of “Failed”.
  • After that, go to the Microsoft Download Center and look for that update using its KB number and once you find it, download and then install it manually.
Note: You can also use the Microsoft Update Catalog, a service from Microsoft that provides a list of software updates that can be distributed over a corporate network. With the help of this service, it can be easier for you to find Microsoft software updates, drivers as well as fixes. Option 4 – Try to reset the Windows Update Agent Since you can’t update the Windows Update Agent on your Windows 10 computer manually, you can try resetting it instead and you can do it using the Reset Windows Update Agent tool which you can download from the official Microsoft website. This tool allows you to:
    • Scan all protected system file and replace the corrupted one’s (sfc /scannow)
    • Scan, detect, and repair corruptions in Windows system image
    • Clean up superseded components
    • Reset Windows Update components
  • Change invalid values in Windows Registry
  • Delete temporary files
Moreover, this tool also allows you to carry out these operations:
  • Open Internet Explorer settings
  • Search for Windows Updates
  • Explorer for local or online solutions
  • Restart your computer
Read More
Headphones are not working or detected
If you find that your headphones are suddenly not working, read on as this post will help you sort out the problem. There could be several reasons why your headphone is malfunctioning, it could be due to an update you just installed, or it could also be due to incompatible operating system, drivers, and so on. Although updates are created to fix bugs on a computer, there are times when it also causes some issues in the computer. One of the issues it causes is the broken headphone. When this happens, the computer will stop playing any audio using the headphones. The problem, as pointed out, could be due to Windows Updates or incompatible or corrupted drivers in the system. To resolve this problem with the headphones, there are several fixes you can check out. Make sure that you follow each one of the given potential fixes below.

Option 1 – Try to set the headphone as the default device manually

There are times when you plug a headphone, it does not toggle the default audio device. Thus, to fix this issue, you have to set the default audio device to the headphones manually. To do that, follow these steps:
  • First, right-click on the volume icon located on the system tray.
  • Next, select the Open sound settings option to open the Sound section in the Windows 10 Settings app.
  • After that, go to the Output section and select Headphones for the “Choose your output device” option. This should fix the problem for you.

Option 2 – Try to update, rollback or reinstall the Audio driver

If the glitch in your audio has something to do with software, chances are it might be related to the audio driver – it could be that the newest version of your Windows 10 does not work well with the old version of the driver. This is why you have to update your audio driver to the newest available version.
  • Tap the Win + R keys to open the Run dialog box and then type in MSC and tap Enter or click OK to open the Device Manager.
  • Expand the section for the outdated device drivers.
  • And then select the outdated driver(s) and right-click on it/them.
  • From the drop-down menu, select the Update Driver option and follow the on-screen instructions to install the latest version of the driver.
  • Then also click on the option, “Search automatically for updated driver software.
  • Restart your PC after the installation.
Note: If updating the Audio driver didn’t work, you can go to the website of your PC manufacturer and look for the support section where you can download the drivers for your computer. You just need to take note of your PC’s correct model and model number so you can find the appropriate driver.

Option 3 – Try checking the status of the audio-related Windows Services

The Windows Services manages audio for all Windows-based programs and if this service is stopped, audio devices, as well as effects, will also be affected and if this service is disabled, any services that depend on it explicitly will fail to start. So you need to check the status of this service. How? Follow the steps below.
  • Tap the Win + R to open the Run dialog box.
  • Then type in “MSC” in the field and tap enter to open the Windows Service Manager.
  • Next, navigate down to the Windows Audio Service and double-click on it to open Properties.
  • After that, set the Startup Type to Automatic and then click on the Start button and if it has already started, stop it and then start it again.
Note: You should also make sure that the following Dependency Services are started and have Automatic Startup type:
  1. Remote Procedure Call
  2. Windows Audio Endpoint Builder
You should also start the Multimedia Class Scheduler and set it on Automatic if you have it in your system. The Multimedia Class Scheduler Service or MMCSS is a service in Windows that allows multimedia applications to get prioritized access to CPU for time-sensitive processing like the multimedia applications as well as prioritized disc access to make sure that the process does not lack data to process.

Option 4 – Try running the Playing Audio Troubleshooter

Since the Windows 10 operating system has the Playing Audio Troubleshooter, you can use this troubleshooter to try and fix the problem with the headphones. You can access this tool in the Control Panel or in the Taskbar Search and even on the Troubleshooters page of Windows 10. Run this troubleshooter and see if it can fix the issue or not.

Option 5– Try to rollback or install a newer Windows Update

As mentioned earlier, the issue with the headphones could be due to a Windows Update. Thus, to fix the problem, you can try to either roll back or install a newer Windows Update.
Read More
Operation did not complete successfully
It is common knowledge that when you open a file that contains viruses, it will automatically infect the operating system. This is why most antivirus programs like Windows Defender won’t allow the opening of a file or execution of any associated program if they detected that the file or program could potentially harm the computer. In situations like this, you may get an error stating, “Operation did not complete successfully because the file contains a virus”. In addition, it is also possible that this error message can pop up even for known programs. To open the program or file that triggered the error, you will be given a couple of options in this post but make sure that the program or file is really safe to open and does not contain any virus. You can open the file or execute the program by disabling the Windows Defender or any antivirus program temporarily. You could also try to add an exclusion in your antivirus program or repair File Explorer or run the Disk Cleanup tool. For more details, refer to each one of the options provided below.

Option 1 – Try to temporarily disable the Windows Defender program

Although you could encounter this error with any antivirus program, it is more common in Windows Defender. Thus, you can try to disable it for a while when you open the file or execute the program. To do so, follow these steps:
  • First, click on the Start button and go to Settings > Update and Security > Windows Security.
  • Here, select the “Open Windows Security” option located in the right pane.
  • After that, click on the “Virus and threat protection” option.
  • Next, click on Manage settings under the Virus and threat protection settings.
  • Then turn off the switch for both Real-time protection and Cloud-delivered protection.
  • Now restart your computer and try to open the file or execute the program again and see if it works.
  • Note: Do not forget to enable the Real-time protection and Cloud-delivered protection back in Windows Defender.

Option 2 – Try adding an exclusion in the Windows Defender program

  • Open the Windows Defender Security Center from the system tray area.
  • Next, click the “Virus & threat protection” option and then open the “Virus and threat protection settings”.
  • After that, scroll down until you find the “Exclusions” and click on the “Add or remove exclusions” option.
  • Then click the plus button and select the type of exclusion you want to add and from the drop-down list, select Folder.
  • Next, navigate to the path where the file or program is located.
  • When a User Account Control or UAC prompt, just click on Yes to proceed.
  • Now try to run the program or file again and see if it worked. If it did, then make sure to turn on your antivirus. However, if it didn’t work, proceed to the next given options below.

Option 3 – Try to run a System File Checker scan

System File Checker or SFC is a built-in command utility that helps in restoring corrupted files as well as missing files. It replaces bad and corrupted system files with good system files that might be the cause why you’re getting the errors 0x8024a11a and 0x8024a112. To run the SFC command, follow the steps given below.
  • Type “cmd” in the Start search and then right-click on the appropriate search result.
  • Next, select “Run as administrator” to open Command Prompt with admin privileges.
  • After opening Command Prompt, type in sfc /scannow
The command will start a system scan which will take a few whiles before it finishes. Once it’s done, you could get the following results:
  1. Windows Resource Protection did not find any integrity violations.
  2. Windows Resource Protection found corrupt files and successfully repaired them.
  3. Windows Resource Protection found corrupt files but was unable to fix some of them.
 Now restart your computer and see if the problem is fixed or not.

Option 4 – Run the Disk Cleanup tool

You can also try using the Disk Cleanup tool. To use it, refer to these steps:
  • Tap the Win + R keys to open the Run dialog box and then type “cleanmgr” in the field and hit Enter to open the Disk Cleanup window.
  • After that, select the drive you want to clean.
  • Now click OK to clean the disk and restart your computer.
Read More
1 2 3 171
Logo
Copyright © 2023, ErrorTools. All Rights Reserved
Trademark: Microsoft Windows logos are registered trademarks of Microsoft. Disclaimer: ErrorTools.com is not affiliated with Microsoft, nor claims direct affiliation.
The information on this page is provided for information purposes only.
DMCA.com Protection Status