Bad or good news, depending on your view comes from RIOT for their game Valorant. It seems that Riot has decided to enforce Windows 11 TPM 2.0 feature into Valorant running on Windows 11 and there is a rumor that it will be de facto standard and that it will move to Valorant in general no matter on which system it runs.
Furthermore, there is a rumor circling around that other developers are also talking about implementing TPM 2.0 requirements so they can harvest advanced security features of Windows 11 in order to prevent hacks and other cheats in their games.
This is an interesting point to stand on, on one side, sure, advanced features that will prevent cheating and hacking is a great thing. On other hand denying access to many computers that do not support TPM 2.0 and removing them from the game can be a permanent loss of customers and therefore loss of money. It is a risk to be sure and I am not really sure that alienating gamers is a good choice for long-term income, especially when you will be able to install Windows 11 on an unsupported PC as stated by Microsoft.
We will all see how this Riot decision will reflect on their business, as not a big Valorant player myself I am not impacted too much with this decision, but it will be interesting to see if others will indeed go with this trend or they will decide to wait a while until much more PC’s are upgraded.
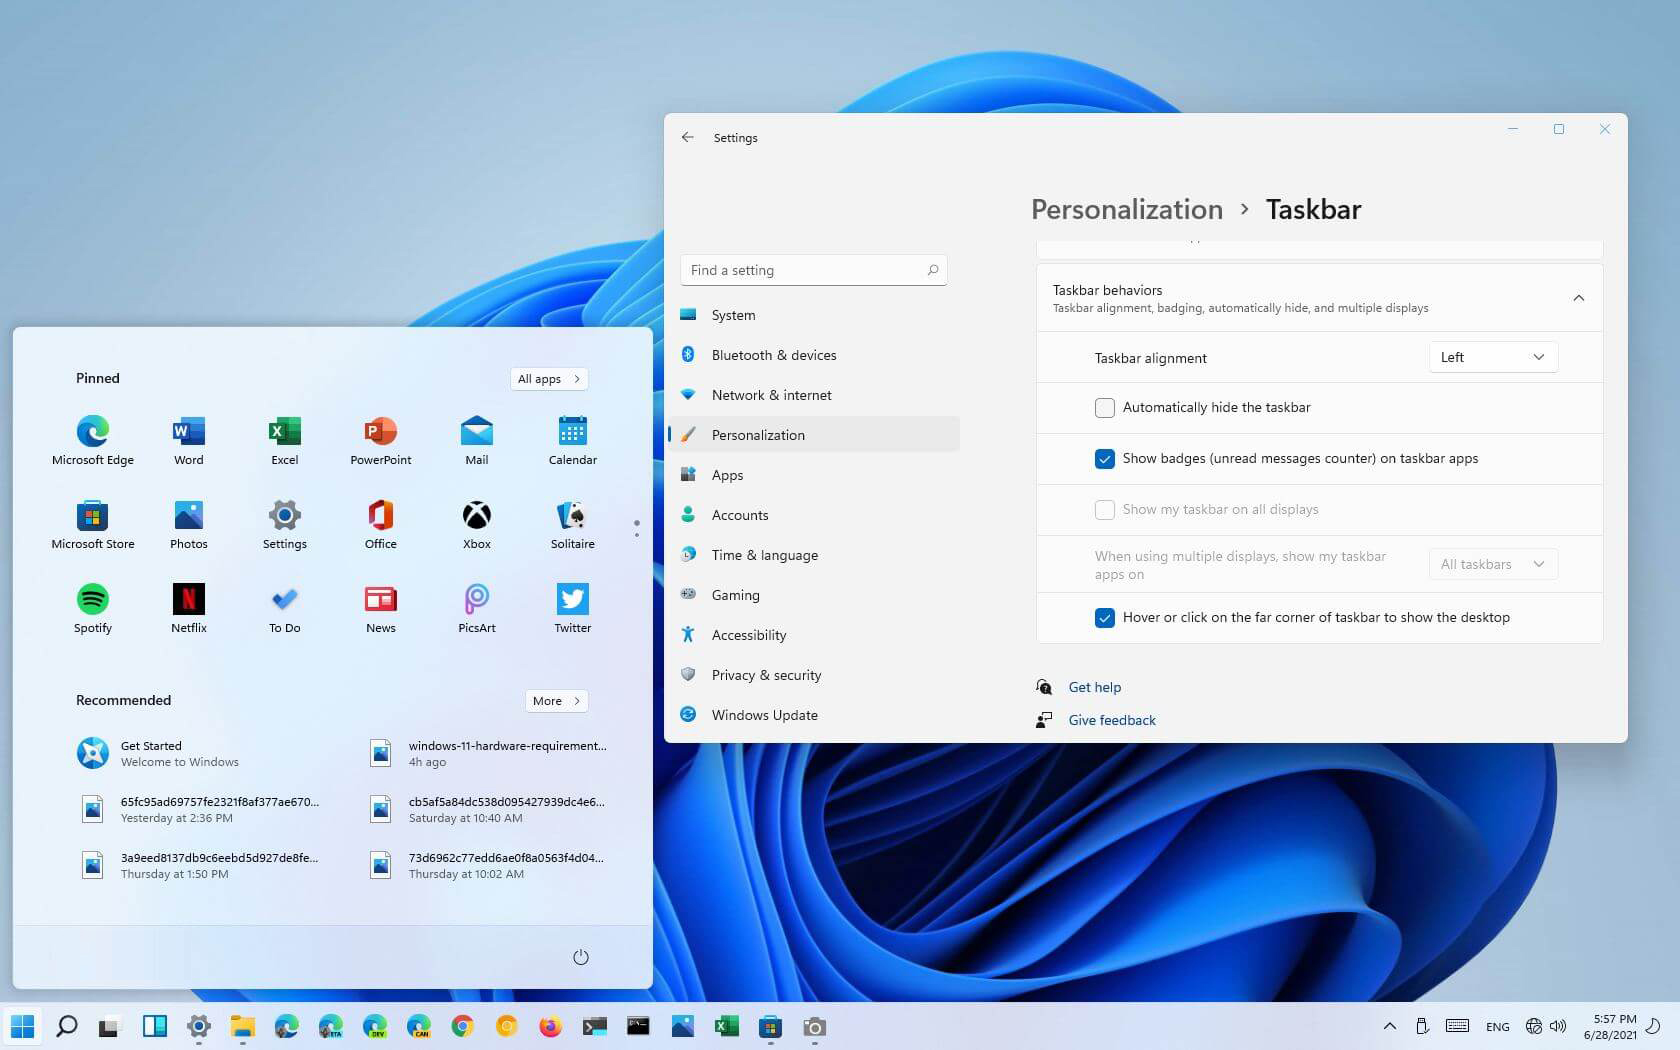
The standard icon place in the Taskbar inside Windows 11 is in the center. Some users welcomed this change, some not so much. If you are part of the user base that is not so much thrilled with this Microsoft’s idea of innovation, do not worry, there is an easy way to move all icons and start button on the left inside Taskbar.
Moving icons in Taskbar
Open Windows settings by using ⊞ WINDOWS + I key combination
Click on Personalization
Select Taskbar
Click on Taskbar Behaviors
Click on the drop-down menu beside Taskbar Alignment
Select your desired option of icon alignment
Close settings
Your options will be active right away and you will see icons switching to the position of your choosing.
Instaling and removing applications from your Windows can sometimes leave some traces that are unpleasant and can cause annoyances. One of these annoyances is the program in the startup section of the task manager.
If you ever opened task manager and went into the startup section trying to disable some of the startup items on your Windows boot there might be a chance that you have experienced and seen a program without any icon or information about it just sitting there.
This is due to some applications being removed from the system but for some reason, it still shows itself in startup and it is quite annoying. So here we will show you how to get rid of this annoyance so your startup is clean again without junk in it.
Removing a program from startup
Locating the source of the issue
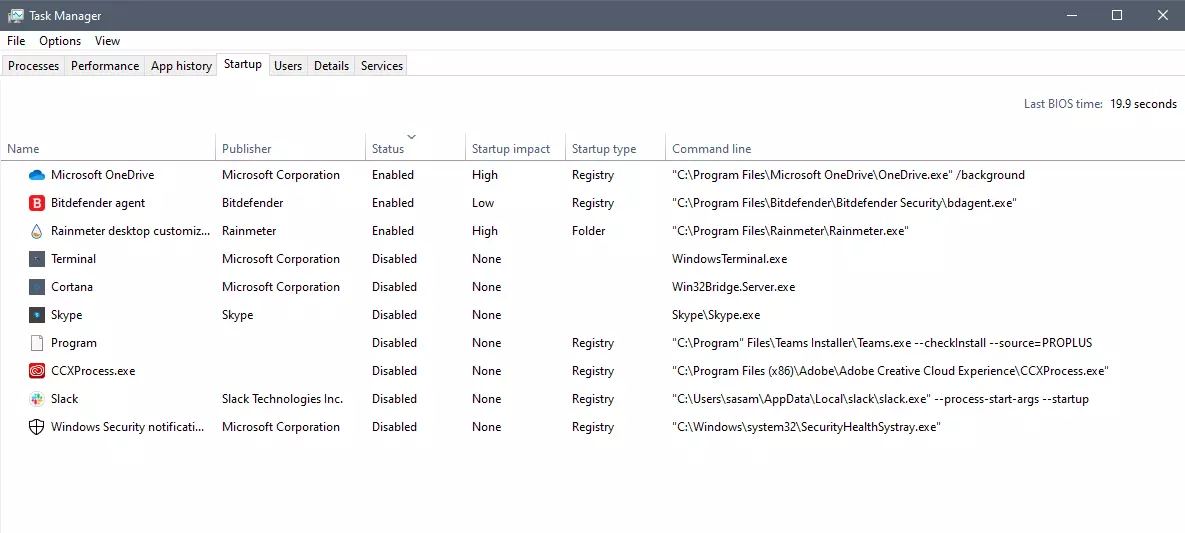
The first thing of course is to open the task manager itself and navigate to the startup tab. Inside the startup tab right-click on the column header and tick or enable Startup type and command line. Now you will see the location of the supposed file (that is missing or you could just go there by right-clicking on the item, but here it is greyed).
99% of the time startup type will be registry since the file is missing, if it was a file fix would be just to simply delete the file in the folder but since it was installed and not properly removed registry key is still present but the file cannot be found. After confirmation that the file is indeed missing and that the startup type is registry open the registry editor by typing Regedit in search and pressing enter.
Removing the key from registry
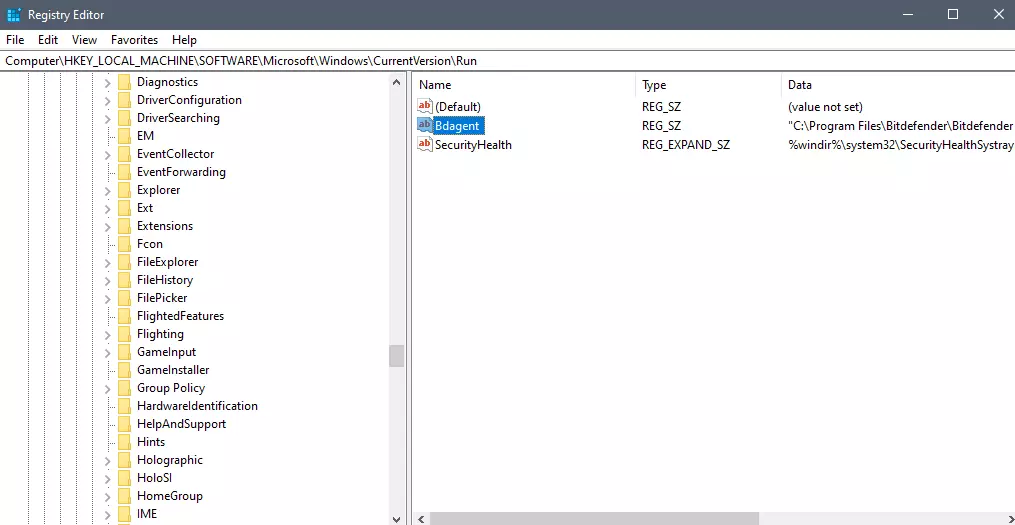
Inside Registry editor navigate to: HKEY_CURRENT_USER\SOFTWARE\Microsoft\Windows\CurrentVersion\Run. Inside on right part, you will see all auto-start entries added by installed applications.
Locate one that is causing issues by comparing its path with the path inside the task manager command line and delete the key. Once the key is deleted right-click on RUN on the left part and choose HKEY_LOCAL_MACHINE to quickly jump on that key location and repeat the process of key deletion if needed. HKEY_LOCAL_MACHINE will delete startup entry for all users and sometimes entry will not be present here since the application is not installed for all users or there are no other users on the machine.
After the procedure is finished, reboot your systems in order to apply changes.
Anxiety from all these digital threats lurking everywhere? An antivirus program can help put your mind at ease.
What can a virus do to your device?
A virus is malicious software that can affect pretty much any device and does so in a variety of ways. Be it your computer, your phone or your smart lightbulb - as long as there’s access to the internet, malware can get to it.
How exactly does this kind of attack manifest itself? Well, there’s a wide variety of effects ranging from mild to severe. Among other things, they depend on which type of malware attacks your device - a virus, spyware, ransomware, adware or something else.
These are some of the things you can expect to happen:
Slow performance
System crashes
Theft of data and sensitive information
Connectivity issues
Constant browser redirects
Strange messages sent to your contacts
Interference with files
It really can be the stuff of nightmares. So, if you want to sleep peacefully knowing that your devices are completely safe, you should definitely consider getting an antivirus.
P.S. don’t let its name fool you - an antivirus does indeed protect your devices against more than just viruses.
What is antivirus software exactly?
Antivirus software is designed to help you battle and ward off malware. Basically, it scans your device to detect any suspicious activity and offers tools to get rid of the culprit.
At first, antiviruses were developed to fight against viruses only, but nowadays they cover a lot more ground. Here are some of the biggest benefits of getting yourself a powerful defender.
Advantages of antivirus software
1. It fights those pesky ads
Look, constant ads that pop up everywhere aren’t the absolute worst thing that can happen on your computer. If anything, they are annoying, like when you’re trying to sleep but that one fly in your room just won’t stop buzzing.
Now, there’s a free, well-established solution for that - installing an ad blocker. And we’re about a hundred and ten percent sure you’ve already done that on each and every browser you use.
However, “if I can’t see it, it doesn’t exist” isn’t the most ideal approach for your online safety. Ad blockers can’t block everything and they won’t protect you from potential adware. An antivirus on the other hand offers that layer of protection against malware snuck into pop-ups and spammy websites.
2. It protects you from hackers
Hackers don’t target government institutions only. They’ll target regular people too if they have something to gain.
Credit: Clint Patteron (Unsplash)
There are different types of hacking, such as phishing e-mails, transmission of malicious programs, credential reuse, denial of service and more. In any case, they take control of your device and hijack your data.
The good thing is that, as threats evolve, antiviruses evolve too and there are tons of quality programs on the market that can keep you secure for an affordable price.
3. It keeps your files and data safe
When malware enters your device, it can target pretty much any file and get access to any and all data.
Installing an antivirus program will make sure that every single file, new or old, is monitored at all times, warning you against threats immediately. That way, you can make sure to react before your other files become infected and data is lost or stolen.
Another great thing for data protection is that the best antivirus software normally comes with a password manager, so no one can use malware to steal your passwords.
4. It blocks all kinds of malware
As we already stated, malicious attacks can be performed in many ways and malware comes in in different shapes an sizes, such as:
Trojan horse
Spyware
Ransomware
Adware
Rootkit
RAT (remote access Trojan)
Keyloggers
Worms
Botnets
Credit: Growtika (Unsplash)
Nowadays, antivirus software is designed to fight against all of these types. That’s why more often than not we hear the term 'antivirus' used interchangeably with 'anti-malware,' like in this article.
5. It keeps your children protected
You can’t keep your eyes on your kid every second of the day and you can’t protect them from everything. But at least you can limit their exposure to the threats they can encounter at every corner of the digital world.
An antivirus program will block harmful or suspicious websites and ads, which is great both for you and your children. To take it a step further, though, many such programs come with special parental controls and offer monitoring as well. It’s a great solution for keeping your kids safe online without sounding like the irritating, overbearing, controlling parent who “just doesn’t get it!”
How to pick one
There are definitely lots of different antivirus programs out there, both free and paid. We recommend you look for a paid option, since free ones are unfortunately a lot more susceptible to being compromised through malicious attacks.
Now, there are a few factors to consider when choosing the right software. If you use your PC for basic things then a basic antivirus will suffice. However, the more complex your use and the more sensitive the data you deal with, the stronger it needs to be.
It’s also crucial that you take into account the features it includes. As we already mentioned, some programs have additional security options. For example, depending on the package you select, Bitdefender provides:
Some are included in plans and some are separate products, so make sure to check out all the offers.
And don’t worry if you have multiple PCs or you’re looking for protection for your smartphone or tablet as well; Bitdefender has suitable solutions for your needs. Of course, you can also just pick their classic antivirus software if you’re not in need of advanced protection.
Another important point is how regularly the software is updated and enhanced. The more frequent the updates the better, as bugs can make the program more vulnerable. Other things we advise you consider are user-friendliness, impact on performance, reputation (user reviews especially) and, of course, price.
The bottom line
Fact is: anyone can be a malware victim. Don’t let it be you.
You can’t put a price on peace and security, so don’t be reluctant to pay for yours - especially since a lot of options out there are extremely affordable. Is $159.00 a year really too much to pay for cross-platform protection for up to 10 devices? We don’t think so.
Explore your options and protect your files and data before it’s too late.
If you spend a large amount of time gaming or working on a computer gaming chair is a very important asset. One other thing that is mostly looked past but could help greatly is a good desk. A great chair accompanied by a great desk can make your long sitting sessions more pleasant and more healthy which is very important in the long run.
Hey, but it is only a desk, what is so special about having an expensive desk? Well truth to be told desk is just a desk and any kind of desk can serve the purpose of hosting a keyboard, mice, and screen. But a good desk will offer some other advantages that may not seem so important but they could mean a lot like adjusting desk height so it fits perfectly on your size and sitting position making long hours more pleasant and lower stress on hands sitting on it.
Advanced desk features
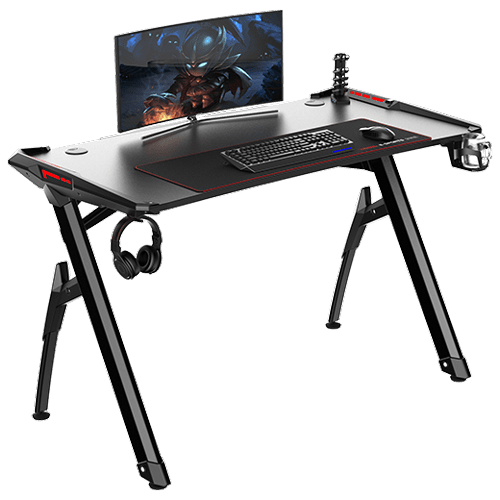
Bytezone might not be a company that will sound familiar to you, mostly because they manufacture gaming chairs and desks, now in the gaming chairs world there are a lot of competitors and Bytezone has managed to make a name for itself despite this fact. But they are more popular in their gaming and office modern-looking desk category.
The advanced desk is made from carbon steel and plastic combination, it is very durable and it weighs 27kg. Now that is not really light but it is not very heavy if we compare it to wood desks. The top layer of the table is made from easy-to-clean material and the desk comes with a large mouse and keyboard pad.
The table itself includes a cup holder, headphones bracket under the table and it has a cable management drawer in the back. The desk is sized 66x120x76 cm. Also for anyone interested desk itself comes also with RGB lights for that true gaming feel.
Microsoft's anniversary update has come with many new features and improvements. One of these features is that Microsoft's Cortana can now be installed on your Android phone and as long as you are logged in to your Microsoft account on different devices, she can pass information between devices. You can not see battery life on your desktop PC, notifications, etc.
There are some prerequisites in order to get this going, first is to have a Windows version 1607 or newer. The second is to have the last Android version
Installing Cortana on Android
Download and install the Cortana app from the Google Play store.
Open the app and accept the license terms.
Enter the credentials for the Microsoft account you use to sign in to your PC.
After a few seconds, Cortana will open.
Click the settings button and select Sync Notifications.
By default, missed calls, incoming messages, and low battery notifications will be turned on. You can turn this on\off from here. The only option off by default is for App notifications. Any non-system apps such as Facebook and Instagram can also send alerts to your Windows box. You can choose to enable the App notification sync option or leave it off.
If you enable “App notification sync,” you will need to give Cortana permissions to read and control notifications on your phone.
You can then select exactly which applications will be synched to your PC.
Once done you can exit out of Cortana.
Configuring Cortana on PC
Click the Windows button and type Cortana. Click the icon for Cortana and Search Settings.
Scroll through the settings list and look for Send notifications between devices
Click the switch to turn it on.
Sign in to the same Microsoft account you used in the previous section
Navigate back to the Cortana & Search settings tool.
Click Edit Sync Settings. Make sure that your phone shows up on the list. You can also determine if you want PC notifications are sent to your phone.
With those settings in place, you should now start getting alerts for the items you enabled in your Action Center. As notices come in, you will see them pop up in a small bubble on the lower right of your screen. You can dismiss the notification or use the link to find a compatible app in the Windows store.
As you know, one of the useful and efficient utilities in Windows 10 is the DISM tool. It can be used with the Command Prompt command line which allows users to carry out various tasks. However, there are instances when the DISM tool could encounter some errors when you try to execute a command. One of these errors is the one that states, “The component store has been corrupted”. This kind of DISM error is due to an error in the image file.
When you encounter the DISM Error 14098 when running the DISM tool, you will see the following content in the command line:
“C:>Dism /Online /Cleanup-Image /RestoreHealth /Source:c:testmountwindows /LimitAccessDeployment Image Servicing and Management toolVersion: 10.0.10586.0Image Version: 10.0.10586.0[==========================100.0%Error: 14098The component store has been corrupted.The DISM log file can be found at C:WINDOWSLogsDISMdism.logC:>”
There are several fixes you can check out to fix the DISM Error 14098, “The component store has been corrupted”. You can try to run the Restore Health command or reset the Windows Update components, or whitelist the dism.exe in your antivirus program, as well as try to uninstall any recently installed updates. Follow the options provided below for more details.
Option 1 – Run the Restore Health command in a Clean Boot State
First, you need to put your computer in a Clean Boot State.
Type in MSConfig in the Start Search to open the System Configuration utility.
From there, go to the General tab and click “Selective startup”.
Clear the “Load Startup items” check box and make sure that the “Load System Services” and “Use Original boot configuration” options are checked.
Next, click the Services tab and select the “Hide All Microsoft Services” check box.
Click Disable all.
Click on Apply/OK and restart your PC. (This will put your PC into a Clean Boot State. And configure Windows to use the usual startup, just simply undo the changes.)
Now open Command Prompt with admin privileges.
Then type and enter this command to execute it: Dism /Online /Cleanup-Image /RestoreHealth
Wait until the process is completed and restart your computer.
Note: If the Restore Health command fails, you can use the “/StartComponentCleanup parameter” by executing this command: Dism /Online /Cleanup-Image /StartComponentCleanup
Option 2 – Try to reset the Windows Update components
If by any chance that the second option didn’t work, resetting the Windows Update components could also help you resolve the problem. How? Refer to the following steps:
Open Command Prompt with admin privileges.
After that, type each one of the following commands and hit Enter after you key in one after the other.
net stop wuauserv
net stop cryptsvc
net stop bits
net stop msiserver
Note: The commands you entered will stop the Windows Update components such as Windows Update service, Cryptographic services, BITS, and MSI Installer.
After disabling WU components, you need to rename both the SoftwareDistribution and Catroot2 folders. To do that, type each one of the following commands below, and don’t forget to hit Enter after you type one command after the other.
Next, restart the services you’ve stopped by entering another series of commands. Don’t forget to hit Enter after you key in one command after the other.
net start wuauserv
net start cryptsvc
net start bits
net start msiserver
Close Command Prompt and reboot your PC.
Option 3 – Whitelist the “dism.exe” in your antivirus program
The DISM error 14098 might also be caused by your antivirus program which could be interfering it from running. To fix this, you have to whitelist dism.exe. How? Refer to these steps:
Open the Windows Defender Security Center from the system tray area.
Next, click the “Virus & threat protection” option and then open the “Virus and threat protection settings”.
After that, scroll down until you find the “Exclusions” and click on the “Add or remove exclusions” option.
Then click the plus button and select the type of exclusion you want to add and from the drop-down list, select Folder.
Next, navigate to this path and select the WinSxS folder: C:/Windows/WinSxS
When a User Account Control or UAC prompt, just click on Yes to proceed.
Option 4 – Try to uninstall recently installed updates
There are times when some Windows Updates affect some mechanism internally when you update your Windows 10 computer. As a result, it causes issues with other components of the operating system which could be the reason why you’re getting the DISM error 14098.
Go to Settings and select Update and Security > Windows Update.
From there, click on the “View update history” option and then click on the “Uninstall Updates” option.
This will open a new window that contains the list of installed Windows Updates.
Now right click on the Windows Update you wish to uninstall and click Uninstall.
New Apple's upscaling technology called MetalFX will place iOS and macOS devices back into the gaming world. Apple had great games back in the old days and some all-time hits like the prince of Persia have been made first for apple but along the way, it just lost it.
Same as NVIDIA's DLSS and Intel's XeSS systems, Apple MetalFX also uses AI algorithms to upscale the resolution of output game frames. So, for example, the GPU inside your MAC might render the game at 1080p, but through MetalFX and AI upscaling it will look like a 4K image but have a good frame rate since it is rendered in base resolution.
The ability to make AI strike a good balance between performance and image quality is a key to technology in today's modern gaming and having this technology will help developers a ton to be able to achieve great results on Apple hardware.
The First MetalFX Games
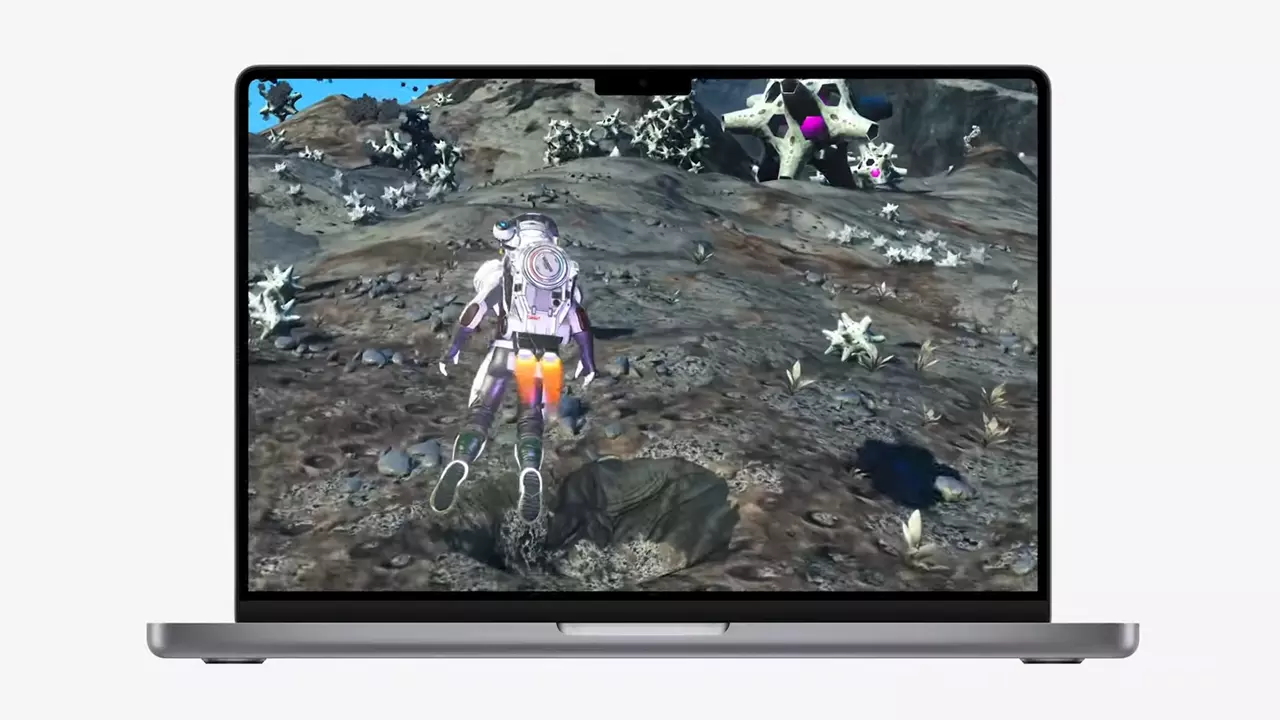
So far three official games that will use this technology and be released natively for Appl hardware are Resident Evil 8 Village, GRID legends, and No Man's Sky. All three games have been confirmed and Resident Evil 8 Village is already sent for review people are impressed since the game can run smoothly on all Apple devices, even ones with an M1 CPU.
Apple is back into gaming
When you say Apple gaming is probably the last thing that comes to your mind but truth be told Apple makes more money from games than Microsoft, Nintendo and Sony combined. Also, Apple itself was a big player once regarding computer games as well, Myst and Prince of Persia are games that were made and have been released for Apple first. Bungie was also founded by Apple developers and Halo was originally announced as a Mac game.
Apple has been trying and pushing gaming on its platform since it kind of died down. Today all Sony, Nintendo, and Microsoft controllers work without any issues with all Apple products. Apple also has its own gaming subscription service, Apple Arcade, and its Apple TV is packed with GPU that can rival Xbox ones.
MetalFX API ties and brings it all together, it is designed to get the most performance from the hardware by minimizing overhead.
Now, computers and laptops do not hold any large numbers if we look at the user base, and that could deter developers but if we look at iPad and iPhone things are different there, much different. How same CPU power these devices and how MetalFX is available across all products it is clear that there is a market for games there. No Man's Sky is coming to iPad using these technologies and bringing full computer experience to tablets.
The error code 0x8024a000 is related to Windows Update. You might see this error when you try to update Windows from the Microsoft site to use the latest and new features and technologies. A connection interruption between your computer and the Windows Update server may be the cause of this error. Operating system overload or corrupt registry may also cause this error. Check your modem, router, cable, etc. to be sure that these components are working well.
Common symptoms
You are trying to update Windows and its components such as system driver. The process suddenly stops and shows the error code 0x8024a000.
Your PC frequently crashes with Error 0x8024A000 when running the same program.
Windows runs sluggishly and responds slowly to mouse or keyboard input.
You cannot connect to the Windows update server and the update will not start.
You may also receive the error message saying that some files could not be updated.
Solution
Error Causes
There may be various causes for this error. Some of which are:
No Internet connection
Windows operating system is overloaded with invalid system references
Corrupt download or incomplete installation of Windows Update software.
Faulty cable, router or modem
Windows update services are missing
The system is infected with malicious programs
Corrupted or deleted system registry files. PC registry errors occur over time because of constant writing, editing, moving, and deleting of information and files from your computer's registry time as programs are installed, modified, and removed.
Further Information and Manual Repair
We are going to discuss some easiest ways to fix up such issues and get your PC working so that you can install new updates.
Method 1:
Press the Windows button + W on your keyboard
In the search box type “troubleshooting”
In the troubleshooting box, select the View all tab
Run the troubleshooter for these services, and then try installing updates
Method 2:
Since most of the installation-related errors can be fixed by System File Checker
System File Checker is a very efficient way to fix errors. Most of the installation-related errors can be fixed by a System File Checker. To use this tool follow instructions below:
Swipe in from the right edge of the screen, and then tap Search. If you are using a mouse, point to the upper-right corner, move the pointer down, and then click Search. OR On the keyboard, press the Windows + W key. A search box will appear. Type cmd in the search box.
On the command prompt, type sfc/scannow
This will scan the system files and fix any error
Reboot the computer and try to install updates
OR
In the command prompt type sfc/scannow.
This will scan the system files and fix any errors.
Reboot the computer and try to install updates.
Method 3:
Press Windows + R
A run dialog box will appear
type services.msc and press OK
Then in Services window, look for Background Intelligent Transfer Service. Click on it.
If it is the Services issue, then it will stop the service. Click on Start in the window below, and then click Apply and OK.
Reboot your machine and retry installing updates.
Method 4:
Click Start or open search box
Type cmd
Right-click on cmd in start menu and select ‘Run as Administrator’
Type net stop wuauserv
Hit Enter
Type ren c:windowsSoftwareDistribution softwaredistribution.old
Hit Enter
Type Exit
Hit Enter
Method 5:
Your PC is always accumulating junk files from normal web surfing and computer usage. If these junk files aren’t occasionally cleaned, it can cause Windows Update to respond slowly and display an error message 0x8024A000, possibly due to conflict with files or an overloaded hard drive. Cleaning up these temporary files will not only solve this problem, but it will also speed up PC performance. Follow the steps below to clean up this junk:
Click Start
Type "command" in the search box and DO NOT hit ENTER yet!
While holding CTRL-Shift on your keyboard, hit ENTER.
You will be prompted with a permission dialog box.
Click Yes.
A black box will open with a blinking cursor.
Type "cleanmgr" and hit ENTER.
Disk Cleanup will begin calculating how much occupied space you can get back.
The Disk Cleanup dialog box will show a series of checkboxes to select. In most cases, the "Temporary Files" category will occupy the most disk space.
Check the boxes of the categories you want to clean and click OK.
If you do not possess the technical expertise required to accomplish this yourself or do not feel comfortable doing so, download and install a powerful automated tool to get the job done.
There are cases when you encounter some issues while updating your Windows 10 computer. One of these issues is the error 0x80240034. This particular error is a Windows Update Error that appears on the Windows Update pane every time an update fails to install. When this happens, your Windows Update will only get stuck at 1% and nothing happens afterward and eventually fails.
If you click on the View Installed Update History, you will see the error code 0x80240034 for the failed updates. You will see this error each time you try to update your Windows PC. Take note that this issue doesn’t only happen to a specific version of the Windows Update but on various different Windows builds based on many users. What’s more, is that some users are also seeing a different error code when their Windows Update fails but they still end up seeing the error code 0x80240034 when they check the Windows Update history.
At the time of writing, it isn’t determined yet what really causes this error but it’s most likely due to some corrupted files in the computer which is why the most common solution you can try is resetting the Windows Update cache. On the other hand, other users also resolved the issue by using the ISO and selecting the “Do not keep previous settings” option during the Windows Update so it might be something to do with transferring the previous settings through the update client. For clear instructions in fixing this issue, refer to the two options provided below.
Option 1 – Try to clear the Windows Update Cache/Distribution Folder
As mentioned earlier, a lot of users tried clearing the Windows Update cache to fix the problem and so far it has worked. Like them, you can try clearing the Windows Update cache by simply deleting the contents of the folder named “SoftwareDistribution” since Windows apparently can’t clear and re-download the update contents once they are corrupted. Thus, deleting the contents of this folder will make Windows download the contents again which will fix the problem. To do that, follow the steps below.
Step 1: Tap the Windows key once.
Step 2: Next, type in “command prompt” in the Windows Start Search, and from the search results that appear, right-click on Command Prompt and select the “Run as administrator” option from the context menu.
Step 3: After opening Command Prompt, type in “net start wuauserv” and hit Enter.
Step 4: Then type in “rmdir %windir%SoftwareDistribution /S /Q” and hit Enter.
Step 5: Now type in “net start wuauserv” and hit Enter. Once it’s done, try updating your Windows PC again, it should now work just fine.
Option 2 – Update Windows via ISO file
If option 1 didn’t work for you, you can try this second option of updating your Windows 10 computer using an ISO file which means that you will have to create a Windows 10 bootable media and use it to install the latest Windows 10 version. The most user reported that this option works and the reason why it does have something to do with the Windows Update client since the Windows Updates downloaded from the regular Windows Update client seems to create issues such as the error 0x80240034. However, issues like this one don’t occur when the very same Windows Updates are downloaded and installed via an ISO file.
Take note that when using a Windows ISO file, you will be asked to choose what you want to do with the previous settings and apps. A lot of users opted for the “Not to keep the old Windows settings” option which has resolved the issue. So if you want to keep the previous settings then you must try to update Windows first while keeping the old settings. However, if it doesn’t work, you have to try installing the latest version of Windows without keeping the previous settings.
Step 1: Click this link and then click the Download Tool Now button.
Step 2: Next, click the “Use the tool to create installation media (USB flash drive, DVD, or ISO file)…” option and follow the next given instructions on the screen.
Step 3: Now select the ISO file option in step 5.
Step 4: After that, you should now have an ISO file.
Step 5: Next, go to the location where you’ve downloaded the ISO file.
Step 6: Then right-click on the Windows 10 ISO file and select the Open with an option and then select File Explorer.
Step 7: Now click on “setup.exe” and follow the next instructions that appear on the screen. When asked, you have to select either: Nothing (clean install) or Keep personal files only option. Take note that you must not select the “Keep personal files, apps, and Windows settings since it doesn’t really work.
If you are using the Camera app on your Windows 10 computer but encountered an error code 0xa00f429f with an error message that says, “Can’t start your camera”, read on as this post will guide you in fixing this problem. This kind of error in the Camera app could be due to a recent update gone wrong or it could also be due to a corrupted driver. If you are certain that the camera is connected and is properly installed, you can try to check for updated drivers.
The error code signifies that the drivers have to be updated. However, that isn’t always the case sometimes as the problem could also have something to do with corruption in the driver. The effective ways to troubleshoot this problem would be trying to reinstall or reset the Windows Camera app, or update, rollback or uninstall some device drivers as well as use the Registry Editor. Before you proceed with the instructions provided below, make sure that you have admin privileges and don’t forget to create a System Restore point.
Option 1 – Try to reset or reinstall the Windows Camera app
As pointed out earlier, you can also reset the Camera app to fix the error. To do so, follow the steps below.
The first thing you have to do is go to the My Pictures folder under the C: drive of the File Explorer and then delete the Camera Roll folder.
Once you’re done, right-click on an empty area on your screen and create a new folder and name it “Camera Roll”.
Then from the Start menu open the Settings app and select System.
From there, navigate to the Apps and features section.
Now go to Camera and click on the Advanced Options and click the Reset button.
Option 2 – Try to reinstall the Camera app
If resetting the Camera app didn’t help, you might want to reinstall it by following these steps:
Tap the Win + X keys and select the “Windows PowerShell (Admin)” option from the menu to open Windows PowerShell as admin.
Next, type this command to uninstall the Camera app: Get-AppxPackage *camera* | Remove-AppxPackage
Once done, exit the Windows PowerShell and restart your computer and then try to install the latest version of the Camera app from Microsoft Store.
Option 3 – Try to rollback, update or disable drivers
The next thing you can do to fix the error code 0xa00f429f in the Camera app is to roll back, or update, or disable device drivers. It is most likely that after you updated your Windows computer that your driver also needs a refresh. On the other hand, if you have just updated your device drivers then you need to roll back the drivers to their previous versions. Whichever applies to you, refer to the steps below.
Open the Devices Manager from the Win X Menu.
After opening the Device Manager, look for the device drivers which have a yellow exclamation mark.
Then right-click on each one of them. If you haven’t updated this driver in a while, select the “Update Driver” option. On the other hand, if you’ve just updated this driver, then select the Uninstall Device option.
Next, follow the screen option to update or uninstall it.
Finally, restart your computer. It will just reinstall the device drivers automatically if you have chosen to uninstall them.
Note: You can install a dedicated driver on your computer in case you have it or you could also look for it directly from the website of the manufacturer.
Option 4 – Try to use the Registry Editor
Tap the Win + R keys to open the Run dialog box and type “Regedit” in the field and then hit Enter to open the Registry Editor.
Next, navigate to this registry key: ComputerHKEY_LOCAL_MACHINESOFTWAREWOW6432NodeMicrosoftWindows Media FoundationPlatform
From there, right-click on any empty space on the right side part of the window and select New > DWORD (32-bit) Value.
Then name it as “EnableFrameServerMode” and double click on it.
Now set its value data to “0” and its base value as Hexadecimal and then click on OK.
After that, restart your computer and see if it helped in fixing the problem or not.
 Bad or good news, depending on your view comes from RIOT for their game Valorant. It seems that Riot has decided to enforce Windows 11 TPM 2.0 feature into Valorant running on Windows 11 and there is a rumor that it will be de facto standard and that it will move to Valorant in general no matter on which system it runs.
 Moving icons in Taskbar
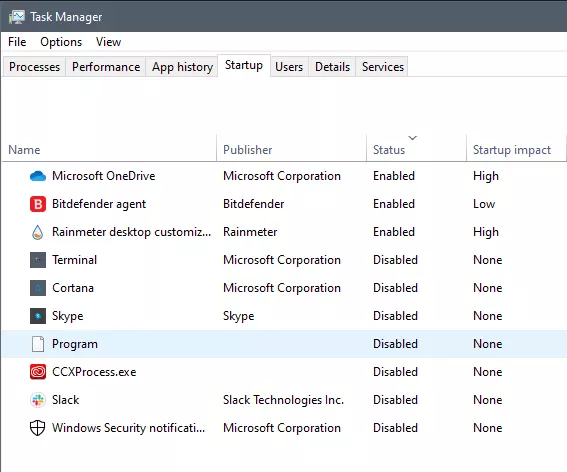


 Advanced desk features