Logo

Razer Iskur gaming chair for healthy gaming

Razer IskurIt seems that last few days we were riding some Razer bandwagon but rest assured that we are not sponsored by them in any way, truth is that simply they come up with some interesting accessories which I believe are worth covering.

Gaming Chair itself comes in two colors, fully black and green black combination and it is not really an entry-level chair if we are talking about price. The chair itself is around 600USD depending on the distributor and considering that price range it is placed in more top cream of gaming chairs but it is worth every dime.

Iskur Specifications

Iskur is made of a steel frame with a reinforced plywood lumbar support frame for added weight tolerance. Frame and lumbar support are surrounded with memory foam and all of that is wrapped in cotton and polyester layer which is again wrapped in multi-layer synthetic leather making the chair very durable for long hours of daily use.

The chair also comes with a memory foam head cushion which is detachable and removable if you do not wish to use it. On the Razer website among specifications, it stands that the chair is best suited for persons from 5’6” – 6’2” (170 – 190cm) height and up to 299lbs (136kg).

Features

The chair has, of course, height adjustment as any gaming chair and surprisingly it has great control for the armrest. The armrest can be adjusted in 4 different ways: up & down, left & right, forward & backward, and inward & outward. The backrest can be also tilted up to 26 degrees angle.

All of these features are great and good but there is one more feature that really makes this chair stand out from rest and it is Lumbar support. Iskur has an adjustable lumbar support system on the lower part of the backrest. With your lumbar support secured, you can then make the necessary tweaks to optimize the rest of your posture using the Razer Iskur’s adjustable height, backrest, and armrests.

Conclusion

Razer Iskur is neither cheapest nor perhaps the best gaming chair you can buy, but it is a really good one. It is well manufactured and made to feel and look like a premium product that actually it is.

Do You Need Help with Your Device?

Our Team of Experts May Help
Troubleshoot.Tech Experts are There for You!
Replace damaged files
Restore performance
Free disk space
Remove Malware
Protects WEB browser
Remove Viruses
Stop PC freezing
GET HELP
Troubleshoot.Tech experts work with all versions of Microsoft Windows including Windows 11, with Android, Mac, and more.

Share this article:

You might also like

Fix 0xC03A0005 error in Windows 10
When performing a Windows Backup to the NAS device (backup to a network share) that is running Samba, fails with an error message The backup failed, The version does not support this version of the file format (0xC03A0005). The problem occurs because of a conflict with the VHD file that is created by Windows Backup and is mounted during the process. There are three types of VHD files:
  1. Fixed,
  2. Expandable
  3. Differencing
If the VHD file is a sparse file that is not supported by the native VHD driver, the mounting will fail, and you will get this error. An example VHD file is one that keeps expanding depending on the backup size. The problem occurs only in the case of  File Level backup (file/folders in a volume) but not on the block level backup as the vhd file is never mounted. However, in the case of File Level Backup, the vhd is mounted, created by Windows Backup, which does not support the mounting of sparse files.

The solution is to use Strict Allocate: option in the smb.conf file

Login to SMB using SSH. Open the configuration file using the VI editor located at /etc/samba/smb.conf. If the option is not there, you can manually add strict allocate = yes which will make sure there are no sparse file that is created.
Read More
How to remove AnytimeAstrology

AnytimeAstrology is a browser extension for Google Chrome developed by Mindspark Inc. When installed, this extension will change your default new tab page to a custom search provider called MyWay (search.myway.com).

While browsing the internet with this extension installed, you will see additional ads through your browsing sessions, including but not limited to Sponsored Content, Injected Ads and Pop-up Ads.

While AnytimeAstrology is active it will monitor your browsing habits, recording website visits, clicked links, viewed products, etc. This information is later sent back to Mindspark Ad network servers where it is used to better target additional injected ads into your web pages.

Several anti-virus applications have marked this extension as a Browser Hijacker and it is recommended to remove it from your computer.

About Browser Hijackers

Browser hijackers (also known as hijackware) are a kind of malicious software that modifies web browser configuration settings without the computer owner’s knowledge or approval. These hijacks are raising at an alarming rate globally, and it can be actually nefarious and often harmful too. Browser hijackers could do more than just changing homepages. In most cases, hijackers are created for the benefit of online hackers usually through income generation that comes from forced ad clicks and site visits. While it might seem harmless, these tools are made by malicious people who always try to take advantage of you, so that they can earn money from your naive and distraction. Browser hijackers can also permit other vicious programs without your knowledge to further damage your computer.

Key symptoms that your browser has been hijacked

The following are some symptoms that indicate you’ve been hijacked: 1. your homepage has been reset to some unfamiliar site 2. your browser is constantly being redirected to porn sites 3. default internet search engine is modified 4. you find unwanted new toolbars added 5. you observe a lot of pop-up ads on your screen 6. your browser has become unstable or starts running slowly 7. you can’t visit certain websites such as homepages of antivirus software.

How browser hijacker finds its way to your computer

Browser hijackers could use drive-by downloads or file-sharing websites or perhaps an e-mail attachment in order to reach a targeted computer. They could also come from add-on software, also referred to as browser helper objects (BHO), web browser extensions or toolbars. Browser hijackers sneak into your computer along with free software downloads that you unwittingly install along with the original. An example of some well known browser hijacker includes Conduit, Anyprotect, Babylon, SweetPage, DefaultTab, RocketTab, and Delta Search, but the names are constantly changing. The existence of any browser hijacker on your computer might considerably diminish the web browsing experience, monitor your internet activities that result in serious privacy issues, produce system stability issues and ultimately cause your PC to slowdown or to an almost unusable condition.

The best ways to remove a browser hijacker

Some hijackers can be simply removed by deleting the free software they came with or by eliminating any extension you have recently added to your system. The sad thing is, the majority of the software applications used to hijack a internet browser are deliberately built to be hard to eliminate or detect. Novice computer users should never attempt for the manual form of removal methods, since it calls for thorough computer knowledge to carry out repairs on the computer registry and HOSTS file. Installing and running anti-malware application on the affected system will automatically erase browser hijackers and other unwanted applications. SafeBytes Anti-Malware could counter persistent hijackers and give you proactive computer protection against all kinds of malware. Together with the anti-virus tool, a system optimizer, such as SafeBytes’s Total System Care, could help you in removing all linked files and modifications in the registry automatically.

How to Get rid of Malware that is Blocking Websites or Preventing Downloads

Malware could potentially cause a great deal of damage to your PC. Some malware sits in between the computer and the internet connection and blocks some or all websites that you really want to visit. It might also prevent you from adding anything to your PC, especially anti-malware software. If you’re reading this article, you may have got affected by a virus that prevents you from installing a security software like Safebytes Anti-Malware. Follow the instructions below to get rid of malware through alternate methods.

Eliminate malware in Safe Mode

If the malware is set to run immediately when Windows starts, entering safe mode could very well block the attempt. Just the minimum required programs and services are loaded when you start your PC in Safe Mode. To launch your Windows XP, Vista or 7 computer in Safe Mode with Networking, do as instructed below. 1) At power-on/startup, press the F8 key in 1-second intervals. This will invoke the Advanced Boot Options menu. 2) Select Safe Mode with Networking using arrow keys and press ENTER. 3) Once this mode loads, you will have an internet connection. Now, use your internet browser normally and navigate to https://safebytes.com/products/anti-malware/ to download Safebytes Anti-Malware. 4) As soon as the software program is installed, allow the scan run to eliminate trojans and other threats automatically.

Use an alternate web browser to download an antivirus application

Some malware mainly targets particular internet browsers. If this is your case, make use of another browser as it might circumvent the computer virus. If you suspect that your Internet Explorer happens to be hijacked by a virus or otherwise compromised by online hackers, the best plan of action is to switch to a different browser such as Mozilla Firefox, Google Chrome, or Apple Safari to download your favorite security application – Safebytes Anti-Malware.

Make a bootable USB anti-virus drive

To successfully eliminate the malware, you will need to approach the problem of running antivirus program on the affected PC from a different angle. Follow these steps to employ a USB flash drive to fix your infected PC. 1) Download the anti-malware program on a virus-free PC. 2) Insert the pen drive on the same system. 3) Run the setup program by double-clicking the executable file of the downloaded application, which has an .exe file extension. 4) When asked, select the location of the USB drive as the place where you want to put the software files. Follow the onscreen instructions to finish the installation. 5) Remove the pen drive. You can now use this portable antivirus on the affected computer. 6) Double-click the antivirus program EXE file on the thumb drive. 7) Run Full System Scan to detect and clean-up up all types of malware.

Protect Your Computer Against Viruses and Malware With SafeBytes Anti-Malware

Would you like to download the best anti-malware software program for your desktop? There are numerous applications in the market that comes in free and paid versions for Microsoft Windows computers. Some are good ones, some are ok types, while some are simply just bogus anti-malware software which will damage your personal computer themselves! You must pick one that is dependable, practical and has a strong reputation for its malware protection. On the list of recommended software programs is SafeBytes AntiMalware. SafeBytes has a really good history of excellent service, and customers appear to be very happy with it. SafeBytes antimalware is a highly effective and easy-to-use protection tool which is created for users of all levels of IT literacy. Through its cutting-edge technology, this software will help you protect your PC against infections brought on by different kinds of malware and similar threats, including adware, spyware, computer viruses, worms, trojan horses, keyloggers, potentially unwanted program (PUPs), and ransomware.

There are plenty of amazing features you will get with this security product. Listed below are some of the great features included in the application.

World-class AntiMalware Protection: This deep-cleaning antimalware program goes much deeper than most antivirus tools to clean out your computer system. Its critically acclaimed virus engine detects and disables hard to remove malware that conceals deep within your personal computer. Active Protection: SafeBytes delivers complete and real-time security for your computer system. They are highly effective in screening and removing numerous threats since they’re continuously improved with new updates and alerts. Safe Web Browsing: Through its unique safety ranking, SafeBytes tells you whether a site is safe or not to visit it. This will ensure that you’re always certain of your online safety when browsing the web. Faster Scanning: SafeBytes’s virus scan engine is among the fastest and most efficient within the industry. It's targeted scanning considerably increases the catch rate for malware that is embedded in various PC files. Lightweight Application: SafeBytes is a lightweight application. It consume a really small amount of processing power as it works in the background so you’re free to use your Windows-based PC the way you really want. 24/7 Premium Support: You can get absolutely free 24/7 technical support from their IT experts on any product queries or PC security concerns. SafeBytes has created a fantastic anti-malware solution to help you conquer the latest malware threats and virus attacks. You can be sure that your computer system will be protected in real-time as soon as you put this software to use. So if you are searching for the best anti-malware subscription for your Windows-based PC, we suggest the SafeBytes Anti-Malware application.

Technical Details and Manual Removal (Advanced Users)

If you wish to manually get rid of AnytimeAstrology without the use of an automated tool, it may be possible to do so by removing the program from the Windows Add/Remove Programs menu, or in cases of web browser plug-ins, going to the browser’s AddOn/Extension manager and removing it. You will most probably also want to totally reset your browser to its default configuration settings. Finally, examine your hard disk for all of the following and clean your computer registry manually to get rid of leftover application entries after uninstallation. Please remember that this is for professional users only and may be difficult, with wrong file removal leading to additional system errors. Additionally, some malicious programs have the capability to defend against its removal. You are urged to do this procedure in Windows Safe Mode.
Folders: C:\USERS\username\APPDATA\LOCAL\AnytimeAstrologyTooltab C:\Users\username\AppData\Local\Google\Chrome\User Data\Default\Extensions\bdcnkkhncapfcngcjkmfkikanomkgnmb\
Read More
Guide to Fixing 0x80040600 Error

What Is 0x80040600 Error?

The 0x80040600 error is a common error that becomes particularly distressing for Outlook users. This error prevents users from sending or receiving emails through Microsoft Outlook. Users may also encounter this problem while altering an entry on the calendar or adding a new contact. There is no obvious message that is displayed to the user when this error occurs. However, Outlook displays a vague message that includes the code 0x80040600.

Solution

Download available to recover all lost Outlook data

Restoro box imageError Causes

The primary cause of this error is a problem with the PST file. When the PST file is corrupt, missing, or damaged, this error occurs at once. The PST file is essentially an important file that stores crucial and personal information of an individual’s accounts. Sometimes this error is because the file is corrupt while at other times, the reason that it occurs is that the file is too full to accommodate any further information. Irrespective of the causes of this problem, it is important that this error is promptly fixed to ensure the proper and uninterrupted functioning of Outlook in the future.

Further Information and Manual Repair

The error occurs because the Outlook application encounters problems while attempting to receive, send or read emails. Some solutions that can work wonders and help you get rid of the problem are outlined below.
  • As soon as the error appears, the first solution is to restart the system. This is the first thing that must be done because a lot of times, these errors can be removed by simply restarting the system. This will, hence, save the user the inconvenience of manually fixing this problem.
If restarting the system doesn’t resolve the problem and the error message displays again, it is advised the user makes use of the ‘Inbox Repair Tool’. This is the most commonly used and effective approach to fixing a corrupt PST file. The procedure to remedy this Personal Storage Table file or PST file is listed below.
  • Go to the start menu. Type Run and launch the Inbox Repair Tool by typing the following path:  drive name: Program FilesCommon FilesSystemMapiLocale IDscanpst.exe. Now click Ok. A pop-up message will appear. Enter the file name and path of the damaged PST file. Now click on the Start button. Here it is important to mention that the inbox repair tool may take a long time depending upon the file size and the amount of data that has to be recovered. However, it is the most effective way of fixing this problem.
Read More
How to remove "program" from startup

Instaling and removing applications from your Windows can sometimes leave some traces that are unpleasant and can cause annoyances. One of these annoyances is the program in the startup section of the task manager.

If you ever opened task manager and went into the startup section trying to disable some of the startup items on your Windows boot there might be a chance that you have experienced and seen a program without any icon or information about it just sitting there.

Program inside task manager

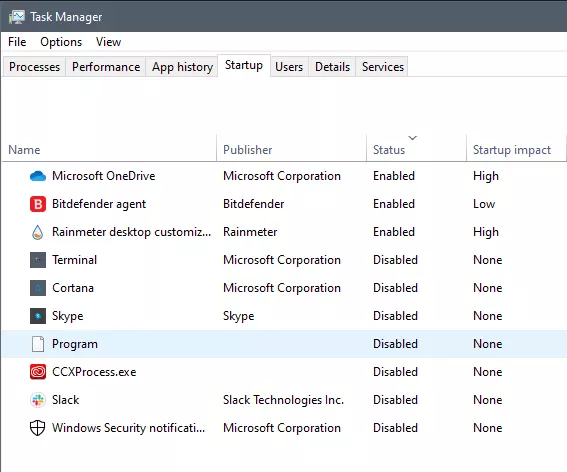
This is due to some applications being removed from the system but for some reason, it still shows itself in startup and it is quite annoying. So here we will show you how to get rid of this annoyance so your startup is clean again without junk in it.

Removing a program from startup

Locating the source of the issue

The first thing of course is to open the task manager itself and navigate to the startup tab. Inside the startup tab right-click on the column header and tick or enable Startup type and command line. Now you will see the location of the supposed file (that is missing or you could just go there by right-clicking on the item, but here it is greyed).

program in task manager with details

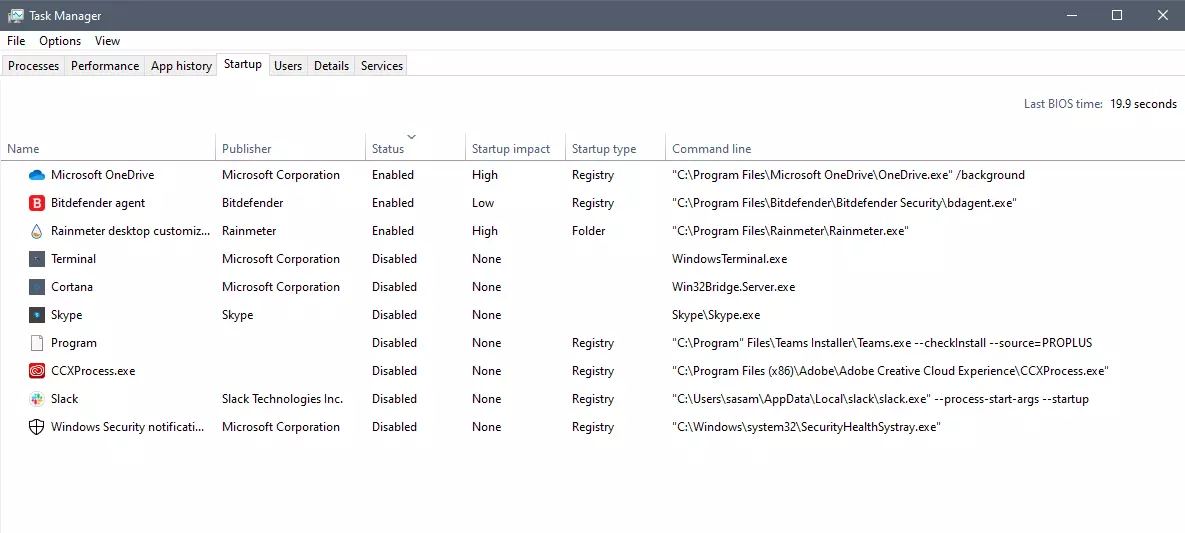
99% of the time startup type will be registry since the file is missing, if it was a file fix would be just to simply delete the file in the folder but since it was installed and not properly removed registry key is still present but the file cannot be found. After confirmation that the file is indeed missing and that the startup type is registry open the registry editor by typing Regedit in search and pressing enter.

Removing the key from registry

Inside Registry editor navigate to: HKEY_CURRENT_USER\SOFTWARE\Microsoft\Windows\CurrentVersion\Run. Inside on right part, you will see all auto-start entries added by installed applications.

regirsty editor

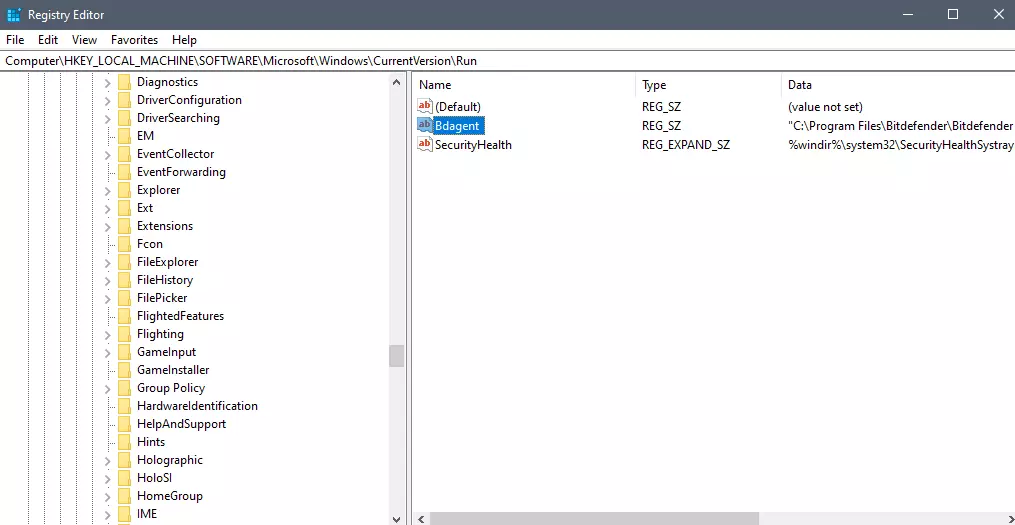
Locate one that is causing issues by comparing its path with the path inside the task manager command line and delete the key. Once the key is deleted right-click on RUN on the left part and choose HKEY_LOCAL_MACHINE to quickly jump on that key location and repeat the process of key deletion if needed. HKEY_LOCAL_MACHINE will delete startup entry for all users and sometimes entry will not be present here since the application is not installed for all users or there are no other users on the machine.

After the procedure is finished, reboot your systems in order to apply changes.

Read More
How to Fix CPU Not Compatible Error Message On Windows 10

CPU Not Compatible – What Is It

Some users wanting to upgrade to Windows 10 from Windows 7 or Windows 8.1 experienced errors with installation. One of these errors is CPU Not Compatible. When you click and run the “Get Windows 10” from your system tray bar, you’ll receive the “CPU is not compatible with Windows 10” error. When this happens, it might be good to check if there’s a bug or if your NX feature (a requirement for the Windows 10 installation) is enabled.

Solution

Restoro box imageError Causes

The “CPU is not compatible with Windows 10” error normally occurs when:

  • NX feature is not enabled
  • You experienced the Windows 10 bug

Further Information and Manual Repair

To successfully upgrade to Windows 10, your CPU must support Physical Address Extension (PAE), SSE2, and NX features. If any of these features are not activated on your system, it’ll cause the CPU not compatible error. However, some users still reported experiencing this error even though their CPU has these features activated. Normally, this is due to the bug that Windows acknowledged.

If any of these two scenarios apply to your computer, the following methods will help you fix the problem:

Method 1 – Check for bugs

The bug applies to some Windows 7 and Windows 8.1 systems. The bug occurs when the “Get Windows 10” app fails to recognize CPUs as being compatible. This produces a false negative result with a message, “Here’s why Windows 10 cannot be installed on this PC: The CPU isn’t supported”. To fix this bug, Microsoft released an update.

Unfortunately, the patch update (KB2976978 for Windows 8/8.1 and KB2952664 for Windows 7 SP1) to fix the bug may not be automatically downloaded to your computer. If this is the case, you need to verify first if the patch was installed correctly. To do this, follow the steps below:

  1. Click ‘Start’ and type in View Installed Updates. The “View installed updates” icon should appear. Click the icon.
  1. Go to the Search bar (Top right portion) then type the patch name for your system. Make sure that you type the correct patch name for your system since Windows 7 and Windows 8/8.1 have different names. If you find the patch, it means it’s already installed. You can now upgrade to Windows 10 without the CPU not-compatible error.
  1. But, if you can’t find it you need to install the patch manually.
  1. Go to Windows Update then click the “Check for Updates” button.
  1. Browse through the available updates and look for KB2976978 for Windows 8/8.1 or KB2952664 for Windows 7 SP1
  1. Download the right patch. You may need to reboot your system once it’s done.
  1. The downloaded patch should be applied after a day or two with the Windows Task Scheduler. Once the patch is applied, you can now upgrade to Windows 10.

Method 2 – Check CPU features and activate them if needed

A major requirement for Windows 10 upgrade is for the CPU to have Physical Address Extension (PAE), SSE2, and NX features enabled on your system. If you receive the CPU not compatible error, one possible cause is that any of the mentioned features are not available OR not enabled on your system. Here’s how you can fix this:

  1. Verify if your CPU supports the three instruction sets. You can use software that provides information like this. If all three are available, proceed to the next step.
  1. Go to your computer’s BIOS. To do this, reboot your computer. You will need to press a key specific to your computer’s manufacturer (usually it’s F12, F8, F2, or DEL).
  1. Look for the NX (No Execute Bit) settings. This is normally found in the “Advanced Configuration” menu, or something similar to this. Just take note that the NX setting can be named differently in BIOS. Some other names include EDB (Execute Disabled Bit), EVP (Enhanced Virus Protection), Execute Disabled Memory Protection or No Excuse Memory Protect.
  1. Once you’re in the NX settings, make sure that it’s enabled.
  1. Exit the BIOS and SAVE your changes.
  1. Boot your computer normally, then try upgrading to Windows 10 again through the “Get Windows 10” app found in the system tray.

Method 3 – Force enabling NX Bit

If changing the settings in your BIOS doesn’t do the trick, your final option is to force enable the NX bit in your Windows system. However, this is only applicable IF and ONLY IF your CPU does support it. To force enable NX bit, do the following:

  1. Click Start and go to command prompt (Type “cmd” – no quotes) and press enter.
  1. Copy and paste the text below to the command prompt.bcdedit.exe /set {current} nx AlwaysOn
  1. Execute the command. You will need to reboot your computer once this is done.
  1. Download and install Windows 10

Method 4 – Use a trusted automated tool

If you still experience the error after doing the methods above, you might want to try a powerful and trusted automated tool to fix the job.
Read More
An Easy Guide to Fixing Mingwm10.dll Error Code

Mingwm10.dll Error Code - What is it?

Mingwm10.dll is a dynamic link library file. This file is associated with the gaming program called the Adventures of Tintin developed for Windows OS by Ubisoft. Like all other DLL files, Mingwm10.dll file also contains small programs that are used to load and run this gaming program on your PC and several other programs developed by Ubisoft. Mingwm10.dll error code may occur when this file fails to run and load the Adventures of Tintin, the game on your PC. This error may appear on your PC in different formats such as:
  • "Mingwm10.dll not found."
  • "The file mingwm10.dll is missing."
  • "Cannot register mingwm10.dll."
  • "Cannot find C:\Windows\System32\mingwm10.dll."
  • "Mingwm10.dll Access Violation."
  • "Cannot start The Adventures of Tintin The Game. A required component is missing: mingwm10.dll.Please install The Adventures of Tintin The Game again."
  • "This application failed to start because mingwm10.dll was not found. Re-installing the application may fix this problem."

Solution

Restoro box imageError Causes

Mingwm10.dll error code is triggered due to a plethora of reasons. These include causes like:
  • Registry damage or corruption
  • Viral infection
  • Hardware failure
  • Corrupt or missing Mingwm10.dll file
Though this error is not fatal nonetheless it is advisable to fix it promptly to ensure you are able to access your desired program successfully without any restriction. Please note, this error can become a major PC threat as the underlying causes are registry corruption or viral infection.

Further Information and Manual Repair

Listed below are some of the best, proven, and easy DIY methods to help you resolve the Mingwm10.dll error code on your system. These are simple methods and require no technical expertise or know-how.

Method 1 - Restore the Missing File

As mentioned above DLL are shared files, there is a possibility that you accidentally deleted the Mingwm10.dll file on your system while uninstalling a program developed by Ubisoft. In such an event, the best and the easiest way to fix the error is to check your recycle bin and restore the deleted Mingwm10.dll file on your system.

Method 2 - Download Mingwm10.dll File from a Reliable Website

If you are unable to locate the missing Mingwm10.dll file in the recycle bin, then another method to fix the issue can be to download the Mingwm10.dll file from a trusted website. The reason why we say trusted is that viruses often enter computer systems when users download files from unreliable websites. So, to avoid bigger problems first make sure the site you select to download the Mingwm10.dll file is authorized and trusted.

Method 3 - Update Outdated Drivers

Hardware failure is related to outdated drivers. If the cause of the Mingwm10.dll error code is hardware failure, simply update the outdated drivers to resolve. Since the Mingwm10.dll file is used to run and load Adventures of Tintin, a gaming software program, then most probably the error is caused because of the outdated video card driver. Therefore update it to fix the issue. For this, go to the start menu, type Device Manager in the search bar. Once it opens use the driver update wizard to make updates. The wizard will walk you through the entire process, making the driver update task easy.

Method 4 - Repair the Corrupt Registry

The registry is the part that stores all the information and activities performed on your system. From important files to obsolete files it saves everything. If the obsolete files like the junk files, bad entries, invalid registry keys, and cookies are not removed from the registry frequently, these files accumulate in the registry and corrupt important system files like DLL files, popping error codes like Mingwm10.dll error. To resolve, download Restoro. It is a PC Fixer embedded with a  registry cleaner. The registry cleaner scans and removes all the obsolete files. It cleans the registry and the corrupted system files in just a few clicks, thereby fixing the problem. Click here to download Restoro to resolve the Mingwm10.dll error code on your PC
Read More
Instagram posts available now on computer
Instagram posting has been reserved for mobile phones for a very long time but in October 2021 that privilege has come to an end. Instagram added the long-awaited ability to post to Instagram from the website. You get nearly all of the same filters and editing tools that you can find in the iPhone and Android app, too. Instagram logoIn order to post via computer on your Instagram account all you need is a browser. The first step, of course, is to go to instagram.com and login into your account, if you do not have an account, you can make one for free. Next, click on the + icon in the upper right corner. Create a new post screen will open, in this screen click on the Select from computer blue button on the bottom. The file manager will open, choose your desired photo and confirm. After that, you will be presented will an adjustment screen for a photo, here you can crop the photo, zoom in, adjust the aspect ratio, or if you wish add more photos to create a slide show. Once you are done will all of these adjustments, click on Next in the upper right. From there you will be taken into a filter screen where you can apply one of many filters or if you want, you can adjust brightness, contrast, saturation, temperature, etc. just like in the application on your phone. Once you have the desired result, again click on Next in the upper right part of the screen. Lastly, you will be given an option to write a caption for the photo if you wish and add a location. Once this step is finished you can post the feed by clicking on share in the upper right part. That is all to it, just like in a mobile application you can now use your computer for Instagram posting.
Read More
Repairing a corrupt Group Policy in Windows
If you recently made some changes in your Windows 10 computer using the Group Policy Editor but they were not reflected and you got errors instead, it could be that your Windows computer wasn’t able to read the Group Policy file (registry.pol). To resolve this kind of issue, you have to repair the potentially corrupted Group Policy using the options given in this post. .As you know, Group Policy is a feature in the Microsoft Windows Active Directory which allows an admin to make changes in the features on Windows PCs that are on the network. So if the modifications you just made weren’t successfully applied, then there could be something wrong with the registry.pol file on the client or it could also be that the Group Policy folder is missing. To fix this issue in the Group Policy, you need to refer to the given suggestions below and make sure that you have admin privileges as you execute them.

Option 1 – Try to delete or recreate the missing registry.pol file

The entire settings of the Group Policy are stored in the registry.pol file so if it went missing, all the changes you make will not be reflected. The good thing is that you can recreate it but if the file exists and is corrupted, you need to delete it first before you recreate it.
  • First, go to the C:/Windows/System32/GroupPolicy/Machine location.
  • And from there, check if the registry.pol file exists or not. If it’s there, just delete it permanently by tapping the Shift + Delete keys.
  • Now it’s time to recreate the file. Just open Windows PowerShell with admin privileges by tapping Win + X + A keys.
  • After opening PowerShell, type this command: gpupdate /force
  • The command you entered will recreate the registry.pol file and will refresh the Group Policy. Restart your computer.

Option 2 – Try recreating the secedit.sdb file

The security settings of Group Policy are stored in the secedit.sdb file so if you made some changes to security and they weren’t reflected, you can try to delete and recreate the secedit.sdb file instead of deleting the Group Policy file. All you have to do is navigate to the C:/WINDOWS/security/Database folder and look for the secedit.sdb file and rename it or move it to another folder. After that, restart your computer. Once your computer has restarted, the secedit.sdb file will be created again.

Option 3 – Try to reset the Group Policy to default

You can also try to reset the Group Policy back to its default state. There are several ways you can do that. You can either use the gpupdate or the secedit command in the Windows PowerShell to do that. Resetting the Group Policy will resolve any issues that could be caused by its current settings.

Option 4 – Try to perform System Restore

System Restore can also help resolve the Group Policy issue. It could be that prior to the issue, you’ve made some changes in the system that might have affected the Group Policy. To undo these changes, perform System Restore.
  • First, tap the Win + R keys to open the Run dialog box.
  • After that, type in “sysdm.cpl” in the field and tap Enter.
  • Next, go to the System Protection tab then click the System Restore button. This will open a new window where you have to select your preferred System Restore point.
  • After that, follow the on-screen instructions to finish the process and then restart your computer and check if the problem is fixed or not.

Option 5 – Use the DISM tool

You can also try running the Deployment Imaging and Servicing Management or DISM tool. This tool will repair the Windows System Image as well as the Windows Component Store in your Windows 10 computer. So if there are any missing or corrupted folders and files, the DISM tool can restore and repair them. As a result, any system consistencies and corruptions will be fixed. To run this tool, follow these steps:
  • Tap the Win + X keys and click on the “Command Prompt (Admin)” option.
  • After that, input each one of the commands listed below sequentially to execute them:
    • Dism /Online /Cleanup-Image /CheckHealth
    • Dism /Online /Cleanup-Image /ScanHealth
    • Dism /Online /Cleanup-Image /RestoreHealth
  • Once you’ve executed the commands given above, restart your computer.
Read More
Could not configure one or more components
If you are trying to install or upgrade your Windows 10 computer but suddenly encountered an error message saying, “Windows could not configure one or more system components”, read on as this post will show you how you can fix the problem. You are not alone in experiencing this problem as other users also reported having the same scenario. Some of them reported getting the following error message:
“Windows could not configure one or more system components. To install Windows restart the computer with error code 0xc1900101-0x30018.”
When you check on the Windows 10 rollback log, you will see a part with the “iisetup.exe” that’s related to the abort. Usually, the upgrade process completes over 50% and gets stuck and then rolls back later on and generates the error logs. This kind of error, in most cases, appears during the upgrade of Windows 10 and is related with the Internet Information Services or IIS in Windows 10. For some unknown reason, it restricts the installation or the upgrade which causes the error to appear. To fix the “Windows could not configure one or more system components” error, you can try to remove the IIS from the Windows Features or rename the “inetsrv” folder. You could also move all the folders related to IIS to another drive. For more details, refer to the options provided below.

Option 1 – Try to remove the IIS from Windows Features

The IIS is installed from the Windows Features and you can find it at Control Panel > Programs. From there, uncheck the checkbox for the Internet Information Services. Once done, click on the OK button to save the changes. Note that this process will get rid of all the related programs, services, and folders from Windows 10. So if you want to, you can just install them later on or use an offline installer from the official site of Microsoft.

Option 2 – Try renaming the inetsrv folder

The next option you can check out to resolve the problem is to rename the “inetsrv” folder. If you have uninstalled IIS from the Windows Features, this should remove the folders as well, however, it didn’t remove the folder then you have to delete the folders that are related to the IIS by following these steps:
  • First, you have to boot into the Advanced Recovery Mode and from there, open Command Prompt.
  • Next, execute this command to rename the folder from this location, C:Windowssystem32inetsrv: rename C:/Windows/system32/inetsrv/inetsrv.old
  • Once done, boot into your computer normally and try to upgrade Windows 10 again, and check if the problem is fixed or not.

Option 3 – Try to move the folders related to IIS to a different drive

  • Tap the Win + R keys to launch the Run utility and type “services.msc” in the field and hit Enter to open the Windows Services Manager.
  • Next, look for the Application Host Helper Service from the list of services and stop it.
  • Once done, take ownership of the “WinSxS” folder and then move the *windows-iis*.*” folders to another drive. You can just search using the “*windows-iis*.*” keyword in the Start Search.
  • Next, tap the Ctrl + X keys and paste the folders to another drive.
  • After that, start the update process for Windows 10 again.
Read More
A Quick Guide to Fixing the Flash.ocx Error on Your PC

Flash.ocx Error - What is it?

To understand this error, first, it is important to understand what Flash.ocx actually is. Flash.ocx is basically a flash plug-in or ActiveX file that is responsible for the adobe flash player to work on the system. The Flash.ocx error triggers due to issues in the Adobe flash player.

Solution

Restoro box imageError Causes

The error Flash.ocx may occur due to many reasons. These include:
  • Flash player corruption
  • Corrupted and broken Active X components
To this error code is not fatal but nonetheless it is still advisable to fix it right away to avoid inconvenience when using Flash player. The inability to run the Flash Player smoothly will hinder you from watching videos on your PC and playing exciting web-based games.

Further Information and Manual Repair

To resolve this error on your system, you don’t have to hire a professional and spend hundreds of dollars. This error code is quite easy to fix. You don’t need to be technically sound to resolve this error code. Simply follow the methods give below to fix the Flash.ocx error code in a few minutes.

Method 1: Reinstall the Flash Player

If the error occurs due to the corruption of the Flash Player, then it is advisable to reinstall the player on your PC. However, before you do that first remove the previous versions of Adobe Flash Player on your system. If the previous corrupted version is not removed properly, then you will be unable to re-install it properly on your PC again. Go to the Add/Remove Programs and find the Flash Player and uninstall it. Make sure the files are also removed from the registry. Once you have successfully uninstalled the corrupted version, now go to the official website of Adobe Flash Player and download the utility from the website. Install it and run it on your system. If it works, then this means the error is resolved. However, if the error still persists, then try method 2.

Method 2: Download Restoro to Fix Active X components

Another reason for Flash.ocx error code can be broken or corrupted Active X components. If this is the issue, then the best way to resolve it is to download Restoro. This is a multi Reimagefunctional and advanced PC Fixer deployed with multiple high-performance scanners including Active X and Class scanner. The Active X and Class scanner perform an entire PC scans for corrupt and broken Active X entries along with missing software paths and invalid combinations. After the scanning process is complete, it repairs and restores the components back to normal. Thereby resolving the Flash.ocx error right away and ensuring smooth video browsing over the web. Restoro is an efficient and a safe program. It has a user-friendly interface and easy navigations. It can be used by all level of users. Besides the Active X scanner, it includes 5 more value-added utilities like a registry scanner and an antivirus to name a few. It is compatible with all Windows versions Click here to download Restoro on your PC and resolve Flash.ocx error code now!
Read More
1 2 3 171
Logo
Copyright © 2023, ErrorTools. All Rights Reserved
Trademark: Microsoft Windows logos are registered trademarks of Microsoft. Disclaimer: ErrorTools.com is not affiliated with Microsoft, nor claims direct affiliation.
The information on this page is provided for information purposes only.
DMCA.com Protection Status