Logo

Microsoft Surface Go 2 review

The new upgraded Surface Laptop Go 2 is the new iteration of the affordable original Surface Laptop Go aimed to offer good performance at a lower price of under $1000. The new version is not anything vastly different from the original but it comes with much-needed upgrades.

microsoft surface go 2 laptop

The biggest and main upgrade is the CPU, the Surface Laptop Go 2 is packing now Intel Core i5 1135G7, an Intels 11th generation CPU that should increase battery life. The laptop is also coming with an improved WEB camera and the cheapest one comes now with 128GB of storage instead of 64GB. Price went up from $550 to $599 which is not a big increase considering what was upgraded.

The bad news of new models is that sadly they are still packing only 4GB of RAM, that's really not enough for most applications released in 2022 and the screen is having a relatively low resolution of 1536 X 1024.

Microsoft is still offering all the color variations as in its first offering but added as well a new Sage color that is muted green in tint.

When we look at hardware it seems a little weak but for this price, there is not much competition in the field, and after all this line of models is aimed to provide good performance for an affordable price. If you really need something better you will go with a standard Surface or MAC book instead.

The new laptops are available to pre-order at Best Buy and Microsoft’s online store, and they’ll start shipping on June 7.

Do You Need Help with Your Device?

Our Team of Experts May Help
Troubleshoot.Tech Experts are There for You!
Replace damaged files
Restore performance
Free disk space
Remove Malware
Protects WEB browser
Remove Viruses
Stop PC freezing
GET HELP
Troubleshoot.Tech experts work with all versions of Microsoft Windows including Windows 11, with Android, Mac, and more.

Share this article:

You might also like

Manually cleaning your PC registry
Manually cleaning your PC registry may be the worst or best thing you ever decide to do. Registry keys that lie around on your computer, unused, can cause your computer to lag. This can end up in your computer not being able to load the easiest of programs and being slow at loading anything, let alone something that would take up a decent amount of memory. If your computer has slowed to almost an absolute stop, it is most probably the registry’s fault and the only option then is to clean it. You can get programs to do this for you, but they can be riddled with inaccuracies and viruses that could harm your computer even more. This is why some people choose to manually edit their computer. However, this is not without its flaws.

Registry Keys

Registry keys tend to have really long names. These names will be full of numbers and hyphens and will most likely give you no indication of what they do. Even some computer experts find it hard to understand what every computer’s registry keys do. This can make it very hard to see which ones are causing the problem; and if you don’t know what’s causing the problem, then there is no way you will be able to fix it. Some registry keys will be completely menial in what they do but some could be vital to even allow Windows to work on your computer.

Manual Registry Repair

Registry keys can also cause huge problems if you manually delete the wrong one. A lot of registry cleaners have the option to revive a key that they have deleted on you, which means that fixing an error that they made would be easy enough to do. However, when you manually delete registry keys, it will be an awful lot harder to get them back to work again afterward. This can cause your computer many problems and if you delete even one wrong key it is possible your computer will not even start. With the horrid naming system they have as well, it makes it very hard to determine what is important and what is not, which means it is all too likely that you will delete something important. However, those are the risks you have to take when you are cleaning out your registry. A registry cleaner has the same likelihood of messing with your computer and deleting something wrong that you have, so it is the same either way however a registry cleaner will do it with less hassle. But, some people say that if you do it yourself, it’s more likely to be right; that is why they prefer to do it manually and that is alright.

Conclusion

So, if you are manually deleting your registry keys that are unused, you’ll have to use a program that comes with Windows known as ‘regedit.exe’ which is incredibly difficult to use but may just be worth the hassle in the end. So, you don’t really need to put up with a slow computer, but be careful when messing with your registry manually! To repair and resolve this and other PC-related issues Click Here to download Restoro.
Read More
An Easy Fix For Error 2032

What is Error 2032?

Error 2032 is a Windows stream error. The error is generated when running applications like Flash. It shows that the application is unable to request ads from server.

Error Causes

The error 2032 is triggered due to multiple reasons including:
  • The URL cannot be located or is blocked
  • HTTP Service is not found
  • Incorrect proxy settings
  • Automatic cookies handling
  • Corrupt Flash Player
  • Viral infection
  • Registry issues

Further Information and Manual Repair

Here are some easy and best do it yourself methods to resolve the error 2032 on your system:

Fix the Proxy Settings

To do this, first, go to the start menu and press RUN, type regedit in the RUN box and press enter. Now from the left-hand panel of the registry path open: HKEY_CURRENT_USERSoftwareMicrosoftWindowsCurrentVersionInternet Settings. Now double click the proxyenable string and replace its value with 0. After that, right-click on proxy server and select delete option. Then exit Regedit and restart your PC to activate changes.

Verify the URL

Sometimes the error 2032 may be generated due to wrong or incorrect URL in the HTTP Service URL property. So, verify your URL and look for typos. Specifying the correct URL can fix the error right away.

Check Cookies Handling

Automatic cookies handling can also trigger this error code. Therefore, to resolve the error, it is advisable to disable automatic cookies handling. This can be done by launching your web browser. Go to tools and then press the privacy tab. Now click on the advance tab from settings and un-check override automatic cookie handling. To confirm changes press OK.

Uninstall and then Reinstall the Flash Player

It is possible your Flash Player is corrupt. Therefore, another way to fix error 2032 is to uninstall the Flash Player and then reinstall it on your system.

Scan for Viruses

Programs usually get corrupted due to two reasons, viruses or registry issues. Therefore, to remove viruses on your PC, download and run an antivirus program.

Clean and Restore Registry

Also, clean the registry.
Read More
Easy Methods of Fixing Error 1706

What is Error 1706?

Error 1706 is a Windows PC error. It occurs when you insert a Microsoft CD-ROM either to repair an Office or to install a feature set to Installed on First Use. The error message is displayed in the following format: Error 1706. Setup cannot find the required files. Check your connection to the network, or CD-ROM drive. For other potential solutions to this problem, see C:\Program Files\Microsoft Office\Office101033\Setup.hlp.

Solution

Restoro box imageError Causes

Error 1706 may occur due to several reasons. These include:
  • You originally installed MS Office from a network administrative installation
  • You are trying to use Office CD-ROM when the error is prompted by the Windows Installer for an Office source location
  • Viral Infection

Further Information and Manual Repair

The good news is that this error code is not fatal. However, to avoid inconvenience, it is recommended to resolve the error right away. To fix the problem you don’t have to be a computer programmer or hire one. In fact, this error code can be resolved quite easily. Here are some of the best and easiest do it yourself methods to resolve error 1706 on your PC:

Method 1

To resolve this issue find a different administrative installation for the Office source file location. To do this, go to the start menu and then click run. In the open box, simply type this command line new network pathSetup.exe /fvm package name.msi and press OK to continue and update changes. Once the update is complete and finished press OK to save and proceed. Please note after you follow these steps, the Windows Installer uses this new server location whenever it needs to reinstall, repair, or add a feature to your Office Installation.

Method 2

Another alternative method to resolve this method is to use CD-ROM for the Office Source Location. To do this you will have to remove Office and then re-install Office from the CD-ROM. Here are the steps to remove the Office program. First, quit all Office programs.
  1. Go to the Control Panel then click on the Program and Features option.
  2. Now double click the Add/Remove programs and remove the entry for the Microsoft Office 2003 or Microsoft Office XP product installed on your PC.
  3. After that, click on the Maintenance Mode Options dialog box, select Uninstall Office, and then click Next to proceed.
  4. Click Yes to confirm changes.
  5. Now insert Office 2003 or Office XP CD-ROM and follow the setup dialog boxes to reinstall the program on your system from CD-ROM.

Download Restoro to Correct Registry Errors

However, to ensure the installation is successful this time around, it is advisable to clean the registry and ensure the uninstalled program is not located in the registry. To do this, download Restoro and run it on your computer. This is a powerful PC Fixer integrated with a registry cleaner. The registry cleaner wipes out all the unnecessary files and uninstalled program files saved in the registry. Once the registry is cleaned, try reinstalling MS Office again. This will resolve the error 1706. Click here to download Restoro and repair error 1706.
Read More
How to Repair Windows 10 Error 0x800F0922

Error Code 0x800F0922 – What is it?

Error Code 0x800F0922 refers to an issue with downloading the newest version of Microsoft Windows, Windows 10. It could mean that your PC doesn't have enough free space in the System Reserved partition, or that it couldn't connect to the Windows Update servers. This issue is not very common, most users will never see this error code. Some, however, will need to follow the below fixes in order to download and upgrade their systems properly. Common symptoms include:
  • Dialog box appears with the Error Code 0x800F0922
  • Microsoft Windows 10 upgrade is unsuccessful and/or incomplete
  • Users are unable to open applications after attempting the Microsoft Windows 10 upgrade

Solution

Restoro box imageError Causes

There are two standard reasons why this error occurs during the Microsoft Windows 10 upgrade.
  • There may not be enough free space in the “System Reserved” partition of your hard drive.
  • Error Code 0x800F0922 could also mean that your PC was not able to successfully connect to the Microsoft Windows update servers due to a VPN (virtual private network) connection in your home or office network.
  • The .Net framework installation portion of the Windows 10 upgrade fails.

Further Information and Manual Repair

Error Code 0x800F0922 as stated is somewhat rare, but it does occur occasionally. Users who have experienced this error while attempting to upgrade their system to Microsoft Windows 10 have the following options for do-it-yourself fixes.

Method 1:

Use this method if you are operating on a network that uses a VPN connection.
  1. Disconnect from your office or home network.
  2. Turn off your VPN software.
  3. Run the Microsoft Windows 10 upgrade.
  4. Restart your PC.
  5. Reconnect to your home or office network.
  6. Turn your VPN software back on.

Method 2:

This will run the Windows 10 Update troubleshooter that is built into your PC.
  1. Click on the Windows icon on the lower-left corner of your desktop.
  2. Press the “w” key to open the SEARCH function.
  3. Type “troubleshooting” in the search field and press ENTER
  4. When the troubleshooting window opens, select the “view all” option from the left window pane.
  5. Select “Windows update”.
  6. Select “advanced” and then choose the “run as administrator” option.
  7. Click the NEXT button and follow the on-screen prompts.
  8. This troubleshooter will walk you through the steps needed for your specific situation.

Method 3:

This method will run the DISM (deployment image servicing and management) tool built into your PC.
  1. Press the “windows key” on your keyboard followed by the “x” key.
  2. Select the “command prompt admin” option.
  3. Type the command “exe /online /cleanup-image /scanhealth” into the command prompt field and press ENTER.
  4. Wait for the scan to run completely.
  5. When the scan is complete, a message will appear telling you that “the operation completed successfully”.
  6. Type the command “dism.exe /online /cleanup-image /restorehealth” into the command prompt field and press ENTER.
  7. This will take a while to run completely, but it will restore any missing or corrupted files necessary for the Microsoft Windows 10 update.
  8. Restart your computer.
  9. Attempt the Windows 10 upgrade again.

Method 4: Use this option if you believe the issue is a result of the .NET framework being disabled.

  1. Press the “windows” key followed by the “x” key.
  2. Select the “control panel” option.
  3. When the control panel window opens, click your cursor in the search field on the upper right hand corner.
  4. Search for the phrase “windows features”, then select the link “turn Windows features on or off”.
  5. Select the check box (add a check) to the box next to “.Net framework”.
  6. Click the OK button.
  7. Proceed with your Microsoft Windows 10 upgrade.
To resolve this, all you need is third-party software to increase the size of the System Reserved partition. One of the four methods listed above should fix your Error Code 0x800F0922 issue and allow for a successful Windows 10 upgrade. On an occasion where there isn't enough space, use third-party software to increase the size of the System Reserved partition.  If you do not possess the technical expertise required to accomplish this yourself or do not feel comfortable doing so, download and install a powerful automated tool to get the job done.
Read More
Fix Windows Update error 0x80244022
Installing Windows Updates in your Windows 10 computer does not always go smoothly as there are instances when you could encounter some errors along the way. One of these errors is error code 0x80244022 –WU_E_PT_HTTP_STATUS_SERVICE_UNAVAIL HTTP 503. This kind of error can be encountered when you check, download or install any updates. At the time of writing, it isn’t known yet what the exact cause of this error is. However, there are some potential fixes you can check out to fix it. When this error occurs, you will see the following error message on your screen:
“There were some problems installing updates, but we’ll try again later. If you keep seeing this and want to search the web or contact support for information, this may help: (0x80244022).”
To fix error code 0x80244022, refer to the potential fixes provided below.

Option 1 – Disable the Proxy server

The first thing you can do is to try disabling the Proxy server as it might be the reason why you’re getting error 0x80244022 for Windows Updates. To disable the proxy server, refer to the steps below.
  • Tap the Win + R keys to open the Run dialog box.
  • Then type “inetcpl.cpl” in the field and hit Enter to pull up the Internet Properties.
  • After that, go to the Connections tab and select the LAN settings.
  • From there. Uncheck the “Use a Proxy Server” option for your LAN and then make sure that the “Automatically detect settings” option is checked.
  • Now click the OK and the Apply buttons.
  • Restart your PC.
Note: If you are using a third-party proxy service, you have to disable it. In addition, if you are also using a VPN, you can try to disable it as well.

Option 2 – Run the DISM tool

You can run the DISM tool as well to help fix the error code 0x80244022 during Windows Update. Using this built-in tool, you have various options such as the “/ScanHealth”, “/CheckHealth”, and “/RestoreHealth”.
  • Open the Command Prompt with admin privileges.
  • Then type in the following commands and make sure to hit Enter right after you type each one of them:
    • Dism /Online /Cleanup-Image /CheckHealth
    • Dism /Online /Cleanup-Image /ScanHealth
    • exe /Online /Cleanup-image /Restorehealth
  • Do not close the window if the process takes a while as it will probably take a few minutes to finish.

Option 3 – Perform a System File Checker scan

The SFC or System File Checker scan could detect and automatically repair damaged system files that could be causing error code 0x80244022 to appear when you try to update your Windows 10 computer. SFC is a built-in command utility that helps in restoring corrupted files as well as missing files. It replaces bad and corrupted system files with good system files. To run the SFC command, follow the steps given below.
  • Tap Win + R to launch Run.
  • Type in cmd in the field and tap Enter.
  • After opening Command Prompt, type in sfc /scannow and hit Enter.
The command will start a system scan which will take a few whiles before it finishes. Once it’s done, you could get the following results:
  1. Windows Resource Protection did not find any integrity violations.
  2. Windows Resource Protection found corrupt files and successfully repaired them.
  3. Windows Resource Protection found corrupt files but was unable to fix some of them.
  • Once done, restart your computer.

Option 4 – Try disabling the Firewall or antivirus program

Disabling the antivirus program or Firewall or any other security software installed in your computer is always a good idea you can try when the Windows Update process does not go smoothly. So before you try updating your computer again, make sure to disable the antivirus or security program and once the Windows Update is done, don’t forget to enable the antivirus program back again.

Option 5 – Try resetting the Windows Update components

  • Open Command Prompt with admin privileges.
  • After that, type each one of the following commands and hit Enter after you key in one after the other.
    • net stop wuauserv
    • net stop cryptsvc
    • net stop bits
    • net stop msiserver
Note: The commands you entered will stop the Windows Update components such as Windows Update service, Cryptographic services, BITS, and MSI Installer.
  • After disabling WU components, you need to rename both the SoftwareDistribution and Catroot2 folders. To do that, type each one of the following commands below, and don’t forget to hit Enter after you type one command after the other.
    • ren C:/Windows/SoftwareDistribution/SoftwareDistribution.old
    • ren C:/Windows/System32/catroot2/Catroot2.old
  • Next, restart the services you’ve stopped by entering another series of commands. Don’t forget to hit Enter after you key in one command after the other.
    • net start wuauserv
    • net start cryptsvc
    • net start bits
    • net start msiserver
  • Close Command Prompt and reboot your PC.

Option 6 – Run the Windows Update Troubleshooter

You might also want to run the Windows Update Troubleshooter as it could also help in fixing Windows Update Error. To run it, go to Settings and then select Troubleshoot from the options. From there, click on Windows Update and then click the “Run the troubleshooter” button. After that, follow the next on-screen instructions and you should be good to go.
Read More
How to Fix Error 118

Error 118 - What is it?

Error 118 is a typical Google Chrome error. It pops up when Google Chrome fails to load websites like Facebook. It is usually displayed in the following format:
‘Error Message: Error 118 (net::ERR_CONNECTION_TIMED_OUT): The operation timed out.’

Solution

Restoro box imageError Causes

Error 118 may be triggered due to several reasons. This includes:
  • Problems with DNS setting
  • IP Address is filtering websites
  • Cookies and invalid registry entries

Further Information and Manual Repair

To ensure smooth internet browsing on Google Chrome, it is advisable to repair the error 118. If error 118 is not resolved you will be unable to load and access your desired websites. To avoid inconvenience and resolve the issue immediately, try the methods suggested below. These are easy and effective do-it-yourself methods that require no technical skills.

Method 1 - Change Proxy Settings

If your IP address is filtering websites, then you might experience error 118 while using Google Chrome. When this is the error cause, then it is advisable to add a proxy for your PC. To change proxy settings and add a new proxy, simply click on Customize and Control Google Chrome menu. Now click the options button. Under the Google Chrome Options window select the Under the Hood tab. After that in the Network, section click the change proxy settings button. Check Show Suggestions for navigation errors and Use DNS pre-fetching to improve page load performance boxes. Now under Internet Properties, click LAN Settings. Under LAN settings you will see the Proxy Server box, check it, and enter your new proxy settings. Click OK to confirm and save settings. This will hopefully resolve the issue.

Method 2 - Change to Google DNS

When the error is related to DNS settings then try this method to resolve it. Simply set DNS to use Google DNS. Here’s how it’s done:
  1. Go to the start menu, click Windows Control Panel, Network and Internet, and change adapter settings. Here you will see Local Area Connection.
  2. Right click to select properties at the bottom.
  3. Check Internet Protocol Version 4 and click properties.
  4. Now check the ‘Obtain an IP address automatically’ box and also select the option that says ‘Use the following DNS server addresses’.
  5. Change Preferred DNS to 8.8.4.4 and Alternate DNS server to 8.8.8.8 now click OK to confirm.

Method 3 - Remove the Bad Entries and Cookies Damaging the Registry

Bad entries and cookies saved in the registry can also trigger error 118. To fix the issue immediately download Restoro. This is PC Fixer with multiple utilities including a registry cleaner. The registry cleaner removes all bad entries and cookies in seconds and repairs the damaged registry. Click here to download Restoro and resolve error 118.
Read More
Update cannot currently check for updates
If you receive an error message saying, “Windows Update cannot currently check for updates because updates on this computer are controlled”, while trying to change the Windows Update preferences or manually update, then read on as this post will guide you in fixing it. You can mostly encounter this error in managed systems where an Administrator controls the permission on the operating system. The reason why you are not able to modify the Windows Update preferences or manually update your system is that a group policy prevents you from doing so and that the only user who can do these things is none other than the administrator of the system. Troubleshooting this kind of problem is the same as when you troubleshoot an error message that says, “Some settings are managed by your organization”. In such cases, you need to check both the Windows Update Group Policy and Registry settings. If you’re just a standard user, you have to contact your system administrator regarding this issue and if you are the administrator, you can make adjustments to the system settings via the Registry Editor and the Group Policy Editor. Refer to the instructions given below for detailed instructions.

Option 1 – via the Registry Editor

If you are using the Home edition of Windows 10 and you want to change the policy for non-admin users on your local computer, then you can use the Registry Editor for that. Here’s how you can do it:
  • Tap the Win + R keys to open the Run dialog box.
  • Then type “Regedit” in the field and hit Enter to open the Registry Editor.
  • After that, navigate to the following registry key:
HKEY_LOCAL_MACHINESOFTWAREPoliciesMicrosoftWindows
  • From there, look for the key named “WindowsUpdate” in the Windows folder and if it does not exist, you can just right-click on the Windows folder and select New > Key.
  • Now name the new key “WindowsUpdate” and create a new sub-key under the newly created key and input “AU” as its name.
  • Keep AU selected and then right-click anywhere in the right pane and select New > DWORD (32-bit) Value.
  • Then name the Value as “AUOptions” and right-click on AUOptions and select Modify.
  • Next, change the value of the Value data to “5” and click OK to save the changes made to the settings. Note that the Value Data of 5 refers to the policy to allow the local admin to choose the setting.
  • Now restart your computer once you’re done and check if non-admin users can now modify the Windows Update settings or update Windows.

Option 2 – via Group Policy Editor

  • Tap the Win + R keys to open the Run dialog box and then type “gpedit.msc” and hit Enter to open the Group Policy Editor.
  • Next, navigate to this folder: Computer Configuration > Administrative Templates > Windows Components > Windows Update.
  • Now look for the “Configure Automatic Updates” policy on the right pane and double click on it to open its Properties.
  • After that, shift the Radio button to “Enabled” and from the drop-down menu for Configure automatic updating, select option 5: Allow local admin to choose the setting.
  • Then click on Apply and OK to save the changes made to the settings.
  • Restart your computer and check if the problem’s fixed or not.
Read More
Chrome browser downloads stuck at 100%
These days, Google Chrome is definitely one of the most used browsers in the browser. Google has almost created a nearly perfect product that rarely experiences problems. However, a lot of users have reported an issue where some files they’re downloading or their downloads in their Google Chrome browsers are stuck at 100%. So if you are one of these users, read on as this post will guide you on what you can do to resolve the problem. This kind of problem could be caused by several factors. It is possible that the file download process could be blocked by a third-party antivirus or it could be that the content-length header could be missing from the server. Aside from that, a Google Chrome extension could also be the culprit or it could be that the current installation of the browser could be corrupted. This kind of problem can get really annoying as the download process has already utilized system resources as well as take up your time. Thus, you need to fix the problem using several suggestions. You can try to clear the browser cache, disable the Chrome virus scan, whitelist the file on the third-party antivirus program, put your browser in Incognito mode and download the file again. On the other hand, you could also try to reset or reinstall the browser. For more details, follow the options provided below.

Option 1 – Try to clear browser cache and try downloading again

There are times when some data in the browser is conflicting with the loading of the website and triggers some problems like download getting stuck at 100%. And so you can try to clear your browser’s data. This might be a very basic solution but oftentimes it works in fixing this kind of error in Google Chrome. Follow the steps below to clear the data in your browser.
  • Open your Google Chrome browser.
  • After that, tap the Ctrl + H keys. Doing so will open a new panel that allows you to delete the browsing history and other data in your browser.
  • Now select every checkbox that you see and click on the Clear data button.
  • Then restart your Chrome browser and check if you can now complete the download again.

Option 2 – Try disabling Chrome virus scan

The next thing you can do to resolve the problem is to disable the Chrome virus scan. It is possible that the virus scan is the one that’s preventing the download to be completed, thus, try to disable it and see if it works.

Option 3 – Whitelist the file you’re downloading in your antivirus program

The download getting stuck might also be caused by your antivirus program which could be interfering it from running. To fix this, you have to whitelist dism.exe. How? Refer to these steps:
  • Open the Windows Defender Security Center from the system tray area.
  • Next, click the “Virus & threat protection” option and then open the “Virus and threat protection settings”.
  • After that, scroll down until you find the “Exclusions” and click on the “Add or remove exclusions” option.
  • Then click the plus button and select the type of exclusion you want to add and from the drop-down list, select Folder.
  • Next, navigate to this path and select the WinSxS folder: C:/Windows/WinSxS
  • When a User Account Control or UAC prompt, just click on Yes to proceed.

Option 4 – Try downloading the file in Incognito mode

There are certain browser extensions, especially those security programs, that prevent any suspicious files from being downloaded. So the easy way to fix the problem is to launch the Chrome browser in Incognito mode and then try to download the file again. Additionally, you might want to consider disabling the problematic extension.

Option 5 – Reset Chrome

Resetting Chrome can also help you fix the problem. This means that you will be restoring its default settings, disabling all the extensions, add-ons, and themes. Aside from that, the content settings will be reset as well and the cookies, cache, and site data will also be deleted. To reset Chrome, here’s what you have to do:
  • Open Google Chrome, then tap the Alt + F keys.
  • After that, click on Settings.
  • Next, scroll down until you see the Advanced option, once you see it, click on it.
  • After clicking the Advanced option, go to the “Restore and clean up option and click on the “Restore settings to their original defaults” option to reset Google Chrome.
  • Now restart Google Chrome.

Option 6 – Try to clean reinstall Chrome

There are instances when programs leave files behind after you’ve uninstalled them and the same thing can happen to Chrome so before you reinstall Chrome, you have to make sure that you have deleted the User Data folder. To do so, refer to the following steps:
  • Hit the Win + R keys to open the Run dialog box.
  • Next, type “%LOCALAPPDATA%GoogleChromeUser Data” in the field and hit Enter to open the User Data folder.
  • From there, rename the default folder and name it something else, e.g. “Default.old”.
  • After that, install Google Chrome again and check if the issue is now fixed.
Read More
Ventoy software review

There is a lot of software on the market today, but from time to time we discover something extraordinary and unique worth sharing and today we have a threat for you. Ventoy is a tool that will help you with system reinstallations and system maintenance once and for all.

If you are a computer user that has multiple operating systems or you are installing and maintaining different hardware via different OS there is a high chance that you have multiple USB sticks with different operating systems on them.

Now the problem with that is that there are probably too many unlabeled sticks around or you do not have enough so you keep making system USBs depending on which one you might need.

ventoy

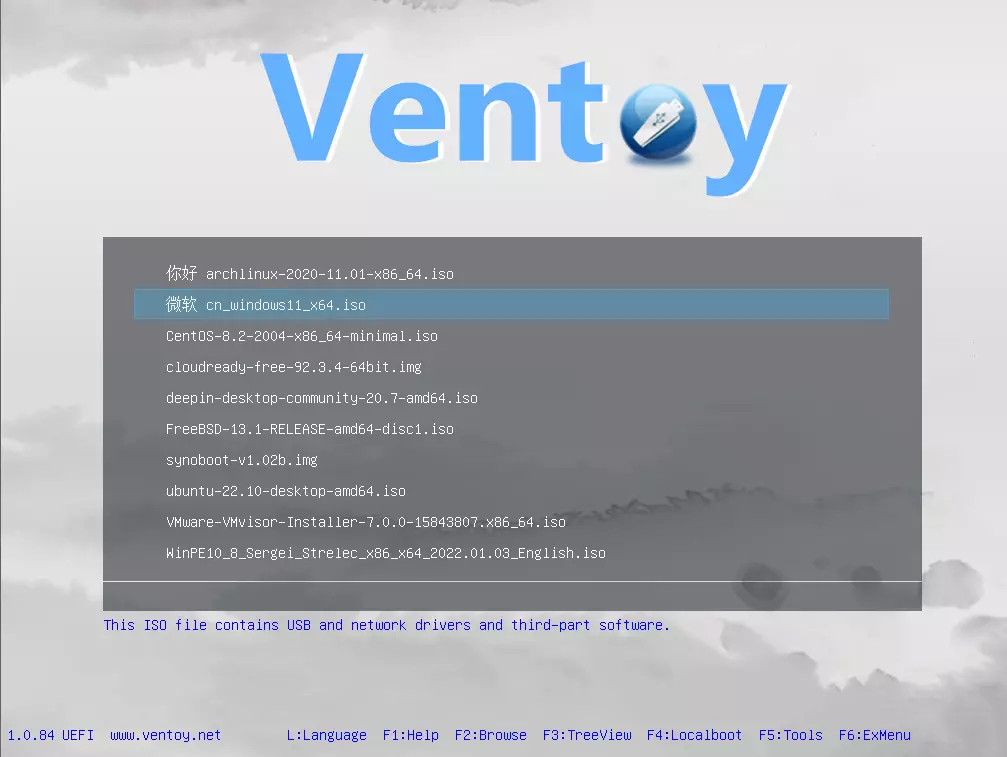
Ventoy solves all of these problems by letting you have as many operating systems images as your USB has capacity. The only thing you need to do is get the software here: https://www.ventoy.net/en/index.html and make a USB with it, then you can freely just copy your ISO images onto the USB and once it is inserted into the computer you will be given a menu to choose which one you would like to start with, simple as that.

Features

  • 100% open source (license)
  • Very simple to use (Get started)
  • Fast (limited only by the speed of copying the iso file)
  • Can be installed in USB/Local Disk/SSD/NVMe/SD Card
  • Directly boot from ISO/WIM/IMG/VHD(x)/EFI files, no extraction needed
  • Support to browse and boot ISO/WIM/IMG/VHD(x)/EFI files in local disk Notes
  • No need to be continuous in disk for ISO/WIM/IMG/VHD(x)/EFI files
  • Both MBR and GPT partition styles are supported
  • x86 Legacy BIOS, IA32 UEFI, x86_64 UEFI, ARM64 UEFI, MIPS64EL UEFI supported
  • IA32/x86_64 UEFI Secure Boot supported Notes
  • Linux Persistence supported Notes
  • Windows auto installation supported Notes
  • Linux auto installation supported Notes
  • Variables Expansion supported for Windows/Linux auto-installation script Notes
  • FAT32/exFAT/NTFS/UDF/XFS/Ext2(3)(4) supported for main partition
  • ISO files larger than 4GB supported
  • Menu alias, Menu tip message supported
  • Password protect supported
  • Native boot menu style for Legacy & UEFI
  • Most types of OS supported, 1000+ iso files tested
  • Linux vDisk(vhd/vdi/raw...) boot solution Notes
  • Not only boot but also complete the installation process
  • Menu dynamically switchable between ListView and TreeView mode Notes
  • "Ventoy Compatible" concept
  • Plugin Framework and GUI plugin configurator
  • Injection of files into runtime environment
  • Boot configuration file dynamically replacement
  • Highly customizable theme and menu style
  • USB drive write-protected support
  • USB normal use unaffected
  • Data nondestructive during a version upgrade
  • No need to update Ventoy when a new distro is released
Read More
Fix igfxem.exe application error in Windows 10
When you get an igfxem.exe error in Windows, it is not really clear what does this means, usually, Windows throw us some code or we get a DLL error, rarely we get an EXE error. So what does this error means? Intel Graphics Executable Main Module, shortly called as IgfxEM module is a part of the Windows operating system. When you run Microsoft .NET Framework applications that use the AS/400 Data Queue ActiveX control (Mseigdq.dll) to read from and to write to IBM iSeries (AS/400) data queues, you may experience this error. In order to overcome this error and cope with it try the following things:
  1. Increase Virtual Memory

    Go to the Start Menu and click on Settings. Type performance. Choose Adjust the appearance and performance of Windows. In the new window, go to the Advanced tab and under the Virtual memory section, click on Change. At the bottom of the new window, check what the Recommended value is and how it compares to Currently allocated. If the current setting is significantly less than the recommended, uncheck the Automatically manage paging file size for all drives box at the top of the same windows and then click on Custom size. Enter the Recommended value in the Initial Size box, and a larger figure in the Maximum size box. Click OK to save the new settings.
  2. Download and update .NET framework

    Go to the Microsoft website and download the latest .NET framework. Once the download is complete, install the package following onscreen instructions.
  3. Reinstall INTEL graphic drivers

    Go to the intel website and download the latest graphic drivers for your graphic card model. Once the download is complete, install the package following onscreen instructions.
  4. Run SCF scan

    If all else fails, run command prompt and inside type sfc /scannow
Read More
1 2 3 171
Logo
Copyright © 2023, ErrorTools. All Rights Reserved
Trademark: Microsoft Windows logos are registered trademarks of Microsoft. Disclaimer: ErrorTools.com is not affiliated with Microsoft, nor claims direct affiliation.
The information on this page is provided for information purposes only.
DMCA.com Protection Status