DailyLocalGuide is a Browser Extension developed by Mindspark for Google Chrome. This extension hijacks your default search engine, the home page, and new tab, setting them to MyWebSearch.com.
From the Author:
The Software and Services are sponsored by third-party advertisements and commercial offers and may also contain links to third parties websites, advertisements, products, offers, applications, and more. By downloading and using the Software you give your consent to display to you such Third Party Content (by using display ads, pops, coupons, price comparison, in-line text, and content recommendations) through Our or Our business partners’ technology.
While installed, this extension gathers user browsing activity and sends it back to ad servers. This information is later used to better target ads. When browsing the internet with DailyLocalGuide installed you will see additional injected ads and sponsored content throughout your browsing sessions.
About Browser Hijackers
Browser hijacking is actually a type of unwanted software program, commonly a web browser add-on or extension, which causes modifications in web browser’s settings. They are made to interfere with browser functions for a variety of purposes. It redirects you to the sponsored websites and inserts ads on the browser that helps its creator generate revenue. Nonetheless, it isn’t that innocent. Your online safety is compromised and it is also very irritating. When the malware attacks your computer, it starts to mess things up a whole lot that slows your system down to a crawl. In the worse case, you may be forced to tackle serious malware threats too.
Symptoms of browser hijacker malware
Symptoms that your web browser is hijacked include: your home page is reset to some unfamiliar website; you see new unwanted favorites or bookmarks added, typically directed to advertisement-filled or pornography websites; the essential web browser settings are modified and unwanted or unsafe sites are added to the trusted sites list; you find unsolicited new toolbars added; your internet browser will display endless pop-up ads; your web browser starts running slowly or presents frequent glitches; you have prohibited entry to particular webpages, for example, the website of an antivirus software manufacturer like SafeBytes.
Exactly how they get into the computer
Browser hijackers infect computer systems in numerous ways, including through a file-share, a drive-by download, or an infected e-mail. They can also be deployed through the installation of an internet browser toolbar, add-on, or extension. Some internet browser hijackers spread in user’s computers using a deceptive software distribution method called “bundling” (often through freeware and shareware). Popular examples of browser hijackers include Conduit, CoolWebSearch, Coupon Server, OneWebSearch, RocketTab, Searchult.com, Snap.do, and Delta Search.
Browser Hijacker Malware – Removal
Some browser hijacking could be simply stopped by discovering and removing the corresponding malware program from your control panel. However, most browser hijackers are hard to eliminate manually. Irrespective of how much you attempt to get rid of it, it can keep returning over and over. Apart from that, manual removal expects you to do many time-consuming and complicated actions that are hard to accomplish for novice computer users.
An anti-malware program is extremely effective with regards to finding out and eliminating browser hijackers that normal anti-virus software has missed. SafeBytes Anti-Malware detects all types of hijackers – such as DailyLocalGuide – and eliminates every trace quickly and efficiently.
What To Do If You Cannot Install Safebytes Anti-Malware?
Malware can cause many different types of damage to PCs, networks, and data. Certain malware types modify internet browser settings by including a proxy server or modify the PC’s DNS configuration settings. When this happens, you’ll be unable to visit certain or all websites, and therefore unable to download or install the required security software to eliminate the computer virus. If you’re reading this, you probably have affected by malware that prevents you from installing a computer security application such as Safebytes Antimalware on your PC. There are some solutions you can try to get around with this particular problem.
Remove malware in Safe Mode
The Windows OS has a special mode referred to as “Safe Mode” where just the minimum required programs and services are loaded. In case the malware is set to load immediately when the computer starts, switching into this mode may well prevent it from doing so. To start the computer into Safe Mode, hit the “F8” key on your keyboard right before the Windows boot screen shows up; Or right after normal Windows boot up, run MSConfig, check Safe Boot under Boot tab, and then click Apply. Once you’re in Safe Mode, you can attempt to install your antivirus program without the hindrance of the malicious software. Right after installation, run the malware scanner to remove most standard infections.
Obtain the security software in an alternate internet browser
Some viruses might target vulnerabilities of a particular browser that obstruct the downloading process. If you appear to have malware attached to Internet Explorer, then switch over to a different internet browser with built-in safety features, such as Firefox or Chrome, to download your favorite antivirus program – Safebytes.
Create a portable antivirus for eliminating viruses
Here’s another solution which is utilizing a portable USB anti-virus software that can check your system for malicious software without the need for installation. Adopt these measures to employ a USB drive to fix your corrupted computer.
1) Download the anti-malware on a virus-free computer.
2) Plug the Flash drive into the uninfected computer.
3) Double-click the Setup icon of the antivirus software to run the Installation Wizard.
4) Choose a USB flash drive as the location when the wizard asks you where you intend to install the application. Follow the directions to finish the installation process.
5) Transfer the USB drive from the clean computer to the infected PC.
6) Run the Safebytes Anti-malware directly from the flash drive by double-clicking the icon.
7) Run Full System Scan to identify and clean-up up all types of malware.
Highlights of SafeBytes Anti-Malware
Do you wish to install the best anti-malware program for your laptop? There are numerous applications available that come in free and paid versions for Windows systems. A few of them are excellent, some are decent, while some will destroy your computer themselves! You have to look for a product that has got a good reputation and detects not just computer viruses but other sorts of malware also. With regards to commercial antimalware tool options, many people go with well-known brands, like SafeBytes, and they are very happy with it.
SafeBytes anti-malware is a trustworthy tool that not only secures your computer permanently but is also very user-friendly for people of all ability levels. With its outstanding protection system, this software will automatically detect and remove most of the security threats, which include browser hijackers, viruses, adware, ransomware, PUPs, and trojans.
SafeBytes anti-malware offers an array of advanced features which sets it apart from all others. These are some of the highlighted features included in the product.
World-class AntiMalware Protection: Safebytes is based on the very best virus engine within the industry. These engines will detect and remove threats even during the initial phases of a malware outbreak.
Real-Time Protection: SafeBytes gives round-the-clock protection for your personal computer restricting malware attacks in real-time. This tool will continuously monitor your computer for suspicious activity and updates itself regularly to keep abreast of the constantly changing threat scenarios.
Internet Security: SafeBytes provides an instant safety rating about the web pages you’re going to check out, automatically blocking harmful sites and making sure that you are certain of your safety while browsing the world wide web.
Fast Scan: SafeBytes Anti-Malware possesses a multi-thread scan algorithm that works up to 5x faster than any other protection software.
Lightweight: SafeBytes is really a lightweight application. It uses up a very small amount of processing power as it operates in the background so you’re free to use your Windows-based computer the way you want.
Premium Support: You can get high levels of support around the clock if you are using their paid version.
Overall, SafeBytes Anti-Malware is a solid program as it has loads of features and can detect and eliminate any potential threats. Once you’ve downloaded and installed this software, you will no longer have to bother about malware or other security worries. If you need advanced forms of protection features & threat detections, buying SafeBytes Anti-Malware could be well worth the money!
Technical Details and Manual Removal (Advanced Users)
If you wish to perform the removal of DailyLocalGuide manually rather than employing an automated software tool, you can follow these measures: Navigate to the Windows Control Panel, click the “Add or Remove Programs” and there, select the offending program to uninstall. In cases of suspicious versions of browser plugins, you can actually remove it via your web browser’s extension manager. You will likely also want to reset your internet browser to its default configuration settings.
If you decide to manually remove the system files and Windows registry entries, utilize the following checklist to ensure that you know exactly what files to remove before carrying out any actions. But bear in mind, this is often a tricky task and only computer professionals could accomplish it safely. Furthermore, some malware keeps replicating which makes it tough to remove. Carrying out this malware-removal process in Safe Mode is suggested.
Files:
Directory %LOCALAPPDATA%\DailyLocalGuideTooltab.
Directory %LOCALAPPDATA%\Google\Chrome\User Data\Default\Extensions\hkeaafmlcginkhibjjdijabnpfobeibe
Directory %LOCALAPPDATA%\Google\Chrome\User Data\Default\Local Extension Settings\hkeaafmlcginkhibjjdijabnpfobeibe
Directory %LOCALAPPDATA%\Google\Chrome\User Data\Default\Sync Extension Settings\hkeaafmlcginkhibjjdijabnpfobeibe
Registry:
key DailyLocalGuide at HKEY_CURRENT_USER\Software\
key DailyLocalGuideTooltab Uninstall Internet Explorer at HKEY_CURRENT_USER\Software\Microsoft\Windows\CurrentVersion\Uninstall\
 Netflix was one that made streaming service standard and even after some stumbles even today it is still a respected service.
 in the command prompt you need to type the next command:

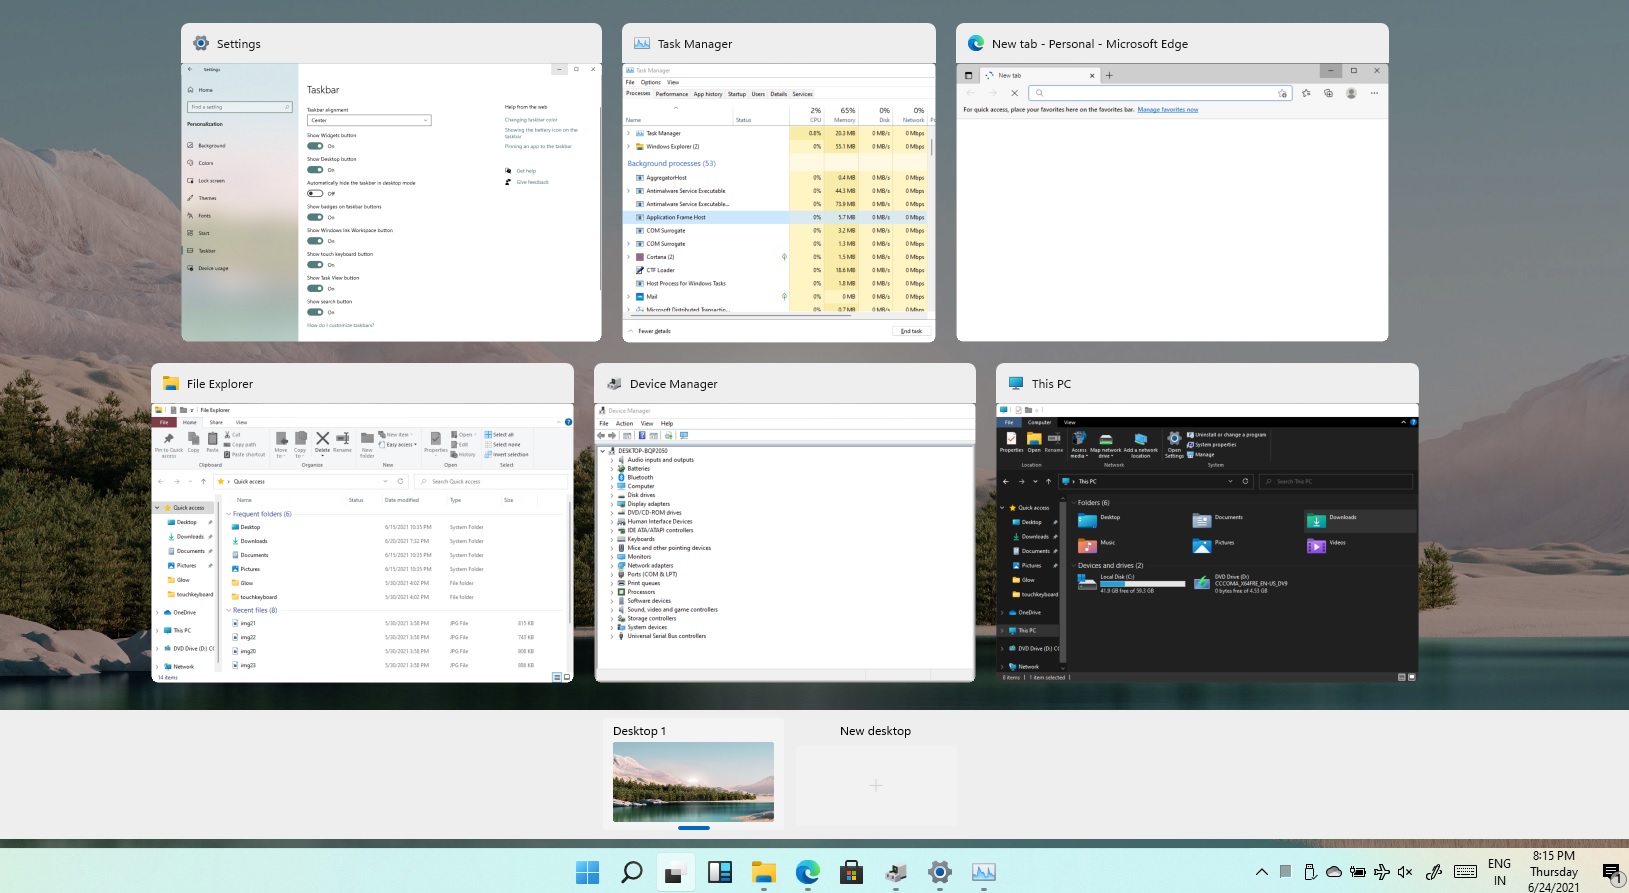 Task View feature inside Windows 11 is actually a great feature, letting you quickly view open windows and virtual desktops. How Task view itself could be reached with keyboard shortcut combination of ⊞ WINDOWS + TAB some users will prefer this way of using it and thus button on the taskbar is something you do not want or need.
There is a very easy way to remove mentioned button and I will show you how to do it.
Right-click the taskbar button itself and click on Hide From Taskbar.
That’s it, you have done it.
Now in order for you to bring it back if you change your mind, you will have to do some extra steps but it is nothing difficult.
Right-click on the taskbar and click on Taskbar settings, you will be lead to Personalization > Taskbar.
Inside locate Taskbar Items and switch Task View to ON, you will see the Task View button right away showing itself again.
Task View feature inside Windows 11 is actually a great feature, letting you quickly view open windows and virtual desktops. How Task view itself could be reached with keyboard shortcut combination of ⊞ WINDOWS + TAB some users will prefer this way of using it and thus button on the taskbar is something you do not want or need.
There is a very easy way to remove mentioned button and I will show you how to do it.
Right-click the taskbar button itself and click on Hide From Taskbar.
That’s it, you have done it.
Now in order for you to bring it back if you change your mind, you will have to do some extra steps but it is nothing difficult.
Right-click on the taskbar and click on Taskbar settings, you will be lead to Personalization > Taskbar.
Inside locate Taskbar Items and switch Task View to ON, you will see the Task View button right away showing itself again.