Social media is here to stay it seems, from Facebook, Instagram, Twitter, etc each site has its users and its rules. Companies, bloggers, public figures, and people, in general, are using them on a daily basis and some are posting cool ads, nice graphics, videos, and many more in order to gain followers or just to share something that they think is worth.

Making your post look good is somewhat essential if you plan on reaching a larger audience and Adobe's Express aims to fill that gap. It is the latest Adobe product that is purposely made for graphic and video creation for social media.
Adobe is well known in the world of professional design in all spheres like print, web, and motion, with this application, they want to take over social media design with Express. The direct competitor to Spark and canva, Express is filled with high-quality adobe templates and some great stuff found in photoshop like automatic background removal which gives it an edge over other applications.
The good thing about Express is that there is a completely free version and premium, like its competitors but with some benefits that clearly show that Adobe is determined to place its application on top of the game. The free plan includes:
For 10 USD per month of 100 USD prepaid annual fee, you get a premium plan that includes:
The application itself is incredibly easy to learn and to work with and literally, anyone can pick it up and start creating immediately. No matter are you just starting with social media or using Canva or Spark, give Express a go, make a free account and try it, I guarantee that you will find some features amazing, and its ease of use relaxing.

The Free Wifi Hotspot is offered to users that own a laptop and a desktop PC that has a wired connection to the Internet and no WiFi modem. The Free Wifi Hotspot is said to help users share their Internet connection with mobile devices that support the 2G/3G/4G/USB tethering connectivity. However, users will need a 2G/3G/4G modem attached to the computer/laptop with access to the Internet if they intend to benefit from the Free Wifi Hotspot software. Additionally, the Free Wifi Hotspot may collect data like your Internet history, downloads log, and software configuration for product placement optimization. PC users that run the Free Wifi Hotspot software may be shown pop-up windows with marketing materials from time to time and maybe redirected to promotional offers.
Several anti-virus applications have flagged Free Wifi Hotspot as a Potentially Unwanted Applications and may come bundled with other PUP-s that may harm your computer or steal some information, due to these risks it is marked for optional removal.
 Option to right-click on the taskbar and launch task manager is gone but do not worry there are other same and simple ways you can launch it.
PowerShell -Command "Set-ExecutionPolicy -Scope CurrentUser Unrestricted" >> "%TEMP%StartupLog.txt" 2>&1 PowerShell -File "%SystemDrive%ScriptsMapDrives.ps1" >> "%TEMP%StartupLog.txt" 2>&1
-windowsstyle hidden -command .MapDrives.ps1 >> %TEMP%StartupLog.txt 2>&1
Microsoft will soon offer 4 CPU computer specifically aimed at developers and its name is Volterra. The machine as stated will come with 4 processors but the strange thing is that they will be ARM-based instead of x86.
CEO of Microsoft, mister Satya Nadella has introduced the product and Microsoft has released a youtube video promoting it.
The computer system will have Qualcomm's NPU or built-in neural processing unit to use AI's power to help developers write and produce better and faster code. The sad news is that besides processors used there is no other information on other components that will go into this system.
As seen in the video, the computer reminds me a lot of the apple MAC mini with its size and design, and as stated it is made from recycled plastic which in our opinion will bring the price under $1000.
Microsoft has not provided an official price tag for Volterra, but our hope is that it will be more affordable than building your own development PC. Also, there was nothing said about computer availability, we suspect that the selling model will be typical Microsoft one with first models available only in the USA and moving forward slowly opening it to other markets.
As previously said nothing except the number of CPUs and their type has been officially said but we managed to get some information about some other specific things not including its inside components.
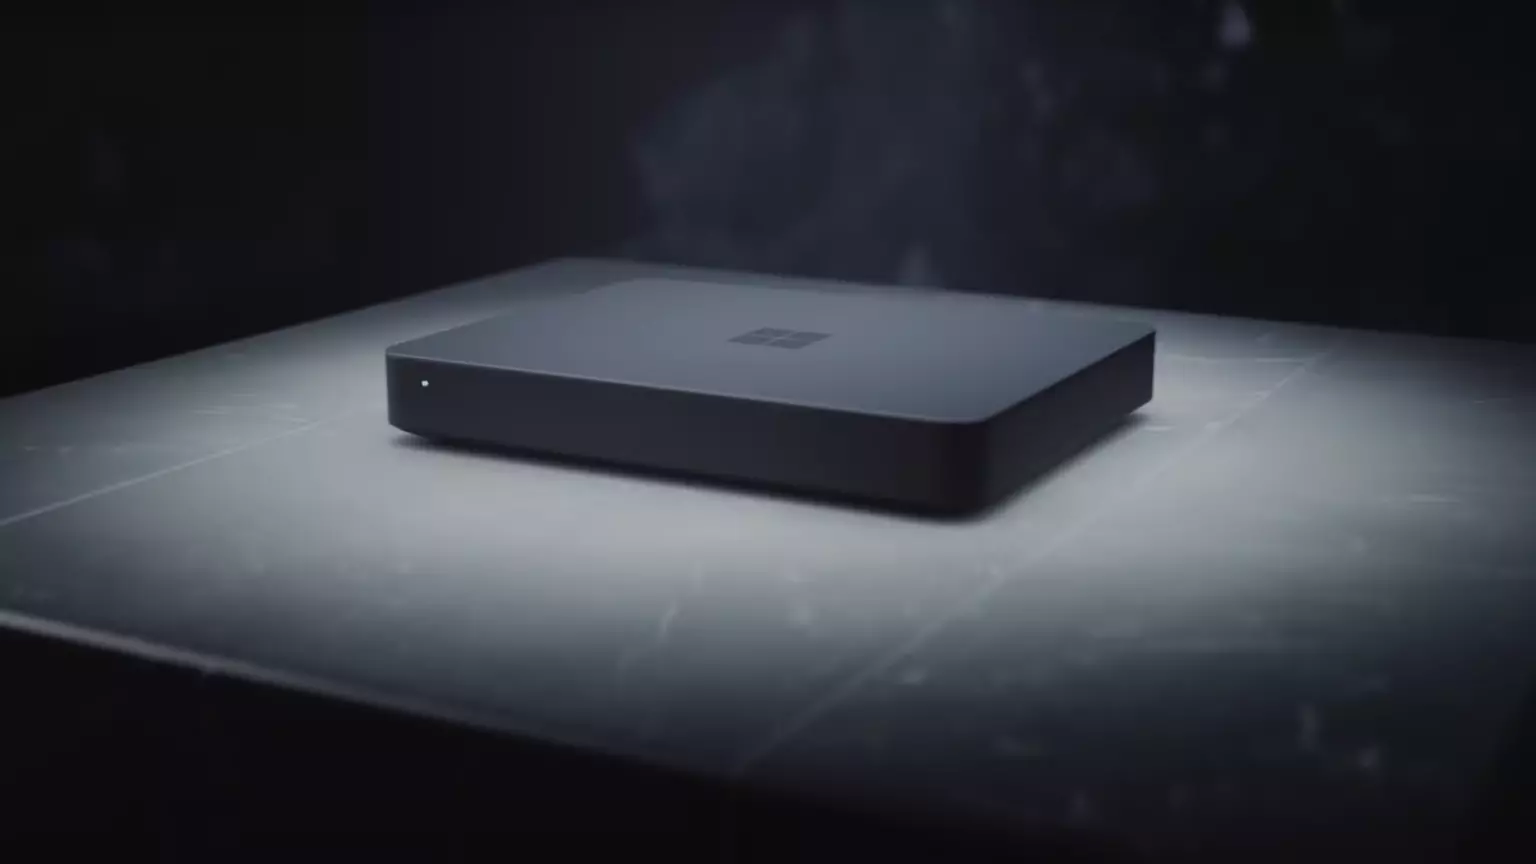
The unit will have a fan inside of it for cooling purposes and better performance and that is what was officially stated by Microsoft. On the outside, it is known that the computer will have three USB-A ports, a mini DisplayPort, and an ethernet input. All of these will be positioned on the back of the device, on its left side there will be two USB-C ports.
The unit itself will be running on Windows 11 but it was not disclosed anything about the version, we presume since this is a model aimed for professional use that it will come with Windows 11 PRO version.
Since this product is aimed at developers logically support for developing software is a must-have and at the time of this writing software that will come and that will run on Volterra is:
Once MAC studio has been released it showed that specific builds have their audience and can be sold for less of a price than full-fledged custom-made workstations. There is no doubt that Microsoft Volterra will find its audience but will that be enough to have more versions of this compact computer only time will tell.
In the last article, we have covered various advantages of Apple hardware over Windows PC, however, PC has their own strengths and advantages over MACs as well. Join us as we explore why would you choose Windows PC over MAC.

If you like to customize and build your own hardware and customize your existing computer then MACs are out of the picture, on other hand, computers based on Windows operating system are much more flexible in terms of customization.
While Apple hardware is locked and only allows small changes to it, computers running on Windows are free and open to various upgrades and modifications so if you like to play with hardware Windows is your platform.
There are games on MAC true but their numbers can not compare to games available for the Windows platform. On top of that, most latest and best gaming hardware is not even available on Apple platforms so if you plan to game in high resolutions and play the latest games there really is no option other than Windows.
Windows Platforms also has multiple emulators that you can use to play games from other older platforms and Microsoft since it owns Xbox has some great plans for both PC and Xbox gaming.
Since the introduction of the new MAC OS X, apple really lost a lot of application back compatibility, and a lot of old legacy software can not be run on modern Apple computers. Windows on the other hand have always tried and succeeded in keeping maximum compatibility with older and legacy software.
Also on the Windows platform, there is a lot of community support for old and legacy software so even if it is not officially supported it is backed up by the community.
In terms of where can you find the most different software, you need to look no further than the Windows platform. How Windows itself has great backward compatibility and a lot of developers are using it to create new software thanks to Visual Studio and .NET Windows has cemented itself as a platform with the most available software.
The popularity of Windows as the home operating system and as a gaming platform has made it quite interesting in eyes of various developers and tons of small applications are made daily for it. Windows 11 has also brought native android support to it and that has just expanded its already impressive catalog of applications.
Overall Windows PC is most appealing for users that like to be able to choose everything, from hardware components to software they would like to use. No other platform will give you larger freedom of choice and better personalization options.