In an operating system, it is ideal for an administrator to have permission to access all the folders and files. However, there are times when you try to access the security settings or attempt to view the properties of a file, you could encounter an error saying, “You do not have permission to view this object’s security properties, even as an administrative user”.
This kind of error may be caused by several reasons. For one, if your computer is infected with a virus or malware which might have caused some changes to the concerned folder or file. It could also occur if a program or service is using the folder or file simultaneously which explains why you’re not able to access the system. It could also be that the folder or file might have been owned by a user account that no longer exists or you might not have the permissions to view the targeted folder or file even though you’re logged in as administrator.
To fix the “You do not have permission to view this object’s security properties, even as an administrative user” error, here are some options that might help.
Option 1 – Put your computer in a Clean Boot State
You can also troubleshoot the problem in a Clean Boot state. It could be that there are some third-party applications in your computer that’re preventing you from accessing security settings or properties of a file and to isolate this possibility, you need to boot your computer in a Clean Boot State and then try installing the program again. Putting your computer in this state can help you identify which program is the culprit and thus isolates the problem. In a Clean Boot state, your computer will start using only the pre-selected minimal set of drivers and startup programs. Note that you have to disable and enable one process at a time.
Log onto your PC as an administrator.
Type in MSConfig in the Start Search to open the System Configuration utility.
From there, go to the General tab and click “Selective startup”.
Clear the “Load Startup items” check box and make sure that the “Load System Services” and “Use Original boot configuration” options are checked.
Next, click the Services tab and select the “Hide All Microsoft Services” check box.
Click Disable all.
Click on Apply/OK and restart your PC. (This will put your PC into a Clean Boot State. And configure Windows to use the usual startup, just simply undo the changes.)
After you’ve set your computer into a Clean Boot State, try to check if the error is now fixed and that you can now view the Properties.
Option 2 – Try booting your computer into Safe Mode and delete inactive users
Aside from the Clean Boot State, you can also reboot your computer in Safe Mode and then delete all the inactive users. There are instances when the folder was created or owned by a user account that’s either deleted or inactive now and so you need to get rid of these inactive user accounts to resolve the error.
First, boot your computer in Safe Mode.
Then right-click on the concerned folder or file and select Properties.
Next, select Advanced in the Security tab and click on Add.
A new window will appear and from there, click on “Select a principal”.
And then type the name of the user to who you wish to give permissions in the “Enter the object name to select” box.
Now select Check Names and this would resolve the user name.
After that, click OK to save the settings. This will close the window and take you back to the previous one.
Next, from the drop-down menu, change the Type to Allow and select the Full Control checkbox.
Click OK to save the changes made and then restart your computer in a normal mode.
Option 3 – Try to take ownership of the folder or file
Another thing you can do to fix the problem is to take ownership and force the system into giving permissions to the Administrator. How? Refer to these steps:
Type “command prompt” in the Windows Search bar and then right-click on the relevant search result and select “Run as administrator”.
After that, if a User Account Control or UAC prompt appears, just click on Yes to proceed.
Next, type and enter this command: TAKEOWN /F <path>
Note that the <path> is the location of the folder or file in File Explorer.
Now type and enter this second command: ICACLS <path> /grant administrators:F
Finally, once the command has been executed, restart your computer and then see if you can now access the folder or file.
Option 4 – Try scanning your computer using Windows Defender
As mentioned, the error when accessing the security settings or properties of a folder or file might be due to a virus or malware. It could be that it had made some modifications that prevents you from accessing security settings or properties. To eliminate it, you have to scan your computer using security programs like Windows Defender.
Tap the Win + I keys to open Update & Security.
Then click on the Windows Security option and open Windows Defender Security Center.
Next, click on Virus & threat protection > Run a new advanced scan.
Now make sure that Full Scan is selected from the menu and then click the Scan Now button to get started.
Microsoft's anniversary update has come with many new features and improvements. One of these features is that Microsoft's Cortana can now be installed on your Android phone and as long as you are logged in to your Microsoft account on different devices, she can pass information between devices. You can not see battery life on your desktop PC, notifications, etc.
There are some prerequisites in order to get this going, first is to have a Windows version 1607 or newer. The second is to have the last Android version
Installing Cortana on Android
Download and install the Cortana app from the Google Play store.
Open the app and accept the license terms.
Enter the credentials for the Microsoft account you use to sign in to your PC.
After a few seconds, Cortana will open.
Click the settings button and select Sync Notifications.
By default, missed calls, incoming messages, and low battery notifications will be turned on. You can turn this on\off from here. The only option off by default is for App notifications. Any non-system apps such as Facebook and Instagram can also send alerts to your Windows box. You can choose to enable the App notification sync option or leave it off.
If you enable “App notification sync,” you will need to give Cortana permissions to read and control notifications on your phone.
You can then select exactly which applications will be synched to your PC.
Once done you can exit out of Cortana.
Configuring Cortana on PC
Click the Windows button and type Cortana. Click the icon for Cortana and Search Settings.
Scroll through the settings list and look for Send notifications between devices
Click the switch to turn it on.
Sign in to the same Microsoft account you used in the previous section
Navigate back to the Cortana & Search settings tool.
Click Edit Sync Settings. Make sure that your phone shows up on the list. You can also determine if you want PC notifications are sent to your phone.
With those settings in place, you should now start getting alerts for the items you enabled in your Action Center. As notices come in, you will see them pop up in a small bubble on the lower right of your screen. You can dismiss the notification or use the link to find a compatible app in the Windows store.
There are times when the Windows Search doesn’t work and you wouldn’t have a clue as to why it happened since it does not give any error codes. In such cases, you have to check the error logs in the Event Viewer to find out more about the problem. From there, look for an error with the Event ID 3104 in the Windows error logs and if you see an error message that says, “Enumerating user sessions to generate filter pools failed”, read on as this post will guide you in fixing the problem. Apart from the error message, you might also see more information in the details section of the log that says, “(HRESULT: 0x80040210) (0x80040210)”.
This kind of error is most likely caused by something that prohibits the search function from initializing. A lot of users assumed that it could be due to Cortana but it’s actually not. While some users also reported that they encounter the issue after they restarted their computers. This error was also reported with the same event ID 3104 on the Windows Server. According to security researchers, this error could be caused by problems in the Registry entry of Windows search. It could also be due to an issue with the SYSTEM account where it hasn’t been added to the DCOM Security. It is also possible that the Windows Search function has not been initialized.
To fix this error, you can try to rebuild the Search Index manually or run the Search and Indexing troubleshooter. You can also check the startup type of the Windows Search service or try some registry tweak.
Option 1 – Try to rebuild the Search Index manually
The first thing you can do to fix the problem is to manually rebuild the Search Index. You can do that by going to Control Panel > Indexing Options and from there, click on Advanced. After that, go to the Index Settings tab and then click on Rebuild > OK. Once you’re done, check if it fixed the problem.
Option 2 – Try running the Search and Indexing troubleshooter
You could also run the Search and Indexing troubleshooter in Windows 10 as it checks whether the settings are in place and automatically corrects any issues with the Windows 10 search function. To run this troubleshooter, just click on the Start button and select Settings > Updates and Security > Troubleshoot. From there, select the Search and Indexing Troubleshooter. Once the troubleshooter is done, restart your computer and see if it fixed the error.
Option 3 – Try checking the startup type of the Windows Search Service
In this option, you have to check the startup type of the Windows Search service since the service won’t start. To do so, refer to these steps:
Tap the Win + R keys to open the Run utility and type “services.msc” in the field and then tap Enter to open the Services Manager.
Next, from the list of services, look for the Windows Search Service or WSearch. Once you find it, right-click on it and select Properties.
After that, change the Startup type to Automatic and click on the Start button if the service is in the Stop state.
Now click on the Apply and OK buttons to save the changes made and then restart your computer.
Option 4 – Try changing the Registry entry for Windows Search
Before you apply some registry tweak, you need to create a System Restore point first. Once you have that covered, follow these steps:
Tap the Win + R keys to open the Run utility and type “Regedit” in the field and tap Enter to open the Registry Editor.
If a User Account Control prompt appears, just click Yes to proceed.
After opening the Registry Editor, navigate to this registry path: HKEY_LOCAL_MACHINESOFTWAREMicrosoftWindows Search
From there, click on Windows Search and look for the key named “SetupCompletedSuccessfully” and change its value to “0”. Just right-click on it and select Modify.
Then input “0” as its value data and click on OK to save the changes made.
Exit the Registry Editor and restart your computer.
Now check if the Enumerating user sessions to generate filter pools failed is fixed or not.
As we near the end of 2022 we look at the current best antivirus software for popular platforms, why they are the best, and why you should get them.
Avira, a great free Antivirus
Avira has been around a long time with its free antivirus version of the larger protection suite. It had its ups and downs but the latest versions are really great. With high-speed scans and low system impact, Avira antivirus is really one of the best free antivirus software currently on the market.
The software itself has also received UI & UX updates making it straightforward and easy to use. The virus scanning engine is the same as in paid version that ranks among the top engines in the world for this type of work. The package also gives you some great browser protection and a good firewall as well, there is really no excuse to skip on this if you want a free solution.
The only thing that we would say is not so great in Avira is reporting some false positives, sometimes even for MS updates, it is rare but it can happen.
Malwarebytes, a powerful Windows antivirus
Malwarebytes Premium is easy to use, simple antivirus solution that shies away from complicated UI, and simply put, it just works. Its scanning engine is well-known and places among the top and best in the world often finding some malware that other can miss.
Another great thing is its integration with Windows itself, it is one of the rare applications that can and will work incredibly well beside your typical Windows protection tools so you can have both of them running at the same time.
Installation and running are really simple and every typical PC user will find it as easy as walking in the park. On the other hand, sadly system impact is a little high and it will have issues running on lower-end systems due to its memory requirements.
Intego MAC Internet Security X9, the best Mac antivirus
Gone are the days when MAC had no virus issues, since MAC rose in popularity among the users, also rose the number of viruses and malware. The system itself has some great protection built it inside but for more security and better control of it, you will need a third-party dedicated solution.
Intego was made by Mac antivirus experts who have been building this kind of software last 25 years. The interface is easy to use and premade presets are really helpful, but the security suite can also be customized to fit your needs and desires.
Since this is only available as a security suite, you are getting a firewall and some other security tools along with your antivirus that will run as a part of it.
The bad side is that scans can sometimes run slow, most of the time they are OK in terms of speed but occasionally they can switch to slower speeds and impact scanning time to some annoying times. Also, there is no webcam protection nor VPN service included where others on this list have them.
Bitdefender mobile security: best Android protection
While protection is not only needed for your gaming or workstation, software suites that are dealing with mobile and tablet security exist. The best of them is the Bitdefender antivirus mobile suite. Low on system resources and low on performance impact with the really great virus detection rate Bitdefender is at the top of suites for your phone.
Consistent high virus detection packed with low battery impact is great but the suite comes with tons of other tools as well like browser security tools, email protection, and real-time link and notification protection.
The application will always scan each file and newly installed application in the background and alert and cut off any found threat. App itself is easy to install and use and most of the time it will do everything in the background for you but offer you customization if you need it.
The package also includes VPN and application lock that will let you protect the critical applications from being accessed as well as an online account scanner. Anti-theft and anti-loss tools, which allow you to find, remotely lock or wipe a stolen or lost device, add yet another layer of protection.
One thing that is missing from this great package is fraudulent call protection. Newer Android phones have this feature inside but it would be nice if Bitdefender had it as well.
Bitdefender, the best antivirus software
Now that we have covered specific cases of each platform, there is one player that has all of them covered and with a quality product, that player is BitDefender and it is great. Personally, this is my protection suite of choice and as I type this it is running in the background.
Bitdefender has it all, low system impact, as a matter of fact, it is one, if not, the lowest performance impact engine on the market currently and that is packed with a great and highly consistent virus & malware detection suite. Along with real-time malware protection, browser security, and anti-spam tools, you also get anti-phishing defenses, ransomware protection, and a strong firewall.
Bitdefender scores are very high in both the zero-day threat and real-world protection tests at AV-Test, an established organization that tests antivirus software. Despite being tested against tens of thousands of well-known and widespread malware threats, the software consistently achieves a 100% blocking rate.
The suite also comes with a restricted free VPN and with parental controls as well. Webcam and microphone protection are also included in the suite and on top of all, it has great pricing plans and constant discounts.
BitDefender is really a great package and it might sound too good, but after years and years of personally using it I have not had single malware or virus issue, the only thing that I would put as a negative is that system is severely slowed down when system scans are performed so be sure to run or schedule them when you are not using your computer. This, of course, can put some people off and I will admit it is a serious drawback but for me, the security of my workstation is more important than leaving the computer for 20 or so minutes in order to perform a full scan of the system.
The 0x8007045D error code is an I/O (input and output) error that is associated with the registry. It indicates that the Windows operating system has become overloaded with invalid system references in the registry.
This may prevent you from executing reading and writing to and from devices successfully.
Error Causes
Registry is the main database of your PC. This portion of your computer saves all the activities that you perform on your PC including the junk files, temporary internet files, invalid entries, bad registry keys, and more.
This clutters the hard disk. If the unnecessary files are not removed from the registry, it may lead to I/O errors like 0x8007045D.
On the hard drive, some parts of the drive may fail to function. If this is not fixed on the time it may lead to serious disk damage and registry corruption eventually resulting in system failure. System failure can make you lose all the valuable data saved on your system for good.
How to Fix the Error Code 0x8007045D?
Error codes on your PC are like warnings. These codes indicate that your PC has some issue. Therefore ignoring it is not wise. To spare yourself from such serious PC damages, it is advisable to take correct measures timely instead of prolonging and making the situation go from bad to worse.
If your Windows 10 computer is downloading or installing updates but suddenly an error pops up saying, “GWXUX has stopped working”, read on as this post will show you what you can do to resolve the problem. GWXUX is a process responsible for downloading and installing Windows updates and is installed on your computer via Windows Updates. That particular update is known as “KB3035583”. Through this process, the “Get Windows 10” pop-ups are installed and initiated by Microsoft. This process is also capable of checking the compatibility of your PC to run Windows 10 as well as preparing it for installation. However, this process might also result in excessive usage of Disk and sometimes, CPU. So in this post, you will be guided on how you can fix the issue with the GWXUX. Follow the instructions given below carefully.
Option 1 – Disable GWXUX in the Task Scheduler
You will have to disable the gwxux.exe process to run from the Task Scheduler. Thus, you need to follow the steps below to do so.
Open the Cortana Search box and then type “task scheduler” in the field.
Then click on Task Scheduler from the related search results that appear to open it.
After opening the Task Scheduler, navigate to Microsoft > Windows > Setup > gwx on the left panel from the Task Scheduler Library.
Once you select the GWX folder, you will see two tasks that are listed under that folder. Select both of these tasks and permanently disable them.
Restart your computer to apply the changes made and check if the issue is now fixed or not.
Option 2 – Uninstall the KB3035583 Windows Update
To uninstall the KB3035583 Windows Update, you need to go to Control Panel, and for you to do that, type “control panel” in the Cortana Search box.
After that, click on Control Panel from the related search results given.
Once Control Panel is pulled up, search for “View Installed Updates” in the search field from the top right part of the window.
Next, click on a link labeled, “View Installed Updates” under the Programs and Features menu.
After clicking the link, you will see the list of all the installed updates in your computer from the Windows Updates.
Now look for an update named “KB3035583” and select it.
You should notice the Uninstall button located at the top portion of the sub-menu ribbon as you can see on the snippet below. Click on that button to uninstall the KB3035583 Windows Update.
After uninstalling the update, make sure to restart your computer to apply the changes made.
Option 3 – Try using the System File Checker
System File Checker or SFC is a built-in command utility that helps in restoring corrupted files as well as missing files. It replaces bad and corrupted system files with good system files that might be causing the error 0x80200056. To run the SFC command, follow the steps given below.
Tap Win + R to launch Run.
Type in cmd in the field and tap Enter.
After opening Command Prompt, type in sfc /scannow
The command will start a system scan which will take a few whiles before it finishes. Once it’s done, you could get the following results:
Windows Resource Protection did not find any integrity violations.
Windows Resource Protection found corrupt files and successfully repaired them.
Windows Resource Protection found corrupt files but was unable to fix some of them.
After running the System File Checker, restart your computer and check if the error with the GWXUX.exe file is now fixed or not.
Disk cleanup is part of Windows 10 tools and it is essential in keeping your computer up and running in optimal settings and to free so much needed space as well as remove temporary files that can accumulate over time.
Using disk cleanup from time to time is recommended and a very useful habit that will save you some headaches and optimize your computer running time, speed up boot sequence, etc. Think of it like cleaning up your desk, from time to time it can get too overwhelmed with junk and non-important things and if you are keeping it tidy all the time each time you need to find something it will be much faster and easier, same goes with computers, so if you do not have it, try to develop a habit that once per month you start disk clean up and remove trash from your hard drive.
In order to do so, press ⊞ WINDOWS + E to bring File Explorer up
Once File Explorer is up and running right-click on the hard drive you wish to run disk cleanup on and click on properties.Properties Windows will open on the general tab, on that tab you have disk cleanup on the lower right part of properties, click on it.
Wait for Windows to gather information about your hard drive and files on it. After it is finished you will be greeted with the next screen:
Here you can thick and mark which items you would like to get rid of and which ones you would like to keep. Note that you can freely tick all of them and remove them since removing these files will not break WIndows in any way. make your choices and click on ok. You can also click on Clean up system files to run system files cleaner and get rid of junk there, you will not be able to choose any options there, Windows will alone clean up what is not needed.
After disk cleanup is finished least thing you will have is more free disk space, but like mentioned, keeping your Windows and computer healthy goes a long way in its usability, speed, and performance.
Dsound.dll is a type of Dynamic Link Library. This is one of the many files that are associated with DirectX software. And DirectX software is used by most Windows-based games.
Dsound.dll contains small programs that help run and load Windows-based games on your system.
The Dsound.dll error pops when Windows-based games are unable to load and run on the computer.
The error code appears on the screen in one of the following formats:
"The file dsound.dll is missing"
"File dsound.dll not found"
"Dsound.dll not found. Reinstalling might help fix this."
"Dsound.DLL Not Found"
Solution
Error Causes
Dsound.dll error is generated due to multiple reasons. These include:
Corrupt, damaged, or missing Dsound.dll file
Malware infection
Outdated drivers
To play the games on your computer, it is important to fix the Dsound.dll error immediately.
Further Information and Manual Repair
To resolve Dsound.dll error at home on your own without hiring a professional and spending hundreds of dollars in repair, here are some methods you can try:
Method 1 - Restart Your PC to Resolve
Sometimes the error may be a fluke and can be resolved by simply restarting your PC. So, before you try other methods, it is recommended that you restart your system first.
If it resolves the issue, then that’s great. If it doesn’t, then try other methods given below!
Method 2 - Reinstall the Deleted Dsound.dll File
Since DLL files are shared files, there is a possibility that while uninstalling a game on your PC, you might have accidentally deleted this file too.
If so, check your recycle bin and search for the deleted file. If you locate it, simply restore it. But if you can’t, then download the Dsound.dll file from a reliable DLL website. Make sure that the site is authentic because the last thing you want is to download malware instead of a DLL file.
Method 3 - Update Driver for Your Video Card
If Dsound.dll error occurs because of outdated drivers, then update them to resolve. You can do this by using a driver update wizard from within Device Manager. The wizard will guide you through the process, making updates simple.
Method 4 - Remove Malware
Download a powerful antivirus to scan and remove malware from your system. A malware infection can trigger a Dsound.dll error too.
Method 5 - Uninstall the Game and then reinstall it again
Try uninstalling the game during which you experienced this error. Sometimes the error may pop because of improper game installation. Uninstall it and then reinstall it. Once you’ve reinstalled it, try accessing it again. If it is accessible, the error is resolved.
Method 6 - Repair the Registry
DLL errors are also related to the registry. These files can get damaged if the registry gets loaded with junk files and cookies. In such as situation clean and repair the registry. You can do this manually but it can be time-consuming and tricky if you are not technically sound.
Therefore download Restoro. It is a powerful and user-friendly PC Fixer embedded with a registry cleaner. The registry cleaner scans and removes all junk files clean the registry and repairs damaged DLL files immediately.
Click here to download Restoro and resolve error Dsound.dll today!
Error 115 is a type of GameGuard redundant execution error. If you have GameGuard installed on your PC, then you will most likely experience this error code.
GameGuard is basically an anti-cheating robot toolkit developed by INCA Internet.
It is installed to block possibly malicious applications and common methods of cheating on multiplayer online role-playing games. But at the same time, this software is infamous for error pop-ups.
Error 115 is displayed on the Windows screen when a game has been executed multiple times or you have left the game running without logging out. Error 115 is displayed in the following format:
GameGuard Execute Error: 115‘There are multiple events of game execution or GameGuard is already running. Close the game then try again.’
Solution
Error Causes
The error 115 may appear on your Windows screen due to multiple reasons. These include:
Multiple executions of the game
Antivirus Conflict
Firewall Conflict
Registry Overloaded with Bad and Invalid Entries
This error may cause a great deal of inconvenience to you if you love to play multi-player role-playing games over the web like Blood Feud, 9Dragons, Phantasy Star Universe, and Alliance of Valiant Arms.
To avoid such inconvenience, it is advisable to fix this error immediately.
Further Information and Manual Repair
Here are some easy do-it-yourself methods to resolve the error 115 on your PC. These methods require no technical expertise.
Method 1 - Terminate the Game Already Running on Your System
To resolve the issue, hit ‘Ctrl+Shift+Esc’ to launch Task Manager. Here you will find a list of applications running on your system, terminate the gaming application to resolve error 115. If this doesn’t work, then restart your PC.
Method 2 - Disable Antivirus Programs or Firewall Temporarily
Sometimes this error may appear on your computer screen because of antivirus or Firewall security conflict.
These programs often block gaming applications and software like GameGuard and because of that, you are unable to play online games on your system. To fix the issue, try disabling these programs on your PC temporarily.
Method 3 - Clean and Repair the Registry
The error 115 may also occur because of the registry issue with Symantec. Follow these steps to enable the game to run:
Go to your start menu then find Run then write Regedit.
Find HKEY_LOCAL_MACHINE. To proceed, go to SYSTEM then CurrentControlSet, and then Services.
Look in the list for SysPlant and click it. Then look for the word 'Start', right-click on Start, and select rename.
Rename 'start' to 'DWORD: 00000004’ then close Regedit and reboot your PC to activate changes.
Method 4 - Download and Run Total System Care.
This process can be slightly tricky and a bit time-consuming. Therefore it is advisable to download Restoro.
This is a cutting-edge, easy-to-use PC Fixer deployed with a powerful registry cleaner. It removes all the unnecessary files cluttering the registry like bad and invalid registry entries.
It fixes the damaged registry and enables it to resume back to its normal functioning.
Click here to download Restoro.
If you encounter an error saying, “error accessing the registry” when you try to merge a registry key on your Windows 10 computer, you’re not alone as some users also experienced the same problem. According to these users, they encounter the error after they’ve re-installed their Windows version and tried to open a .reg file.
Based on the reports, this error could occur if the registry file does not have administrative privileges. Meaning to say, the program does not have the necessary permission to merge the .reg file. This is common with fresh installs as well as reinstalls. Moreover, this kind of issue could also occur due to system file corruption. Whichever the case may be, here are some troubleshooting tips you can check out to resolve the error.
Option 1 – Try to import the .reg file with admin privileges
As pointed out, the error may be due to a lack of admin privileges. It could be that the Registry Editor does not have admin privileges to merge the registry file. This is common with new Windows installations especially since the Registry Editor hasn’t been opened before. So you need to import the .reg file again and this time, with admin privileges.
Tap the Win + R keys to open the Run dialog box.
Then type “Regedit” in the field and tap the Ctrl + Shift + Enter keys to open the Registry Editor with admin privileges.
A User Account Control or UAC prompt will appear where you have to click Yes to proceed.
After opening the Registry Editor, go to File > Import using the ribbon bar at the top.
Next, use the import menu to go to the location of the file you were trying to merge. Once you’ve found it, click Open to merge it with your current registry. This should fix the problem. If not, refer to the next options below.
Option 2 – Try performing a System Restore
Running System Restore can also help you fix the error when accessing the Registry. You can do this option either by booting into Safe Mode or in System Restore. If you are already in the Advanced Startup Options, just directly select System Restore and proceed with the next steps. And if you have just booted your PC into Safe Mode, refer to the steps below.
Tap the Win + R keys to open the Run dialog box.
After that, type in “sysdm.cpl” in the field and tap Enter.
Next, go to the System Protection tab then click the System Restore button. This will open a new window where you have to select your preferred System Restore point.
After that, follow the on-screen instructions to finish the process and then restart your computer and check if the problem is fixed or not.
Once the next startup is complete, you have to merge or import the file again and see if the error is now fixed or not.
Option 3 – Try to perform repair install by creating a Windows 10 installation media
Click this link and then click the Download Tool Now button.
Next, click the “Use the tool to create installation media (USB flash drive, DVD, or ISO file)…” option and follow the next given instructions on the screen.
Now select the ISO file option in step 5.
After that, you should now have an ISO file.
Next, go to the location where you’ve downloaded the ISO file.
Then right-click on the Windows 10 ISO file and select the Open with option and then select File Explorer.
Now click on “setup.exe” and follow the next instructions that appear on the screen. When asked, you have to select either Nothing (clean install) or Keep personal files only option. Take note that you must not select the “Keep personal files, apps, and Windows settings since it doesn’t really work.
Option 4 – Try running the System File Checker Scan
As mentioned, the error when accessing the Registry might be caused by file corruption. And that’s where the SFC scan comes in. The SFC or System File Checker scan could detect and automatically repair damaged system files. SFC is a built-in command utility that helps in restoring corrupted files as well as missing files. It replaces bad and corrupted system files with good system files. To run the SFC command, follow the steps given below.
Tap Win + R to launch Run.
Type in cmd in the field and tap Enter.
After opening Command Prompt, type in sfc /scannow
The command will start a system scan which will take a few whiles before it finishes. Once it’s done, you could get the following results:
Windows Resource Protection did not find any integrity violations.
Windows Resource Protection found corrupt files and successfully repaired them.
Windows Resource Protection found corrupt files but was unable to fix some of them.
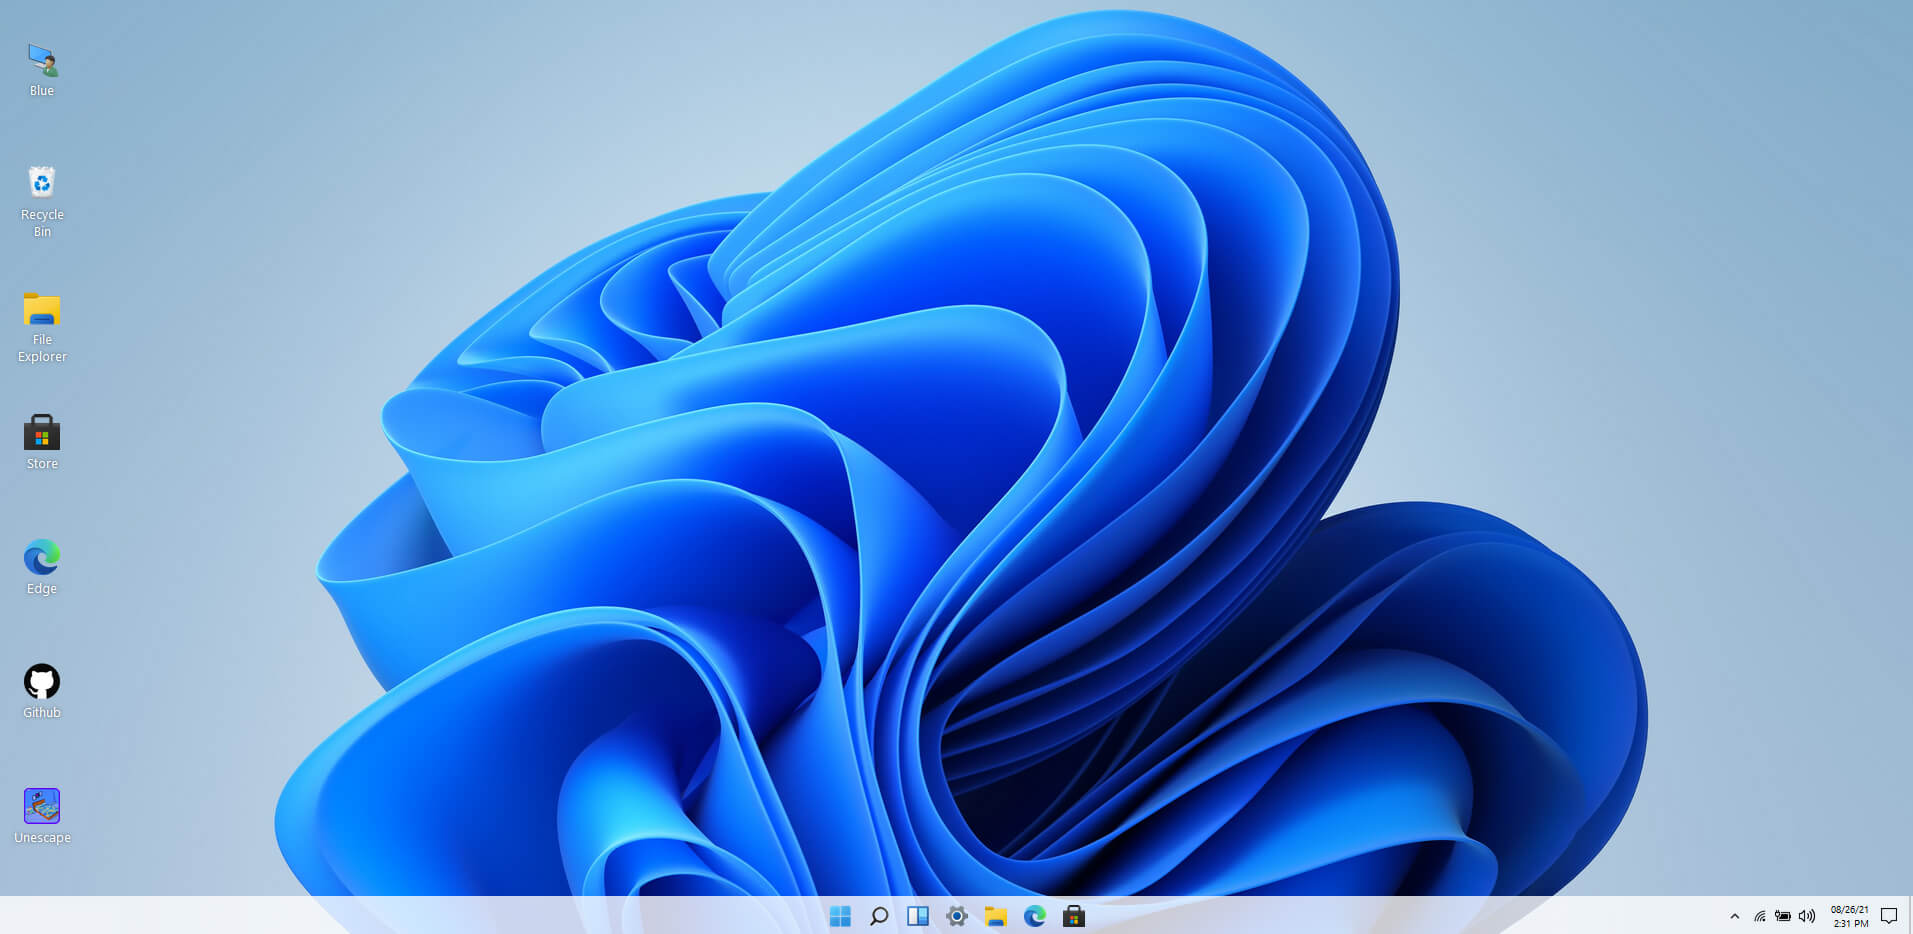
Windows 11 release date is closing in, some people have tried it via insider build, some have decided not to. It has come to our attention that there is a little website made by BlueEdge that offers a virtual Windows 11 desktop.
Opening the Website will put you right inside Windows 11 desktop, now take note that this is not Windows 11, it is a simulation of Microsoft’s newest OS and therefore many things will not work like File Explorer, etc.
One thing you can make sure it is working is UI itself, you can see how you do like the new Taskbar, start menu, widgets, and some other things. You can just pop up on the site and check how you do like the overall new look and feel of Windows 11 UI before installing it or trying it.
We are sure that many more options will come in time but even now you can get a feel of the newest OS.
Windows 11 BlueEdge site: https://win11.blueedge.me/


 Once File Explorer is up and running right-click on the hard drive you wish to run disk cleanup on and click on properties.
 Properties Windows will open on the general tab, on that tab you have disk cleanup on the lower right part of properties, click on it.
 Wait for Windows to gather information about your hard drive and files on it. After it is finished you will be greeted with the next screen:
 Here you can thick and mark which items you would like to get rid of and which ones you would like to keep. Note that you can freely tick all of them and remove them since removing these files will not break WIndows in any way. make your choices and click on ok. You can also click on Clean up system files to run system files cleaner and get rid of junk there, you will not be able to choose any options there, Windows will alone clean up what is not needed.
After disk cleanup is finished least thing you will have is more free disk space, but like mentioned, keeping your Windows and computer healthy goes a long way in its usability, speed, and performance.
Here you can thick and mark which items you would like to get rid of and which ones you would like to keep. Note that you can freely tick all of them and remove them since removing these files will not break WIndows in any way. make your choices and click on ok. You can also click on Clean up system files to run system files cleaner and get rid of junk there, you will not be able to choose any options there, Windows will alone clean up what is not needed.
After disk cleanup is finished least thing you will have is more free disk space, but like mentioned, keeping your Windows and computer healthy goes a long way in its usability, speed, and performance. 
 Windows 11 release date is closing in, some people have tried it via insider build, some have decided not to. It has come to our attention that there is a little website made by BlueEdge that offers a virtual Windows 11 desktop.
Opening the Website will put you right inside Windows 11 desktop, now take note that this is not Windows 11, it is a simulation of Microsoft’s newest OS and therefore many things will not work like File Explorer, etc.
One thing you can make sure it is working is UI itself, you can see how you do like the new Taskbar, start menu, widgets, and some other things. You can just pop up on the site and check how you do like the overall new look and feel of Windows 11 UI before installing it or trying it.
We are sure that many more options will come in time but even now you can get a feel of the newest OS.
Windows 11 BlueEdge site:
Windows 11 release date is closing in, some people have tried it via insider build, some have decided not to. It has come to our attention that there is a little website made by BlueEdge that offers a virtual Windows 11 desktop.
Opening the Website will put you right inside Windows 11 desktop, now take note that this is not Windows 11, it is a simulation of Microsoft’s newest OS and therefore many things will not work like File Explorer, etc.
One thing you can make sure it is working is UI itself, you can see how you do like the new Taskbar, start menu, widgets, and some other things. You can just pop up on the site and check how you do like the overall new look and feel of Windows 11 UI before installing it or trying it.
We are sure that many more options will come in time but even now you can get a feel of the newest OS.
Windows 11 BlueEdge site: