Support for Bluetooth hardware has always been included in the Windows 10 operating system for a long time now. And it just keeps getting better especially now with the support for the latest version of Bluetooth 5.0 LE. However, there are still times when Bluetooth experiences a couple of issues one of which is users were not able to turn on or off Bluetooth on their Windows 10 Pc since the option to turn Bluetooth off or on is missing in the Windows 10 settings app and even in the Action Center. So if you are one of the users who experience the same problem, read on as this post will guide you in resolving the issue.
To resolve this Bluetooth issue, here are some suggestions that could help:
As you know, Windows 10 has various troubleshooters with user-friendly interfaces where you can utilize them to fix issues in your PC. And since you’re dealing with some Bluetooth problem, you have to run the Bluetooth Troubleshooter.
The issue might have something to do with the Bluetooth drivers. It could be that it is outdated and needs to be updated or that you recently updated it and since then you have trouble removing the Bluetooth devices and so to fix the issue, you can update, roll back or uninstall the Bluetooth drivers. How? Follow the steps below.
Note: Checking the update may take a few minutes so you’ll have to wait until it finishes. If it is able to find an update, you must install it. And if you want to reinstall the Bluetooth driver, just select the “Uninstall driver” option and follow the next on-screen instructions that follow.
If the first two options didn’t work, the next thing you can do is configure Bluetooth Services. How? Simply follow these steps:

In today's IT world, if you want a computer for typical day-to-day actions and gaming, there are 3 primary ways you can go. An Apple computer with its proprietary hardware and operating system or a typical machine with Windows or Linux operating system.
Each system has both advantages and disadvantages and picking the right one might be difficult for some users. From hardware differences to specific software and operating system, each system is aimed at a different type of work, and in this article, we will explore each one and help you in choosing the right one for you.

Apple has managed to create a unique ecosystem of its own devices, from its iMac desktop computers to more professional MAC studio and power MAC and all the way to tablet iPad and iPhone are powered by Apple's own operating system that connects all of these devices into one large system. So if you really need one singular ecosystem this is a huge advantage.
The ecosystem on the side, MAC computer systems are great, some would argue best for coding, design, video work, and sound editing. MAC M2 chip is optimized for all of these tasks and a specially tailored operating system is just the icing on the cake. Specific Apple-made software like a logic pro or final cut also helps a lot to position MAC systems on top of the line.
Reading all of this you might think hey this is the computer for me, it does everything! Sadly the truth is not like that. The first thing that is difficult on MAC systems and a maybe big reason that it is not so adopted outside professional working environment is lack of games. If you are a gamer or plan on using MAC for gaming, well I have some bad news. The second big turn-off is that MAC systems tend to be more expensive than PC systems, yes components are of higher quality but rest assured that you will pay for also for branding.
Get MAC as your workstation for serious work and for good tech support, if you need a plain home computer keep reading.

There is no better feeling than assembling your own computer, tweaking hardware to make a monster and despite haters hating, Windows is the best all-around operating system on the market. It is supporting the largest variety of hardware and the largest variety of software.
The best platform for serious gaming and streaming Windows machine has cemented itself as a multimedia powerhouse. But, this kind of computer is not alien to being also a professional machine, you can practically do everything that you can do on Apple or Linux machine inside Windows, yes some things might require extra steps or will be slightly slower but in the end, being able to do anything is the greatest strength of Windows machine.
Of course, every system has its flaws and Windows is not immune to that. One of the biggest is being the operating system for every hardware ever made and every software as well while keeping legacy support for old software and hardware, basically, its biggest strength is in the same time its biggest weakness leading to sometimes stability issues. Also being able to place any kind of hardware can also lead to the same stability issues. Executing something a little slower than other systems and having some extra steps can also be looked upon as weaknesses.

First and perhaps for some people, the biggest advantage of the Linux operating system is its price, it is completely free! Other advantages include the great server and networking included in the OS itself, the large amount of customization, and unmatched stability. The ability to write scripts inside the OS terminal is also a great thing and coding is much more streamlined and friendlier than on other machines.
The power of Linux is the ability to change anything, even on the system layer, no other operating system will let you change the basic functionality of the OS itself while Linux will let you do this. It is also the only operating system you can fully use by booting it up from a USB stick and having the same experience as it was installed on a local hard drive. Among other OS mentioned earlier, Linux is by far the lightest one, taking the smallest amount of memory among the three.
The bad side of the Linux machine is the steep learning curve, among the three mentioned operating systems rest assured Linux is the most difficult to learn and be comfortable in it. The operating system will require you to know the hardware and how computers work in order to fully use its potential. Other things that place it behind are not so wide hardware support compared to Windows and the somewhat confusing distro model.
Linux versions come in form of different distro packages and first-time users will face many of them being left in awe of which one to choose. Also installing drivers and software via a package system can also be a tedious task as well, often being that some version of the driver will not work on the newer version of the Linux distro.
Get a Linux machine if you are well versed in computer technology, if you want great customization of the OS itself or if you do not want to spend money on OS and software since almost entire Linux software is open source.
jZip is a software utility published by Bandoo Media and is classified as a Potentially Unwanted Program. The software is an archive tool that used to compress and extract files in the rar, zip, and other formats. The program is typically bundled upon installation with other unwanted applications and is itself often installed in co-bundles. As of publication time, over 40 AntiViruses have flagged jZip as malicious or potentially unwanted.
It injects itself in Windows shell, providing quick access to the program by right-clicking on any file. jZip displays it's advertising in your browser, instead of the default search results, to better do this, it collects information about your browsing history and your current browsing session, so it can better target ads. This software, upon install, defines an auto-start registry key in your system, this allows the software to launch every time your computer is rebooted, no matter what Windows account you log in to, it also adds Windows Tasks, to allow it to launch by itself at random times, even when closed. Error Causes
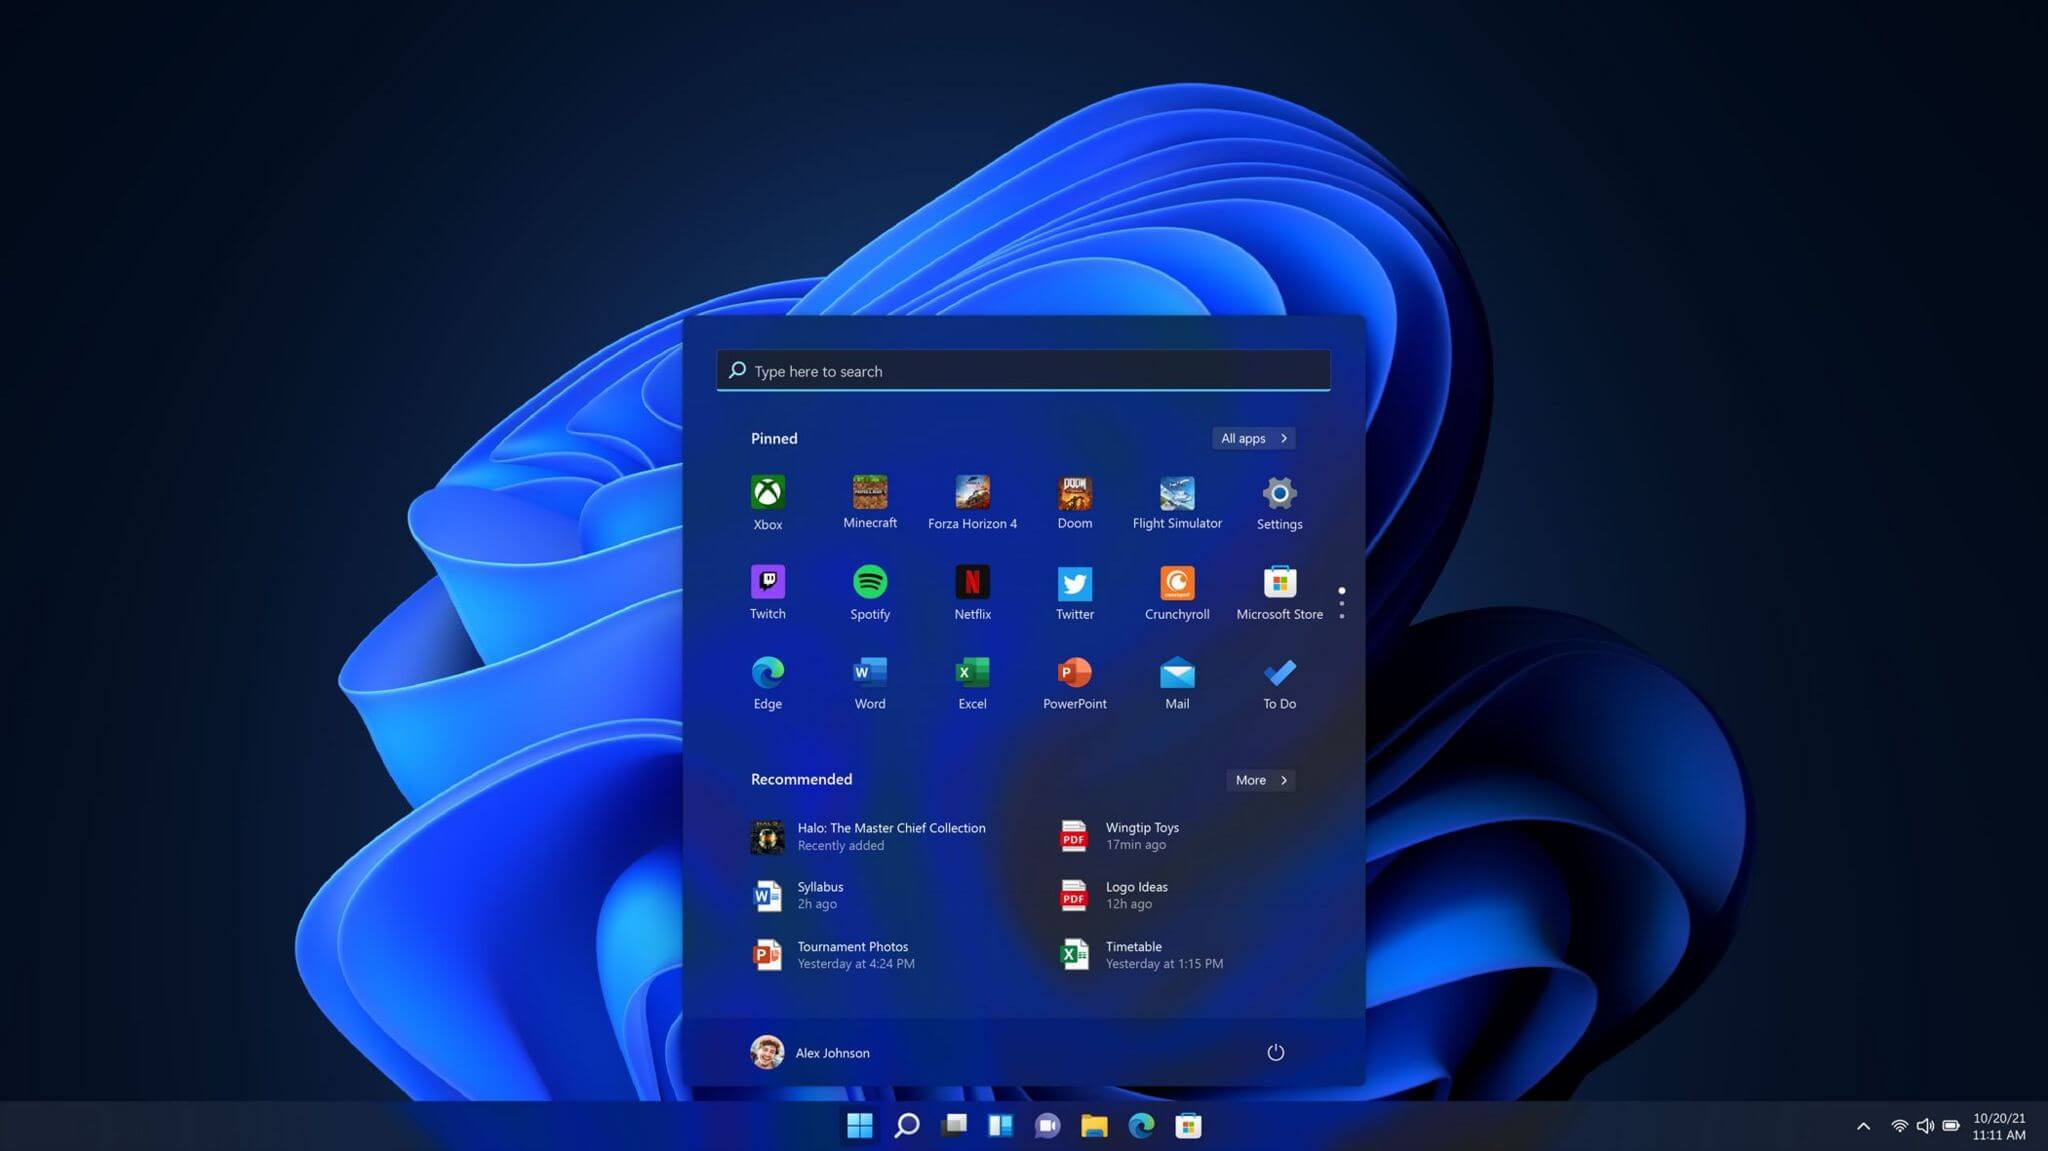 One of the first things that everyone saw when Microsoft has unveiled Windows 11 is its Start menu. Funny enough this is what has caused most of the divide among users, some find it interesting, and some do not like it. Truth is, it is different, and it is centered in the middle instead of the lower left part of the screen.
It has been confirmed however that the Start menu can be moved to any part of the screen so if you want, you could place it on the lower left as it has always been.
Live tiles do not longer exist in the Start menu, instead, we have styled simple icons.
One of the first things that everyone saw when Microsoft has unveiled Windows 11 is its Start menu. Funny enough this is what has caused most of the divide among users, some find it interesting, and some do not like it. Truth is, it is different, and it is centered in the middle instead of the lower left part of the screen.
It has been confirmed however that the Start menu can be moved to any part of the screen so if you want, you could place it on the lower left as it has always been.
Live tiles do not longer exist in the Start menu, instead, we have styled simple icons.
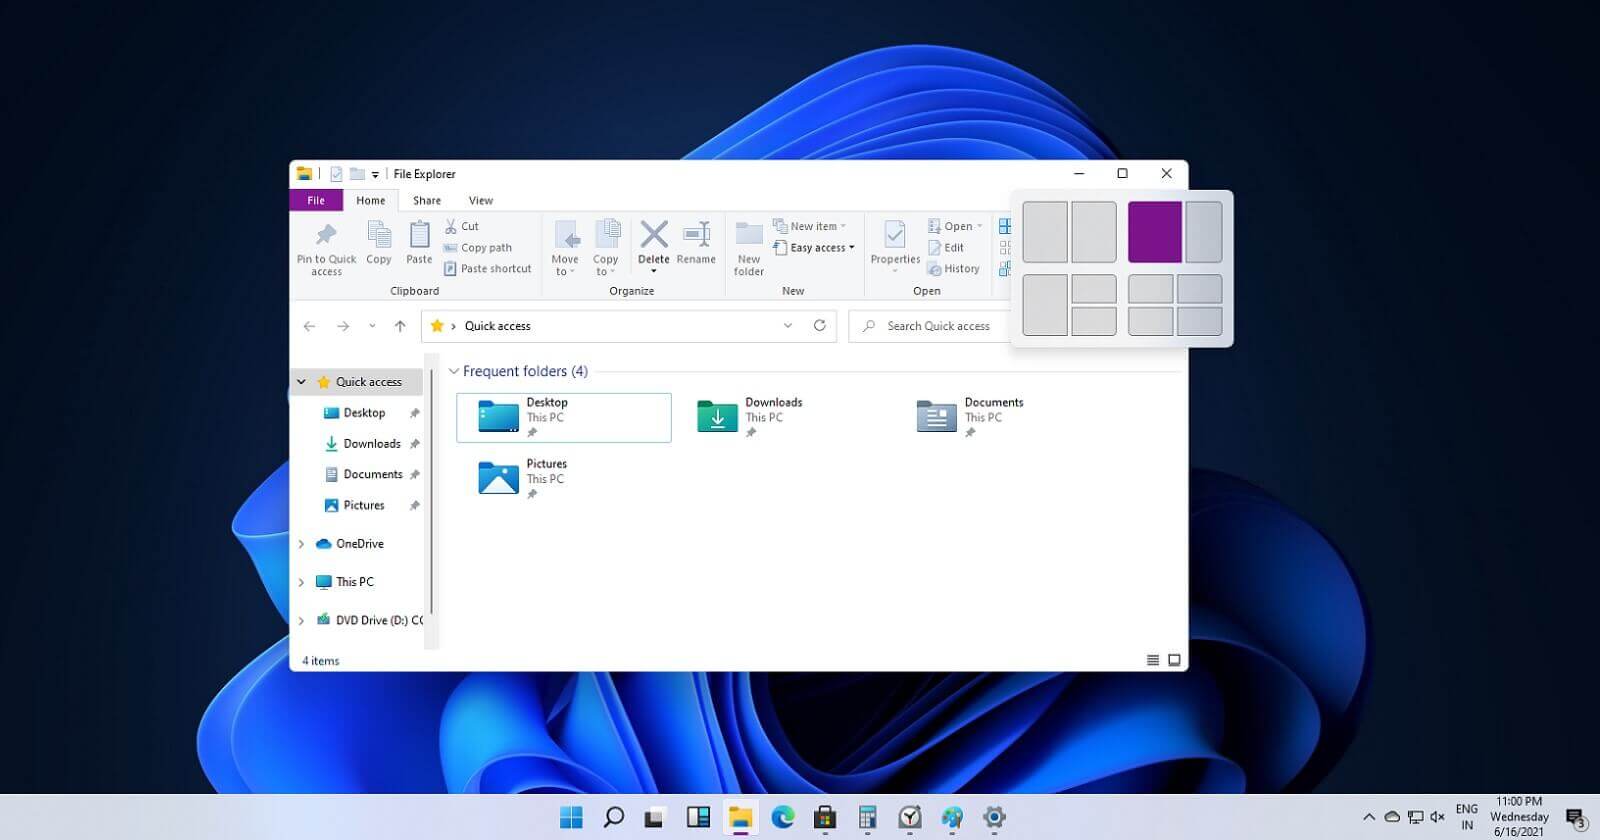 If you have used the cascade option in previous Windows versions then it is most likely that you will like the new Snap controls.
You can quickly snap windows side by side, or arrange them in sections on your desktop just by hovering over maximize button on the title bar.
If you have used the cascade option in previous Windows versions then it is most likely that you will like the new Snap controls.
You can quickly snap windows side by side, or arrange them in sections on your desktop just by hovering over maximize button on the title bar.
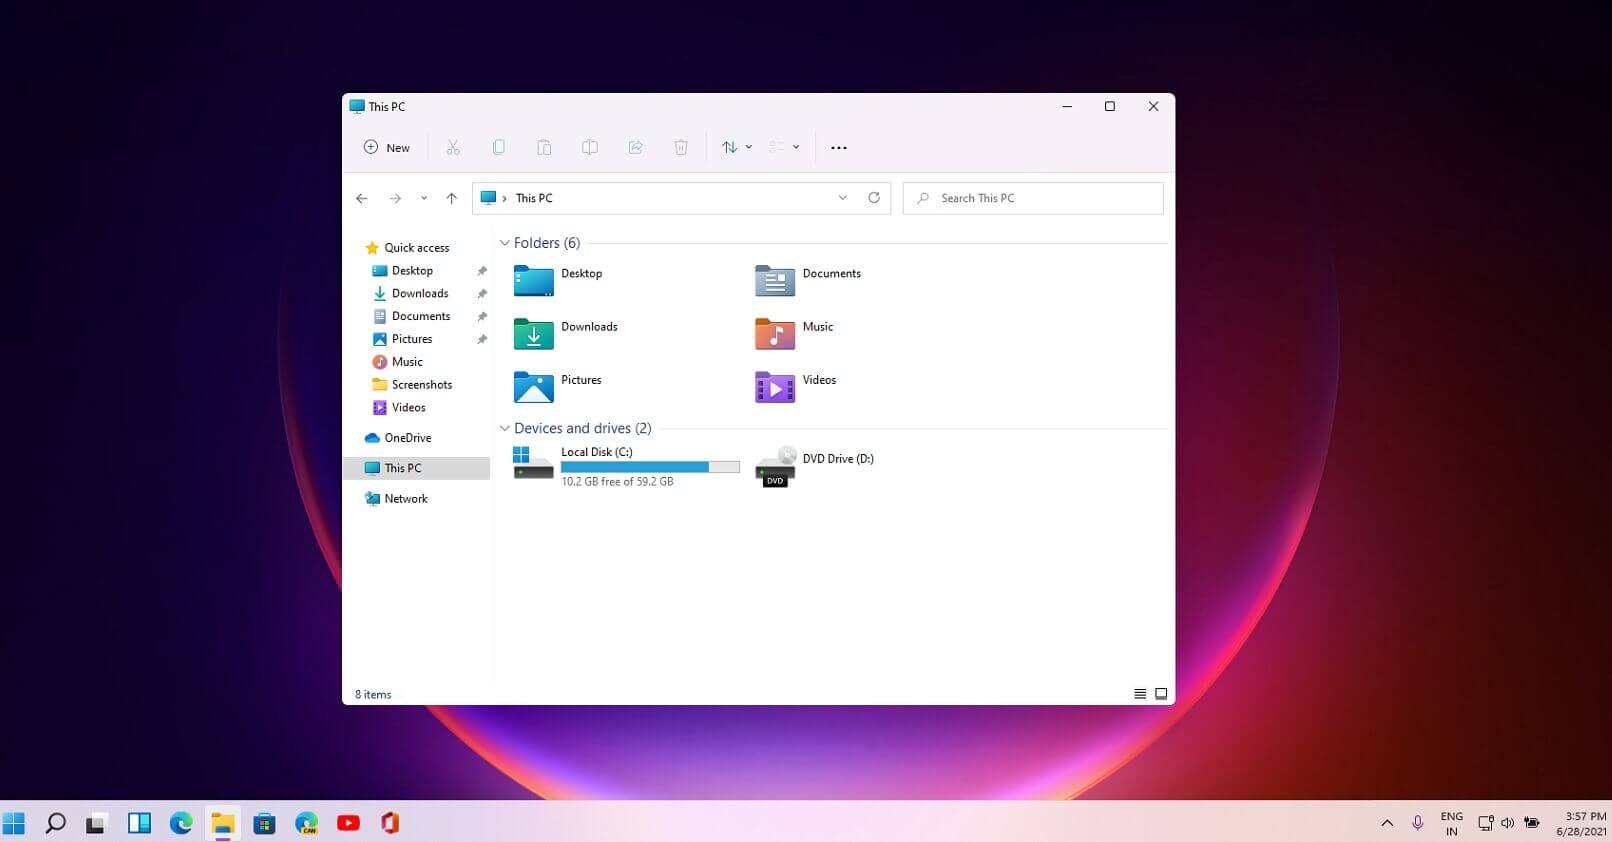 File explorer has gone through some visual and design changes, the ribbon on top has been completely removed and replaced with a header-like feature with a slick and clean design.
The header contains a nice organized and designed single row of icons like cut, paste, copy, rename, delete, and new folder icons.
File explorer has gone through some visual and design changes, the ribbon on top has been completely removed and replaced with a header-like feature with a slick and clean design.
The header contains a nice organized and designed single row of icons like cut, paste, copy, rename, delete, and new folder icons.
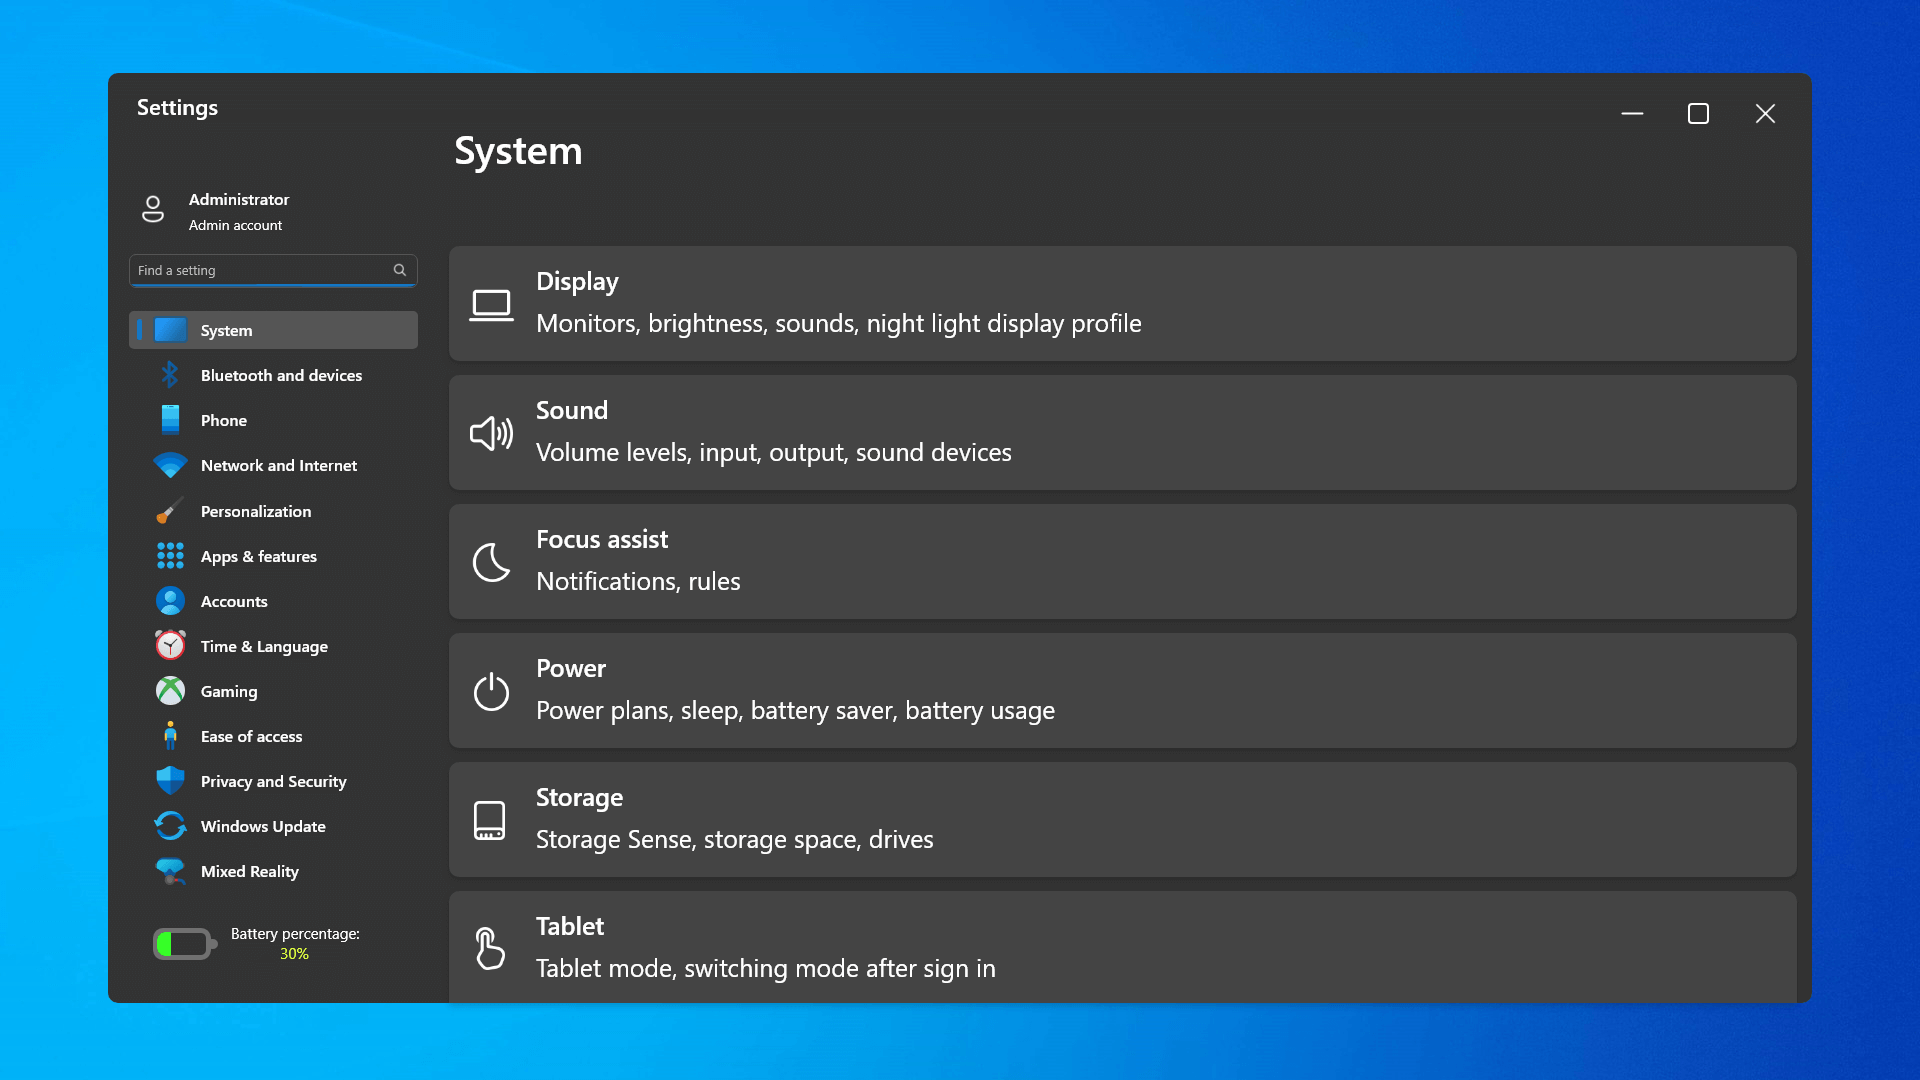 The settings app also has gone through visual and design changes. It has a new design that is very visually appealing and navigation has been simplified and more organized. Finding the right and desired setting is much faster and clearer now.
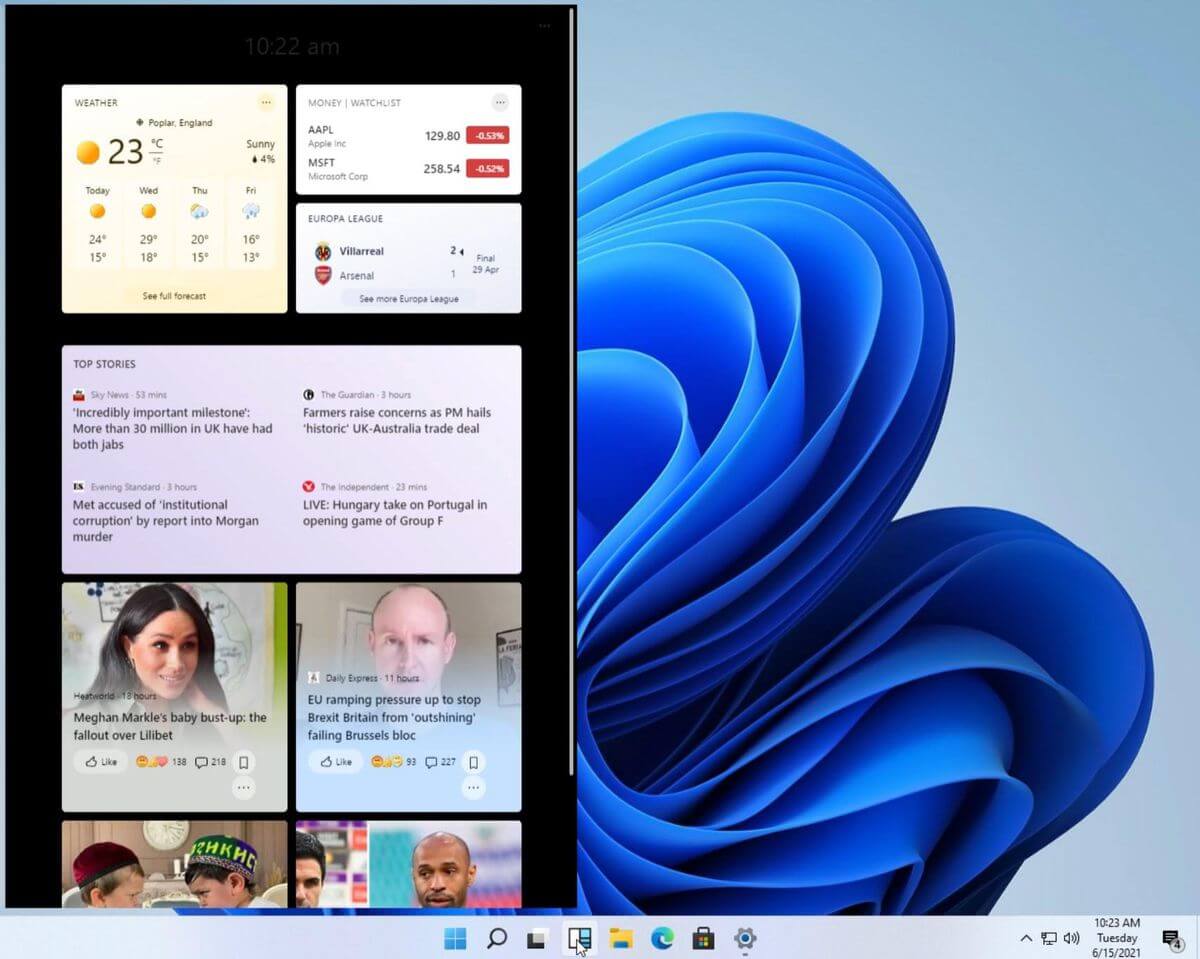 Yes, widgets are back but not like you remember them.
Instead of being all-time present at your desktop like once they used to be, now there is a button on the taskbar which brings the widget bar up that contains desired widgets. This way they are easily accessible and do not clutter desktops.
So far we have weather, news, calendar, and stocks widget but we will see how development on these goes. I expect to have community-made widgets like in old days for all of our needs.
Yes, widgets are back but not like you remember them.
Instead of being all-time present at your desktop like once they used to be, now there is a button on the taskbar which brings the widget bar up that contains desired widgets. This way they are easily accessible and do not clutter desktops.
So far we have weather, news, calendar, and stocks widget but we will see how development on these goes. I expect to have community-made widgets like in old days for all of our needs.
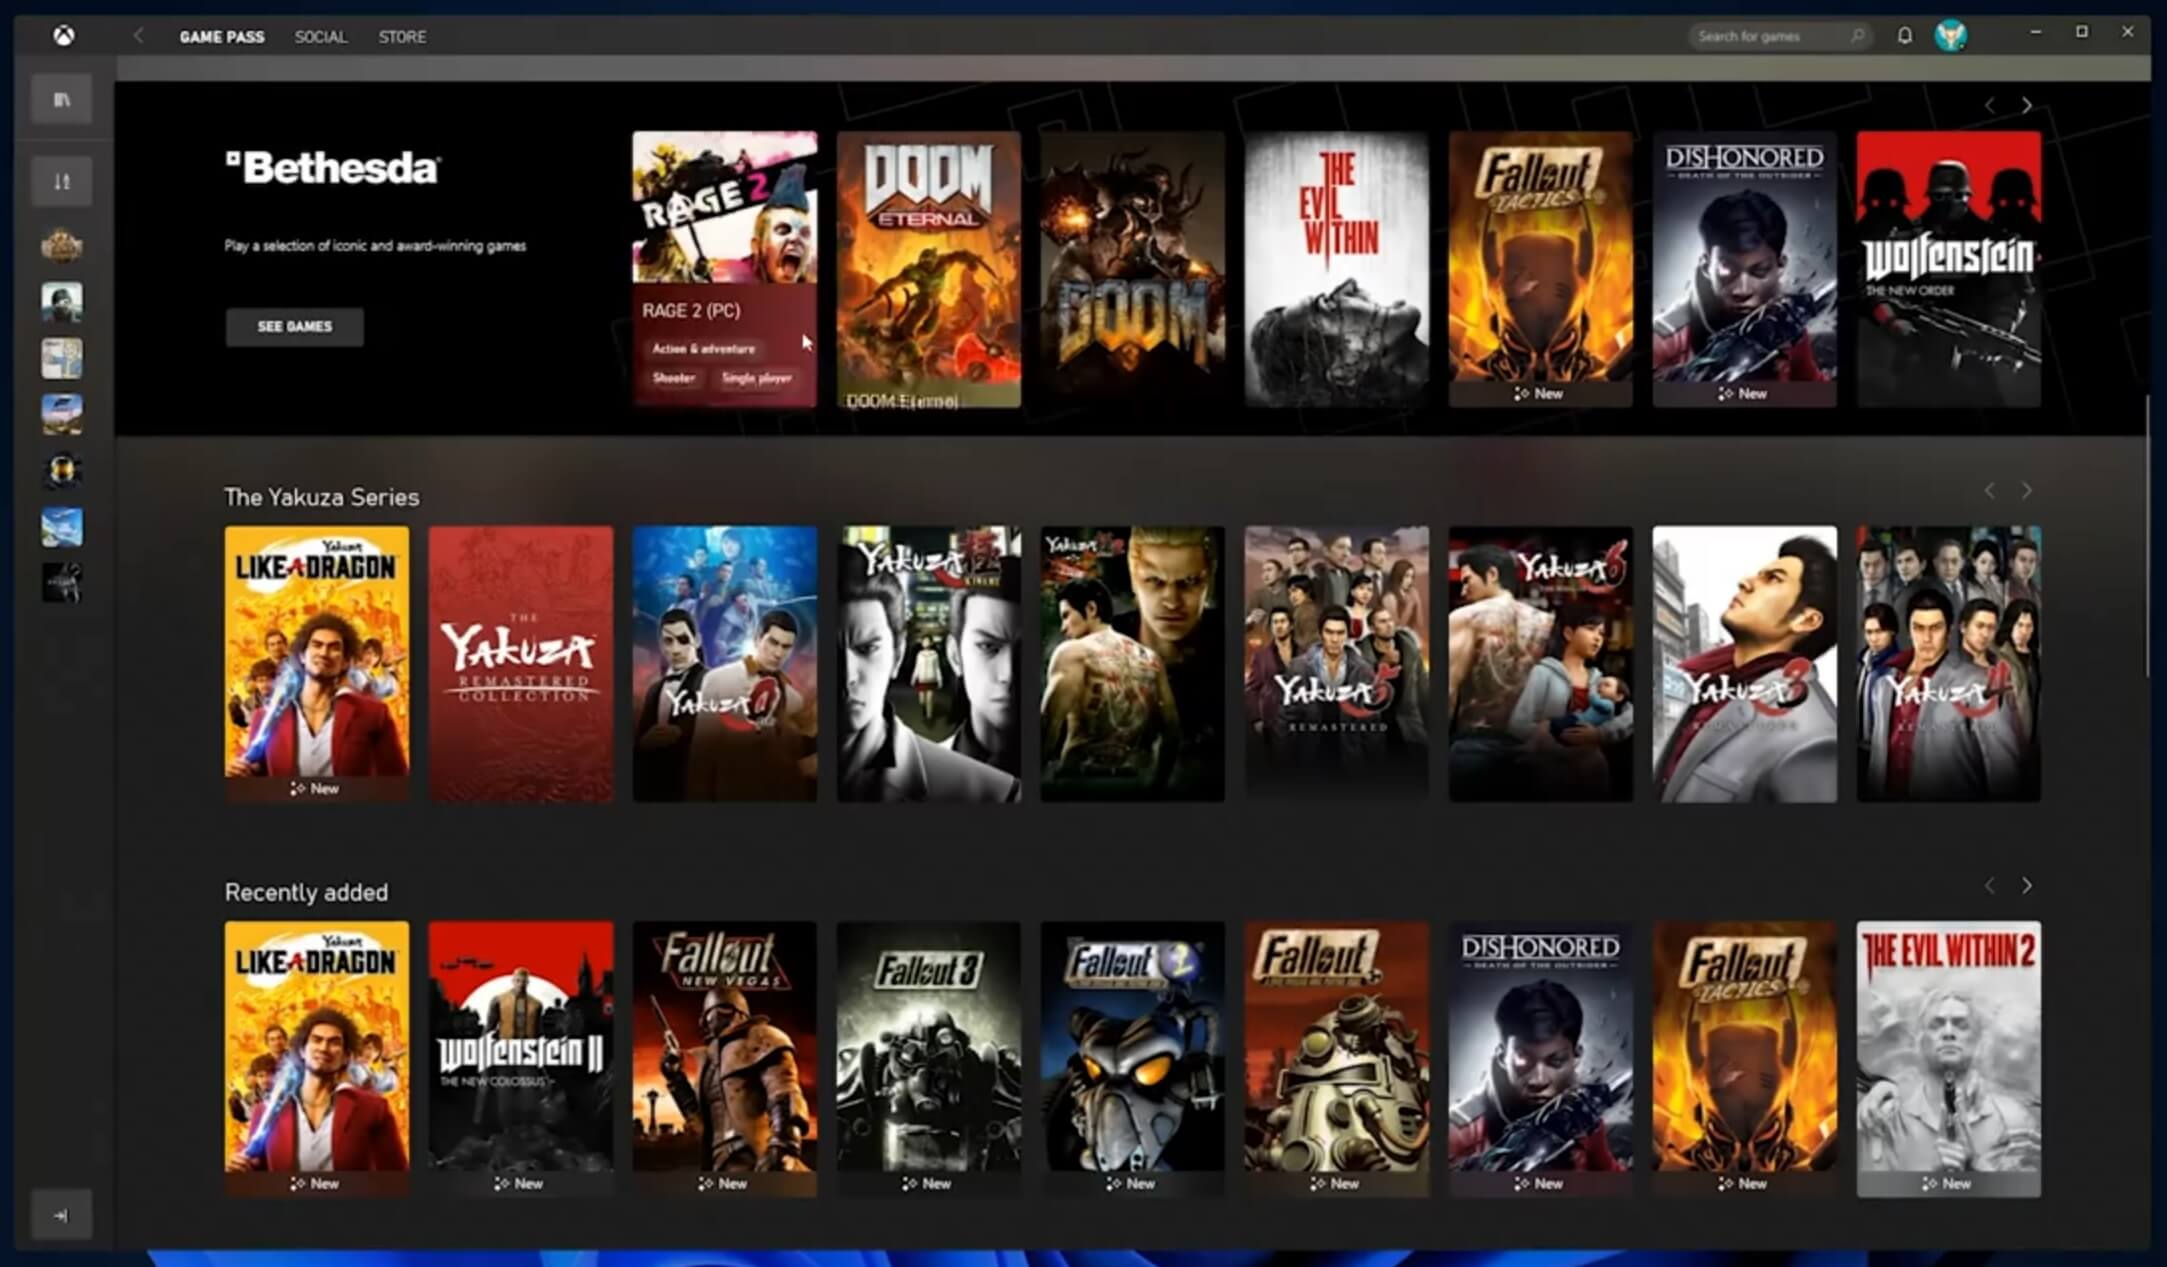 The new Xbox app is now integrated into Windows 11, offering quick access to Xbox Game Pass games, the social parts of the Xbox network, and the Xbox store.
 As widely known by now Windows 11 will require you to have a TPM 2.0 module capable CPU in order to install it.
This system requirement has caused a lot of controversies but essentially it seems that MS's goal is to protect your personal data by using this module.
The upside of course is that your data will be protected much more than in previous Windows versions, the downside, of course, will be that you will need newer hardware to run OS on it.
and that is essentially it, keep on tuned on more Windows 11 information and overall articles tied to PC and technology here at errortools.com
As widely known by now Windows 11 will require you to have a TPM 2.0 module capable CPU in order to install it.
This system requirement has caused a lot of controversies but essentially it seems that MS's goal is to protect your personal data by using this module.
The upside of course is that your data will be protected much more than in previous Windows versions, the downside, of course, will be that you will need newer hardware to run OS on it.
and that is essentially it, keep on tuned on more Windows 11 information and overall articles tied to PC and technology here at errortools.com Sometimes we need and want some apps that are not part of the official Amazon Appstore but having their Fire TV stick prevents us from installing anything that's not in their store, or does it?

You can quickly "jailbreak" given stick and unlock additional installations via different providers. Although the term jailbreaking is associated with illegal and hacker activities rest assured that in this case there is nothing illegal about this procedure and that you are entirely safe.
In order to do this procedure firstly you will have to allow the installation of apps obtained from outside the Amazon Appstore. To do this open the settings menu on your Fire TV Stick and inside settings choose My Fire TV. On the My Fire TV page select Developer Options and inside select Apps From Unknown Sources. The prompt screen will open, choose Turn On to activate the option.
APK installation is enabled now and the next step is to download an app like Downloader that will allow you to get your favorite apps. Downloader is free to download manager fully available on the Amazon Appstore and with it, you can download any kind of file to your device including APKs.
Once installed open the Downloader app and type in the URL or search term in order to find your application of choice but please do get all of your APK from trusted sources in order to avoid exploits and getting malware.
MyWebFace is a browser extension developed by Mindspark. This extension claims to allow users to easily access websites that allow them to make a cartoon portrait of themselves. While this may seem interesting in the beginning, all this extension does is to add links to already popular websites that are easy to find.
When installed MyWebFace changes your default search engine and your home page to MyWay.com.
While the extension is running it gathers user browsing information, allowing it to mine data and better server unwanted ads throughout your browsing sessions. MyWebFace has been marked as a Browser Hijacker by many anti-virus programs, and while not considered malware, it is not recommended to keep it on your computer.
Presented next are essential steps in order to recognize a dying graphic card.