Still sitting on the fence about upgrading to Windows 11 because you don’t know what to expect? Interestingly, the new edition somehow manages to be both a total revamp and still very similar to its predecessor in many ways. It’s really something to experience for yourself.
We do want to give you a sneak peek, though. So here’s an overview of the biggest changes Windows 11 brings to the table.
What’s different in Windows 11?
1. Visual changes
The first thing anyone will notice after switching to Windows 11 is the striking visual difference. The entire interface is smoother, cleaner and more minimalistic than on Windows 10, even resembling the macOS in some instances. Perhaps the most obvious change in appearance is the Start menu and Taskbar location, which is now at the bottom center. It’s actually very neat, but if you’re someone who loves familiarity, don’t worry, you can move it back to the left.
Centralized Taskbar and Start menu
Moreover, you’ll notice that the Taskbar includes a Microsoft Teams icon by default (which you can, of course, remove) and that Live Tiles are gone. The News and Interests section has also been removed - or, shall we say, replaced. As opposed to Windows 10, news, weather forecasts and other information are now displayed as widgets.
To add to the cleanliness of the UI, Microsoft also enhanced the ‘Snap Layouts’ feature to help you better organize your windows and maximize screen real estate. It’s similar to app grouping on your smartphone. In Windows 10 this feature is slightly restricted, as it requires some manual resizing and dragging. In Windows 11, you can just hover over the minimize/maximize option on a window, select a layout and throw the windows in there.
Snap Layouts
2. New accessibility features
Microsoft has certainly paid attention to accessibility with Windows 10, but Windows 11 takes this to a whole new level.
One of the ways Windows 11 has taken things up a notch is by adding the long-awaited ‘Live Captions’ feature and advanced Narrator options.
Live Captions apply both to media played on your PC as well as your own speech when you’re using the microphone. Keep in mind that, as with almost all kinds of subtitles, you have to be prepared for a potential delay. However, it’s barely noticeable and doesn’t take away from the usefulness of this awesome new feature whatsoever.
As for the Narrator, there are three new voice packs to choose from. Microsoft has tried to put emphasis on a more natural voice than we are used to. So, now you can choose between Aria, Jenny and Guy, who will read pretty much anything off your screen out loud. Aside from this, Microsoft has also expanded the list of braille displays supported by the Narrator feature. For users with anxiety or trouble concentrating, a welcomed addition is the Focus app, which is no longer part of the Clock app. It’s now separate and called ‘Focus Sessions’, automatically triggering the Do Not Disturb mode when activated. It blocks all pop-ups and flashes and lets you work in peace until you’re ready to switch it off.
3. Android apps
Android users may rejoice! Windows 11 supports the use of your favorite applications now.
Microsoft has done this by integrating the Amazon Appstore to the Windows 11 Microsoft Store. From there, you can download your favorite Android apps and use them on your PC in a smartphone-like window.
Unfortunately not too many apps are supported at this time, but Microsoft is working on making the emulation possible for many more. Also, the option is only available in specific regions at this moment - check out if you’re one of the lucky ones.
4. Improved gaming performance
Avid gamers will be happy to hear that Microsoft has put some effort into streamlining Windows 11 for their gaming needs.
To give gamers a supreme visual experience, Windows 11 offers the ‘Auto HDR’ feature. As long as your monitor is HDR-compatible, this feature will automatically adjust the colors, brightness and contrast of games without any input from you.
Another update is DirectStorage, which we were introduced to in Windows 10 already. In Windows 11, it’s been improved to tweak loading times and overall gaming performance efficiency even better. The predisposition for it to work optimally is that your device has an NVMe SSD.
The Xbox Game Bar also helps gamers towards a smoother experience. It allows in-game screenshots, viewing processes that are running (similar to the Task Manager), monitoring the CPU and GPU performance and frame rate, integrating the Xbox App and more. There’s also a number of widgets you can now use with the Game Bar, for example the Spotify widget.
Xbox Game Bar
Another cool addition is the Xbox Game Pass, which unlocks hundreds of games to play on your Xbox App, with new additions coming in every month.
5. Smart App Control
Aside from a sleek new look and better accessibility for all users, Windows 11 also comes with a security power-up. Bear in mind that this feature is only available on clean Windows 11 installs.
Smart App Control (SAC) is an AI-powered new feature designed to protect your PC from potential threats. It blocks untrustworthy apps and adware and helps detect potentially unwanted apps, maintaining your PC’s performance and keeping your system safe.
It comes with an ‘Evaluation’ mode, which you should definitely select when running SAC for the first time. That way, the app monitors your usage and assesses whether you’re a candidate for SAC. Some users need it to be on all the time, for others it might be too distracting. Evaluation mode will turn SAC on or off based on your usage.
Don’t disable SAC again unless you’re absolutely sure you don’t need it, since reenabling it will require a fresh install. We recommend you don’t turn it off, as it is a neat feature protecting your data and files from malware at all times.
Summary
Have we piqued your interest in trying Microsoft’s latest OS? It’s a pretty exciting new iteration, but we’ll let you find out for yourself. We hope you like it!
D3dx9_32.dll is basically a type of dynamic link library used to load and run different programs on the PC. The D3dx9_32.dll error message pops on the screen when this file is unable to load successfully. The error message is displayed in either of the following formats on the computer screen:
"The file d3dx9_32.dll is missing" "D3DX9_32.DLL is missing. Replace D3DX9_32.DLL and try again." "File d3dx9_32.dll not found""D3dx9_32.dll not found. Reinstalling might help fix this.""Missing component d3dx9_32.dll"
This error usually pops while using gaming software. The D3dx9_32.dll error is displayed after a game is loaded or before the game-play begins. However, it may also appear in software that uses advanced graphic features.
Solution
Error Causes
D3dx9_32.dll error may occur due to multiple causes. These include:
The problem is related to Microsoft DirectX software. This software includes the D3dx9_32.dll file in its software collection.
Incompatible Video Card Drivers
Improper game installation
DLL File Corruption
Registry issues
Viral infection
Further Information and Manual Repair
To avoid inconvenience, it is advisable to fix the error right away. To resolve it you don’t need to be a technical whiz or hire a technician. Luckily, the D3dx9_32.dll file error is quite easy to fix. Here are some of the best and effective DIY methods that you can try to remove the error:
Method 1 - Install the Latest Version of DirectX
Since D3dx9_32.dll error is related to DirectX software, it is advisable to make sure that you have the latest version of this software installed on your PC.
To install the updated version, simply go to Microsoft’s official website, download the software from there and install it on your PC. To activate changes, restart your computer.
Method 2 - Uninstall and then Re-install Gaming Application
If the error still persists, then the reason for it could be the gaming application. Sometimes D3dx9_32.dll error may also occur due to poor program installation.
Therefore, in this case it is recommended that you first uninstall the program by going to the Add/Remove program option. And once the program is uninstalled, try re-installing it on your PC. Hopefully, it will remove the error.
Method 3 - Restore the Damaged/Corrupt D3dx9_32.dll File
The error may also pop due to the damaged or corrupt D3dx9_32.dll file. This indicated registry issues.
When the registry becomes overloaded with unnecessary and obsolete files, there is not enough space for other files to store. Due to the poor registry maintenance, the system and dll files are often damaged. To restore the damaged D3dx9_32.dll file, you need to clean the registry first.
You can do this manually, but that will be quite time-consuming and slightly technical.
Therefore, download a registry cleaner. A registry cleaner scans all registry-related errors and removes them right away. It cleans the registry and restores the damaged dll files.
Method 4 - Scan for Viruses
If the D3dx9_32.dll error is triggered by viruses, then it is advisable to scan your PC with an antivirus. It will scan and removes all viruses from your system.
Whether D3dx9_32.dll error is related to registry issues or viral infection, download Restoro.
It is a cutting-edge, advanced, and multi-functional PC Fixer. A one-stop solution for all PC-related issues. It is deployed with a powerful registry cleaner, an antivirus, a system optimizer and several other scanners.
The registry cleaner detects and removes all registry errors and repairs damaged Dll files including D3dx9_32.dll file and simultaneously the antivirus utility scans your entire PC for all types of malicious software infecting your system including spyware, Trojans, adware and malware.
The system optimizer feature ensures your PC works at its optimal level.
Restoro PC Fixer is safe and efficient. It has a user-friendly interface which makes it quite easy for all levels of users to operate. In just a few simple clicks, errors are resolved.
In addition to this, you can download it on all Windows PC. It is compatible with all Windows versions.
Click here to download Restoro and resolve D3dx9_32.dll error code on your PC today.
The world today is still sadly under pandemic and by the looks of it, COVID-19 is here to stay, well at least for some time in the near future. Razer seems to think so as well since their upcoming gear is not really what you would expect.
Enter Hazel, a new and upcoming Razer smart mask.
Protection
Hazel mask has a high bacterial surgical N95 filter with fluid resistance that will protect you against large droplets and splashes. A detachable active ventilator regulates airflow and is capable of filtering around 95% of airborne particles. Mask comes with a special charging case that has an auto sterilization UV light that will kill bacteria and viruses inside the case interior while it charges.
When the mask is recharging it will change color from red to green visually showing the level of the current charge. Mask of course has easy to replace filters inside ventilators and Razer is standing by that fully charged mask will last enough for full-day use.
An active ventilation system brings cool air while releasing breathing heat at the same time drastically reducing CO2 inside the mask that could produce dizziness and headache.
Silicon guard is on its edge gluing to around your face in order to prevent exterior air sneaking inside the mask and positioning it firmly so it does not rest on your lips in order for easier and clearer communication.
Hazel personalization and technical features
Hazel has a clear and transparent design making it better for social interaction since other people will be able to see your lips and smiles thus making it more natural. A low light mode that turns on automatically when it is dark outside is also aimed for easier communication.
Speaking of communication, the mask comes with voice Amp technology that has a built-in mic and amplifier thus making your voice lines clear so you are not muffled when wearing the mask itself. Your friends and other people will be able to hear you like you are not wearing a mask at all.
Thicker air loops apply less pressure on ears and can be adjusted for a more secure fit, while the mask itself can be custom-made to fit your face shape.
And of course Hazel comes with 16.8 million colors and a suite of effects with Razer Chroma RBG
Hello and welcome to our Business Email Etiquette. Most people have experience in writing emails at some point before in their lives. However, the emails an average person writes are probably personal emails and not mails for work purposes.
Emails you send to friends are incredibly different in content and context to business emails you would send to customers or employers or even other colleagues in your workforce.
So, if you have a job that involves you writing emails to people in business style, learning business email etiquette is an absolute must for you.
1. Heading layouts
When you are sending emails to friends, you generally lay them out like a memo. This means there is very little detail in the layout besides basic greetings and paragraphs, usually starting with the greetings.
However, with a business email, it is best to lay it out exactly like you would lay out a formal letter. You need to put the company’s address in the right-hand corner and the date as well. Only then must you go on to the greetings.
This will make your email look more formal, making you seem like a professional who knows what they are doing as opposed to someone who just couldn’t be bothered spending the extra time to get the layout right.
2. Proper greetings
When you are sending an email to a friend, you usually greet them informally. If their name was Mary Johnson, you’d probably start your letter with a ‘Hey Mary’ or a ‘Hello Mary.’
However, this is not considered a professional way to write an email to a customer or other important person in your business. Again, you must use the proper method that you would greet someone with were you writing them a formal letter instead.
If your customer is Mary Johnson again, you should greet her with respect. ‘Dear Ms. Johnson’ would be the most appropriate way to start off your letter’s actual body in this case. If you do not know the recipient’s name, then you should start with a simple ‘Dear Sir or Madam.’
Politeness will always get you incredibly far, no matter what line of work you are in.
3. Informal language
You should get straight to the point with your email. Don’t dawdle on with it like you would if chatting to a friend and don’t write it how you would speak either.
You use language that sounds impressive and smart while not using such obscure language that your recipient doesn’t know what you are saying. All the time, you must keep it informal where possible, possibly even impersonal as well.
It will make you seem very professional in the long run.
4. Signing off
When you are sending your email, you must end it as you would with a letter also. Don’t just say ‘Bye’ and your first name; that is too personal.
You need to say ‘yours sincerely if you know the name of the recipient and ‘yours faithfully’ if you do not. Then you should end with your full name and whatever position you have at the company. (CEO, technical staff etc.)
So there you have it! All you need to do now is to show your boss that you can handle the emails from now on!
If you are following the latest gaming trends and spend a lot of time on social media, watching streams, etc. you might be under impression that gaming as a hobby is very expensive. If you plan to play the latest games on a very large screen in their highest setting that might be true but if you do not care about that you can still play games and spend much less money on them.
That being said we are here to share with you some tips and tactics on how to play good games with minimum money spent.
Do not buy games the moment when they are released
Buying a game on its launch date is maybe the worst and most expensive thing you can do. Games have their highest price on launch day but sadly with the current state of the industry, they are in their worst state as well. Games eventually became better over time after patches are released but so does their price drops after the hype has calmed down. So if you really must have some specific game on its launch day, go for it but know that by doing so you are getting the worst version of the game for its higher price.
Wishlist games and wait for the sale
All services today have a wishlist, very good and money-saving tactic is to wishlist interesting titles and wait for them to be on the sale. Services will usually have the option of sending you an email once your wishlist titles are on sale so you will be notified once they do. A good tactic as well is to wait for large sales like for example summer, winter, easter sales, or many other seasonal ones.
Get free games
Some online stores are offering free games from time to time and some are always offering some titles as gifts in order to get customers to their platform. EPIC has become famous for gifting some great titles over the past years completely for free and there are a lot of free-to-play games on each platform that you can play.
Get second-hand PC
Having a new computer is great but if your budget is tight you might consider getting your PC as a second hand instead of the new one. Hardcore games will switch components more frequently than your typical users and usually the components will be sold cheaper and be more affordable.
Play games on some older devices in general
Many games today are available on many platforms not only just on your typical PC. Same titles are available on your mobile phones, tablets, and even on your Android TV. Many titles will not even require the latest technology or monster of a computer in order to run them. You can also lower game settings and play many games on lower hardware if you do not mind not having top graphics settings.
Play over the cloud streaming
If you are very tight on budget but want to enjoy new games in their full glory there is always the option to play games via a cloud streaming service, it is not exactly a mega cheap option since it has a monthly fee but it is cheaper than some high-end gaming computer. If you combine this with the game pass you can enjoy the latest games with high-quality settings and pay it on a monthly basis.
A couple of Windows 10 users recently reported getting an error that says, “The group or resource is not in the correct state to perform the requested operation” while opening UWP Applications as well as accessing the File Explorer.
You can encounter this kind of error mostly on File Explorer, Microsoft Store application, and other UWP applications. This indicates that this error occurs during both the Windows Classic Application and the Universal Windows Platform Applications.
There are several ways to fix this error. You can try to run a System File Checker scan, or run the DISM tool or the Program Compatibility troubleshooter or Windows Store Apps troubleshooter or try to reset or reinstall Windows 10 or the affected application that's not working. However, before you do any of these troubleshooting tips, you can try to perform System Restore first as it could undo the changes you’ve made in the system which might have caused the error.
Tap the Win + R keys to open the Run dialog box.
After that, type in “sysdm.cpl” in the field and tap Enter.
Next, go to the System Protection tab then click the System Restore button. This will open a new window where you have to select your preferred System Restore point.
After that, follow the on-screen instructions to finish the process and then restart your computer and check if the problem is fixed or not.
If System Restore wasn’t able to fix the error, then you can refer to each one of the following options.
Option 1 – Try to use the DISM tool
You might want to repair potentially corrupted files in your system as having them could also trigger the “The group or resource is not in the correct state to perform the requested operation”. To repair these corrupted system files, you can run the DISM commands:
Tap the Win + X keys and click on the “Command Prompt (Admin)” option.
After that, input each one of the commands listed below sequentially to execute them:
Dism /Online /Cleanup-Image /CheckHealth
Dism /Online /Cleanup-Image /ScanHealth
Dism /Online /Cleanup-Image /RestoreHealth
Once you’ve executed the commands given above, restart your computer and check if the DCOM error is now fixed.
Option 2 – Run the System File Checker Scan
Aside from the DISM tool, you can also run a System File Checker scan. It is another built-in command utility that helps in restoring corrupted files as well as missing files. It replaces bad and corrupted system files to good system files that might be the cause why you’re getting the error. To run the SFC command, follow the steps given below.
Tap Win + R to launch Run.
Type in cmd in the field and tap Enter.
After opening Command Prompt, type in sfc /scannow
The command will start a system scan which will take a few whiles before it finishes. Once it’s done, you could get the following results:
Windows Resource Protection did not find any integrity violations.
Windows Resource Protection found corrupt files and successfully repaired them.
Windows Resource Protection found corrupt files but was unable to fix some of them.
Reboot your computer.
Option 3 – Try to run the Program Compatibility Troubleshooter
You might also want to run the Program Compatibility Troubleshooter. This built-in troubleshooter is available in the Windows Update & Security section. From there, select Troubleshoot. This will find a list of programs for you and since you have already downloaded the driver files, just click on Not Listed located at the top of the program list. After that, browse and select the driver files and then let the program do its job. In addition, you can try to run the Windows Store apps troubleshooter as it can also help you resolve the problem.
Option 4 – Reset your computer
Tap the Win key or click on the Start button located in the Taskbar.
Then click on the Power button at the bottom right portion of the screen.
Next, press and hold the Shift key on your keyboard and then click on Restart. This will restart your Pc into the Advanced Startup options.
Note: Once you have access to the Advanced Startup options, you have to go to the setting which allows you to Reset your Windows 10 PC. All you have to do is select Troubleshoot > Reset this PC to reach the following screen
Afterward, select either the “Keep my files” option and then proceed to the next on-screen instructions that follow to reset your Windows 10 computer without losing your files.
Microsoft has presented its next version of their flagship product, Windows 11, and feelings are divided among users.
Some users like it very much and eager to upgrade, some do not like the graphic overhaul it went through, but overall I think Microsoft has done a good job with it.
Here in this article, we will discuss some of the new features which Windows brings to the table, well at least ones that were showed, I am sure there are plenty more which we will see once OS has been released.
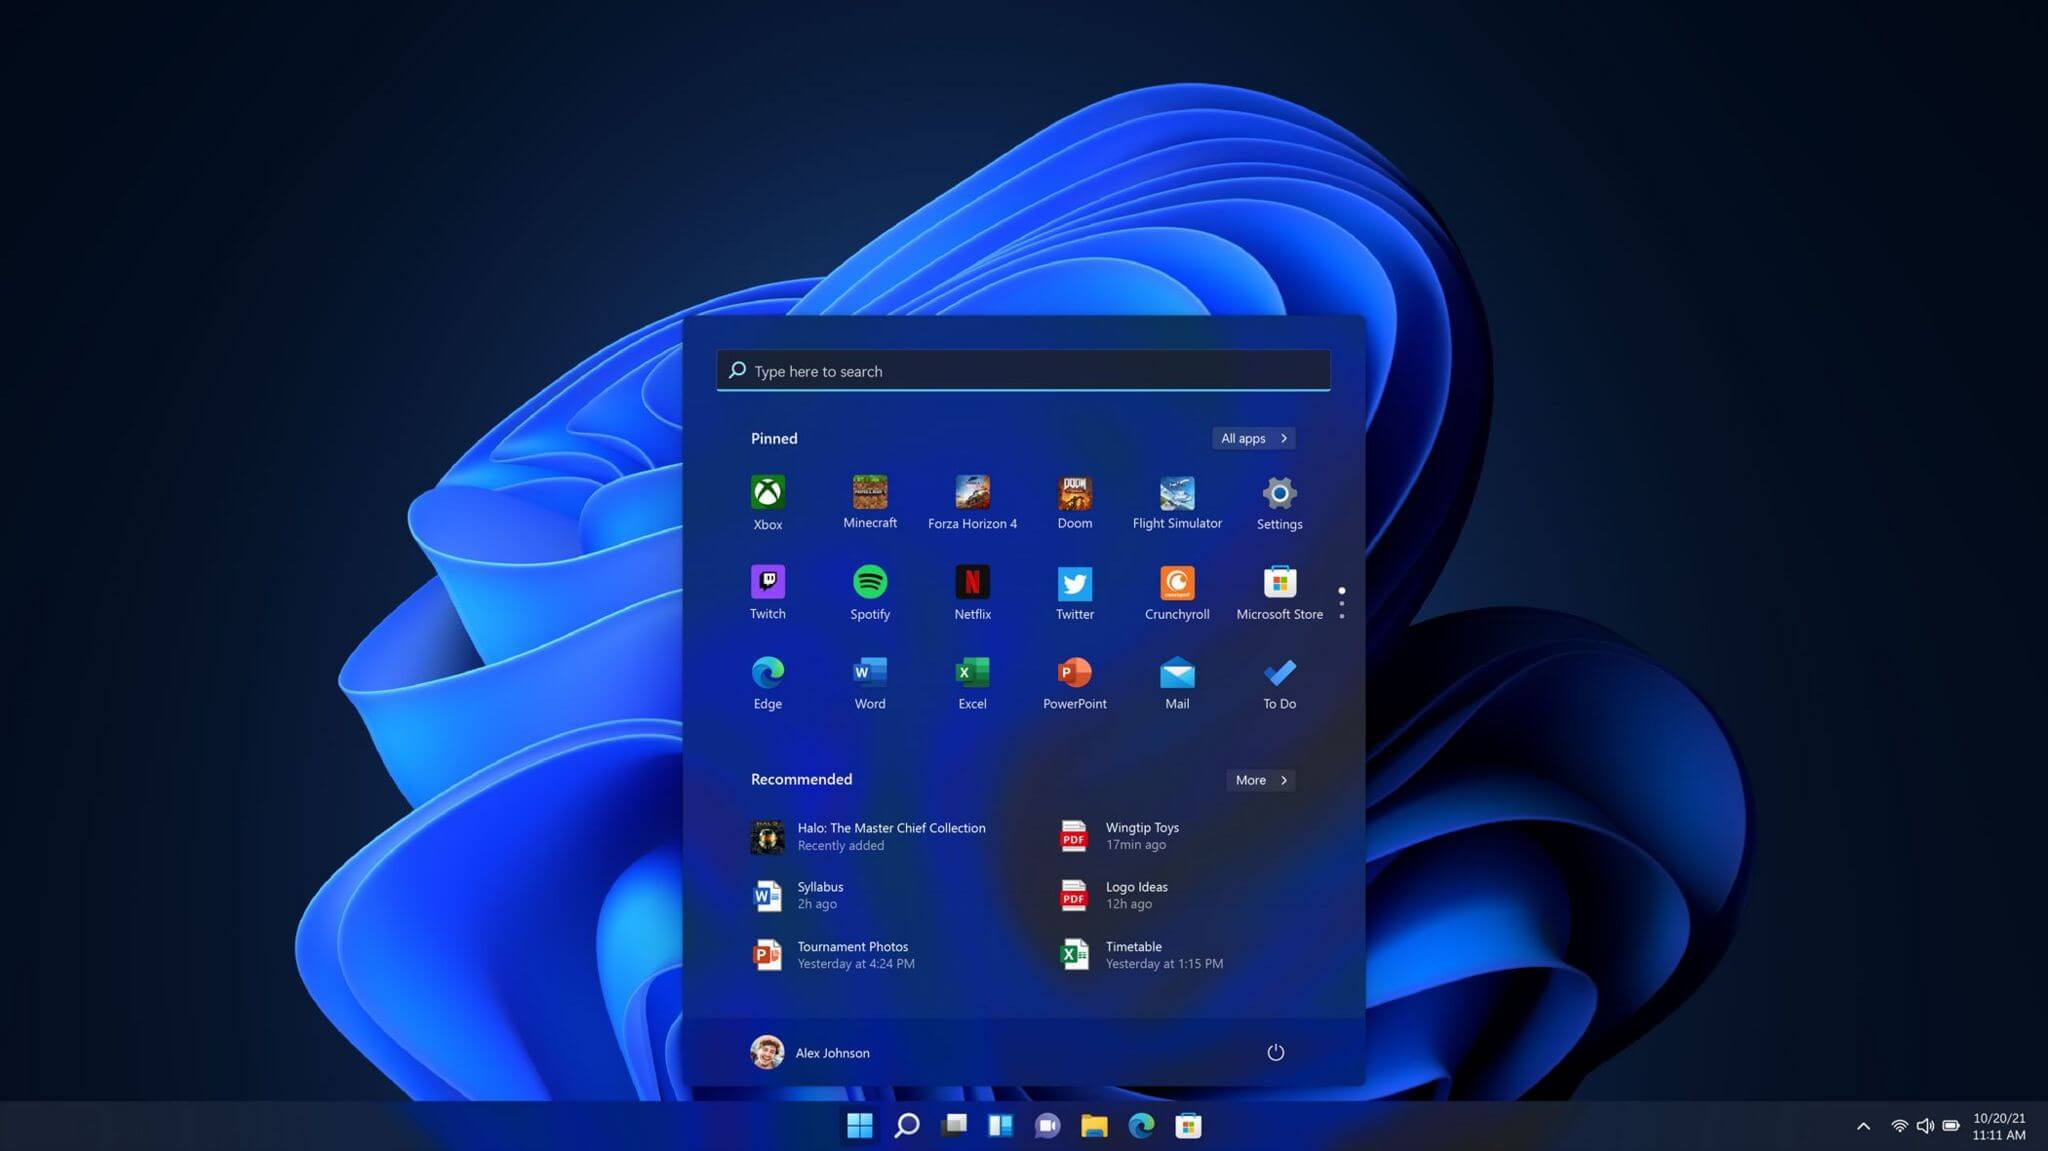
New Start menu
One of the first things that everyone saw when Microsoft has unveiled Windows 11 is its Start menu. Funny enough this is what has caused most of the divide among users, some find it interesting, and some do not like it. Truth is, it is different, and it is centered in the middle instead of the lower left part of the screen.
It has been confirmed however that the Start menu can be moved to any part of the screen so if you want, you could place it on the lower left as it has always been.
Live tiles do not longer exist in the Start menu, instead, we have styled simple icons.
Windows 11 Snap controls are great
If you have used the cascade option in previous Windows versions then it is most likely that you will like the new Snap controls.
You can quickly snap windows side by side, or arrange them in sections on your desktop just by hovering over maximize button on the title bar.
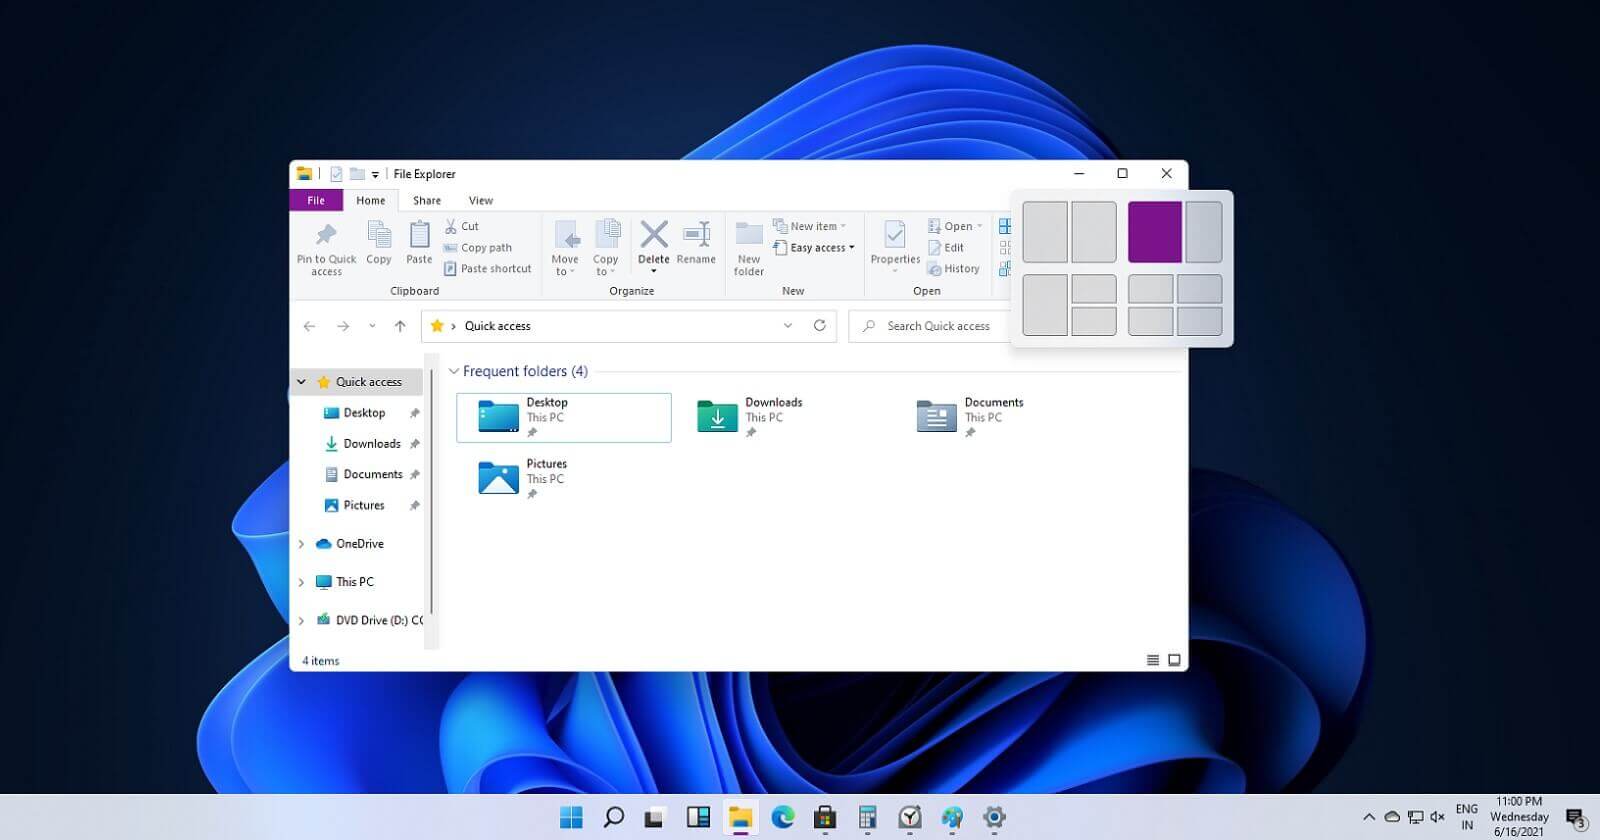
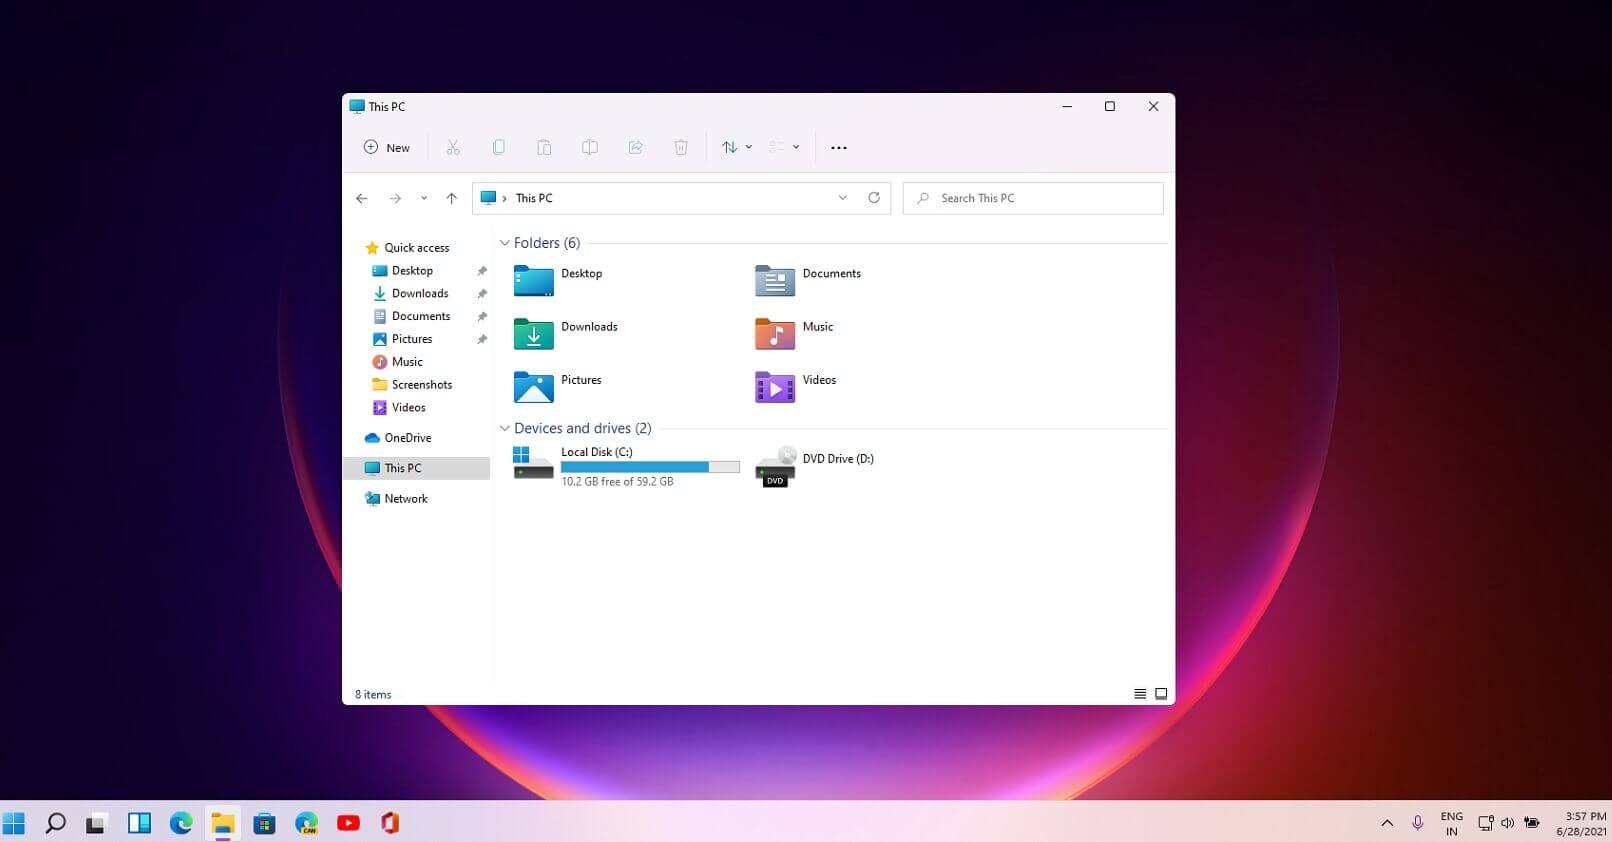
Windows 11 File Explorer
File explorer has gone through some visual and design changes, the ribbon on top has been completely removed and replaced with a header-like feature with a slick and clean design.
The header contains a nice organized and designed single row of icons like cut, paste, copy, rename, delete, and new folder icons.
Settings app ovberhaul
The settings app also has gone through visual and design changes. It has a new design that is very visually appealing and navigation has been simplified and more organized. Finding the right and desired setting is much faster and clearer now.
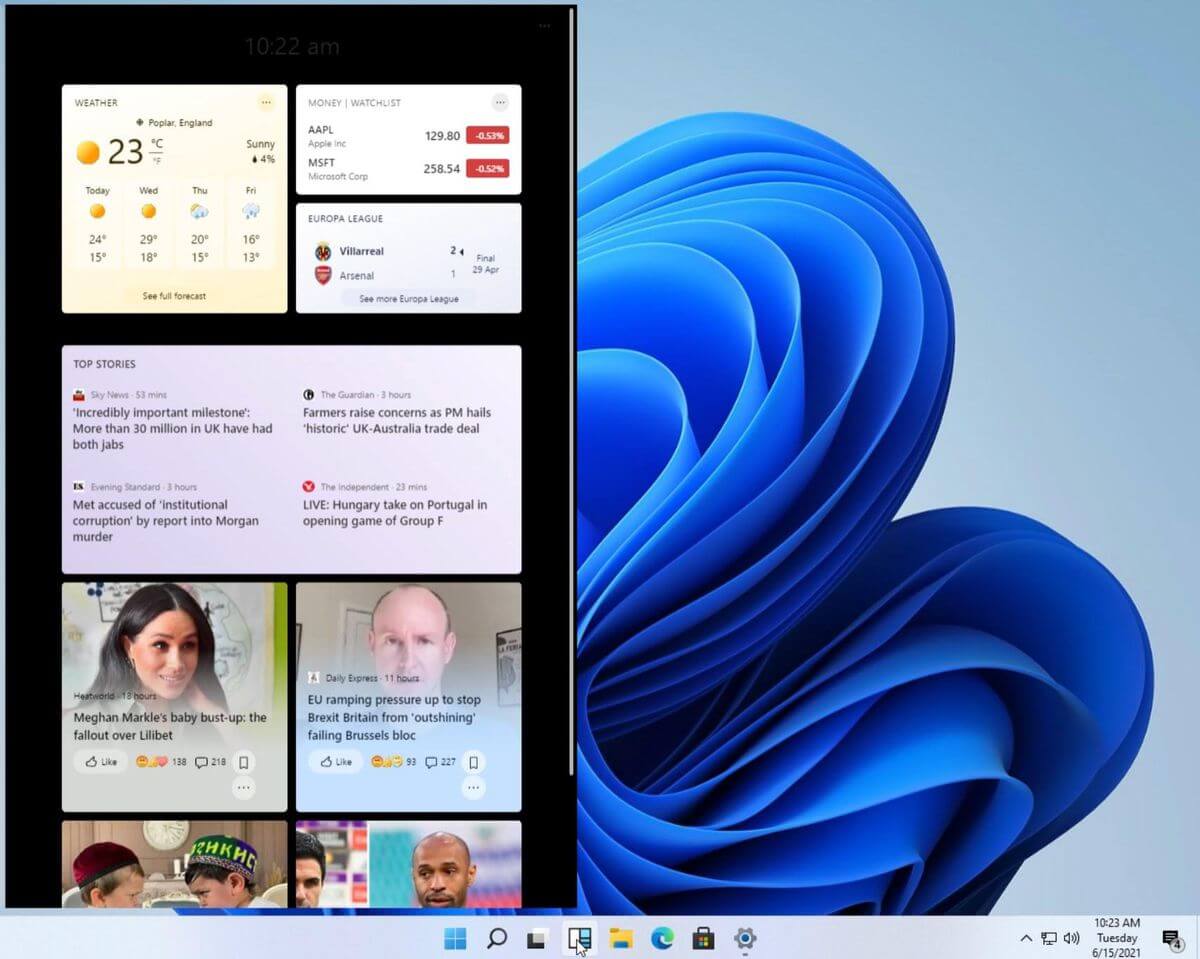
Widget tab makes comeback in Windows 11
Yes, widgets are back but not like you remember them.
Instead of being all-time present at your desktop like once they used to be, now there is a button on the taskbar which brings the widget bar up that contains desired widgets. This way they are easily accessible and do not clutter desktops.
So far we have weather, news, calendar, and stocks widget but we will see how development on these goes. I expect to have community-made widgets like in old days for all of our needs.
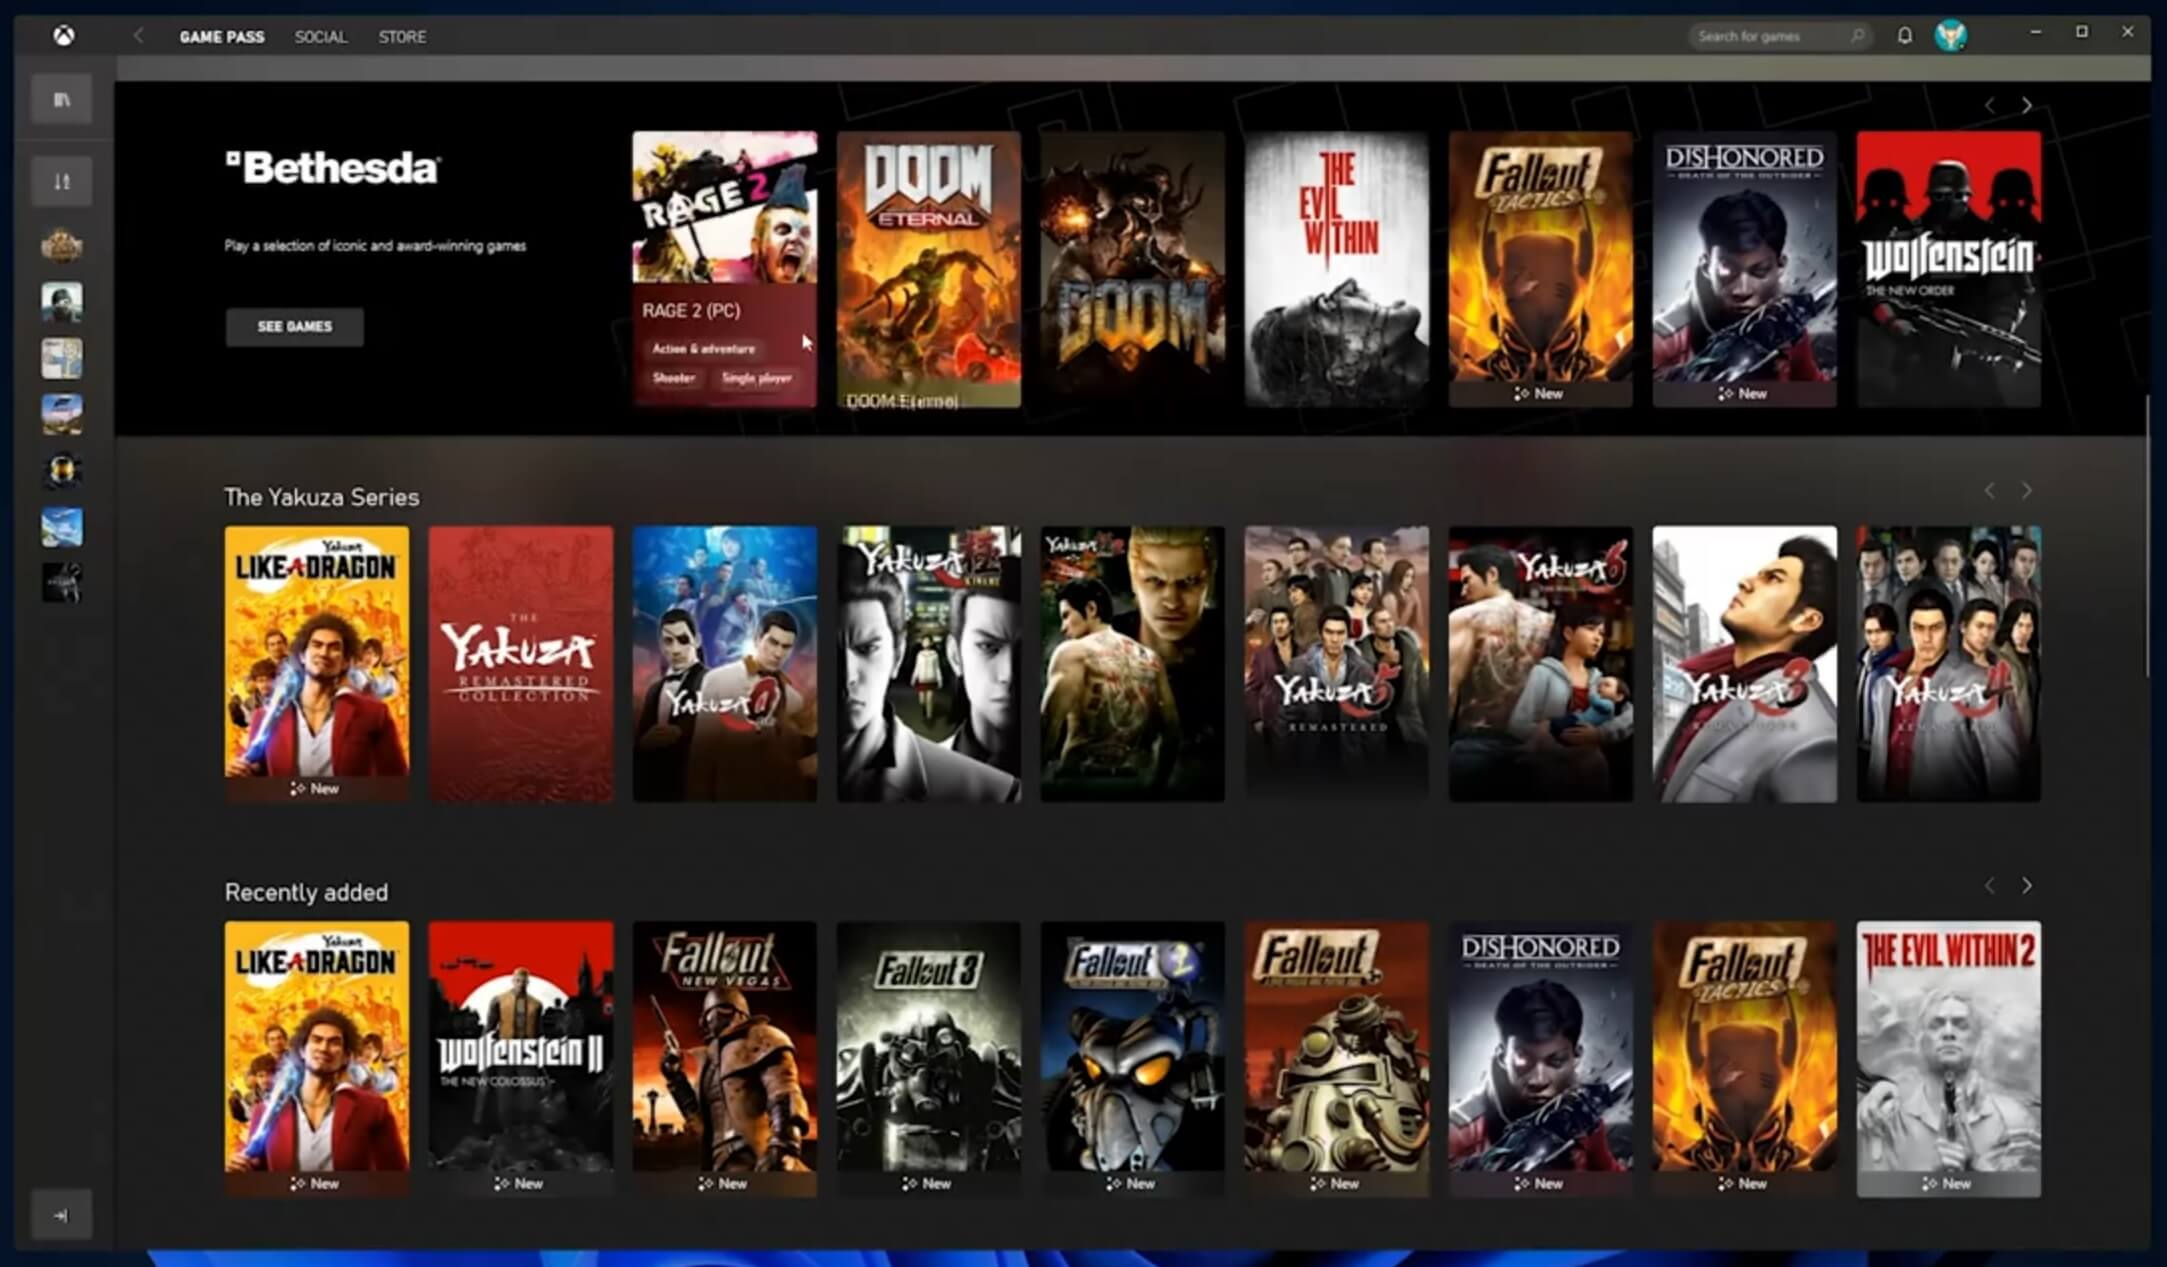
XBOX app
The new Xbox app is now integrated into Windows 11, offering quick access to Xbox Game Pass games, the social parts of the Xbox network, and the Xbox store.
Security and TPM 2.0 in Windows 11
As widely known by now Windows 11 will require you to have a TPM 2.0 module capable CPU in order to install it.
This system requirement has caused a lot of controversies but essentially it seems that MS's goal is to protect your personal data by using this module.
The upside of course is that your data will be protected much more than in previous Windows versions, the downside, of course, will be that you will need newer hardware to run OS on it.
and that is essentially it, keep on tuned on more Windows 11 information and overall articles tied to PC and technology here at errortools.com
Users are reporting that randomly their screen will just go black for a second and come back. When this happens, it usually distorts any video currently on the screen; sometimes, they can resume working on the PC normally. However, when they view the event logs, they see the error message Display driver nvlddmkm stopped responding and has successfully recovered.
In this article, we will address solutions to this issue and how to not have it again.
Remove Aura iCUE plugin (applies to only ASUS motherboards)
Some PC users discovered that iCue adds an Aura plugin for ASUS MOBOs. That, combined with EVGA Precision X1, was causing the error it seems – this was determined when the screen would turn off and on when opening EVGA x1 software. In this case, the issue was resolved by removing the Aura iCUE plugins.
Change Power Management mode
Right-click the battery icon on the notification area on the right of the Taskbar.
Select Power Options.
In the Power Options window, locate your current Power Plan.
Select High performance, if that’s not your current power plan.
Now, click on Change plan settings next to it.
Now click on Change advanced power settings.
Expand PCI Express section.
Expand Link State Power Management.
Now set power saving to Off for both On battery and Plugged in state. This would fix any issues caused by the low power of the video card.
Click Apply > OK to save changes.
Update graphics driver
Go into device manager
Expand display adapter section
Right-click on adapter
Click on update driverReboot
Rollback graphics driver
Go into device manager
Expand display adapter section
Right-click on adapter
Click on Roll back driverReboot
Uninstall and reinstall graphics card driver
Go into device manager
Expand display adapter section
Right-click on adapter
Click on Uninstall deviceReboot
Replace the graphics card
If everything else failed, replace the graphic card
Microsoft has started to use group along with every open window in the Taskbar ever since the release of Windows 10. Early on, they used to show an individual entry for each one of the windows after grouping them which makes the taskbar look cleaner and organized. However, the main issue lies in the fact that you have to hover on your desired window to get on to them. At the time of writing, you need to tap the Ctrl key and click on the taskbar icon to open the last active window but you have to only click on the program’s taskbar icon after you apply the tweak given in this post for the last active window to open. Take note that the “Last Active” windows feature will only work if the taskbar buttons are combined.
Before you get started doing the instructions given below, you need to create a System Restore Point first since you will be dealing with registry files and modifying some of the critical settings in Windows 10. Once you’ve done this, proceed to the given steps below.
Step 1: Tap the Win + R keys to open the Run dialog box and then type “Regedit” in the field and hit Enter to open the Registry Editor.
Step 2: If a User Account Control or UAC prompt appears, just click on Yes to proceed to open the Registry Editor.
Step 3: Next, navigate to the following registry path:
Step 4: From there, right-click on the right side of the panel and select New > DWORD (32-bit) and then name it “LastActiveClick”.
Step 5: After that, double click on the newly created DWORd to modify its value. Put “1” as its value data.
Step 6: Then click OK and close the Registry Editor.
Step 7: Now restart your computer to successfully apply the changes made.
Note: In case you want to revert back to the default configuration, all you have to do is set the value data of LastActiveClick to “0” or simply delete that DWORD and restart your computer to successfully apply the changes made.
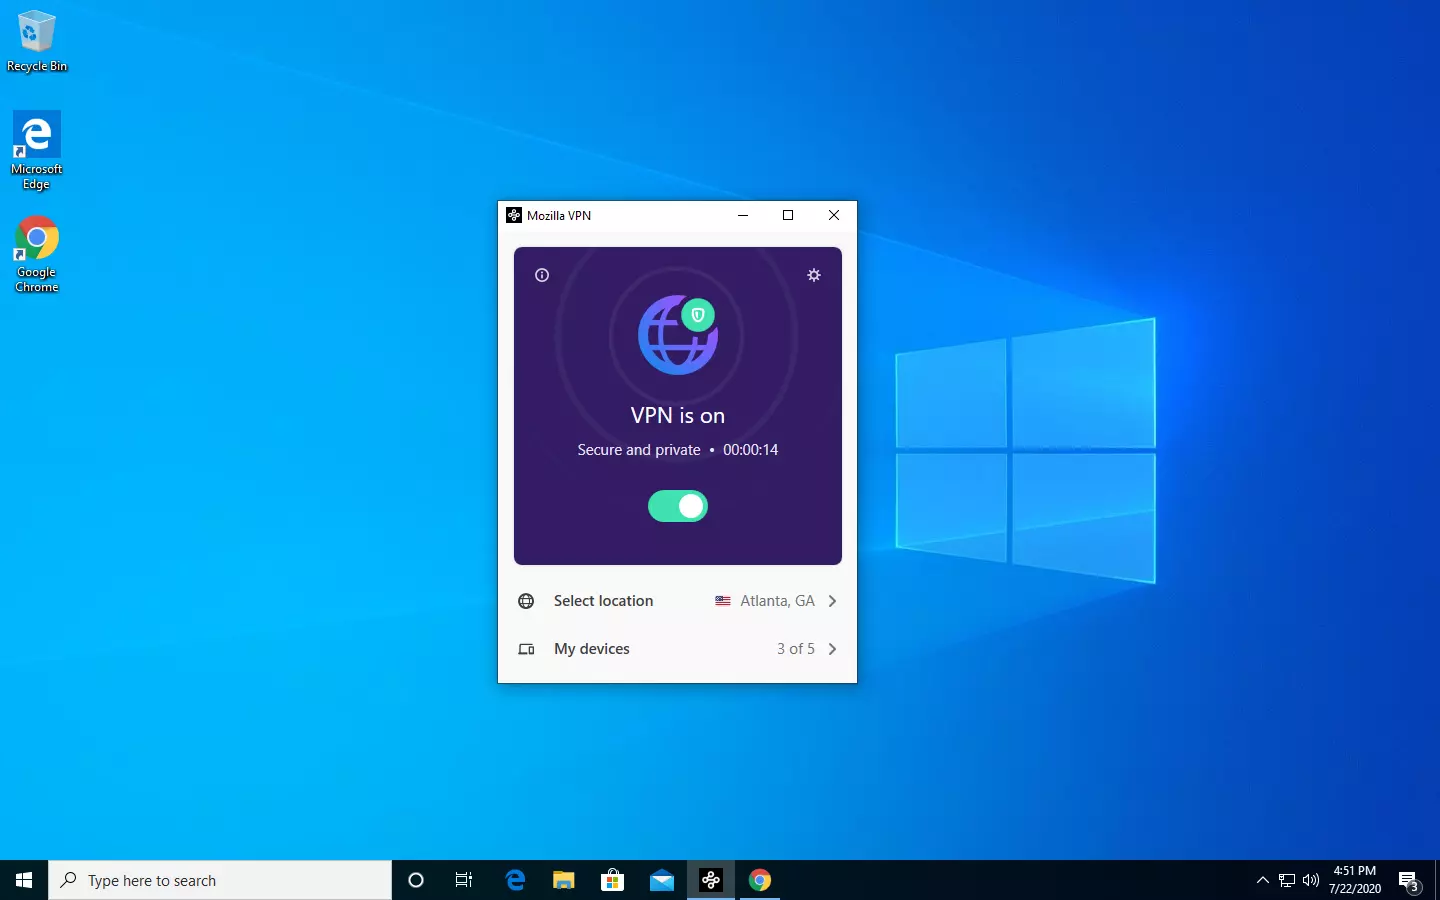
The new thing from Mozilla is not a browser, it is a VPN!
Besides Firefox, Mozilla offers now Firefox Relay, an app helping you to mask your email and phone number, and a new Mozilla VPN.
Mozilla has recently announced a new subscription model that will let you use all products together for $6.99 per month. Although this is a little more expensive than the competition that goes around for $5 per month note that with this subscription you are having access to all services, not just VPN.
VPN will not only hide your IP address but will also make sure websites cannot access your real location and it encrypts all of your network activity. Relay will give you protection against spam, serving as a shield for your email and limiting spammers from access to your real email address and phone number. With Mozilla subscription will let you use both services.
0x8007042c is a Windows Firewall error code. This error hampers your ability to turn on Windows Firewall on your PC. Firewall is a network security system.
It establishes a barrier between a trusted, secure internal network and another network (the internet) that is assumed unsecure.
Error 0x8007042c is displayed in the following format:
“0x8007042c” error message when you try to start Windows Firewall
Solution
Error Causes
Error 0x8007042c may pop up on your computer screen because of many reasons. These include:
Firewall service is disabled
Malware infection
Registry corruption
Further Information and Manual Repair
The good news is that this error code is easy to resolve. To repair, you don’t to be technically sound or hire a professional for the job. Try our DIY methods illustrated below to fix the problem by yourself in a few minutes.
Method 1 - Start Firewall Manually
This method allows you to start Windows Firewall service manually and then make sure that it starts automatically in the future. This can be done by following these steps, first, go to the start menu and then type services in the search box.
Right-click services and then click RUN as Administrator. Now scroll down until you see Windows Firewall. Then double click on it. After that, click the startup type box and then click Automatic.
If ‘Service Status’ is stopped, then click Start. Now click ‘Apply’ and then press OK. Scroll until you see ‘Base Filtering Engine’, double click it. If again the ‘Service Status’ is stopped, click start.
Press Apply and then OK to activate changes. Now restart Windows, Firewall will be enabled.
Method 2 - Remove Malware
If the error cause is a malware infection, use the Microsoft Safety Scanner to remove malware immediately from your PC.
Download it from Microsoft’s official website, install, accept terms and then run it to perform a quick scan. The Microsoft Safety Scanner will scan and remove all malware infecting your PC.
Once this is done, click Start and then type Windows Firewall in the Search box. Click Windows Firewall and the navigation pane of Control Panel;
Click Turn Windows Firewall on or off. Click Turn on Windows Firewall for each network location and then press OK to activate changes.
Method 3 - Repair the Registry
Sometimes the underlying cause can be registry corruption. In such a situation, download Restoro. It is a PC Repair Tool deployed with a registry cleaner.
It scans and removes all the bad entries and files infecting your PC, cleans and repairs the registry in a few minutes.
Click here to download Restoro.


 Error Causes
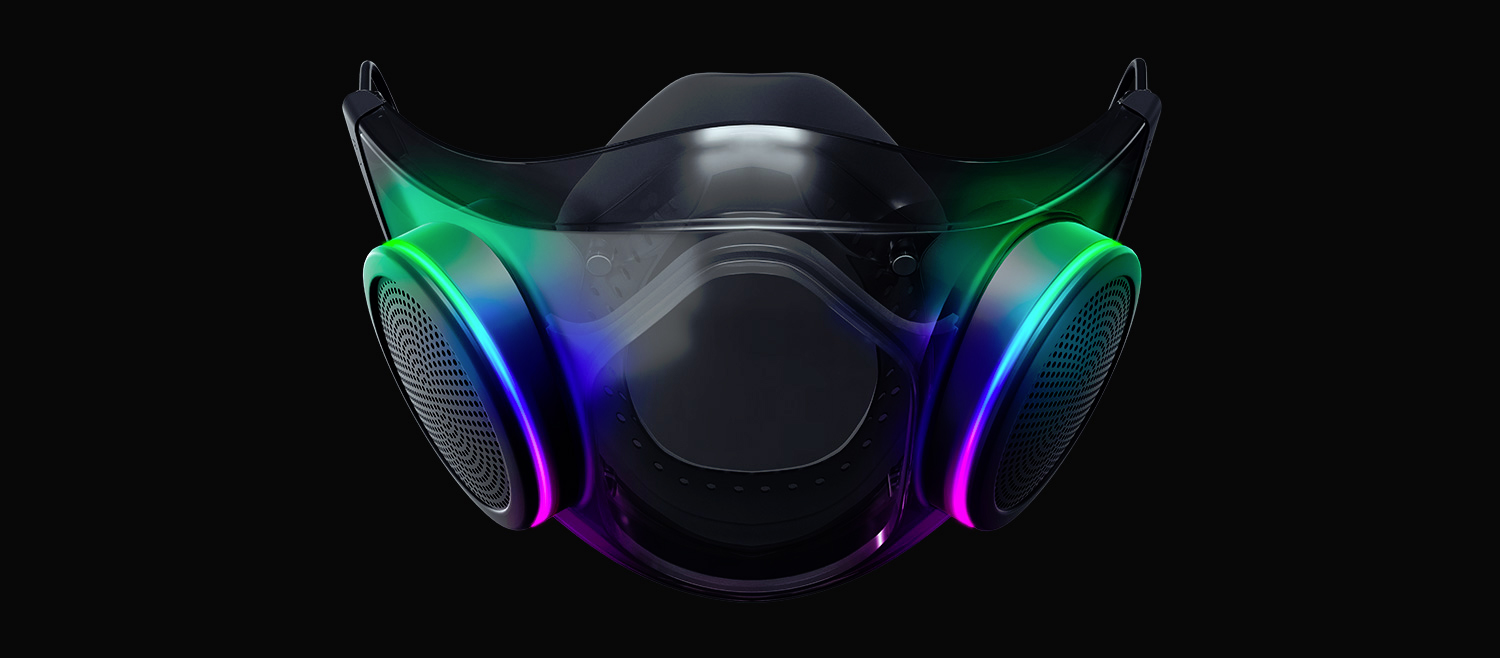 The world today is still sadly under pandemic and by the looks of it, COVID-19 is here to stay, well at least for some time in the near future. Razer seems to think so as well since their upcoming gear is not really what you would expect.
Enter Hazel, a new and upcoming Razer smart mask.
The world today is still sadly under pandemic and by the looks of it, COVID-19 is here to stay, well at least for some time in the near future. Razer seems to think so as well since their upcoming gear is not really what you would expect.
Enter Hazel, a new and upcoming Razer smart mask.

 One of the first things that everyone saw when Microsoft has unveiled Windows 11 is its Start menu. Funny enough this is what has caused most of the divide among users, some find it interesting, and some do not like it. Truth is, it is different, and it is centered in the middle instead of the lower left part of the screen.
It has been confirmed however that the Start menu can be moved to any part of the screen so if you want, you could place it on the lower left as it has always been.
Live tiles do not longer exist in the Start menu, instead, we have styled simple icons.
One of the first things that everyone saw when Microsoft has unveiled Windows 11 is its Start menu. Funny enough this is what has caused most of the divide among users, some find it interesting, and some do not like it. Truth is, it is different, and it is centered in the middle instead of the lower left part of the screen.
It has been confirmed however that the Start menu can be moved to any part of the screen so if you want, you could place it on the lower left as it has always been.
Live tiles do not longer exist in the Start menu, instead, we have styled simple icons.
 If you have used the cascade option in previous Windows versions then it is most likely that you will like the new Snap controls.
You can quickly snap windows side by side, or arrange them in sections on your desktop just by hovering over maximize button on the title bar.
If you have used the cascade option in previous Windows versions then it is most likely that you will like the new Snap controls.
You can quickly snap windows side by side, or arrange them in sections on your desktop just by hovering over maximize button on the title bar.
 File explorer has gone through some visual and design changes, the ribbon on top has been completely removed and replaced with a header-like feature with a slick and clean design.
The header contains a nice organized and designed single row of icons like cut, paste, copy, rename, delete, and new folder icons.
File explorer has gone through some visual and design changes, the ribbon on top has been completely removed and replaced with a header-like feature with a slick and clean design.
The header contains a nice organized and designed single row of icons like cut, paste, copy, rename, delete, and new folder icons.
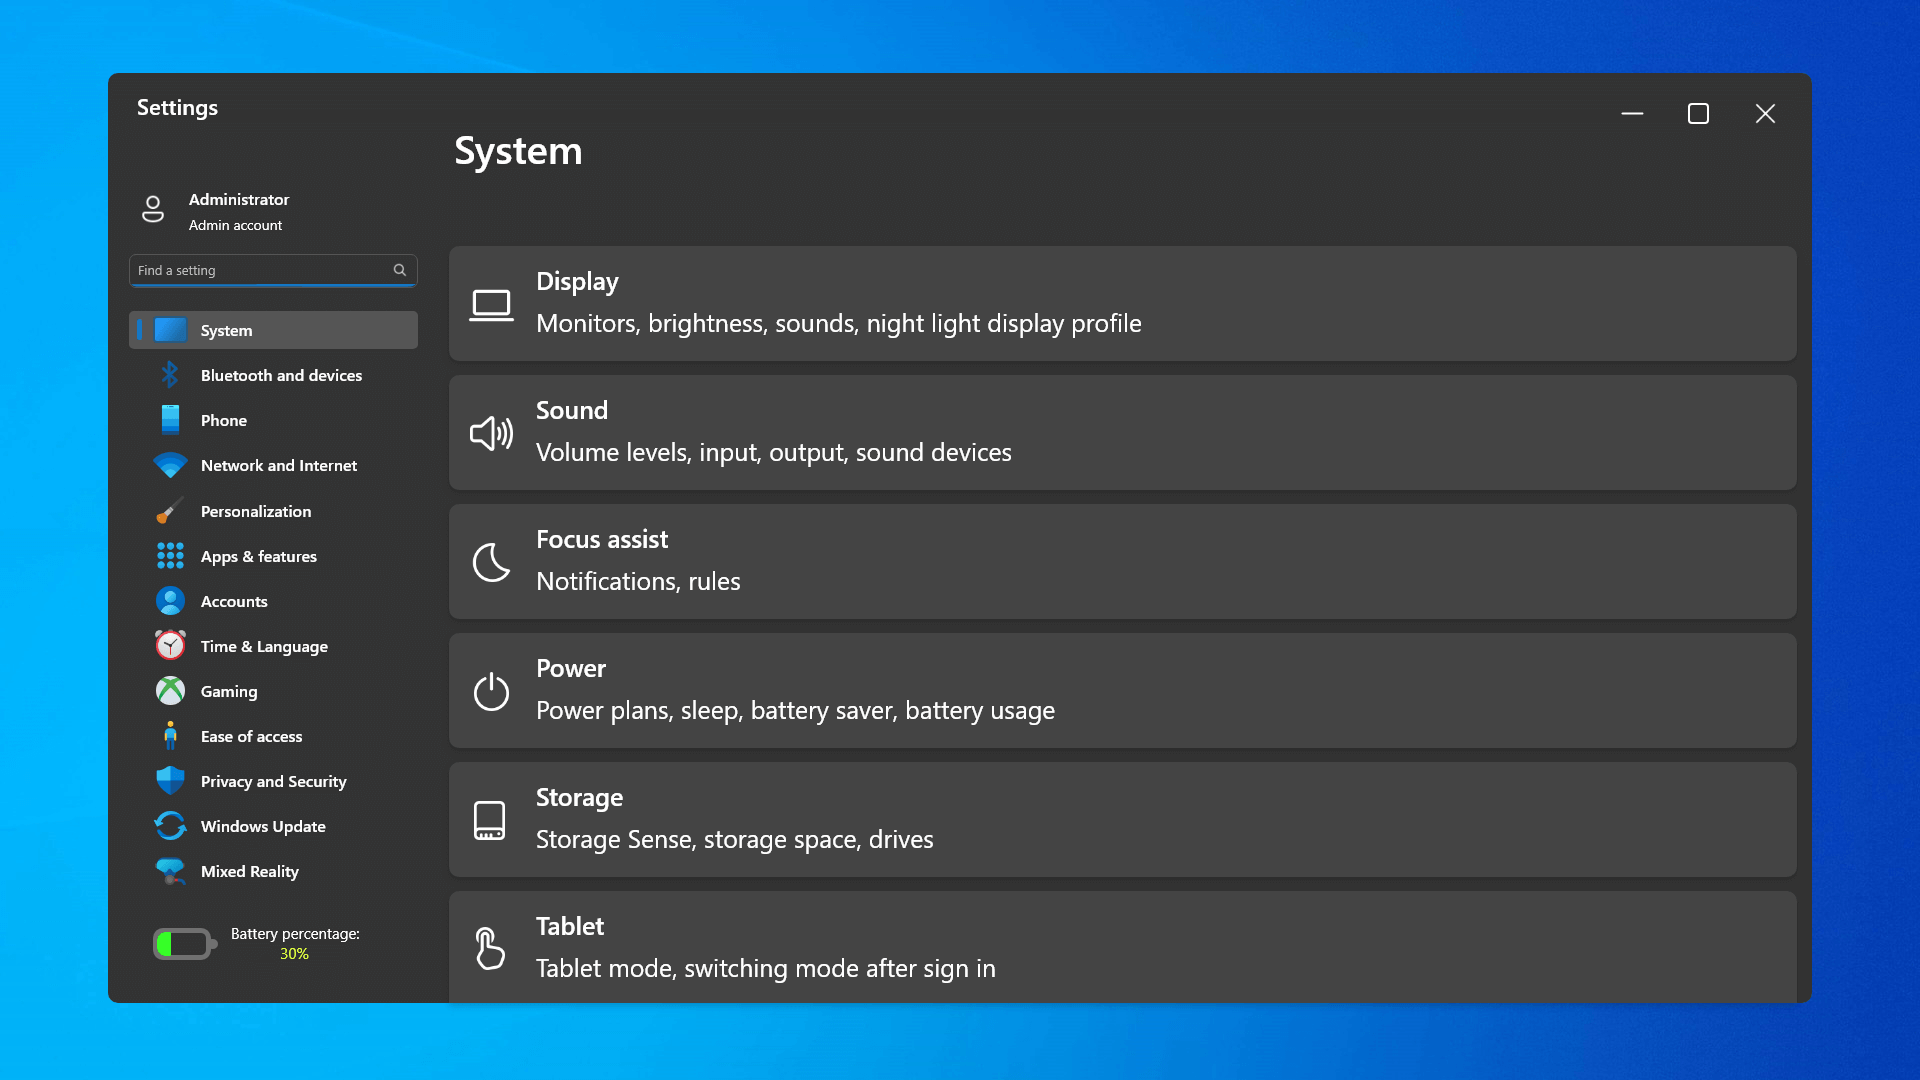 The settings app also has gone through visual and design changes. It has a new design that is very visually appealing and navigation has been simplified and more organized. Finding the right and desired setting is much faster and clearer now.
 Yes, widgets are back but not like you remember them.
Instead of being all-time present at your desktop like once they used to be, now there is a button on the taskbar which brings the widget bar up that contains desired widgets. This way they are easily accessible and do not clutter desktops.
So far we have weather, news, calendar, and stocks widget but we will see how development on these goes. I expect to have community-made widgets like in old days for all of our needs.
Yes, widgets are back but not like you remember them.
Instead of being all-time present at your desktop like once they used to be, now there is a button on the taskbar which brings the widget bar up that contains desired widgets. This way they are easily accessible and do not clutter desktops.
So far we have weather, news, calendar, and stocks widget but we will see how development on these goes. I expect to have community-made widgets like in old days for all of our needs.
 The new Xbox app is now integrated into Windows 11, offering quick access to Xbox Game Pass games, the social parts of the Xbox network, and the Xbox store.
 As widely known by now Windows 11 will require you to have a TPM 2.0 module capable CPU in order to install it.
This system requirement has caused a lot of controversies but essentially it seems that MS's goal is to protect your personal data by using this module.
The upside of course is that your data will be protected much more than in previous Windows versions, the downside, of course, will be that you will need newer hardware to run OS on it.
and that is essentially it, keep on tuned on more Windows 11 information and overall articles tied to PC and technology here at errortools.com
As widely known by now Windows 11 will require you to have a TPM 2.0 module capable CPU in order to install it.
This system requirement has caused a lot of controversies but essentially it seems that MS's goal is to protect your personal data by using this module.
The upside of course is that your data will be protected much more than in previous Windows versions, the downside, of course, will be that you will need newer hardware to run OS on it.
and that is essentially it, keep on tuned on more Windows 11 information and overall articles tied to PC and technology here at errortools.com