 Razer had some strange dives into stuff not really aimed at gamers and the gaming community overall like its Zephir smart mask and now it is venturing into the area of smartwatches teaming up with Fossil. I am not clear if this initiative was set in motion by Razer or Fossil and I really do not know why limited production numbers. Officially named RAZER X FOSSIL GEN 6 SMARTWATCH, this watch comes with the official following text on Razer's page:
Way more. Way faster. Way ahead of the game. Get time on your side with the limited-edition Razer X Fossil Gen 6 Smartwatch—only 1,337 pieces worldwide. Designed for the next generation of gamers, supercharge your style with customizable straps, dials, Razer Chroma™ RGB effects, and more.
Now, I am a fan of Razer and I like their products, mostly keyboards and mouse altho chair is also very good and in top of the product line in that field but I can not really stand behind this product and decision, and the only reason why I can not stand behind it is this 1337 (leet, or elite) a limited number of available pieces that is nothing more than a gimmick to sell watches at a higher price. Watch itself is not really bad, as a matter of fact, it has some solid hardware statistics.
Featuring a 1.28-inch AMOLED Display with 3 unique Razer watch faces (Analog, Text, Chroma*), 4 customizable Razer Chroma™ RGB effects, and 2 custom-designed, interchangeable straps, this Razer's baby is packing 44mm, Stainless Steel case with 22mm, straps. It runs on Wear OS by Google as an operating system of a choice and under software, it is packing Qualcomm Snapdragon Wear 4100+ CPU paired with 1GB of RAM and 8GB Storage. The display is running at 416x416 resolution with 326ppi.
Watch input is with 2 configurable Push buttons, One rotating Home button, touchscreen, and voice. It has in it a loudspeaker, microphone, and vibration. Connection is via Bluetooth 5.0, GPS, NFC SE, and Wi-Fi. The battery can in their word work for 24 Hr + multi-day Extended Mode **Varies based on usage and after updates install**. USB data cable with magnetic dock snaps to split rings on the watch case back and spins 360 degrees for ease of use. Approximately half an hour to reach 80%. Sensors included in the watch itself are: Accelerometer, Altimeter, Ambient Light, Compass, Gyroscope, Off-body IR, PPG Heart Rate, SPO2.
Smartwatch is water-resistant up to 3 ATM & it comes with preloaded apps like: Agenda, Alarm, Battery-Optimized Activity Mode, Calendar, Cardio Level Tracking, Cardiogram, Contacts, Enhanced Phone Dialer App, Google Assistant, Google Fit (Workout, Heart Rate, Goals, Breathe), Google Maps, Google Pay™, Google Play Store, Nike Run Club, Noonlight, Smart Battery Modes, Spotify, Stopwatch, Timer, Translate, Wellness Apps with Sleep Tracking.
Watch is Dropping on 01.10.22, 8 AM PST which is 4 days from now and altho it is an interesting device with solid hardware I can not stand behind it due to its limited edition numbers and with $329 price tag. With the same amount of money, you can get yourself Samsung or Apple watch with more features packing. But of course, that is just my personal preference and if you want to own this limited edition Razer smartwatch, go for it.

C0000135 is a blue screen of death error code (BSoD) also referred to as the ‘Stop’ error. This error code usually pops up on the screen at startup. The system stops and displays the error code:
Stop: c0000135 {Unable to Locate DLL} The dynamic link library FILE_NAME could not be found in the specified path Default Load Path
 Error Causes
“The product key used on this PC didn’t work with this edition of Windows. Activation Error 0xC004F212.”Every time Microsoft generates a license for a copy of Windows, it is associated with one particular Windows variant. Windows comes in many editions like Enterprise, Home, Professional, and so on. For instance, if you bought a license for Windows 10 Enterprise but you have installed Windows 10 Professional instead, then the activation will surely fail and you’ll encounter the Activation Error 0xC004F212. You will be asked to select which edition you want to install when you reinstall Windows 10 using a digital license. If you opted for an edition other than the one you are licensed to use, then you will most likely get the Activation Error 0xC004F212. If you have purchased your license key from a store or some website, you might want to check back with them about the exact version of Windows. Doing so will help you narrow down the problem. And if you have second thoughts about the license key’s validity, you can just reach out to a Microsoft Support agent to check the validity of the license key. Also, if have bought it from the store, there should be an option to get a refund. That way you can choose to buy the right version of Windows.
[PID] Value=xxxxx-xxxxx-xxxxx-xxxxx-xxxxxNote: “xxxxx” is the KEY to your Windows version.
Error Code 0x8007000d is a common error code that can be found on the Windows 10 Operating system, although it can also appear in previous versions of the operating system, as well.
Common symptoms include:
There are four basic ways to try to resolve Error Code 0x8007000d on your Windows machine. Three of these are pretty simple for even the most basic users, while the final method requires some familiarity with running commands in the Command Prompt. If you don’t feel that you have the skill or confidence to complete the steps listed below, it is generally recommended that you get in touch with a qualified computer repair technician that can assist you in error resolution.
The main cause for the appearance of Error Code 0x8007000d on a Windows machine is that one of the files that the Update tool uses to run one or more updates cannot be found or has experienced damage. Fortunately, there are a few things that you can try on your machine that can be used to attempt to resolve the issues at hand.
Three primary methods exist for the resolution of Error Code 0x8007000d on a Windows machine. As mentioned above, two of these methods can usually be accomplished by basic users, while the third requires some degree of familiarity with the tools associated with the Command Prompt. If you don’t feel that you have the knowledge or skill necessary to follow these steps, contact a computer repair technician to aid you.
Here are the best ways to try to resolve Error Code 0x8007000d on your device:
From the Windows Update tool, you can attempt to run a scan using the Windows Update Troubleshooter, which can try to identify the specific issue that is occurring and to fix it automatically.
Not only will this tool often fix the problem at hand, but it can also help you to avoid other errors that you may have encountered later on in the Update process. This tool should always be your starting point when you encounter an error as you attempt to download or install updates for your Windows machine.
After the tool has been run, restart your computer to apply any changes and then reopen the Update tool to reattempt installation.
In some cases, the missing or corrupted files may be extensive enough that you need to restore your computer to an earlier point. If you create regular backups of your information or have a past version of the software that you can install, this can help you to resolve the issue. Otherwise, you may need to restore your device to its factory settings to resolve the error.
Always make sure to backup your important files and information before you perform a reset of your device, in order to ensure that you are able to return the computer to its original state when you have finished.One of the ways that you can try to resolve this particular error code is the use a DISM tool. This is accessed through the Command Prompt. In order to use this method, follow the steps below:
If you have not been able to resolve the error code using the steps above or if you are unsure of your ability to follow these steps on your own, get in touch with a trusted computer repair professional that is familiar with the Update process and the errors associated with it.
 However, if you are working on a computer with a keyboard and mouse this feature might annoy you and seem like something that is not needed. Like many things inside Windows 11 this feature also can be customized and turned OFF if you do not want it.
In this guide, we will see how to turn these boxes off. Microsoft has somewhat hidden this feature but luckily it is not difficult to find it if you know where to look.
However, if you are working on a computer with a keyboard and mouse this feature might annoy you and seem like something that is not needed. Like many things inside Windows 11 this feature also can be customized and turned OFF if you do not want it.
In this guide, we will see how to turn these boxes off. Microsoft has somewhat hidden this feature but luckily it is not difficult to find it if you know where to look.
Error code 0x000000D1 is a serious error that is displayed when Windows automatically shuts down to protect the system against further damage.
Usually, when this error occurs, the message displayed to the users states something like STOP 0x000000D1 DRIVER_IRQL_NOT_LESS_OR_EQUAL.
What Causes 0x000000D1 Error?Usually, the STOP 0x000000D1 error code is caused by issues like incompatibilities, third-party drivers, driver conflicts, outdated drivers, malicious drivers, and other related problems.
Speaking technically, the message displayed to the user actually means that the kernel-mode driver has tried to gain access to memory at an unreasonably high process IRQL.
If left unfixed, STOP 0x000000D1 error can become quite serious. Increased frequency of occurrence may not only lead to data loss but can cause system corruption as well. That’s why it is crucial to fix it and to resolve the underlying issues causing it as soon as possible.
“Something went wrong, Sorry, installation cannot continue because no compatible office products are detected.”When you have to work on two different languages, that’s where the language packs come in handy. You might have to work on one language but when it comes to proofreading or help, you need another language. Note that some language accessory packs offer partial localization which is why some parts of the Office might show the default language. If you are using Office 365 or Office 2019, 2016, 2013, or 2010, you need to go to the language accessory pack page from office.com and select your language. Once you see the download link, click on it to start downloading the pack. It includes the display in the chosen language, proofing tools for the selected language, as well as the Help in the selected language. Once the installation is complete, follow each one of the given options below to configure the language accessory pack properly.
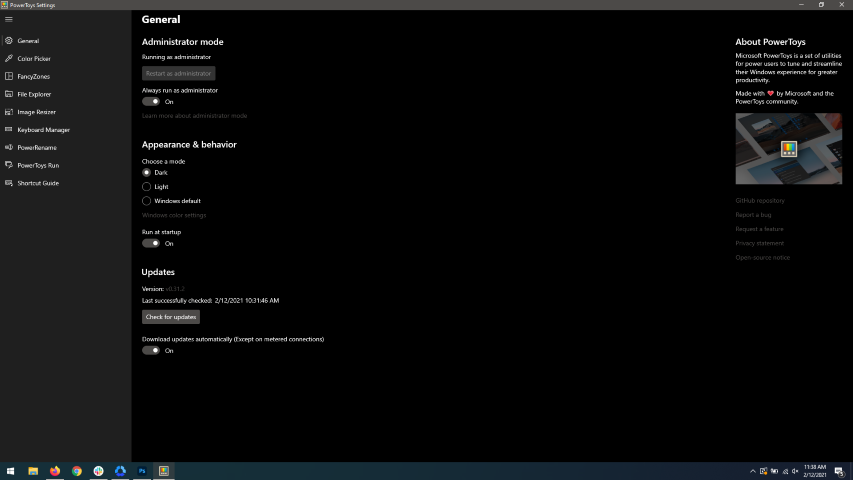 When opened you will be greeted with general settings window. These are settings for power toys themselves, Here you can check for updates, change the looks of power toys, run it on system startup and run them as administrator. Set them up so they best suit your needs.
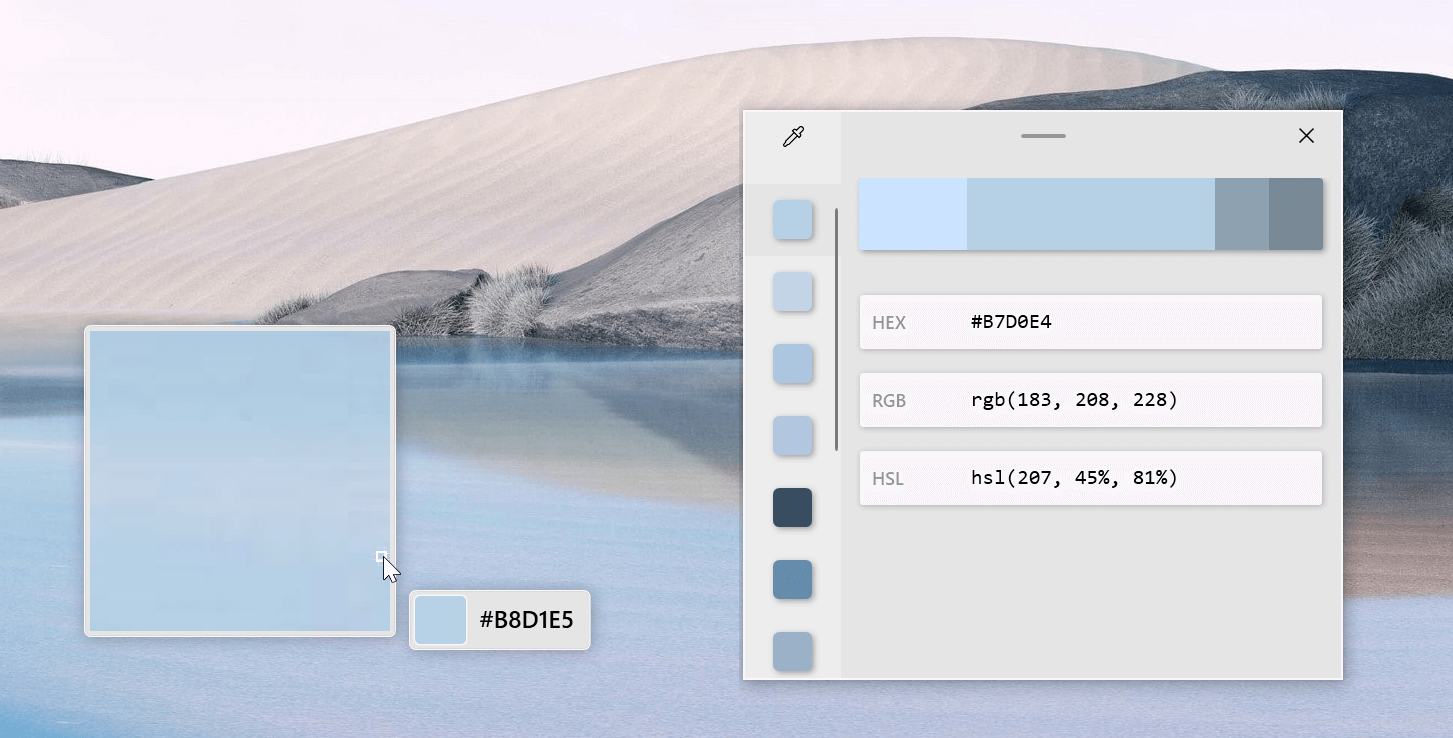 The color picker will let you as the name suggests pick colors, it will sample colors from running applications and windows, snap their values, and place them in the clipboard. A useful application if you are working as a graphic designer, want to create some cool word document, or just want to compare the difference between colors.
After the Color Picker is activated, hover your mouse cursor over the color you would like to copy and left-click the mouse button to select a color. If you want to see the area around your cursor in more detail, scroll up to zoom in. The copied color will be stored in your clipboard in the format that is configured in the settings (HEX by default). The editor lets you see the history of picked colors (up to 20) and copy their representation in any predefined string format. You can configure what color formats are visible in the editor, along with the order that they appear. This configuration can be found in PowerToys settings. The editor also allows you to fine-tune any picked color or get a new similar color. Editor previews different shades of currently selected color - 2 lighter and 2 darker ones. Clicking on any of those alternative color shades will add the selection to the history of picked colors (appears on the top of the colors history list). Color in the middle represents your currently selected color from the history of the colors. By clicking on it, the fine-tuning configuration control will appear, which will let you change the HUE or RGB values of the current color. Pressing OK will add newly configured color into the history of the colors.
The color picker will let you as the name suggests pick colors, it will sample colors from running applications and windows, snap their values, and place them in the clipboard. A useful application if you are working as a graphic designer, want to create some cool word document, or just want to compare the difference between colors.
After the Color Picker is activated, hover your mouse cursor over the color you would like to copy and left-click the mouse button to select a color. If you want to see the area around your cursor in more detail, scroll up to zoom in. The copied color will be stored in your clipboard in the format that is configured in the settings (HEX by default). The editor lets you see the history of picked colors (up to 20) and copy their representation in any predefined string format. You can configure what color formats are visible in the editor, along with the order that they appear. This configuration can be found in PowerToys settings. The editor also allows you to fine-tune any picked color or get a new similar color. Editor previews different shades of currently selected color - 2 lighter and 2 darker ones. Clicking on any of those alternative color shades will add the selection to the history of picked colors (appears on the top of the colors history list). Color in the middle represents your currently selected color from the history of the colors. By clicking on it, the fine-tuning configuration control will appear, which will let you change the HUE or RGB values of the current color. Pressing OK will add newly configured color into the history of the colors.
 FancyZones is a window manager utility for arranging and snapping windows into efficient layouts to improve the speed of your workflow and restore layouts quickly. FancyZones allows the user to define a set of window locations for a desktop that are drag targets for windows. When the user drags a window into a zone, the window is resized and repositioned to fill that zone. When first launched, the zones editor presents a list of layouts that can be adjusted by how many windows are on the monitor. Choosing a layout shows a preview of that layout on the monitor. The selected layout is applied automatically.
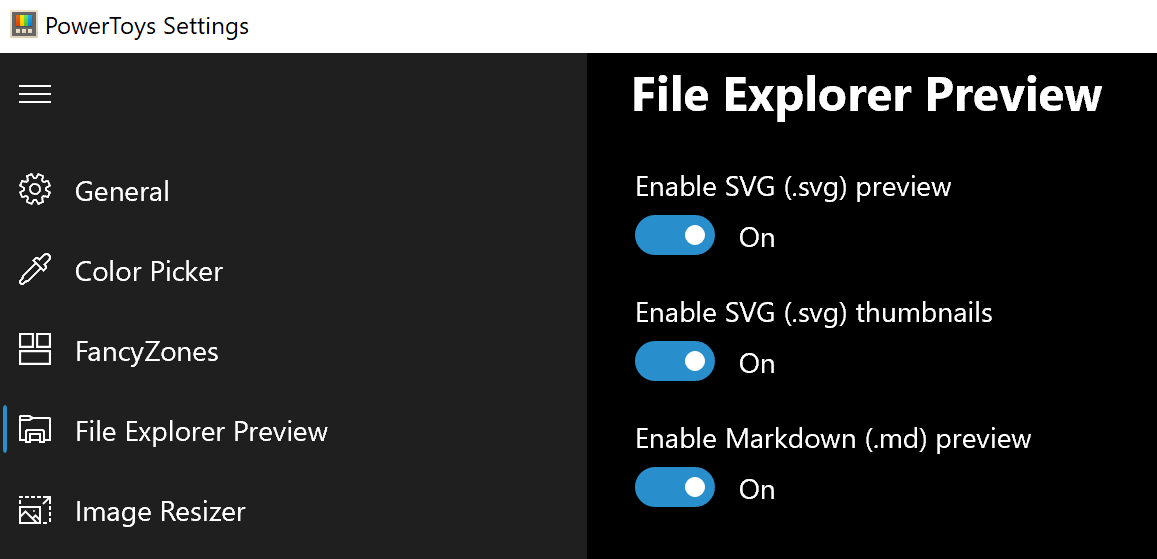 Only 3 options here but maybe some are important to you. This extension lets you enable SVG file preview in File Explorer, enable Markdown preview, and enable SVG thumbnails. Turn on each one you might need.
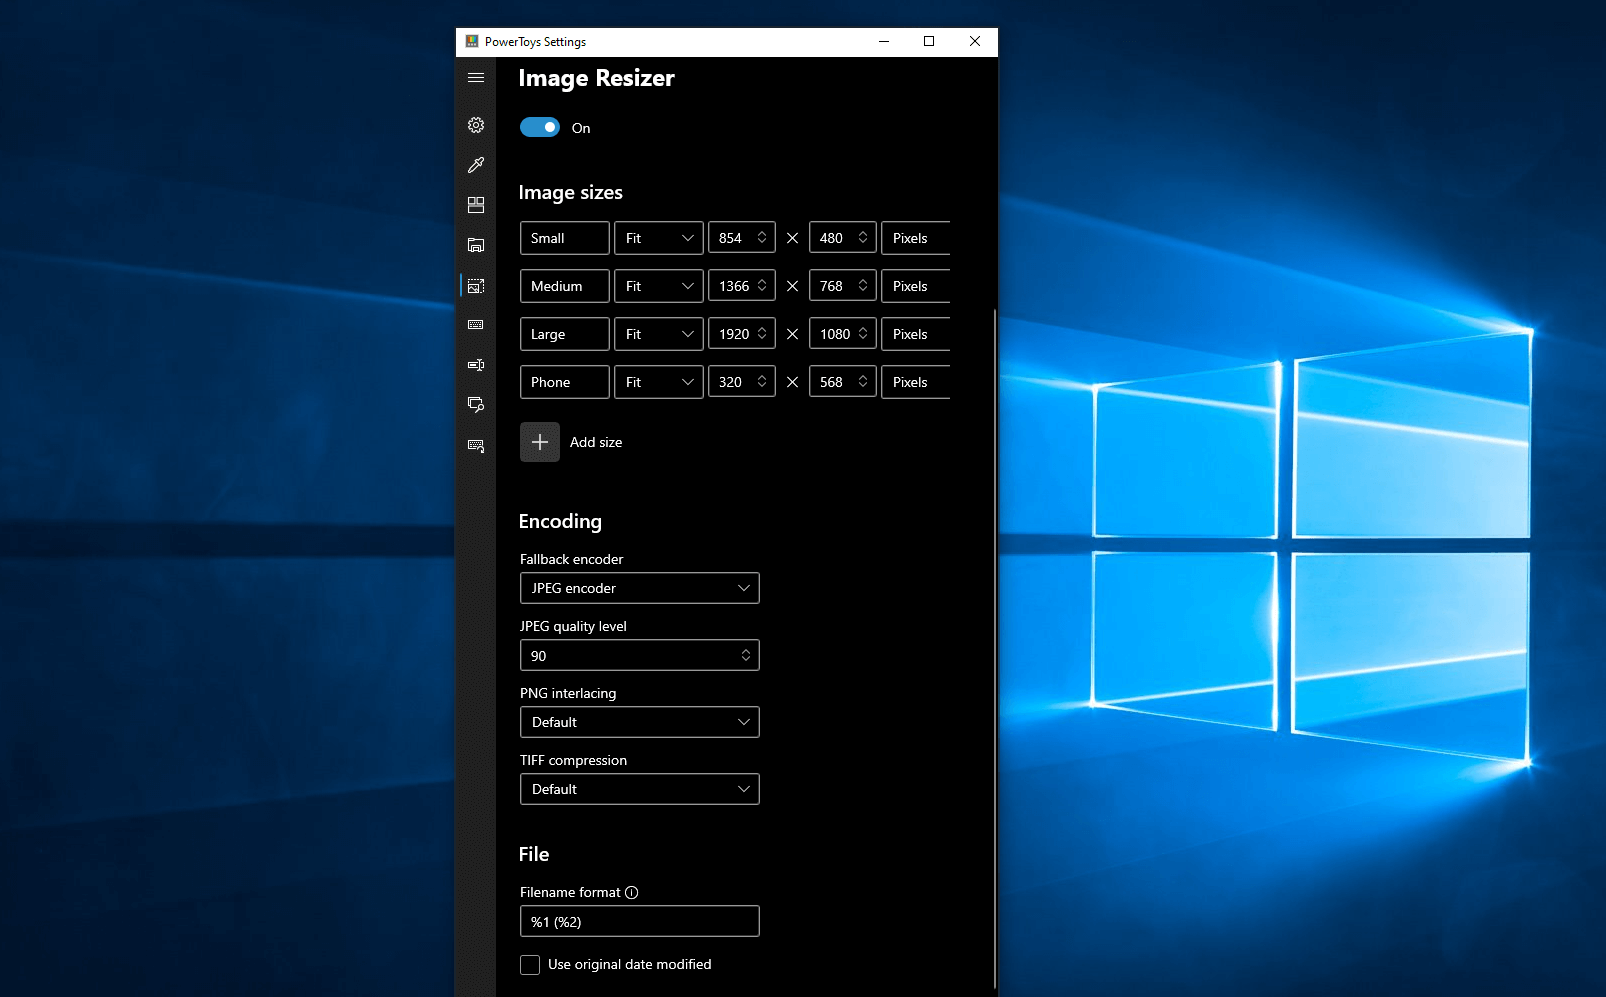 Image Resizer is a Windows shell extension for bulk image-resizing. After installing PowerToys, right-click on one or more selected image files in File Explorer, and then select Resize pictures from the menu. You can specify your own sizes if you want, you can resize when dragging files, you can overwrite files or make new copies of new sizes, and many more options. A very useful tool I am sure plenty of users can use since this eliminates the need for pictures or any other image application for common resizing tasks.
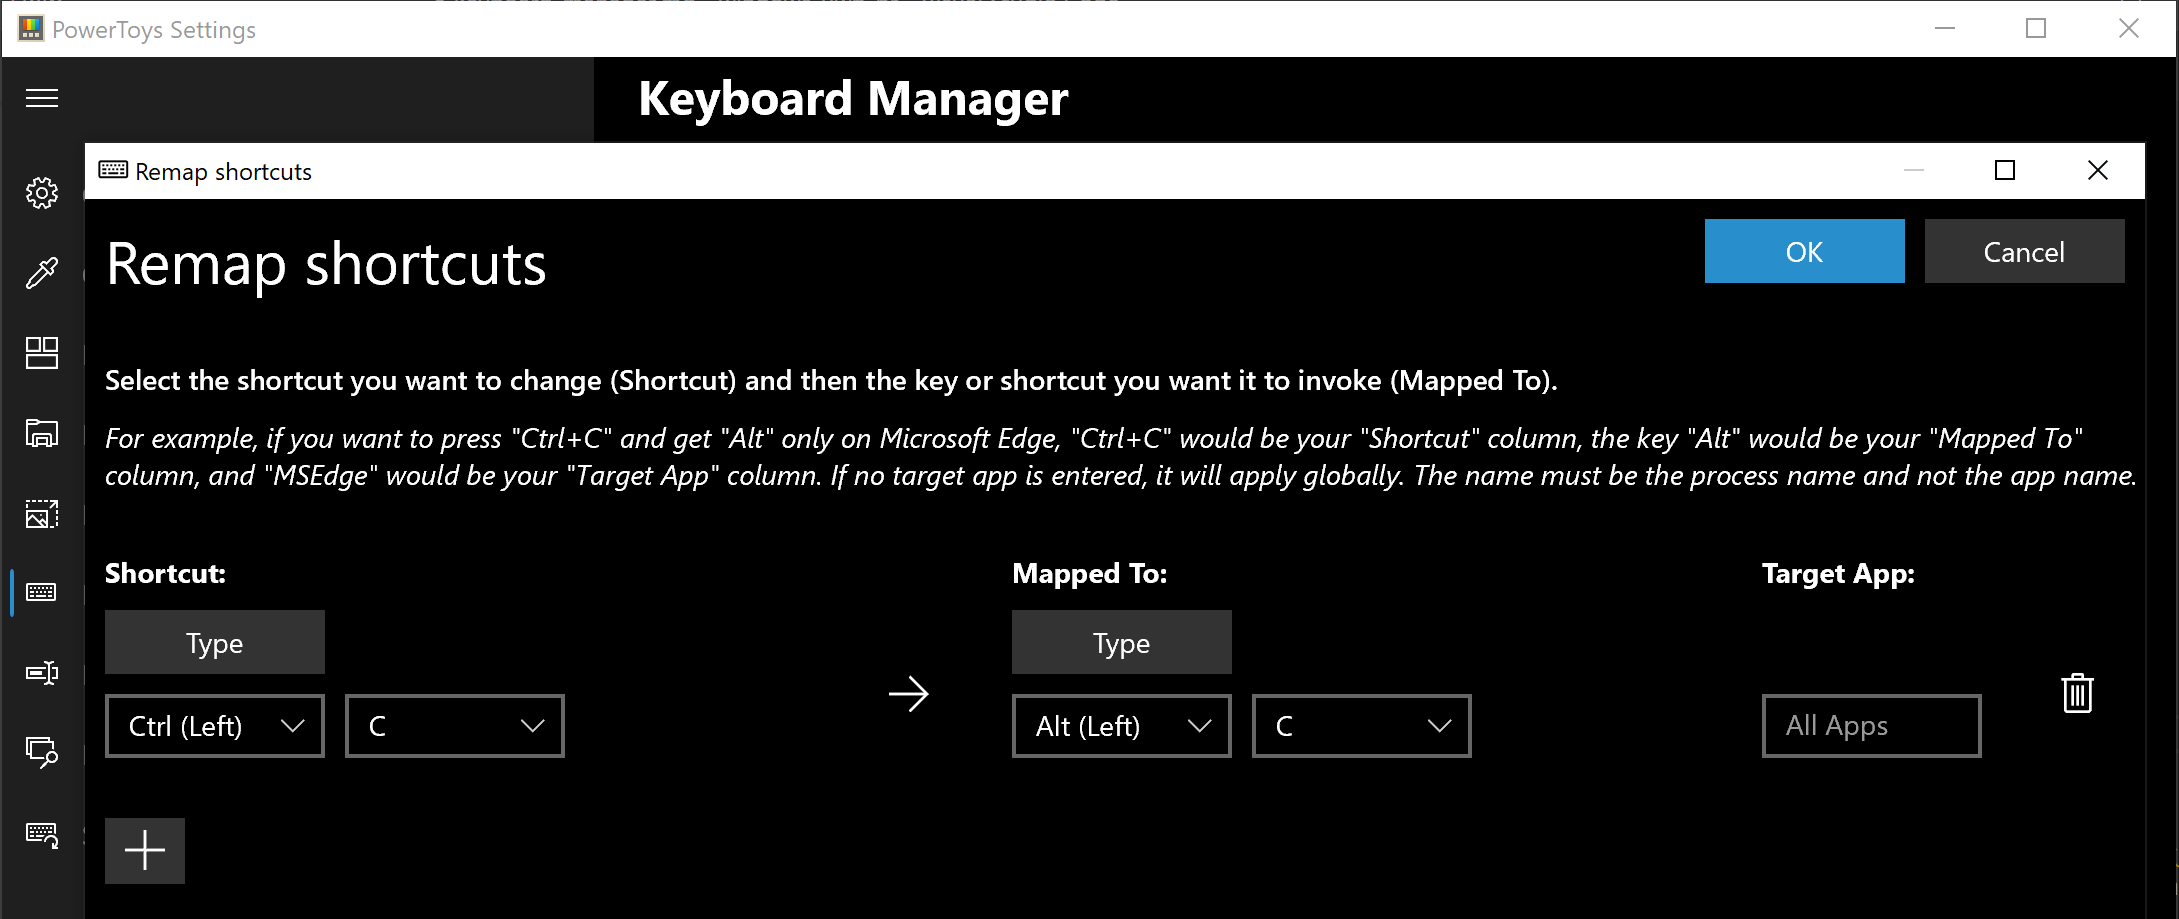 The PowerToys Keyboard Manager enables you to redefine keys on your keyboard. For example, you can exchange the letter A for the letter D on your keyboard. When you select the A key, a D will display. You can also exchange shortcut key combinations. For example, the shortcut key, Ctrl+C, will copy the text in Microsoft Word. With the PowerToys Keyboard Manager utility, you can exchange that shortcut for ⊞ Win+C). Now, ⊞ Win+C) will copy text. If you do not specify a targeted application in PowerToys Keyboard Manager, the shortcut exchange will be applied globally across Windows. PowerToys Keyboard Manager must be enabled (with PowerToys running in the background) for remapped keys and shortcuts to be applied. If PowerToys is not running, key remapping will no longer be applied.
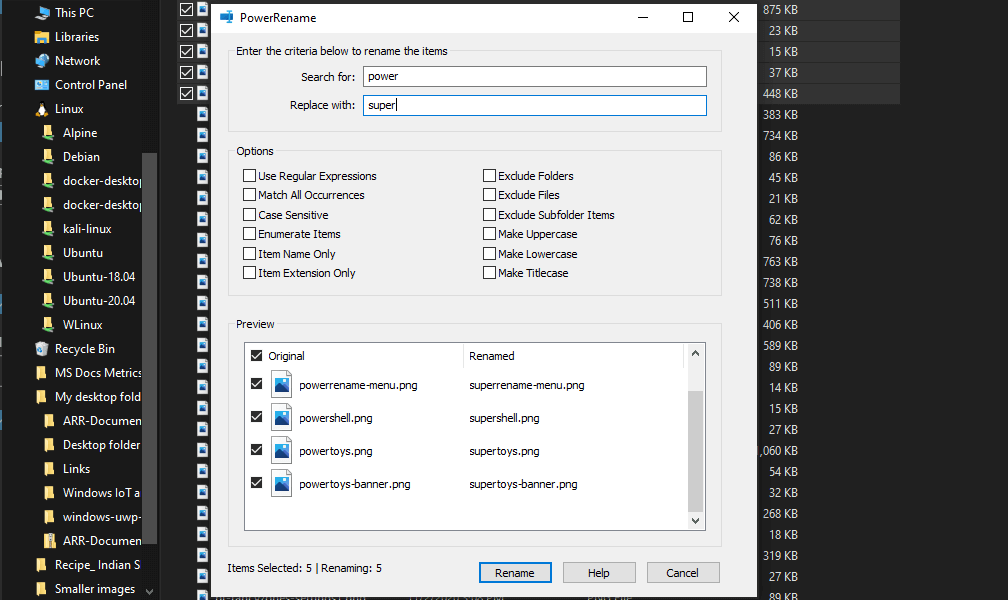 PowerRename is a bulk renaming tool that enables you to:
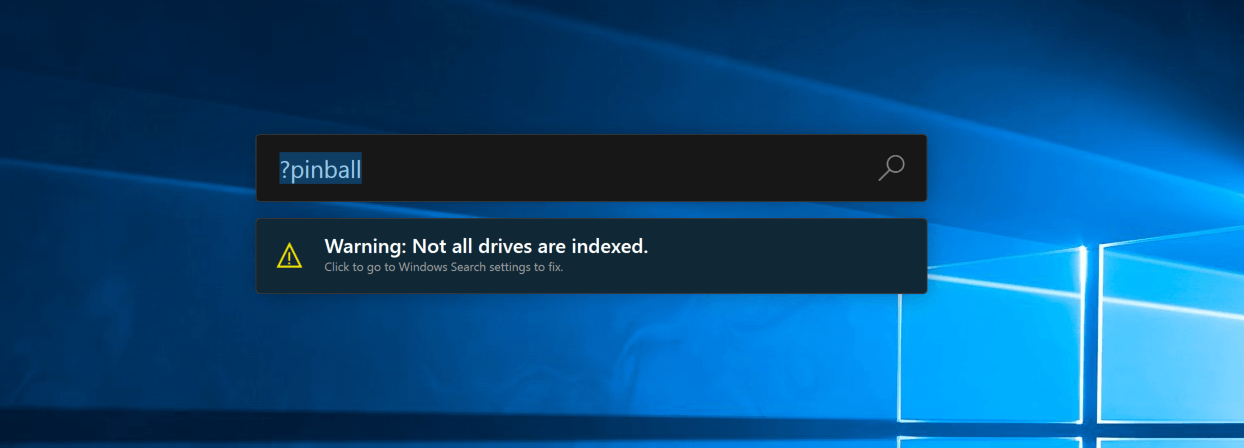 PowerToys Run is a quick launcher for power users that contains some additional features without sacrificing performance.
PowerToys Run features include:
PowerToys Run is a quick launcher for power users that contains some additional features without sacrificing performance.
PowerToys Run features include:
> (for example, > Shell:startup will open the Windows startup folder)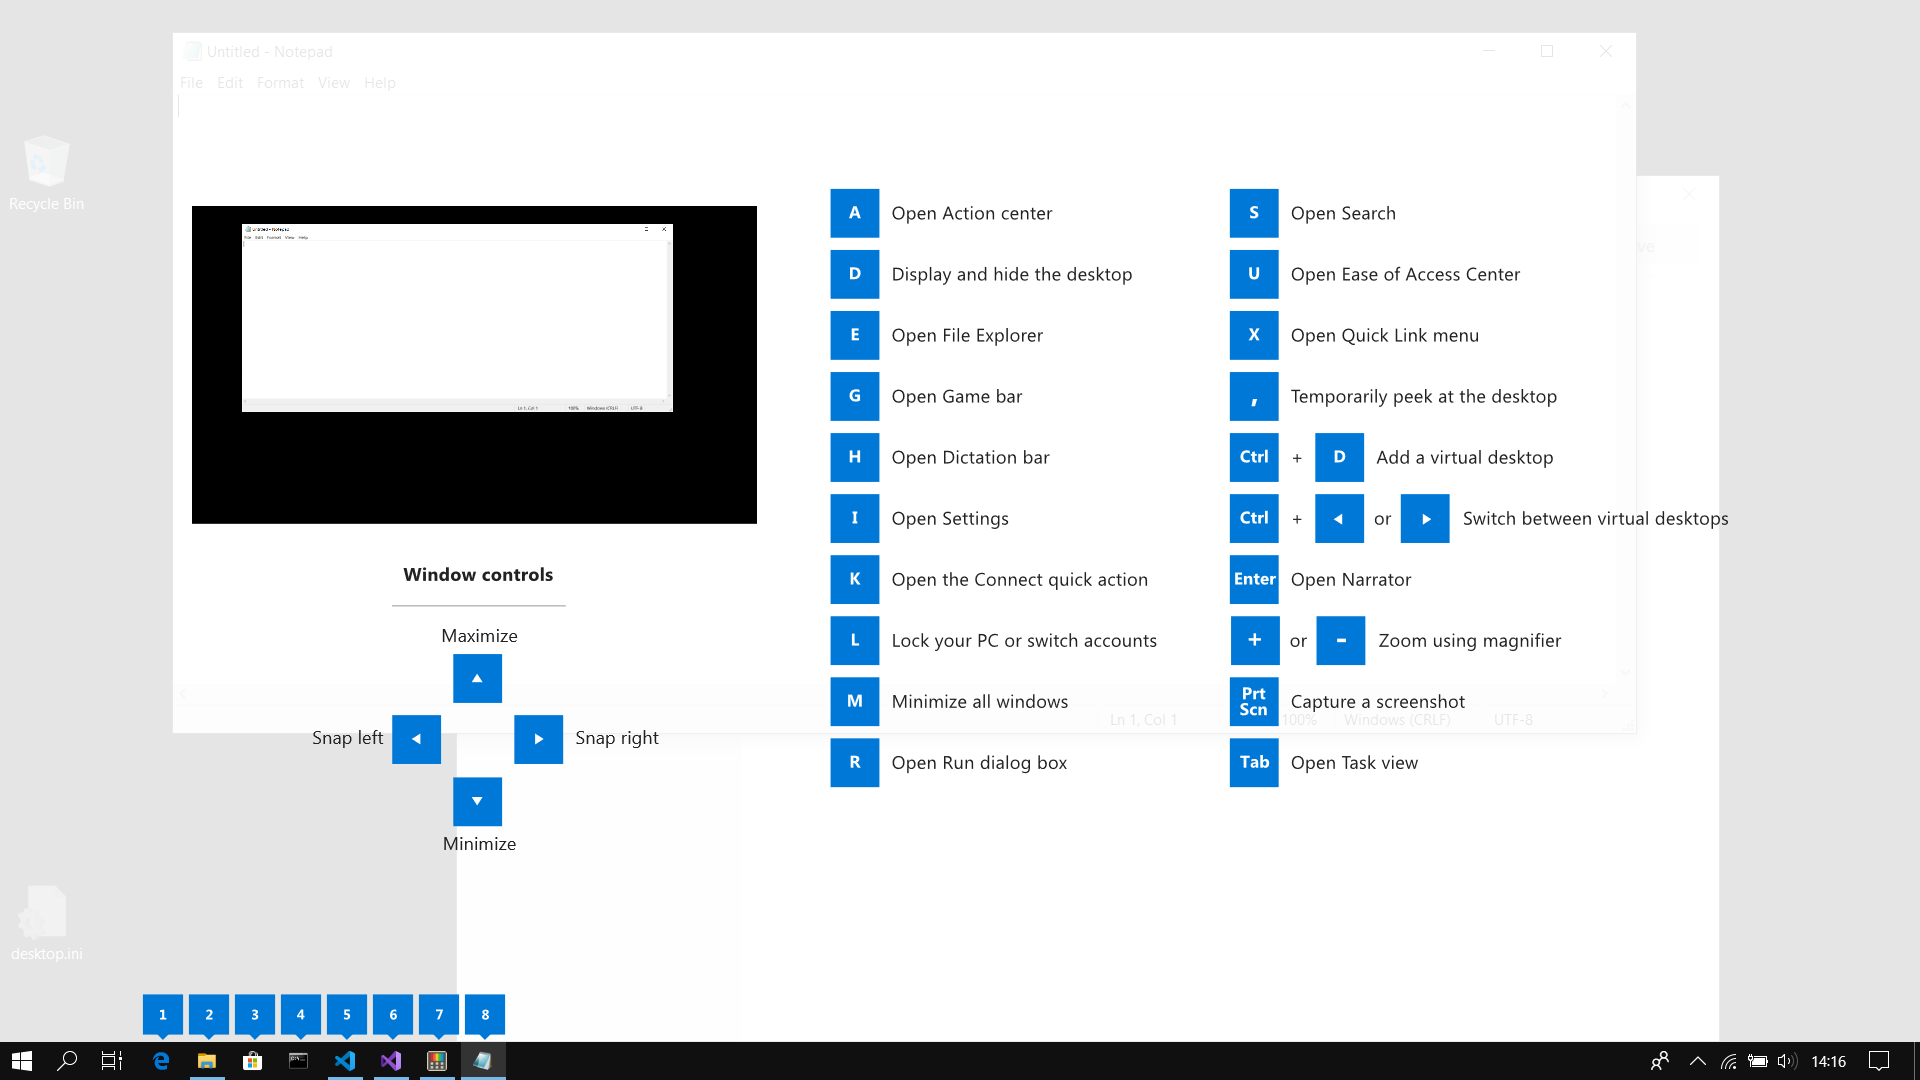 This guide uses PowerToys to display common keyboard shortcuts that use the Windows ⊞ key. Windows key keyboard shortcuts can be used while the guide is being shown and the result of those shortcuts (active window moved, arrow shortcut behavior changes, etc) will be displayed in the guide. Releasing the Windows ⊞ key will make the overlay disappear. Tapping the Windows ⊞ key will display the Windows Start menu.
Hey, you made it till the end, thank you for reading and I hope to see you soon.
This guide uses PowerToys to display common keyboard shortcuts that use the Windows ⊞ key. Windows key keyboard shortcuts can be used while the guide is being shown and the result of those shortcuts (active window moved, arrow shortcut behavior changes, etc) will be displayed in the guide. Releasing the Windows ⊞ key will make the overlay disappear. Tapping the Windows ⊞ key will display the Windows Start menu.
Hey, you made it till the end, thank you for reading and I hope to see you soon.