By default inside Windows 11 in File Explorer, once the file is selected, the small check box will appear beside it on left indicating visually that the file is selected. Older users will remember this feature from old Windows Vista and the feature itself is great if you are on some sort of touch device and need to select multiple files.
 However, if you are working on a computer with a keyboard and mouse this feature might annoy you and seem like something that is not needed. Like many things inside Windows 11 this feature also can be customized and turned OFF if you do not want it.
In this guide, we will see how to turn these boxes off. Microsoft has somewhat hidden this feature but luckily it is not difficult to find it if you know where to look.
That is everything that needs to be done, after the checkbox is unchecked all check boxes from File Explorer will disappear. If you wish to turn boxes back ON, just follow the steps and check the box beside Item Check Boxes.

“An unexpected error has occurred. Your request cannot be processed at this time. Please try again later. (0x80070426)”This kind of error is caused by various supporting processes and services that are not working or are not being triggered as they were supposed to. If you are currently facing this issue, worry not for this post will guide you in fixing it. There are two potential fixes you can try – you can either check the responsible services or manually run the Activation Script. For more details refer to the given options below.
cscript ospp.vbs/act
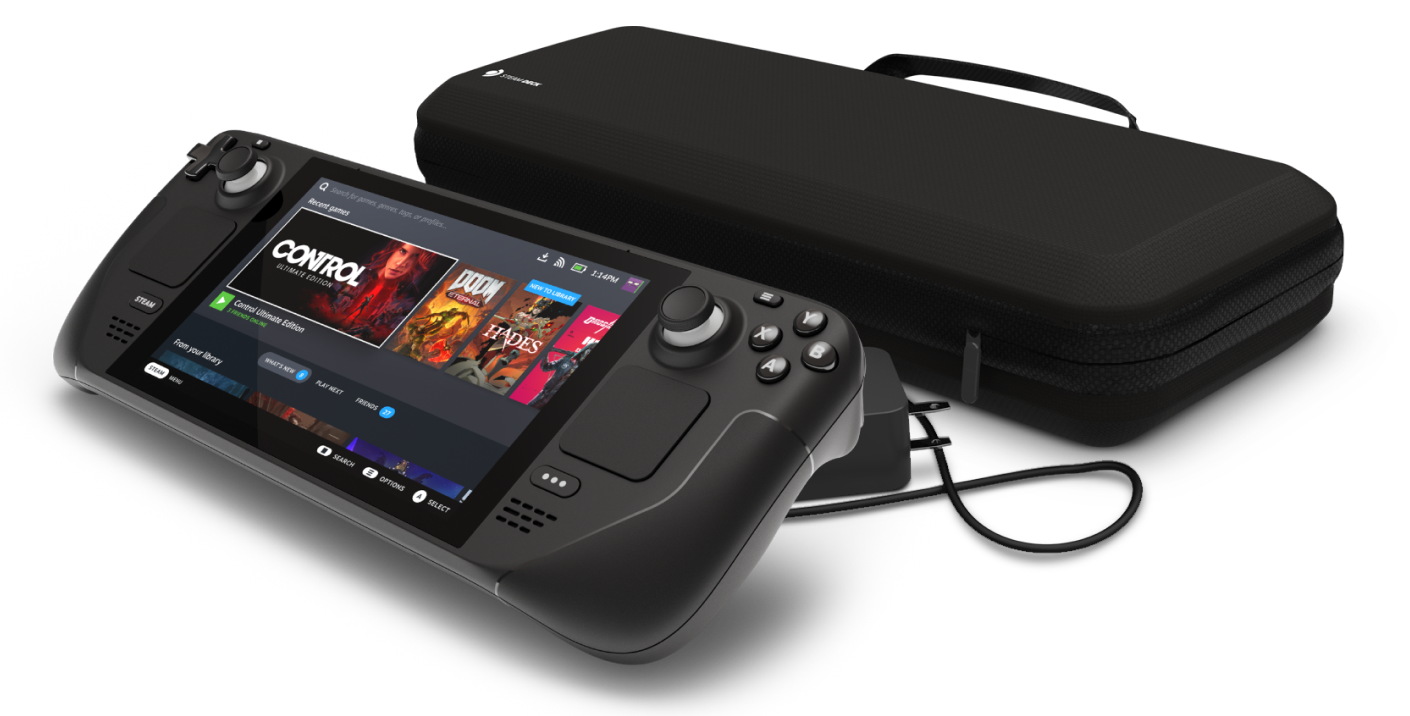 This, of course, means that you will be able to have both Proton and Windows on your device letting you play anything that you wish if the hardware is strong enough. Valve also said that you can launch OS from an SD card! This of course will save space available for games themselves, especially for entry models with less than one available.
All of this information really pushes Deck into the territory of a handheld PC and not just another console and I must admit that this announcement left a smile on my face.
This, of course, means that you will be able to have both Proton and Windows on your device letting you play anything that you wish if the hardware is strong enough. Valve also said that you can launch OS from an SD card! This of course will save space available for games themselves, especially for entry models with less than one available.
All of this information really pushes Deck into the territory of a handheld PC and not just another console and I must admit that this announcement left a smile on my face. “Cannot activate Windows 10. Try activating again later. If that doesn’t work, contact support. Error code: 0xC004F211.”Note that although hardware changes cause this error, the minor ones don’t really cause any issues with activation, however, if you have made any significant hardware change such as replacing your motherboard, it will most likely cause the activation error. In such cases, the Windows Activation system will treat this as new hardware and you will need a new license for that. Even if your Windows 10 computer has a genuine key, it might still fail to get activated which results in the Windows Activation Error 0xC004F211. Thus, before you do other troubleshooting steps, you need to run the Windows 10 Activation Troubleshooter first. To do so, follow these steps:
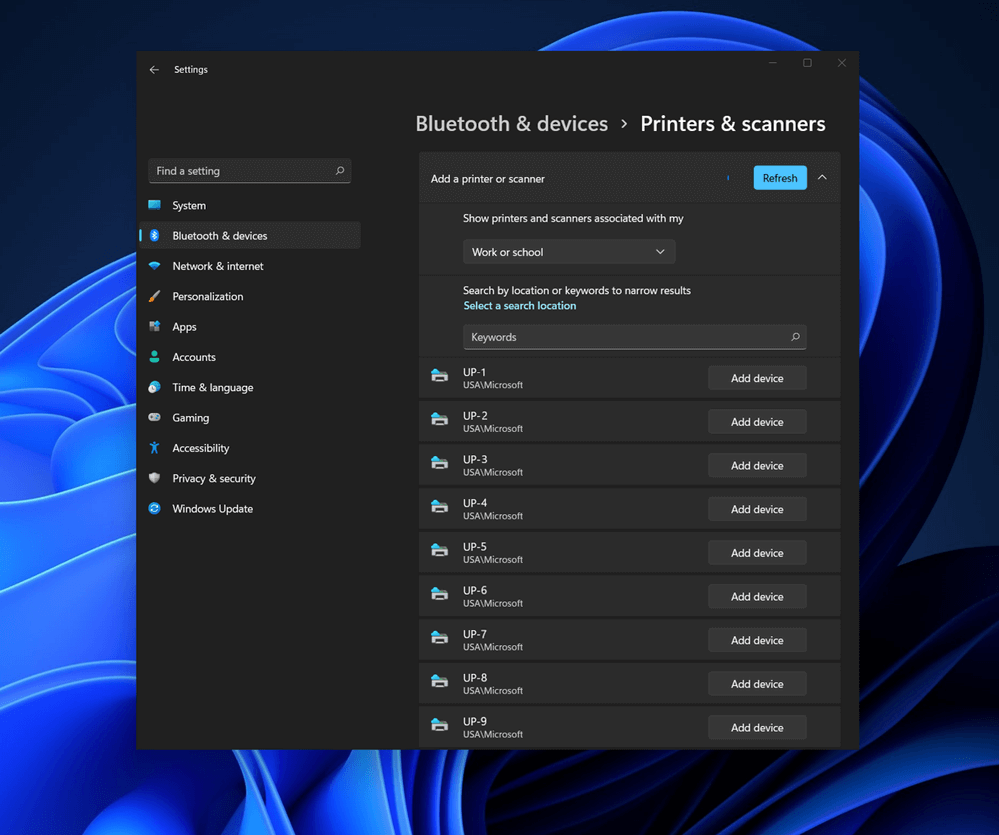 Bluetooth perhaps is slowly becoming an outdated feature but sometimes you can really used it and need it.
By default, in Windows 11 Bluetooth is turned OFF so if you need it, you will need to turn it ON first. Luckily turning it ON is easy and we will guide you through the process
Bluetooth perhaps is slowly becoming an outdated feature but sometimes you can really used it and need it.
By default, in Windows 11 Bluetooth is turned OFF so if you need it, you will need to turn it ON first. Luckily turning it ON is easy and we will guide you through the process
CON, PRN, AUX, NUL, COM1, COM2, COM3, COM4, COM5, COM6, COM7, COM8, COM9, LPT1, LPT2, LPT3, LPT4, LPT5, LPT6, LPT7, LPT8, and LPT9When you rename or create a folder or file using the reserved words given above, you could encounter an error that says, “The specified device name is invalid”. This occurs since these words are Windows system reserved words that you can’t use, unlike any other words. Thus, if you have a folder or file which contains any of the reserved words on another computer that runs a non-Windows operating system and you try to copy or rename it Windows, then it’s no wonder why you’re getting this error message. In such cases, you can always click on the Skip button to stop the operation. However, if there are various folders or files, you can just use the Command Prompt to carry out the task. All it takes is a simple command that will get rid of the folder as well as the files in it. How? Refer to the instructions given below. Step 1: Tap the Win + R keys to open the Run utility. Step 2: Next, type “cmd” in the field and then tap Enter to open Command Prompt. Step 3: After opening Command Prompt, execute the following command:
rd \.file-folder-path /S /QNote: The “rd” command will remove the directory or the folder while the “\.” command will select the current computer. The “/S” command, on the other hand, helps you in removing all the sub-directories and the files that are in the CON folder. The “/Q” command is not really mandatory since it helps you remove everything silently without any confirmation message. For example, if you have a folder named “CON” located on your Desktop, the path will be like this “C:/Users/<username>/Desktop/CON”. In this case, the command should be like this:
rd \.C:Users<username>DesktopCON /S /QHowever, if the error pops up for a whole different reason, you could use the following command instead to remove the reparse point extended functionality. Once you’ve entered the given command below, you should now be able to delete the file.
FSUTIL reparsepoint delete C:Users<username>DesktopFileName DEL C:Users<username>DesktopFileName
nslookup [–SubCommand …] [{ComputerToFind| [–Server]}]If you’ve determined that the drives disappear each time, you may have to change the DNS server or ask your admin to resolve the problem for you. Alternatively, you can also check out another option that has worked for a lot of users. This second option is disabling the IPv6 on the network adapter. In case you don’t know, Windows 10 prefers IPv6 over IPv4 so if you now have issues using IPv6 to connect to the servers, you can change your computer’s settings so that it’ll only use IPv4 instead of IPv6. To do so, follow these instructions:
The GifsGalore Toolbar from Mindspark Interactive Network, Inc. is proposed to active Web users who like to embed GIFs into their emails and share entertaining GIFs with friends via social media services. The GifsGalore software can be added to your Internet client for free but you need to be using Google Chrome, Internet Explorer or Mozilla Firefox for the GifsGalore Toolbar to be activated.
When installed it hijacks your New tab page and default search engine changing them to search.myway.com. This extension also monitors user browsing activity recording information such as: visited websites, clicked links, viewed products, etc. This information is later used to better target ads. While browsing the internet with this extension enabled you will see additional pop-up ads, as well as sponsored links and injected ads throughout your browsing session, especially in search results.