Hello everyone and welcome to our Windows 10 security basics where we will provide you with common practices you should aim to follow in order not to cough some viruses, malware, keylogger, worm, etc.
As you are all aware, we live in a digital age where we are surrounded by luxuries of unlimited information, video chats all over the globe, free calls via the internet, applications that track stuff for us, and many many more things that make our lives easier. Sadly with this kind of technology comes risks of cyber attacks that aim to steal your information, credit card numbers, or any other relevant stuff which could be used illegally in order to make purchases, loans, and other theft in your name so ones doing that could not get caught.
Think of data stealers the same as you think of armed robbers in a dark alley, just this time their pray is data about your life so they can make purchases for themselves more than once.
This article aims to provide you with some common logic, tips, and tricks of what should you do and where should you pay attention in order not to provide wrong people with your crucial information and data. we hope that you will find reading informative and helpful.
Keep Windows updated.
Microsoft is working hard on their Windows defender and firewall to provide protection to its users and fixing any introduced security leaks which are found in Windows itself. By updating and keeping Windows updated you make sure that every security leak that is found is patched and removed from Windows and that you have the latest database of known malware inside the firewall and defender.
This common practice, however, should not be limited to Windows only, you should update every application you are using for the same reasons.
Use antivirus, anti-malware, and firewall
These applications exist for a reason and that reason is to protect your data. Dedicated applications specifically made for purposes of defending your data are better than any kind of I am careful mentality since sometimes is enough to just visit a website or just click on some link and you are compromised. You can use Windows Defender and firewall if you wish, they are already in Windows but if you are serious about your data and like to surf the internet some better protection is worth the investment.
Get a dedicated password manager
Your password is bad, if you use the same password everywhere then it is even worse. Computers have come a long way in the last 50 years and so have cyber attack applications which make your commonsense passwords extremely vulnerable and all of your accounts open to cyber attacks. Dedicated password managers that can hash passwords and automate them are your safest bet that your passwords will not be compromised, get one, and get it today.
Do not click on anything inside emails
Cyber attacks come in vast variety and one of them is sending you emails informing you that for example your Paypal or anything else has been hacked and that you must click this link to reset your password. These you do not click, no matter how convincing they sound or how good they look, if you need to update your information on a specific service or website, you delete email, open browser and go to that service and change stuff. The same goes with different offers, discounts, women seeking you, men seeking you, prince sending you 1 billion in gold. Only click on links in emails from a trusted and verified source.
Do not click on pop-ups
Similar to clicking on links in emails you should not click on pop-ups, the same rules, same stuff apply as with emails.
Be careful what you are downloading
Be careful from where you download your software and be careful what are you downloading and stop using pirated software, any kind of malicious applications, keyloggers, viruses, etc could be hidden in these downloads, and by downloading them you are opening doors to your private information. Only use legal software from trusted sources.
Never leave your phone or computer unattended
You can never tell who can implement malicious software or get some crucial information from unattended devices, lock them all time and take them with you.
There you go, 7 common tips and tricks for the basic security of your computer. Thank you for reading and I hope to see you again on our site.
Skinning of applications is not new to PC users, but did you knew you could skin Steam?
With skin, you can customize the UI and style of the client to what you want making it more personal and to your liking. First thing is to find the skin that you would like to install. There are a lot of sites where you could find custom made Steam skins but we would recommend steamskins.org
The site itself is organized in tabs with different sections, once you click on the tab you will get a list of skins available for chosen section. If you click on the skin you will be taken to skin page detail where you can find what skin is aiming for, its legibility, a record of how the skin has been altered over time, or some mix of these aspects.
Note that some skins might have issues like some buttons might be missing from big picture mode but so far none of the skins has any kind of client breaking feature, only functionality one.
Downloading skin
Once you have chosen desired skin and while on the skin details page, scroll to the middle of the page just above the Related Skins sections with two options: Direct Download and External Download. Now usually I would recommend Direct download but in this case, I would advise going with External Download for the simple reason that the External link will send you to the developer's website where there is a higher chance to get the latest updated skin.
Installing it in Steam
Once the skin is downloaded you will first need to create a skin folder inside your Steam installation location. Navigate to your Steam installation folder (default: C:\Program Files (x86)\Steam) and create a new folder inside it. Give new folder name Skins and confirm.
Extract the skin zip file in the newly made folder. Once the file is extracted you can delete the ZIP file if you wish.
Go to your Steam client and go to Steam>Settings. In settings select Interface on the left bar and on the right part then click the Select the skin you wish Steam to use the drop-down menu and select the skin that you wish to use. Confirm and restart your Steam client
Reverting to old skin
If you found skin unappealing or, unfortunately, has some functions missing you can always choose another skin or revert back to default Steam skin.
Default Steam skin is named in the drop-down menu as < default skin >.
System restore is usually the go-to tool when something goes bad in Windows, we fire it up and roll back Windows in the state when everything was working fine. But what if Windows does not want to boot? Can we use system restore in that case?
The answer to that question would be yes, yes we can.
Boot interrupt Windows 10 by starting your PC and as soon as you see the Windows logo; press and hold the power button to force a shutdown.
Repeat this 2-4 times and Windows will open up the Advanced Startup Options menu for you.
At the Advanced Startup Options screen, select Advanced Options.
Select Troubleshoot.
Under the Advanced options screen, select System Restore.
or if you prefer, use Windows USB installation.
Boot the faulty PC using the Windows 10 installation media.
The Windows Setup dialog box will appear.
Set the Time and currency format, Keyboard or input method, and the language to install.
Click Next.
Click on Repair your computer from the lower-left corner.
From the Choose an option screen, click on Troubleshoot.
Click Advanced Options in the Troubleshoot screen.
In the Advanced Options screen, click System Restore.
Windows will take some time to prepare System Restore. It may even restart your computer or device.
When System Restore is ready, you will be prompted to choose a user account to continue.
Select an account that is set as administrator on your Windows 10 computer or device.
At the next screen, change the keyboard layout if you want and then input the password for that account.
What is DISM Error 1726? Every time you encounter some issues in your Windows 10 computer, especially when it comes to corrupted system files, you can always use the SFC scan and if the SFC can isn’t able to resolve the issue, there is also the DISM tool you can use which usually resolve the vast majority of system file corruption sufficiently. However, there are times when even the DISM commands experience issues as well. Such is the case with the 1726 error: “The remote procedure call failed”.
Some users reported that this DISM problem happens right before the process is supposed to end. According to experts, this error in DISM occurs due to any of the following reasons:
A third-party program might have interrupted the DISM operation and is the one that triggered the 1726 error: “The remote procedure call failed”.
The error could also pop up when there is a pending corruption repair. This usually happens when you tried to run a DISM command previously that was terminated manually or was halted because of some malfunction.
Lastly, the error could also occur because the process that’s responsible for the procedure is disabled or was prevented from running.
Whichever the case is, here are some suggestions that might help you in resolving the 1726 error: “The remote procedure call failed”.
Option 1 – Try updating your PC to the latest Windows build available
Since the problem is specific to certain builds in Windows 10, you need to make sure that your computer is updated before you try other troubleshooting steps. Thus, follow the steps below to update your Windows 10 PC.
Tap the Win + R keys to open the Run dialog box.
Then type “ms-settings:windowsupdate” in the field and hit Enter to open the Windows Update screen.
After that, click on Check for Updates and then follow the next on-screen instructions to apply the latest Windows update.
Once the update has been installed, restart your PC and run the DISM command again and see if the problem is fixed.
Option 2 – Try to change the Startup Type of the Remote Procedure Call service
As stated early on, the error might also be caused by a disabled Remote Procedure Call service or RPC or that it might be prevented from running for some reason.
In case you don’t know, RPC is the service control manager for both COM and DCOM servers and it’s responsible for performing object variation requests, exporting resolution as well as distributing collection for the servers. And so if the server is disabled, all programs that are using COM and DCOM including the DISM commands, will not function correctly. Thus, you need to make sure that the RPC service is scheduled to enable itself on every system boot. To do so, here’s what you have to do:
Tap the Win + R keys to open the Run dialog box.
Type “services.msc” in the field and hit Enter to open Services.
From there, scroll down until you see the Remote Procedure Call (RPC) service and then right-click on it and select Properties.
Then go to the General tab and change the drop-down menu next to Startup type to Automatic.
After that, click the Apply button and then OK to apply the changes made.
Restart your PC and run the DISM command once again at the next startup.
Option 3 – Try to modify the RpcSs registry key value
If the option didn’t work, you can also try enabling the RPC service using the Registry Editor. Before you proceed, make sure to create a System Restore point first and then follow the steps below afterward.
Tap the Win + R keys to open the Run dialog box.
Type “Regedit” in the field and hit Enter or click OK to open the Registry Editor. And if a User Account Control prompt appears, just click on Yes.
After that, navigate to this registry key: HKEY_LOCAL_MACHINE SYSTEM CurrentControlSet Services RpcSs
After selecting the aforementioned registry key, go to the right pane and double-click on the Start value.
Next, change the Value data of start to 2 and click OK to save the changes made.
Exit the Registry Editor and restart your PC and check if the 1726 error in DISM has already been resolved or not.
Option 4 – Try to disable the Windows Search service temporarily
Some users also recommended disabling the Windows Search service for the meantime as it could be the one that’s interrupting the DISM process.
Tap the Win + R keys to open the Run dialog box.
In the field, type “services.msc” to open the Services window again and hit Enter to open it.
Next, scroll down over the services list and double-click on the Windows Update service.
Afterward, go to Windows Search properties and click the General tab and then click the Stop button to stop the service from running temporarily.
Now try running the DISM commands again and see if the problem’s fixed or not.
Restart the Windows Search service and then restart your PC as well.
There is no doubt that the VLC media player is one of the best kinds of media players available today. However, it is not without any issues and one of the common issues encountered by users is VLC’s inability to be updated. And when you try to update VLC, you only get an error message saying, “An error occurred while checking for updates”.
This inability to update VLC can be quite a headache for many users especially the ones who are facing other issues in VLC and has to update it in order to resolve them. So how will you update VLC and fix its issues when you can’t even update it in the first place? Worry not as this post will help you out. Refer to the suggestions laid out below to resolve the issue in updating VLC.
Option 1 – Check if VLC is not being blocked by the Firewall
There are instances when the Firewall like the Windows Defender Firewall blocks VLC for some unknown reason without your knowledge. Thus, you need to allow VLC to get past the Firewall in order for you to fix the issue else you won’t be able to send out a network communication. To do that, follow the steps below.
Tap the Windows key + I to open the Settings app.
Then click on the Update & Security option.
After that, click on Windows Security and click the Open Windows Defender Security Center option. This will open the Windows Defender antivirus and antimalware program.
From there, click on Firewall & network protection.
Next, click on Allow an app through Firewall. You should see a list of programs. Scroll down until you see VLC and make sure that all the boxes are ticked including the Public and Private ones.
Once you’re done, restart your PC and then try updating VLC again.
Just open VLC and select the Help menu and click on Check for Updates.
Option 2 – Try running the VLC media player as an administrator
There are programs designed for Windows 10 that won’t work fully unless some parameters are met. In most cases, starting the program as an admin should resolve the problem, thus, that’s what you have to do to try and fix the “An error occurred while checking for updates” in VLC.
First, right-click on the VLC Media Player desktop icon and then select the “Run as administrator” option or you could also right-click on the icon and click on Properties.
After that, click the Compatibility tab and then tick the box labeled “Run this program as an administrator”.
Next, click the OK button and then open VLC again and try updating it. That should fix the problem.
Have you been feeling anxious in the digital space? Feeling like you have a million eyes on you each time you visit a website? It can definitely make you uneasy. Luckily there’s an easy fix, and it’s called a VPN.
In this article we’ll take you through the basics of what a VPN does and some of the biggest benefits you can reap from buying one.
VPN: definition and how it works
VPN stands for Virtual Private Network, so its name already says a lot about what it does.
A VPN is specialized software that keeps your browsing private and secure. Essentially it hides your identity, preventing possible cyberattacks and data theft. This is especially important in cases of public network use, where you’re highly exposed to potential threats.
To be more specific, this software encrypts your Internet Protocol (IP) address by filtering it through a server hosted by the VPN provider first. That way, it prevents your Internet service provider, third parties and lurking online thieves from tracking the actual you.
Credit: FLY:D on Unsplash
Some providers, such as Surfshark VPN with its IP Rotator feature, even make it a habit to frequently change your IP address to further protect your identity. With most VPN providers, you can also appear to be in a completely different country, adding to your disguise.
There are tons of advantages you can look forward to if you decide to use a VPN. Take a look at some of the crucial ones.
Benefits of using a VPN
When choosing a VPN, you can find both free and paid options. We recommend you go with the paid ones, since they have stronger security, encryption and data protection, as well as more advanced features. Free VPNs come with limitations and risk of malicious attacks on the software itself.
You can choose to buy a singular VPN service or opt for antivirus software that has a VPN built in, for example Bitdefender’s Ultimate Security plan. That depends on what you use your computer for and how much.
When you pick one, here’s what it can do for you.
1. Access region-specific content
When we said you could change your location, we meant it. Say you’re using a streaming service and a show you desperately want to watch isn’t available in your country. You can use your VPN to make it look like you’re browsing from a country where it’s unlocked.
This option is also convenient for gamers who want to access maps, skins and other in-game items unavailable in their location.
In addition, you can use this powerful feature when you’re traveling to a region where some of your favorite content may not be accessible.
Do keep in mind that you need to read the Terms and Conditions (yeah, we know - who does that?) of your games and services before doing this, since you could end up getting a penalty. It’s also important to remember that there are entire countries that have strict regulations or even bans on VPNs, for example Belarus, Russia and China. So make sure to be very cautious with your VPN use, friends.
2. Browse like no one’s watching
VPNs shield your browsing habits from prying eyes on the web. Those can be malicious hackers or just third-party cookies tracking your every move to later bombard you with targeted ads. For example, Surfshark VPN features a Cookie blocker that blocks all cookie-related pop-ups and lets you browse in peace (and secret). It works even when the VPN is turned off, which is also pretty neat.
In addition, their CleanWeb 2.0 technology makes sure ads and especially malware don’t stand a chance at all, since they’re blocked before they can even load.
The inability of sites to track your browsing means they can’t collect and analyze any of your data. So, your personal information - or your company’s information in case that’s what you’re using your computer for - is entirely hidden and secure.
3. Save money
It’s well-known that the prices of certain items and services vary based on your location, browsing time, age and many other factors. This most commonly goes for airline tickets and hotel stays.
You can use your VPN to avoid high prices and surcharges. Clear all cookies, turn on your VPN and visit an online shopping site to check out their prices. Then compare your findings with the offers you see when your VPN is off, when you spend a long time on the site or have an active account with the company.
Sometimes this can really help you find the best deals and avoid breaking the bank. But again, check the Terms and Conditions before you purchase something using a VPN.
4. Secure your smart home
The more smart devices you have connected to your network, the more exposed you are to potential cyberattacks. Phones and computers are generally designed to be decently secure even without a VPN or antivirus, but smart home devices leave a lot to be desired in that regard.
Protecting your home network with a VPN software means all devices connected to it are secure, be it an air purifier or Alexa.
Credit: Bence Boros on Unsplash
5. Prevent connection slowdown
Your ISP can intentionally slow down your internet speed based on how much data you’ve consumed (data throttling) or your activities online (bandwidth throttling).
But with a VPN, what kind of data you send and receive and how much is entirely hidden. Therefore, if your ISP can’t see you, they can’t control you and they can’t throttle down your speed.
The bottom line
You can never be too safe online. So definitely think about getting yourself a solid VPN to pump up your privacy and security as much as you can. And if you have any questions or need help choosing the perfect software for you, feel free to reach out to us.
If you are getting this error even if STEAM.EXE is present on your system then follow the easy guide to solve the issue.
Scan your system for malware
Scan your complete system for viruses and other malware. If all the scans come negative then move to the next step.
Disable your anti-virus software
Some anti-virus and anti-malware software can detect steam as a potential threat and block it. Turn off your protection software and try to run Steam once all your protection is disabled. If this works you will need to either place Steam in the applications exception list or to move to another protection software.
Remove administrator privileges from steam client
Right-click on steam.exe and choose properties, go to the compatibility tab, and uncheck run this program as administrator. Try to run Steam again.
Delete Steam registry value
If everything else failed try deleting the registry value for steam. Open registry editor and locate key:
HKEY_LOCAL_MACHINE\SOFTWARE\Microsoft\Windows NT\CurrentVersion\Image File Execution Options
Double click on Image File Execution, find steam on left, right-click on it, and choose delete. Save and exit the registry editor.
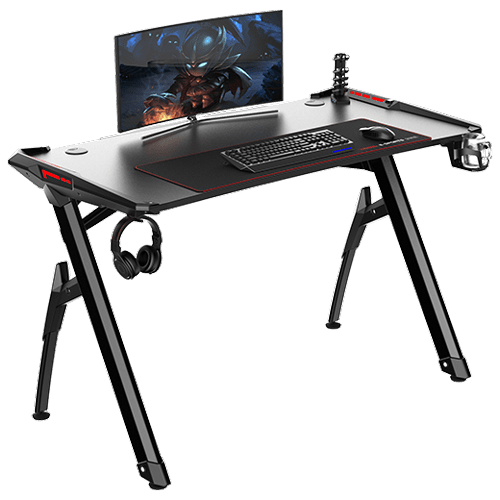
If you spend a large amount of time gaming or working on a computer gaming chair is a very important asset. One other thing that is mostly looked past but could help greatly is a good desk. A great chair accompanied by a great desk can make your long sitting sessions more pleasant and more healthy which is very important in the long run.
Hey, but it is only a desk, what is so special about having an expensive desk? Well truth to be told desk is just a desk and any kind of desk can serve the purpose of hosting a keyboard, mice, and screen. But a good desk will offer some other advantages that may not seem so important but they could mean a lot like adjusting desk height so it fits perfectly on your size and sitting position making long hours more pleasant and lower stress on hands sitting on it.
Advanced desk features
Bytezone might not be a company that will sound familiar to you, mostly because they manufacture gaming chairs and desks, now in the gaming chairs world there are a lot of competitors and Bytezone has managed to make a name for itself despite this fact. But they are more popular in their gaming and office modern-looking desk category.
The advanced desk is made from carbon steel and plastic combination, it is very durable and it weighs 27kg. Now that is not really light but it is not very heavy if we compare it to wood desks. The top layer of the table is made from easy-to-clean material and the desk comes with a large mouse and keyboard pad.
The table itself includes a cup holder, headphones bracket under the table and it has a cable management drawer in the back. The desk is sized 66x120x76 cm. Also for anyone interested desk itself comes also with RGB lights for that true gaming feel.
Resize icons on desktop in Windows 10 in a matter of seconds!
Hello everyone and welcome to today's quick tip. If you have ever been dissatisfied with icon size on your desktop and any of the default sizes like small, medium large, etc have not been appropriate know that there is a quick way to resize icons on your desktop in between sizes.
All that you have to do in order to use this built-in feature is:
Press and hold CTRL and scroll with the mouse. That's it! Find your appropriate size for icons and enjoy.
Screen flickering when you’re using Windows 10 is quite a common problem. It is often caused by apps that are not compatible with the operating system, or faulty display drivers.
There are a lot of possibilities for why this issue occurs. If you are one of the many users that encounter this kind of problem, you might want to check on your task manager to see if everything is working fine. One common sign that something wrong has happened is if the task manager flickers, as well. To fix this, you will need to update an app, uninstall an app, or update your display driver.
Solution
Error Causes
Common causes of the screen flickering when running on Windows 10 are software issues. This is most likely caused by the following:
Faulty display driver
You have an application installed that is not compatible with your operating system
Further Information and Manual Repair
In order to fix the issue of your screen flickering when you have Windows 10 as your operating system, follow these simple steps.
Note: It is very important to consult with an authorized computer technician if you are not highly confident in solving this issue by yourself. Furthermore, you can also use software to fix this problem.
The first method is by checking if your task manager is flickering. To open the task manager, all you have to do is right-click or press and hold the start button, then select task manager.
If you have confirmed that the task manager is the one causing the screen flickers, the display driver can possibly be your problem. To fix it, all you have to do is update your display driver.
How to update the display driver
You have to reset your computer and boot it on Safe Mode.
-In order to do this, you have to hold the Shift key while selecting Power>Restart. When your computer boots up, you will be greeted by a Choose an option screen. From there, you have to select Troubleshoot, then Advanced Options, then Startup Settings, and then Restart. When your computer restarts, select 4 or hit the F4 key to enter into Safe Mode.
When your computer finally boots up in Safe Mode, right-click or press and hold the Start button. From there, click Device Manager.
From the Device Manager screen, you have to expand the Display Drivers section, right-click on the driver that might be causing the problem then select Uninstall. Don’t forget to tick the Delete the driver software for this device box, press the OK button, and then restart your computer.
- When you have two, or more, drivers installed on your computer, all you have to do is disable the other drivers. You can do this by right-clicking on the driver in the Device Manager and click the Yes box next to disable. Shut down your PC after this, disconnect the installation, and boot your computer back on.
When your PC boots up after the restart, click on the Start button then click on Settings.
You need to go to Update & Security, then Windows Update, and then check for updates.
- If you are using multiple drivers and this technique doesn’t work, repeat the process in Step 3 and try to disable a different driver.
Remove an incompatible app
There are two ways to remove an incompatible app to fix the issue of a screen flicker on Windows 10. Apps like Norton AV, iCloud, and IDT Audio are usually the ones causing the problem. Uninstalling these apps could solve the problem. Uninstall the apps by using the methods below:
First Solution: Uninstall an app in Settings
Click Start, and then click Settings.
Click on System, and then click on Apps & Features.
A window will pop up and from there you will need to select the application you wish to uninstall. Click the app, and then click uninstall. Follow the screen prompt to fully uninstall the program.
Second Solution: Uninstall an app in the Start Menu
Click Start, and then click All Apps.
Look for the application you will need to uninstall, right-click the said app, and then click Uninstall. Follow the screen prompt to fully uninstall the program.
Random freezing in a Windows in the middle of work can be a very frustrating experience and can even cost us the loss of work. From time delays to sometimes complete crashes this behavior is something that every PC user wants to avoid or at least have very little of.
In this article, we will cover solutions on what to do and how to fix the random freezing of computers.
Run a virus scan on your computer.
Viruses and other malware can cause freezes and other issues in your computer, run a complete system scan for any kind of viruses and malware and if needed remove them.
Uninstall applications that you are not using
Besides taking your hard drive space some applications can have and require to have some services always running on your computer which can cause some issues, if an application is not needed and it is not used, removing it might solve freezing issues.
Increase RAM memory
Sometimes the problem with freezing is not a software issue, having less RAM memory than the application requires can cause the application not to work properly and it can cause freezing of the entire system since precious RAM can not be allocated to the required application.
Run system checker
Corrupted Windows system files can cause freezing of the entire system, to fix this, start the command prompt in administrator mode and type sfc /scannow
Keep running applications to a minimum
Having too many applications running in the background can drain system resources and can cause system freezes because of lack of memory. Close applications that are running in the background and keep them minimal.
Delete files and folders which you are not using
Having many files and/or folders on the hard drive can cause a lot of system resources to be wasted, from indexing size to less free space for caching. If you have files that you no longer need, removing them will free up space and can increase performance and introduce the stability.
Run memory check
Memory issues could lead to system freezing. When an application needs to write or read to a corrupted memory cluster, freezing will occur since it can not. To check memory bring up run dialog and type in ti mdsched.exe, click on restart now and let the memory test finish.
Update all drivers
Hardware issues can cause freezing of applications and having the latest drivers can make a world of difference. Make sure that you have all device drivers to the latest versions.
Optimize Disk drives and check for errors
Windows 10 has built-in tools to check hard drives for errors and to optimize them, use them in order to see if this issue is causing freezes.
Clean your registry
A Clean registry is a happy registry and Windows is appreciating it. Make sure that you do not have any keys which you do not need in the registry and that long-forgotten application trails are deleted for good.
Upgrade SSD firmware
Like updating drivers, updating firmware is also important, and having the latest firmware for your SSD can help a lot, newer firmware can eliminate freezing if the issue was in Windows not using SSD properly.
Update BIOS
Like updating SSD firmware can help so it can update Firmware on your BIOS. Make sure that you have the latest firmware version and freezing can go away if that was the issue.

 Skinning of applications is not new to PC users, but did you knew you could skin Steam?
With skin, you can customize the UI and style of the client to what you want making it more personal and to your liking. First thing is to find the skin that you would like to install. There are a lot of sites where you could find custom made Steam skins but we would recommend steamskins.org
The site itself is organized in tabs with different sections, once you click on the tab you will get a list of skins available for chosen section. If you click on the skin you will be taken to skin page detail where you can find what skin is aiming for, its legibility, a record of how the skin has been altered over time, or some mix of these aspects.
Note that some skins might have issues like some buttons might be missing from big picture mode but so far none of the skins has any kind of client breaking feature, only functionality one.
Skinning of applications is not new to PC users, but did you knew you could skin Steam?
With skin, you can customize the UI and style of the client to what you want making it more personal and to your liking. First thing is to find the skin that you would like to install. There are a lot of sites where you could find custom made Steam skins but we would recommend steamskins.org
The site itself is organized in tabs with different sections, once you click on the tab you will get a list of skins available for chosen section. If you click on the skin you will be taken to skin page detail where you can find what skin is aiming for, its legibility, a record of how the skin has been altered over time, or some mix of these aspects.
Note that some skins might have issues like some buttons might be missing from big picture mode but so far none of the skins has any kind of client breaking feature, only functionality one.


 Advanced desk features