Kernel_Data_Inpage_Error is a BSOD (blue screen of death) error.
Also, know as a 0x0000007A Stop error. This bug check indicates that the requested page of kernel data from the paging file failed to be read into memory. In simple words, this means that Windows has trouble reading from the memory.
This can apply to both kinds of memory: stored memory on your hard drive and also the dynamic memory in your RAM.
The Kernel_Data_Inpage_Error turns your computer screen all blue, stops the program being executed, and sometimes even leads to abrupt system shut down.
Error Causes
Kernel_Data_Inpage_Error may occur due to numerous reasons. The exact cause of this error can easily be found by going through the code displayed in the parameter of 0x00000007A.
Let’s take a look at Kernel_Data_Inpage_Error parameter codes and the underlying causes of its occurrence:
0xC0000009A- This parameter code triggers missing nonpaged pool resources
0xC0000009C- This represents the installed hard disk drive has bad sectors.
0xC0000000E- This indicates a hardware failure or an incorrect drive configuration
Further Information and Manual Repair
No matter what the cause for Kernel_Data_Inpage_Error may be, it is advisable to fix it immediately as blue screen of death error codes are considered to be critical PC errors that can cause serious damages and even result in valuable data loss.
Here are a couple of ways to repair this issue on your system:
1. Call the ‘Chkdsk’ (check disk) command on your system.
Windows XP, Vista, and 7 users can call this command, by pressing Windows Key +F and type in ‘chkdsk’ and run.
However, you can’t run it while actively using Windows but you can always schedule it to start automatically the next time your computer turns on. Wrap up what you need and then reboot. Chkdsk disk checking process can take a long time, especially on large and slow hard drives.
To run this command on Windows 8, open Windows search by pressing Windows Key+ F and then type ‘cmd’. Then right-click on the command prompt and choose the option ‘Run as Administrator’.
To continue with the disk checking process, here you will be prompted to provide your administrator authentication.
Once you insert the administrator authentication, type the command ‘Chkdsk C:/f/r/x” where the letter ‘C’ indicates the drive you want to examine and repair. Run it to scan for Kernel_Data_Inpage_Errors on your system. Chkdsk command will detect and repair errors on the hard drive and then automatically reboot.
Limitations to this Solution:
‘Chkdsk’ is a value-adding inbuilt disk checking tool in PC new Window versions; nonetheless, this command has certain limitations.
It is time-consuming. You may have to wait for a long time for it to scan your system. Also when disk check is running, you will have to stop all other activities on your system. Furthermore, Chkdsk does not scan and fix all registry errors and other PC-related errors.
So, you can’t be 100% sure that it will resolve all the Kernel_Data_Inpage_Errors on your PC.
As you know, one of the most popular browsers these days is the Google Chrome browser. Browsing the web every day using your Chrome browser, leaves a trail of browsing history. Google uses the browser history to streamline and make the browsing experience a lot better. But there are times when Chrome users experience trouble in deleting their web browsing history, data, cookies, and cache. In this post, you will be guided through specific settings that will help you in getting rid of the browsing history in Chrome.
There are several options you can take in clearing the browsing history in Chrome. But before you try them, you can try the basic one first using the following steps:
First, click on the three-dotted icon and click on History from the menu.
Next, click on the Clear browsing data option and select “All time”.
Then select the type of history you want to delete.
After that, click on the Clear Data button.
If clearing the browsing history in Chrome the old way didn’t work, then you can try to check out the options provided below.
Option 1 – Clear the cache using the File Explorer
The first thing you can do is to clear the cache by using File Explorer. To get started, refer to these steps:
From the given locations above, replace “YOUR USERNAME” with the user profile name you use and then search for a file named “Cookies”.
Now delete its contents.
Option 2 – Reset Chrome
Resetting Chrome can also help you fix the error. This means that you will be restoring its default settings, disabling all the extensions, add-ons, and themes. Aside from that, the content settings will be reset as well and the cookies, cache, and site data will also be deleted. To reset Chrome, here’s what you have to do:
Open Google Chrome, then tap the Alt + F keys.
After that, click on Settings.
Next, scroll down until you see the Advanced option, once you see it, click on it.
After clicking the Advanced option, go to the “Restore and clean up option and click on the “Restore settings to their original defaults” option to reset Google Chrome.
Now restart Google Chrome.
Option 3 – Try to clean reinstall Chrome
There are instances when programs leave files behind after you’ve uninstalled them and the same thing can happen to Chrome so before you reinstall Chrome, you have to make sure that you have deleted the User Data folder. To do so, refer to the following steps:
Hit the Win + R keys to open the Run dialog box.
Next, type “%LOCALAPPDATA%GoogleChromeUser Data” in the field and hit Enter to open the User Data folder.
From there, rename the default folder and name it something else, e.g. “Default.old”.
After that, install Google Chrome again and check if the issue is now fixed.
Bluetooth perhaps is slowly becoming an outdated feature but sometimes you can really used it and need it.
By default, in Windows 11 Bluetooth is turned OFF so if you need it, you will need to turn it ON first. Luckily turning it ON is easy and we will guide you through the process
Turning Bluetooth using the Quick Settings menu
The easiest and fastest way to turn the Bluetooth ON is using the quick setting menu:
Click on indicator icons located left of date and time in Taskbar
Click on the Bluetooth icon (if the icon is not displayed, click on the pencil icon, then click on Add and add Bluetooth icon from the list)
Right-click on the Bluetooth icon and select go to Settings
Go to Adding a Bluetooth Device to Windows 11 section
Switch it ON via Windows Settings
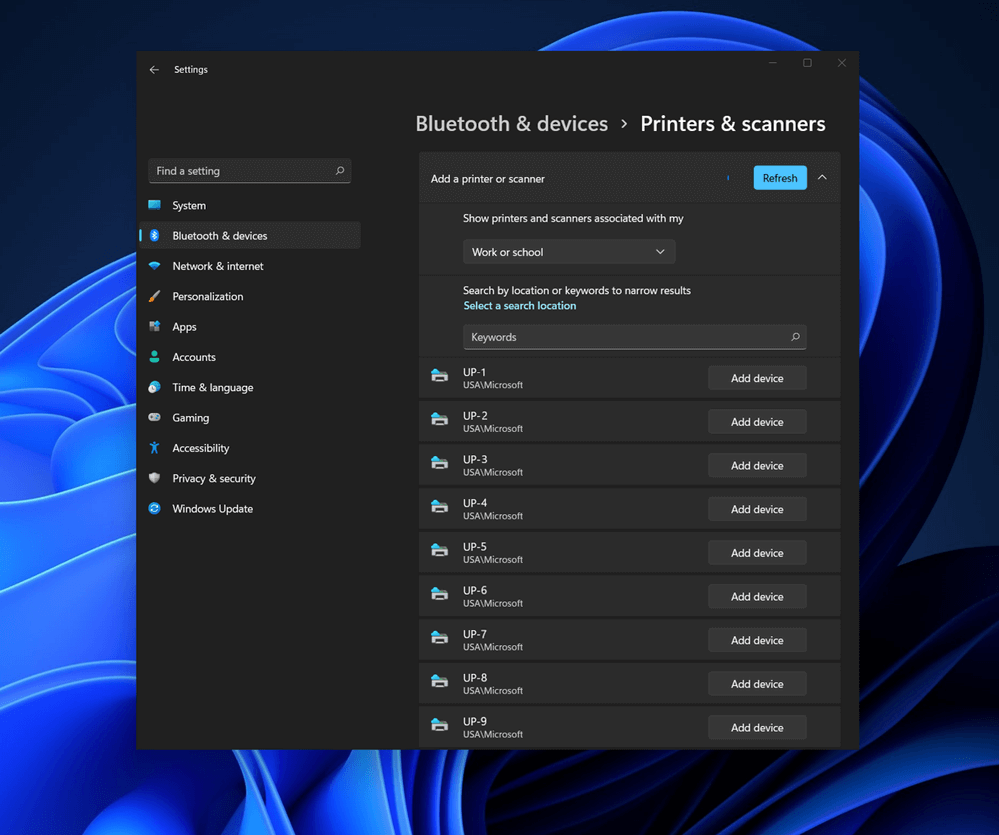
Open Windows settings by using ⊞ WINDOWS + I combination
Click on Bluetooth & Devices
Inside settings turn Switch to ON beside Bluetooth
Click + Add Device large button on top
Click Bluetooth
Select device in the list of found devices (make sure device is turned ON, it has Bluetooth sharing ON, and that it is in pairing mode)
If the device needs the password, type it in
When the message Your device is ready to go is showed on the screen click on the Done
Advice on Bluetooth devices
Note that the Bluetooth devices you connect to Windows 11 stay linked to your PC unless you pair them with a different PC, smartphone, or tablet later.
After a time, most Bluetooth devices power down automatically to save battery life. To continue where you left off, either power the Bluetooth device up (if it has a power button) or press a button on a keyboard or mouse, and it should automatically turn on and reconnect with your PC.
If you’re having trouble connecting your Bluetooth device, make sure that Windows 11 is fully updated and that you’ve installed any drivers that came with your device.
Make sure that the device is fully charged or that it has a fresh set of batteries.
while Windows is searching. You’ll need to remove the device from Windows 11 first and then attempt to pair it with your PC again.
Removing devices
If you need to remove (un-pair) a Bluetooth device, just open Windows Settings and navigate to Bluetooth & Devices. Locate the name of the device that you want to remove, click the three dots button in the corner of its square and select Remove Device.
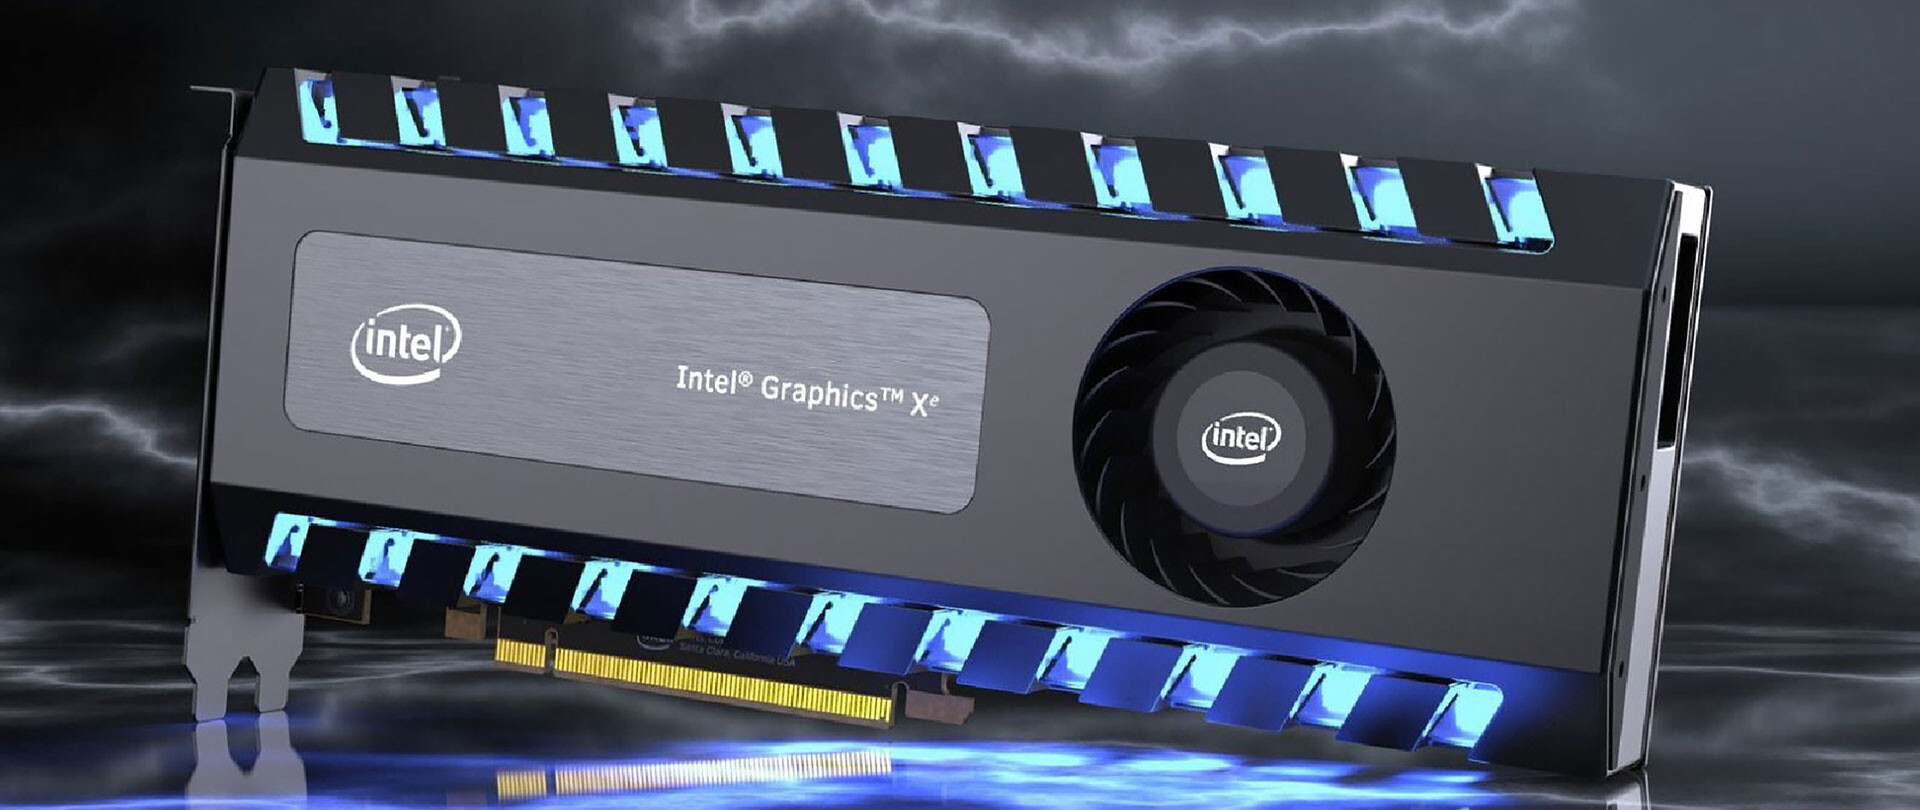
This is not the first time that Intel is trying to enter the GPU field but its adventures so far were, well let us agree not so good. All of that is hoping to be changed with the upcoming ARC GPU. The first generation of Arc graphics, code-named Alchemist and previously known as DG2, will support desktop PCs and laptops and is set to arrive in the first quarter of 2022.
Alchemist will have hardware-based Ray tracing and AI-driven supersampling. This indicates that GPU is aimed to compete in the Hi-end spectrum and battle side by side with Nvidia and AMD on the market. Alchemist will also pack full DirectX 12 Ultimate support.
Intel also released names for the next upcoming future generations of ARC GPUs: Battlemage, Celestial & Druid. More information about ARC products will be released later this year.
“Today marks a key moment in the graphics journey we started just a few years ago. The launch of the Intel Arc brand and the reveal of future hardware generations signifies Intel’s deep and continued commitment to gamers and creators everywhere,” Roger Chandler, Intel vice president, and general manager of client graphics products and solutions.
BSOD or Blue Screen of Death errors are one of the most common errors you can encounter on your Windows PC. One of these BSOD errors is the “ACPI_BIOS_ERROR”. If you suddenly get this error, it means that there is some problem in booting the operating system from your hard drive or Windows was not properly installed on your PC. In addition, this error could also mean that there is something wrong with the CMOS battery located in the motherboard.
Unlike other BSOD errors, the workaround for this error is a bit different as these workarounds require a bit more expertise in updating the BIOS as well as setting the correct boot configuration. If you know are capable enough in troubleshooting the problem, refer to the instructions laid out below to fix the BSOD “ACPI_BIOS_ERROR”.
Option 1 – Try to remove the SSD and update the BIOS
The first thing you have to do is to check the primary storage devices on your PC. If you have just installed a new hard drive or SSD recently on your computer, then it’s most likely the cause of the BSOD error. Moreover, you should also ensure that your BIOS is up-to-date to the latest available build.
Remove the SSD/HDD and inject a different HDD that was already preinstalled in your Windows PC.
After that, update the BIOS to the latest available build. After updating it, insert the old SSD/HDD and then try to boot your PC again. The problem should be fixed now. If not, refer to the next given option.
Option 2 – Try to check the CMOS battery and reset the CMOS module
As mentioned earlier, the CMOS battery might also be the one that’s causing the problem. It is a physical component of the motherboard and is a memory chip that contains all the settings configuration on your computer and is also powered by a battery. So if your battery loses power, the CMOS will be reset and as a result, all the configurations will be gone as well. It is also possible that the CMOS module is not properly working and every time things are saved, they are properly written due to the battery. That’s why you have to consider changing the CMOS battery and see if it fixes the problem. In addition, you also have to make sure that you completely reset the CMOS module and then try booting your PC again.
Option 3 – Try to check the BIOS settings
If the BIOS settings are incorrect, chances are that’s the reason why you’re getting the “ACPI_BIOS_ERROR” BSOD error. Every BIOS has different settings which you can make use of to enhance your computer experience. So make sure that your BIOS is up-to-date and that the settings are in accordance with your requirement.
Another thing you can try is to disable the Legacy USB and the Legacy BIOS in the BIOS settings if you are trying to install a 64 bit Windows version. Make sure that you also enable AHCI before plugging in the installation drive on your PC. Moreover, ensure that your PC is using IDE or Integrated Drive Electronics mode instead of SATA or Serial Advanced Technology Attachment. Aside from that, try to check the extracted setup if it is in NTFS format, if it is, you should extract the ISO in FAT32 and use it to install Windows.
Option 4 – Try to reset the ACPI Compliant Control Method
ACPI or Advanced Configuration and Power Interface provide an open standard that operating systems can use to detect hardware, perform power management, as well as monitor the status of your device and provide information for other processes. Chances are, there are some misconfigurations with this module on your PC that lead to believing that there is no battery present. That’s why you need to reset it and see if it fixes the BSOD error or not.
Boot your PC into Safe Mode.
Tap the Win + R keys to open the Run dialog box.
Type in “devmgmt.msc” in the field and tap Enter to open the Device Manager.
After opening the Device Manager, go to the “Batteries” section and click it to expand it and then right-click on the “Microsoft ACPI-Complaint Control Method Battery” option and click on Uninstall.
After you disable the module, click on any empty space and then click the “Scan for hardware changes” option.
Then check if you can now boot your PC normally and without the BSOD error.
Recently on errortools.com, we were talking about Cooler Master’s Orb X gaming chair that is an absolute beast and an amazing product. One downside of Orb X is its price. IW product line is somewhat competing with Orb X with a much more affordable price aiming to probably take customer base with lower income but offering them a great experience as well.
The first thing you will notice is a different design and somewhat feeling of cheaper quality if you compare it to Orb X but that is quite reasonable considering the chair itself is around 3.5 times cheaper than Orb X which really puts it in range of everyone can get it.
But does a much cheaper price means low quality? Let’s explore.
IW Unicorn
The 2021 CLUVENS BRAND newly issued model UNICORN has fully electrical tilting capabilities to 160 degrees, Reading light-two LED & RGB illumination lighting, manual open/close keyboard tray, and armrests. This model is suitable for home and office, and also gaming computer work environments.
It offers functions that enable the user to experience unprecedented comfort and quasi total immersion through strategically positioned 1-3 monitors, audio systems, and accessories. The result is a complete computer office, ergonomically optimized, with a minimal footprint that improves overall performance and productivity and health and comfort.
Sitting on a chair can help a lot for relieving health problems like lower back pain, herniated discs, sciatica, and neck pain and also enhance performance and viewing effects.
More Luxury and More comfortable:
Equipped with Luxury feeling reclining Gaming chair made with high-density Mold Shaping Foam and superior quality PU leather with very comfortable texture, electrical recline to 128 degrees, and more to 160 degrees for the flat position for the user.
More High-End Setting and more High-tech:
Manual push for open / close of big sized (87x34cm) Self-Balancing Keyboard tray, adjustable with 20cm distance range with Electrical control for the height of roof arm & monitors. Electrical control for reclining Zero Gravity position or even flat position, Manual adjusted Feet pedal for a more comfortable position for feet. Using a High-Quality PU leather Gaming chair that has Heat/Massage functions with it!
The IW-Unicorn monitor mounts allow the use of a single monitor up to Ultra-wide 49” or 43” in size or triple monitor setups up to 3 x 29” other monitors configurations are available upon request. (VESA standard)
IW Scorpion
Scorpion is basically a premium version of Unicorn with being able to hold more weight, having cup holders on the armrest, etc.
The look is also similar with Scorpion being more sinister-looking but overall Steel frame and chair are the same.
Conclusion
Sadly I have not personally experienced neither of these products including Orb X but from all information I have found and looked over, I would say these products are not trying to compete with each other.
Although Products are similar in nature, Orb X is aimed at hi end-users focusing on privacy and robustness while IW is filling the gap of users that would like an advanced chair but are not willing or ready to shell hi amount of money for it offering advanced chairs with advanced features in somewhat affordable price.
The error code 28 is a driver error. This is one of the many device manager error codes. When this error occurs on your computer, the following message is displayed:
“The drivers for this device are not installed. (Code 28)”
Another driver device error message you might encounter is error code 41.
Error Causes
Error 28 occurs because of unsuccessful device driver installation. This usually happens when you try to update new drive versions on your system. It is advisable to repair this error right away as it can hamper your ability to use certain hardware.
For example, if error 28 occurs due to the unsuccessful installation of the USB driver, then it if not fixed and resolved it may prevent you from using hardware devices.
Unsuccessful driver installation means you either didn’t install it properly or your computer has registry issues. If it’s the registry then you must fix it without any delay because it can expose your PC to serious threats like system crash and failure.
To avoid such inconvenience, repair it.
Further Information and Manual Repair
When it comes to repairing the error code 28, here’s what you can do:
Simply go to the control panel and click on the Device Manager option:
In the details pane with the list of devices, locate the device for which you want to reinstall the driver software.
Double click on it to open the properties dialog box.
Now click on the driver tab and then click update driver.
After updating, try using that device again if it doesn’t work and shows the error code 28 on your computer screen then this means the underlying cause is the registry.
Losing an internet connection is not a pleasant thing, especially if it happens often. If you are a gamer this phenomenon can be very disturbing since it can stop your progress or even get your account banned if you are playing competitively.
Luckily we have the solution for this annoyance, keep on reading and follow the guide.
Update your driver
Outdated or wrong drivers can cause a lot of issues and the device can exhibit strange behavior this way. To update driver
Right-click on Start
Click on Device Manager
Locate your network adapter, wifi card, or device you are using for internet access
right-click on it and choose update driver
Renew IP
Right-click on Start
Click on command prompt (admin)
In command prompt type ipconfig /renew and press ENTER
Reset Winsock API
Right-click on Start
Click on command prompt (admin)
In command prompt type netsh winsock reset catalog and press ENTER
then type netsh int ipv4 reset reset.log and press ENTER
reboot PC
A surprisingly large amount of things present at your home can and do interfere with your wi-fi signal making it weak so devices are dropping it, having trouble connecting, or being slow.
Hello and welcome to our latest article where we will take a look at all things that are present in a lot of homes but are very bad for your WI-Fi signal.
Bad router placement
Having a router in a bad position can have some really large effects on WI-Fi signal strength and its availability. Usually, we do not give great attention to where we are placing our router but it has been proved over and over again that being close to certain objects does indeed have a great influence on the wireless signal strength and performance.
So, what are these objects and bad positions where we could place the router and effectively kill his Wi-Fi capabilities?
Fish Tanks
Water will block all radio waves including Wi-FI signals and waves themselves, so having a router next to the aquarium or any large source of water is a bad idea. You should always look at water as something bad for your Wi-Fi and move your router away from it as far as possible.
Bookshelves
Paper is another story and example of the dampening effect on radio waves. Did you know that various patterns of paper are used in silent rooms and recording studios in order to eliminate sound reflection from surfaces? Well besides absorbing sound waves, the paper also absorbs Wi-Fi signals and if you have a large bookshelf with a lot of books packed one beside another you just have a great wall of signal absorbing.
Mirrors
The problem with mirrors is in their coating that goes over the glass in order to turn it into the mirror, that coating is metal and as such, it is absorbing signals in large amounts. If you have an old or high-quality mirror that has a silver coating things are even worse since silver will absorb even more waves than modern cheap ones.
TV
Yup, TV is also on this list and for a similar reason as a mirror, although TV does not have coatings of metal, they have something even worse: a large metal plating on the back. Metal plating is there to produce structural integrity of the TV set and provide it with shielding from electromagnetic waves and as such it will prevent Wi-Fi waves as well. Do not place the router behind your TV.
Things that influence signals in homes
Any kind of metal decoration
Now when we covered mirrors and TV because of the metal they have, we must take a look at the metal itself. Any kind of metal stuff that you might have like baskets, figures, statues, frames, etc will effectively block your signal.
Kitchen appliances and Home utilities
Kitchen appliances like refrigerators, microwaves, ovens, stoves, etc. along with home appliances and utilities like dishwashers, washing machines, dryers, etc are large metal objects enclosed in a metal cage that will block signals from spreading further and it is no secret that most kitchens have weaker Wi-Fi because of this reason.
Home gyms
This is a logical conclusion as to everything explained so far if you have a workout room or small gym at home it is probably filled with weights that are metal and have mirrors inside, all of that will interfere and block signals.
Things blocking your Wi-Fi that you have no easy control over
Walls
Thick walls will dampen signals, thick walls from bricks will dampen even more and concrete walls will kill it almost completely. Any kind of metal reinforcement wiring inside walls will reduce and kill signals as well.
Floors and ceiling
This is somewhat important if you have a floor beneath or under the room where is your router located, but for the same reason how walls are blocking your signal floor and ceiling can do it as well, especially since most of the time they are made of some stronger material like concrete with metal fence inside.
Heating systems
If you have a heating system that is composed of metal radiators with water inside, then in terms of Wi-Fi signal strength you have an aquarium but in a metal box, and as such it will greatly reduce signal strength.
Error Code 0x80070008 generally appears on machines running Windows 10, although it may sometimes also appear on earlier versions of the software, going all the way back to Windows 7, when the error was first introduced.
Common symptoms include:
Inability to complete the Windows 10 Update process fully
Machine running slowly
Messages about a lack of memory on the device in question
If Error Code 0x80070008 has appeared on your computer, there are several things that you can do in order to fix the error and be able to install updates as necessary. Most of these methods are simple enough to use, even for the most inexperienced users, but at least one of the methods may require advanced knowledge or comfort in changing your settings on a deeper level.
If you don’t feel comfortable in your ability to use the steps below to resolve Error Code 0x80070008, get in touch with a qualified technician who is experienced in memory issues and Windows 10 error code resolution to assist you.
Solution
Error Causes
There are three basic causes for Error Code 0x80070008. The first is that your machine may not have enough memory to finish the installation of an update. The second possible cause is that another program may be interfering with your machine’s ability to finish the update installation. Lastly, Error Code 0x80070008 can occur when a user has a lot of language packs, which may interfere with the ability to complete updates.
Further Information and Manual Repair
Because there are three different causes for Error Code 0x80070008, there are also three different methods to attempt to resolve the error. If you believe that the error may be caused by the number of language packs installed on your device, you should attempt method three first. Otherwise, use methods one and two first.
If you are not confident that you can do the steps below on your own to resolve Error Code 0x80070008, get in touch with a certified computer repair technician that is familiar with Windows 10 issues in order to fix the issue.
Here are the top three methods to resolve Error Code 0x80070008 on a machine running Windows 10:
Method One: Run the Windows Update Troubleshooter
When Error Code 0x80070008 first appears on your computer, one of the first steps that you can take to resolve the issue is to open up the Windows Update module and click on the “Troubleshoot” tool. This will run a scan on the Windows Update tool to attempt to identify the root cause of the problem and to resolve it automatically for you.
If the troubleshooter finds a problem, simply follow the steps on the screen to resolve the error. In some cases, you may want to restart your computer after this process is complete before you attempt to run the Windows Update tool again.
Method Two: Close All Programs Until Updates are Done
In some cases, a lack of memory on the machine can mean that running other programs while you are attempting to run Windows Update will cause the update process to fail. Closeout all of the programs that are running on the device, including any antivirus software or firewalls, before you run the update process. If this allows the Update process to run through to completion, you can then reactivate all of the programs that were running prior to the update.
Method Three: Remove Unwanted Language Packs
This method generally applies to users who have an abundance of language packs installed on their machine, usually more than 20 in total, which may interfere with the update process. To remove unwanted language packs, follow these steps:
Step One: Open the Start Panel and select “Control Panel.”
Step Two: Find the setting for “Clock, Language, and Region” and choose “Region and Language.”
Step Three: Select the option for “Keyboards and Languages,” then under the settings for “Display language,” choose “install/uninstall languages” and select “uninstall display languages.”
Step Four: For any languages that you do not wish to keep, deselect them and choose “Next.” It may require several minutes for the process to complete.
Step Five: After the unwanted language packs have been removed from your computer, you can attempt to run Windows Update again. You may want to restart your computer first for maximum efficiency.
Method Four: Use An Automated Tool
If you wish to always have at your disposal a utility tool to fix these Windows 10 and other related issues when they do arise, download and install a powerful automated tool.
Error code 0xc00007b usually manifests itself via the inability to start an application properly. It can occur when users attempt to run a game or other programs on their computer. In such a case, the application will not start and a message box will pop up stating that error code 0xc00007b has occurred. The error code is likely to occur when users attempt to run a program in the incorrect or inappropriate bit. For instance, if you try to load a 32bit location with a 64bit location.
Solution
Error Causes
Error code 0xc00007b affects various versions of the Windows operating system, including Windows 7, 8, 8.1, and Windows 10. In the case of error code 0xc00007b for Windows 10, the error may be caused by issues related to software you’ve installed on your machine. This may cause software conflict resulting in the need to install programs like DirectX. Left unchecked, error code 0xc00007b could incite other error codes in Windows 10, such as error code 0xc004f034.
Further Information and Manual Repair
To repair error code 0xc00007b for Windows 10 devices, users will need to implement at least one manual repair procedure. Manual repair methods are effective in combating these issues as they can address the issues causing the error in the first place, thus fixing the problem.
The manual repair procedures for fixing error code 0xc00007b are very straightforward and can be implemented with little technical knowledge. However, you may need to contact a Windows repair technician if you have difficulty fixing the error code after completing the manual repair methods listed below.
Method One: Install Microsoft DirectX
Microsoft DirectX is an application usually included in the Microsoft operating system. It enables users to access high-speed gaming and multimedia on their PC. The latest version of this Windows technology is available on Microsoft’s official site.
Visit the Microsoft website and search for DirectX End-User Runtime Web Installer. Once you have located the latest version of the program, select the preferred language you would like DirectX to run in, and then click download. Run the program, then be sure to reboot your computer.
Note that this solution should only be applied if you are having issues running or displaying a gaming or multimedia application. Once you’ve correctly installed the latest version of DirectX, it should be able to fix underlying issues that may be causing error code 0xc00007b to occur. If you are still unable to run applications after completing this manual repair procedure, however, you will need to apply another method to fix error code 0xc00007b for Windows 10.
Method Two: Install Latest Version of .NET Framework
.NET Framework, a framework developed by Microsoft, provides solutions for users who may be having problems with applications. To download the latest version of the .NET framework, follow the steps listed below.
Step one: Open your favorite web browser
Step two: Enter www.microsoft.com/net
Step three: Click Downloads
Step four: Select the latest version of the .NET Framework by clicking the framework at the top of the list. (Currently, the latest version is .NET Framework 4.6.2.)
Step five: Select preferred language, then download
Step six: Run software.
To ensure you successfully download the latest version of the .NET Framework, verify your computer is properly connected to the Internet while downloading the software. Also, follow the instructions provided on the Microsoft website.
After completing the download process, reboot your computer then check if you have successfully resolved error code 0xc00007b for Windows 10. If this manual repair method is successful, you will be able to access your gaming and multimedia programs. Otherwise, the error code message box will reoccur, stating that the application error code is present on your device. Apply the next manual repair procedure to correct the error code if this reoccurs.
Method Three: Install Windows Updates
In certain instances, application error codes like error code 0xc00007b affect PC users who fail to install the most current Windows updates on their device. That is why it’s important to check your system and ensure you have installed all the latest updates.
The updates, if any are available, will automatically be installed on your PC once you access Windows Update in Settings. Reboot your computer then check if you are able to run programs that previously would not open due to error code 0xc00007b. If problems persist resulting in the reoccurrence of the error code, reinstall the applications you are unable to open or get help from a Windows repair technician.
Method Four: Download an Automated Tool
If you wish to always have at your disposal a utility tool to fix these Windows 8 and other related issues when they do arise, download and install a powerful automated tool.

 Bluetooth perhaps is slowly becoming an outdated feature but sometimes you can really used it and need it.
By default, in Windows 11 Bluetooth is turned OFF so if you need it, you will need to turn it ON first. Luckily turning it ON is easy and we will guide you through the process
Bluetooth perhaps is slowly becoming an outdated feature but sometimes you can really used it and need it.
By default, in Windows 11 Bluetooth is turned OFF so if you need it, you will need to turn it ON first. Luckily turning it ON is easy and we will guide you through the process
 This is not the first time that Intel is trying to enter the GPU field but its adventures so far were, well let us agree not so good. All of that is hoping to be changed with the upcoming ARC GPU. The first generation of Arc graphics, code-named Alchemist and previously known as DG2, will support desktop PCs and laptops and is set to arrive in the first quarter of 2022.
Alchemist will have hardware-based Ray tracing and AI-driven supersampling. This indicates that GPU is aimed to compete in the Hi-end spectrum and battle side by side with Nvidia and AMD on the market. Alchemist will also pack full DirectX 12 Ultimate support.
Intel also released names for the next upcoming future generations of ARC GPUs: Battlemage, Celestial & Druid. More information about ARC products will be released later this year.
“Today marks a key moment in the graphics journey we started just a few years ago. The launch of the Intel Arc brand and the reveal of future hardware generations signifies Intel’s deep and continued commitment to gamers and creators everywhere,” Roger Chandler, Intel vice president, and general manager of client graphics products and solutions.
This is not the first time that Intel is trying to enter the GPU field but its adventures so far were, well let us agree not so good. All of that is hoping to be changed with the upcoming ARC GPU. The first generation of Arc graphics, code-named Alchemist and previously known as DG2, will support desktop PCs and laptops and is set to arrive in the first quarter of 2022.
Alchemist will have hardware-based Ray tracing and AI-driven supersampling. This indicates that GPU is aimed to compete in the Hi-end spectrum and battle side by side with Nvidia and AMD on the market. Alchemist will also pack full DirectX 12 Ultimate support.
Intel also released names for the next upcoming future generations of ARC GPUs: Battlemage, Celestial & Druid. More information about ARC products will be released later this year.
“Today marks a key moment in the graphics journey we started just a few years ago. The launch of the Intel Arc brand and the reveal of future hardware generations signifies Intel’s deep and continued commitment to gamers and creators everywhere,” Roger Chandler, Intel vice president, and general manager of client graphics products and solutions.  The 2021 CLUVENS BRAND newly issued model UNICORN has fully electrical tilting capabilities to 160 degrees, Reading light-two LED & RGB illumination lighting, manual open/close keyboard tray, and armrests. This model is suitable for home and office, and also gaming computer work environments.
It offers functions that enable the user to experience unprecedented comfort and quasi total immersion through strategically positioned 1-3 monitors, audio systems, and accessories. The result is a complete computer office, ergonomically optimized, with a minimal footprint that improves overall performance and productivity and health and comfort.
Sitting on a chair can help a lot for relieving health problems like lower back pain, herniated discs, sciatica, and neck pain and also enhance performance and viewing effects.
The 2021 CLUVENS BRAND newly issued model UNICORN has fully electrical tilting capabilities to 160 degrees, Reading light-two LED & RGB illumination lighting, manual open/close keyboard tray, and armrests. This model is suitable for home and office, and also gaming computer work environments.
It offers functions that enable the user to experience unprecedented comfort and quasi total immersion through strategically positioned 1-3 monitors, audio systems, and accessories. The result is a complete computer office, ergonomically optimized, with a minimal footprint that improves overall performance and productivity and health and comfort.
Sitting on a chair can help a lot for relieving health problems like lower back pain, herniated discs, sciatica, and neck pain and also enhance performance and viewing effects.
 Scorpion is basically a premium version of Unicorn with being able to hold more weight, having cup holders on the armrest, etc.
The look is also similar with Scorpion being more sinister-looking but overall Steel frame and chair are the same.
Scorpion is basically a premium version of Unicorn with being able to hold more weight, having cup holders on the armrest, etc.
The look is also similar with Scorpion being more sinister-looking but overall Steel frame and chair are the same.

