Logo

Windows 11 different sounds for dark theme

Windows 11 dark mode2Interesting information has come out from Microsoft, Windows 11 dark theme will include a different sound theme from its standard light one.

When in dark mode on Windows 11, the system sounds generally become softer, and they echo a bit, creating a more soothing experience that matches the overall look and feel of the dark mode. Flipping back to light mode brings the system sounds back to their normal level.

However, even though the light model has slightly louder sounds than the dark mode, Microsoft has taken great care to make sure the audio is more soothing, according to a report from CNBC.

The designers of Windows 11 took inspiration from an approach called calm technology. Microsoft’s Christian Koehn and Diego Baca wrote about calm technology in a post on Medium. In it, they said, “Windows 11 facilitates this through foundational experiences that feel familiar, soften formerly intimidating UI, and increase emotional connection.”

According to a Microsoft spokesperson in a statement to CNBC, “The new sounds have a much rounder wavelength, making them softer so that they can still alert/notify you, but without being overwhelming.”

Do You Need Help with Your Device?

Our Team of Experts May Help
Troubleshoot.Tech Experts are There for You!
Replace damaged files
Restore performance
Free disk space
Remove Malware
Protects WEB browser
Remove Viruses
Stop PC freezing
GET HELP
Troubleshoot.Tech experts work with all versions of Microsoft Windows including Windows 11, with Android, Mac, and more.

Share this article:

You might also like

Disable Taskbar on the second display
If you have a dual monitor setup on your Windows 10 computer and you mostly use the second screen when you are presenting something, this makes the Taskbar completely unnecessary and is not really required. So if you are using your computer generally and do not want the taskbar on your second screen, read on as this post will guide you in disabling Taskbar on your second display. The good thing is, Windows comes with a built-in feature to disable Taskbar on your second screen or projector connected to your computer. In this post, you will be guided on how you can hide or disable the Taskbar from the second monitor in Windows 10. This post is coming in handy especially if you are using projectors or multiple displays. Refer to the steps given below to disable Taskbar on the second display in Windows 10. Step 1: Go to Settings and click on Taskbar from the left menu. Step 2: After that, scroll down to lo look for Multiple Displays. Step 3: Next, turn off the toggle labeled, “Show taskbar on all displays”. Note: After completing the steps given above, it will disable the Taskbar on all the secondary displays. Bear in mind that these settings will work only if you are running a second screen in Extended mode. Contrariwise, if you are in the Duplicate mode, this setting will not work but you can always set your Taskbar to Autohide so that it won’t be displayed.

On the other hand, if you are facing some issues in finding which screen is primary and which one is secondary, refer to these steps:

Step 1: Go to Settings and select System. Step 2: Next, from the left menu open Display. Step 3: From there, select the desired display and make it the primary one as required by your setup.
Read More
How to Fix Screen Flickering in Windows 10 Error

Screen flickering in Windows 10 - What Is It?

Screen flickering when you’re using Windows 10 is quite a common problem. It is often caused by apps that are not compatible with the operating system, or faulty display drivers.

There are a lot of possibilities for why this issue occurs. If you are one of the many users that encounter this kind of problem, you might want to check on your task manager to see if everything is working fine. One common sign that something wrong has happened is if the task manager flickers, as well. To fix this, you will need to update an app, uninstall an app, or update your display driver.

Solution

Restoro box imageError Causes

Common causes of the screen flickering when running on Windows 10 are software issues. This is most likely caused by the following:

  • Faulty display driver
  • You have an application installed that is not compatible with your operating system

Further Information and Manual Repair

In order to fix the issue of your screen flickering when you have Windows 10 as your operating system, follow these simple steps.

Note: It is very important to consult with an authorized computer technician if you are not highly confident in solving this issue by yourself. Furthermore, you can also use software to fix this problem.

  • The first method is by checking if your task manager is flickering. To open the task manager, all you have to do is right-click or press and hold the start button, then select task manager.

If you have confirmed that the task manager is the one causing the screen flickers, the display driver can possibly be your problem. To fix it, all you have to do is update your display driver.

How to update the display driver

  1. You have to reset your computer and boot it on Safe Mode.

      -In order to do this, you have to hold the Shift key while selecting Power>Restart. When your computer boots up, you will be greeted by a Choose an option screen. From there, you have to select Troubleshoot, then Advanced Options, then Startup Settings, and then Restart. When your computer restarts, select 4 or hit the F4 key to enter into Safe Mode.

  1. When your computer finally boots up in Safe Mode, right-click or press and hold the Start button. From there, click Device Manager.
  1. From the Device Manager screen, you have to expand the Display Drivers section, right-click on the driver that might be causing the problem then select Uninstall. Don’t forget to tick the Delete the driver software for this device box, press the OK button, and then restart your computer.

            - When you have two, or more, drivers installed on your computer, all you have to do is disable the other drivers. You can do this by right-clicking on the driver in the Device Manager and click the Yes box next to disable. Shut down your PC after this, disconnect the installation, and boot your computer back on.

  1. When your PC boots up after the restart, click on the Start button then click on Settings.
  1. You need to go to Update & Security, then Windows Update, and then check for updates.

            - If you are using multiple drivers and this technique doesn’t work, repeat the process in Step 3 and try to disable a different driver.

Remove an incompatible app

There are two ways to remove an incompatible app to fix the issue of a screen flicker on Windows 10. Apps like Norton AV, iCloud, and IDT Audio are usually the ones causing the problem. Uninstalling these apps could solve the problem. Uninstall the apps by using the methods below:

First Solution: Uninstall an app in Settings

  1. Click Start, and then click Settings.
  2. Click on System, and then click on Apps & Features.
  3. A window will pop up and from there you will need to select the application you wish to uninstall. Click the app, and then click uninstall. Follow the screen prompt to fully uninstall the program.

Second Solution: Uninstall an app in the Start Menu

  1. Click Start, and then click All Apps.
  2. Look for the application you will need to uninstall, right-click the said app, and then click Uninstall. Follow the screen prompt to fully uninstall the program.
[/section]
Read More
How to Fix Windows 10 Error 80240020

Error Code 80240020 – What is it?

Users who receive Error Code 80240020 when attempting to install and/or upgrade to Microsoft Windows 10, are receiving the error because the Windows 10 installation folder is either corrupted or unfinished. As a result of this error code, your download and the subsequent update will not process correctly. Users who receive this code do not have to do anything specific, as it might mean that they are attempting to update before their system is ready. These users can simply wait for their computer to prompt them for the update, and then follow the on-screen instructions for the update. However, if a user is seriously wanting to update to Microsoft Windows 10 prior to the prompt, there are ways around error code 80240020. Common symptoms include:
  • A dialog box appears with the Error Code 80240020
  • Microsoft Windows 10 upgrade is unsuccessful or freezes in the process of updating and displays the error code message.

Solution

Restoro box imageError Causes

This error is only caused by one type of issue, and that is unfinished or corrupted files being present in the Windows 10 installation folder.
  • Files that are unfinished in the Windows 10 installation folder are a result of the download not processing correctly, therefore the update is not successful because your computer does not have the files that it needs.
  • Files that are corrupted in the Windows 10 installation folder are a result of either a faulty download or preexisting corrupted files that need to be purged.
Until your system is ready to download the new Microsoft Windows 10 upgrade, you will be unable to install the upgrade. As stated, you have the option of waiting for your system to prompt you to download (which means that your system has made the necessary changes to its own files and is ready for the upgrade), or you can use the following steps to correct the issue yourself.

Further Information and Manual Repair

Users and Microsoft Tech Support personnel have discovered three methods to correct error code 80240020. Each of these methods should be attempted by someone who is comfortable with computer software and programs. Anyone who is not comfortable with software should either contact Microsoft Support or wait for their computer to prompt them for the Microsoft Windows 10 upgrade.

Method 1:

  1. Back up the Registry of your operating system.
  2. Find the Registry Key: [HKEY_LOCAL_MACHINESOFTWAREMicrosoftWindowsCurrentVersionWindowsUpdateOSUpgrade]
  3. Note: this Registry Key should already exist, if it does not exist, create it.
  4. Create a brand new DWORD Value that is named AllowOsUpdate
  5. Set the Value to 0x00000001.
  6. Close and reopen your Control Panel.
  7. Restart the Microsoft Windows 10 upgrade.

Method 2:

  1. Download the Microsoft Windows 10 ISO (installation device) from the following website: http://www.microsoft.com/en-us/software-download/windows10
  2. Users must select the appropriate ISO, either 32 bit or 64 bit, depending upon their individual computer.
  3. Extract the ISO file to a separate USB device or burn the program to a compact disc.
  4. Run the Microsoft Windows 10 upgrade directly from the software that you have thus created.

Method 3:

  1. Access the files on your computer via MY COMPUTER
  2. Under the C: drive, access the WINDOWS folder
  3. Select the SOFTWARE DISTRIBUTION folder, followed by the DOWNLOAD folder.
  4. Delete any files within this download folder.
  5. If you are unable to delete these files, open the command prompt (CMD) as the administrator, and type “net stop wuauserv” into the CMD prompt window. Press ENTER. This should allow you to delete the files from step 4.
  6. Once the files are deleted, open and run the CMD as the administrator and type “wuauclt.exe /updatenow”. Press ENTER.
  7. Access the WINDOWS UPDATE folder from your control panel, the update and download should resume without further interference from the user.
As with any other error codes, if the above methods do not rectify the issue, it may be necessary to download and install a powerful automated tool to rectify error code 80240020.
Read More
Fix CHKDSK is not available for RAW drives
One of the most useful tools you can use to repair bad or corrupted sectors in the hard disk of your computer is the CHKDSK utility. However, there are also instances when this Disk Checking tool could encounter some issues and one of them is the error that states, “The type of the file system are RAW, CHKDSK is not available for RAW drives”. This kind of issue is due to the RAW file format which is not recognized by the Windows operating system that you’ve installed which explains why you’re getting this error when running the CHKDSK utility. You can also encounter this error in case there is something wrong with the drive encryption. To fix this error, you have to change the File System of the drive. How? Refer to the steps given below. Step 1: The first thing you need to do is create a bootable Windows 10 media. Step 2: After that, click on Repair your computer on the first Windows 10 installation setup window. Step 3: Next, you have to select the operating system partition from the given options and then click on Next. Step 4: Now select Command Prompt from the System Recovery Options box and then type the following command and tap Enter to initiate the Diskpart utility inside Command Prompt.
diskpart
Step 5: Afterwards, type in either of the following commands to help you in either listing all the Disk connects or all the partitions on those disks formed.
diskpart or list volume
Step 6: Next, you need to select any of the two given commands below depending on the list you entered on the previous step.
select disk # or select volume #
Step 7: After you enter the command, it will select the Disk or the Partition you want to select. Now you have to type and enter the following command to clean your drive.
clean
Step 8: Now enter any of the two following commands.
list disk or list volume
Step 9: Then type the next command below to create a specified partition.
create partition primary
Step 10: Once done, type in the following command to select the newly created partition.
select partition 1
Step 11: Next, type the following command to mark the selected partition as active.
active
Step 12: Finally, restart your computer to successfully apply the changes made and then see if it has fixed the problem or not.
Read More
Your computer is running low on resources
Signing in to a computer that runs a Windows 10 version OS is usually fast and straightforward. However, there are instances when signing in takes too long especially if there are a lot of programs in the Startup. So if many things are loading as soon as you log into your computer, it will slow down the sign-in process. Aside from programs in Startup, it is also possible that there are too many users that are logged in to the account. In such a case, you will most likely encounter an error that says, “Your computer is running low on resources, so no new users can sign in. Please use an account that has already been signed in”. If you’ve encountered such an error when you try to log into your computer, read on as this post will be guiding you on how you can fix it. Each time a user signs in to Windows 10, it will allocate resources in order to work smoothly. But, in many cases, the system is running low on resources which is why this error pops up and blocks a sign-in of a new user. To fix it, you can try to log out the existing users, or perform a Cold Boot, as well as run both the DISM tool and System File Checker scan.

Option 1 - Try to logout existing users

The first thing you can do is to log out the existing users. If you have a shared Windows 10 computer, you have to check if someone hasn’t logged out. It could be that some background task or there is an existing program that is still running under that account. So you have to make sure to ask the same user to log out in case there is some unsaved work. On the other hand, if that user is not around, then you reboot the computer right away.

Option 2 - Try Performing a Cold Boot

You could also try to perform a Cold Boot to fix the problem. A Cold Boot is a process that makes sure that the Windows 10 Kernel shuts down properly and releases all the resources held by any account. To perform a Cold Boot, just press and hold the physical power button on your CPU until it goes off. After that, boot your computer regularly and see if you can now log into your account without any error.

Option 3 - Try to run a System File Checker scan

System File Checker is a built-in command utility in Windows that helps in restoring corrupted files as well as missing files. It replaces bad and corrupted system files to good system files that might be the cause why you’re getting the error when you log into your computer. To run the SFC command, follow the steps given below.
  • Boot your computer into the Advanced Recovery mode and from there open Command Prompt.
  • After opening Command Prompt, type in sfc /scannow
The command will start a system scan which will take a few whiles before it finishes. Once it’s done, you could get the following results:
  1. Windows Resource Protection did not find any integrity violations.
  2. Windows Resource Protection found corrupt files and successfully repaired them.
  3. Windows Resource Protection found corrupt files but was unable to fix some of them.
 Now restart your computer and see if the problem is fixed or not.

Option 4 - run the dism tool

You might also want to run the DISM tool. This tool is known to repair potentially corrupted files in your system as having them could also system issues like the “Your computer is running low on resources, so no new users can sign in” error. To repair these corrupted system files, you can run the DISM commands:
  • Go to the Advanced Recovery mode and select Command Prompt.
  • After that, input each one of the commands listed below sequentially to execute them:
    • Dism /Online /Cleanup-Image /CheckHealth
    • Dism /Online /Cleanup-Image /ScanHealth
    • Dism /Online /Cleanup-Image /RestoreHealth
  • Once you’ve executed the commands given above, restart your computer and check if the problem is now fixed.
Read More
Setting up Logitech C922 in Windows 10
Being a streamer altho popular is a very demanding call, there is a lot of technical knowledge involved and one of this knowledge is setting your web camera equipment. On the internet, you can find how to install certain devices and register them in Windows but with little to no information on how to set everything for streaming. In this article, we will try to address as many of this as we can so you can start using your camera right away.

Features of the Logitech C922 Pro Stream Webcam

In the package of your Logitech C922 Pro Stream Webcam, you should have the camera itself with a USB hookup, tripod, and user manual. Tripod, of course, is meant to stabilize the camera for recording using high zoom values so visual shaking of the picture is eliminated. The camera itself captures natural light without any distortion in full HD and if placed on top of the monitor it can accommodate the field of view to capture two people. Also when in a low-light room, autofocus will correct light and it will sharpen an image in order to compensate for lack of light. The camera also features a dual microphone for clarity of sound.

Assembling the Logitech C922 Webcam

Of course, the first thing when the camera is unpacked is to assemble it. Basically, there are two ways for the camera to be assembled:
  1. On top of monitor and
  2. On tripod
The next section will cover both assemblings

Mounting camera on the monitor:

The Logitech C922 Pro Stream Webcam can be used to capture up-close images or video from the top of any computer monitor or TV. To set up your Logitech C922 Webcam on top of a monitor or TV:
  • Completely extend the mounting stand until it reaches the top width of your monitor or TV
  • Turn the bottom piece of the mounting stand, so it matches the angle of the back of your monitor or TV
  • Place the mounting stand on top of your monitor or TV and tighten the bars until they’re flush with each surface
  • Pivot the webcam up, down, or to the sides to center the camera angle
After you have securely mounted the C922 to your monitor or TV, it’s ready to be plugged in and used with any recording application on your computer.

Mounting camera on the tripod

You can set up your Logitech C922 Pro Stream Webcam to record a 78-degree view of a room for presentations or live streams by attaching it to the tripod. To set up your Logitech C922 Webcam with a tripod:
  • Unfold and extend the legs of your tripod
  • Place the webcam on top of the tripod, aligning the swivel bolt with the webcam mounting hole
  • Swivel the bolt by turning a small knob on the tripod
Once you have assembled your Logitech C922 Pro Stream Webcam on your tripod, plug it into your computer and load up your favorite recording application.

How can you use your Logitech C922 Pro Stream Camera?

Altho this camera is designed and built to be used in a live stream environment it can also be used to record video offline to a file. In this next segment, we will explore further applications in which the camera is meant to be used.

Live video

The Logitech C922 Pro Stream Webcam allows content creators to share content in high definition with thousands of viewers in real-time. Stream full 1080p at 30 frames per second and 720p at 60 frames per second live on platforms such as Twitch or YouTube.
  • Stream video games or entertainment in real-time
  • Create live presentations for work, customers, or followers
  • Discuss matters of interest in live talk shows or podcasts
  • Video call family or friends on Skype, Facetime, or Google Hangouts
  • Capture crystal-clear, 78-degree video with the Logitech C922 autofocus lens. With two microphones attached on each end, you can stream any live video with little to no audio drops.

Offline recordings

The Logitech C922 Pro Stream Webcam can be used with desktop recording software to create professional videos or snapshots. After you’ve finished recording, you can edit specific spots in the video and add custom presentation details.
  • Product demonstrations and tutorials
  • Educational or promotional presentations
  • Video game or entertainment videos
  • Personal vlogs
  • Talk shows or podcasts
  • Desktop or laptop technical walkthroughs
  • Complete offline recording in high definition at 1080p. Use QuickTime Player (Mac) or Microsoft Camera App (Windows) to take photos or record videos offline.

Setting up Logitech C922 Pro Stream Camera using XSplit Broadcaster

XSplit Broadcaster offers live stream support for several platforms, which include Facebook Live, YouTube Live, and Twitch. After you hook up your webcam and create profiles for each platform, you can begin a live stream with XSplit Broadcaster.

Twitch Streaming

  • Enable Two-Factor Authentication on Twitch: Navigate to the settings of your profile and the Security and Privacy tab. Before you can start broadcasting with XSplit, you must set up Two-Factor Authentication.
  • Set Up Twitch Streaming Profile in XSplit: In XSplit Broadcaster, navigate to Broadcast > Set up a new output > Twitch. Select an account to authorize with XSplit and proceed.
  • XSplit automatically chooses a resolution to record based on target server connection quality.
  • A settings window opens before you complete the setup, which allows you to customize the server and video recording options. Once you have completed the setup, your Twitch profile is set up in XSplit. You can begin a stream by navigating back to Broadcast and clicking on the new Twitch profile.

YouTube Streaming

  • Enable YouTube Streaming Live: Click on your YouTube profile picture to open a dropdown and click on YouTube Studio Beta.
  • On the left side of the page, navigate to Other features and click on Live events in the dropdown.
  • Click on Enable live streaming to set up live streaming for your YouTube profile.
  • Set Up YouTube Streaming Profile in XSplit: In XSplit Broadcaster, navigate to Broadcast > Set up a new output > YouTube. Select an account to authorize with XSplit and proceed.
  • Once YouTube Live Properties window pops up, click Authorize to connect your Google account. You can also change any settings as needed before you begin a live stream. Once you’re ready to broadcast live with XSplit, navigate back to Broadcast and click your new YouTube Live profile.

Facebook Live Streaming

  • Set Up Facebook Live Streaming Profile in XSplit: In XSplit Broadcaster, navigate to Broadcast > Set up a new output > Facebook Live.
  • A prompt opens in XSplit to log in to your Facebook profile.
  • Log in and set up permissions and posting options as you’d like them to appear whenever you stream live on Facebook. After you’ve completed the permission process, your Facebook Live profile is ready to use in XSplit. You can navigate anytime back to Broadcast and select your new Facebook Live profile in XSplit to begin a live stream.

Using OBS with Logitech C922 Pro Stream Webcam

OBS live streaming application offers high-quality audio and video performance and video capturing in real-time. This application offers full control over every detail and it is a very good choice for both cases.

Setting up Logitech C922 with OBS

  • Add Logitech C922 as a Capture Device: Click the + under the Sources section. Once you are in the drop-menu, select Video Capture Device.
  • When this menu pops up, click Create New and hit OK.
  • From the Device bar, you can select your Logitech C922 as a default Video Capture Device. Set any configurations up how you want them and click OK before exiting.
  • Changing Resolution or Frames Per Second: With OBS open, click on Settings in the bottom-right portion of the screen and then on the Video tab on the next page. Here you can set up the screen resolution, downscale filter, and frames per second defaults for all videos recorded with OBS. Click Apply before exiting.
  • After you’ve finished applying the initial settings, you can begin recording or streaming in the bottom right-hand corner of the main menu.
Read More
Fix DRIVER_IRQL_NOT_LESS_OR_EQUAL in Windows
DRIVER_IRQL_NOT_LESS_OR_EQUAL will cause your computer to go to the blue screen of death but do not worry there are solutions around this and we are here to instruct you on how to solve this.
  1.  Uninstall and install network drivers

    DRIVER_IRQL_NOT_LESS_OR_EQUAL is most commonly tied to bad network drivers, whatever that be a corruption of the driver files or their incompatibility. So first thing is to check if this is the case. Press ⊞ WINDOWS + X to open the hidden menu in Windows and click on Device Manager. keyboard with windows and x marked Windows menu device manager 
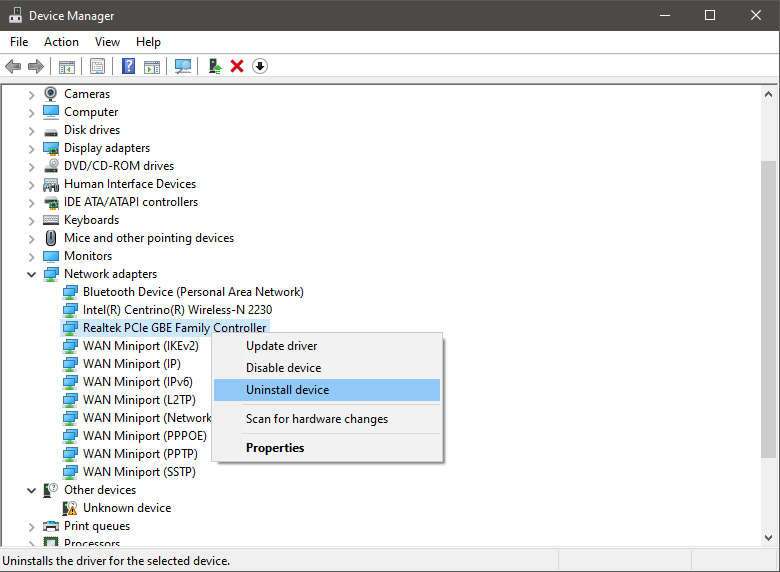
In the Device Manager expand Network adapters, choose adapter, right-click on it and choose Uninstall. network device manager Install latest driver or reboot so Windows will install the driver automatically
  2. Update driver

    If you do not want to reinstall the driver or you are unable to for whatever reason updating the driver might do the trick. To update driver: Press ⊞ WINDOWS + X to open the hidden menu in Windows and click on Device Manager. keyboard with windows and x markedWindows menu device manager In the Device Manager expand Network adapters, choose adapter, right-click on it and choose Update Driver. network device manager update
  3. Fix via Command prompt

    If both of the beforementioned solutions fail, try running the command prompt and fix the issue from there. Press ⊞ WINDOWS + X to open the hidden menu in Windows and click on Command Prompt (administrator) keyboard with windows and x markedWindows menu command prompt admin In command prompt type next line and press ENTERDEL /F /S /Q /A “C:\Windows\System32\drivers\mfewfpk.sys Reboot the system
  4. Scan your PC for malware

    Sometimes corruption in the system is caused by malware, Scan your system for malware, viruses, etc.
  5. Check connections or other hardware issues

    If all methods fail, open your PC case and check to see if connections everywhere are properly connected and tight. Clean your PC and turn it back ON
  6. Use system restore

    If anything fails, use Windows system restore and bring back computer into a state where everything was working fine.
Read More
A Quick Guide to Fixing Error 0x80010108

What is Error 0x80010108?

Error 0x80010108 is a Windows Live Photo Gallery error. This error prevents the Windows PC user from viewing photos. The error code is often displayed in the following format:
‘An error is preventing the photo or video from being displayed’ Error code 0x80010108

Solution

Restoro box imageError Causes

The error 0x80010108 occurs due to multiple reasons including:
  • The issue in Windows Live Essential Settings
This error occurs while using Windows Photo Gallery but it is actually related to the Windows Live Photo Viewer within the Windows Live Essentials software.
  • Viral Infection
  • Registry Issues
To view the photos on your Windows PC, it is advisable to fix the problem right away. Furthermore, you should also not delay in fixing this problem especially if the underlying causes are related to the registry or viral infection. These can pose serious system and security threats including system failure, crash and data breaches.

Further Information and Manual Repair

To resolve this error on your system, you don’t always have to hire a technical expert or be a technical whiz yourself. Here are some easy and effective methods to resolve error 0x80010108 on your PC immediately:

Method #1

To repair Windows Live Essential Software Settings, go to the start menu and then click the control panel. Now in the control panel go the option Programs. In the programs click the tab programs and features and then select Windows Live Essentials and click repair tab. Once the settings are repaired, restart your PC to activate changes.

Method #2

Go to the start menu and type regedit.exe and then press enter. Type the following key: HKEY_CLASSES_ROOT WindowsLive.PhotoGallery.bmp.15.4 shell open DropTarget then right-click DropTarget and then Rename. Prefix a hyphen so that it becomes “-DropTarget”. Now type the following for each GIF/ICO/JPG/PNG/TIF file types: HKEY_CLASSES_ROOTWindowsLive.PhotoGallery.gif.15.4 shellopen DropTarget HKEY_CLASSES_ROOT WindowsLive.PhotoGallery.ico.15.4 shell open DropTarget HKEY_CLASSES_ROOT WindowsLive.PhotoGallery.jpg.15.4 shell open DropTarget HKEY_CLASSES_ROOT WindowsLive.PhotoGallery.png.15.4 shell open DropTarget HKEY_CLASSES_ROOT WindowsLive.PhotoGallery.tif.15.4 shell open DropTarget

Method #3

Download Restoro on your PC to scan for both registry issues and malware. Restoro is a multi-functional PC Fixer embedded with utilities like a powerful registry cleaner, an antivirus, and a system optimizer to name a few. The registry cleaner scans and detects all registry-related issues. It removes all unnecessary files damaging the registry and corrupting the registry settings. Simultaneously, the antivirus removes all kinds of malicious software affecting your PC including spyware, viruses, and Trojans. The system optimizer feature ensures that your PC works at the optimal level and does not slow down during and after the cleaning process. Restoro is efficient and safe. It has a user-friendly interface and simple navigations which makes it quite easy to operate. It can be downloaded on all Windows versions including. Click here to download Restoro to resolve error 0x80010108.
Read More
DirectX function GetDeviceRemovedReason
DirectX function GetDeviceRemovedReason error is a DirectX error that comes up during playing games on Windows 11 operating system. Usually, the error occurs in gaming systems powered by AMD and very rarely if any times at all on Nvidia or intel platforms. DirectX function GetDeviceRemovedReason error
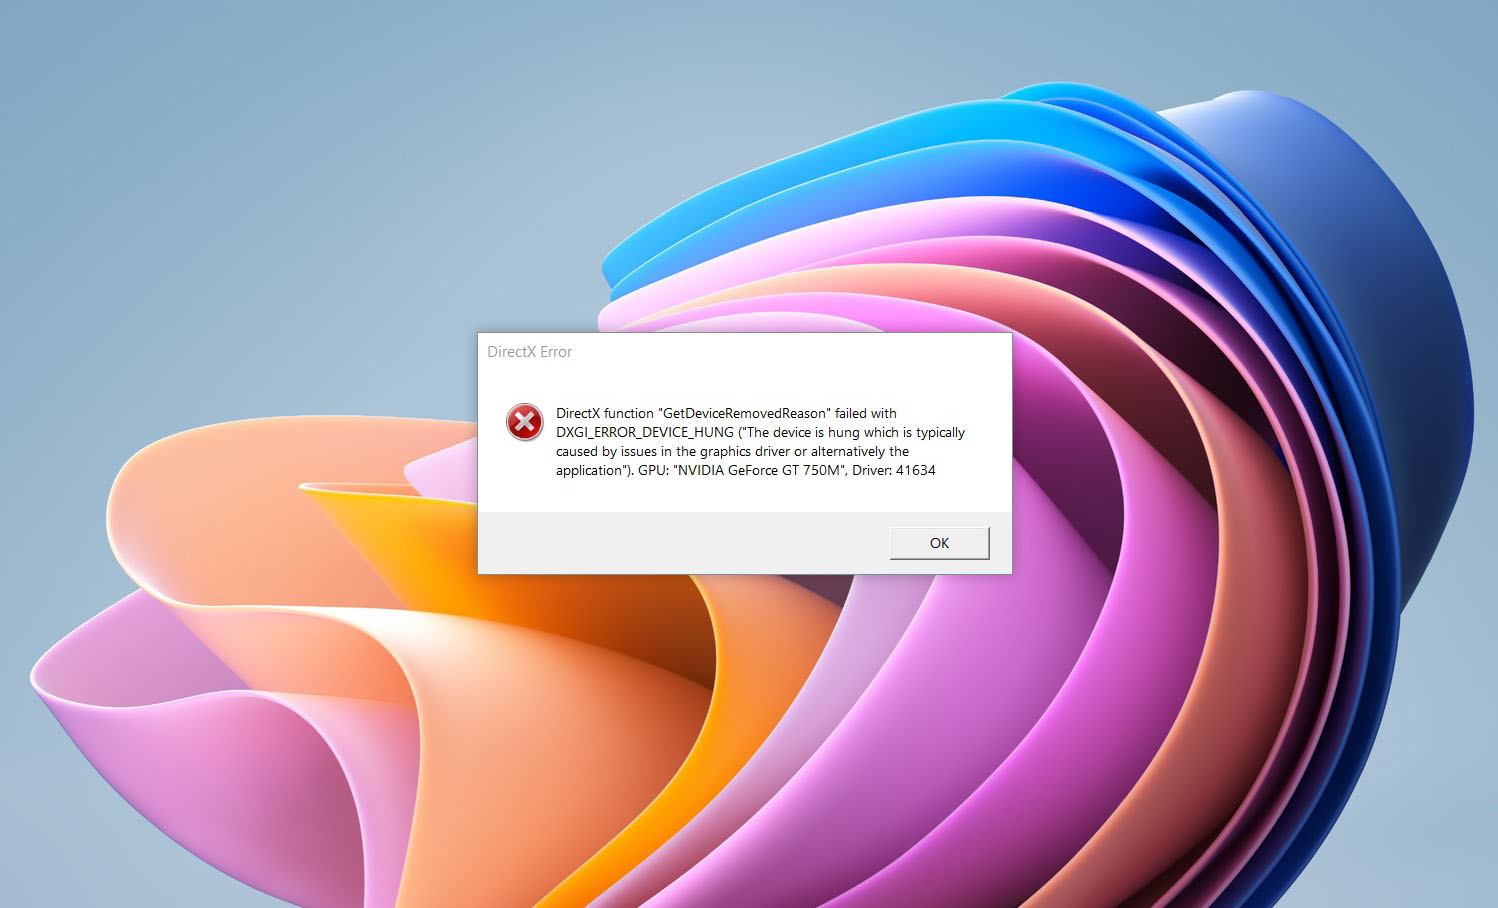
If you are one of the gamers affected by this error, fear not because we have a solution for you. Follow provided fix guide in order to correct this error and get back to gaming asap.

1. Update drivers

The first thing of course is to update your graphic card driver, you can do this with your graphic cards panel software or directly in Windows itself but the best practice and one that I would recommend is to go to your graphic card manufacturer’s website and download the latest driver there, and then install it inside Windows 11.

2. Change power mode

Changing power mode inside Windows 11 can solve this issue since sometimes Windows power manager if it is set to anything except best performance can interfere with the proper functioning of the graphic adapter, and because of this error. To change the power setting do the following:
  1. Press ⊞ WINDOWS + I to open settings
  2. Click on the System tab
  3. Select power & battery on the right part
  4. Click on the menu beside power mode
  5. Select the best performance

3. Run SFC scan

Corrupted system files can also cause this error and if previous steps have not resolved it we will use Windows built-in tool SFC scan to find and repair all bad files in windows.
  1. Press ⊞ WINDOWS + S to open the search menu
  2. Type in Windows terminal and run it as administrator
  3. If prompted click on YES on UAC
  4. Press CTRL + SHIFT + 2 to run command prompt
  5. Type in sfc /scannow and press ENTER
  6. Wait for the whole process to finish and then reboot your system

4. Reinstall the problematic game

Sometimes game files can get corrupt and maybe even overwritten, try with game reinstallation if the problem still persists.
Read More
DDR5 what we know so far about it
DDR5 memory moduleNext-generation of RAM, DDR5 supposed to hit shelves around late summer or fall in 2021if everything goes as planned. Its goal is to increase speed and efficiency, wants to pack more memory in a single stick, and have better power management.

Hardware requirements for DDR5

Using the latest memory technology will require other hardware to follow certain standards and the first ones that will need to follow are CPUs and Motherboards. Intel is already prepared with its Alder Lake CPUs that suppose to come out also later this year. AMD on other hand has not stated anything at the time of this writing but it is a bet that their next generation that will come in 2022 will have full support. It is speculated that bot companies and their respective CPUs will have both support for DDR4 and DDR5. A story about motherboards is a little different. Motherboards will support DDR4 or DDR5 memory banks, not both, so make sure that your motherboard will support the memory you plan on getting.

Capacity of memory

The goal and aim for the DDR5 memory stick are to reach a whopping 126GB per stack. This will be done by using a dual in-line module or DIMM enabling larger capacity. That being said, the first modules that we will see are more likely to be 16GB as standard and 8GB as low entry ones.

Power consumption of DDR5 memory

The standard voltage that DDR4 operates under is 1.2V. DDR5 wants to lower this to 1.1V without sacrificing speed. Voltage regulation on modules themselves will be now integrated on memory banks instead of leaving that to motherboards which will help to detect memory errors directly on the memory bank.

Speed of memory

The most common speed of DD4 memory banks is 2,666MHz, more expansive ones go from 3,600 to 4,000MHz. DD5 aims to raise this bar to 4,800MHz and offers greater speed.

Should you get it right away?

Hardware is ever-evolving, we have PCIe 3.0 to PCIe 4.0, and taking into account that sometimes the newest tech can cause some unexpected behavior it is always the best strategy to wait for a little. Price for the newest tech has also been in its heist just when it is released and seeing how DDR5 will benefit mostly servers mostly since even today memory, processors, and other available equipment can tackle all daily tasks.
Read More
1 2 3 171
Logo
Copyright © 2023, ErrorTools. All Rights Reserved
Trademark: Microsoft Windows logos are registered trademarks of Microsoft. Disclaimer: ErrorTools.com is not affiliated with Microsoft, nor claims direct affiliation.
The information on this page is provided for information purposes only.
DMCA.com Protection Status