If you have multiple keyboards, things can get quite tricky. There are times when the keyboard language changes on its own since the keyboard changes while you are typing. The thing is, the keyboard changes because sometimes we accidentally tap shortcuts like Win key + Space key or Alt + Shift or Ctrl + Shift which changes the keyboard pairs or language. Thus, if your keyboard language changes on its own, there are two ways to resolve it. First, you have to make sure that Windows 10 does not add keyboards without your permission. Second, you have to make sure that the shortcut keys don’t change the keyboard language. This second option is what we’re going to discuss in this post.
You need to first set a different input method for each app window. To do that, you have to disable the change in layout. Refer to these steps:
Go to Settings > Language and input.
Next, type “switching input methods” to open the Advanced keyboard settings with this option inside.
After that, select the checkbox labeled as “Let me set a different input method for each app window” and then click the Save button.
Restart your computer.
Now that you’ve disabled the change in layout, you now have to find the keyboard settings. Just go to Settings > Devices > Typing > Advanced Keyboard settings. From there, you have the option to select which keyboard is going to be used for any app. When you change the keyboard every time you use an app, usually, Windows remember it so that you won’t have to set it up all over again. In addition, the Advanced keyboard settings page also allows you to override the default input method which could be different from the first one in your language list. Aside from that, there is also a Language bar option that comes in handy as you can quickly switch between keyboards. And if you removed it, you have the option to restore the language bar back as well.
Now all that’s left for you to do is to change the Language Settings under the Administrative tab. A user from a forum that came up with this solution, reported that the issue occurred when he started typing in some program with non-Unicode characters which caused Windows to use the default system local language to interpret these characters even though the language is unavailable in the Language bar. To change the Language Settings under the Administrative tab, follow these steps:
Go to Settings > Time and Language > Language > Administrative language settings.
After that, click on Copy Settings under the Administrative tab.
Now make sure that all the Display language, Input language, and Format are English (United States) or any language you prefer.
Then mark the two checkboxes in “Copy your current settings to Welcome screen and system accounts & New user accounts”.
After that, click OK and then exit.
Note: You also have the option to disable those shortcut combinations which can change your keyboard settings accidentally.
Dism.exe error 1392 is usually displayed whenever a file or directory is corrupted, and unreadable. The location specified in the error message states that some temporary files are corrupt. Since the files are only temporary, you could delete the mentioned file in the error message and check if the issue persists. The error is caused by missing system files or broken corrupt data, which should be fixed as soon as possible. Taking action should prevent further hardware and app damage, as this can lead to system crashes, data loss, or hardware failure in most cases.
Temporarily disable the antivirus program
Antivirus applications are well known that they can detect certain things as false positives and quarantine them or cut their system access, to make sure that this is not the case in this situation, disable your antivirus and try the operation again.
Perform an SFC scan
Press ⊞ WINDOWS + X to open the windows menu
Click on Command prompt (admin)
In the command prompt window type: sfc /scannnow and press ENTER
Wait for the operation to complete
Reboot
Run Check disk to check and fix disk errors
Press ⊞ WINDOWS + X to open the windows menu
Click on Command prompt (admin)
In the command prompt window type: chkdsk /f c: where c: is hard drive with issue and press ENTER
Scan your computer for malware
Malware and other malicious software can be a problem for this type of behavior, run your security's software scan on the whole system and remove any found malware.
Perform a system restore
If anything else failed run system restore and bring Windows back to a date when everything was working fine.
Hello and welcome to another great tutorial from errortools.com. Today we will be making Windows START menu full screen.
First introduced in Windows 8.1, the start menu has been shifted from full screen to gadget like in Windows 10 but if you prefer to have it over the entire screen with all of its glory and large icons you can do so and we will be happy to show you how.
Press ⊞ WINDOWS and choose settings.
From the settings screen, choose Personalization.
Under personalization options click on START.
And then on the right part click on the button under Use Start full screen to turn it ON
That's it, your start menu is now full screen.
Updating your computer does not always end up successfully as there are a number of things that could go wrong with the Windows Update module in your Windows 10 computer. One of the issues you could face when you update your computer is error 0x80244019. This error could be caused by a number of factors. If you are currently having problems fixing this Windows Update error, read on as this post will help you resolve this problem.
Here’s the full content of the error:
“There were some problems installing updates, but we’ll try again later. If you keep seeing this and want to search the web or contact support for information, this may help: (0x80244019).”
In this kind of Windows Update error, you might not be able to get the download file of the requested update started to your computer and this could be due to some third-party application or the overall internal components that contribute to the functioning of the Windows Update module.
Refer to each one of the following options to fix the Windows Update error 0x80244019.
Option 1 – Restart your computer
The most basic thing you can do to fix the problem is to restart your computer. It usually works in fixing common issues like the Windows Update error 0x80244019. However, if it didn’t work, proceed to the next given options below.
Option 2 – Try to run the Windows Update Troubleshooter
The Windows Update Troubleshooter will help you in fixing error 0x80244019. This is a great built-in tool from Microsoft that helps users fix any issues with Windows Update. So this is worth a try to solve the problem.
To use the Windows Update Troubleshooter, follow the steps below.
Tap Win + I keys again to open the Windows Settings panel.
Go to Update & Security and then go to Troubleshoot.
Under the Troubleshoot section, on your left-hand side, scroll down to find Windows Update and then click on Run the troubleshooter option and follow the on-screen instructions and then see if it fixes the problem.
Option 3 – Try configuring the Windows Update-related Services
Configuring all the Windows Update-related services could also help in fixing the error as it makes sure that all the required services are available.
Tap the Win + R keys to open the Run dialog box.
Then type “cmd” in the field and tap Enter to open an elevated Command Prompt.
Next, execute the following commands. Note that you have to type and enter each command one after the other.
SC config wuauserv start= auto
SC config bits start= auto
SC config cryptsvc start= auto
SC config trustedinstaller start= auto
The commands you executed will make sure that the Windows Update-related services are available. Once it’s done, restart your computer and see if the Windows Update error is now fixed.
Option 4 – Run Windows Update in a Clean Boot State
It could be that some third-party application is the one that’s causing the problem so it’s best if you put your computer in a Clean Boot state. During this state, you can start the system with a minimum number of drivers and startup programs that will surely help you in isolating the root cause of the issue.
Log onto your PC as an administrator.
Type in MSConfig in the Start Search to open the System Configuration utility.
From there, go to the General tab and click “Selective startup”.
Clear the “Load Startup items” check box and make sure that the “Load System Services” and “Use Original boot configuration” options are checked.
Next, click the Services tab and select “Hide All Microsoft Services” check box.
Click Disable all.
Click on Apply/OK and restart your PC. (This will put your PC into a Clean Boot State. And configure Windows to use the usual startup, just simply undo the changes.)
After that, try to run Windows Update again.
Note: If you are able to install the app without any trouble at all then it means that the error is caused by some third-party application on your computer. You need to look for the culprit and uninstall it once you found it.
Option 5 – Try to fix the Proxy Settings
In the Cortana search box, search for Internet Explorer and then click on the related search result.
After that, tap the Win + T keys on your keyboard and click on Internet Options.
Next, navigate to the Connections tab and click on LAN Settings.
Then click on the Advanced button and delete all the entries in the list generated in the Exceptions section. And if the Advanced button is disabled because the “Use a proxy server for your LAN (These settings will not apply to dial-up or VPN connections)” option is disabled then you are good to go. Now proceed to the next step.
Tap the Win + X keys or right-click on the Start button and select Command Prompt (Admin) or you could also search for “cmd” in the Cortana search box and right-click on Command Prompt from the search results and select the “Run as administrator” option.
If a User Account Control appears, click on Yes to proceed. After that, type each one of the commands listed below, and don’t forget to hit Enter after you type each one of them.
netsh winhttp reset proxy
net stop wuauserv
net start wuauserv
Now restart your computer and check if the problem is fixed or not by checking for Windows Updates again.
Stop 0x00000000 error code is a type of a Stop error popularly known as a blue screen of death error code. This is a critical error.
It can pop up while loading or using the Windows program on your PC. When this error occurs, the computer screen turns blue and you, the user, get locked out of the program. Furthermore, it can also result in sudden system shut down or system freeze.
If not fixed timely, the error may start to pop up more and more frequently which then may lead to complete system corruption and system crash.
Solution
Error Causes
The two most common causes for the STOP 0x00000000 error code are:
Malware infection
Registry corruption
This is a fatal system error and must be resolved immediately. Delay may lead to system crashes and data loss. And recovering lost data is not easy.
Further Information and Manual Repair
Though this is a fatal error the good news is that it is easy to resolve. To repair the STOP 0x00000000 error on your system, here are some methods that you can try:
Method 1 - Use System Restore to Bring Your Computer Back to its Previous State
To resolve this error on your system, try using the System Restore tool. Use this tool to bring your computer back to its previous state. The Windows System Restore utility is one of the most valuable recovery tools.
To use it, simply type System Restore in the search box. Once you find it, click on it and select a restore point to bring your PC back to its normal state. To activate changes, reboot the PC.
Method 2 - Scan for Viruses
If the underlying cause of the Stop 0x00000000 error code is related to malware infection, then you must download a powerful antivirus to resolve it. Run it to scan your entire PC.
Make sure you remove all types of malware including adware, spyware, viruses, and Trojan. Once your PC is malware-free, the error will be fixed in no time.
Method 3 - Clean and Repair the Registry
The registry is an important part of the PC. It stores practically all the activities you perform on your system.
It saves all the files including both important and unnecessary files such as junk files, cookies, internet history, bad and invalid entries. If these obsolete and unnecessary files are not deleted frequently and keep on accumulating it takes up all the registry space and corrupts it.
This results in registry errors like runtime and BSoD errors and sometimes may also lead to disk fragmentation.
To resolve it is advisable to repair the registry. This can be done manually but that will take too much time and also require technical expertise. However, another way to resolve it is to download Restoro.
This is a user-friendly PC Fixer with a powerful registry cleaner. It removes all obsolete and unnecessary files, cleans the registry and repairs the damaged files, thereby removing the error right away.
Click here to download Restoro and resolve Stop 0x00000000 today!
If your Windows 10 laptop suddenly turns off when you unplug its power cord, then you’ve come to the right place as this post will guide you on how you can fix this issue.
One of the most common causes for this kind of issue is that there is some problem with your laptop’s battery. It is possible that it might have gone bad or has been damaged. However, this couldn’t be the case especially if the laptop is new. The problem could have something to do with the system settings, connections, laptop hardware, and so on. To fix it, there are various suggestions you can check out such as follows:
Option 1 – Perform a hard reset on your laptop
This option works in most cases when the laptop with a removable battery is charging slowly as it is plugged in constantly. Refer to the steps below to do a hard reset on your laptop.
Switch off the power of your laptop.
Disconnect your laptop’s charger and then remove the battery.
Tap and hold the power button for at least 30 seconds – doing so will discharge the capacitors of the motherboard and reset the memory chips that were active constantly.
Plug the battery back and then charge the laptop again.
Check if the problem is fixed, if not, proceed to the next option below.
Option 2 – Try to change the Power Options
Tap the Win + R keys to open the Run utility.
Then type “powercfg.cpl” and tap Enter to open the Power Options window.
Next, go to your selected power plan and click the “Change plan settings” option to open a new page.
From there, click on the “Change advanced power settings” option. This will open a new window where you can see various power consumption options.
Now on the next window that appears, click on “Change advanced power settings”. This will open another window where you have to expand the Processor power management > Maximum processor state.
Then change the value for On battery mode to 25% and enable Adaptive brightness.
Now shut down your computer and try to boot it with the power cord unplugged.
Option 3 – Try to run the Power troubleshooter
The next thing you can do is to run the Power troubleshooter. To do so, follow these steps:
Go to Settings and navigate to Update & Security > Troubleshoot.
After that, look for the “Power” option from the given list of built-in troubleshooters and click on it.
Next, click on the “Run the troubleshooter” button to run the Power troubleshooter.
Once the troubleshooter is done identifying the problems, follow the next on-screen instructions to resolve the problem.
Option 4 – Try to run the Power Efficiency Diagnostics Report
You could also try to run the Power Efficiency Diagnostics Report to fix the problem. This tool is helpful and will help you analyze the status of the battery but note that this can be quite overwhelming especially if you’re not well-versed in this matter.
Option 5 – Try to uninstall or reinstall the Battery driver
You might also want to uninstall or reinstall the battery driver as it can also resolve the problem. But before you start, you have to shut down your computer and remove the power chord as well as the battery. Once you’re done, follow these steps:
Plug the power cord and restart your computer.
Once your computer has restarted, tap the Win + R keys to open the Run utility and type “devmgmt.msc” in the field and tap Enter to open the Device Manager.
After that, look for the “Batteries” driver from the list of drivers and expand it.
Then right-click on the “Microsoft ACPI-Compliant System” driver and click on the “Uninstall device” option.
Once it’s done, restart shut down your computer and remove the power cord and then attach the battery.
Now attach the power chord again and restart your computer to automatically install the driver.
Option 6 – Try to update the BIOS
Updating the BIOS can help you fix the problem but as you know, BIOS is a sensitive part of a computer. Even though it is a software component, the functioning of the hardware depends on it largely. Thus, you must be careful when modifying something in the BIOS. So if you don’t know much about it, it’s best if you skip on this option and try the other ones instead. However, if you are well-versed in navigating the BIOS, then follow the steps below.
Tap the Win + R keys to open the Run dialog box.
Next, type “msinfo32” in the field and press Enter to open System Information.
From there, you should find a search field on the bottom where you have to search for the BIOS version and then press Enter.
After that, you should see the developer and version of the BIOS installed on your PC.
Go to your manufacturer’s website and then download the latest version of BIOS on your computer.
If you are using a laptop, make sure that you keep it plugged in until you have updated the BIOS.
Now double click on the downloaded file and install the new BIOS version on your computer.
Now restart your computer to apply the changes made.
Note: If updating the BIOS didn’t help, you might want to consider resetting it instead.
Wondering if upgrading to Windows 11 will boost your gaming experience? We can’t give you a straightforward answer, sadly. But we can take you through the tweaks you can expect if you have all the right requirements and help you make a final decision.
Is Windows 11 good for gaming?
Essentially, the answer to this question is yes. Microsoft has definitely added a bunch of enhancements and features to its latest OS to give gamers the best possible experience. However, you have to keep in mind that this may not work out smoothly for every single user.
Whether you’ll be able to fully take advantage of the Windows 11 gaming features really depends on your setup. As expected, Windows 11 has more demanding system requirements than its predecessor.
Credit: Florian Olivo on Unsplash
So, unless your hardware can run the new OS comfortably, you might not be able to make the most of all these gaming perks. In that case, we recommend you first upgrade your hardware and then make the switch. Be prepared to be a little surprised by a few other interesting changes in comparison to Windows 10, though!
For some of the new gaming features to work, it’ll also be necessary for you to have an NVMe SSD and an HDR-compatible monitor. So let’s take a look at 4 big improvements you can expect if your setup is compatible.
Gaming enhancements on Windows 11
1. Enjoy faster loading speed with DirectStorage
For this powerful feature to work, you need a compatible graphics card and, as stated before, an NVMe SSD. It’s also important for your GPU to support the DirectX 12 graphics API at least. And since we’re on that subject, you’ll be happy to know that Windows 11 has also introduced a new version of the API called DirectX 12 Ultimate.
Now, what does DirectStorage do? It’s a new feature designed to make full use of the speedy storage of NVMe SSDs. It also transfers game data directly onto the graphics card, lightening the load on your CPU. Normally the CPU would have to decompress the data first, but DirectStorage helps bypass this. That’s how loading times are reduced and games run more smoothly.
2. Fully immerse yourself through Game Mode
Windows 11’s Game Mode is certainly a welcomed addition. When you turn on Game Mode, usage of background apps that aren’t essential to your game is reduced. This results in the game you’re running becoming a priority process. This way, it uses your hardware and system resources to the max. Ultimately, the Game Mode means less lag and higher frame rates so you can play undisturbed and fully enjoy your gaming session.
3. Vibrant visual experience thanks to AutoHDR
For this one you’ll absolutely need an HDR-compatible monitor. Basically, HDR (High Dynamic Range) means a wider range of contrasts and colors that can be displayed on a monitor.
Windows 10 has an HDR feature, but you have to turn it on and off manually (“Use HDR”). Plus, users have reported that, if left on, it results in an unappealing appearance of content other than movies and games.
Windows 11 fixes that problem with its AutoHDR feature. Toggling it results in the system automatically adjusting the color contrast, balance and brightness based on what you’re currently looking at. For gamers, this means vivid imagery in every single game, resulting in a supreme visual experience. You can check out Microsoft’s own video showcasing the power of AutoHDR.
Aside from AutoHDR, another way Windows 11 improves the visual aspect is through its support for refresh rates of up to 360Hz.
4. Xbox Game Pass & Game Bar
It’s no secret that Microsoft wants to integrate Windows and Xbox. We’ve seen some attempts with Windows 10, but they’re pretty wonky compared to the new OS.
Windows 11’s built-in Xbox Game Bar enables quite a few options all gamers desire. You can take screenshots and videos of your game and send them, for starters. Furthermore, you can use it to see audio settings and monitor your PC’s performance without having to leave the game or open the Task Manager.
Widgets are also a really cool part of the Game Bar. You can choose from a wide variety of widgets, such as Xbox Achievements, Spotify, Gallery, Xbox Social and more.
Moreover, the Xbox Game Pass has been streamlined on Windows 11. Game Pass is a subscription service that unlocks hundreds of awesome games and supports cloud streaming. Do keep in mind that the games are only unlocked for a certain period of time, as the selection rotates once in a while.
What can you do for a better gaming experience?
Windows 11 does offer tweaks that require zero input from you. However, there are a few things you can do manually to get even more out of your new OS while gaming.
Turn off enhanced pointer precision. Most games enhance precision by default, so having this feature on might interfere with that.
Make sure to select your high performance graphics card for each game. Go to Settings > Gaming > Game Mode and tap ‘Graphics’ from the ‘Related settings’ menu. Find the game you want to adjust, click on ‘Options’ and choose your high performance graphics card to be the default setting. While there, you can also turn on ‘Hardware-accelerated GPU scheduling’ at the top.
Disable unnecessary apps and programs. As long as they aren’t essential to running your game, they might take up valuable system resources, so disable them to make space for your gaming requirements.
Check for pending updates and install them. It’s well-known that out-of-date software causes bugs, latency and crashes. The same goes for your GPU drivers.
Use the High-performance power plan (Control Panel > Power Options > Additional plans) to maximize the use of resources for the best possible performance.
Summary
Windows 11 has done quite a bit for avid gamers. We hope your setup is compatible with all these new features and you can experience these enhancements ASAP!
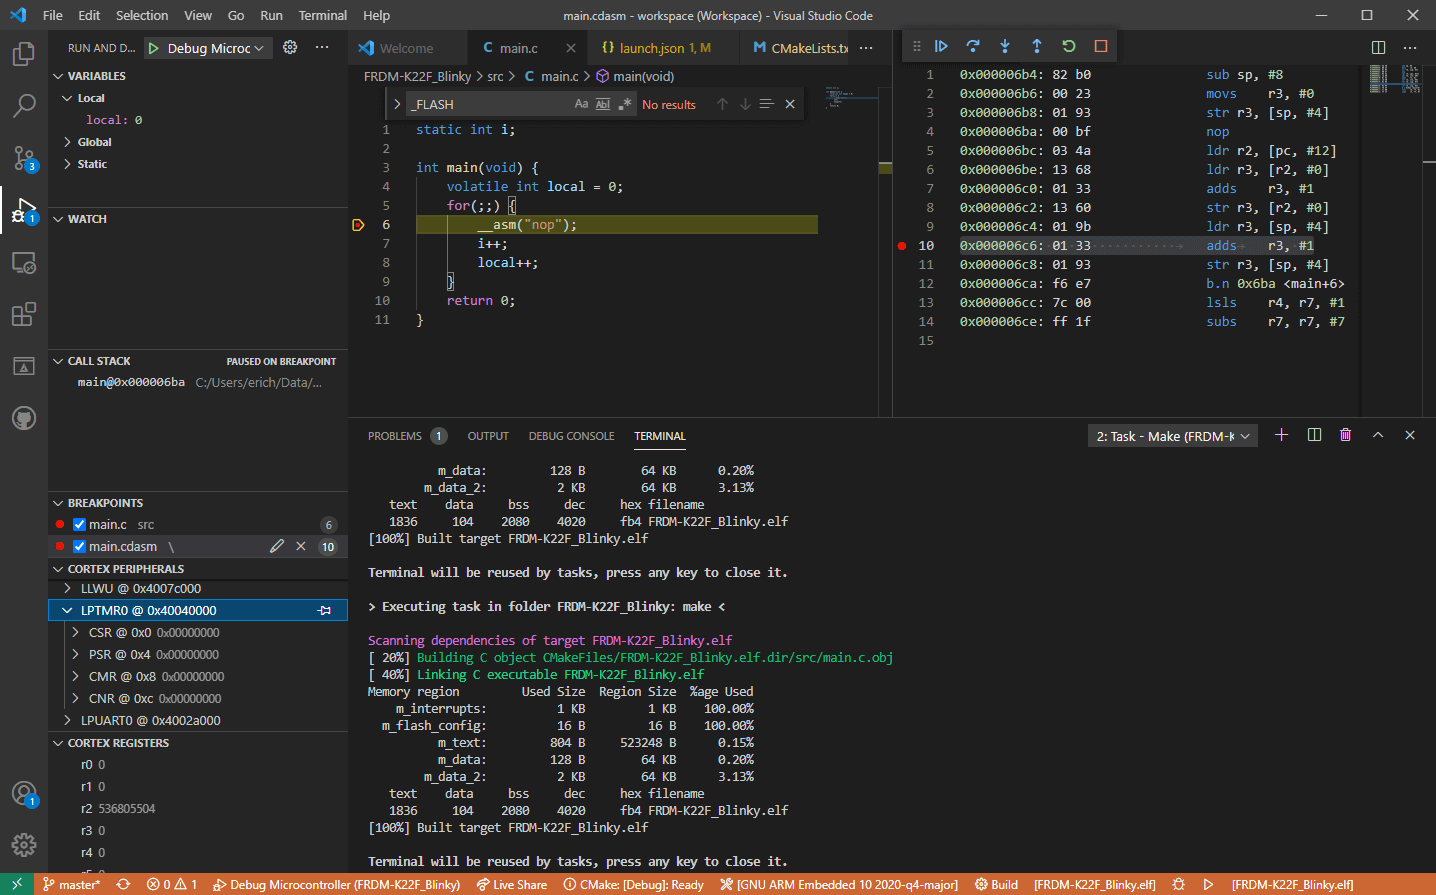
Visual studio code is a code editor available for Windows, Linux, and macOS. It is a completely free tool offering you to code in any language without the need to switch to another editor.
Visual Studio Code is part of Microsoft Visual Studio which is a complete integrated development environment (IDE). Take notice that Visual studio itself has more advanced tools for developing and testing, it has 24/7 support, training, and Azure for WEB apps.
Visual Studio Code is an editor lacking in some advanced features Visual Studio offers.
Visual Studio code Price and royalty
As mentioned Visual Studio code is completely free licensed under the MIT license agreement giving you the tool free to use and sell your product.
How it supports Linux, Windows, and macOS, all you need it to go to its official page https://code.visualstudio.com/, download it and start using it.
How this is free project backside is that there is no official support, you will have to rely on various articles and community in order to get needed information or problem solution.
Features
Syntax highlighting has become standard and norm for any editor but besides this function VS code offers us also IntelliSense option which goes a step further with code completion, code hinting, and parameter info.
This means that VS code is aware of many things going on inside your code and will offer you as you type a menu with options for autocomplete along with variables referenced, function names, etc.
VS code offers extensions inside its extensions marketplace where you can add extensions in order to implement new languages, add debuggers, change the layout, etc. This is one of the great features it allows you to easily switch from one project to another, one language to another not leaving your code editor.
Working with version control systems like Git is easy with VS Code. You’ll be able to stage files and make commits, then push and pull changes to your remote code repository of choice, right from the editor.
Conclusion about Visual Studio code
Visual Studio Code is one of if not the most flexible and extensible code editors currently on the market that I have ever tried and used. IT has become my code editor of choice simply for reasons that there is really not much it cannot do and it is constantly updated and taken care of.
You can really tune it to look and feels how you want with extensions and you really cannot beat the free price tag.
I would highly recommend this editor for daily use especially since its biggest competitors like Atom and sublime text have not seen many updates lately.
Microsoft starting as of today will block its Office 365 users if they are using Internet Explorer or early versions of Edge browsers.
So if you are using older non Chromium Edge versions of Microsoft browsers you can no longer access Office services until you switch. Now normally I would fully support this kind of decision since Internet explorer is a slow and vulnerable browser and the edge is similar in that regard.
The new edge browser is great and it should be used but the issue I have is that Office 365 is not free, it is a premium feature and I am wondering how Microsoft plans to deal with people that have already paid for service but suddenly cannot access it anymore.
Default Taskbar inside Windows 11 is pretty good if we are talking about its height. Sitting at 48 pixels it is a pretty decent size considering functionality and size ratio but if you want to make it a little larger or smaller know that you can do that as well in order to customize it for your personal needs.
Sadly in order to actually change height size, you will have to do it inside the registry editor, but worry not, we are here with you to guide you all the way, one step at a time.
Also, note that you can only change Taskbar from normal size of 48px to either small of 32px or large gapping at 72px. Icons will also be scaled proportionally with the taskbar.
Guide
Press ⊞ WINDOWS + R to open the run dialog
Inside run dialog type in RegEdit and press ENTER
In registry editor locate and find HKEY_CURRENT_USER\Software\Microsoft\Windows\CurrentVersion\Explorer\Advanced
Right Click on it to select it and create a new DWORD (32-bit) value
Name the value TaskbarSi
Inside TaskbarSi double click in order to set the value to 0 if you want a small size Taskbar, 1 is if you want to revert back to medium (standard one), or type in 2 if you want a large Taskbar.
Save and close the Registry editor
Reboot PC
And there you go, you have successfully changed Taskbar size inside Windows 11. If you want to revert back to standard size just repeat steps and place 1 as a value in point 6.
Uncdms.dll is a Dynamic Link Library file and a crucial part of the Windows Desktop Search Software. It is used to search emails, documents, photos, videos, and folders instantly.
However, the Uncdms.dll error pops on the screen, when the Windows Desktop Search Software fails to start.
The error message is displayed in one of the following formats:
“Uncdms.dll cannot be found.”
“Windowssearch.exe – cannot find the component. This application has failed to start because uncdms.dll was not found. Reinstalling the application may fix the problem.”
“The file uncdms.dll is missing.”
Solution
Error Causes
Uncdms.dll error code may pop on your screen due to multiple reasons. These usually include but are not limited to:
Viral infection
Issues with Windows Desktop Search
Registry corruption
Uncdms.dll accidentally deleted during program un-installation
Further Information and Manual Repair
If you experience an Uncdms.dll error code on your system, fix it right away. This error is easy to resolve. You don’t have to be technically sound to resolve the uncdms.dll error code. Try the methods listed below to resolve without any hassle:
Method 1 - Check Your Recycle Bin and Restore the Deleted Uncdms.dll File
Since DLL files are shared files, there is a possibility that you accidentally deleted them while uninstalling some other program. To fix the issue, simply go to the recycle bin and look for the file. If you locate it, reinstall it. If you can’t, then it is advisable to download the Uncdms.dll file from a trusted DLL file website.
Method 2 - Uninstall and Then Re-install Windows Desktop Search
If the error code is related to issues with the Window Desktop Search application, then simply uninstall this software and re-install to resolve. To do this, click the start button, go to the control panel and then add/ remove programs.
Now choose Windows Desktop Search from the list of programs and click Remove. After that, reboot your PC to activate changes. Now download the software and follow the same process and reinstall the Windows Desktop Search program on your PC.
To activate changes, reboot. This will hopefully resolve the issue.
Method 3 - Update Windows
As this file is included in the service pack, try updating the Windows Utility to resolve the Uncdms.dll error code. To get started, click start and then go to the control panel, now choose Windows update. Follow the instructions to install Active X and then click install to update Windows Utility. Restart your system to bring the changes into effect.
Method 4 - Scan for Viruses and Repair the Registry
Whether the underlying cause of the Uncdms.dll error code is viral infection or registry corruption, it is advisable to download Restoro. It is an advanced and multi-functional PC Repair Tool integrated with 6 powerful utilities including antivirus and a registry cleaner.
It scans and removes all types of viruses. The registry cleaning utility works simultaneously and removes all the unnecessary files corrupting the registry including cookies, temporary files, internet history, and junk files, and repairs it in seconds, thereby resolving the Uncdms.dll error immediately.
Click here to download Restoro - PC Fixer

 Under personalization options click on START.
 And then on the right part click on the button under Use Start full screen to turn it ON
 That's it, your start menu is now full screen.


 Visual studio code is a code editor available for Windows, Linux, and macOS. It is a completely free tool offering you to code in any language without the need to switch to another editor.
Visual Studio Code is part of Microsoft Visual Studio which is a complete integrated development environment (IDE). Take notice that Visual studio itself has more advanced tools for developing and testing, it has 24/7 support, training, and Azure for WEB apps.
Visual Studio Code is an editor lacking in some advanced features Visual Studio offers.
Visual studio code is a code editor available for Windows, Linux, and macOS. It is a completely free tool offering you to code in any language without the need to switch to another editor.
Visual Studio Code is part of Microsoft Visual Studio which is a complete integrated development environment (IDE). Take notice that Visual studio itself has more advanced tools for developing and testing, it has 24/7 support, training, and Azure for WEB apps.
Visual Studio Code is an editor lacking in some advanced features Visual Studio offers.
 Microsoft starting as of today will block its Office 365 users if they are using Internet Explorer or early versions of Edge browsers.
So if you are using older non Chromium Edge versions of Microsoft browsers you can no longer access Office services until you switch. Now normally I would fully support this kind of decision since Internet explorer is a slow and vulnerable browser and the edge is similar in that regard.
The new edge browser is great and it should be used but the issue I have is that Office 365 is not free, it is a premium feature and I am wondering how Microsoft plans to deal with people that have already paid for service but suddenly cannot access it anymore.
Microsoft starting as of today will block its Office 365 users if they are using Internet Explorer or early versions of Edge browsers.
So if you are using older non Chromium Edge versions of Microsoft browsers you can no longer access Office services until you switch. Now normally I would fully support this kind of decision since Internet explorer is a slow and vulnerable browser and the edge is similar in that regard.
The new edge browser is great and it should be used but the issue I have is that Office 365 is not free, it is a premium feature and I am wondering how Microsoft plans to deal with people that have already paid for service but suddenly cannot access it anymore.  Guide
Guide