If you are running the Windows Update service but decided to stop it but you encountered an error message instead that says, “The Windows Update service could not be stopped”, read on as this post will help you fix the problem.
This kind of error appears when you use the Command Prompt to stop the Windows Update service, especially if you are using cmd without admin privileges. A lot of users reported that they were not able to disable the automatic Windows Update in Windows 10 using Command Prompt. The command used to stop the Windows Update service is the “net stop wuauserv” command. However, when some users executed this command, they got the error message. So if you are one of these users that can’t stop the Windows Update Service via Command Prompt, you can try to fix that using PID as well as checking the Service dependencies. For more details, follow the given options below.
In case you don’t know, each running service or process has its own unique ID or PID and you can find it in the Task Manager. You can use it to stop the Windows Update service. How? Refer to these steps:
Note: You need to replace “<PID>” with the PID of the “wuauserv” service. For instance, the PID is 6676, then this is how the command should be “taskkill /f /pid 6676”.
Dependencies of a Windows Service in Windows 10 are when windows services depend on other services. Such is the case with the Windows Update service – it also depends on three different services such as the Remote Procedure Call or RPC service, DCOM Server Process Launcher, and the RPC Endpoint Mapper. Meaning to say, if two of these services are not working as expected, then the dependant service will also be affected. This could be the reason why the Windows Update service could not start.

 Following a two-year investigation by the California Department of Fair Employment and Housing, the state has filed a lawsuit against Activision Blizzard for fostering a "frat boy" culture in which female employees are allegedly subjected to unequal pay and sexual harassment.
As reported by Bloomberg, Activision Blizzard is being accused by the state of California of discriminating against female employees at nearly all levels of employment, including in regards to compensation, promotion, assignments, and termination. The state alleges Activision Blizzard’s leadership has failed to address any of these outstanding issues or prevent them from occurring within the workplace. You can read the full details of the lawsuit here.
The suit, filed Tuesday in the Los Angeles Superior Court, says Activision Blizzard, which is made up of about 20 percent women, assigns women, and women of color, to "lower paid and lower opportunity levels" with lower starting pay for similar work as their male counterparts.
The documents also accuse Activision Blizzard of fostering a "pervasive 'frat boy' workplace culture in the office. Male employees are said to drink "copious amounts of alcohol" as they make their way through cubicles and "often engage in inappropriate behavior toward female employees."
Male employees are said to come to work hungover, play video games during work "while delegating their responsibilities to female employees, engage in banter about their sexual encounters, talk openly about female bodies, and joke about rape."
The lawsuit also cites one particular incident where a female employee, who was already subjected to intense sexual harassment at the company, committed suicide during a work trip with a male supervisor who allegedly brought inappropriate, sexual items with him on the trip.
The lawsuit is asking for an injunction that will force Activision Blizzard to comply with workplace protections, as well as deliver unpaid wages, pay adjustments, back pay, and lost wages and benefits for female employees.
Following a two-year investigation by the California Department of Fair Employment and Housing, the state has filed a lawsuit against Activision Blizzard for fostering a "frat boy" culture in which female employees are allegedly subjected to unequal pay and sexual harassment.
As reported by Bloomberg, Activision Blizzard is being accused by the state of California of discriminating against female employees at nearly all levels of employment, including in regards to compensation, promotion, assignments, and termination. The state alleges Activision Blizzard’s leadership has failed to address any of these outstanding issues or prevent them from occurring within the workplace. You can read the full details of the lawsuit here.
The suit, filed Tuesday in the Los Angeles Superior Court, says Activision Blizzard, which is made up of about 20 percent women, assigns women, and women of color, to "lower paid and lower opportunity levels" with lower starting pay for similar work as their male counterparts.
The documents also accuse Activision Blizzard of fostering a "pervasive 'frat boy' workplace culture in the office. Male employees are said to drink "copious amounts of alcohol" as they make their way through cubicles and "often engage in inappropriate behavior toward female employees."
Male employees are said to come to work hungover, play video games during work "while delegating their responsibilities to female employees, engage in banter about their sexual encounters, talk openly about female bodies, and joke about rape."
The lawsuit also cites one particular incident where a female employee, who was already subjected to intense sexual harassment at the company, committed suicide during a work trip with a male supervisor who allegedly brought inappropriate, sexual items with him on the trip.
The lawsuit is asking for an injunction that will force Activision Blizzard to comply with workplace protections, as well as deliver unpaid wages, pay adjustments, back pay, and lost wages and benefits for female employees.
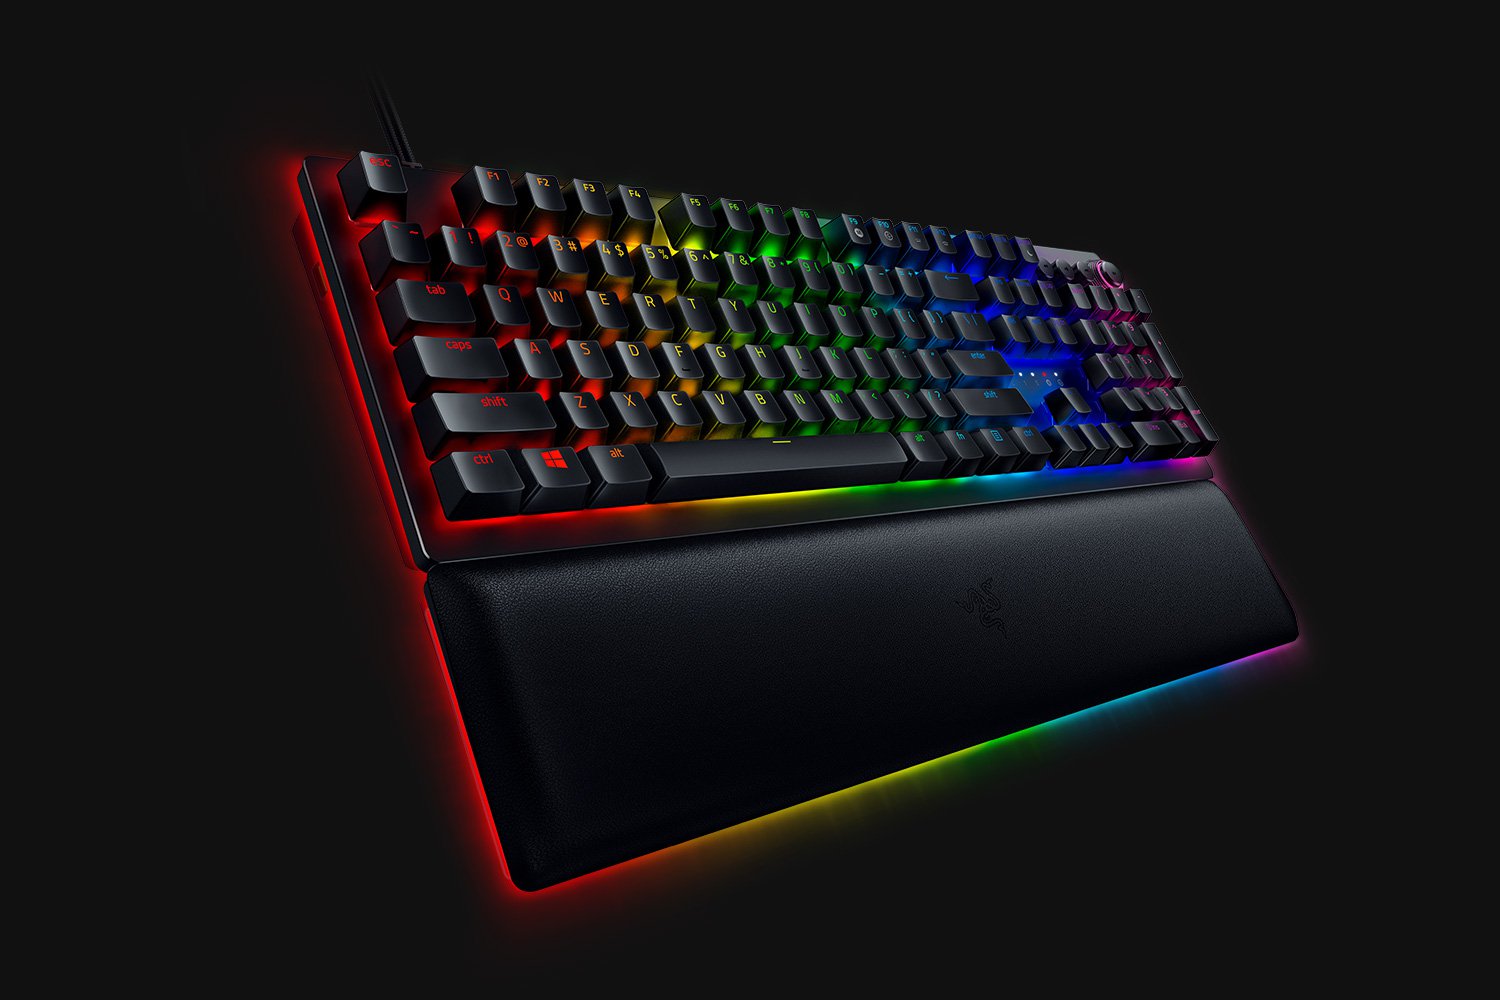 When it comes to computer peripherals first thing that comes to people's minds is probably Mouse and Keyboard. Also when discussing peripherals brands, Razer is not a stranger and over the years it has built its name and cult following.
Razer’s mechanical keyboards have been always in the upper field of quality and trust from users and Huntsman is no different.
When it comes to computer peripherals first thing that comes to people's minds is probably Mouse and Keyboard. Also when discussing peripherals brands, Razer is not a stranger and over the years it has built its name and cult following.
Razer’s mechanical keyboards have been always in the upper field of quality and trust from users and Huntsman is no different.
 Error Causes
Once this error code is encountered, it's a clear indication that your Operating System has malfunctioned. This could be a consequence of an incorrect or failed installation of software. The software might leave invalid entries in the Windows registry. Improper shut down of your system and a malware attack are also causes of error code 0x8007007e. Additionally, someone with little or no technical knowledge might have deleted a system file by accident. Missing system files can also equate to other error codes such as registry error code 19.
You may not always be able to prevent issues from affecting your computer, but proper measures can be taken to limit your risk of experiencing problems like error code 0x8007007e. See the following suggestions below:
System File Checker is a Windows tool that allows users to check their system for corrupt or bad system files. The utility scans for corrupt files and repairs them as well as files that may have gone missing.
Depending on the type of Windows operating system on your computer, you may need to follow varying instructions. However, note that Windows operating systems including Windows 10 and Windows 8 or 8.1 and Windows Vista all provide access to System File Checker via Command Prompt.
Once you run System File Checker, the tool should be able to repair and replace corrupted files. However, in cases where the repair process does not take place, you can attempt a manual repair by replacing the corrupt file the tool identifies with a good file. The process may require technical knowledge of Command Prompt so consider help from a Windows repair technician or consider contacting Windows for instructions based on your computer’s operating system.
The System Recovery Options menu in Windows contains many tools which can enable users to resolve serious errors. In the case of Error Code 0x8007007e, one of the best tools in this menu is System Restore.
When an error occurs which inhibits users from accessing key functions on their system, System Restore enables the user to restores the computer to an earlier period without causing harm to files, photos, or documents.
However, once you run this tool, you will only be able to access files available within the period to which your computer is restored. For this reason, carefully consider which period is best suited to your purposes. Also, ensure you restore the system to a time when error code 0x8007007e was not present on your machine.
If System Restore does not resolve the error, you may undo the restoration changes. Ensure you have sufficient free space on your machine hard disk before you proceed (300 MB at least for hard drives above 500MB or at least 50 MB for smaller sized disks).
When it comes to resolving error codes, it can often be a frustrating and tricky venture, especially when you are attempting to fix the problem manually. The Internet is awash with bits and pieces of instruction, some misleading at best with uncertain success rates.
But what if there was a one-stop-shop or better yet a tool that offered solutions for error codes including 0x8007007e? Download a powerful automated tool that offers easy and effective, user-friendly solutions for users with varying error code problems.
“Out of memory or system resources, Close some windows or programs and try again.” “There is not enough memory to complete this operation – copying files.”These errors are caused by the Desktop Heap limitation when there is no longer enough memory to complete the operation while copying the files. If you encounter any of these errors, you will be guided in this post with the help of some potential fixes that can increase its limit and will hopefully fix this error on your Windows 10 computer. You may try to close all the open windows and programs and then try copying the file again and see if that helps. If not, then proceed to the instructions given below. But before you do that, make sure that you create a System Restore point first. This way, you can undo the changes you’ve made any time in case there are some unwanted changes you want to reverse. After you create a System Restore point, refer to the steps provided below. Step 1: Tap the Win + R keys to open the Run utility and type “Regedit” in the field and tap Enter to open the Registry Editor. Step 2: Next, navigate to this registry key: ComputerHKEY_LOCAL_MACHINESYSTEMCurrentControlSetControlSession ManagerSubSystems Step 3: Now double click on the DWORD named Windows to modify it. Step 4: Change the values for SharedSection in the Value Data field. It should be in the format of “SharedSection=aaaa,bbbb,cccc”. Note that you have to change the value of “bbbb” and “cccc”. So in case you are using an x86 operating system, set the value of bbbb to 12288 and then set the value for cccc to 1024. On the other hand, if you are using an x64 operating system, set the bbbb value to 20480 and the cccc value to 1024. Step 5: Exit the Registry Editor and restart your computer to successfully apply the changes made. Note: The bbbb value in the SharedSection registry is the size of the desktop heap for each interactive window station while the cccc section of the SharedSection value is the size of the desktop heap for each non-interactive window station. In addition, you must keep in mind that setting the value of bbbb to more than 20480 KB is not really recommended. On the other hand, there is another tool that could help in resolving the Out of Memory error. This tool is called the Memory Diagnostic tool in windows can help resolve the Out of Memory error by checking and automatically fixing any memory-based issues. To run it, refer to these steps:
100sOfRecepies is a Browser Extension developed by MindSpark Inc. that provides users with hundreds of recopies for breakfast, lunch, dinner, and dessert. This extension may appear very handy at the start, however, it may monitor your browser activity, and send it back to the developer to better serve ads. This extension injects itself into the System Registry allowing it to run each time your computer is restarted.
While browsing the internet with this extension installed you may see additional ads, sponsored links, and pop-up ads displayed in your browser. Many anti-virus scanners have detected this extension as a Browser Hijacker and are therefore not recommended to keep on your computer.
“Something went wrong, We weren’t able to set up your PIN. Sometimes it helps to try again or you can skip for now and do this later.”On the other hand, here’s the error message you get for the Microsoft Store-related error:
“Try that again, Something happened on our end and we couldn’t sign you in.”Here are some potential fixes you can try to fix the Error Code 0x80090016 in the Microsoft Store:
powershell -ExecutionPolicy Unrestricted Add-AppxPackage -DisableDevelopmentMode -Register $Env:SystemRootWinStoreAppxManifest.xml
“This policy setting allows you to control whether a domain user can sign in using a convenience PIN. If you enable this policy setting, a domain user can set up and sign in with a convenience PIN. If you disable or don’t configure this policy setting, a domain user can’t set up and use a convenience PIN. Note: The user’s domain password will be cached in the system vault when using this feature. To configure Windows Hello for Business, use the Administrative Template policies under Windows Hello for Business.”
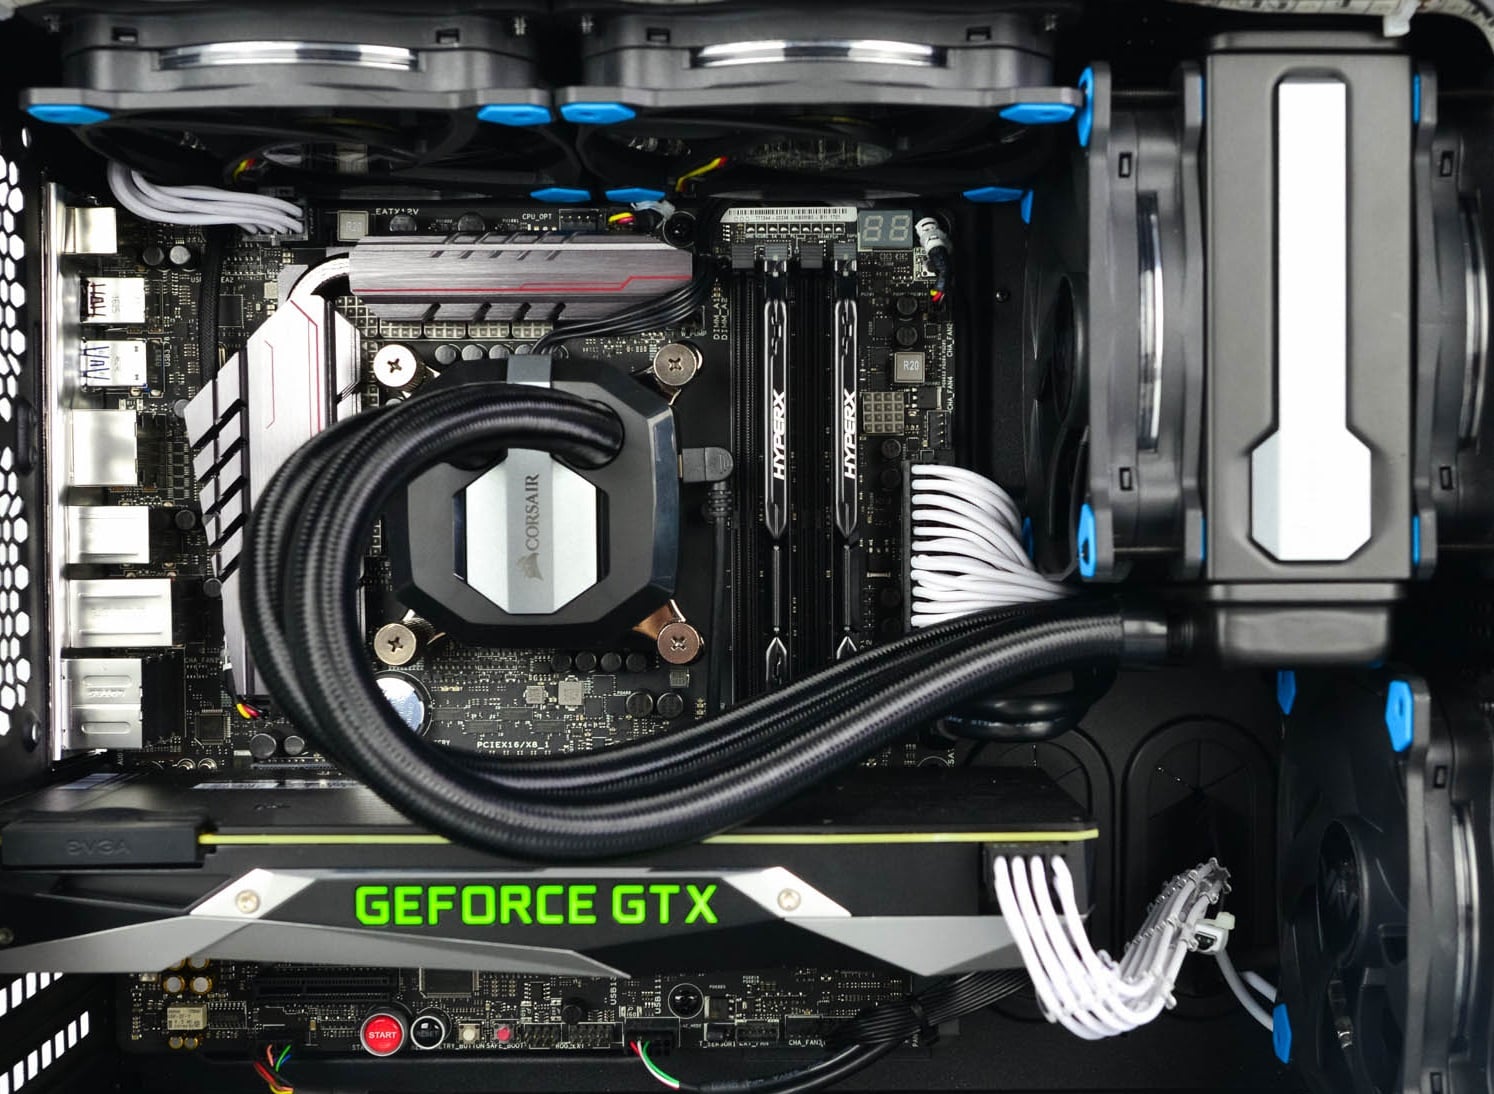 Builders with no depth knowledge and experience can sometimes choose improper CPU or GPU, picking one of them to be much more powerful than another thus not using it to its full potential because another component cannot handle stuff at the same speed. In order to not be trumped by this kind of stuff, there is a website that is completely free and you do not even need to be registered in order to use it.
Bottlenet calculator link here
What is even better, once you input your components you will get advice on what to change in order to tweak the system a little more to avoid bottlenecks even more. It is a very useful tool and we are advising you to use it in order to save money but not throwing it on some component that will be half used.
Builders with no depth knowledge and experience can sometimes choose improper CPU or GPU, picking one of them to be much more powerful than another thus not using it to its full potential because another component cannot handle stuff at the same speed. In order to not be trumped by this kind of stuff, there is a website that is completely free and you do not even need to be registered in order to use it.
Bottlenet calculator link here
What is even better, once you input your components you will get advice on what to change in order to tweak the system a little more to avoid bottlenecks even more. It is a very useful tool and we are advising you to use it in order to save money but not throwing it on some component that will be half used.