One of the most basic and commonly used features in the Windows operating system is the copy and paste feature that helps users accomplish tasks in a faster and easier way. However, if you notice that it’s not working properly for some reason, then this post might be of help as it will provide you with options you can check out to resolve the problem.
You can encounter this kind of problem with the copy and paste feature if some system files are corrupted or if there’s some third-party application or process that interferes with this function. Worry not though for there are some options you can check out to fix this. You can try to restart the
rdpclip.exe process or the explorer.exe process. You could also try to reinstall the program where you encountered the issue with the Copy and Paste function. In addition, you could try clearing the clipboard history or run the built-in tools like the DISM tool and SFC scan. You could also troubleshoot the problem in a Clean Boot State or use the Refresh Windows tool. For more information, refer to each one of the options below.
Option 1 – Try to restart the rdpclip.exe and the explorer.exe processes
The first thing you can do to resolve the problem is to restart certain processes namely, the rdpclip.exe process and the explorer.exe process via Task Manager.
First, right-click on your Taskbar and select the Task Manager.
Next, look for the rdpclip.exe process and right-click on it, and select the End process option.
After that, click on the File tab > Run new task and then type “rdpclip.exe” and tap Enter.
This should help fix the problem. If not, you could also try to restart the explorer.exe process – just look for the explorer.exe process in the Task Manager and right-click on it, and then select the Restart option.
Option 2 – Try reinstalling the concerned program
If you only experience this issue on a particular program, you might want to uninstall this program and install it back again, and then see if it fixed the problem or not.
Option 3 – Try to clear the clipboard history
You could also try clearing the clipboard history as it has been known to help in fixing this kind of issue. You can clear the clipboard history using the command line.
Tap the Win + R keys to launch the Run dialog box and type “cmd” in the field and hit Enter to open Command Prompt.
Next, execute this command: echo off | clip
After that, check if the Copy and Paste function is now working properly or not.
Option 4 – Try running the DISM tool
You can run the DISM tool as well to help fix the “Tile Database is corrupt” error. Using this built-in tool, you have various options such as the “/ScanHealth”, “/CheckHealth”, and “/RestoreHealth”.
Open the Command Prompt with admin privileges.
Then type in the following commands and make sure to hit Enter right after you type each one of them:
Dism /Online /Cleanup-Image /CheckHealth
Dism /Online /Cleanup-Image /ScanHealth
DISM.exe /Online /Cleanup-image /Restorehealth
Do not close the window if the process takes a while as it will probably take a few minutes to finish.
Once it’s done, check if it was able to fix the corrupted Start Menu or not.
Option 5 – Try to run System File Checker or SFC scan
Tap Win + R to launch Run.
Type in cmd in the field and tap Enter.
After opening Command Prompt, type in sfc /scannow and hit Enter.
Once done, restart your computer.
Option 6 – Restart your computer in a Clean Boot State
If a third party program like antivirus is the one that’s causing the problem, you can try to put your computer in a Clean Boot State to isolate the issue by following these steps:
Log onto your PC as an administrator.
Type in msconfig in the Start Search to open the System Configuration utility.
From there, go to the General tab and click “Selective startup”.
Clear the “Load Startup items” check box and make sure that the “Load System Services” and “Use Original boot configuration” options are checked.
Next, click the Services tab and select the “Hide All Microsoft Services” check box.
Click Disable all.
Click on Apply/OK and restart your PC. (This will put your PC into a Clean Boot State. And configure Windows to use the usual startup, just simply undo the changes.)
Now try to connect your device or copy the files to your external device again and check if the problem with the Copy and Paste function is fixed.
Hello and welcome everyone, just a few years ago we had FLASH video content on the internet, we had FLASH games, full FLASH website experiences, and more, but then flash was shut down mostly due to security reasons meaning that in just a few months we have lost most of FLASH web content.
However, there is still FLASH content on the internet even today, there are still FLASH videos and flash games, but we can not play any of that content since browsers do not support FLASH and you can not get the FLASH plugin for browsers. So what might be the solution for this situation?
Ruffle and FLASH emulation
Emulation of course. We will not be able to get the flash player working, well at least not the original and official one, but we can make flash content playable again inside our browsers.
The first thing is first, we need to get an emulator package from the internet in order for this trick to work, one we will be using is RUFFLE. It is lightweight, it is free, it is open source and it is reliable, everything we need.
Download RUFFLE from its official website here.
For Chrome and Edge download the ZIP package, for Firefox, go to the Firefox section of the tutorial.
There is also a desktop version of RUFFLE there so if you are keen on playing your flash content on your desktop computer you might well grab that as well, but for the sake of this tutorial where we are enabling flash in our browsers, we will not focus on that part since it is pretty straightforward.
Now once you have downloaded the RUFFLE emulator, please extract it to the desired folder somewhere on your computer.
Once it is extracted, start your browser of choice and follow instructions.
FOR CHROME:
Navigate to: chrome://extensions/
Turn ON developer mode in the top right corner
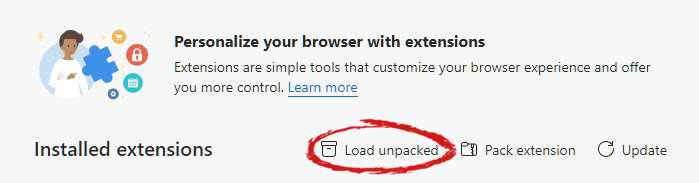
Click on Load unpacked
Navigate to the folder where you have extracted RUFFLE
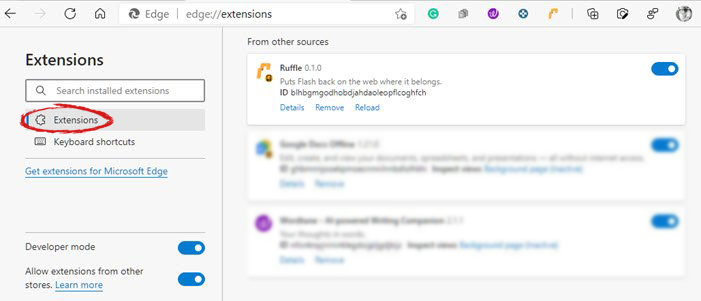
FOR EDGE:
Navigate to: edge://extensions/
Turn ON developer mode on the bottom left corner
Navigate to the folder where you have extracted RUFFLE
Turn RUFFLE ON
FOR FIREFOX:
Go to the RUFFLEdownload page, we can not use the zip package we were using for Chrome and Edge
Right-click on the Firefox download link
Save link by clicking on Save link as...
Navigate to about: debugging
Click on this Firefox
Click Load Temporary Add-on
Select the .xpi that you have downloaded
BONUS:
If you want to enable FLASH content live on your website use: <script src="path_to_ruffle/ruffle.js"></script>
There are times when you upgrade or install Windows 10 on an old computer and the Aspect Ratio of the screen is in a mess. This issue occurs when a new Windows version does not support the GPU or the driver does not work in Windows 10. And in such cases, Windows uses a generic driver which does not support all the resolution as well as the correct aspect ratio. So in this post, you will be guided on how you can fix the issues with the screen aspect ratio in Windows 10.
It could be that your screen has an aspect ratio of 16:9 but after the upgrade, you changed to screen resolution, and is now set to 16:!0. And later on, you found that you are unable to go back to the previous aspect ratio. Thus, you will notice that everything on the screen might look stretched. You might be wondering if it’s possible to change the aspect ratio in Windows 10 directly even if the GPU does not have the compatible driver, well it really isn’t. However there is another way to resolve the problem. Refer to the options given below to get started.
Option 1 – Try using the Compatibility Mode
The first thing you can do is to run the driver in a Compatibility Mode. Follow the steps below to do so:
You need to download the driver and place it on your desktop.
After that, right-click on it and select Properties.
Next, switch to the Compatibility tab where you should see two options:
Compatibility troubleshooter, and let Windows figure out what works best for you. If it fails, follow the next.
Manually choose the version of Windows it was correctly working.
You also have the option to change the DPI settings and see if that helps. Then click the Apply and OK buttons.
Now right-click on the file and select the “Run as administrator” option to install. After that, you should now be able to change your screen aspect ratio to what you were using early on.
Note: If you have other programs that won’t work on the existing version of Windows, then make sure to run the program in a Compatibility mode.
Option 2 – Try to run the Program Compatibility Troubleshooter
You might also want to run the Program Compatibility Troubleshooter. This built-in troubleshooter is available in the Windows Update & Security section. From there, select Troubleshoot. This will find a list of programs for you and since you have already downloaded the driver files, just click on Not Listed located at the top of the program list. After that, browse and select the driver files and then let the program do its job.
Option 3 – Update or rollback your device drivers
If the first option didn’t work for you, then it’s time to either update or roll back the device drivers. It is most likely that after you updated your Windows computer that your driver also needs a refresh. On the other hand, if you have just updated your device drivers then you need to roll back the drivers to their previous versions. Whichever applies to you, refer to the steps below.
Open the Devices Manager from the Win X Menu.
Then locate the device drivers and right-click on them to open the Properties.
After that, switch to the Driver tab and click on the Uninstall Device button.
Follow the screen option to completely uninstall it.
Finally, restart your computer. It will just reinstall the device drivers automatically.
Note: You can install a dedicated driver on your computer in case you have it or you could also look for it directly from the website of the manufacturer.
If you are using a multi-monitor, then you might find it quite useful. It helps many users with their work and brings more productivity. And over the past few years, Windows has managed to offer one of the excellent multi-monitor features where users can plug in an additional monitor and access their work or use their computer seamlessly on both displays. This is really handy, especially for users who are graphic designers, gamers, and other professionals who have to use a larger screen for their work.
One of the biggest inconveniences for users who use multi-monitor is that the Taskbar is switched on, on both displays, by default. This default arrangement is most likely to cause clutter on the second display. So if you are one of these users who find such a thing annoying, then you will find this post useful for you as we will walk you through how you can move the Taskbar to a second monitor. To get started, follow the instructions laid out below.
Step 1: The first thing you have to do is right-click on the Taskbar.
Step 2: Next, uncheck the “Lock the taskbar” option.
Step 3: After that, click and hold the taskbar and drag it to the second monitor.
Step 4: Once done, click the mouse button on the place where you want to place the taskbar.
Step 5: Now right-click on the “Lock the taskbar” option to lock the taskbar.
Once you’re done carrying out the steps given above, there are Advanced Options you can explore. This array of advanced options are offered by Windows 10 to fine-tune the multi-monitor experience of users. For instance, you have the option to choose to show the taskbar on an active screen only or combine the buttons on other taskbars. It would be better if you try out different variations and stick with the best one. In addition, you could also move the taskbar from one display to another.
If you were trying to run Windows Update or activate Windows Firewall or download from the Windows Store but encounter the Windows Update Error 0x80070422 instead, read on as this post will show you how you can resolve the problem.
This kind of Windows Update error occurs when the Windows Update or WUAUSERVE is not started or when the Background Intelligent Transfer Service or BITS can’t be started. It could be that they are disabled or because they have no enabled devices associated with them. Whichever the case is, you can check out the options given below to fix the Windows Update Error 0x80070422 and make sure that you create a System Restore point first before you start.
Option 1 – Check the status of some Windows Update Services
Tap the Win + R keys to open the Run dialog box.
Next, type “services.msc” in the field and hit Enter or click OK to open Services.
From the list of Services, look for the following services and make sure that their Startup type is as follows:
Windows Update – Manual (Triggered)
Background Intelligent Transfer Service – Manual
After that, check if the Service status of the listed services above is set to Running. If they’re not, click on the Start button to start these services and then check if you can now enable the Windows Update service or not.
Option 2 – Try to disable IPv6 in the Network Center
You might also want to disable IPv6 in the Network Center in order to fix the Windows Update Error 0x80070422. How? Follow these steps:
Tap the Win + X key combination on your keyboard and click on Network Connections.
This will open the Network Connections section under the Setting app. From there, click on the Network and Sharing Center link located at the right side of the panel which will open a Win32 version of the Windows settings known as Control Panel.
In the Control Panel, click on the network your computer is connected to.
A mini window will appear and in that window click on Properties which will open another mini window that will provide a list.
From this list, uncheck the option that says, “Internet Protocol Version 6 (TCP/IPv6)”.
Now click on OK and close all the other windows and see if it fixes the Windows Update error.
Option 3– Run the Windows Update Troubleshooter
If disabling IPv6 didn’t work, you could also try running the Windows Update Troubleshooter as it could also help in fixing any issues related to Windows Update including the Windows Update Error 0x80070422. To run it, go to Settings and then select Troubleshoot from the options. From there, click on Windows Update and then click the “Run the troubleshooter” button. After that, follow the next on-screen instructions and you should be good to go.
Option 4 – Try running the DISM tool
You can also try to run the Deployment Imaging and Servicing Management or DISM tool to fix the Windows Upgrade error. Using this built-in tool, you have various options such as the “/ScanHealth”, “/CheckHealth”, and “/RestoreHealth”.
Open the Command Prompt with admin privileges.
Then type in the following commands and make sure to hit Enter right after you type each one of them:
Dism /Online /Cleanup-Image /CheckHealth
Dism /Online /Cleanup-Image /ScanHealth
exe /Online /Cleanup-image /Restorehealth
Do not close the window if the process takes a while as it will probably take a few minutes to finish.
Option 5 – Run Microsoft’s online troubleshooter
Running Microsoft’s online troubleshooter might also help you fix the Windows Update Error 0x80070422. This online troubleshooter is known to help in fixing Windows Update errors, it scans your computer for issues that might be causing the problem and then fixes them automatically.
If you’re having some problem browsing multiple websites on the Firefox browser on your Windows 10 computer, then this post might be of help. One of the most common problems you could encounter in Firefox is mostly related to HTTPS and one of them is the MOZILLA PKIX ERROR MITM DETECTED or ERROR SELF SIGNED CERT or SEC ERROR UNKNOWN ISSUER error which means that Firefox was unable to trust certificates issued on secured websites.
If you encounter the MOZILLA_PKIX_ERROR_MITM_DETECTED error in Firefox, this indicates that something in your network or system is interrupting your connection and injecting certificates and when that happens, Firefox won’t trust it. In such cases, one of the culprits is malware. Malware will try to replace a legitimate certificate with its certificate. Another cause is security software where it keeps a tab on a secure connection and creates a false positive, for instance:
“In Microsoft Windows accounts protected by Family Safety settings, secure connections on popular websites like Google, Facebook and YouTube might be intercepted and their certificates replaced by a certificate issued by Microsoft in order to filter and record search activity.”
And if you are connected to a corporate network, there might be a monitoring/filtering product that could be replacing certificates. Moreover, there are also users who reported getting this issue when they use the Nightly version of Firefox. And if that’s the case, you have to try accessing secure websites using only the stable build especially when it comes to payments. However, if you are not doing that, then here are some options you need to check out.
Option 1 – Try turning off HTTPS Scanning on your security and antivirus programs
Each security-based software has a security option that allows you to turn off the HTTPS scanning functionality. They may be available under different names such as HTTPS Scanning, Scan SSL, Show safe result, Do not scan encrypted connections, etc. Find what is applicable for your security or antivirus software and then try turning it off temporarily and see if it helps in fixing the MOZILLA_PKIX_ERROR_MITM_DETECTED error in Firefox.
Option 2 – Try to disable security.enterprise_roots.enabled
The next thing you can do if the first option didn’t work is to disable security.enterprise_roots.enabled which is an HTTPS certificate check on Firefox. Note that this is not recommended but you have to at least try in order to fix the error.
Open Firefox and then type “about: config” in the Firefox address bar and hit Enter.
After that, if an info message appears, confirm it.
Next, search for the security.enterprise_roots.enabled preference and once you found it, double click on it.
Then change its value to true and restart the Firefox browser once. This will import all the custom certificates from the other security software into Firefox. As a result, it will make sure to mark those sources as trusted and you won’t get the MOZILLA_PKIX_ERROR_MITM_DETECTED error.
‘R6025 pure virtual function call’ is a runtime error that occurs suddenly on the screen and disrupts the program being run prior to it. This error display indicates that the program has been corrupted. R6025 runtime error usually occurs with the Visual C++ framework.
Solution
Error Causes
This error occurs when the C++ program crashes which is usually because of the malfunctioning or missing of the device driver or incomplete device driver files.
It happens because your application indirectly calls a pure virtual member function in a context where a call to the function is invalid. Most of the time, the compiler detects it and reports it as an error when building the application. R6025 error is usually detected at run time.
Further Information and Manual Repair
To fix the R6025 pure virtual function call error, you need to find the call to the pure virtual function. After you find the call, you need to rewrite the code so that it is not called again.
There are 2 ways to do this:
Alternative 1
One way to fix the R6025 pure virtual function call is to replace the function with an implementation that calls the Windows API function DebugBreak. The DebugBreak causes a hard-coded breakpoint.
Once the code stops running at this breakpoint, it is easy for you to view the call stack. By viewing the call stack you can identify the place where the function was actually called.
Alternative 2
Another quick way to find a call to a pure virtual function to fix the R6025 error is to set a breakpoint on the _purecall function that is usually found in PureVirt.c.
By breaking this function you can trace the problem occurring and rewrite the call to ensure the error does not occur and the program you are trying to develop on the Visual C++ framework is easily developed.
If R6025 Error is related to Windows Registry Problem Then here’s how you can fix the problem:
To fix the runtime error R6025, run registry cleaner software to scan and fix all errors. This alternative is suitable if the R6025 error is related to the Windows registry problem and where the error has occurred due to corrupted or malicious registry entries.
You can download the registry cleaner repair tool for free. Run it to scan errors and then click the fix error button to repair the problem immediately.
As of late, a number of users reported experiencing a problem where their Windows 10 computers get stuck on Airplane mode for some unknown reason. According to the affected users, they were unable to turn off the Airplane mode which means that their computers are also not able to connect to the internet. One of the possible reasons why this kind of issue occurs is that there could be a bug with the airplane mode or it could also be the doing of faulty network drivers or physical switch that’s turned on, and so on. If you are one of the few users who experience the same issue, then read on as this post will guide you on what to do if your Windows 10 computer gets stuck on Airplane mode.
There are a couple of suggestions you can check out to resolve the problem. You can try to check the status of the Radio Management service, flush the DNS cache or you could turn off the airplane mode via system settings. You could also update the network drivers or turn off the physical switch for airplane mode or make some adjustments in the Windows Registry. For more details, refer to each one of the suggestions provided below.
Option 1 – Try to check the Radio Management Service status
First, tap the Win + R keys to open the Run dialog box and type “services.msc” in the field, and hit Enter to open the Windows Services Manager.
Next, look for the Radio Management service and select Properties.
From there, change its Startup type to Disabled and click on the Apply and OK buttons to save the changes made.
Once done, restart your computer and check if you can now turn off the airplane mode.
Option 2 – Flush the DNS cache
You could also try to flush the DNS cache to fix the “ERR_ICAN_NAME_COLLISION” error. All you have to do is open Command Prompt as an administrator and then execute each one of the following commands sequentially to flush the DNS cache:
ipconfig/release
ipconfig/renew
ipconfig/flushdns
Option 3 – Try turning off the airplane mode via System settings
If flushing the DNS cache did not help in fixing the problem, then you might want to turn off airplane mode via system settings.
In the Windows Search bar, type “airplane mode”.
From the search results that appear, click on Airplane mode.
After that, a window will appear where you have to turn off the toggle button for Airplane mode.
Option 4 – Try to update, rollback or reinstall the Network adapter drivers
The next thing you can do to resolve the problem is to update the Network Adapter drivers by following these steps:
Tap the Win + R keys to launch the Run window and then type in the “devmgmt.msc” command and hit Enter to open the Device Manager window.
Under the Device Manager, you will see a list of drivers. From there, look for the Network Adapters and expand them.
Look for the Broadcom Network Adapter and right-click on it, as well as other network adapters that have an exclamation icon, and update them all.
Restart your PC and see if it helped in fixing the problem.
Note: If updating the network drivers didn’t help in fixing the problem, you can also try to roll back the very same drivers from their previous versions and restart your Windows 10 PC. After that, the system itself will reinstall the drivers you just uninstalled. Alternatively, you can also download and install the drivers from the manufacturer’s website directly.
To reinstall the network adapter drivers, refer to these steps:
Open the Devices Manager from the Win X Menu.
Then locate the device drivers and right-click on them to open the Properties.
After that, switch to the Driver tab and click on the Uninstall Device button.
Follow the screen option to completely uninstall it.
Finally, restart your computer. It will just reinstall the device drivers automatically.
Option 5 – Try to turn off the physical switch for Airplane mode
If your computer has a physical switch to turn on or off the airplane mode, then you might want to check that switch if you have one. Chances are, it could be the reason why you’re unable to turn off Airplane mode on your computer.
Option 6 – Try to make some adjustments in the Registry
Tap the Win + R keys to launch the Run utility.
Then type “Regedit” in the field and hit Enter to open the Registry Editor.
Next, navigate to this registry path: HKEY_LOCAL_MACHINESystemCurrentControlSetControlClass
From there, edit the registry value of “RadioEnable” to “1”.
Exit the Registry Editor once done, and restart your computer.
There is a central location in Windows 10 that allows users to view all the notifications from its Action Center. Aside from viewing notifications, users can also manage them and take necessary actions in just one single place. Notifications in Windows 10 look similar to a message icon but can be at variance in function. However, recently, a number of users reported that even though they receive notifications about new actions but when opening them, they see nothing. In other words, the notification is false, and to fix this, read on as this post will provide you a couple of workarounds.
The Windows 10 Notifications and Action Center notification messages might show a mismatch. For instance, Windows 10 may say that you have some notifications but when you open Action Center, you find it empty and there are actually no notifications there. Take the case of the following screenshot, the Windows 10 Notification says that there are 6 new notifications available for viewing but the Action Center says otherwise.
Before you troubleshoot the problem, you might want to run System Restore especially if you’ve made some changes in your computer prior to this issue which might have messed with the Windows 10 Notifications and Action Center. To perform System Restore, refer to these steps:
First, press the Win + R keys to open the Run dialog box.
After that, type in “sysdm.cpl” in the field and tap Enter.
Next, go to the System Protection tab then click the System Restore button. This will open a new window where you have to select your preferred System Restore point.
After that, follow the on-screen instructions to finish the process and then restart your computer and check if the problem is fixed or not.
If the problem wasn’t fixed and you’re still getting false notifications, you might want to troubleshoot the problem further using the options given below.
Option 1 – via Windows PowerShell
In the Start search, type “PowerShell” in the field and hit Enter to pull up the Windows PowerShell window.
Next, copy and paste this command and hit Enter to execute it: Get-AppxPackage | % { Add-AppxPackage -DisableDevelopmentMode -Register “$($_.InstallLocation)AppxManifest.xml” -verbose }
After that, reboot your computer and check if the false notifications are now gone.
Option 2 – Try renaming the Usrclass.dat file
DAT errors like the ones that are associated with the Usrclass.dat file, most likely occur during computer startup, program startup, or while you try to use a specific function in your program. Even so, it can easily be fixed. How? Refer to the given steps below.
Tap the Win + R keys to open the Run dialog box.
Then type %localappdata%MicrosoftWindows and hit Enter to get to the location of the UsrClass.dat file.
After that, look for a file named UsrClass.dat and once you’ve found it, right-click on it and select the Rename option.
Now rename the file to UsrClass.old.dat and then restart your computer and see if the problem is now fixed or not.
A black screen error inside Windows 11 is a typical screen turning to solid black without any error message. This can be very annoying since it can randomly appear out of nowhere and it will appear while you are using the computer. Worry not, this is not a serious error and we have several solutions for it, so please keep reading and try them as presented in order.
Restart graphic driver
This is the first thing to check if the issue is due to software or driver malfunctioning, there is a shortcut for rebooting graphic driver inside Windows 11. Press WINDOWS + CTRL + SHIFT + B to reboot the graphic driver and see if this fixes the issue. A beep sound should be heard during this process and the screen should turn back to normal.
Check connections
Sometimes the screen can go black due to a faulty connection or cable. If you have it at your hand try a different cable or slightly and gently nudge the existing one to see will screen flicker. If you are on a laptop try gently moving the lid from back to front and pay attention to the screen. If screen flickers or picture returns with this method, cable or connector needs to be replaced.
Clean your computer
The black screen can be because the computer is overheating. If this is the case either fan inside is not working properly or there is a lot of dirt and dust that needs to be removed so airflow can be established again for proper cooling. We have an article on errortools.com on how to properly clean your PC but if you are not technical enough maybe the best solution would be to call someone who is or to take the PC to service for cleaning.
Change The Projection Settings
Press WINDOWS + P to open projection settings, check to see if PC is set to PC screen only. If any other option is selected change it to PC screen only since this can cause random black screen issues.
Uninstall latest updates
If this problem has started to manifest itself during the latest update, go to setting and roll back from the latest update to fix this issue.
Scan system for malware
The black screen can also be caused by various viruses and malware. IF you have anti-virus software, run a full system scan to check it for malware. If you do not have one, download a free one and run a system scan, we recommend Bitdefender.
So, you have finished with work, game, movie, music, email, or whatever on your PC, you look at the clock, it is late, you decide to go to sleep or outside, you click on the power button and choose shutdown. Now when a PC is shut down you feel good and go with your business but the next time you power it up you get the same error like the computer never really shut down in the first place. You wonder why and reboot it, just in case and all of the sudden error is gone.
If something similar has happened to you or you had the feeling that after shutting down your computer has not really felt like shutting it down, do not seek professional help, everything is OK with you because when you click on shut down, your computer does not really shut down!
Truth is that Microsoft has changed how to shut down works and how rebooting works in Windows with an update but has not publicly said anything about it so some users may experience this feeling of not shutdown phenomenon and might even think there is something wrong with their PC.
Why this change?
A few years ago shutdown button and option in Windows were really shutting down OS, but things changed when Microsoft wanted to increase boot-up speed. Now when that decision was made shutdown option was changed. So, what was changed? Well in order to increase Windows booting time, the shutdown will now turn off power to PC components and it will look like everything is indeed shutdown but the Windows kernel will actually be saved to a hard drive with all settings and just awaken once the PC is turned back ON. This will result in all errors and other stuff being just still present same as they were once the system was instructed to be turned off.
Rebooting your PC will now clear kernel and file from the hard drive and you will get a clean system startup without any issues tied with the kernel itself.
Workaround
Now that we know why and what change has been made to Windows logical question is can we shut down our PC at all properly? Luckily for us, the answer is yes and we will not need any external application to do it, we can still do it inside Windows itself and it is quite quick and easy.
Bringing back the old shutdown
In order to bring the old shutdown functionality of your PC please follow the instructions but be aware that by doing this your PC will boot a little bit slower since it will have to load the kernel from scratch each time computer is turned ON.
First thing is to go to settings and go to System
Then once you are inside the system, navigate to the power and sleep and click on it to select it. Once you have it selected to all the way to the right and click on additional power settings.
When you click on advanced power settings you should be led to the control panel's power options. Inside this panel click on top left link where it says Choose what the power button does.
Inside options, you will need to untick the box next to Turn on fast startup (recommended), this option has been ticked ON by the Windows update and probably without notifying you. Option means exactly what was described, it will save kernel state on the hard drive for faster boot time but sadly it can cause some issues since it will never be reloaded from 0.
If you are unable to uncheck the box click on the text beside the shield icon that says: Change settings that are currently unavailable (you will have to be logged in as administrator).
Conclusion
Altho turning off fast startup and shutting down the PC completely will for sure extend your bootup time I still believe that it is the right choice since sometimes a lot of clutter and bad things accumulate over time inside the OS and can cause a vast variety of problems in a long run. So stay safe and shut down that PC as it used to be in the past.


 Restart graphic driver


