Chrome automatically opens a new tab

Recently, a number of users reported that their Google Chrome browsers keep on opening new tabs no matter what they do. This issue could be due to lots of reasons but the main ones are corrupt installation, background applications, adware, dubious browser extensions, malware, and so on.

Although there are a lot of possible causes for this particular issue in Chrome, its potential fixes are straightforward so you should not have any problem following the given options below.

Option 1 – Get rid of any conflicting browser extensions

As mentioned, shady browser extensions can cause unusual behavior in a browser. Chances are, these extensions or toolbars might be conflicting with the loading of the website. Thus, you have to get rid of these unwanted extensions and toolbars to fix the issue.

  • Open Chrome and press Alt + F keys.
  • Go to More tools and click Extensions to look for any suspicious browser extensions or toolbars.
  • Click the Recycle bin and select Remove.
  • Restart Chrome and press Alt + F keys again.
  • Proceed to On Startup and mark Open a specific page or set of pages.
  • To check if the browser hijacker is still active, click Set pages, if it is active, overwrite the URL.

Option 2 – Try to disable applications from running in the background

  • Open Google Chrome and then click on the menu button located in the top-right corner.
  • From the drop-down, select Settings and then scroll down until you see the Advanced button. Click on it.
  • Next, turn off the toggle for “Continue running background apps when Google Chrome is closed” under the System section.
  • Now restart Chrome and check if it is working properly.

Option 3 – Try to configure the search settings of Chrome

  • Open Google Chrome and type any search query in the address bar and then tap Enter.
  • After that, it will open the Google search engine. From the top-right corner, click the Settings button.
  • Next, select Search settings from the drop-down menu.
  • Then scroll down to the new page that appears and make sure that the “Open New Window for each result” option is set to Uncheck.
  • Once you’re done, save the changes made and restart Google Chrome.

Option 4 – Reset Chrome

Resetting Chrome can also help you fix the error. This means that you will be restoring its default settings, disabling all the extensions, add-ons and themes. Aside from that, the content settings will be reset as well and the cookies, cache, and site data will also be deleted. To reset Chrome, here’s what you have to do:

  • Open Google Chrome, then tap the Alt + F keys.
  • After that, click on Settings.
  • Next, scroll down until you see the Advanced option, once you see it, click on it.
  • After clicking the Advanced option, go to the “Restore and clean up option and click on the “Restore settings to their original defaults” option to reset Google Chrome.
  • Now restart Google Chrome.

Option 5 – Try to clean reinstall Chrome

There are instances when programs leave files behind after you’ve uninstalled them and the same thing can happen to Chrome so before you reinstall Chrome, you have to make sure that you have deleted the User Data folder. To do so, refer to the following steps:

  • Hit the Win + R keys to open the Run dialog box.
  • Next, type “%LOCALAPPDATA%GoogleChromeUser Data” in the field and hit Enter to open the User Data folder.
  • From there, rename the default folder and name it something else, e.g. “Default.old”.
  • After that, install Google Chrome again and check if the issue is now fixed.

Option 6 – Try scanning your computer using Windows Defender

As mentioned, the error when accessing the security settings or properties of a folder or file might be due to a virus or malware. It could be that it had made some modifications that prevents you from accessing security settings or properties. To eliminate it, you have to scan your computer using security programs like Windows Defender.

  • Tap the Win + I keys to open Update & Security.
  • Then click on the Windows Security option and open Windows Defender Security Center.
  • Next, click on Virus & threat protection > Run a new advanced scan.
  • Now make sure that Full Scan is selected from the menu and then click the Scan Now button to get started.

Do You Need Help with Your Device?

Our Team of Experts May Help
Troubleshoot.Tech Experts are There for You!
Replace damaged files
Restore performance
Free disk space
Remove Malware
Protects WEB browser
Remove Viruses
Stop PC freezing
GET HELP
Troubleshoot.Tech experts work with all versions of Microsoft Windows including Windows 11, with Android, Mac, and more.

Share this article:

You might also like

Fix wdf01000.sys BSOD Error on Windows
If you encounter a Blue Screen error that points to the Wdf01000.sys file, then this post might be of help. Wdf01000.sys is a file related to the Windows Driver Framework which is the one that manages the system drivers. So if this file ends up being corrupted, the drivers would start to cause trouble in the system which would lead to a Blue Screen of Death error eventually. There are lots of error descriptions that are associated with the Wdf01000.sys file such as:
  • DRIVER_IRQL_NOT_LESS_OR_EQUAL
  • System_Thread_Exception_Not_Handled
  • Page_Fault_In_Nonpaged_Area
  • System_Service_Exception
  • Kmode_Exception_Not_Handled
  • DRIVER_VERIFIER_DETECTED_VIOLATION
Although the troubleshooting steps you must take depends on the kind of BSOD error you are getting, there are a couple of options you can try to resolve the Blue Screen errors related to the Wdf01000.sys file. Refer to the options given below.

Option 1 – Try running the DISM tool

You can try running the Deployment Imaging and Servicing Management or DISM tool to fix the Wdf01000.sys Blue Screen error. Using this built-in tool, you have various options such as the “/ScanHealth”, “/CheckHealth”, and “/RestoreHealth”.
  • Open the Command Prompt with admin privileges.
  • Then type in the following commands and make sure to hit Enter right after you type each one of them:
    • Dism /Online /Cleanup-Image /CheckHealth
    • Dism /Online /Cleanup-Image /ScanHealth
    • exe /Online /Cleanup-image /Restorehealth
  • Do not close the window if the process takes a while as it will probably take a few minutes to finish.

Option 2 – Try to update or rollback your device drivers

If the first option didn’t work for you, then it’s time to either update or roll back the device drivers. It is most likely that after you updated your Windows computer that your driver also needs a refresh. On the other hand, if you have just updated your device drivers then you need to roll back the drivers to their previous versions. Whichever applies to you, refer to the steps below.
  • Open the Devices Manager from the Win X Menu.
  • Then locate the device drivers and right-click on them to open the Properties.
  • After that, switch to the Driver tab and click on the Uninstall Device button.
  • Follow the screen option to completely uninstall it.
  • Finally, restart your computer. It will just reinstall the device drivers automatically.
Note: You can install a dedicated driver on your computer in case you have it or you could also look for it directly from the website of the manufacturer.

Option 3 – Use the Driver Verifier Manager

The Driver Verifier Manager is another tool in Windows that could help you fix driver-related issues. And so if you want to fix the Wdf01000.sys Blue Screen error, you need to use the Driver Verifier Manager:
  • Type in the keyword “Verifier” in the Cortana search box to search for Verifier in Windows 10.
  • After that, select the option “Create custom settings”.
  • Make sure that you have checked everything except the options “DDI compliance checking” and “Randomized low resources simulation”.
  • Next, select the option “Select driver names from a list” option.
  • Afterward, you have to select all the drivers from any unofficial or third-party provider. To simply put it, you have to select all the drivers that are not supplied by Microsoft.
  • Then click on the Finish button.
  • Open Command Prompt as administrator and execute this command – verifier /querysettings
  • The command you just executed will display the Driver Verifier settings so if you see any of the flags enabled boot your Windows 10 PC into Safe Mode.
  • Open the Command Prompt as admin again and run this command – verifier /reset
  • The command will reset the Driver Verifier. Once the process is done, restart your PC and check.

Option 4 – Run the System File Checker Scan

System File Checker or SFC is a built-in command utility that helps in restoring corrupted files as well as missing files. It replaces bad and corrupted system files to good system files. To run the SFC command, follow the steps given below.
  • Tap Win + R to launch Run.
  • Type in cmd in the field and tap Enter.
  • After opening Command Prompt, type in sfc /scannow
The command will start a system scan which will take a few whiles before it finishes. Once it’s done, you could get the following results:
  1. Windows Resource Protection did not find any integrity violations.
  2. Windows Resource Protection found corrupt files and successfully repaired them.
  3. Windows Resource Protection found corrupt files but was unable to fix some of them.
  • Reboot your computer.

Option 5 – Run the Blue Screen Troubleshooter

The Blue Screen troubleshooter is a built-in tool in Windows 10 that helps users in fixing BSOD errors like Wdf01000.sys. It can be found on the Settings Troubleshooters page. To use it, refer to these steps:
  • Tap the Win + I keys to open the Settings panel.
  • Then go to Update & Security > Troubleshoot.
  • there, look for the option called “Blue Screen” on your right-hand side and then click the “Run the troubleshooter” button to run the Blue Screen Troubleshooter and then follow the next on-screen options. Note that you might have to boot your PC into Safe Mode.
Read More
How to Fix Entry Point not Found Dll Errors

What is ‘Entry Point not found dll’ Error?

Entry Point not found dll errors are common in Windows PC. These errors indicate poor PC maintenance. An entry point is basically the memory address inside the dynamic link library. It contains the call being made. A dynamic link library on the other hand is a collection of small programs which use and request this call to run and load programs successfully on your PC. However, when this process is unable to be executed successfully, you come across ‘entry point not found dll’ error messages.

Solution

Restoro box imageError Causes

Generally speaking, some of the typical causes of ‘entry point not found dll’ errors are:
  • Missing, corrupted, and damaged dll files
  • Registry overloaded with invalid entries
  • Disk fragmentation
  • Viral infection
It is advisable to resolve these ‘entry point not found dll’ errors on your PC immediately because dll errors can cause you a great deal of inconvenience as you may be locked out and unable to access your desired programs. Furthermore, if dll errors are left unresolved, such errors can expose your PC to serious threats like system failure, system damage, corruption, and crash.

Further Information and Manual Repair

Though ‘entry point not found dll’ errors are critical errors but the good news is that these can be easily resolved. To fix dll errors on your PC, you don’t always have to hire a professional technician or be a computer programmer yourself. Here are some of the best DIY (do it yourself) ways to resolve ‘entry point not found dll’ errors on your system:

1. Reinstall the Deleted Program

This method to resolve ‘entry point not found dll’ error code is very basic. It is advisable to uninstall and then reinstall the deleted program to retrieve the missing or deleted dll files. Here’s why: dll files are shared files. There are multiple programs on your PC that may be using one type of dll file to load. Now when you uninstall a program that you no more need on your PC, chances are that it may also delete that particular dll file. And when this happens the other programs supported by the deleted dll file are unable to load. Therefore, in such an event the best way to retrieve the missing dll file is to uninstall the program that displays the errors message and then reinstall it. This will help you restore the missing dll file and run the program successfully.

2. Install an Antivirus and a Registry Cleaner

As mentioned above, ‘entry point not found dll’ errors indicate poor PC maintenance. If you don’t maintain your system, the registry overloads with bad and invalid entries, redundant and obsolete files, junk files and cookies. These files acquire a lot of space which damages dll files and the registry. Furthermore, due to data volume overload and less storage space, files are then saved in different places. This is also known as disk fragmentation. When these files are called, it takes a lot of time for the disk to consolidate fragmented data and execute the function successfully. To resolve these issues, you need to clean and restore the registry. Though this can be done manually it may be slightly complicated and time consuming therefore it is advisable to install and run a registry cleaner.

Restoro.

In addition to this, due to poor PC maintenance, viruses and malware can also enter your system unknowingly through file downloads and phishing emails. These can also damage dll files. To remove viruses and malware from your PC it is important to run an anti-virus. Instead of downloading both tools separately on your system, we recommend Restoro. This is a multi-functional and advanced PC fixer embedded with an intuitive algorithm and a user-friendly interface. It includes multiple utilities including a powerful antivirus, a high functional registry cleaner, and Active X controls and class scanner. It also functions as a system optimizer. By running this software on your system, you can easily scan all registry issues and viruses simultaneously. It repairs the damaged registry and dll files, removes unnecessary files and all types of malicious software. It is compatible with all Windows versions. It is easy to use and high on performance. It is a one-stop solution for all ‘entry point not found dll’ errors on your PC. In just a few clicks you can resolve system errors and optimize your PC performance dramatically. Click here to download Restoro and resolve ‘entry point not found dll’ errors.
Read More
How to Fix Tcpip.sys Blue Screen Error in Windows 10
If you have received a BSOD error message that says, “Tcpip.sys”, read on as this post will show you how you can fix the problem. The “Tcpip.sys” means Transmission Control Protocol over Internet Protocol. It is a library of a set of rules that are used to interconnect different devices all over the internet. The Tcpip.sys file is a driver and if a BSOD error message includes this one, it could only mean that the driver file is corrupted or incompatible with your system or there are some conflicting programs installed in your computer. To fix this error, you can try the following workarounds. Make sure to carefully follow each one of them.

Option 1 – Check for conflicting or incompatible programs by putting your PC in a Clean Boot state

As mentioned, the “tcpip.sys” BSOD error might be caused by some problematic programs that clash with your existing operating system. Several users reported that numerous programs that are supposedly designed to enhance computer performance are causing conflict in the system instead. To identify which program is causing the problem, you need to put your computer in a Clean Boot State. To do so, follow the steps below.
  • Log onto your PC as an administrator.
  • Type in MSConfig in the Start Search to open the System Configuration utility.
  • From there, go to the General tab and click “Selective startup”.
  • Clear the “Load Startup items” checkbox and make sure that the “Load System Services” and “Use Original boot configuration” options are checked.
  • Next, click the Services tab and select the “Hide All Microsoft Services” checkbox.
  • Click Disable all.
  • Click on Apply/OK and restart your PC. (This will put your PC into a Clean Boot State. And configure Windows to use the usual startup, just simply undo the changes.)
After putting your PC in a Clean Boot State, try creating a system restore point and see if the problem still occurs. Clean Boot troubleshooting is designed to help you isolate the problem. For you to execute a clean boot troubleshooting, you must do a couple of actions (the steps are given above) and then restart your PC after every action. You might have to disable one third-party app after the other to really isolate the issue. And once you’ve narrowed down the problem, you can either disable the third-party app that’s causing the problem or remove it. Note that you must switch your PC back into the Normal Startup mode after you’re done troubleshooting the problem. Here’s how you can do it:
  • From the “Start” menu, go to System Configuration.
  • After that, switch to the General tab and click the option for “Normal Startup”.
  • Next, go to the Services tab and clear the checkbox for “Hide all Microsoft services”.
  • Then find and click “Enable all” and if prompted, you have to confirm.
  • Afterward, go to the Task Manager and enable all the Startup programs and confirm the action.
  • Restart your PC when prompted.

Option 2 – Disabling Antivirus Software

There are cases when the “tcpip.sys” BSOD error is caused by the antivirus program installed in your computer that’s blocking some essential operations. Because of this, the operating system fails which throws up the BSOD error. As you know, the antivirus program is designed to protect the computer and monitor every action in the system. However, there are instances when the antivirus program gives false positives and shuts down some modules even if it’s harmless. So this could be the case for the “tcpip.sys” error. To verify if the problem is indeed caused by the antivirus program in your computer, you need to temporarily disable it. After you’ve disabled it, restart your PC and then check if the problem’s fixed or not.

Option 3 – Try to update all your Drivers

From time to time, drivers get corrupted or outdated so it’s no surprise that they conflict with the operating system and cause errors like the “tcpip.sys” BSOD error. To fix the problem, you need to update all your drivers especially the network driver since the “tcpip.sys” error is closely related to this driver. Follow the steps below to update your drivers.
  • Tap the Win + R keys to launch Run.
  • Type in devmgmt.msc into the box and tap Enter or click OK to open the Device Manager.
  • After that, a list of device drivers will be displayed. If you see a red or yellow sign that shows up against the driver, right-click on the driver’s name and select “Update Driver Software” or “Uninstall”. And if you find any “Unknown device”, you need to update it as well.
  • Select the “Search automatically for updated driver software” option and then follow the instructions to complete the process.
  • Restart your PC.
Note: You also have the option to go directly to the website of your graphics card manufacturer and check if there’s a new update – if there is, download it. After that, you could also check if there’s a new update of the game you’re getting the issue of the black bar.
Read More
A Quick Guide to Fixing Error 2046

Error 2046 - What is it?

Error 2046 is an error code related to Adobe Flash Player. It usually occurs while watching movies or videos on the web browser. This error code may interrupt video display and hamper you from watching your favorite movies and videos.

Solution

Restoro box imageError Causes

Narrowing down the reason for the occurrence of this error code is quite difficult virtually because it may trigger due to several reasons such as:
  • There might be issues with Adobe Flash Player settings
  • Ad-blocking products
  • Windows not updated
  • Registry issues
  • Malware infection
  • Flash Player Add on not properly installed

Further Information and Manual Repair

The good news is that the error 2046 is not fatal. It is easy to fix. In fact, it is so easy to repair that you can do it all by yourself even if you are not a computer whiz. You don’t have to hire a professional and spend hundreds of dollars on repairs. Here are some of the many manual solutions that you can try to fix this issue on your computer screen:

Reinstall Adobe Flash Player

Since this error code is largely related to Adobe Flash Player, it is advisable to start by reinstalling the Flash Player. Here is a step-by-step guide to help you work through it.
  1. First, click start and then select the control panel.
  2. Now click on programs and then uninstall Flash Player from the program list.
  3. After that’s done, reboot your computer.
  4. Now download Adobe Flash Player from a reliable website and run it.
If it works perfectly, then the issue is resolved. If not, then try other methods given below.

Re-Enable Flash Player Add-on

Adobe Flash Player add-on is basically installed in IE (Internet Explorer) which is loaded each time you load IE. Sometimes the problem with this add-on can also generate error 2046.
  1. To resolve this, open Internet Explorer and press Alt-Key.
  2. Select tools and then manage add-ons.
  3. Now select Adobe Flash Player Active X and then click disable tab.
Once that’s done, restart the web browser and repeat the same steps but this time click enable button. This will hopefully resolve the issue.

Unblock Ad Blocking Products

Sometimes error 2046 may pop up on your screen if you use ad-blocking products like AdBlock Plus. If so, then try uninstalling ad-blocking products installed on your PC to fix the issue.

Install Window Update

Microsoft releases new updates every now and then. These updates are made with the objective of solving bugs and run-time errors like error 2046. Therefore if the error code is related to Windows updates then to resolve it is it advisable to launch the Windows update program and update your operating system. For this, click Start, All Programs, and then click Windows Update. Now click the Check for updates button and download and install the new updates. Once that is complete, restart your PC to bring changes into effect.

Scan for Malware and Look For Registry issues

Whether the issue is related to malware or the registry, it is recommended to download Restoro. This is a next-generation and a multi-functional PC Fixer embedded with a powerful antivirus and a registry cleaner. Run it on your PC and scan for viruses and registry issues and click repair to resolve. It is user-friendly and compatible with all Windows versions. Click here to download Restoro to resolve error 2046.
Read More
Fix Could not find the Recovery Environment
If you suddenly find the Windows Recovery Environment not working and you see an error message saying, “Could not find the recovery environment”, then you’ve come to the right place as this post will guide you on how you can fix it. In times when you can’t boot into the Windows Recovery Environment, there could be several reasons behind it. However, have you ever wondered where exactly the Windows Recovery Environment is in your computer? Windows initially places the Windows RE Image file in the installation partition during Windows Setup so if you have installed Windows in the C drive, you can find the Windows RE at the C:/Windows/System32/Recovery or C:/Recovery folder. Keep in mind that this folder is hidden and later on, the system copies the image file into the recovery tools partition to make sure that one can boot into recovery if there are any issues with the drive partition. The “Could not find the recovery environment” error mostly occurs if the Windows Recovery Environment is disabled or if the “Winre.wim” file is corrupted. Thus, to fix this error, you need to refer to the given suggestions below.

Option 1 – Try to enable Windows Recovery Environment

  • In the Windows Start Search, type “PowerShell” and from the search results that appear, right-click on Windows PowerShell and then select the “Run as administrator” option to open it with admin privileges.
  • Next, type the “reagentc /info” command and tap Enter to execute it.
  • After that, if the output states that Status is enabled, then you’re all set.
  • Now type the “reagentc /enable” command and tap Enter to enable the Windows Recovery Environment. You will see a success message at the end signifying that Windows RE is available.

Option 2 – Try to fix the corrupted or missing “Winre.wim” file

If the Winre.wim file is either corrupted or missing, you need to get a new copy of this file from another computer where the Windows RE is working. Once you’re able to get a new copy of the Winre.wim file, you have to set the image path to a new location. For more details, refer to these steps:
  • First, type “Powershell” in Windows Start Search and right-click on Windows PowerShell from the results, and select Run as administrator.
  • Next, execute the given command below to change the path of the WIM file to the new location. Note that the steps should be used when the file path of the Windows Recovery Environment is different from the usual spot.
Reagentc /setreimage /path C:RecoveryWindowsRE
  • As mentioned, if the file is corrupted, you just have to get a new copy from another PC but before you do that, make sure that the WINRE on that computer is disabled (just enable it later on) and then place it in the C:/Recovery path and then set its path again using the command given above and then verify its path by executing the following command.
reagentc /info command
Note: Since the Recovery folder is hidden as well as the WINRE folder in it and you won’t be able to access them using the Windows File Explorer, you need to use the Windows PowerShell or Command Prompt so that you can access them.

Option 3 – Try checking and fixing the WinRE Reference in the Windows Boot Loader

The Windows Boot Loader is the one that determines if it has to load the Windows Recovery Environment. It could be that the boot loader is pointing to an incorrect location which is why you’re getting the error. To resolve it, you have to check and fix the WinRE Reference in the boot loader. How? Follow these steps:
  • In the Windows Start Search, type “PowerShell” and from the search results that appear, right-click on Windows PowerShell and then select the “Run as administrator” option to open it with admin privileges.
  • After that, execute the “bcdedit /enum all” command.
  • Next, look for an entry in the Windows Boot Loader identifier set as Current and look for “recoverysequence” in that section and take note of the GUID.
  • Ensure that the device and the osdevice items show the path for the Winre.wim file and that they are the same. If not, you need to point the current identifier to the one which has the same.
  • Once you’ve found the new GUID, execute this command: bcdedit /set {current} recoverysequence {GUID_which_has_same_path_of_device_and_device}
  • Now check if the error in the Recovery Environment is fixed or not.

Option 4 – Try creating a Recovery Media

You could also try creating a Recovery Media to resolve the error in the Windows RE. All you have to do is download the Windows 10 ISO file using the Media Creation tool and then create a recovery drive. Once you’re done, check if it fixes the problem or not.
Read More
INF file doesn't support this installation
If you got an error message saying, The INF file you selected does not support this method of installation while trying to install a driver using the “Install” option in the right-click context menu, read on as this post will guide you in fixing the problem. The INF file mentioned in the error message is a text file that’s divided into different types of formatted sections. Each one of the sections is designed for a particular purpose. For instance, one section is designed to copy files or to add entries to the registry. INF files are used to install drivers. However, if something is wrong, you might encounter this error while installing a driver on your Windows 10 computer. To resolve this problem, you can try to download the driver again from the official manufacturer website or check if the driver is compatible with your computer’s operating system architecture or you can also try installing the driver from the Device Manager. For more details, follow the given options below.

Option 1 – Try downloading the driver again from the official website of the manufacturer

Usually, you shouldn’t encounter this kind of issue no matter what installation method you used on your Windows 10 PC. However, there are times when the driver itself is corrupted for some reason which is why you are unable to complete the installation and receive an error message instead.

Option 2 – Try checking if the driver is compatible with the OS architecture

It is possible that you’re getting this error if you have a driver that is compatible with a 32-bit system and you are trying to install it on a 64-bit system and vice versa. Thus, you need to check if the driver you are trying to install is compatible with your operating system if you haven’t done it when you’ve downloaded the driver from the website of the manufacturer. To check the system architecture, in the Start Search, type “msinfo32” in the field and hit Enter to open the System Information window. From there, you should see all the information about your operating system. In addition, you can also search “system information” in the Cortana search box and look for the System Type entry and open it.

Option 3 – Try installing the driver from the Device Manager

If you have the driver files on your PC and you have to update a driver, refer to the steps given below to be guided on how to install the driver from the Device Manager.
  • First, click the Start button and type “device manager”.
  • Then click on the “Device Manager” from the search results to open it.
  • From there, look for the driver you want to update, and then right-click on each one of them and select the Update Driver from the menu.
  • After that, click on the “Browse my computer for driver software” option.
  • Next, select the “Let me pick from a list of available drivers on my computer” option and then click the Next button.
  • On the next screen, you should see the “Have Disk” option. Click on this option and then click on the Browse button to go to the location of the file. After that, you shouldn’t have any problem installing the INF file.

Option 4 – Try running the System File Checker Scan

The SFC or System File Checker scan could detect and automatically repair damaged system files that could be causing the “The INF file you selected does not support this method of installation” error. SFC is a built-in command utility that helps in restoring corrupted files as well as missing files. It replaces bad and corrupted system files with good system files. To run the SFC command, follow the steps given below.
  • Tap Win + R to launch Run.
  • Type in cmd in the field and tap Enter.
  • After opening Command Prompt, type in sfc /scannow
The command will start a system scan which will take a few whiles before it finishes. Once it’s done, you could get the following results:
  1. Windows Resource Protection did not find any integrity violations.
  2. Windows Resource Protection found corrupt files and successfully repaired them.
  3. Windows Resource Protection found corrupt files but was unable to fix some of them.
 Now restart your computer.
Read More
How to create a public VPN Server on Windows
As you know, a Virtual Private Network or VPN is used to access a particular network from another network which is why it is also referred to as a mini-internet. Moreover, you can use it in two ways. One, you can use it to get you access to a closed server which means that you would not be getting access to the internet. Second, you can also use it to access a set of resources while at the same time get access to the internet. However, what if you want to access your resources at home even when you’re away? And what if you want to use the private server at home or at your office even when you’re away? This is where the callout for a VPN server for yourself comes in. And so in this post, you will be guided in how you can create a public VPN server on your Windows 10 computer. Follow each one of the given steps below to get started. Step 1: Find your IP address. This step is rather simple since all you have to do is open Control Panel > Network and Internet > Network and Sharing Center. From there, click on “Local Area Connection” and then click on Details where you’ll see your IP address next to “Autoconfiguration IPv4 Address”. Step 2: Next, set up port forwarding on your router. In this step, you will have to configure port forwarding in your router so that you would be able to connect to the VPN server through a public network like the internet.
  • Log in to the Admin Panel of your router. You have to do this since your router will be the gateway for your access to the network.
  • After you’re logged in, look for the “Port Forwarding” or “Applications and Gaming” or “NAT/QoS” menu tab and other similar names.
  • Now you need to set the port number to 1723 for connections based on Point to Point Tunneling Protocol.
  • Then save the configuration and reboot your router.
Step 3: Set up a VPN server on Windows 10.
  • In the Cortana search box, type “ncpa.cpl” and click on the related entry from the search results.
  • After that, tap the Alt + F keys to bring down the File Menu and then select New Incoming Connection which will open a mini window where you can allow the user accounts on the particular machine to access the VPN connection.
  • On the other hand, you can also click the “Add someone” button so that you can add someone else to the whitelist that can access the connection.
  • Now click on Next and you’ll see an option to select how people will connect to the network. Check the checkbox for the “Through the Internet” option.
  • After that, you will see a page where you have to configure the network. Just select IPv4 and then click on Properties.
  • From there, you will be asked to continue some additional settings like letting users access your Local Area Network or how IP addresses will be allocated to these users. Click on OK to save the changes you’ve made.
  • Click on Allow Access after you configure the network. And if you want to, you have the option to print this information for future reference or for the client machine.
  • Now click on Close to exit the configuration process.
Step 4: Allow the VPN Connections through the firewall In this step, you will have to allow the VPN connections through the firewall.
  • In the Cortana search box, type “Allow an app through Windows Firewall” and click on the related search result to open the intended Windows Firewall settings.
  • Next, click on Change Settings.
  • Then scroll down to check if Routing and Remote Access is Enabled for both the Public and Private networks and click on OK.
Step 5: Set up a VPN connection on Windows 10 Now all that’s left for you to do is to set up a VPN connection on Windows 10.
  • Go to Settings > Network and Internet.
  • From the list of options given, click on VPN located on the left pane to see the related settings.
  • After that, click on the “+” icon to add a VPN connection.
  • Next, select Windows Default under VPN Provider and under the Connection Name, input your VPN’s name, and then enter the IP address you got from the VPN service provider under the Server name or address section.
  • Now select PPTP under VPN type since it is the most commonly used protocol for VPNs.
Read More
Disabling the Blur on Login Screen in Windows
You will notice the blurred background on the login screen right away when you start your Windows 10 computer that’s running the v1903 and up. This kind of blurred background is known as “Acrylic Blur Effect on Sign-in Screen”. This new feature delivers a beautiful experience to users by adding more focus to the login screen. However, no matter how nice this feature is and even if it only stays for less than a minute, not all users like it and if you’re one of these users, read on as this post will guide you in disabling the blurred background login screen in your Windows 10 computer. Disabling the blurred background in the login screen can be done in two methods. The first one is via the Registry Editor and the second one is via the Group Policy Editor. Before you proceed, make sure that you are using an admin account and you must create a System Restore point first. Once you have that covered, follow the options provided below.

Option 1 – Disable the Blurred background in the login screen via Registry Editor

  • First, tap the Win + R keys to open the Run dialog box and type “Regedit” in the field, and hit Enter to open the Registry Editor.
  • After that, navigate to this registry path: KEY_LOCAL_MACHINESOFTWAREPoliciesMicrosoftWindowsSystem
  • Next, right-click on any empty space in the right pane and create a new DWORD (32 bit) and name it as “DisableAcrylicBackgroundOnLogon”.
  • Once you’ve created the DWORD, double click on it and set its value to 1 to disable it and 0 to enable it.
  • After you make the necessary changes, restart your computer. You won’t now see the blurred background on the login screen.
Note: No matter what option you select to change the background, it will stay blurred when you click on the login button. At the time of writing, there is no way to disable this feature in the Personalization section so the Registry Editor will have to suffice for now.

Option 2 – Disable the Blurred background in the login screen via Group Policy Editor

  • Tap the Win + R keys to open the Run utility and type “gpedit.msc” in the field and tap Enter to open the Group Policy Editor.
  • After that, navigate to this policy setting: Computer ConfigurationAdministrative TemplatesSystemLogon
  • From there, double click on the “Show clear logon background settings” and since its default value is “Not configured”, set it to “Disabled”. You will see the following description under this setting:
    • “This policy setting disables the acrylic blur effect on the logon background image.”
    • “If you enable this policy, the logon background image shows without blur.”
  • Now click on OK and then check the login screen.
Note: If you don’t configure or if you disable this policy, the logon background image adopts the acrylic blur effect. However, if it didn’t work, you have to restart your computer and then check.
Read More
Setting default applications in Windows 11
Setting default applications in Windows 11
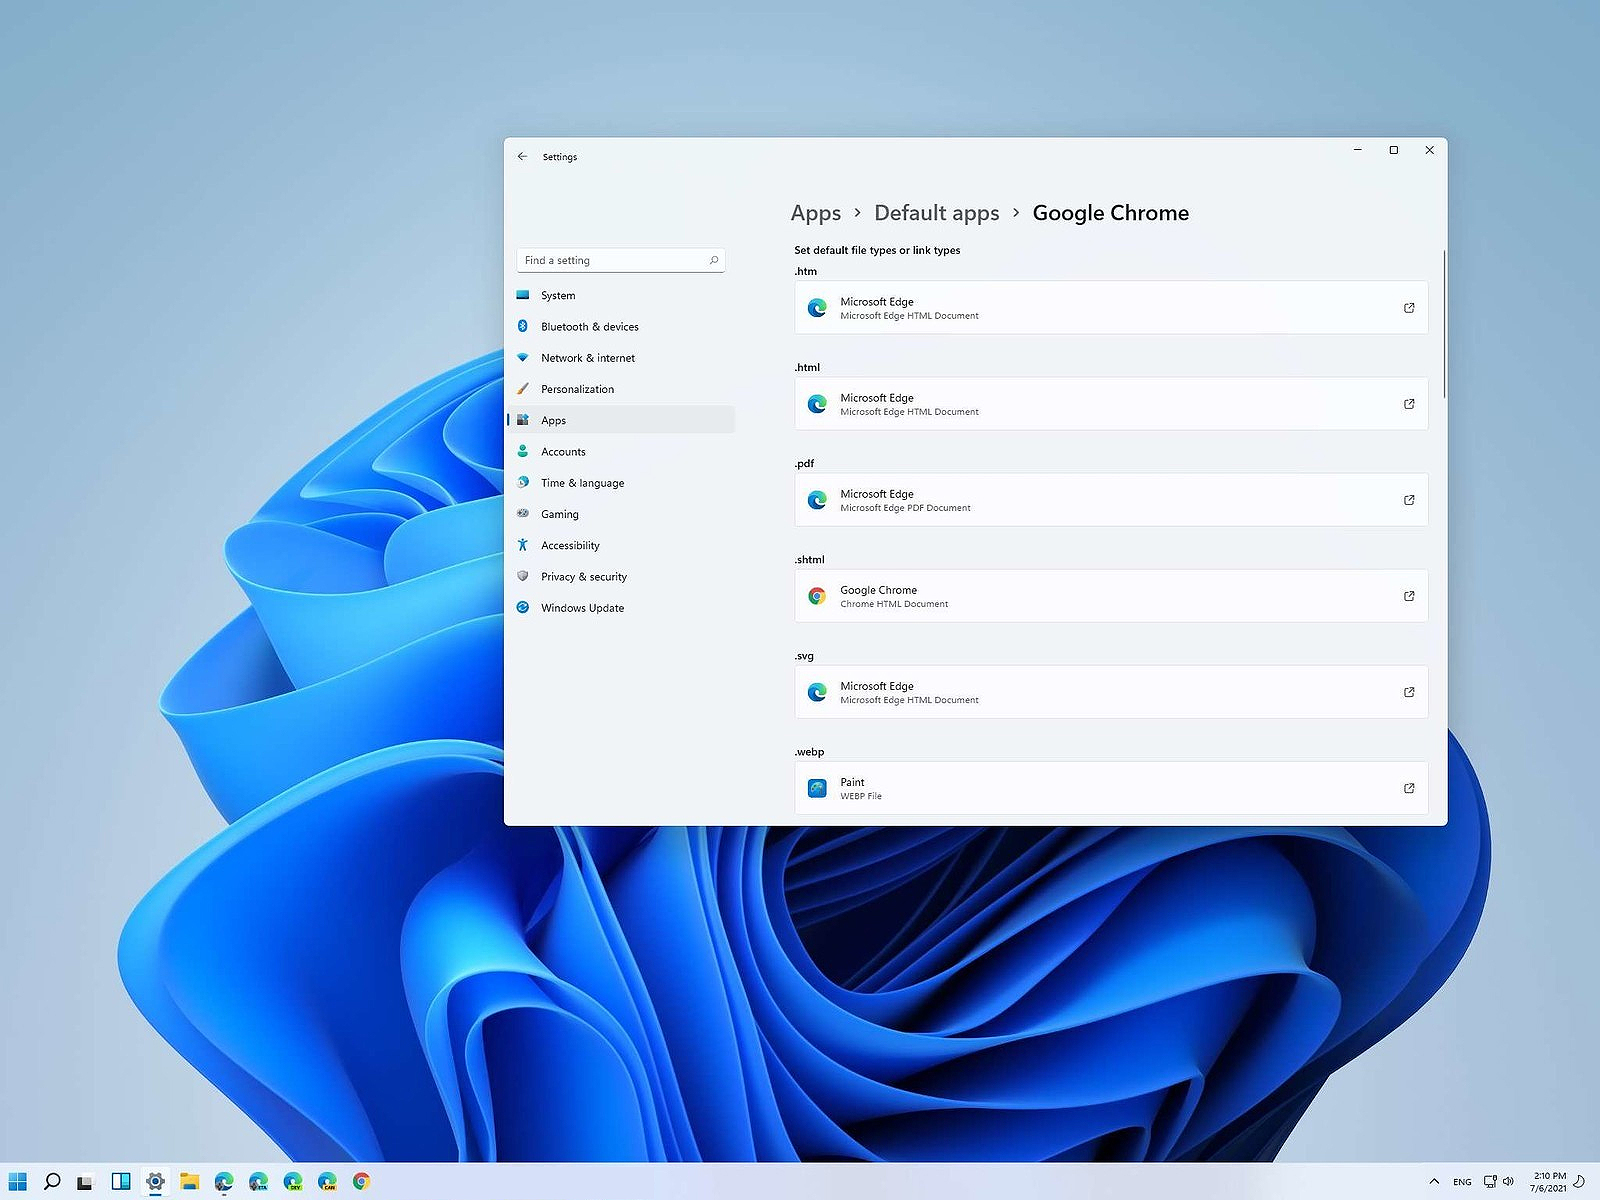
Same as in previous Windows versions, Windows 11 will also use certain applications as default ones for opening certain file types and file extensions. And yes, same as in previous versions it will come preconfigured for certain file types and associated applications like for example photos for pictures. Of course, users usually have their own favorite applications for certain file types and much more prefer to open them inside the application of their choice instead of the default one. We can change the default application like in previous Windows versions but this time there are two ways and overall more control of this process. Windows 11 has settings for choosing default file type applications and default file extension applications giving you more control of this process.

The opening setting for apps

Whatever you wish to change default application or default extension application you will need to open settings for default application. Follow steps to quickly go into it.
  1. Press ⊞ WINDOWS + I to open settings
  2. Select Apps on left
  3. On the right part select Default Apps
Now you are in settings for choosing default applications

Choosing default application by file type extension

This is considering by Microsoft as a typical way to set default applications inside Windows 11. Once you are inside the settings app there is a box labeled Enter a file type or link type. Inside the search box, type in file extension that you wish to associate the application with like .JPG, .TXT, or other. If the file extension is not associated with any application you will be presented with a Choose a Default button, if however, the file extension is already associated with the app, you will need to click on the app box itself. In any case, a pop-up will appear and ask How do you want to open YOUR FILE EXTENSION files from now on? Choose Application from the list of presented ones and click on OK.

Choosing default file type

Another method is to select the default application by file type selecting application for it. In the settings screen, under the search box, you will have a list of installed applications. Choose the application that you would like to associate a file type with and click on it. On the next details screen scroll down and select the file type that you want to associate with the selected application and click on OK.

Other/third method

There is also the third method for choosing the default application for file type but it includes some surfing on your hard drive and it can be more time-consuming for first-time settings. But it is fairly quick when you need to only use it once on some new file type (for example you have a new application installed and want to switch just one file type extension to that application). Locate the file that you want to associate with the application and right-click on it. Select Open With from the menu and then Choose Another App. Pop up will appear, select the application that you would like to use, and check the box beside Always use this app to open CHOOSEN EXTENSION files followed by clicking on the OK button.
Read More
How to Fix a Windows PC Crash Dump
Crash Dump is a type of malfunction that can happen when a few portions of the processor's data or RAM memory are erroneously copied to one or more files. It is common among Windows PCs. It used to be most prominent on the Windows 95 edition but subsequent versions have mostly remedied the situation. Even with the remedies over time though, this error still occurs.

Error Causes

A Crash Dump usually points to some serious and critical errors with your Computer. Below are some of the possible causes for this error:-
  • Corrupt memory
  • Incorrect configurations on hardware
  • Programming errors.
  • Incompatible drivers
  • Faulty Operating system
Despite the listed causes for Crash Dumps. Nobody is ever ready for them. A crash dump is classified as an unexpected error simply because it can happen anytime.

Further Information and Manual Repair

Most PC users get scared and anxious when a crash dump happens. Which need not be the case. You can easily repair a Crash Dump without necessarily requiring a computer technician. Follow these simple steps and the malfunction will soon dissipate:

a) Re-Install the Operating System

Put the setup CD into the computer disk drive. Once you've completed this, reboot the pc.

b) Push F8

Push the F8 function key on your keyboard while the pc is re-booting. This takes you to a menu where you should choose “Advanced Boot Options”

c) Click "Repair My Computer"

As soon as you push the F8 option, and do what's suggested in the last measure above, you must click on "Repair My Computer" and press the "Return/Enter" key.

d) Click on the "Startup Repair"

Search for the start-up repair option, and choose it. Subsequently, move to Next. Using this method, the cause of the Crash dump will undoubtedly be recognized and ended after a thorough scan of your system. Additionally, it is smart to take note of the whole Crash Dump information that appears on your screen. Windows supplies you with detailed error messages. Write down each of the error codes in hexadecimal values as well as capital characters as displayed on the screen.
  • Disconnect Hardware  and Un-Install all Drivers

Disconnect and remove any new hardware that is causing your PC to crash dump. Uninstall any drivers you used to install the hardware. If this solves the problem, contact the hardware manufacturer and request the latest and updated device drivers. At length, prior to starting panicking, see the error information that appears on your own display. Browse to see whether it includes info on a certain driver that you ought to search for and install. Bottom line, remain calm when your computer crash dumps and use the mentioned steps to repair it.
Read More
1 2 3 171
Logo
Copyright © 2023, ErrorTools. All Rights Reserved
Trademark: Microsoft Windows logos are registered trademarks of Microsoft. Disclaimer: ErrorTools.com is not affiliated with Microsoft, nor claims direct affiliation.
The information on this page is provided for information purposes only.
DMCA.com Protection Status