How to Resolve Error Code 0xd0000272 in Windows 10
Error Code 0xd0000272 – What is it?
Error code 0xd0000272 is an activation error code that occurs when Windows users are unable to activate their Windows operating system. This error code features common symptoms which include the following:
Inability to activate Windows 10 operating system
Message box with error code 0xd0000272
Solution
Error Causes
When error code 0xd0000272 occurs in Windows 10, it is usually due to issues related to the Windows activation servers. In such a case where the error code occurs due to an activation server that is temporarily unavailable, users may need to wait for a few hours until the activation server is available. Their copy of Windows will then be automatically activated. Once the activation process is not done accordingly, you might encounter other Windows 10 errors such as error code 0xc004f034.
Further Information and Manual Repair
As is the case with many activation error codes, Windows 10 users can perform several manual repair methods to determine the cause as well as fix the error code affecting their device. Instead of passively waiting to see if your activation error code will be fixed on its own, resolve error code 0xd0000272 through the manual repair methods available. Below are simple instructions that when followed can lead to your success.
Method One: Verify Internet Connection
Check Settings to verify if your machine is connected to the Internet. This is one of the causes of various error codes which affect Windows 10. Also, this manual method is a simple process that can help Windows users recognize or eliminate factors that may or may not be affecting their system. To check your Internet connection, follow the simple instructions below.
Step one: Click the Start button and select Settings
Step two: Select Network & Internet
Step three: Click the Status section of the Network & Internet tab
Once you’ve been able to verify an Internet connection or troubleshoot any issues related to your network, go to Update & security. Make an attempt to activate your system. If you are successful, you will be able to access all the features and benefits offered via your copy of Windows. However, move to the next manual method below if error code 0xd0000272 reoccurs.
Method Two: Run Windows Update Troubleshooter
Your inability to activate Windows 10 may be related to an issue with Windows Update. To verify whether or not Windows Update is functioning properly, run Windows Update Troubleshooter.
You’ll need to visit the Microsoft website to access their Windows Update Troubleshoot tool. Once you’ve downloaded the troubleshooter, run the tool. After running the tool, check if you are able to access Windows Update services as well as activate Windows 10. If the problem with error code 0xd0000272 persists, however, follow the instructions provided for manual repair method three detailed below.
Method Three: Disable Proxy Settings
Another option available to individuals experiencing error code 0xd0000272 in Windows 10 is to manually disable their machine’s proxy settings. After disabling the proxy settings, remember to open the Windows Update tab to complete the activation process. See the instructions provided below to disable proxy settings.
Step one: Press Windows key + R
Step two: Type control then click OK
Step three: Select Settings then go to Network & Internet
Step four: View connection settings
Step five: Click on the Network tab
Step six: Click Proxy -- turn off proxy
Once you have successfully disabled your proxy settings, open Windows Update. Select the activation option to access your copy of Windows 10. If you are unable to complete the activation process, however, contact a Windows repair technician.
Method Four: Use an Automated Tool
Error codes in Windows often occur due to poor maintenance of one’s PC. To improve your system and reduce your machine’s risk of experiencing error codes, download a powerful automated tool. This tool is both powerful and user-friendly, making its benefits accessible to even the most non-technical Windows users.
If your Windows 10 computer slows down, the first thing you can do is to check the status of the resource usage in the Task Manager. In such cases, it shoots up to even 1000% which causes the system to either hang or freeze since some programs are using a major chunk of system resources. And this is the case with msrtn32.exe.
Msrtn32.exe is a malicious file that may try to steal your digital currency. It can get installed on your computer when you install a browser plugin or extension that can modify the default settings of browsers, the content of web pages, search results, as well as display tons of intrusive ads. So if you see msrtn32.exe under the Processes tab of the Task Manager
If you see msrtn32.exe under the Processes tab of your Task Manager, refer to the suggestions given below to get rid of it and restore your computer’s normal function.
Before you proceed, take note that this executable file is found in the following location:
C:/Program Files(x86)msrtn32
Option 1 – Delete the folder where msrtn32.exe is located
The first thing you can do is to go to C:/Program Files(x86)/msrtn32. From there, look for the malicious executable file and delete its folder. If you are not able to delete the folder, make sure that you’re logged in as administrator and then try again.
Option 2 – Try scanning your computer using Windows Defender
Since you are dealing with a malicious file, if you weren’t able to delete the folder where the file is located, you can scan your computer using the built-in Windows Defender program and then eliminate the malicious file. Follow the steps below to do so:
Tap the Win + I keys to open Update & Security.
Then click on the Windows Security option and open Windows Defender Security Center.
Next, click on Virus & threat protection > Run a new advanced scan.
Now make sure that Full Scan is selected from the menu and then click the Scan Now button to get started.
When Microsoft held Windows 11 presentation it took special time to present the upcoming new Windows 11 store as kind of a big deal.
It was openly stated that with new Windows we will get a new store with a different attitude and new look.
New Microsoft store
Microsoft has stated that both customer and developer feedback over time has contributed to their redesign and rethinking of the store itself.
They want to be sure that policies for developers are more straightforward and clear so more developers will decide to bring their product to Windows. As for customers, they want more safety and more security so they feel protected when making a purchase.
The new store will come in Windows 11 but also in Windows 10 as well via update.
Stories and collections
Introducing the new store will be curated stories. Microsoft believes that stores should be focused on user experience so stories from customers themselves will play a big role here. They are rich editorial content to keep you informed about the best apps and inspire you to achieve more with your device.
This approach to information is aimed at bringing unknown applications to users via presenting them in a professional manner.
Android apps in the store
As stated in Windows 11 unveiling and presentation, Android apps will work inside Windows 11. Microsoft has teamed up with Amazon to bring you Android apps directly inside Windows via the new Microsoft store.
Pop up store from within a browser
When you are surfing on a certain webpage and want to save and install the application from there, a new pop-up store window will show allowing you to install the app directly.
Microsoft has not said will this feature work outside their Edge browser so we will have to wait and see about that.
Support for multiple types of applications
Since now developers were tied to certain formats if they wanted to publish their application in any kind of environment. Microsoft wants to bridge this.
Windows developers can publish any kind of app, regardless of app framework and packaging technology – such as Win32, .NET, UWP, Xamarin, Electron, React Native, Java, and even Progressive Web Apps.
For Progressive Web Apps Microsoft has made open-source tool PWABuilder 3.
Flexibility and choice of commerce platform
Starting July 28, app developers will also have an option to bring their own or a third-party commerce platform in their apps, and if they do so they don’t need to pay Microsoft any fee. They can keep 100% of their revenue.
So you have just got home from that new computer store with your fancy and all-new mouse, screen, keyboard, etc. You plugged in your new component, Windows detected it, installed drivers for it and it is working like a charm. A few months later down the road and the computer starts little by little to slow down.
Plug and play is a great concept, and automatic detection is even greater but how time passes old unused stuff piles in your hard drive and in Windows itself thus slowing down your computer and taxing it more and more as new components and software are added. Old drivers from old components sadly are not removed from Windows itself and over some larger period of time they can pile up and slow down your daily operations on the computer or even cause some problems in it.
This guide will teach you how to manually remove old unused device drivers from your Windows so it is fresh and like new again.
Making old devices visible
In order for us to remove old drivers, the first thing we must do is make them visible in our device manager, old drivers are hidden and will not show up, we must make this happen. We do this by pressing WINDOWS + X keys on your keyboard to bring up a hidden menu in Windows.
Once the menu appears, click on Command Prompt (admin)Once the command prompt with administrator privileges comes on-screen type in it following string:
SET DEVMGR_SHOW_NONPRESENT_DEVICES=1
This command will force Windows to show all devices in the device manager including old ones that are not used anymore, but since their drivers are still installed, devices will show up.
When you type command press ENTER.
Once again press WINDOWS + X to show the hidden menu but this time choose the device manager
The device manager will open, go to view > snow hidden devices in order to show unused devices.
Removing old device
Open any category and if there is a device that was once used and still has its drivers in the system it will be shown as faded out.
Right-click on the device and click on uninstall device to remove it completely from your system.
Please always be careful when removing devices so you do not remove the device which is being used by mistake and always double-check that you are removing something that you used to have on your system. This method will show all hidden devices even ones that are hidden but crucial to the system working properly.
Javaw.exe is a type of executable file or a process used by Sun Microsystems. It is in charge of executing programs created with Java on Windows PC. It is a part of the Oracle Java Runtime Environment.
The javaw exe error hampers your ability to run programs supported by Java.
Common Javaw.exe error messages include:
"Javaw.exe Application Error."
"Javaw.exe is not a valid Win32 application."
“Cannot find javaw.exe.""Javaw.exe not found."
"Error starting program: javaw.exe."
"Javaw.exe is not running.""Javaw.exe failed."
"Javaw.exe has encountered a problem and needs to close. We are sorry for the inconvenience."
Solution
Error Causes
There can be many reasons for javaw.exe error code on your PC such as:
Viral infection
Malware attack
Invalid registry entries
Ignoring such error messages is not wise. You must resolve it right away as such errors can lead to serious PC threats like system failure and data security threats.
Further Information and Manual Repair
Scan the Javaw.Exe File For Malware
To fix Java Exe error on your system, first you need to find out the cause of the error. Is it triggered by malware or invalid registry entries? The best way to identify the cause is to check your system’s CPU usage.
This can be done through assessing the Task Manager by pressing Ctrl+Alt+Del all at the same time. After that, click ‘Processes and locate the javaw.exe file. Remember this file does not require too much memory, so abnormal memory usage is a surefire sign that the java.exe file on your system is a virus.
To resolve it, download an antivirus and run it to scan and remove viruses from your PC. However, running an antivirus may slow down your PC performance.
On the other hand, if you find the memory usage is fine, then this means the error is not caused by malware but it occurred either due to old version system files on your PC or registry corruption.
Update the Javaw.Exe File
To remove the old version files, go to the start menu. Click Control Panel and then Add/Remove programs.
Here find the Java program and uninstall it. Now after the program is completely uninstalled, go to Java’s official website and download the latest version of your desired program. Restart your PC after the installation is successfully complete.
Clean & Repair Registry
If the problem still persists, then the javaw exe error is mostly likely triggered due to registry corruption. The best way to resolve it is to clean and restore the registry. You can do it manually but you may find the manual procedure slightly time-consuming and complex especially you are not a computer programmer.
Therefore we recommend you download Restoro.
Why Restoro?
Whether the javaw exe error occurs due to viral infection, invalid entries, or registry corruption, Restoro takes care of all. This is a new, cutting edge, and multi functional PC fixer deployed with multiple performance-boosting and system repair utilities including a powerful registry cleaner, an antivirus, a system optimizer, and Active X controls, and a Class ID detector.
The registry cleaning utility wipes out all the unnecessary files, clearing up the cluttered disk. It cleans the registry and restores it.
Simultaneously, the antivirus feature detects and scans all malicious software infecting your PC and removes them right away. The system optimizer module boosts the speed of your system and ensures your PC performs at its optimum pace.
This is a safe, efficient, and bug-free tool. It has a user-friendly interface and easy navigation. Furthermore, it is compatible with all Windows versions.
Click here to download Restoro and resolve Javaw exe error on your PC today!
As you know, Microsoft constantly releases new updates with the main goal of fixing bugs as well as deliver users with new and exciting features. However, there are times when the latest update comes with an unwanted bug. One of these bugs is an error message saying, “Low Disk Space. You are running out of disk space on Local Disk (G:). Click here to see if you can free space on this drive.” So if you have recently installed a Windows 10 update, then you’ll most likely see a completely new drive on your computer which will appear right after the installation of the update and you’ll also start seeing the aforementioned error message.
It gets irritating as this error message keeps on popping up even if you still have a lot of free space on your other drivers. Obviously, the main reason why this error message pops up all the time is the bug brought along by the Windows Update. This bug unhides the recovery partition drive and allocates it a drive letter which is why you are seeing a new drive in your computer. Thus, you can get rid of the pesky error message by simply removing the letter of the new drive. Just remember that you must not delete anything from the recovery partition drive nor format the drive. Formatting or deleting the recovery partition drive can heavily affect the recovery of Windows since the data on the drive is used by the Windows Recovery Environment or your system’s manufacturer.
A lot of users have reported that removing the drive letter has resolved the issue. And if you worry that removing the drive letter will delete the drive, you are mistaken. This solution is basically harmless and is proven effective to make the notifications go away.
Carefully follow the instructions below to get rid of the Low Disk Space notification by removing the drive letter.
Step 1: Tap the Windows key once.
Step 2: Next. In the Windows Start Search, type in “command prompt” and right-click on Command Prompt from the search results and select the “Run as administrator” option or you could simply tap Win + R keys and then input “cmd” and hit Enter to open Command Prompt.
Step 3: After opening Command Prompt, type in “diskpart” and tap Enter.
Step 4: Next, type in “list volume” and tap Enter. After that, you will see a list of drives.
Step 5: Take note of the letter associated with the newly created drive.
Step 6: Afterwards, type in “select volume <drive letter>” and tap Enter. Take note that you must replace the <drive letter> with the drive letter you’ve found in Step 5.
Step 7: Now type in “remove letter=<drive letter>” and then tap Enter. Once again, replace the <drive letter> with the letter you took note of in Step 5.
BringMeSports is a browser extension developed by Mindspark Inc. that lets you watch live sports streams, follow sports scores, and catch up on the latest news from the sports world.
BringMeSports installs an extension into your browser that replaces your default home page with the MyWebSearch starting page, it also replaces your default search engine, shows additional ads, and while running, collects personal and web browsing data that is later sent back to be Sold / Forwarded to serve ads. While browsing the internet with this extension installed, you will see additional ads and sponsored links appear in your search results. It may even show pop-up ads.
Several anti-virus scanners have marked this extension as a Browser Hijacker and are therefore not recommended to keep on your computer.
About Browser Hijackers
Browser hijacking is a type of unwanted software, commonly a web browser add-on or extension, which causes modifications in web browser’s settings. Browser hijacker malware is created for many different reasons. The idea would be to force users to visit particular websites that are trying to increase their website visitor traffic and produce higher ad income. Although it might appear naive, all browser hijackers are damaging and therefore always regarded as security risks. Browser hijackers can even allow other harmful programs without your knowledge to further damage your personal computer.
Signs of browser hijack
There are various symptoms of browser hijacking. Here are a few of them:
1. you notice unauthorized changes to your Internet browser’s homepage2. you find re-directed to websites you never meant to visit3. the default search engine is changed and the web browser security settings have been lowered without your knowledge4. you’re finding new toolbars you have never seen before5. you observe numerous ads pop up on the browsers or computer screen6. your web browser gets slow, buggy crashes frequently7. you are blocked to access those sites of computer security solution providers.
Precisely how browser hijacker infects computers
Browser hijackers attack computer systems through malicious email attachments, downloaded infected computer files, or by going to infected internet sites. They could also come from add-on programs, also called browser helper objects (BHO), web browser extensions, or toolbars. A browser hijacker could also be installed as a part of freeware, shareware, demoware, and pirated programs. Common examples of browser hijackers include CoolWebSearch, Conduit, Coupon Server, OneWebSearch, RocketTab, Snap.do, Delta Search, and Searchult.com.
The existence of any browser hijacker malware on your computer might drastically diminish the web browsing experience, track your online activities that result in troublesome privacy concerns, create system stability problems and eventually cause your computer to slow down or to a practically unusable state.
How you can remove browser hijackers
Some hijackers could be removed by deleting the free software they were included with or by removing any extension you have recently added to your system. Having said that, many hijackers are quite tenacious and need specialized tools to eliminate them. And there’s no denying the very fact that the manual fixes and removal methods can certainly be a complicated job for a novice PC user. Also, there are plenty of risks associated with fiddling around with the system registry files.
What To Do If You Cannot Install Any Anti-Malware?
Every malware is bad and the consequences of the damage could vary based on the specific kind of malware. Certain malware variants alter internet browser settings by including a proxy server or modify the computer’s DNS configurations. In these instances, you will be unable to visit certain or all of the websites, and therefore unable to download or install the required security software to remove the infection. If you are reading this, odds are you’re stuck with a malware infection that is preventing you to download or install Safebytes Anti-Malware software on your system. Although this type of issue will be difficult to circumvent, there are a few actions you can take.
Install in Safe Mode
In Safe Mode, you could change Windows settings, uninstall or install some programs, and remove hard-to-delete malware. If the malicious software is set to load automatically when the computer starts, switching to this particular mode may prevent it from doing so. To enter into Safe Mode or Safe Mode with Networking, press F8 while the PC is starting up or run MSCONFIG and look for the “Safe Boot” options in the “Boot” tab. Once you are in Safe Mode, you can try to install your antivirus software application without the hindrance of the malware. After installation, run the malware scanner to get rid of most standard infections.
Utilize an alternate internet browser to download the anti-malware application
Web-based viruses could be environment-specific, aiming for a particular browser or attacking particular versions of the browser. The most effective way to overcome this issue is to select a web browser that is renowned for its security features. Firefox comprises built-in Malware and Phishing Protection to keep you safe online.
Create a portable anti-malware for removing viruses
Another option is to create a portable anti-malware program onto your USB stick. To run anti-virus using a USB flash drive, follow these simple steps:
1) Download the anti-malware on a virus-free PC.2) Insert the USB drive on the same system.3) Run the setup program by double-clicking the executable file of the downloaded software, which has a .exe file format.4) Select the drive letter of the pen drive as the place when the wizard asks you exactly where you want to install the anti-malware. Do as instructed on the screen to complete the installation process.5) Transfer the flash drive from the uninfected PC to the infected PC.6) Run the Safebytes Anti-malware directly from the flash drive by double-clicking the icon.7) Click the “Scan” button to run a full system scan and remove malware automatically.
Protect Your PC & Privacy With SafeBytes Anti-Malware
If you are looking to buy anti-malware for your PC, there are lots of brands and packages for you to consider. A few of them do a great job in getting rid of malware threats while some will affect your PC themselves. You need to be careful not to pick the wrong product, especially if you buy a premium program. One of the recommended software is SafeBytes AntiMalware. SafeBytes carries a very good reputation for top-quality service, and clients appear to be very happy with it.
Safebytes is among the well-established computer solutions firms, which provide this complete anti-malware application. Using its cutting-edge technology, this application will assist you to eliminate multiples types of malware such as viruses, PUPs, trojans, worms, ransomware, adware, and browser hijackers.
SafeBytes has got a variety of features that can help you protect your computer from malware attacks and damage. Let’s check out a few of them below:
Robust Anti-malware Protection: With a critically acclaimed malware engine, SafeBytes offers multilayered protection which is intended to catch and get rid of viruses and malware which are hidden deep in your computer system.
Active Protection: SafeBytes provides real-time active checking and protection against all known viruses and malware. It’ll continuously monitor your laptop or computer for hacker activity and also provides users with superior firewall protection.
“Fast Scan” Abilities: SafeBytes Anti-Malware has a multi-thread scan algorithm that works up to 5 times faster than any other anti-malware software.
Internet Security: Safebytes assigns all sites a unique safety score that helps you to have an idea of whether the webpage you are going to visit is safe to view or known to be a phishing site.
Lightweight Utility: SafeBytes is a lightweight and user-friendly anti-virus and anti-malware solution. Since it utilizes negligible computer resources, this application leaves the computer’s power exactly where it belongs: with you actually.
Premium Support: Support service is available for 24 x 7 x 365 days via email and chats to answer your queries.
Technical Details and Manual Removal (Advanced Users)
If you wish to manually remove BringMeSports without the use of an automated tool, it may be possible to do so by removing the program from the Windows Add/Remove Programs menu, or in cases of browser extensions, going to the browsers AddOn/Extension manager and removing it. You will likely also want to reset your browser.
To ensure the complete removal, manually check your hard drive and registry for all of the following and remove or reset the values accordingly. Please note that this is for advanced users only and may be difficult, with incorrect file removal causing additional PC errors. In addition, some malware is capable of replicating or preventing deletion. Doing this in Safe Mode is advised.
The following files, folders, and registry entries are created or modified by BringMeSports
Each time you open an application inside your Windows 11 operating system, it is opened with standard privileges. Now, please note that your account privileges and application privileges are two different things, you might be the administrator of the system but when you open the app, it still opens with standard privilege.
Most of the time running applications with typical settings is fine but from time to time we might have some applications that will require running with administrator privilege in order to work properly. In this case, it is very easy to do it, you just right-click and choose run as administrator.
Although a very easy solution, it can be quite annoying if running the app is on a daily basis or even more times per day. If this is the case then right-clicking and choosing to run as administrator can be a daunting task, sometimes you can even forget to run it like this in heat of work and some unforeseen consequences might occur.
Luckily there is an easy hack so you can open the chosen application each time as an administrator with a simple double click each time.
Setting application to run as administrator always
Locate application executable file
Right-click on in and choose properties
Click on the Compatibility tab
Check the box next to Run this Program as an Administrator
Click on Apply
Click on OK
From now on each time you open an application normally with a double click, it will be opened as administrator privileges.
Anxiety from all these digital threats lurking everywhere? An antivirus program can help put your mind at ease.
What can a virus do to your device?
A virus is malicious software that can affect pretty much any device and does so in a variety of ways. Be it your computer, your phone or your smart lightbulb - as long as there’s access to the internet, malware can get to it.
How exactly does this kind of attack manifest itself? Well, there’s a wide variety of effects ranging from mild to severe. Among other things, they depend on which type of malware attacks your device - a virus, spyware, ransomware, adware or something else.
These are some of the things you can expect to happen:
Slow performance
System crashes
Theft of data and sensitive information
Connectivity issues
Constant browser redirects
Strange messages sent to your contacts
Interference with files
It really can be the stuff of nightmares. So, if you want to sleep peacefully knowing that your devices are completely safe, you should definitely consider getting an antivirus.
P.S. don’t let its name fool you - an antivirus does indeed protect your devices against more than just viruses.
What is antivirus software exactly?
Antivirus software is designed to help you battle and ward off malware. Basically, it scans your device to detect any suspicious activity and offers tools to get rid of the culprit.
At first, antiviruses were developed to fight against viruses only, but nowadays they cover a lot more ground. Here are some of the biggest benefits of getting yourself a powerful defender.
Advantages of antivirus software
1. It fights those pesky ads
Look, constant ads that pop up everywhere aren’t the absolute worst thing that can happen on your computer. If anything, they are annoying, like when you’re trying to sleep but that one fly in your room just won’t stop buzzing.
Now, there’s a free, well-established solution for that - installing an ad blocker. And we’re about a hundred and ten percent sure you’ve already done that on each and every browser you use.
However, “if I can’t see it, it doesn’t exist” isn’t the most ideal approach for your online safety. Ad blockers can’t block everything and they won’t protect you from potential adware. An antivirus on the other hand offers that layer of protection against malware snuck into pop-ups and spammy websites.
2. It protects you from hackers
Hackers don’t target government institutions only. They’ll target regular people too if they have something to gain.
Credit: Clint Patteron (Unsplash)
There are different types of hacking, such as phishing e-mails, transmission of malicious programs, credential reuse, denial of service and more. In any case, they take control of your device and hijack your data.
The good thing is that, as threats evolve, antiviruses evolve too and there are tons of quality programs on the market that can keep you secure for an affordable price.
3. It keeps your files and data safe
When malware enters your device, it can target pretty much any file and get access to any and all data.
Installing an antivirus program will make sure that every single file, new or old, is monitored at all times, warning you against threats immediately. That way, you can make sure to react before your other files become infected and data is lost or stolen.
Another great thing for data protection is that the best antivirus software normally comes with a password manager, so no one can use malware to steal your passwords.
4. It blocks all kinds of malware
As we already stated, malicious attacks can be performed in many ways and malware comes in in different shapes an sizes, such as:
Trojan horse
Spyware
Ransomware
Adware
Rootkit
RAT (remote access Trojan)
Keyloggers
Worms
Botnets
Credit: Growtika (Unsplash)
Nowadays, antivirus software is designed to fight against all of these types. That’s why more often than not we hear the term 'antivirus' used interchangeably with 'anti-malware,' like in this article.
5. It keeps your children protected
You can’t keep your eyes on your kid every second of the day and you can’t protect them from everything. But at least you can limit their exposure to the threats they can encounter at every corner of the digital world.
An antivirus program will block harmful or suspicious websites and ads, which is great both for you and your children. To take it a step further, though, many such programs come with special parental controls and offer monitoring as well. It’s a great solution for keeping your kids safe online without sounding like the irritating, overbearing, controlling parent who “just doesn’t get it!”
How to pick one
There are definitely lots of different antivirus programs out there, both free and paid. We recommend you look for a paid option, since free ones are unfortunately a lot more susceptible to being compromised through malicious attacks.
Now, there are a few factors to consider when choosing the right software. If you use your PC for basic things then a basic antivirus will suffice. However, the more complex your use and the more sensitive the data you deal with, the stronger it needs to be.
It’s also crucial that you take into account the features it includes. As we already mentioned, some programs have additional security options. For example, depending on the package you select, Bitdefender provides:
Some are included in plans and some are separate products, so make sure to check out all the offers.
And don’t worry if you have multiple PCs or you’re looking for protection for your smartphone or tablet as well; Bitdefender has suitable solutions for your needs. Of course, you can also just pick their classic antivirus software if you’re not in need of advanced protection.
Another important point is how regularly the software is updated and enhanced. The more frequent the updates the better, as bugs can make the program more vulnerable. Other things we advise you consider are user-friendliness, impact on performance, reputation (user reviews especially) and, of course, price.
The bottom line
Fact is: anyone can be a malware victim. Don’t let it be you.
You can’t put a price on peace and security, so don’t be reluctant to pay for yours - especially since a lot of options out there are extremely affordable. Is $159.00 a year really too much to pay for cross-platform protection for up to 10 devices? We don’t think so.
Explore your options and protect your files and data before it’s too late.
If your internet suddenly stops working on your Windows 10 computer and you get an error message saying, “Windows is still setting up the class configuration for this device (Code 56)”, then read on as this post will show you what you can do to resolve it. This kind of issue has something to do with the Network Adapter and you can see this error message in the Properties menu of the corresponding Network Adapter under the Device Manager.
This kind of issue could be caused by many things. For one, it could be caused by your VPN connection if you are using one or it could also be due to an outdated driver. Whatever the cause may be, here are some suggestions you have to check out to fix the error.
Option 1 – Check your VPN
When you install a virtual machine or VPN software on your computer, a new setup will be added in the Network Connection settings and helps your computer in using that adapter setting each time the VPN is turned on. Assuming that you are using an Ethernet connection but your system is trying to use another adapter or settings, that’s when issues occur and one of them is the “Windows is still setting up the class configuration for this device” error. To fix it, you can try to disable your VPN temporarily and see if the error is resolved or not and if turns out that your VPN is the culprit, you have to uninstall it and install a new one or its latest version. To uninstall it, follow the steps below.
Tap the Win + R keys to open the Run dialog box
Then type “appwiz.cpl” in the field and hit Enter to open the Programs and Features in Control Panel.
From there, look for the VPN service you are using, select it and then click on Uninstall to remove it.
After that, restart your computer and try to install the latest version of the program again. It should work now. If not, proceed to the next available option below.
Option 2 – Try to update or rollback or uninstall the Network Adapter drivers
You might also want to update, roll back or disable your Network drivers to fix the “This operation failed as no adapter is in the state permissible for this operation” error.
Tap the Win + R keys to launch the Run window and then type in the “devmgmt.msc” command and hit Enter to open the Device Manager window.
Under the Device Manager, you will see a list of drivers. From there, look for the Network Adapters and expand it.
Then right-click on each one of the Network drivers and depending on your preference, you can either select “Update driver”, “Disable device” or “Uninstall device”.
After that, restart your PC and see if it helped in fixing the netio.sys Blue Screen error.
Option 3 – Try to run the Network Adapter troubleshooter
To run the Network Troubleshooter, refer to these steps:
Open the Search bar on your computer and type in “troubleshoot” to open the Troubleshoot settings.
Next, scroll down and select the “Network Adapter” option from the right pane.
Then click on the Run Troubleshooter” button.
After that, your computer will check for any possible errors and will pinpoint the root cause of the problem if possible.
Restart your computer.
Option 4 – Try to reset the Network
You might perform a Network Reset to resolve the problem if none of the three given options above worked. This will reset the entire network configuration including your IP address. To perform Network Reset, follow these steps:
Tap the Win + I keys to open Settings.
From there, go to the Network and Internet section.
Next, scroll down and look for “Network Reset” under the status pane.
After that, click on Network Reset and then on Reset now to start resetting the network configuration. Once done, check if it is able to fix the error or not.
So, what is Electron bot, and why it even matters if it is in the MS store. Electron bot is malware that somehow found its way inside MS Store via game clones of popular games temple run and subway surfer. This infiltration led to the infection of around 5000 systems over the globe in a very short period of time.
This malware is a backdoor that gives complete system control to the attacker. Any type of execution can be performed remotely in real-time. Usually, this kind of attack was aimed at a spread of click fraud over popular social media like Facebook, google, youtube, etc.
Primary goal
Electron Bot's primary goals in the ongoing campaign analyzed by researchers are:
SEO poisoning – Create malware-dropping sites that rank high on Google Search results.
Ad clicking – Connect to remote sites in the background and click on non-viewable advertisements.
Social media account promotion – Direct traffic to specific content on social media platforms.
Online product promotion – Increase store rating by clicking on its advertisements.
These functions are offered as services to those who want to increase their online profits illegitimately, so the gains for the malware operators are indirect.
Publishers that contain malware
For now, users may take note of the publishers who released confirmed malicious game apps using the following names:


 New Microsoft store
 Once the menu appears, click on Command Prompt (admin)
 Once the command prompt with administrator privileges comes on-screen type in it following string:
 This command will force Windows to show all devices in the device manager including old ones that are not used anymore, but since their drivers are still installed, devices will show up.
When you type command press ENTER.
Once again press WINDOWS + X to show the hidden menu but this time choose the device manager
This command will force Windows to show all devices in the device manager including old ones that are not used anymore, but since their drivers are still installed, devices will show up.
When you type command press ENTER.
Once again press WINDOWS + X to show the hidden menu but this time choose the device manager
 The device manager will open, go to view > snow hidden devices in order to show unused devices.

 Right-click on the device and click on uninstall device to remove it completely from your system.
 Please always be careful when removing devices so you do not remove the device which is being used by mistake and always double-check that you are removing something that you used to have on your system. This method will show all hidden devices even ones that are hidden but crucial to the system working properly.
 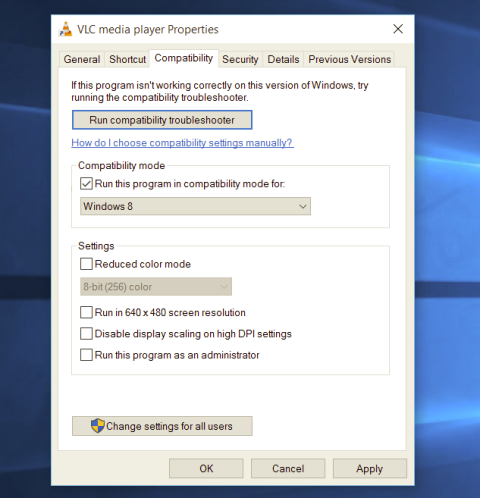 Most of the time running applications with typical settings is fine but from time to time we might have some applications that will require running with administrator privilege in order to work properly. In this case, it is very easy to do it, you just right-click and choose run as administrator.
Although a very easy solution, it can be quite annoying if running the app is on a daily basis or even more times per day. If this is the case then right-clicking and choosing to run as administrator can be a daunting task, sometimes you can even forget to run it like this in heat of work and some unforeseen consequences might occur.
Luckily there is an easy hack so you can open the chosen application each time as an administrator with a simple double click each time.
Most of the time running applications with typical settings is fine but from time to time we might have some applications that will require running with administrator privilege in order to work properly. In this case, it is very easy to do it, you just right-click and choose run as administrator.
Although a very easy solution, it can be quite annoying if running the app is on a daily basis or even more times per day. If this is the case then right-clicking and choosing to run as administrator can be a daunting task, sometimes you can even forget to run it like this in heat of work and some unforeseen consequences might occur.
Luckily there is an easy hack so you can open the chosen application each time as an administrator with a simple double click each time.


