Logo

Prompted For A Product Key On Windows 10 - How to Fix It

Prompted For A Product Key – What Is It?

Some Windows 7 or Windows 8/8.1 users are having a hard time upgrading to Windows 10 as they are being prompted for a product key. By default, the Windows 10 operating system does not require a product key and users should not be prompted for one, given you upgraded your computer from an activated Windows 7 or Windows 8/8.1 license or from the Windows 10 Preview build. However, there are some users encountering this problem and there are several reasons for this.

Solution

Restoro box imageError Causes

There are a few reasons why some users are being prompted for a product key when upgrading to Windows 10:

  • Windows 7 or Windows 8/8.1 license is not activated.
  • You’re upgrading to Windows 10 final release from a preview build.
  • There are broken operating system files.
  • Activation servers get overwhelmed due to the high volume of upgrades.
  • The Windows 10 copy you downloaded does not correspond with the current Windows system you are upgrading from.

Further Information and Manual Repair

Before you can fix this problem, you need to know why you’re being prompted for a product key. Some things you should know about Windows 10 product key activation are the following:

  • You cannot activate Windows 10 using your Windows 7 or Windows 8/8.1 product key. Windows 10 has a unique product key.
  • Error codes such as 0x8007232b, 0XC004E003, 0x8007007B, or 0x8007000D might pop up during system upgrade especially when the activation servers get overwhelmed with the high volume of upgrades.
  • You don’t really need to know your Windows 10 product key.

Now, if ever you’re prompted for a product key when you’re upgrading to Windows 10, you can apply the following methods:

Method One: Give It A Few Days

If you’ve been prompted for a product key upon upgrading to Windows 10, you should click on the “Do this later” option. Wait for a few days then Windows 10 will get activated automatically.

Method Two: Download A Copy of Windows 10 Corresponding Your Current System

One of the reasons Windows users are being prompted for a product key when upgrading to Windows 10 is that they have downloaded a wrong edition of Windows 10 and do not correspond with your current system.

  • Users of Home Basic, Home Premium, Windows 7 Starter, Windows 8.0 Core, and Windows 8.1 Core should download Windows 10 Home ISO.
  • Users of Windows 7 Ultimate, Windows 7 Professional, Windows 8.0 Pro, and Windows 8.1 Pro should download Windows 10 Pro ISO.

NOTE: Users of Windows 7 Enterprise, Windows 8.0 Enterprise, and Windows 8.1 Enterprise are not eligible for the free upgrade offer.

Method Three: Ensure Windows Is Activated

If your Windows 7 or Windows 8/8.1 is not genuine or activated, you will get prompted for a product key. You need to make sure first your current system is activated.

  1. Click on Start then right-click Computer. For Windows 8 and up users, you can simply press on Windows key + X then select Choose Properties.
  2. When the Properties window appears, check if the Windows you’re running is activated.

Method Three: Reset License Status

  1. Press on Windows key + X.
  2. Select Command Prompt (Admin).
  3. Once the command prompt window appears, type vbs –rearm then press Enter.
  4. Exit Command Prompt then restart your PC.
  5. Input the product key by following the instructions given.

Method Four: Force Activation

  1. Press on Windows key + X
  2. Select Command Prompt (Admin).
  3. Once the command prompt window appears, type vbs –ato then press Enter.
  4. Exit Command Prompt then restart your PC.

Method Five: Run System File Checker

Another thing you can try doing is to run the system file checker utility to scan if there are any broken operating system files. In doing so, you’ll be able to detect problems that might be preventing the product activation of your Windows 10 upgrade.

Method Six: Contact Microsoft Activation Center

If in case you’ve exhausted all your resources and you are still being prompted for a product key when upgrading to Windows 10, you can try contacting the Microsoft Activation Center for further details. Check here for the appropriate telephone numbers to contact.

Method Seven: Download An Automated Tool

If you still experience the error after doing the methods above, you might want to try a powerful and trusted automated tool to fix the job.

Do You Need Help with Your Device?

Our Team of Experts May Help
Troubleshoot.Tech Experts are There for You!
Replace damaged files
Restore performance
Free disk space
Remove Malware
Protects WEB browser
Remove Viruses
Stop PC freezing
GET HELP
Troubleshoot.Tech experts work with all versions of Microsoft Windows including Windows 11, with Android, Mac, and more.

Share this article:

You might also like

Restore, Minimize and Close are not working
Recently, a number of users reported not being able to use the Restore, Minimize and Close buttons on their Windows 10 computers. This kind of issue can be quite annoying as you won’t be able to use your computer properly, especially when you navigate between programs and windows. In such cases, the buttons on the right side of the title bar won’t respond to any inputs which could be caused by a number of factors such as different input modes, corrupted system files, and many more. If you are one of the users who are currently facing this problem, worry not for this post will guide you on what you can do to resolve it. There are several potential fixes you can check out to fix the issue. You can try to check if Tablet Mode is enabled and if it is, you have to disable it. You could also boot your computer in a Clean Boot State to check if a third-party program is the one that’s causing the problem. In addition, you could also reinstall the program where you experience the problem or run built-in utilities like System File Checker and DISM tool.

Option 1 – Make sure that you are not in Tablet Mode

Since Windows 10 is designed to work on both desktop and mobile devices, it could be that your computer has slipped into Tablet Mode which explains why you’re not seeing the Taskbar. To check if your computer is really in Tablet Mode, follow these steps:
  • Go to the Start menu and select Settings.
  • Next, select the System setting and from the left pane select the Tablet Mode.
  • From there, make sure that the buttons next to the options given below are set to the off position:
    • Hide app icons on the taskbar in tablet mode
    • Automatically hide the taskbar in tablet mode

Option 2 – Put your computer in a Clean Boot State

As pointed out, it is possible that some third-party program or service is the one that’s behind the problem. To isolate this possibility and to identify the culprit, you have to put your computer into a Clean Boot State. To do so, follow the steps below.
  • Log onto your PC as an administrator.
  • Type in MSConfig in the Start Search to open the System Configuration utility.
  • From there, go to the General tab and click “Selective startup”.
  • Clear the “Load Startup items” check box and make sure that the “Load System Services” and “Use Original boot configuration” options are checked.
  • Next, click the Services tab and select the “Hide All Microsoft Services” check box.
  • Click Disable all.
  • Click on Apply/OK and restart your PC. (This will put your PC into a Clean Boot State. And configure Windows to use the usual startup, just simply undo the changes.)
  • Once your computer is in a Clean Boot State, try to open the program where the problem occurred.

Option 3 – Try reinstalling the program

If the first two options didn’t work, then you might want to consider uninstalling the program and then install it back with its latest version. This should resolve the problem.

Option 4 – Try to run System File Checker

System File Checker or SFC is a built-in command utility that helps in restoring corrupted files as well as missing files. It replaces bad and corrupted system files to good system files that might be the cause why the Restore, Minimize and Close buttons don’t work. To run the SFC command, follow the steps given below.
  • Type “cmd” in the Start search and then right-click on the appropriate search result.
  • Next, select “Run as administrator” to open Command Prompt with admin privileges.
  • After opening Command Prompt, type in sfc /scannow
The command will start a system scan which will take a few whiles before it finishes. Once it’s done, you could get the following results:
  1. Windows Resource Protection did not find any integrity violations.
  2. Windows Resource Protection found corrupt files and successfully repaired them.
  3. Windows Resource Protection found corrupt files but was unable to fix some of them.
  • Now restart your computer and see if the problem is fixed or not.

Option 5 – Run the DISM tool

You can try running the Deployment Imaging and Servicing Management or DISM tool to fix the problem. Using this built-in tool, you have various options such as the “/ScanHealth”, “/CheckHealth”, and “/RestoreHealth”.
  • Open the Command Prompt with admin privileges.
  • Then type in the following commands and make sure to hit Enter right after you type each one of them:
    • Dism /Online /Cleanup-Image /CheckHealth
    • Dism /Online /Cleanup-Image /ScanHealth
    • exe /Online /Cleanup-image /Restorehealth
  • Do not close the window if the process takes a while as it will probably take a few minutes to finish. Once it’s done, restart your computer.
Read More
Fix blank or empty dialog boxes with no text
The dialog boxes that you see on your Windows computer exist to send you a message or to notify you. However, you can also encounter issues with them. Recently, some users reported that they’re getting empty or blank dialog boxes. It’s definitely hard to choose between Yes or No or to click OK when you don’t know the context of the dialog box. If the same thing happened to you, worry not for there are some possible solutions that can help you fix the problem. This kind of problem usually happens when there are some issues with the graphics driver or when there is some corrupted software. Whichever the case is, here are some fixes you can check out to fix the empty or blank dialog boxes on your Windows 10 computer.

Option 1 – Run the System File Checker

System File Checker or SFC is a built-in command utility that helps in restoring corrupted files as well as missing files. It replaces bad and corrupted system files with good system files that might be the cause why you’re getting the errors 0x8024a11a and 0x8024a112. To run the SFC command, follow the steps given below.
  • Type “cmd” in the Start search and then right-click on the appropriate search result.
  • Next, select “Run as administrator” to open Command Prompt with admin privileges.
  • After opening Command Prompt, type in sfc /scannow
The command will start a system scan which will take a few whiles before it finishes. Once it’s done, you could get the following results:
  1. Windows Resource Protection did not find any integrity violations.
  2. Windows Resource Protection found corrupt files and successfully repaired them.
  3. Windows Resource Protection found corrupt files but was unable to fix some of them.
 Now restart your computer and see if the problem is fixed or not.

Option 2 – Try to update or rollback the Graphics driver

You can try to update your Graphics card driver using the Device Manager in your computer to resolve the blank dialog boxes problem or you can also go directly to the website of your graphics card manufacturers like NVIDIA, Intel, or AMD and go to the section called Drivers then check if there’s a new available update – if there is, download and install it. To update your Graphics driver via Device Manager, refer to these steps:
  • First, boot your computer into Safe Mode.
  • After that, tap the Win + R keys to launch Run.
  • Type in devmgmt.msc into the box and tap Enter or click OK to open the Device Manager.
  • After that, a list of device drivers will be displayed. From there, look for the Display Adapters and click on them.
  • After that, right-click on each entry under the Display Adapters and select the “Uninstall Device” option from the menu.
  • Now restart your computer.
  • After restarting your computer, go to the Settings app and Check for Updates in the Windows Update section.
Note: If updating the Graphics driver didn’t fix the problem, you can also try to roll back to its previous version and see if that helps.

Option 3 – Run the DISM tool

The next thing you can do is run the DISM tool. This tool is known to repair potentially corrupted files in your system as having them could also system issues like the blank dialog boxes. To repair these corrupted system files, you can run the DISM commands:
  • Tap the Win + X keys and click on the “Command Prompt (Admin)” option.
  • After that, input each one of the commands listed below sequentially to execute them:
    • Dism /Online /Cleanup-Image /CheckHealth
    • Dism /Online /Cleanup-Image /ScanHealth
    • Dism /Online /Cleanup-Image /RestoreHealth
  • Once you’ve executed the commands given above, restart your computer and check if the problem is now fixed.

Option 4 – Try to repair or reinstall the software

If the issue with the empty dialog boxes only occurs in a specific program, you can either try to repair the program or reinstall it. You can find the Repair option in the Add/Remove program section when you select the concerned program. If repairing the program didn’t work, you might have to uninstall it and then reinstall it.

Option 5 – Try troubleshooting the problem in a Clean Boot State

You might also want to troubleshoot the problem in a Clean Boot State. Doing so will help you isolate the problem. Refer to the steps below to do so:
  • Log onto your PC as an administrator.
  • Type in MSConfig in the Start Search to open the System Configuration utility.
  • From there, go to the General tab and click “Selective startup”.
  • Clear the “Load Startup items” check box and make sure that the “Load System Services” and “Use Original boot configuration” options are checked.
  • Next, click the Services tab and select the “Hide All Microsoft Services” check box.
  • Click Disable all.
  • Click on Apply/OK and restart your PC. (This will put your PC into a Clean Boot State. And configure Windows to use the usual startup, just simply undo the changes.)
Read More
Enable or Disable Status Bar in File Explorer
As you know, the Windows File Explorer is quite a responsive program and contains tons of features. It allows you to do various customizations by changing Settings or changing the value of a Registry key or Group Policy modification. Either way, you will be guided on how you can enable or disable the Status Bar in File Explorer on your Windows 10 computer. The Status Bar is located at the bottom of the File Explorer and shows you how many items are inside the folder and how many items you’ve selected. In addition, it also shows you information about each item and can display items using large thumbnails with just a single click. In order to enable or disable the Status Bar in File Explorer, you can use the two given options below as reference. You can either use the Folder Options or the Registry Editor.

Option 1 – Enable or Disable Status Bar via Folder Options

  • Tap the Win + E keys on your keyboard to open File Explorer.
  • Then tap the Alt + F keys and click on Options.
  • From there, make sure that you are in the View tab and look for the “Show Status Bar” option in the list that gets populated.
  • After that, check if the Show Status Bar option is enabled or disabled. It is supposed to be enabled by default so if it is enabled and you want to disable it, just simply uncheck its checkbox otherwise, leave it as it is.
  • Now click on Apply and then OK to save the changes made

Option 2 – Enable or Disable Status Bar via Registry Editor

  • Tap the Win + R keys to open the Run dialog box.
  • Then type “Regedit” in the field and hit Enter to pull up Registry Editor.
  • Next, navigate to this registry key: HKEY_CURRENT_USERSoftwareMicrosoftWindowsCurrentVersionExplorerAdvanced
  • Afterward right-click on Advanced and select New > DWORD (32-bit) Value and then input “ShowStatusBar as the name of the newly created DWORD.
  • Now double click on the new DWORD and change its value to “0” if you want to disable Status Bar and “1” if you want to enable it.
  • Then exit the Registry Editor and restart your computer to apply the changes made.
Read More
Fix INVALID_POINTER_READ_c0000005 atidxx64.dll
If your Microsoft Edge browser encountered a Stop Error that says, “INVALID_POINTER_READ_c0000005 (atidxx64.dll)” in your Windows 10 computer, then this indicates that your Graphics card driver is outdated. According to security experts, Microsoft has already acknowledged the problem and stated that this issue exists with Windows 10 v1809, Windows Server 2019, and Windows Server version 1809. Although there is no direct way to resolve the problem, there are still some workarounds you can try. If you are using a RadeonHD2000 or HD4000 series video card, the update will be blocked for you. Some users also claim to experience performance issues with the lock screen or the ShellExperienceHost. However, if you are using AMD, the problem is that it no longer supports Radeon HD2000 and HD4000 series graphics processing units or GPUs. Even though Microsoft is already working for a way to resolve the problem, here are some alternative solutions you can check out:

Option 1 – Update your Graphics card drivers

  • First, boot your computer into Safe Mode.
  • After that, tap the Win + R keys to launch Run.
  • Type in devmgmt.msc into the box and tap Enter or click OK to open the Device Manager.
  • After that, a list of device drivers will be displayed. From there, look for the Display Adapters and click on them.
  • After that, right-click on each entry under the Display Adapters and select the “Uninstall Device” option from the menu.
  • Now restart your computer.
  • After restarting your computer, go to the Settings app and Check for Updates in the Windows Update section.
Note: You also have the option to go directly to the website of your graphics card manufacturers like NVIDIA, Intel or AMD and go to the section called Drivers then check if there’s a new available update – if there is, download and install it.

Option 2 – Try removing AMD Radeon HD2000 and HD4000 drivers

Although this is not exactly a perfect solution, removing AMD drivers will make the operating system fall back to the default GPU available on your motherboard. You also have the option to completely disable the hardware.
  • Tap the Win + X + M keys to open the Device Manager.
  • Next, look for your Graphics card drive, and under Display Adapters, right click on them and click Uninstall device or Disable device.
  • After that, restart your computer. This will disable the AMD drivers so you won’t be able to find them. It will also release the Windows 10 v1809 update on your computer and in case your operating system tries to prompt you with the “New Device found” message, simply ignore it.

Option 3 – Try to use another browser

You might want to use another browser especially when you already updated your computer and Microsoft Edge still keeps on crashing. You can use Google Chrome, Mozilla Firefox, and other browsers as alternatives until you sort out the problem.

Option 4 – Try to remove the Graphics card physically

You might also want to try removing both AMD Radeon HD2000 and HD4000 as they are very old graphics cards. And since AMD is not going to roll out anything, at least on its own if your motherboard has an onboard GPU, it would be best to get rid of the cards. After that, install the Windows v1809 update and then put them back in. You also have the option to install the driver but just don’t use Microsoft Edge.
Read More
Cannot save media from Microsoft Photos
The Microsoft Photos app is a useful tool that allows users to view, edit, as well as create videos on their Windows 10 computers. Although it works just fine most of the time, there are some instances when you might encounter some issues when using it. One of these issues is when you cannot save media from the Photos app after you’ve edited an image. This is most likely related to a permission issue. However, according to some users, they got the error where the edited media file can’t be saved. When you encounter this kind of error, you will see the following error in your Photos app:
“It looks like you don’t have permission to save changes to this file. Try saving a copy instead.”
There are several options you can explore to resolve this error. You can try updating the Microsoft Photos app or verify the ownership of the destination folder. You can also re-register and reinstall the app. For more detailed instructions, make use of the options provided below.

Option 1 – Try to update the Microsoft Photos app

The first thing you can do to fix the problem is to update the Microsoft Photos app.
  • Open the Microsoft Store and click on the three horizontal dots for the menu located on the top right portion of the window to see the options.
  • Next, select Downloads and updates and then click the Get updates button in the top right. This will install any pending updates for all the apps including the Microsoft Photos app using the Microsoft Store.

Option 2 – Try to verify the ownership of the destination folder

The next thing you can do to fix the error is to verify the ownership of the folder because chances are, the location where you’re trying to save the file might not have enough permissions to read and write the file to the disk. Thus, you need to take ownership of the folder by following these steps:
  • Type “command prompt” in the Windows Search bar and then right-click on the relevant search result and select “Run as administrator”.
  • After that, if a User Account Control or UAC prompt appears, just click on Yes to proceed.
  • Next, type and enter this command: TAKEOWN /F <path>
  • Note that the <path> is the location of the folder or file in File Explorer.
  • Now type and enter this second command: ICACLS <path> /grant administrators:F
  • Finally, once the command has been executed, restart your computer and then see if you can now access the folder or file.

Option 3 – Try resetting the Photos app

If the first option of restarting the background process of the Photos app didn’t work for you, you can try to reset the Photos app so that it will use the default factory settings. Note that this option works when you are experiencing this issue after making a couple of changes in the Photos app.
  • To get started in resetting the Photos app, open the Windows 10 Settings.
  • Then go to Apps > Apps & features.
  • After that, scroll down until you see the Photos app option – click on it and open its Advanced options.
  • From there, you will see the Reset button, click on it and click and then click on it once more to confirm.
Note: The process may take a couple of minutes to complete. Once it’s done, open the pictures again using the Photos app.

Option 4 – Try reinstalling the Photos app

If none of the first two options given above worked, then you might want to consider reinstalling the Photos app. Unlike what most users think, it isn’t really that hard reinstalling preinstalled apps as you have the Windows PowerShell for that. To use this program in reinstalling the Photos app, follow these steps:
  • Open the Windows PowerShell program with admin privileges and key in the following command:
Set-ExecutionPolicy Unrestricted
  • After that, execute this second command to re-register and reinstall the Microsoft Photos app.
Get-AppXPackage -AllUsers | Foreach {Add-AppxPackage -DisableDevelopmentMode -Register "$($_.InstallLocation)AppXManifest.xml"}
Note: In the command given, do not forget to replace the “PackageFullName” with the actual package name for the Photos app. After executing the command, it will uninstall the Photos app from your computer so you need to install it again from the Windows Store by simply looking for it. Once you found it, just click on install to start the installation process.
Read More
An Easy Guide to Resolving Error 0x80040600

0x80040600 - What is it?

This is a typical MS Outlook error code. This error message may prevent you from sending and receiving emails via your Outlook account. The error message is displayed in the following format:
"An unknown error has occurred. 0x80040600"
If this is the primary source of your communication in the office, then this error can cause you a great deal of inconvenience as it may prevent you from running important business errands via your Outlook account efficiently. Therefore, when you experience the 0x80040600 error on your PC, it is advisable to fix it immediately.

Solution

Restoro box imageError Causes

This error code is triggered due to multiple reasons. These include but are not limited to:
  • PST (Personal Storage Table) file reaches its file size limit
  • PST file corruption
  • Viral infection
  • Incorrect Windows registry settings
  • Improper shutdown of Outlook
This error code can lower your office productivity as you may be unable to send and receive emails on your Outlook account. Also, you may get locked out of your account and be unable to view your calendar entries and open email attachments saved previously in your account.

Further Information and Manual Repair

To resolve the error on your PC, you don’t have to wait for the network personnel to fix it or be a computer expert. Here is a list of easy and effective DIY methods to help you fix this error code right away.

Method 1: Download a PST File Repair

If the error occurs because your PST file has reached it maximum limit which is normally 2 GB or because of PST file corruption, then it is advisable to download a PST file repair tool. After downloading it, simply run it on your PC. This tool will immediately fix the damaged PST file and file the issue.

Method 2: Download an Antivirus

Deadly viruses like Trojans and spyware can penetrate into your PC if through downloads and opening phishing emails. Therefore, to remove such viruses it is important to install an antivirus and scan your entire PC.

Method 3: Install Restoro.

If the problem is associated with incorrect Windows registry settings or viral infection, it is advisable to download Restoro. This software is multi-functional deployed with 6 different and powerful utilities including an antivirus, a registry cleaner, and a system optimizer to name a few. The registry cleaner repairs the registry corrects the settings and fixes the damaged files. The antivirus on the other hand simultaneously removes all types of viruses including Trojans, spyware, malware, and adware on the system. While the system optimizer feature ensures the PC performance and speed are not compromised during the scanning and cleanup process. This software is safe, efficient, and compatible with all Windows versions. It has a user-friendly interface and simple navigations which makes it quite easy for all levels of users including novice and intermediate to operate. Click here to download Restoro and resolve the 0x80040600 error code on your PC today!
Read More
Fix ERR_EMPTY_RESPONSE error in Chrome
It is a fact that Google Chrome is one of the world’s most used web browsers and it’s because this search giant is focused on following the standards of the web. Although this web browser has become quite bloated over the years, it still remains at the top of the list of browsers used most by users. If you are a user of Google Chrome for a long time now, you have most likely come across a couple of issues in the past while using this browser. In this post, we’ll help you fix one of the issues commonly encountered in Chrome which is the “No Data Received – ERR_EMPTY_RESPONSE” error. This kind of error message in Chrome pops up when you try to log into a website. It isn’t clear what’s the cause of this error but worries not, for there are several ways you can try to fix it.

Option 1 – Try checking if your network connection is working

The No Data Received – ERR_EMPTY_RESPONSE error is not usually related to a downed network. However, anything is possible so you need to check if your internet connection is working just fine or not as it might be the reason why you’re getting this error in Chrome.

Option 2 – Try resetting the network

There are instances when a network goes into haywire because of a bad DNS. Thus, a bad DNS might be the one that’s causing this headache so it’s time for you to reset the entire network to resolve the issue. To reset the network, here’s what you have to do:
  • Click the Start button and type in “command prompt” in the field.
  • From the search results that appear, right-click on Command Prompt and select the “Run as administrator” option.
  • After opening Command Prompt, you have to type each one of the commands listed below. Just make sure that after you type each command, you hit Enter
    • ipconfig /release
    • ipconfig /all
    • ipconfig /flushdns
    • ipconfig /renew
    • netsh int ip set dns
    • netsh winsock reset
After you key in the commands listed above, the DNS cache will be flushed and the Winsock, as well as the TCP/IP, will reset.
  • Now restart your computer and open Google Chrome then try opening the website you were trying to open earlier.

Option 3 – Try to clear the browsing data of Google Chrome

If your browsing data in Chrome hasn’t been cleared for some time now then that might be the reason why you’re suddenly getting the ERR_EMPTY_RESPONSE error when you browse the web. To fix this error, you need to clear your web browsing data. Refer to the following steps to do so.
  • Tap the Ctrl + Shift + Delete buttons to go to the Clear browsing data section in Chrome.
  • Next, set the time range to “All time” and tick all the boxes and then click on the Clear data button.
  • After that, restart the Chrome browser and try to open the website you were trying to open earlier.

Option 4 – Reset Google Chrome

If none of the options given above worked, you can try resetting the Chrome browser. To do that, follow these steps:
  • Open Google Chrome, then tap the Alt + F keys.
  • After that, click on Settings.
  • Next, scroll down until you see the Advanced option, once you see it, click on it.
  • After clicking the Advanced option, go to the “Restore and clean up an option and click on the “Restore settings to their original defaults” option to reset Google Chrome.
  • Restart Chrome and check if you can now open the webpage or not.
Read More
How to always run the app in admin mode in W11
Each time you open an application inside your Windows 11 operating system, it is opened with standard privileges. Now, please note that your account privileges and application privileges are two different things, you might be the administrator of the system but when you open the app, it still opens with standard privilege. admin privileges
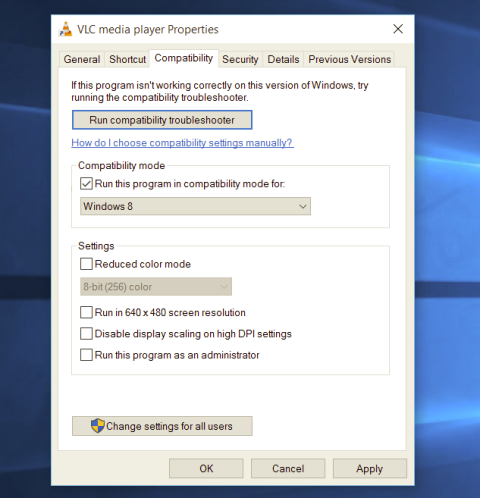
Most of the time running applications with typical settings is fine but from time to time we might have some applications that will require running with administrator privilege in order to work properly. In this case, it is very easy to do it, you just right-click and choose run as administrator. Although a very easy solution, it can be quite annoying if running the app is on a daily basis or even more times per day. If this is the case then right-clicking and choosing to run as administrator can be a daunting task, sometimes you can even forget to run it like this in heat of work and some unforeseen consequences might occur. Luckily there is an easy hack so you can open the chosen application each time as an administrator with a simple double click each time.

Setting application to run as administrator always

  1. Locate application executable file
  2. Right-click on in and choose properties
  3. Click on the Compatibility tab
  4. Check the box next to Run this Program as an Administrator
  5. Click on Apply
  6. Click on OK
From now on each time you open an application normally with a double click, it will be opened as administrator privileges.
Read More
Changing the Primary and Secondary monitor
If you are using a dual monitor setup on your computer and you wish to change the Primary and Secondary monitor in Windows 10, then you’ve come to the right place as this post will guide you on how exactly you can do that. A lot of users use more than one monitor to be more productive so having dual monitors helps a lot. So if you have more than one monitor, know that you can actually select any monitor as the primary monitor after installing Windows. Changing the primary and secondary monitor in Windows 10 does not really require you to install any third-party application since you can get the job done by simply making some alterations in the Windows 10 Settings panel. You won’t have any problem in making such alterations since it is quite simple – from modifying the wallpaper to scaling and so on.

To get started, follow the instructions given below carefully.

Step 1: First, tap the Win + I key combination to open the Windows 10 Settings app and go to System and click the Display tab. Step 2: Next, look for the Identify button located on your right-hand side and then click on it. This button will help you check which one is the primary and the secondary monitor. Step 3: After that, select the desired monitor that you want to set as the primary one from the drop-down menu. Step 4: After that, mark the checkbox for the “Make this my main display” option. Step 5: After choosing the primary monitor, this will automatically set the other monitor as the secondary monitor. Restart your computer. So that’s how you change the primary and secondary monitor on your Windows 10 computer. Note that you can always go back to the previous setting of your monitor by following the same instructions provided above.
Read More
Fix Network driver issue in Windows
The network driver error is a not serious Windows issue.  It happens from time to time and luckily it can be solved with a little effort and in a short time period. Today in this article we will explore the most common solutions for driver malfunction for Network adapter inside Windows 10. If you have this particular problem, go from step 1 to the last step since all steps are meant to go from simplest to the most complex. All of that being said let us fix your Network driver issue.
  1. Check to see if the cable is plugged in and not malfunctioned

    The first common issue of the network now working can be cable malfunction or bad contact in your network adapter or in HUB/SWITCH. There are various tools to check the quality and working order of cable but you could also make sure that it is not a cable issue by trying connection with the correct working cable. If the network is restored with another cable then change the malfunctioning cable and your issue is resolved if the problem persists move to the next step.
  2. Check if Windows troubleshooter will resolve the issue

    Righ-click on the network icon in the taskbar and choose to troubleshoot problems. Windows built-in tools could resolve issues and fix them for you. If by any chance Windows is not able to find or resolve issues move to the next step.
  3. Check if the Device Manager is reporting an error and update the driver

    If the hardware is functioning properly then the issue might be in Windows not detecting device or driver malfunction. In any case, the Device Manager will be the one who will report this problem. In order to check to see if the driver is properly working press ⊞ WINDOWS + X to open the hidden start menu. keyboard with windows and x marked Once it opens, click on Device Manager to open it, If you have a driver device error inside Windows, you should see it immediately when entering the Device Manager, it will have a yellow exclamation mark beside it. Right-click on it and choose update driver.
  4. Reinstall driver

    If driver update failed or you already have the latest drivers, reinstalling them could fix the issue since drivers might have corrupted during installation of some update or application. Follow steps from point 3 to get to the driver in Device Manager, then right-click on it but instead of update choose to uninstall. Reboot Windows once the driver is uninstalled and Windows will install a new one automatically. If you do not want to update drivers automatically, do not restart your system, instead install the latest driver for your device, then reboot. Since this is a network error, you will have to get drivers on another computer and transfer them via USB to malfunctioning one.
  5. Check Windows update

    Check to see if the latest Windows update is installed, update your Windows if needed
  6. Fix driver issue with DRIVERFIX

    If everything else fails, get DRIVERFIX, a premium solution for your PC issues, and fix driver errors.
Read More
1 2 3 171
Logo
Copyright © 2023, ErrorTools. All Rights Reserved
Trademark: Microsoft Windows logos are registered trademarks of Microsoft. Disclaimer: ErrorTools.com is not affiliated with Microsoft, nor claims direct affiliation.
The information on this page is provided for information purposes only.
DMCA.com Protection Status