Logo

How to place different wallpapers on 2 screens

Two monitor systems are not such a rarity like they were just a couple of years ago. More and more people are finding out the benefits of having 2 screens instead of one no matter if you play games or do serious work. So how technology has moved forward and new norms so have Windows and we can now set different wallpapers to different screens very easy, a task which was very difficult in the past.

  1. Go to the Personalization option in the Control Panel.
  2. Right-click on your home screen and select the Personalize option from the menu.
  3. In the new window, you can browse for images you wish to set as wallpaper on both of your monitors. This way, the images would be preloaded in the “Choose your picture” option.
  4. Right-click on the image. Doing this will open a new menu that will allow you to set wallpapers for each screen. There is also another option called “Choose a fit” which gives you the option to select the fit of the wallpaper.
  5. Choose one wallpaper for “monitor 1” and a different wallpaper for “monitor 2.” You will now see your dual-screen setup customized with two different wallpapers.

Do You Need Help with Your Device?

Our Team of Experts May Help
Troubleshoot.Tech Experts are There for You!
Replace damaged files
Restore performance
Free disk space
Remove Malware
Protects WEB browser
Remove Viruses
Stop PC freezing
GET HELP
Troubleshoot.Tech experts work with all versions of Microsoft Windows including Windows 11, with Android, Mac, and more.

Share this article:

You might also like

How to Fix Error Code 0xc00007b in Windows 10

Error Code 0xc00007b – What is it?

Error code 0xc00007b usually manifests itself via the inability to start an application properly. It can occur when users attempt to run a game or other programs on their computer. In such a case, the application will not start and a message box will pop up stating that error code 0xc00007b has occurred. The error code is likely to occur when users attempt to run a program in the incorrect or inappropriate bit. For instance, if you try to load a 32bit location with a 64bit location.

Solution

Restoro box imageError Causes

Error code 0xc00007b affects various versions of the Windows operating system, including Windows 7, 8, 8.1, and Windows 10. In the case of error code 0xc00007b for Windows 10, the error may be caused by issues related to software you’ve installed on your machine. This may cause software conflict resulting in the need to install programs like DirectX. Left unchecked, error code 0xc00007b could incite other error codes in Windows 10, such as error code 0xc004f034.

Further Information and Manual Repair

To repair error code 0xc00007b for Windows 10 devices, users will need to implement at least one manual repair procedure. Manual repair methods are effective in combating these issues as they can address the issues causing the error in the first place, thus fixing the problem.

The manual repair procedures for fixing error code 0xc00007b are very straightforward and can be implemented with little technical knowledge. However, you may need to contact a Windows repair technician if you have difficulty fixing the error code after completing the manual repair methods listed below.

Method One: Install Microsoft DirectX

Microsoft DirectX is an application usually included in the Microsoft operating system. It enables users to access high-speed gaming and multimedia on their PC. The latest version of this Windows technology is available on Microsoft’s official site.

Visit the Microsoft website and search for DirectX End-User Runtime Web Installer. Once you have located the latest version of the program, select the preferred language you would like DirectX to run in, and then click download. Run the program, then be sure to reboot your computer.

Note that this solution should only be applied if you are having issues running or displaying a gaming or multimedia application. Once you’ve correctly installed the latest version of DirectX, it should be able to fix underlying issues that may be causing error code 0xc00007b to occur. If you are still unable to run applications after completing this manual repair procedure, however, you will need to apply another method to fix error code 0xc00007b for Windows 10.

Method Two: Install Latest Version of .NET Framework

.NET Framework, a framework developed by Microsoft, provides solutions for users who may be having problems with applications. To download the latest version of the .NET framework, follow the steps listed below.

  • Step one: Open your favorite web browser
  • Step two: Enter www.microsoft.com/net
  • Step three: Click Downloads
  • Step four: Select the latest version of the .NET Framework by clicking the framework at the top of the list. (Currently, the latest version is .NET Framework 4.6.2.)
  • Step five: Select preferred language, then download
  • Step six: Run software.

To ensure you successfully download the latest version of the .NET Framework, verify your computer is properly connected to the Internet while downloading the software. Also, follow the instructions provided on the Microsoft website.

After completing the download process, reboot your computer then check if you have successfully resolved error code 0xc00007b for Windows 10. If this manual repair method is successful, you will be able to access your gaming and multimedia programs. Otherwise, the error code message box will reoccur, stating that the application error code is present on your device. Apply the next manual repair procedure to correct the error code if this reoccurs.

Method Three: Install Windows Updates

In certain instances, application error codes like error code 0xc00007b affect PC users who fail to install the most current Windows updates on their device. That is why it’s important to check your system and ensure you have installed all the latest updates.

The updates, if any are available, will automatically be installed on your PC once you access Windows Update in Settings. Reboot your computer then check if you are able to run programs that previously would not open due to error code 0xc00007b. If problems persist resulting in the reoccurrence of the error code, reinstall the applications you are unable to open or get help from a Windows repair technician.

Method Four: Download an Automated Tool

If you wish to always have at your disposal a utility tool to fix these Windows 8 and other related issues when they do arise, download and install a powerful automated tool.

Read More
Fix nVIDIA driver issues in Windows 10
nVIDIA is one of the behemoths of the GPU world, but that not means that they are perfect and that they do not make mistakes, throw WIndows in the mix, and sometimes you have issues with your nVIDIA display drivers for various reasons which could get very unpleasant. But do not worry, we have your back and in this article, we will focus and help you to resolve common nVIDIA driver issues. So sit back and let's start with the repairs.
  1. Rollback to the previous driver and stop automatic updates.

    nVIDIA sometimes publishes really messy drivers which can really cause some serious issues, if by any chance you managed to be unlucky enough to get this kind of driver, do not despair, roll back to the previous working version and wait for the fix. To stop Windows from doing automatic driver updates, navigate to Control Panel > System & Security > System > Advanced System Settings > Hardware > Device Installation Settings. Then choose "No (your device might not work as expected)". Once you have turned off automatic driver updates, uninstall your current driver and install the previous version from the official nVIDIA website. Reboot your system
  2. Reinstall nVIDIA driver

    Reinstalling the driver might fix the issue if by any chance driver files got corrupted during download for example. First, you will need to delete some files in order to perform a clean installation. Log in as administrator if you are not one and delete following files and folders: C:\Windows\System32\DriverStore\FileRepository\nvdsp.inf fileC:\Windows\System32\DriverStore\FileRepository\nv_lh fileC:\Windows\System32\DriverStore\FileRepository\nvoclock fileC:\Program Files\NVIDIA Corporation\C:\Program Files (x86)\NVIDIA Corporation\Reboot your system Start driver installation again, choose custom installation, then clean install.
  3. Update driver in the Device Manager

    If driver updates for any reason can not work via the official install package from nVDIDA, try updating the driver in the Device Manager Navigate to Device Manager, expand graphic adapters, right-click on your nVIDIA device and click on update driver. Reboot your system
That's it, 3 solutions on how to remove, reinstall and update your nVIDIA driver, thank you for reading and I hope to see you again.
Read More
Software review series: HWiNFO
HWiNFO (Hardware Information) is a professional hardware information and diagnostic tool supporting the latest components, industry technologies, and standards. It's targeted to recognize and extract the most possible amount of information about computer hardware which makes it suitable for users searching for driver updates, computer manufactures, system integrators, and technical experts too. Retrieved information is presented in a logical and easily understandable form and can be exported into various types of reports. System health monitoring and basic benchmarking available too. If you would like to read more helpful articles and tips about various software and hardware visit errortools.com daily.
Read More
How To Speed Up PC Startup
Hello and welcome to How To Speed Up PC Startup where we will explore how to make your PC boot-up system faster. When your computer gets older, you'll see a decrease in your PC's load time. This can be very annoying and frustrating, especially if you're not accustomed to exercising patience. Your computer's boot time does not need to be sluggish, even if it's old. While there are reasons why your computer is acting up and giving you the 'slow' sign, there are ways that you can optimize how fast your PC starts up at the beginning. Once you start speeding things up, you’ll never look back!

Start With your BIOS

You may need to tweak your PC’s start-up menu. Since the majority of issues encountered on your PC might not be related to the software running in the back end, you can focus on your computer's hardware. The ideal way to speed up your PC startup is to access your computer's BIOS when booting up. This can be accessed by holding the DEL key or whichever button is used to tap into your BIOS. You can change where your computer boots from. You can opt to put your hard disk right at the top which would elude searching for CDs and other storage media devices when your PC starts up.

Tweak Startup Programs

There are many programs that execute when your computer starts up. These programs normally run in the back end. Most times back-end programs are unnecessary and do not contribute to the productivity or performance of your computer when in use. Instead of allowing these programs to execute when your PC boots up, why not disable them?  By deactivating these programs, you'll be reducing the amount of CPU usage which will accelerate your PC performance. Additionally, there are some installed programs that you never use. Instead of leaving these programs to occupy needed space on your computer system, you can uninstall these to create more room on your computer. This actually increases your PC startup speed.

Put Malware on a Leash

Malware and spyware can cause problems for your start-up. A slow computer is an indication that your computer is plagued by malware. This affects your computer's boot time and whether or not it'll startup as quickly as you intend it to. If your computer gives you the 'virus alert', you need to download an antivirus program that will be able to eradicate all virus threats. Be mindful of where you download antivirus programs since many of them are viruses or have viruses attached to them. Some viruses are tough on your computer. This means that if an antivirus works for your best friend, it may not work for you. Since malware differs in functions and the havoc they cause, it's best to know what you're up against by doing research.

Clean Your Registry

You should also clean out your registry. The fewer unused registry keys you have lying around on your computer, the faster your computer will go. Getting a good registry cleaner from a clean source can help tremendously, but be careful; registry cleaners have the potential to be very dangerous so make sure you backup everything on your computer and only download registry cleaners from a reliable source. By implementing the above tips, you'll see quick improvements when using your computer.
Read More
Fix DRIVER_PAGE_FAULT_IN_FREED_SPECIAL_POOL
If you suddenly encounter the DRIVER_PAGE_FAULT_IN_FREED_SPECIAL_POOL Blue Screen error on your Windows 10 computer along with the error codes, 0x000000D5, 0xb10BBD9E, 0x0D82DA24, 0Xfecd479D, 0x779827CB then read on as this post will provide you some troubleshooting tips that could help you resolve the BSOD error. Getting this kind of BSOD error means that a driver has referenced memory that was freed earlier and it could also mean that the Driver Verifier Special Pool option has caught the driver accessing memory which was freed earlier. Follow the given options below to fix the DRIVER_PAGE_FAULT_IN_FREED_SPECIAL_POOL BSOD error.

Option 1 – Use the Driver Verifier Manager

The Driver Verifier Manager is another tool in Windows that could help you fix driver-related issues.
  • Type in the keyword “Verifier” in the Cortana search box to search for Verifier in Windows 10.
  • After that, select the option “Create custom settings”.
  • Make sure that you have checked everything except the options “DDI compliance checking” and “Randomized low resources simulation”.
  • Next, select the option “Select driver names from a list” option.
  • Afterward, you have to select all the drivers from any unofficial or third-party provider. To simply put it, you have to select all the drivers that are not supplied by Microsoft.
  • Then click on the Finish button.
  • Open Command Prompt as administrator and execute this command – verifier /querysettings
  • The command you just executed will display the Driver Verifier settings so if you see any of the flags enabled boot your Windows 10 PC into Safe Mode.
  • Open the Command Prompt as admin again and run this command – verifier /reset
  • The command will reset the Driver Verifier. Once the process is done, restart your PC and check.

Option 2 – Try updating SSD firmware

If you have installed SSD on your computer recently and you have started getting the DRIVER_PAGE_FAULT_IN_FREED_SPECIAL_POOL Blue Screen error since then you may have to update the SSD firmware. To fix this, you can download the Intel Solid-State Drive Toolbox from the official website. This toolbox is compatible with Windows 10 and Windows 7 and later versions.

Option 3 – Try running the Blue Screen Troubleshooter

The Blue Screen troubleshooter is a built-in tool in Windows 10 that helps users in fixing BSOD errors like DRIVER_PAGE_FAULT_IN_FREED_SPECIAL_POOL. It can be found in the Settings Troubleshooters page. To use it, refer to these steps:
  • Tap the Win + I keys to open the Settings panel.
  • Then go to Update & Security > Troubleshoot.
  • From there, look for the option called “Blue Screen” on your right-hand side and then click the “Run the troubleshooter” button to run the Blue Screen Troubleshooter and then follow the next on-screen options. Note that you might have to boot your PC into Safe Mode.

Option 4 – Try running Microsoft’s online Blue Screen Troubleshooter

If running the built-in Blue Screen Troubleshooter didn’t work, you can also try running Microsoft’s online Blue Screen Troubleshooter. All you have to do is go to Microsoft’s website and from there, you will see a simple wizard that will walk you through the troubleshooting process.

Option 5 – Try to reinstall or update device drivers of recently installed hardware

If the first few options didn’t work for you, then it’s time to either update or roll back the device drivers. It is most likely that after you updated your Windows computer that your driver also needs a refresh. On the other hand, if you have just updated your device drivers then you need to roll back the drivers to their previous versions. Whichever applies to you, refer to the steps below.
  • Open the Devices Manager from the Win X Menu.
  • Then locate the device drivers and right-click on them to open the Properties.
  • After that, switch to the Driver tab and click on the Uninstall Device button.
  • Follow the screen option to completely uninstall it.
  • Finally, restart your computer. It will just reinstall the device drivers automatically.
Note: You can install a dedicated driver on your computer in case you have it or you could also look for it directly from the website of the manufacturer.

Option 6 – Try disabling Hardware Acceleration

You might want to disable Hardware Acceleration system-wide or for a particular program like Google Chrome and see if it resolves the DRIVER_PAGE_FAULT_IN_FREED_SPECIAL_POOL BSOD error
Read More
Fix Chrome ERR_BAD_SSL_CLIENT_AUTH_CERT
The Google Chrome browser checks the SSL Security Certificate of the website that you are trying to open. However, if Chrome is not able to check the certificate then you might encounter an error related to the SSL Certificates which you might face when browsing the web. This particular error is the ERR BAD SSL CLIENT AUTH CERT error which is caused by many factors such as the computer’s Time, Cached Data is corrupt, Date is out of sync, as well as third party software installed in your computer is the one that’s blocking the site and many more. The ERR_BAD_SSL_CLIENT_AUTH_CERT error might also be coming from the website’s end. It could be that the server is rejecting the certificate the client website is sending. The certificate might have already expired or the server may not trust its issuer – whichever the case may be, here are some options you can check out to fix the error.

Option 1 – Sync Date and Time

The first thing you can try is to sync the Date and Time of your computer as the wrong Date and Time settings are one of the most common causes of connection problems like the ERR_BAD_SSL_CLIENT_AUTH_CERT error. This is because of the incompatibility between the SSL Certificate validation date and the System Clock. Thus, you have to sync your System Clock. Refer to the steps below to do so.
  • Right-click on the Taskbar and click on the Adjust Date and Time option.
  • Next, click on the Sync Now button to synchronize the Date and Time with the Microsoft Servers.
  • Now make sure that the Time Zone that’s set on the same page is correct.

Option 2 – Try clearing the browser data

There are times when some data in the browser is conflicting with the loading of the website and triggers errors like ERR_BAD_SSL_CLIENT_AUTH_CERT. And so you can try to clear your browser’s data. This might be a very basic solution but oftentimes it works in fixing this kind of error in Google Chrome. Follow the steps below to clear the data in your browser.
  • Open your Google Chrome browser.
  • After that, tap the Ctrl + H keys. Doing so will open a new panel that allows you to delete the browsing history and other data in your browser.
  • Now select every checkbox that you see and click on the Clear browsing data button.
  • Then restart your Chrome browser and check if you can now open any website or not.

Option 3 – Try to check and fix any possible conflicts with third-party programs

Third-party programs like internet protection software could be interrupting the connection and causing the error. For some unknown reason, your antivirus program or firewall might be detecting the webpage you are trying to open as malicious or with less credibility which is why it is blocking the browser from opening the website. To fix that, if you have third-party programs installed like VPN, security software, or any add-on, or firewall, you can disable them temporarily and see if it fixes the problem and you’re able to pull up the website. After a while, you have to enable them back and configure their settings so that the website won’t get blocked again.

Option 4 – Try enabling SSL 3 / TLS and disable QUIC Protocol

If you were using Google Chrome when you got the ERR_BAD_SSL_CLIENT_AUTH_CERT error, then you need to follow the protocol fixes for SSL3/TLS and QUIC which are usually some of the reasons that cause the SSL version / Cipher Mismatch. It also has a few fixes for Windows 10 computer where you can clear the certificates and make sure that your computer date and time is in sync with your time zone and so on. If you were using Edge or Internet Explorer when you got the error, then you have to follow the steps below.
  • Type “Internet” in the search box of your browser. After that, you should see the Internet Options from the search results.
  • Next, open the Internet Properties window and switch to the Advanced tab and then scroll down to the Security section.
  • From there, check the “Use TLS 1.1” checkbox as well as the “Use TLS 1.2” checkbox and then click OK to save the changes made.
  • Restart the browser.
On the other hand, if you were using Firefox when you go the error, here’s what you have to do.
  • Open Firefox and in the address bar, type “about:config” and hit Enter.
  • If a warning appears, just click on the “I accept the risk!” button to proceed.
  • Next, type in “TLS” in the search field and hit Enter.
  • Then look for “security.tls.version.min” and double click on it and set its integer value to 3 to force the protocol of TLS 1.3.
  • Now click OK and restart Firefox and do the same thing with SSL.

Option 5 – Try to update Google Chrome

You might also want to try updating your browser to its latest version and have it installed in your computer. After you install the update, check if you can now open the website you were trying to open earlier.

Option 6 – Get rid of any conflicting browser extensions

  • Open Chrome and press Alt + F keys.
  • Go to More tools and click Extensions to look for any suspicious browser extensions or toolbars.
  • Click the Recycle bin and select Remove.
  • Restart Chrome and press Alt + F keys again.
  • Proceed to On Startup and mark Open a specific page or set of pages.
  • To check if the browser hijacker is still active, click Set pages, if it is active, overwrite the URL.
Note: If removing the browser extensions or toolbars didn’t work, you can also try to reset your Google Chrome browser.
  • Open Google Chrome, then tap the Alt + F keys.
  • After that, click on Settings.
  • Next, scroll down until you see the Advanced option, once you see it, click on it.
  • After clicking the Advanced option, go to the “Restore and clean up option and click on the “Restore settings to their original defaults” option to reset Google Chrome.
  • Now restart Google Chrome.
Read More
Quick Guide to Fixing 0x0000007E Error

What is 0x0000007E Error Code?

If you’ve been experiencing a 0x0000007E error code pop message on your PC frequently then you need to get it fixed before it causes serious damage to your system. 0x0000007E is a Stop error or Blue Screen of Death error code. This error message turns your computer screen blue and locks you out of the program running on your computer. It freezes your system and hampers your ability to perform any type of task on your PC.

Solution

Restoro box imageError Causes

Error 0x0000007E, a blue screen of death error triggers registry issues. It’s not easy to narrow down the cause of 0x0000007E as it results due to many reasons like memory overload, cluttered disk space, viral infection, malware attack, and if the hardware malfunctions. Ignoring 0x0000007E error pop up is not wise. It is more like a warning of the serious damage that can happen to your PC if it is not fixed timely. It also leads to slowing down the system and increases boot time. This error message exposes you to dangerous Windows PC threats like registry corruption and damage. Registry corruption can lead to system crash and failure and you may also lose all your important data saved on your PC.

Further Information and Manual Repair

Install Restoro

You don’t always have to spend hundreds of dollars to hire a technician to fix error pop-ups on your PC try using Restoro Restoro is an advanced and multi-functional PC repair tool with a comprehensive suite of powerful features designed to resolve almost all types of PC errors in seconds including 0x0000007E error code. It is a next-generation PC repair tool that serves as a system optimizer, anti-virus, and quality registry cleaner. Its built-in intuitive technology enables Restoro to scan, identify and repair the ultimate cause of the error code 0x0000007E in just a few seconds. Eventually, it spares you from the hassle of finding the root cause of the 0x0000007E error message and then selecting a tool specifically designed to resolve only that particular cause with limited features. This highly functional PC error tool is the answer for all your registry issues. By running Restoro on your PC, you can fix the 0x0000007E BSOD error code and avoid registry corruption.

Why Restoro?

The smart registry cleaner utility embedded in this tool enables it to scan for registry errors and clear up disk space accumulated by junk files, internet temporary files, invalid entries, and other types of unnecessary files taking up a good chunk of your disk space. This clutter also slows down your PC performance as it requires more power than it has to run the system because of the excess load on the RAM. However, by wiping out the clutter with this helper, you can optimize the speed of your PC and see a significant difference in its performance. Restoro backup feature enables you to create backup files for safety purposes. Furthermore, it has several other built-in value-adding features like privacy error utility and system stability utility for enhanced functionality. To resolve the error code 0x0000007E in seconds, all you need to do is download and install Restoro on your system and run it to scan for errors. In a few seconds, you will see a scanning report with comprehensive details of the types of PC damages. To fix the issue right away, create backups and click ‘fix’ to resolve. In just a few clicks you can repair your PC. Download Restoro Today!
Read More
How to always run the app in admin mode in W11
Each time you open an application inside your Windows 11 operating system, it is opened with standard privileges. Now, please note that your account privileges and application privileges are two different things, you might be the administrator of the system but when you open the app, it still opens with standard privilege. admin privileges
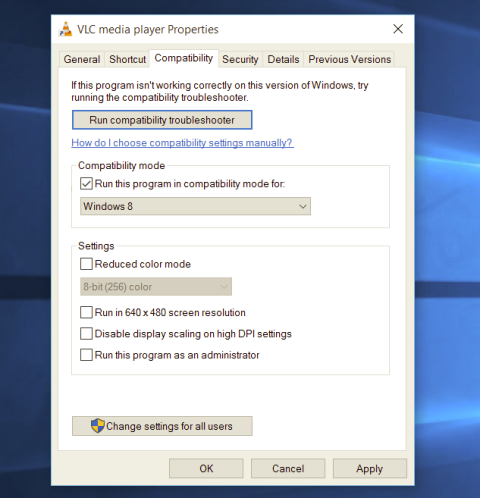
Most of the time running applications with typical settings is fine but from time to time we might have some applications that will require running with administrator privilege in order to work properly. In this case, it is very easy to do it, you just right-click and choose run as administrator. Although a very easy solution, it can be quite annoying if running the app is on a daily basis or even more times per day. If this is the case then right-clicking and choosing to run as administrator can be a daunting task, sometimes you can even forget to run it like this in heat of work and some unforeseen consequences might occur. Luckily there is an easy hack so you can open the chosen application each time as an administrator with a simple double click each time.

Setting application to run as administrator always

  1. Locate application executable file
  2. Right-click on in and choose properties
  3. Click on the Compatibility tab
  4. Check the box next to Run this Program as an Administrator
  5. Click on Apply
  6. Click on OK
From now on each time you open an application normally with a double click, it will be opened as administrator privileges.
Read More
Fix Windows Update Error 0x80004005
As you know, Microsoft is consistent in pushing updates to its supported versions of the Windows operating systems in order to make it better and defend it from different kinds of vulnerabilities. And pushing billions of active Windows computers every now and then is really not an easy thing to do since it calls for a complex Windows Update delivery module. These complexities often give rise to various errors like the Windows Update error code 0x80004005. When you encounter this kind of Windows Update error, you will see the following error message on your screen:
“There were problems installing some updates, but we’ll try again later. If you keep seeing this and want to search the web or contact support for information, this may help 0x80004005.”
This kind of Windows Update error occurs due to an issue while either installing or downloading an update. There are several ways you can fix the problem. You can try to replace the dpcdll.dll file, reset the Windows Update-related services, run the Windows Update troubleshooter or manually install the Windows Updates. For more details, check out the options given below.

Option 1 – Try to replace the DLL file with a trusted source

The first thing you can do is to replace the dpcdll.dll file with a trusted source.
  • First, you need to get the new dpcdll.dll file from another computer with preferably the same file version number as your computer.
  • After that, you need to boot your PC into Safe Mode and navigate to the paths listed below and then replace the file using a USB drive or other external storage devices.
    • For x86: This PC > C:/Windows/System32
    • For x64: This PC > C:/Windows/SysWOW64
  • Next, type “cmd” in the Cortana search box and right-click on Command Prompt, and select “Run as administrator” to open it with administrator privileges.
  • Now type the “regsvr32 dpcdll.dll” command and hit Enter.
  • Restart your PC and check if the error is now fixed.

Option 2 – Try to reset the Windows Update components

If by any chance that the third option didn’t work, you can also try resetting the Windows Update components as it could also help you resolve the Windows Update error. How? Refer to the following steps:
  • Open Command Prompt with admin privileges.
  • After that, type each one of the following commands and hit Enter after you key in one after the other.
    • net stop wuauserv
    • net stop cryptsvc
    • net stop bits
    • net stop msiserver
Note: The commands you entered will stop the Windows Update components such as Windows Update service, Cryptographic services, BITS and MSI Installer.
  • After disabling WU components, you need to rename both the SoftwareDistribution and Catroot2 folders. To do that, type each one of the following commands below and don’t forget to hit Enter after you type one command after the other.
    • ren C:WindowsSoftwareDistribution SoftwareDistribution.old
    • ren C:WindowsSystem32catroot2 Catroot2.old
  • Next, restart the services you’ve stopped by entering another series of commands. Don’t forget to hit Enter after you key in one command after the other.
    • net start wuauserv
    • net start cryptsvc
    • net start bits
    • net start msiserver
  • Close Command Prompt and reboot your PC.

Option 3 – Run the Windows Update Troubleshooter

You might also want to run the Windows Update Troubleshooter as it could also help in fixing Windows Update error 0x80004005. To run it, go to Settings and then select Troubleshoot from the options. From there, click on Windows Update and then click the “Run the troubleshooter” button. After that, follow the next on-screen instructions and you should be good to go.

Option 4 – Try downloading and installing the Windows Updates manually

Windows Update Error 0x80004005 might be due to a Windows Update that has failed. So if it is not a feature update and only a cumulative update, you can download the Windows Update and install it manually. But first, you need to find out which update has failed, and to do so, refer to the following steps:
  • Go to Settings and from there go to Update and Security > View Update History.
  • Next, check which particular update has failed. Note that Updates that have failed to install will be displayed under the Status column which has a label of “Failed”.
  • After that, go to the Microsoft Download Center and look for that update using its KB number and once you find it, download and then install it manually.
Note: You can also use the Microsoft Update Catalog, a service from Microsoft that provides a list of software updates that can be distributed over a corporate network. With the help of this service, it can be easier for you to find Microsoft software updates, drivers as well as fixes.
Read More
Guide to Correcting Error Code 46

Error Code 46 – What is it?

Error Code 46 is a device driver error that occurs when Windows fails to access the connected peripheral device to the computer as Windows is in a process of shutting down.

Users experience this error on any Windows 2000 and later operating system versions and usually see a pop-up with the following message:

“Windows cannot gain access to this hardware device because the operating system is in the process of shutting down. (Code 46)”

Solution

driverfix boxError Causes

Error Code 46 is caused when there is a temporary problem with windows system files which prompts that the system is undergoing a shut down when in fact is it not.

This prevents access to the connected devices. This error may also be caused by a registry issue in which case it has either become corrupted or damaged.

Further Information and Manual Repair

Unlike all other Windows error codes, code 46 is relatively easy to fix with the right knowledge and does not pose any serious threat to the well-being of your PC. Here is how you can do it.

Method 1 – Restart your PC

The simplest method to resolve Error Code 46 is to run a restart of your computer.

The error is most commonly a temporary registry glitch that prevents you from accessing the device connected to your computer. Upon restarting your computer, it will resume working properly as before.

There is no need to run a troubleshooting wizard, use system restore, or run anti-virus software to scan and remove malware or spyware. A simple restart is all that is needed.

Method 2 – Install DriverFIX

Although the error code can be resolved upon restarting the computer, there’s a possibility of damaged or corrupted Windows registry files. This can be fixed by using a program like DriverFIX.

DriverFIX, with its user-friendly approach to help you fix your PC issues, comes with an integrated database that detects which drivers you need to reconfigure within just a few seconds and downloads it automatically.

It further ensures that your drivers are installed in their entirety leaving no room for any corrupted or damaged registry.

Error Code 46 may not be much of an issue, however, to prevent any risk of a Windows system corruption can be disastrous for your computer.

DriverFIX helps you fix your PC registry and device driver problems with user-friendly software and an integrated database. The database which consists of detailed information on what device driver needs to be installed will automatically download the required device driver without you need to refer to your hardware instruction manual.

Registry problems resulting from incomplete program installations and viruses such as malware and spyware damaged registry files. This affects your PC in serious ways.

DriverFIX further has an automatic backup and restoration system that helps create system ‘checkpoints’ which allow you to roll back to a healthier state and resume operations. This can help you avert any Windows error codes in the future.

Click here to download DriverFIX now!

Read More
1 2 3 171
Logo
Copyright © 2023, ErrorTools. All Rights Reserved
Trademark: Microsoft Windows logos are registered trademarks of Microsoft. Disclaimer: ErrorTools.com is not affiliated with Microsoft, nor claims direct affiliation.
The information on this page is provided for information purposes only.
DMCA.com Protection Status