CoreFoundation dll Error – What is it?
The CoreFoundation dll error is a common error associated with Apple Software products. Most of the Apple Software products rely on this dll file to load and run. This dll file is Apple’s proprietary.
The error message is prompted in the following format:
“CoreFoundation.dll was not found”
or
“Apple Application Support is missing’.
Solution
 Error Causes
The CoreFoundation.dll error message is triggered because of several reasons. These include:
- Deleted CoreFoundation dll file
- The CoreFoundation dll file has been overwritten
- Poor installation of the Apple software
- Corrupt software due to viral infection
- Registry problems
Further Information and Manual Repair
It is advisable to fix CoreFoundation dll error code right away to avoid inconvenience. This error may stop you from accessing and running your desired Apple application.
Here are some of the best ways to resolve this error on your system:
1. Restore the Deleted CoreFoundation dll File
Since Dynamic Link Library is a shared program, if you happen to delete an
Apple program on your PC, chances are you might have deleted that file too in the process.
Therefore, the easiest way to recover and restore the CoreFoundation dll file and resolve the error is to look for the file in the recycle bin. If you can’t locate it, then another way to restore the missing CoreFoundation dll file is to download the files from the internet.
2. Reinstall Apple Software
If the error still persists then it is advisable to re-install Apple software via iTunes or any other Apple Software that you have on your PC.
For example, if you have iTunes, then to reinstall it first go to the start menu and then the control panel. Now click on Add/Remove programs and locate iTunes software. Click the Uninstall button next to iTunes. Wait for a while until the program is completely uninstalled.
After the installation is complete, restart your PC and then download the
latest version on iTunes and install it. Now try running the software again. Hopefully, this will resolve the issue.
3. Scan for Viruses
Another way to resolve CoreFoundation dll error on your system is to scan for viruses. Run an antivirus to detect viruses and remove them from your PC.
4. Clean Your Registry
Remember DLL file errors also indicate a corrupt registry. When you don’t clean the registry it overloads with unnecessary and obsolete files like junk files, cookies, temporary internet history, and bad /invalid registry entries.
When these files accumulate, they damage the registry, dll, and system files too. It also causes
disk fragmentation. To repair the registry and fix dll files again, download a registry cleaner.
Whether you want to scan for viruses or clean the registry, it is advisable to download Restoro.
This is a multi-functional and advanced PC Fixer deployed with an intuitive algorithm and multiple powerful utilities. These include an antivirus, a registry cleaner, Active X controls, and class scanner, and a system optimizer.
The registry cleaner detects all registry issues and resolves them instantly. It wipes out the unnecessary files cluttering and damaging the registry. It fixes and restores the damaged dll files including CoreFoundation dll file thereby resolving the error. It takes a few clicks to resolve this error.
The antivirus feature scans your entire PC and removes all kinds of malicious software including spyware, malware, viruses, and Trojans.
To ensure the antivirus does not slow down the speed of your PC, Restoro also features a system optimizer that boosts the performance of your computer significantly.
It is powerful and bug-free software with a user-friendly interface that makes it quite easy to operate. You can download it on any Windows version as it is compatible with all.
Click here to download Restoro and resolve CoreFoundation dll error now!

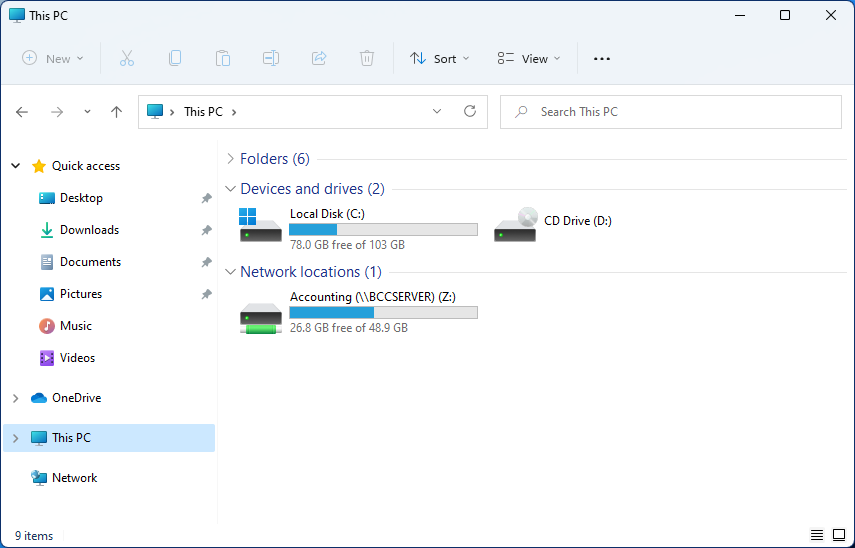 Mapping network drive has many benefits in terms of speed and ease of access of files via network. It lets you access the hard drive over the whole network like it was the hard drive inside your PC case. In order to easily and quickly map a folder as a network drive follow the guide below.
 Microsoft’s initial Windows 11 hardware requirements were not really well received by users and they were not really clearly represented from the start making a lot of potential customers slowly drift away from the hype.
It seems that Microsoft has acknowledged this since they have changed their tune about system hardware requirements for the upcoming Windows 11.
It seems that Windows 11 will be able to be officially installed on unsupported computers but with a little inconvenience.
Microsoft’s initial Windows 11 hardware requirements were not really well received by users and they were not really clearly represented from the start making a lot of potential customers slowly drift away from the hype.
It seems that Microsoft has acknowledged this since they have changed their tune about system hardware requirements for the upcoming Windows 11.
It seems that Windows 11 will be able to be officially installed on unsupported computers but with a little inconvenience.

 Windows 11 has brought some bad reviews for its inability to change the taskbar location to the screen. Luckily we can still hide it if needed.
In order to hide the taskbar from the screen follow these simple instructions:
Windows 11 has brought some bad reviews for its inability to change the taskbar location to the screen. Luckily we can still hide it if needed.
In order to hide the taskbar from the screen follow these simple instructions: