Logo

How to Fix Low Wi-Fi signal strength on Windows 10

If you are experiencing a Low Wi-Fi signal strength on your Windows 10 PC after you’ve updated or reinstalled it, read on as this post will guide you on what you can do to fix the problem.

The way devices connect these days has evolved with our cognitive revolution. Various devices use some or other wireless technology to connect with other devices. However, all wireless technology has some kind of limitation when it comes to range and signal strength. From time to time, you might have faced several Wi-Fi issues. Low Wi-Fi signal strength usually happens after you update or reinstall your Windows 10 system. This issue can be identified easily by looking at the signal bars in the Wi-Fi icon or by measuring its strength. Since this problem is wide scope, there are tons of possibilities which is why this post covers the most generic situations that could help most users. Refer to the options given below to fix the low Wi-Fi signal strength of your Windows 10 PC.

Option 1 – Try running the Network Adapter Troubleshooter

If a few days ago the range and signal of the Wi-Fi was perfectly fine before you did an update or reinstall, it is possible that there were some changes made in the configuration as well. In most cases, the latest configuration that came with the update has not aligned the config in your computer or laptop. The easiest and simplest way to fix this is by using the Network Adapter Troubleshooter. How? Follow the steps below.

  • Right-click on the Wi-Fi icon from the system tray to start troubleshooting.
  • After that, select Troubleshoot problems. Note that it might take a while to run it but once it’s finished, it will show you all the problems with the network adapter.

Note: The Network Adapter Troubleshooter will also fix the issues in the background but there might be some issues that will require manual action. And if the troubleshooter wasn’t able to identify and fix the problem for you, proceed to the next given option below.

Option 2 – Try using the Device Manager

If the problem is related to hardware, you need to seek out the help of the Device Manager. To do so, follow the steps below.

  • Pull up the Device Manager.
  • Next, look for your Wi-Fi adapter under the Network Adapters.
  • Once you found it, right-click on it and open Properties.
  • After that, you will see all the actions related to drivers under the driver tab.
  • You can either update or roll back the selected driver or you could also disable and re-enable it to see if the problem’s fixed.

Note: If updating the driver didn’t help, you might have to dig into the advanced settings. From this post on, it can get a bit complicated as there are terms that you might not understand as well as some configuration. To make it easier for you, you can search for your Wi-Fi adapter online and try following the instructions from there. And before you make any further changes to your computer’s settings, make sure that you create a system restore point first.

Option 3 – Try changing the Wi-Fi Roaming Sensitivity

If you want to enhance the Wi-Fi reception as well as the performance on your Windows 10 PC, you might want to change the Wi-Fi Roaming Sensitivity or Aggressiveness. Roaming Sensitivity is the rate at which your computer chooses and switches to the nearest available point of access which offers a better signal. It is based on the strength and quality of the Wi-Fi and not on the distance to the Wi-Fi point.

Option 4 – Try adjusting the Wi-Fi range

The issue could also be caused by the position of your computer with respect to the Wi-Fi router instead of your hardware or drivers. It could be that your physical location might be a factor for the low signal strength of your Wi-Fi so you might want to adjust the Wi-Fi range to fix the problem.

Do You Need Help with Your Device?

Our Team of Experts May Help
Troubleshoot.Tech Experts are There for You!
Replace damaged files
Restore performance
Free disk space
Remove Malware
Protects WEB browser
Remove Viruses
Stop PC freezing
GET HELP
Troubleshoot.Tech experts work with all versions of Microsoft Windows including Windows 11, with Android, Mac, and more.

Share this article:

You might also like

Show more/less details when copying/moving
When we initiate the copy or move files command we get a dialog that shows us the progress of the current operation, under that bar we can click on the little arrow to expand the bar into so-called more details view where we get more information like which file is being copied, more detailed graph, etc. Windows will remember the last option we had and next time when we start the same process it will open the last view. But what if we want to only have one view always open as default, even if we change it? Let's say that we always want to have a detailed view opened always as our default even if we switch to a minimal one? Well with some tweaks in the registry of Windows we can. Note that this guide will require changing things in the registry of Windows itself, it is always smart and recommended to make a safe backup of your registry, just in case.

FOR ALWAYS SHOW MORE DETAILS FOLLOW THIS GUIDE:

open notepad and paste the following code inside: Windows Registry Editor Version 5.00 [HKEY_CURRENT_USER\Software\Microsoft\Windows\CurrentVersion\Explorer\OperationStatusManager] "EnthusiastMode"=dword:00000001 Go to File > Save as... and once the file save dialog opens choose at the bottom all files under file type. Save the file with extension .REG naming it whatever you want. Right-click on file and choose Merge, confirm with YES and you are done, now each time when you start copy or move operation details view will be open.

FOR ALWAYS SHOW FEWER DETAILS FOLLOW THIS GUIDE:

open notepad and paste the following code inside: Windows Registry Editor Version 5.00 [HKEY_CURRENT_USER\Software\Microsoft\Windows\CurrentVersion\Explorer\OperationStatusManager] "EnthusiastMode"=dword:00000000 Go to File > Save as... and once the file save dialog opens choose at the bottom all files under file type. Save the file with extension .REG naming it whatever you want. Right-click on file and choose Merge, confirm with YES and you are done, now each time when you start copy or move operation minimal details view will be open.
Read More
How to install and remove fonts in Windows 10
Once a tedious and unfriendly task of installing fonts has been severely made easier and more user-friendly. As technology advances daily so do some tasks. One of these tasks which today look unnecessarily complicated is fonts installation in Windows. What was once complicated navigation to control panel with an administrative account, today is two-click with the mouse anywhere, well anywhere on your hard drive, but still a great improvement nonetheless. Ok, so you have found cool new font which you like very much and you are eager to try it out, but how do you install it in Windows so your other software can find it and use it? The task is incredibly easy, let's presume that you have downloaded desired font or fonts to your hard drive from the internet, they are nicely placed in a folder, all you have to do is select which one you would like to install, right-click on any one selected and click on install. That's it, that is all that you need to do. Now in order to remove fonts first, you will have to go to the folder which has all fonts installed in the system. The location of this folder is conveniently enough c:\Windows\Fonts. In there select all fonts that you would like to uninstall from the system and simply delete them, that's it.
Read More
Software review series: BitWarden
BitWardenMany times we were talking and writing here on Errortools.com about security, privacy, hacking, identity theft, etc. We tried to raise important security questions and I hope I have managed to at least shed some light and change maybe some bad behaviors for some, helping them embrace better routines about their security on their PC. 
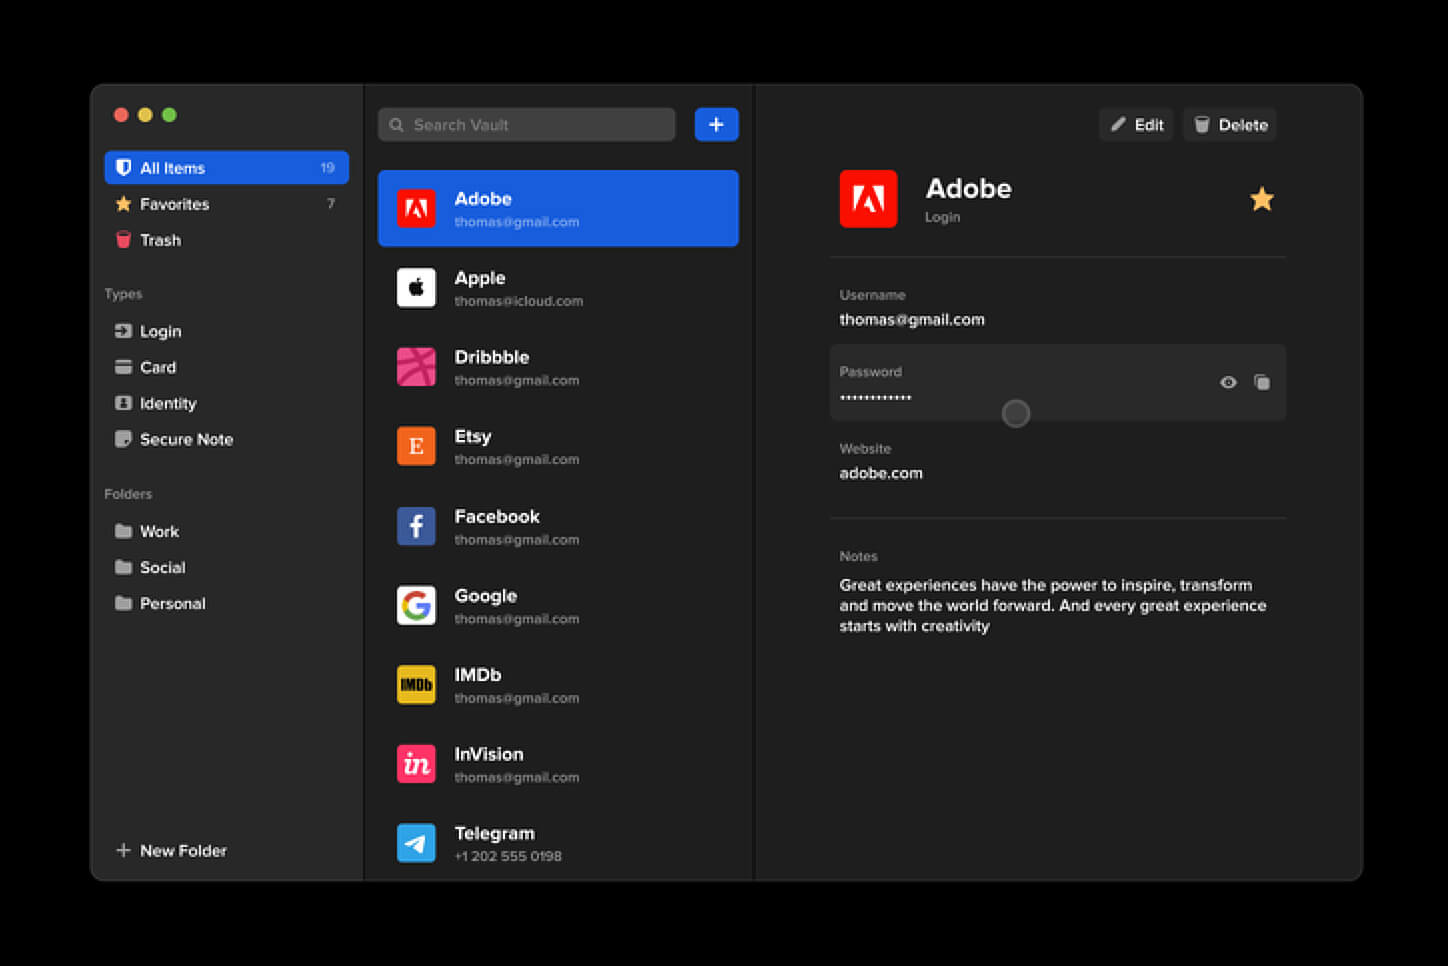
In this light, I will today present you with one neat and awesome piece of software, a password manager worth your time and money (if you want premium features): BitWarden.

What BitWarden offers?

The first thing that it offers is the completely free basic plan, granted BitWarden is not an open-source project nor completely free but it has an unlimited free basic plan that will cover 90% of user needs. There is also a free basic unlimited plan for Organizations letting you and one more user share files and other stuff via BitWarden making it a cool option if you need it. Premium features offer you encrypted sharing of files, two-step login, 1GB file attachments (encrypted), Bitwarden Authenticator (TOTP), Vault Health Reports, Emergency Access, and Priority Support. The cost for all of these additional features is 10 USD per year for an individual plan or 40 USD per year for organizations where you will get an increase of maximum users from 2 to 6. Yes, you read that correctly, only 10 USD per YEAR for the whole set of features. Granted if you do not need any of them, enjoy the free version forever. Besides very low premium cost BitWarden will offer you compatibility with all major browsers and devices including both Android and iOS platforms making it a great cross-platform solution to login and maintain your passwords anywhere with just one click. Once installed all you need to do is set one master password and be very careful not to lose or forget this one, if you do all of your other generated passwords will be lost forever.

Features

Secure Password Sharing

Share your encrypted data quickly and easily, and only with the users or teams who need access

Cross-Platform Accessibility

Access critical data in your Bitwarden vault from any location, browser, and device

Cloud-Based or Self-Host

Get up and running in minutes in the cloud or you can self-host Bitwarden for complete data control

Security Audit & Compliance

Open source and third-party audited, Bitwarden complies with Privacy Shield, GDPR, CCPA regulations

Vault Health Reports

Access insightful reports to reveal weak, reused passwords, and other helpful data security metrics

Directory Sync

Our powerful Directory Connector streamlines user and group onboarding and keeps them in sync

Always-On Support

Our Customer Success agents are available to support you around the clock

Detailed Event Logs

Bitwarden creates audit trails to help you keep track of user and group access to sensitive data

Flexible Integrations

Unite your existing systems with Bitwarden using SSO authentication, Directory services, or powerful APIs

Conclusion

There are many password managers out there but via recommendation I have tried BitWarden and truth to be told, I really never felt the need to try anything else, it is great at what it does and it is moving forward with features and it is constantly updated and maintained.
Read More
Airplane Mode turns on by itself in Windows
As you know, Airplane mode is the one that gets devices in such a state where all the wireless connections are turned off. However, recently, there are some reports from users claiming that the Airplane Mode turns on by itself in their Windows 10 computers. This kind of problem could be due to an error with the Network driver, third-party applications, and many other factors. Other users also reported that the Airplane Mode automatically flickers, while some stated that they aren’t able to toggle the option for Airplane mode. There are several options you can try to resolve this problem. You can try to configure the Power Management settings for the driver or run the Network troubleshooter. You could also roll back, reinstall or update the Network driver, as well as troubleshoot the problem in a Clean Boot State. For more details, follow each one of the given options below.

Option 1 – Try configuring the Power Management settings for the driver

The first thing you can do to fix the problem is to try configuring the Power Management settings for the driver. How? Refer to these steps:
  • Tap the Win + X keys to open the WinX menu and from there, select the Device Manager to open it.
  • Next, expand the Network adapters and select the entry for your Wi-Fi hardware.
  • After that, right-click on it and select Properties.
  • From there, go to the Power Management tab and uncheck the “Allow the computer to turn off this device to save power” option.
  • Once done, restart your computer and see if it has fixed the problem.

Option 2 – Try to run the Network troubleshooter

To run the Network Troubleshooter, refer to these steps:
  • Open the Search bar on your computer and type in “troubleshoot” to open the Troubleshoot settings.
  • Next, scroll down and select the “Network Adapter” option from the right pane.
  • Then click on the Run Troubleshooter” button.
  • After that, your computer will check for any possible errors and will pinpoint the root cause of the problem if possible.
  • Restart your computer.

Option 3 – Try to update, rollback or reinstall the Network adapter drivers

The next thing you can do to resolve the problem is to update the Network Adapter drivers by following these steps:
  • Tap the Win + R keys to launch the Run window and then type in the “devmgmt.msc” command and hit Enter to open the Device Manager window.
  • Under the Device Manager, you will see a list of drivers. From there, look for the Network Adapters and expand them.
  • Look for the Broadcom Network Adapter and right-click on it, as well as other network adapters that have an exclamation icon, and update them all.
  • Restart your PC and see if it helped in fixing the problem.
Note: If updating the network drivers didn’t help in fixing the problem, you can also try to roll back the very same drivers from their previous versions and restart your Windows 10 PC. After that, the system itself will reinstall the drivers you just uninstalled. Alternatively, you can also download and install the drivers from the manufacturer’s website directly. To reinstall the network adapter drivers, refer to these steps:
  • Open the Devices Manager from the Win X Menu.
  • Then locate the device drivers and right-click on them to open the Properties.
  • After that, switch to the Driver tab and click on the Uninstall Device button.
  • Follow the screen option to completely uninstall it.
  • Finally, restart your computer. It will just reinstall the device drivers automatically.

Option 4 – Try to reset the Network Adapter

You can also try to perform a Network Reset to resolve the problem. This will reset the entire network configuration including your IP address. To perform Network Reset, follow these steps:
  • Tap the Win + I keys to open Settings.
  • From there, go to the Network and Internet section.
  • Next, scroll down and look for “Network Reset” under the status pane.
  • After that, click on Network Reset and then on Reset now to start resetting the network configuration. Once done, check if it is able to fix the error or not.

Option 5 – Try putting your computer in a Clean Boot State

You can also troubleshoot the problem in a Clean Boot state. It could be that there are some third-party applications in your computer that are causing the Airplane Mode to behave in a strange way. So, to isolate this possibility, you need to boot your computer in a Clean Boot State be using these steps:
  • Log onto your PC as an administrator.
  • Type in MSConfig in the Start Search to open the System Configuration utility.
  • From there, go to the General tab and click “Selective startup”.
  • Clear the “Load Startup items” check box and make sure that the “Load System Services” and “Use Original boot configuration” options are checked.
  • Next, click the Services tab and select the “Hide All Microsoft Services” check box.
  • Click Disable all.
  • Click on Apply/OK and restart your PC. (This will put your PC into a Clean Boot State. And configure Windows to use the usual startup, just simply undo the changes.)
  • After you’ve set your computer into a Clean Boot State, try to observe if the Airplane mode is now back to normal or not.
Read More
SettingSyncHost.exe High CPU usage
One of the important processes in the Windows operating system is the Setting Synchronization or SettingSyncHost.exe. This process is the one responsible for synchronizing the settings of your computer with other devices. It is the one that replicates settings like OneDrive, Internet Explorer, wallpapers, and so on, to other systems. However, it has been known to cause high CPU usage in Windows 10 and there are times when it causes the system to freeze or system lags. So if you notice that the SettingSyncHost.exe process is causing high CPU usage in your computer, worry not for this post will guide you in fixing them. You have to be cautious when you notice high CPU usages caused by system processes since cybercriminals mostly set the names of viruses in a way that the system or the user won’t be able to identify them. Cyber crooks could name the virus and malware the same as one of the system processes like SettingSyncHost.exe to make it seem like it’s a legitimate process. Thus, you need to keep in mind that original system processes like the SettingSyncHost.exe file are located in the System32 folder. The original SettingSyncHost.exe file is located in the System32 folder. To check for the same, right-click on the troublesome process in the Task Manager and select Open file location. If the place is any other than the System32 folder, run a full system anti-virus scan on the system. The SettingSyncHost.exe causes high CPU usage when it gets stuck in the sync process and is not able to come out of the loop. To fix this problem, you need to follow the solutions offered below but before you proceed, make sure that you create a System Restore point first.

Option 1 – Apply some registry tweak

The first thing you can do is to apply some tweaks to the Windows Registry. To get started, follow these steps:
  • Tap the Win + R keys to open the Run utility and type “Regedit” in the field and then tap Enter to open the Registry Editor.
  • Next, navigate to this registry path: HKEY_CURRENT_USERSoftwareMicrosoftInputPersonalizationTrainedDataStore
  • From there, right-click on the key and select Permissions.
  • After that, check the box next to “Allow” for Full Permission for every user group.
  • Now click on the Apply and OK buttons to save the changes made.
  • Then restart your computer.

Option 2 – Close the Host process for setting synchronization

If the registry tweak didn’t work, you can try to close the host process for setting synchronization, especially if this process continues to hog resources. You can terminate this process by opening the Task Manager. From there, end the process or task of the host process. On the other hand, you can also turn off the Host process for synchronization by opening Settings > Accounts > Sync settings located in the left pane. After that, turn off the Sync setting.

Option 3 – Run the Hardware and Devices Troubleshooter or the Performance Troubleshooter

Hardware and Devices Troubleshooter:

  • The first thing you need to do is click on Start and then on the gear-like icon to pull up the window for Settings.
  • After opening Settings, look for the Update and Security option and select it.
  • From there, go to the Troubleshoot option located on the left-hand side of the list.
  • Next, select Hardware and Devices from the list and open the Troubleshooter and run it. Once it is doing its job, wait for it to complete the process and then restart the system.
  • After the system restarts, check if the problem’s now fixed. If not, refer to the next option given below.

Performance Troubleshooter:

  • Tap the Win + R keys to open the Run dialog box.
  • Type “exe /id PerformanceDiagnostic” in the field and hit Enter to open the Performance troubleshooter.
  • Then click on Next to get started. Wait until the process is completed.

Option 4 – Try scanning your computer using Windows Defender

As mentioned, it is possible that the SettingSyncHost.exe could be infected with a virus or malware. To eliminate it, you have to scan your computer using security programs like Windows Defender.
  • Tap the Win + I keys to open Update & Security.
  • Then click on the Windows Security option and open Windows Defender Security Center.
  • Next, click on Virus & threat protection > Run a new advanced scan.
  • Now make sure that Full Scan is selected from the menu and then click the Scan Now button to get started.
Read More
Diablo 2 Resurrected facing server issues
It has been some time since the release of Diablo 2 resurrected and overall reception was pretty good. People are enjoying the old classic game in hi-def. resolution and with new and improved visuals. Sadly some server issues are present still until this day and somewhat spoil the experience for players. diablo 2 server statusThe greatest lag and server crashes are pinpointed to game-creating events. When a player creates a new online game, the server needs to pull a lot of details from the database and make a game, due to some legacy code present this process takes some time and it is demanding a bit on the server-side, and although code was optimized to cater to more modern approach some legacy code still remains. Another thing that was spotted to affect performance itself is player behavior, to be more specific, modern gamer behavior. Where players find good builds and runs on the internet and then go to farm-specific areas or bosses for loot or experience points, which in return boils down to making plenty and short runs that are made by creating games and after run eliminating them. Now pair that with the previous statement about legacy server and database code and you can add 1 and 1 and see how this might be an issue. A lot of short games over legacy code are placing games in a state it was not designed for back in 2001 and therefore we have issues. Sadly solutions without completely rewriting the whole code are not very promising and they include rate limiting, which will prevent players to create many games in succession in a short period of time and maybe even login queues to drop a load on servers. Blizzard reached to people in the whole company, even old diablo 2 developers to ask for advice and they say that they are working on solutions so they could lift limitations and have everything running fine.
Read More
Step By Step Guide to Fixing Regsvr32.exe Error On Windows

What is Regsvr32.exe Error?

Regsvr32 (Microsoft Register Server) is a command-line utility in Microsoft Windows Operating System. This is used for registering and unregistering OLE controls such as ActiveX controls and DLLs in the Windows Registry. This is executed as Regsvr32.exe.  The filename extension .exe is the abbreviation for executable.   It is installed in the %systemroot%System32 folder in Windows XP and new Windows versions. The Regsvr32.exe is an error that occurs when you attempt to run Regsvr32.exe to register a 32 bit DLL (Dynamic Link Library) on a 64-bit version of Windows. The error message is displayed as the following:
  • Filename.dll is not an executable file and no registration helper is registered for this file type.
  • Unrecognized flag: /invalid_flag
  • No DLL name specified
  • Dll_Name is not an executable file and no registration helper is registered for this file type.
  • The module "%1" failed to load.

Solution

Restoro box imageError Causes

There are multiple causes for the Regsvr32.exe error code. These include:
  • Invalid entry (command) path
  • Active X control errors
  • Missing or Damaged .dll files
  • Viral infection (Trojans) (.exe can easily get infected by viruses)
  • Registry issues
If you come across the Regsvr32.exe error code, it is advisable to repair it immediately before the damage sets in. Since this may occur due to viral infection, it can pose privacy and data security risks to your PC.

Further Information and Manual Repair

Here are solutions that you can implement to resolve the Regsvr32.exe error code on your system:
  1. If an invalid entry point is the cause of the error, then simply open an elevated command prompt. If the 32-bit DLL is in the %systemroot%System32 folder, then move it to the %systemroot%SysWoW64 folder. After that run the following command: %systemroot%SysWoW64regsvr32 <full path of the DLL>. This will help resolve the Regsvr32.exe error.
  2. If the cause of the error is a viral infection, then you will need to run a powerful antivirus to detect and remove viruses from your system to resolve the Regsvr32.exe error on your system.
  3. Nonetheless, if the causes for Regsvr32.exe are either Active X controls or registry corruption, then you will need to scan your computer with different tools to resolve each issue separately.
This can be time-consuming and too many program installations at one time can also slow down your system’s performance. This means you’ll also have to compromise on your PC’s speed.

Repair Regsvr32.exe Error With Restoro

To avoid all this hassle yet repair the Regsvr32.exe error, download Restoro. This is a multi-functional and innovative PC repair tool deployed with multiple utilities in one program including features like a registry cleaner and an Active X controls error fixer. It also functions as a system optimizer. It is a one-stop solution for all your PC-related errors including the Regsvr32.dll error. It is safe, efficient, and user-friendly. It is compatible with all Windows versions. When the RAM overloads it leads to damaged dlls and registry corruption. The registry cleaner utility repairs the damaged dll files and the corrupt registry. It wipes out all the unnecessary files cluttering the RAM including the junk files, invalid registry entries, and temporary files. Restoro also has an Active X controls scanning utility. This utility can be of great use if the Regsvr32.exe error is triggered by Active X control-related issues. Click here to download Restoro and resolve Regsvr32.exe on your computer right away.
Read More
Windows 11 new features and preview
Microsoft has presented its next version of their flagship product, Windows 11, and feelings are divided among users. Some users like it very much and eager to upgrade, some do not like the graphic overhaul it went through, but overall I think Microsoft has done a good job with it. Here in this article, we will discuss some of the new features which Windows brings to the table, well at least ones that were showed, I am sure there are plenty more which we will see once OS has been released.

New Start menu

Winodws 11 start menu
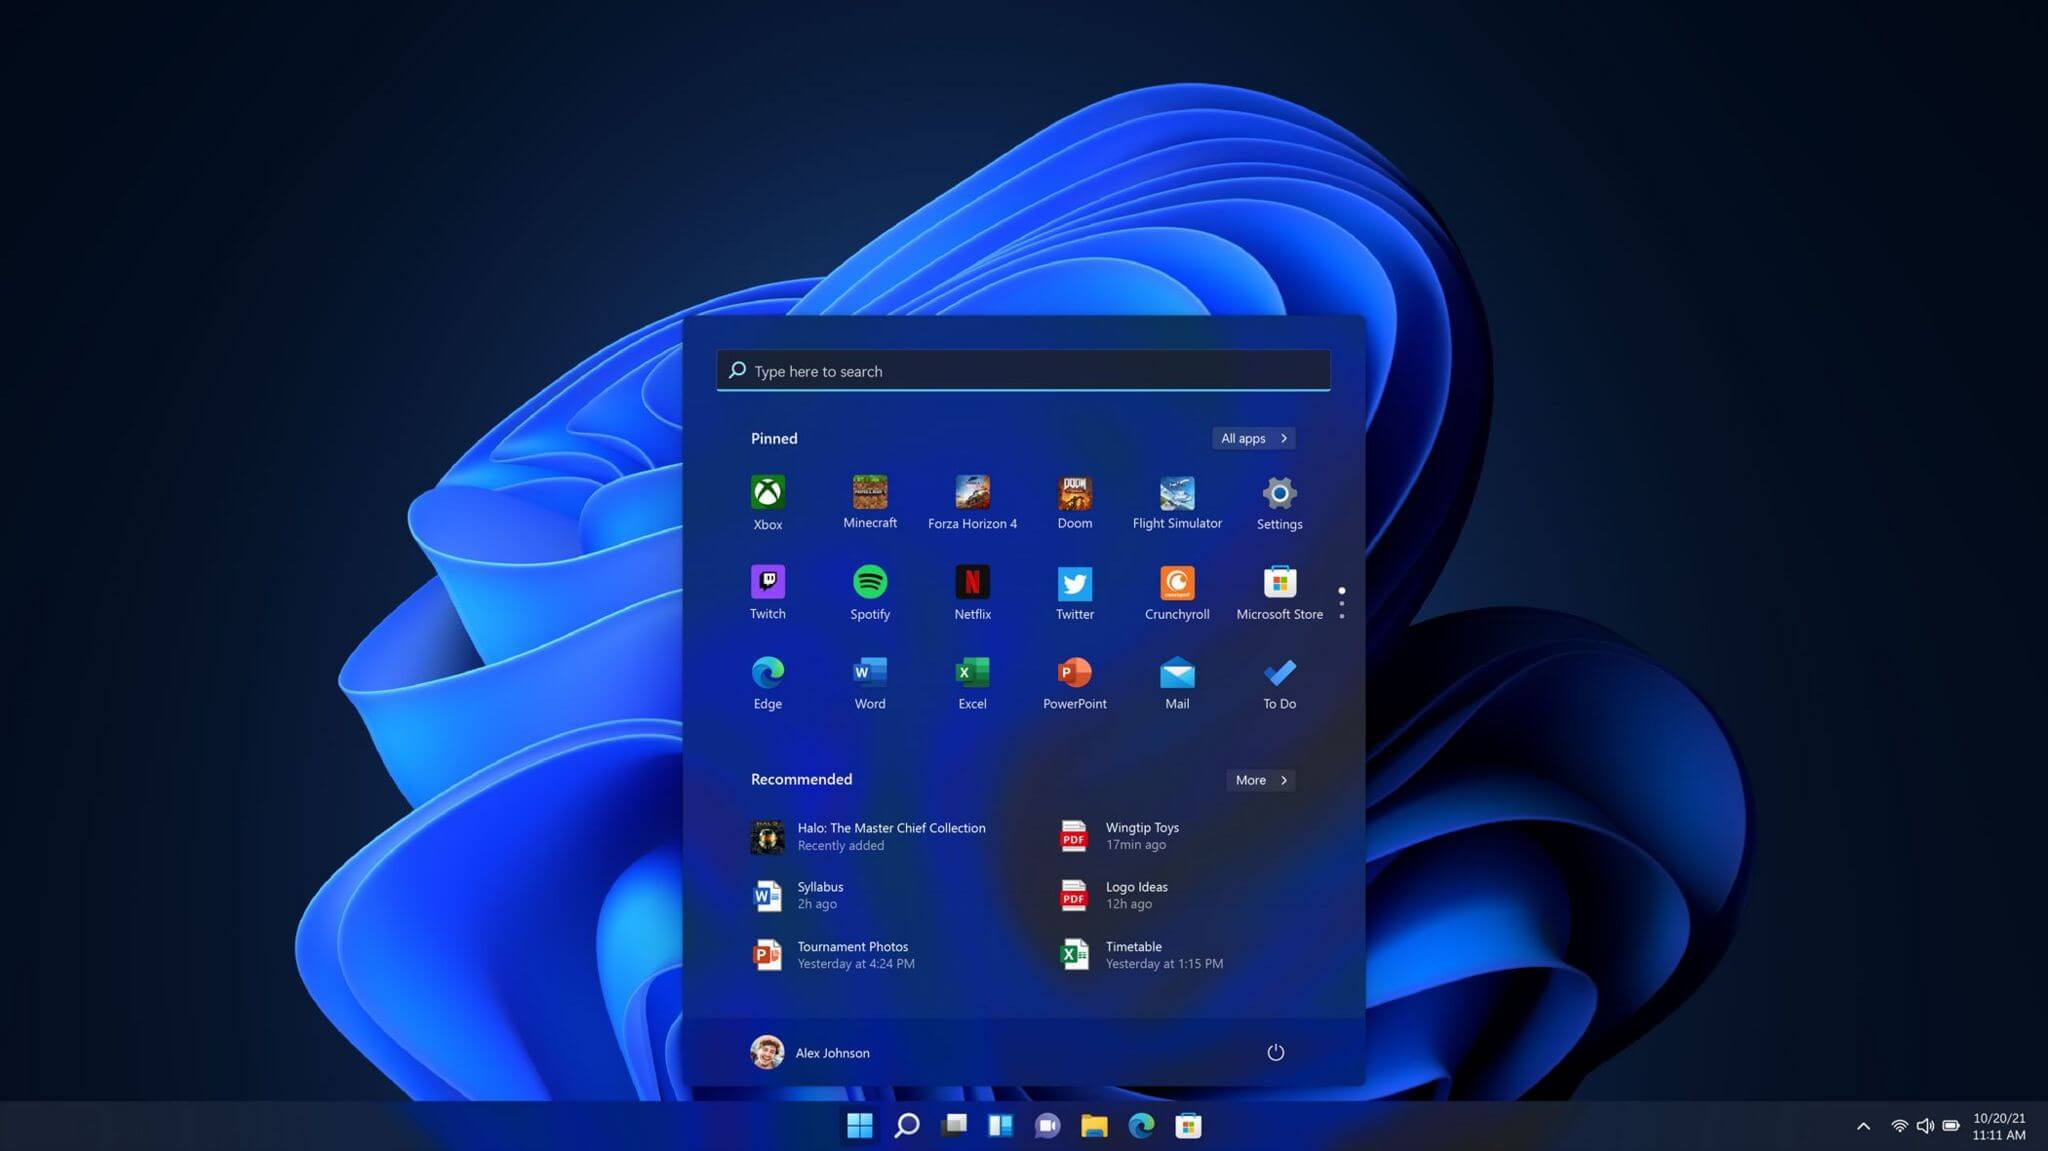
One of the first things that everyone saw when Microsoft has unveiled Windows 11 is its Start menu. Funny enough this is what has caused most of the divide among users, some find it interesting, and some do not like it. Truth is, it is different, and it is centered in the middle instead of the lower left part of the screen. It has been confirmed however that the Start menu can be moved to any part of the screen so if you want, you could place it on the lower left as it has always been. Live tiles do not longer exist in the Start menu, instead, we have styled simple icons.

Windows 11 Snap controls are great

Windows 11 snap controls
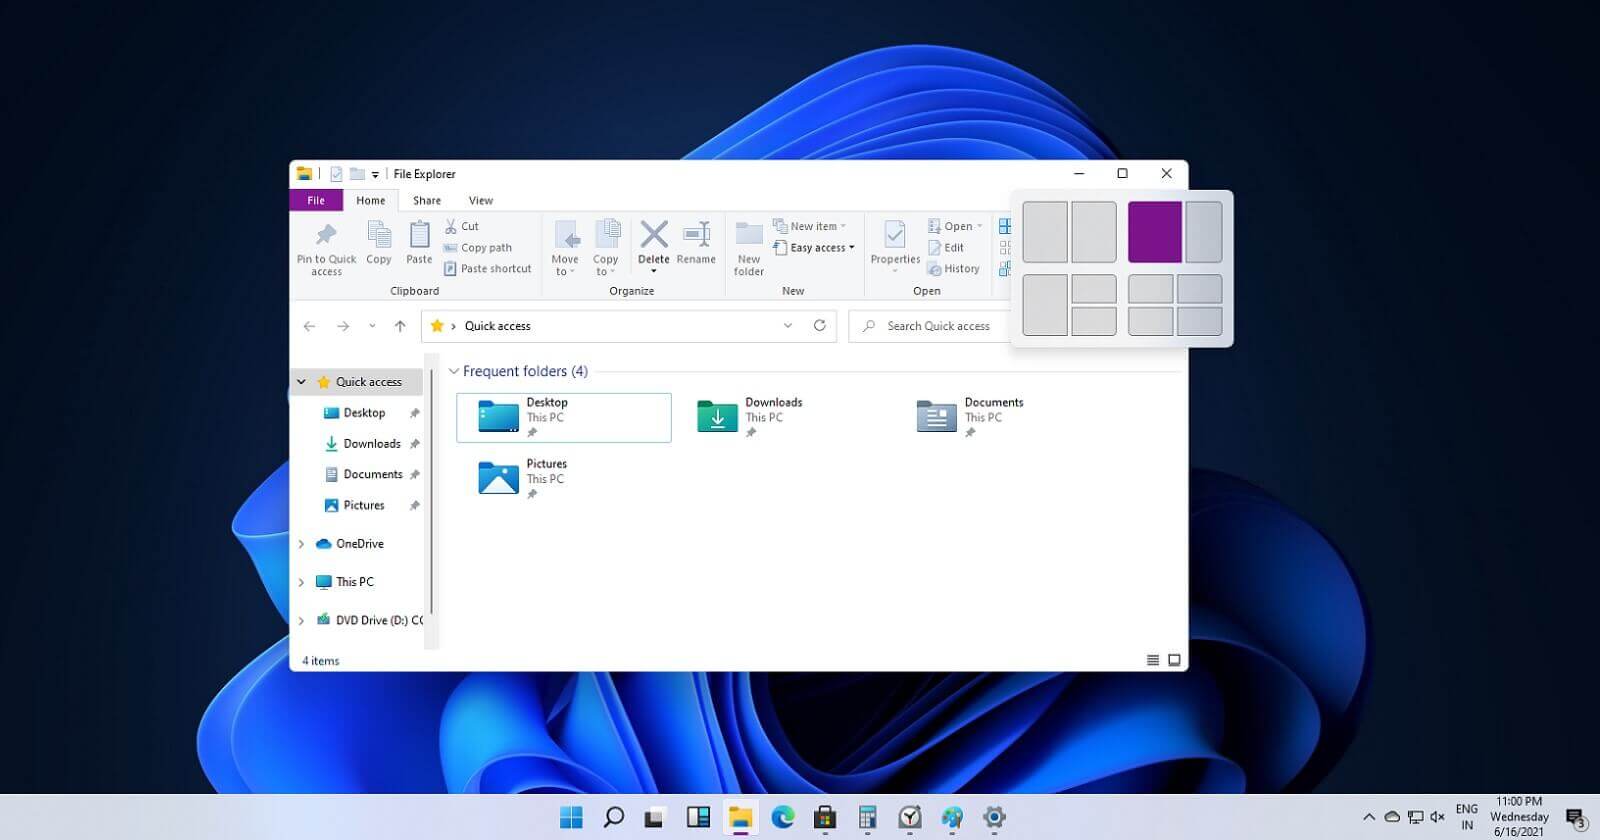
If you have used the cascade option in previous Windows versions then it is most likely that you will like the new Snap controls. You can quickly snap windows side by side, or arrange them in sections on your desktop just by hovering over maximize button on the title bar.

Windows 11 File Explorer

Windows 11 file explorer
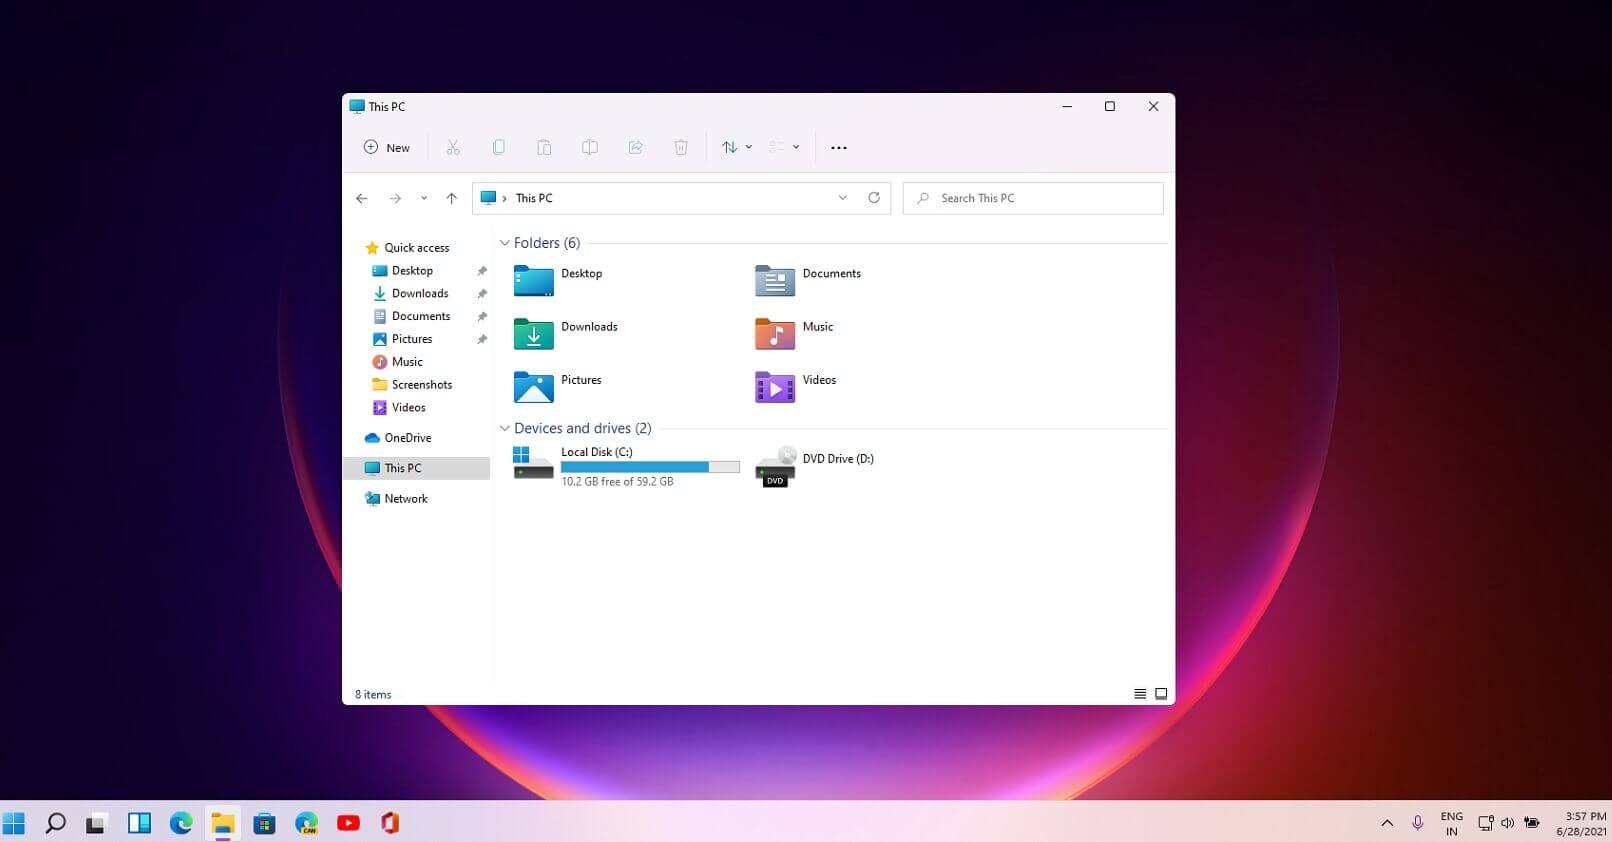
File explorer has gone through some visual and design changes, the ribbon on top has been completely removed and replaced with a header-like feature with a slick and clean design. The header contains a nice organized and designed single row of icons like cut, paste, copy, rename, delete, and new folder icons.

Settings app ovberhaul

Windows 11 settings app
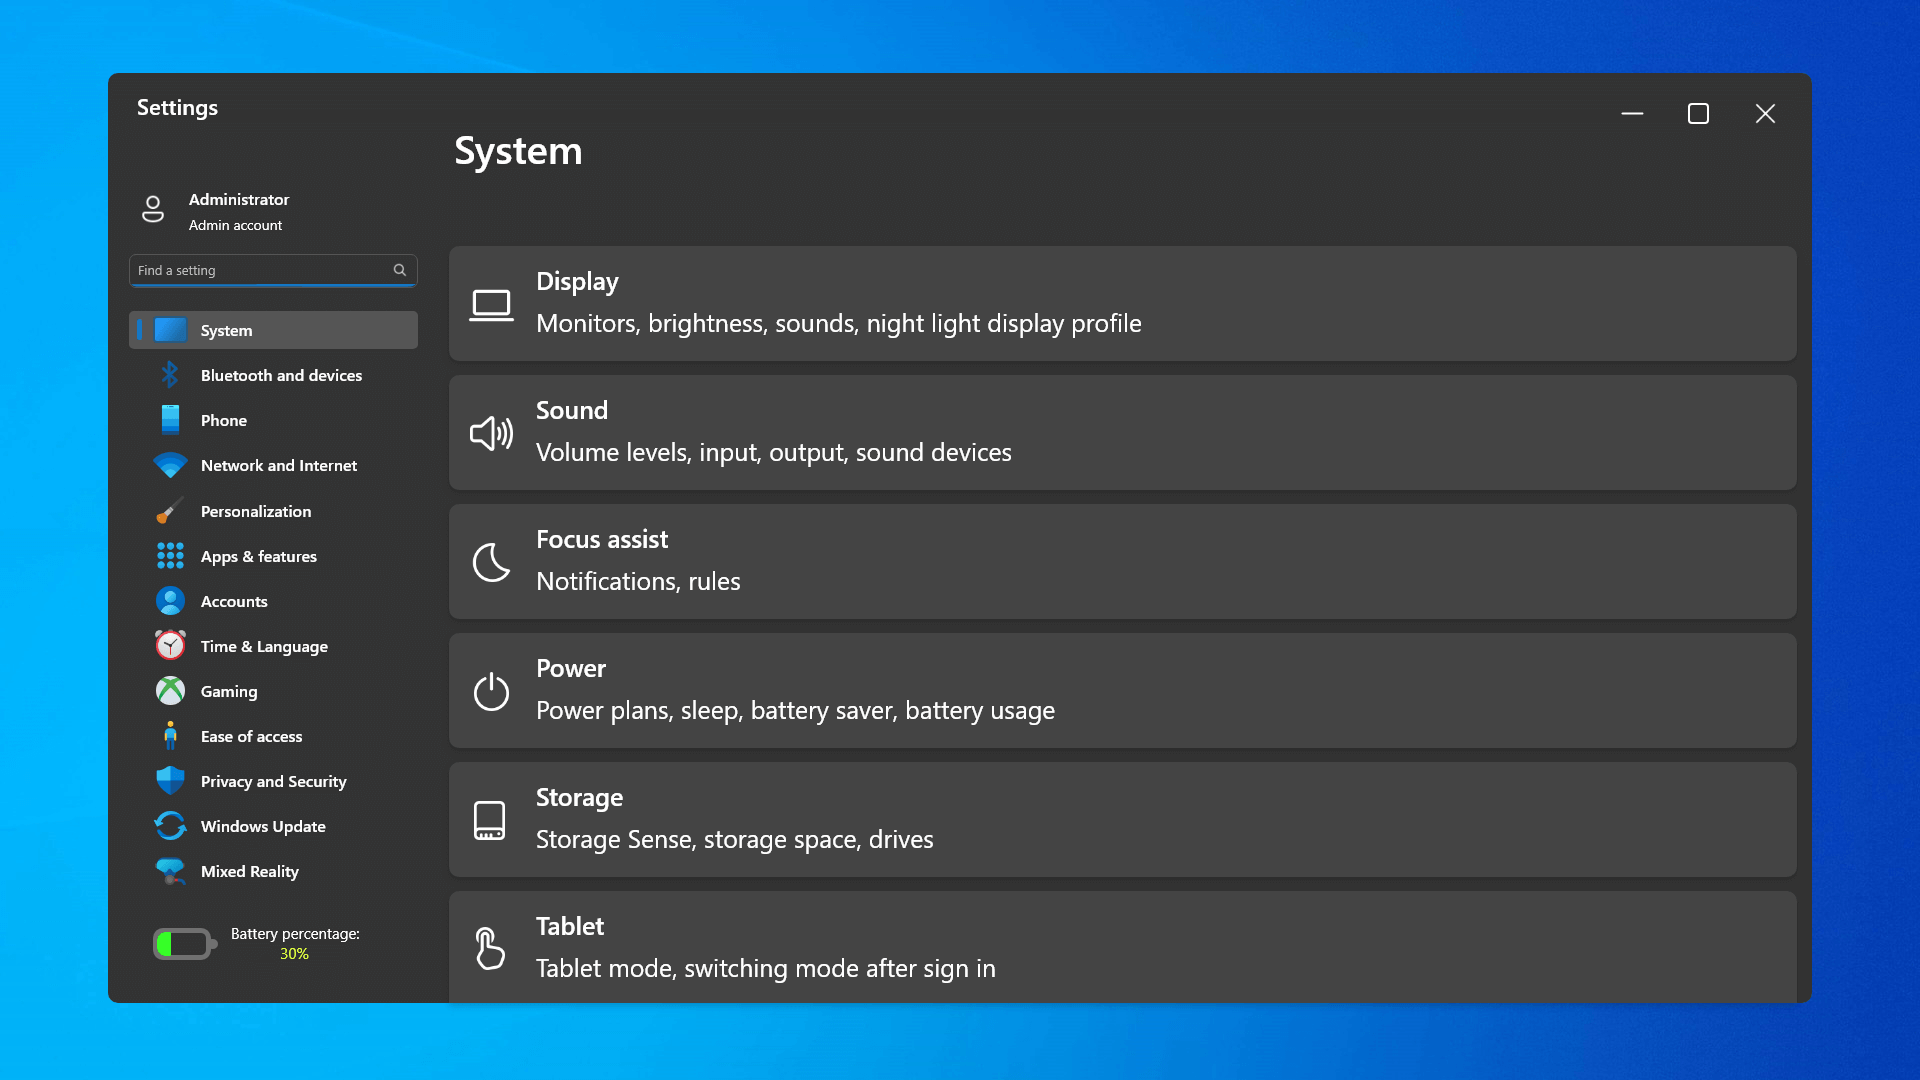
The settings app also has gone through visual and design changes. It has a new design that is very visually appealing and navigation has been simplified and more organized. Finding the right and desired setting is much faster and clearer now.

Widget tab makes comeback in Windows 11

Windows 11 widgets bar
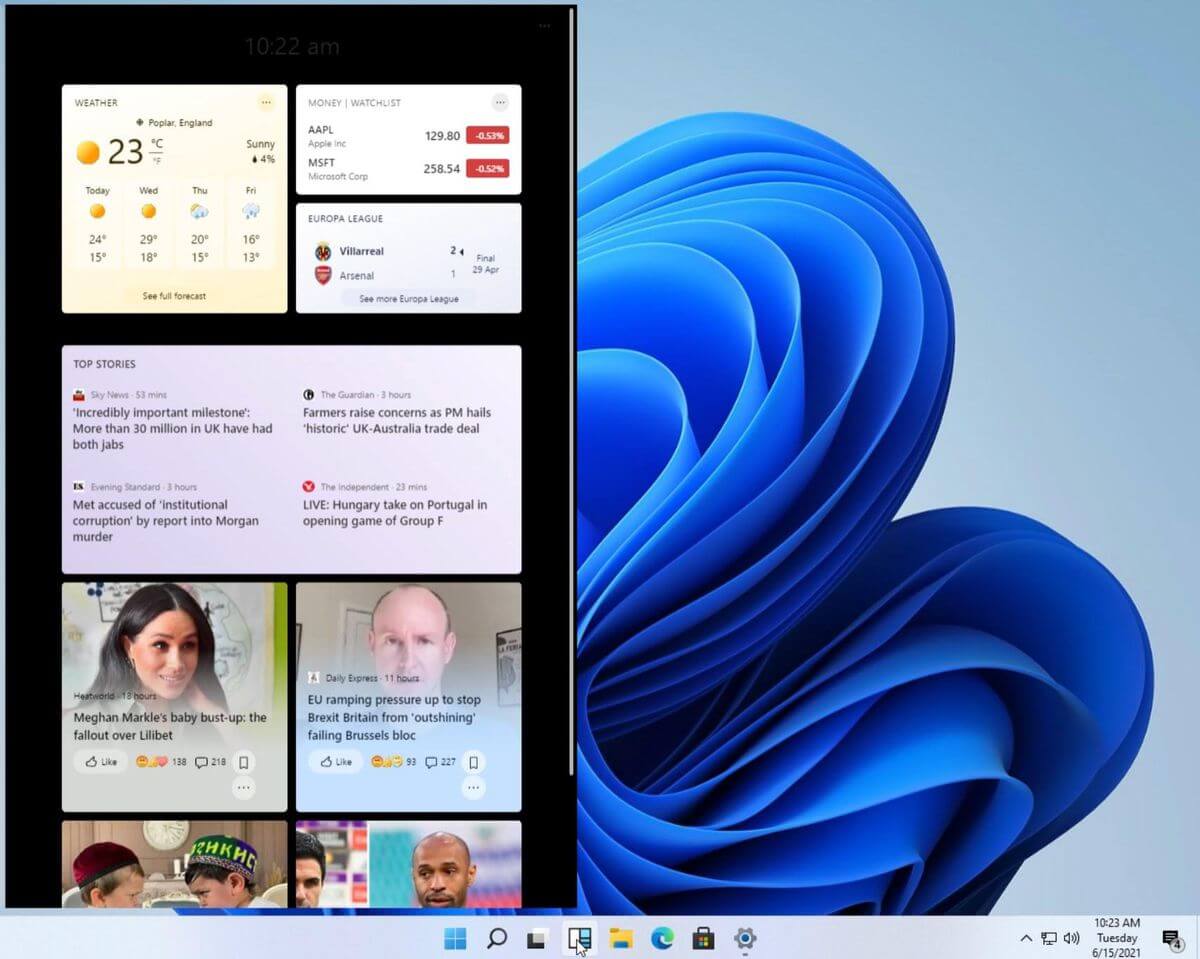
Yes, widgets are back but not like you remember them. Instead of being all-time present at your desktop like once they used to be, now there is a button on the taskbar which brings the widget bar up that contains desired widgets. This way they are easily accessible and do not clutter desktops. So far we have weather, news, calendar, and stocks widget but we will see how development on these goes. I expect to have community-made widgets like in old days for all of our needs.

XBOX app

Windows 11 xbox app
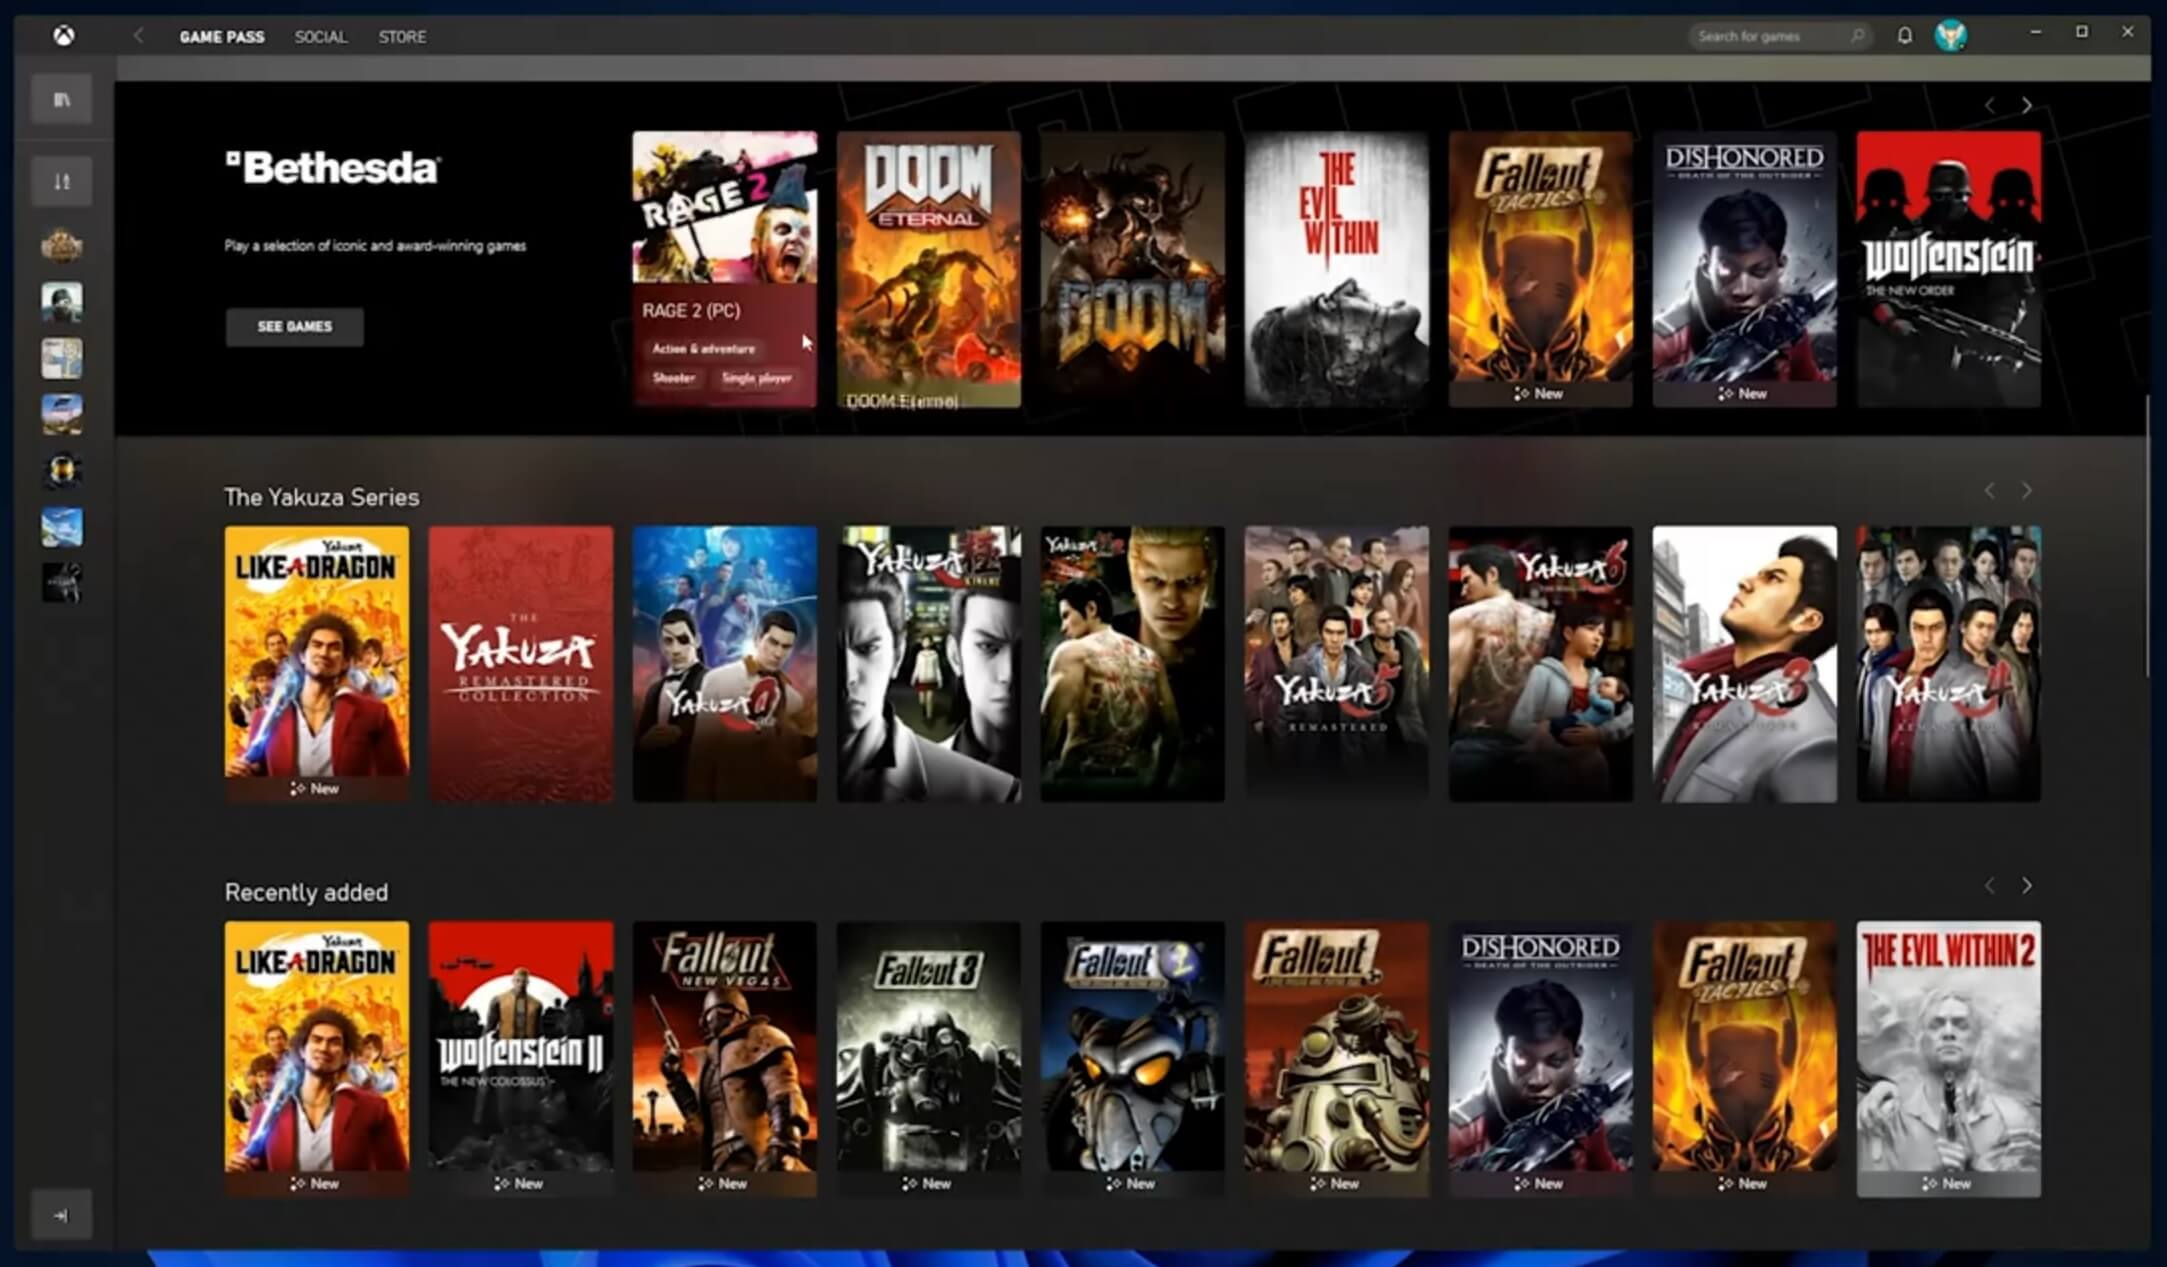
The new Xbox app is now integrated into Windows 11, offering quick access to Xbox Game Pass games, the social parts of the Xbox network, and the Xbox store.

Security and TPM 2.0 in Windows 11

Windows 11As widely known by now Windows 11 will require you to have a TPM 2.0 module capable CPU in order to install it. This system requirement has caused a lot of controversies but essentially it seems that MS's goal is to protect your personal data by using this module. The upside of course is that your data will be protected much more than in previous Windows versions, the downside, of course, will be that you will need newer hardware to run OS on it. and that is essentially it, keep on tuned on more Windows 11 information and overall articles tied to PC and technology here at errortools.com
Read More
How to Fix Error 0x8024a206 in Windows
When you upgrade or update your Windows 10 computer but you suddenly got Error 0x8024a206 while trying to install the updates, it is due to a rouge update that was downloaded or because of some corrupted component in Windows. In case you don’t know, any file downloaded by Windows is verified for its integrity and if the files don’t pass the integrity test, then Error 0x8024a206 will most likely pop up during the Windows update or upgrade.

Option 1 – Reset the Windows Update components to the default

You have to stop a couple of services such as BITS, Cryptographic, MSI Installer, and Windows Update Services. And to do that, you need to flush the contents in the SoftwareDistribution folder. The Software Distribution folder in the Windows operating system is a folder that can be found in the Windows directory and is used to store files temporarily which might be required to install the Windows Update on your PC. Thus, it is required by the Windows Update and maintained by WUAgent. Aside from that, it also contains all the Windows Update History files and once you delete them, you will most likely lose the Update history. As a result, the next time you run the Windows Update, it may result in a longer detection time.
  • Open the WinX Menu.
  • From there, open Command Prompt as admin.
  • Then type in the following command – don’t forget to hit Enter right after typing each one of them.
net stop wuauserv net start cryptSvc net start bits net start msiserver
  • After entering these commands, it will stop the Windows Update Service, Background Intelligent Transfer Service (BITS), Cryptographic, and the MSI Installer
  • Next, go to the C:/Windows/SoftwareDistribution folder and get rid of all the folders and files thereby tapping the Ctrl + A keys to select them all and then click on Delete. Note that if the files are in use, you won’t be able to delete them.
After resetting the SoftwareDistribution folder, you need to reset the Catroot2 folder to restart the services you just stopped. To do that, follow these steps:
  • Type each one of the following commands.
net start wuauserv net start cryptSvc net start bits net start msiserver
  • After that, exit Command Prompt and restart your computer, and then try to run Windows Update once more.

Option 2 – Re-register DLLs related to Windows Update

DLL files, also known as Dynamic Link Library, are parts of applications that are separated from the core program so that they can be used again as well as independently be updated. The DLL files are loaded into memory and then used. Note that they have to be registered with Windows so they can be loaded. So if they’re not, the main program will fail. And this is the same with the DLL files related to the Windows Update. Thus, you need to register them in order to resolve Error 0x8024a206.
  • In the Cortana search box, type “command prompt”.
  • From the search results that appear, right-click on Command Prompt and select the “Run as administrator” option.
  • After that execute the commands listed below one after the other and don’t forget to hit Enter right after you key in each one of them.
    • regsvr32 JSCRIPT.DLL
    • regsvr32 MSXML3.DLL
    • regsvr32 WUPS2.DLL
    • regsvr32 WUPS.DLL
    • regsvr32 WUAUENG.DLL
    • regsvr32 WUAPI.DLL
    • regsvr32 WUCLTUX.DLL
    • regsvr32 WUWEBV.DLL
Note: You also have the option to run the commands together via a batch file. Simply create a batch file by copying all the commands in a notepad and then save it as “WURegisterDLL.bat”. After that, run the batch file and it will execute the commands all at the same time. Then you have to restart your computer and see if it has fixed the Error 0x8024a206.

Option 3 – Run the System File Checker

The SFC or System File Checker scan could detect and automatically repair damaged system files that could be causing the Error 0x8024a206. SFC is a built-in command utility that helps in restoring corrupted files as well as missing files. It replaces bad and corrupted system files to good system files. To run the SFC command, follow the steps given below.
  • Tap Win + R to launch Run.
  • Type in cmd in the field and tap Enter.
  • After opening Command Prompt, type in sfc /scannow and hit Enter.
The command will start a system scan which will take a few whiles before it finishes. Once it’s done, you could get the following results:
  1. Windows Resource Protection did not find any integrity violations.
  2. Windows Resource Protection found corrupt files and successfully repaired them.
  3. Windows Resource Protection found corrupt files but was unable to fix some of them.

Option 4 – Run the Windows Update Troubleshooter

Running the built-in Windows Update troubleshooter could also help you resolve the Windows Update Error 0x8024a206. To run it, go to Settings and then select Troubleshoot from the options. From there, click on Windows Update and then click the “Run the troubleshooter” button. After that, follow the next on-screen instructions and you should be good to go.
Read More
How to Fix Installation Error 1628

What Is Installation Error 1628?

Installation Error 1628 is, as the name suggests, an installation error. When it occurs, a generic 1628 message is displayed to the user. When this message appears, it is either a problem with the install files or an issue with the InstallShield.

Solution

Restoro box imageError Causes

Installation Error 1628 is caused because every Windows-based program or application has been designed that such that it has to be installed on the computer for use. This installation process is important because it not only moves files to the appropriate location on one’s hard drive but also because the process creates registry entries in Windows System files. A vast majority of these programs and applications have a built-in tool that’s responsible for aptly performing this installation. This built-in tool is the InstallShield. This establishes that when this error occurs, it is either because of some unforeseen issue that occurred during the installation process or because of some problem with the InstallShield.

Further Information and Manual Repair

In order to keep this error from occurring in the future, some recommendations are outlined below.
  • Check the installation disc and determine if there are any smudges, scratches, or fingerprints on it. If the system is unable to read data from the disc, Installation Error 1628 will be generated. In order to ensure that the Installation Disc is clean, use a microfiber cloth. Dampen it lightly with water and clean the disc. Wipe the inside of the disc lightly in an outward direction, making sure that it is not wiped in a circular pattern. Try to reinstall the application or program after cleaning the disc. The issue should be resolved. However, if it persists, some problems may be with the InstallShield.
  • The alternative solution is to repair the InstallShield and the procedure goes as follows.
  1. Stop InstallShield’s running process. It may have been crashed and simply needs to be restarted. Now access task manager. Press Ctrl+Alt+Del and the task manager will open. Now go to the processes tab and disable ‘idriver.exe’ and ‘msiexec.exe’ from here.
  2. Now go to ‘C: Program Files/Common Files’. Here you will find the ‘InstallShield’ folder. Select ‘rename’ and modify the folder name to ‘InstallShield1’. Confirm rename and start the installation process again. Now Windows will try to re-install any InstallShield files one needs.
  3. If the error persists after renaming the InstallShield folder, download the Windows Installer from Microsoft’s website. This file will determine whether or not your version is valid. Old versions often have bugs that cause problems. Your system is now ready to be used.
Read More
1 2 3 171
Logo
Copyright © 2023, ErrorTools. All Rights Reserved
Trademark: Microsoft Windows logos are registered trademarks of Microsoft. Disclaimer: ErrorTools.com is not affiliated with Microsoft, nor claims direct affiliation.
The information on this page is provided for information purposes only.
DMCA.com Protection Status