Error code 0x80073afc deals with an antivirus program first built into Windows 8/8.1 This error occurs when Windows Defender, the built-in anti-virus software in Windows 8/8.1 and higher, does not start automatically and users attempt to manually start the program. During the initialization period of the program start-up, something goes wrong and users get a 0x80073afc Error message. The error message states there was a problem with the initialization of the program. Windows Defender provides protection of your computer and it is advised by the Microsoft Corporation that you ensure it starts up automatically on every start-up.
Solution
Further Information and Manual Repair
Users have found several manual repairs that have fixed the problem without needing to contact technicians for extra help. While the methods below should solve your problem easily, if this is the first time you have encountered the issue you may want to do a simple restart. This has fixed the problem for some users and is the easiest first troubleshooting move. If it doesn’t work move on to the methods listed below, which are easily completed without extra help.
Before trying any of these methods, please make sure that you are logged into a profile that is listed as the administrator of the computer of his administrative powers enabled. If this is not the case you will not be able to complete the following methods. Please log out and log back in on the administrator profile.
Method 1:
First, check to see if you have a third-party anti-virus program installed on your computer. Some users believe that the built-in Windows Defender program is not powerful enough to handle the safety of their computer so they usually download a third-party program. However, that program may have caused a conflict with Windows Defender and may not allow it to open. If you do have a third-party program installed, try uninstalling it then manually starting Windows Defender.
Method 2:
If method one does not work, you may be infected by malware or a virus that has tampered with the settings on your computer and will not allow Windows Defender to start automatically or manually.
First, open Run by holding the “Win” key and pressing the “R” key. Then type “Regedit”. The program will ask for permission to follow through with this action. Click on “Yes” and the Open Registry Editor will open.
Find the HKEY_LOCAL_MACHINESoftwareMicrosoftWindows NTCurrentVersionImage File Execution Option and check to see if there are any files similar to MSASCui.exe or MpCmdRun.exe. If there are any file entries that resemble that, you will want to right-click on them before selecting the “Delete” option. If you do not see any entries that match, this is not the issue with your Windows Defender and you will want to try another method.
The Registry on your computer is very important. It helps tell your computer what programs are safe to run, what programs should be run, and what programs should not be run. If it is tampered with by a virus or Malware, multiple system operations can be affected.
However, if you did find similar file names, and you deleted them, try to start Windows Defender manually. If it does not work again, move on to the next method.
Method 3:
If the first two methods do not work for your issue, and you are still receiving error code 0x80073afc when attempting to start Windows Defender, this step should solve the problem if you have Restore Point installed on your computer, which you most likely do.
For this method, we will be restoring your computer to a previous Restore Point. First, just like in method two, hold the “Win” key and press the “R” key. This will open run. Next type “Rstrui.exe” and click “ok”. After some time, you will see System Restore Windows. Click “Next” and select the restore point that you would like to go back to. After your computer has restored to the point you selected, check to ensure that Windows Defender has started correctly.
If the above methods aren't able to rectify the issue, you might have to download and install a powerful automated tool to get the job done.
The dialog boxes that you see on your Windows computer exist to send you a message or to notify you. However, you can also encounter issues with them. Recently, some users reported that they’re getting empty or blank dialog boxes. It’s definitely hard to choose between Yes or No or to click OK when you don’t know the context of the dialog box. If the same thing happened to you, worry not for there are some possible solutions that can help you fix the problem.
This kind of problem usually happens when there are some issues with the graphics driver or when there is some corrupted software. Whichever the case is, here are some fixes you can check out to fix the empty or blank dialog boxes on your Windows 10 computer.
Option 1 – Run the System File Checker
System File Checker or SFC is a built-in command utility that helps in restoring corrupted files as well as missing files. It replaces bad and corrupted system files with good system files that might be the cause why you’re getting the errors 0x8024a11a and 0x8024a112. To run the SFC command, follow the steps given below.
Type “cmd” in the Start search and then right-click on the appropriate search result.
Next, select “Run as administrator” to open Command Prompt with admin privileges.
After opening Command Prompt, type in sfc /scannow
The command will start a system scan which will take a few whiles before it finishes. Once it’s done, you could get the following results:
Windows Resource Protection did not find any integrity violations.
Windows Resource Protection found corrupt files and successfully repaired them.
Windows Resource Protection found corrupt files but was unable to fix some of them.
Now restart your computer and see if the problem is fixed or not.
Option 2 – Try to update or rollback the Graphics driver
You can try to update your Graphics card driver using the Device Manager in your computer to resolve the blank dialog boxes problem or you can also go directly to the website of your graphics card manufacturers like NVIDIA, Intel, or AMD and go to the section called Drivers then check if there’s a new available update – if there is, download and install it.
To update your Graphics driver via Device Manager, refer to these steps:
First, boot your computer into Safe Mode.
After that, tap the Win + R keys to launch Run.
Type in devmgmt.msc into the box and tap Enter or click OK to open the Device Manager.
After that, a list of device drivers will be displayed. From there, look for the Display Adapters and click on them.
After that, right-click on each entry under the Display Adapters and select the “Uninstall Device” option from the menu.
Now restart your computer.
After restarting your computer, go to the Settings app and Check for Updates in the Windows Update section.
Note: If updating the Graphics driver didn’t fix the problem, you can also try to roll back to its previous version and see if that helps.
Option 3 – Run the DISM tool
The next thing you can do is run the DISM tool. This tool is known to repair potentially corrupted files in your system as having them could also system issues like the blank dialog boxes. To repair these corrupted system files, you can run the DISM commands:
Tap the Win + X keys and click on the “Command Prompt (Admin)” option.
After that, input each one of the commands listed below sequentially to execute them:
Dism /Online /Cleanup-Image /CheckHealth
Dism /Online /Cleanup-Image /ScanHealth
Dism /Online /Cleanup-Image /RestoreHealth
Once you’ve executed the commands given above, restart your computer and check if the problem is now fixed.
Option 4 – Try to repair or reinstall the software
If the issue with the empty dialog boxes only occurs in a specific program, you can either try to repair the program or reinstall it. You can find the Repair option in the Add/Remove program section when you select the concerned program. If repairing the program didn’t work, you might have to uninstall it and then reinstall it.
Option 5 – Try troubleshooting the problem in a Clean Boot State
You might also want to troubleshoot the problem in a Clean Boot State. Doing so will help you isolate the problem. Refer to the steps below to do so:
Log onto your PC as an administrator.
Type in MSConfig in the Start Search to open the System Configuration utility.
From there, go to the General tab and click “Selective startup”.
Clear the “Load Startup items” check box and make sure that the “Load System Services” and “Use Original boot configuration” options are checked.
Next, click the Services tab and select the “Hide All Microsoft Services” check box.
Click Disable all.
Click on Apply/OK and restart your PC. (This will put your PC into a Clean Boot State. And configure Windows to use the usual startup, just simply undo the changes.)
Internal Error 2771 is an internal error code associated with Kaspersky Internet Security and Antivirus software. This error pops up when Kaspersky Internet Security software fails to install on your PC successfully.
Installation of the software is interrupted and therefore it ends prematurely. This happens mostly when you try to install a new build on an existing installation.
Internal Error 2771 is displayed in one of the following formats:
This error may result on your computer screen due to several reasons. Some of the most common underlying causes include:
A leftover Registry Key
Bad entries from previous Security Package
INFCACHE.1 file corrupted
Conflicts with other security software installed on your system
Further Information and Manual Repair
To successfully overcome this problem and ensure the successful installation of Kaspersky Internet Security software on your system, try the methods given below.
Method 1- Remove the Leftover Registry Key
Sometimes Internal error code 2771 may appear during installation due to the leftover registry key from the previous Kaspersky software removal.
A registry key is often created when uninstalling the previous Kaspersky version from the PC. This key is left behind even after you reboot your system.
This key is called AVP**_post_ uninstall, you need to delete it to ensure the new version of the Kaspersky program is installed successfully on your PC. For this, simply go to the start menu and type Regedit in the search bar.
Now navigate to HKEY_LOCAL_MACHINESOFTWAREMicrosoftWindowsCurrentVersionRun and then look here for the registry key called AVP**_post_ uninstall. In order to delete this file, right-click it and then select delete.
Once uninstalled, reboot your PC and then try installing the Kaspersky Internet Security program again.
Hopefully, this will resolve the issue. If the software installs smoothly, then the error is fixed, in case it still persists, then try other methods illustrated below.
Method 2 - Remove the INFCAHCE.1 Corrupt File
Another reason for the error pop-up may be INFCAHCHE.1 corruption.
This file is basically used to store driver information and inf file locations. However, if it contains corrupted information, then you must remove it.
To do this, go to the start menu and type cmd into the search bar. This will open a command prompt. Here type del C:\Windows\infinfcache.1. Now reboot your PC and try installing Kaspersky software on again.
Method 3 - Fix Software Conflict
Security software conflict can also result in internal error 2771 code display. And when this happens, the installation of Kaspersky prematurely ends.
Security software conflict may occur if you have Comodo Firewall installed on your PC. A firewall is known to cause issues with Kaspersky software programs.
The best way to resolve this issue is to uninstall all security software programs on your PC. Once all security software is removed, then install Kaspersky on your system. If the installation is successfully completed, then reinstall the other software again.
Method 4 - Download Restoro
Error 2771 can also result on your computer screen if traces of the previously installed Kaspersky software still remain in the registry despite the program removal. In such an event it is advisable to download Restoro.
This is a cutting-edge and user-friendly PC Repair Tool deployed with an intuitive interface and a powerful registry cleaner. The registry cleaner scans your entire PC in seconds and detects all registry-related problems.
It removes all the bad entries, invalid registry keys, traces of previously uninstalled programs, junk files, and cookies that are known for registry corruption. It takes just a few clicks to perform this process.
Once all traces are removed, you can install the new version of the Kaspersky Internet Security program on your PC without interruption.
Click here to download Restoro and be on your way to resolve Internal Error 2771 on your computer!
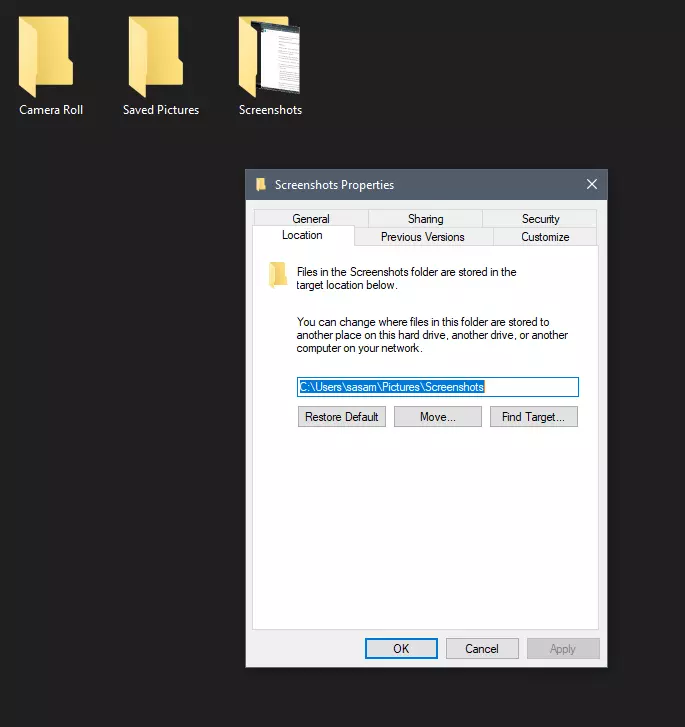
Each time when you press WINDOWS + PrtScn key on your keyboard a screenshot is taken and saved on your Hard drive, to be more precise, it is saved in a specific folder which is in c:\Users\Your user name\Pictures\Screenshots. Now, this specific location is not anything that's bad but it is a little deep and not so user-friendly for quick access.
Luckily this default location can be changed into any folder that you like.
Changing location
First thing is to open File Explorer and then navigate to your PC. Once you go to your PC, go to Pictures, and inside right-click on the Screenshots folder. If there is no screenshots folder inside, this means that since Windows was installed no screenshots were taken with WINDOWS + PrtScn key combination. Please note that just by pressing PrtScn you will create a screenshot but you will place it inside the clipboard ready to be pasted somewhere, with WINDOWS + PrtScn you are saving the screenshot directly in a file on your hard drive.
So once you clicked on the Screenshots folder, go to the bottom and click on properties. Inside properties go to the Location tab. In the location, tab clicks on MOVE and browse to your new location where you would like screenshots to be saved. Once you select the folder for screenshots, click on the Select Folder button and confirm with OK. After this, Windows will ask you would you like to move existing screenshots into the chosen folder. Click YES or NO, depending on your preference.
After this easy setup, all of your new screenshots will be placed now inside the chosen folder.
Thank you for reading and I hope to see you tomorrow. Take care.
Stop error 7B is a blue screen of death error code that occurs during Windows XP setup or after installation. The error message is displayed in either of the following formats:
‘A problem has been detected and Windows has been shut down to prevent damages’
Setup has encountered a fatal error that prevents it from continuing.
Setup cannot continue. Power down or reboot your computer now.
Solution
Error Causes
There is no one particular cause for this error. The Stop error 7B may be triggered due to multiple reasons. These include:
Boot Sector Viruses
Device Driver Issues
Poor Windows XP installation
Registry Corruption
If you come across this error code on your PC, it is advisable to fix it right away particularly because it is a blue screen of death error that can cause severe damages to your system. It can lead to system failure, crash, and valuable data loss.
Further Information and Manual Repair
Here we’ve listed for you the best PC repair solutions to resolve and fix stop error 7B.
Cause: Boot Sector Viruses
Solution: Stop error 7B can occur when infected with a boot sector virus. If this is the cause, then first download a powerful antivirus on your system. After downloading it, run it to scan your PC for viral infection. Immediately delete the viruses if found.
However, if the virus is too powerful, the antivirus may fail to remove it. In such an event, you will have to repartition and format your hard disk and then later reinstall Windows XP.
Cause: Device Driver Issues
Solution: If the boot controller is not properly configured or the driver is not updated, Stop error 7B can occur. When this happens, simply restart your system and press F8 to go to the advanced boot options.
Here choose the Last Known Good Configuration option. After that boot into Windows and then perform a system restore. Now go to the start menu and type Device Manager in the search box.
To access the Device Manager window it may prompt you to enter an administrator password, insert it to proceed. Now go to Device Manager and perform a driver rollback to reinstall the drivers generating this stop error.
By following these simple steps you can easily resolve device driver and configuration issues.
Cause: Poor Windows XP Installation
Solution: In this case, you will have to perform a Windows start-up repair. This can be done by booting Windows XP from CD. Simply press enter at setup Windows Screen when prompted. Then press R to repair Windows XP installation.
This procedure copies the original Windows files over the bad ones.
Cause: Registry Corruption
Solution: Sometimes the stop error 7B is also triggered by the registry corruption. When this happens, it is advisable to download and run Restoro software for PC scan and repair.
Restoro is a powerful, advanced, and highly functional registry cleaner. It is deployed with intuitive algorithms that detect registry issues and errors like Stop error 7B on your system in seconds. It wipes out clutter from your hard disk, repairs damaged files and the corrupted registry.
It is safe, efficient, and bug-free. It is also compatible with all Windows versions. In addition to this, it is also embedded with other utilities like an antivirus, a system optimizer, and Active X controls, and a class ID scanner.
Click here to download Restoro and resolve to stop error 7B on your PC immediately!
OpenCandy is an application that downloads and installs software, including other Internet Browsers to a computer system. Used as a bundle, this application installs additional programs that you may knowingly or unknowingly agree to install. Since most users don’t accept the challenge of reading the EULA in its entirety, they tend to download bundled applications unknowingly.
Assessment of OpenCandy PUP
During the initial assessment of OpenCandy, I was a little skeptical about what to look out for or expect. In fact, I had to install the OpenCandy.exe file twice to discern its behavior. I’m not sure how this application got its name but I do believe it has something to do with the fact that it supposedly helps Internet users open a new world of Internet browsing. That conclusion was arrived at after realizing that OpenCandy.exe installed mostly Internet browsers along with a tune-up tool on the test computer. However, as a result of the system requirements, there was a pop-up message indicating that Internet Explorer 8 was not compatible with the computer system in question.
In comparison to the malware I’ve encountered since I started researching malware, OpenCandy is everything but malicious. In fact, this application is only categorized as malware because of its’ subtle covert nature of installing bundled programs unsolicited by the user.
Additionally, OpenCandy coerces users into changing their Internet Browsers by installing those unrequested by the user. In fact, it’s no shock that OpenCandy chose to install the Internet Browser ‘Opera’ as a part of this bundle since it’s one of the least used browsers according to the Federal Government. Clearly, this was a smoothly disguised advertisement or promotion to force users into using the Opera Browser, along with Internet Explorer 8.0.
While these aforementioned browsers in themselves aren’t malicious and are in no way considered malware, they were installed as a promotional tool and without the request of the user. Despite being mentioned within the EULA, advertisers are capitalizing on this since most users do not bother to read the agreements when installing a program.
Furthermore, OpenCandy, like most other bundled applications I’ve dealt with, threw in a tune-up tool as a part of the promotion. I found this tune-up application annoying since I had to hassle my way into getting it to close from the computer screen. I can only imagine the hassle users would go through trying to remove this software.
Image 7: Depiction of a scan performed by Tuneup Utilities. The scan detected that several areas on the test PC could be optimized/tuned up.
Image 8: After a scan was completed using the Tuneup utility program, I was given an option to buy the full version. Nothing is wrong with this marketing strategy. In fact, most utility tools if not all will scan your computer to detect threats or loopholes, but they won't exactly allow you to fix those problems unless you buy the full version. It's not unfair, it's just business.
Programs installed during the installation of OpenCandy include:
Web Companion: Developed by Lavasoft, Web Companion is said to be an application that serves as a security defense for your Internet browsers by preventing unauthorized changes (see image below)
Tuneup Utilities: Tuneup Utilities does exactly as it says. It cleans up a computer system, whereby preventing unused programs from slowing it down.
Opera Stable 30.01.1835.88: Opera is a fast, simple, and effective Internet browser that allows users to get around on the web.
All in all, the intent of installing an application such as OpenCandy is to unleash a world of promotion or advertisements on your computer. They are pretty annoying and in some cases difficult to remove. Furthermore, as a user, you want to control what gets installed on your computer without being dictated to or coerced in some EULA that you probably overlook.
To completely remove OpenCandy PUP from your computer, click here to download and install Spyhunter.
Still sitting on the fence about upgrading to Windows 11 because you don’t know what to expect? Interestingly, the new edition somehow manages to be both a total revamp and still very similar to its predecessor in many ways. It’s really something to experience for yourself.
We do want to give you a sneak peek, though. So here’s an overview of the biggest changes Windows 11 brings to the table.
What’s different in Windows 11?
1. Visual changes
The first thing anyone will notice after switching to Windows 11 is the striking visual difference. The entire interface is smoother, cleaner and more minimalistic than on Windows 10, even resembling the macOS in some instances. Perhaps the most obvious change in appearance is the Start menu and Taskbar location, which is now at the bottom center. It’s actually very neat, but if you’re someone who loves familiarity, don’t worry, you can move it back to the left.
Centralized Taskbar and Start menu
Moreover, you’ll notice that the Taskbar includes a Microsoft Teams icon by default (which you can, of course, remove) and that Live Tiles are gone. The News and Interests section has also been removed - or, shall we say, replaced. As opposed to Windows 10, news, weather forecasts and other information are now displayed as widgets.
To add to the cleanliness of the UI, Microsoft also enhanced the ‘Snap Layouts’ feature to help you better organize your windows and maximize screen real estate. It’s similar to app grouping on your smartphone. In Windows 10 this feature is slightly restricted, as it requires some manual resizing and dragging. In Windows 11, you can just hover over the minimize/maximize option on a window, select a layout and throw the windows in there.
Snap Layouts
2. New accessibility features
Microsoft has certainly paid attention to accessibility with Windows 10, but Windows 11 takes this to a whole new level.
One of the ways Windows 11 has taken things up a notch is by adding the long-awaited ‘Live Captions’ feature and advanced Narrator options.
Live Captions apply both to media played on your PC as well as your own speech when you’re using the microphone. Keep in mind that, as with almost all kinds of subtitles, you have to be prepared for a potential delay. However, it’s barely noticeable and doesn’t take away from the usefulness of this awesome new feature whatsoever.
As for the Narrator, there are three new voice packs to choose from. Microsoft has tried to put emphasis on a more natural voice than we are used to. So, now you can choose between Aria, Jenny and Guy, who will read pretty much anything off your screen out loud. Aside from this, Microsoft has also expanded the list of braille displays supported by the Narrator feature. For users with anxiety or trouble concentrating, a welcomed addition is the Focus app, which is no longer part of the Clock app. It’s now separate and called ‘Focus Sessions’, automatically triggering the Do Not Disturb mode when activated. It blocks all pop-ups and flashes and lets you work in peace until you’re ready to switch it off.
3. Android apps
Android users may rejoice! Windows 11 supports the use of your favorite applications now.
Microsoft has done this by integrating the Amazon Appstore to the Windows 11 Microsoft Store. From there, you can download your favorite Android apps and use them on your PC in a smartphone-like window.
Unfortunately not too many apps are supported at this time, but Microsoft is working on making the emulation possible for many more. Also, the option is only available in specific regions at this moment - check out if you’re one of the lucky ones.
4. Improved gaming performance
Avid gamers will be happy to hear that Microsoft has put some effort into streamlining Windows 11 for their gaming needs.
To give gamers a supreme visual experience, Windows 11 offers the ‘Auto HDR’ feature. As long as your monitor is HDR-compatible, this feature will automatically adjust the colors, brightness and contrast of games without any input from you.
Another update is DirectStorage, which we were introduced to in Windows 10 already. In Windows 11, it’s been improved to tweak loading times and overall gaming performance efficiency even better. The predisposition for it to work optimally is that your device has an NVMe SSD.
The Xbox Game Bar also helps gamers towards a smoother experience. It allows in-game screenshots, viewing processes that are running (similar to the Task Manager), monitoring the CPU and GPU performance and frame rate, integrating the Xbox App and more. There’s also a number of widgets you can now use with the Game Bar, for example the Spotify widget.
Xbox Game Bar
Another cool addition is the Xbox Game Pass, which unlocks hundreds of games to play on your Xbox App, with new additions coming in every month.
5. Smart App Control
Aside from a sleek new look and better accessibility for all users, Windows 11 also comes with a security power-up. Bear in mind that this feature is only available on clean Windows 11 installs.
Smart App Control (SAC) is an AI-powered new feature designed to protect your PC from potential threats. It blocks untrustworthy apps and adware and helps detect potentially unwanted apps, maintaining your PC’s performance and keeping your system safe.
It comes with an ‘Evaluation’ mode, which you should definitely select when running SAC for the first time. That way, the app monitors your usage and assesses whether you’re a candidate for SAC. Some users need it to be on all the time, for others it might be too distracting. Evaluation mode will turn SAC on or off based on your usage.
Don’t disable SAC again unless you’re absolutely sure you don’t need it, since reenabling it will require a fresh install. We recommend you don’t turn it off, as it is a neat feature protecting your data and files from malware at all times.
Summary
Have we piqued your interest in trying Microsoft’s latest OS? It’s a pretty exciting new iteration, but we’ll let you find out for yourself. We hope you like it!
Error code C1900107 is associated with an issue with upgrading to Windows 10. If you are trying to upgrade your Windows 7, Windows 8, or Windows 8.1 to Windows 10, you might have trouble doing it and you might come across this error C1900107. The error prevents you from upgrading to Windows 10 no matter what you do.
Common symptoms of this error:
The update process continues for a long time and never ends.
The update process ends suddenly and a message says “Failed: 1 update. Errors found: Code C1900107. Windows Update encountered an unknown error.”
The update process fails after trying multiple times.
Solution
Error Causes
Following reasons may be responsible for this error:
There is not enough space for Windows 10 files in the primary drive
There is not enough space in System Reserved Partition
Windows 10 files are faulty or corrupt
More Information and Manual Repair
Method 1:
Clean boot Windows 8 and Windows 8.1:
Whenever you get some unexpected behavior on your Windows 8, the first thing you should do is try to resolve the issue by taking a diagnostic approach. Plenty of factors can be the cause for issues like slowdowns, BSODs, computer freezes, sudden reboots, etc. The best way to detect the problem is to perform a clean boot. Using a clean boot, you can find out if the Operating System is damaged by some third-party app or bad driver. You can exclude the influence of these factors and prevent them from loading.
You should do 2 things before you proceed with the clean boot.
First, check if any third-party application is causing the problem. If you disable all third-party apps from startup, it will help eliminate software conflicts.
Press the Windows + R on the keyboard. The Run dialog box will pop up.
Type MSConfig in the dialog box and click "OK".
The System Configuration utility will appear on the screen.
On the services tab of the System Configuration dialog box, tap or click to select the Hide all Microsoft services check box, and then tap or click Disable all.
On the startup tab of the System Configuration dialog box, tap or click Open Task Manager.
On the startup tab in Task Manager, for each startup item, select the item and then click Disable.
On the startup tab of the System Configuration dialog box, tap or click OK, and then restart the computer.
Now, close MSConfig.
Method 2:
The second step is a Safe boot. Follow the steps below for a safe boot:
Press Win + R shortcut keys on your keyboard. The Run dialog will appear on the screen. Type MSConfig and press Enter.
The 'System Configuration' application will appear on the screen.
Switch to the 'Boot' tab, select your Windows 8.1 entry and tick the 'Safe mode' checkbox.
Reboot your PC to enter the Safe mode of Windows 8.1.
After you finish troubleshooting in Safe Mode, run MSConfig again from Safe Mode and uncheck the checkbox from step 2.
Method 3:
For this method, you will need to find the $Windows.~BT Folder in your primary drive which is C:. This folder might contain corrupt files which are preventing you from installing Windows 10. The folder is hidden and we need to unhide it. Follow the steps below:
Open File Explorer or alternatively double click on This PC or My Computer.
Now from the top option click on View, The Check the Box that says Hidden items.
Now you will be able to see hidden files and folders. Navigate to C:$Windows.~BT and Rename the folder to something like $Windows.~BT1.
Now, try downloading Windows 10 again. The installation process should go through this time without any errors like code C1900107.
Method 4:
If the above methods fail, try this method:
Go to C:\Windows\Software Distribution\Download. Now delete all the files from this download folder. Remember, do not delete the folder itself, and just delete the files.
Now, delete the $Windows.~BT Folder. This might ask you for administrator permission. Simply click yes.
Now try to install or upgrade to Windows 10. This method should work fine and there should be no error code C1900107.
If you do not possess the technical expertise required to accomplish this yourself or do not feel comfortable doing so, download and install a powerful automated tool to get the job done.
To understand Dxgkrnl.sys error code, it is important to develop an understanding about Dxgkrnl.sys file. Dxgkrnl.sys is a type of system file associated with Windows 8 Consumer Preview ISO images that are developed by Microsoft for the Windows OS.
System files like Dxgkrnl.sys are third-party device drivers, critical system files. These files enable attached PC hardware such as a printer to communicate with 3rd party software programs like web browsers and Windows 8 Consumer Preview ISO images.
Dxgkrnl.sys error code is a blue screen of death error. It occurs when the Dxgkrnl.sys files are unable to function properly. This is a critical error. It can cause system failure, crash, and data loss. Therefore, it must be resolved immediately before the damage is done.
The error may pop up in any one of the following formats
A problem has been detected and Windows has been shut down to prevent damage to your computer. The problem seems to be caused by the following file: Dxgkrnl.sys."
"Your PC ran into a problem and needs to restart. We’re just collecting some info, and then we’ll restart for you. If you would like to know more, you can search online later for this error: dxgkrnl.sys."
Some of the common symptoms of this error code include
Blue screen
System freeze
And sudden shutdown
Solution
Error Causes
Dxgkrnl.sys error code may be triggered due to several reasons. These include:
Incorrectly configured or corrupted Windows 8 Consumer Preview ISO images device drivers
Windows registry issues
Malware infection
Hardware conflict
Damaged hard disk
Further Information and Manual Repair
To resolve Dxgkrnl.sys error code on your PC, here are some effective and easy DIY methods that you can try:
Method 1 - Scan and Remove Viruses
Dxgkrnl.sys error may occur due to malware and viral infection. If this is the cause, then it is advisable to download a powerful antivirus and scan your entire PC. Remove all viruses from your system to resolve the error.
Method 2 - Utilize Windows System Restore to Undo Recent System Changes
Windows System Restore is an in-built powerful tool that enables Windows Operating System users to restore previous your PC to its former state. To repair Dxgkrnl.sys error, use this tool.
It can help you avoid hours of troubleshooting headaches associated with SYS errors. To get started, simply go to the start menu, type System Restore in the search box and press Enter.
Now click on System Restore to proceed. If you are prompted for an administrator password, insert it to move to the next step. Now to bring your computer to its former state, simply choose a restore point.
To activate these changes, reboot the PC. This is most likely to resolve the issue.
Method 3 - Clean the Registry
The registry is a collection of databases. It stores much of the information and activities you perform on your system including unnecessary and obsolete files like junk files, cookies, internet history, bad and invalid registry entries.
These files accumulate in the registry and damages and corrupt the registry itself. Due to this runtime and BSoD errors are triggered.
To repair and clean the registry manually can be time consuming and technical, therefore it is advisable to download Restoro. This is a user-friendly PC Fixer embedded with a powerful registry cleaner.
The registry cleaner scans your entire PC, wipes out all bad entries, cookies and unnecessary files, cleans the registry and repairs the damaged system files in seconds.
Click here to download Restoro and resolve Dxgkrnl.sys error today!
If you encounter an error code of 0xa0000400 while trying to upgrade your Windows 10 computer using the Windows 10 Upgrade Assistant or the Windows 10 Media Creation Tool, then you might find this post useful as it will guide you in resolving this problem. When you get this error, you will see the following error message:
“Something went wrongYou can contact Microsoft support for help with this error. Here is the error code 0xa0000400.”
As you know, keeping your computer up to date with all the Windows Updates is important and is imperative especially if you are experiencing a couple of issues like the Windows Upgrade error 0xa0000400. At the time of writing, there is no specific cause that has been found for this error. However, there are some potential fixes that might help you. You can try to recreate the Windows 10 installation USB and get the ISO files or you could also get a newer version of the Windows Media Creation Tool, or turn off your internet connection at a specific time or run the Windows Update troubleshooter. For more details, refer to the options given below.
Option 1 – Try to recreate the Windows 10 installation USB
Recreating the Windows 10 installation USB might help in fixing the problem. You can use a USB drive to do so but make sure that it has a great read-write speed. Follow the steps below to recreate Windows 10 installation USB”
Click this link and then click the Download Tool Now button.
Next, click the “Use the tool to create installation media (USB flash drive, DVD, or ISO file)…” option and follow the next given instructions on the screen.
Now select the ISO file option in step 5.
After that, you should now have an ISO file.
Next, go to the location where you’ve downloaded the ISO file.
Then right-click on the Windows 10 ISO file and select the Open with option and then select File Explorer.
Now click on “setup.exe” and follow the next instructions that appear on the screen. When asked, you have to select either Nothing (clean install) or Keep personal files only option. Take note that you must not select the “Keep personal files, apps, and Windows settings since it doesn’t really work.
Option 2 – Try turning off the Internet connection at a specific time
You might want to turn off your internet connection at a specific time. This option can be quite tricky so what you need to do is to disconnect the internet connection when the update is downloaded using the Windows Upgrade tool. It’s actually okay since all the files you need would be downloaded safely and the Windows Upgrade tool will be the one to install the newer updates using those files.
Option 3 – Try to get a newer version of the Windows Media Creation tool
You can also fix the Windows Upgrade error 0xa0000400 by using the latest version of the Windows Media Creation tool. And so if what you have is an older version, you need to update it in order to resolve the error and upgrade your Windows 10 computer.
Option 4 – Run the Windows Update Troubleshooter
Running the built-in Windows Update troubleshooter is one of the things you can first check out as it is known to automatically resolve any Windows Update or upgrade errors like error code 0x800701E3. To run it, go to Settings and then select Troubleshoot from the options. From there, click on Windows Update and then click the “Run the troubleshooter” button. After that, follow the next on-screen instructions and you should be good to go.
Option 5 – Try running Disk Cleanup
You might want to run the Disk Cleanup utility as it is a useful tool that could delete temporary and useless files in your computer.
Tap the Win + R keys to open the Run dialog box and then type “cleanmgr” in the field and hit Enter to open the Disk Cleanup window.
After that, select the drive you want to clean.
Now click OK to clean the disk and restart your computer.
If you encountered an error message that says, “Unhandled exception has occurred in your application”, when you start your Windows 10 computer, read on as this post will guide you on how you can fix it. This kind of error usually appears in a Microsoft .NET Framework window and it mostly pops up as soon as you turn on your computer. Here’s the complete context of the error message:
“Unhandled exception has occurred in your application. If you click Continue, the application will ignore this error and attempt to continue. If you click Quit, the application will close immediately.”
When this error occurs, your computer may freeze or display other suspicious behavior at times. Either way, there are several options you can check out in this post to resolve this issue, so read on.
This kind of error could be caused by several factors. It could be due to your antivirus program or other third-party programs installed on your computer. It is also possible that the installation of the Microsoft .NET framework id corrupted or some of its installation files are corrupted. Thus, to fix the error, there are a few suggestions you need to follow such as:
Option 1 – Try to temporarily disable your anti-virus program
As mentioned, the error could be due to the antivirus program or the Windows Defender Firewall installed on your computer. Thus, disabling them or any security software installed in your computer is always a good idea you can try when you’re not able to access the shared drive in your computer. There are times when you encounter problems like the “Unhandled exception has occurred in your application” error due to interference of antivirus or security programs. Thus, you have to disable both your antivirus program in the meantime and check if it fixes the error or not.
Option 2 – Put your computer in a Clean Boot State
As pointed out, it is possible that some third-party program or service is the one that’s behind the problem. To isolate this possibility and to identify the culprit, you have to put your computer into a Clean Boot State. To do so, follow the steps below.
Log onto your PC as an administrator.
Type in MSConfig in the Start Search to open the System Configuration utility.
From there, go to the General tab and click “Selective startup”.
Clear the “Load Startup items” check box and make sure that the “Load System Services” and “Use Original boot configuration” options are checked.
Next, click the Services tab and select the “Hide All Microsoft Services” check box.
Click Disable all.
Click on Apply/OK and restart your PC. (This will put your PC into a Clean Boot State. And configure Windows to use the usual startup, just simply undo the changes.)
Once your computer has restarted, check if the error is now gone. If it is, then the culprit is some third-party program. Thus, you have to enable the third-party programs one by one to find out which one of them is causing the the “Unhandled exception has occurred in your application” error.
Option 3 – Try to run a System File Checker scan
System File Checker or SFC is a built-in command utility that helps in restoring corrupted files as well as missing files. It replaces bad and corrupted system files with good system files that might be the cause why you’re getting the “Unhandled exception has occurred in your application” error. To run the SFC command, follow the steps given below.
Type “cmd” in the Start search and then right-click on the appropriate search result.
Next, select “Run as administrator” to open Command Prompt with admin privileges.
After opening Command Prompt, type in sfc /scannow
The command will start a system scan which will take a few whiles before it finishes. Once it’s done, you could get the following results:
Windows Resource Protection did not find any integrity violations.
Windows Resource Protection found corrupt files and successfully repaired them.
Windows Resource Protection found corrupt files but was unable to fix some of them.
Now restart your computer and see if the problem is fixed or not.
Option 4 – Install and update Dependencies
There are times when programs and applications need to have drivers and supporting software installed for them to properly work. Although the installation usually takes care of it, it’s time for you to do some manual check especially if you are getting this issue of abnormal program termination.
Install some qualified drivers – A number of high-end games and applications need to have correct and valid drivers for them to work. They just don’t work with general drivers though. Microsoft has this Windows Hardware Quality Labs testing also known as WHQL testing which makes sure that drivers meet the correct experience and pass through the proper testing before certification. Thus, when installing drivers, you need to ensure that they are qualified drivers for your Windows 10 PC.
Download and install or Update DirectX – As you know, Microsoft DirectX is a suite of technologies developed by Microsoft to provide hardware acceleration for heavy multimedia applications like HD videos and 3D games. Since you are using Windows 10, you have the DirectX 12 version while the earlier Windows versions use the DirectX 11 version.
Install the Microsoft DirectX End-user runtime – The Microsoft DirectX end-user runtime gives updates to version 9.0c as well as previous versions of DirectX. To install it, click on this link and download it.
Update or install the .NET framework – The .NET framework is used by games and applications during development which means that without the runtime files that are installed in your computer, it definitely won’t work. Thus, you need to install or update this framework. You can also use the .NET setup verification tool to verify it.