When we purchase a computer, usually it is meant to be used by one person. Sometimes we would like to share our computer with other people, with friends and family members but we would also like to keep some privacy for ourselves in the process. Lucky for us Windows 10 will let us create multiple user accounts which then can be used by other persons with their own settings, documents, etc. The only requirement is to already have one user account which is automatically created when Windows is installed.
This guide will lead you step by step in the creation of a new user account within Windows 10, so grab your favorite drink, and let's begin.
Creating new account
First thing is to
click on the
windows icon on the bottom left and open
start menu, from start menu
click once on
settings.
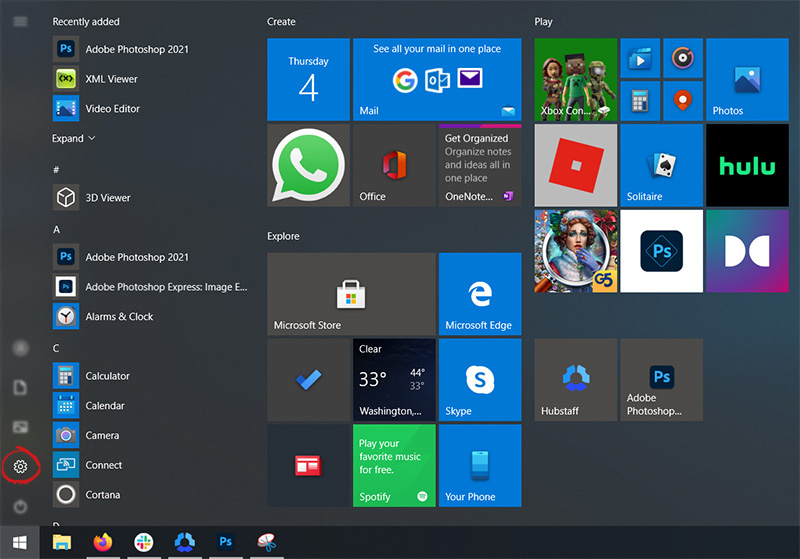
When the
settings window opens, choose
ACCOUNTS on it.

Windows will then go to the
accounts settings page. Within that page,
click on the Family & other users to open the setting for the chosen section on right. On the right settings, screen
navigate to the lower section and
click once with the left button on add someone else to this PC

When
add someone else to this PC is clicked, pop up window will appear which will ask you to provide the persons email address and later on the password of his/her Microsoft account, after the required information is provided you are done, a
new user has been added and he can use his Microsoft credentials on the login screen to use this computer.
Setting up a user without Microsoft ID
However, if you do not wish to add a new user via his Microsoft login credentials or the person does not have them, on the pop-up window click on
I don't have this person's sign-in information.

This will open yet another pop-up giving you the option to create a Microsoft account for this person, to use a phone number instead of a Microsoft account, or to create a new email address for the user. Any of these options will create a new user for this computer with provided credentials but there is the last option at bottom of the pop-up which will allow you to create a
local user only without a Microsoft account. This user will be able to use this computer, will not be able to transfer his document through various devices like he/she would if using a valid Microsoft account but it could use the computer and personalize it fully to his/her liking.

Once the
link is clicked, you will be presented with a floating window requiring you to input needed information in order for the account to be created. You will need to provide
username, password, and answers to 3 security questions.

Once all information has been provided,
click on
next and your new non-Microsoft
local user has been created. Now when you click on
Family & other users you will see that Windows has added a
new user with the provided name to this computer. If you wish, you can
add another user in the same manner, following the previous steps. Microsoft Windows does not have a limit for how many users can be on one computer so feel free to create as many as you like.
User account options
Now,
clicking on the
existing created user will
open user options. From there you will have options to
remove the user, therefore removing him/her from this computer, note that removing the local user will remove
permanently his/her settings and they would not be able to be restored, or you can change the
user account type.

Click on
Change account type.

Under
account type, you will have the option to promote this user to an
administrator if you wish or you can leave it as a
standard user.

 In the dialog, type in netplwiz and press ENTER.
 You will find yourself in the User Accounts window, inside deselect Users must enter a user name and password to use this computer. Press OK
 Sign in the window will pop up where you will have to type in your password and confirm it in order to start the feature.
 After typing in your password and confirming it, press OK. That's it, next time you wake your computer from hibernation or turn it ON, you will automatically be greeted with a desktop instead of a Windows login screen.
 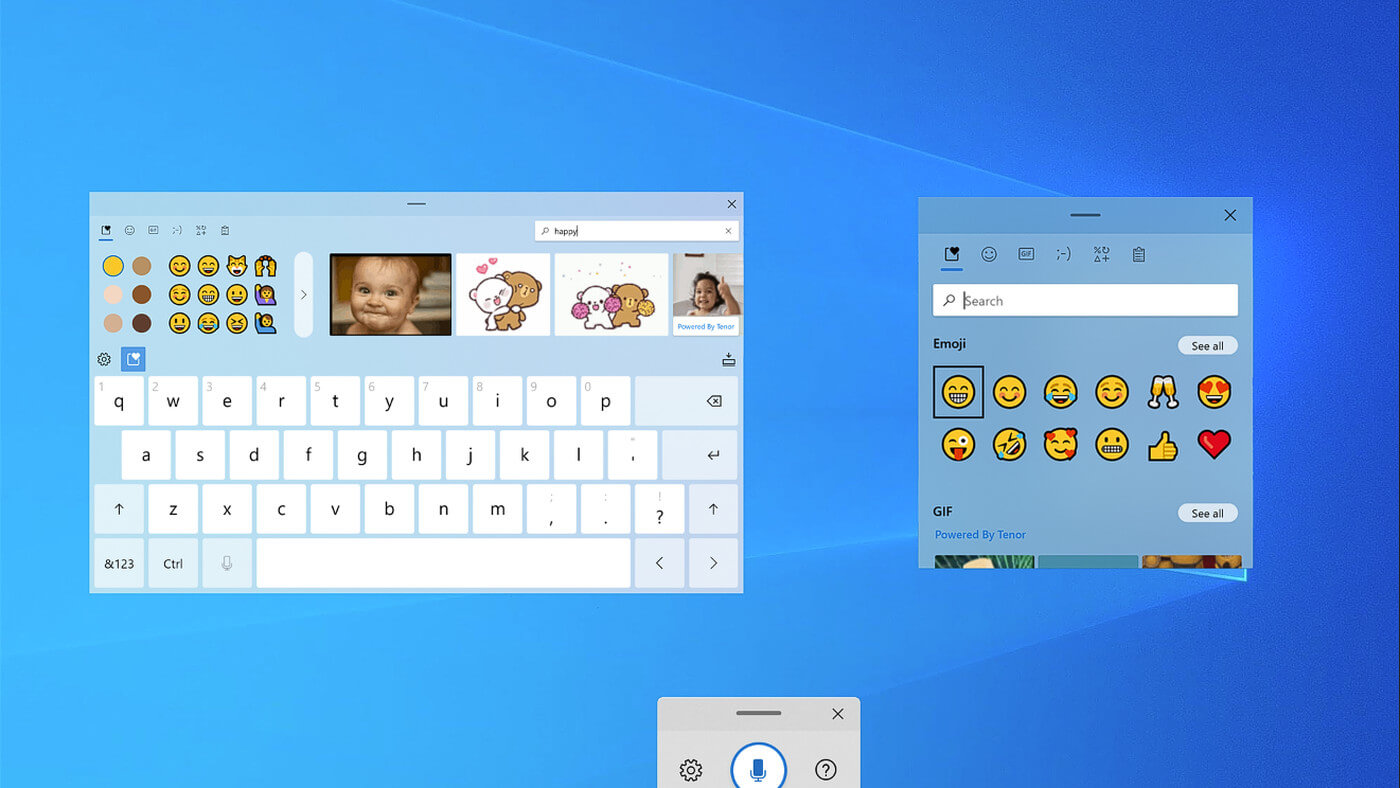 If by any chance you are working on a touchscreen PC, tablet, or any similar device and have no access to a hardware keyboard there is a way to place Touch Keyboard on your screen for easy typing, and you can enable icon on the taskbar for easy access.
 California's Department of Fair Employment & Housing has widened its anti-discrimination lawsuit against Activision Blizzard and claims the publisher has been shredding vital documents relevant to the ongoing investigation.
A recent report from Kotaku described the department as offering poorly paid, highly insecure positions, with a culture of hostility towards LGBTQ+ testers. The DFEH's rewording of "employees" to "workers" now hopes to take these contractors' experiences into account.
"As a contract employee, I feel there's a lot of pressure to excel, impress, and move through the ranks as fast as you can before your contract ends and you're forced to go 3 months without income or find another job," Axios reports one worker saying. "I take pride in what I do, but it feels like it's never enough."
Activision's contentious hiring of union-busting third-party law firm WilmerHale "directly interferes" with its own investigation, it says. By going to WilmerHale, Activision appears to be claiming that all work related to the investigation is privileged and can't be shared with DFEH.
The suit also claims that Activision HR shredded documents related to "investigations and complaints", against its legal obligation to retain them during the investigation. The relevant parts of the updated lawsuit were shared by Axios reporters Stephen Totilo and Megan Farokhmanesh, the former also noting that the DFEH "fixed their misspelling of Bill Cosby's name".
"DFEH is also informed and aware that documents and records have not been maintained as required by law or by the DFEH's Document Retention Notice," the complaint reads, "including but not limited to documents related to investigations and complaints were shredded by human resource personnel and emails are deleted thirty days after an employees separation."
California's Department of Fair Employment & Housing has widened its anti-discrimination lawsuit against Activision Blizzard and claims the publisher has been shredding vital documents relevant to the ongoing investigation.
A recent report from Kotaku described the department as offering poorly paid, highly insecure positions, with a culture of hostility towards LGBTQ+ testers. The DFEH's rewording of "employees" to "workers" now hopes to take these contractors' experiences into account.
"As a contract employee, I feel there's a lot of pressure to excel, impress, and move through the ranks as fast as you can before your contract ends and you're forced to go 3 months without income or find another job," Axios reports one worker saying. "I take pride in what I do, but it feels like it's never enough."
Activision's contentious hiring of union-busting third-party law firm WilmerHale "directly interferes" with its own investigation, it says. By going to WilmerHale, Activision appears to be claiming that all work related to the investigation is privileged and can't be shared with DFEH.
The suit also claims that Activision HR shredded documents related to "investigations and complaints", against its legal obligation to retain them during the investigation. The relevant parts of the updated lawsuit were shared by Axios reporters Stephen Totilo and Megan Farokhmanesh, the former also noting that the DFEH "fixed their misspelling of Bill Cosby's name".
"DFEH is also informed and aware that documents and records have not been maintained as required by law or by the DFEH's Document Retention Notice," the complaint reads, "including but not limited to documents related to investigations and complaints were shredded by human resource personnel and emails are deleted thirty days after an employees separation."

 This error is very frustrating and it annoys pretty much anyone who encountered it but do not worry we have a solution for you.
First thing is to confirm the error prompt, Click on the OK button and then on X to exit Windows 10 installation wizard. Click on yes to confirm that you want to exit the setup.
You will find yourself in original installation windows.
On that screen choose and click on Repair your computer. Choose an option screen that will pop up, click on Troubleshoot. In the advanced options, click on the command prompt.
Once you are in command prompts type DISKPART and hit ENTER
In the diskpart prompt type LIST DISK and hit ENTER again.
type SELECT DISK #, where # is listed disk number where you would like to install Windows.
type LIST VOLUME in order to list volumes in the selected disk and hit ENTER
You need to select the volume on which you would like to place your WINDOWS, to do this type in SELECT VOLUME #, where # is the listed number of the volume
Finally, type FORMAT FS=NTFS and hit ENTER
You have successfully formated a given volume, you can now exit DISKPART and return to setup, to exit DISKPART simply type exit and hit ENTER.
Leave command prompt as well by again typing exit and hitting ENTER
You will be returned to Choose an option screen, click on Turn off your PC.
Your drive has been successfully formatted and it is ready for clean Windows installation, you can now restart your Windows 10 installation and the process will complete without errors.
This error is very frustrating and it annoys pretty much anyone who encountered it but do not worry we have a solution for you.
First thing is to confirm the error prompt, Click on the OK button and then on X to exit Windows 10 installation wizard. Click on yes to confirm that you want to exit the setup.
You will find yourself in original installation windows.
On that screen choose and click on Repair your computer. Choose an option screen that will pop up, click on Troubleshoot. In the advanced options, click on the command prompt.
Once you are in command prompts type DISKPART and hit ENTER
In the diskpart prompt type LIST DISK and hit ENTER again.
type SELECT DISK #, where # is listed disk number where you would like to install Windows.
type LIST VOLUME in order to list volumes in the selected disk and hit ENTER
You need to select the volume on which you would like to place your WINDOWS, to do this type in SELECT VOLUME #, where # is the listed number of the volume
Finally, type FORMAT FS=NTFS and hit ENTER
You have successfully formated a given volume, you can now exit DISKPART and return to setup, to exit DISKPART simply type exit and hit ENTER.
Leave command prompt as well by again typing exit and hitting ENTER
You will be returned to Choose an option screen, click on Turn off your PC.
Your drive has been successfully formatted and it is ready for clean Windows installation, you can now restart your Windows 10 installation and the process will complete without errors.