Google fonts are a free open-source font library made to enrich web content and present end-user with a smooth web experience while surfing. Fonts are completely free for both commercial and personal use and they are not limited to use in WEB only, you can use them also in other projects like business cards, flyers, etc.
In order to use google fonts first thing of course you will need to download them. In this guide, we will show you how to download and install google fonts.
Select the font family that you wish to use. You can preview each font style to make double-sure it is the right one.
When you are ready, click on the Download family button.
A File Explorer window will pop up, asking you where to save the font family.
The downloaded file will be compressed in .zip format to save bandwidth, so you will first need to uncompress/unzip it. Right-click on the file and select Extract all.
You will then be asked where to unzip/extract the file. File Explorer will automatically create a new subfolder, named as the file name, so all you need to do is confirm it by clicking Extract.
Click on the Windows icon in the bottom-left corner of your desktop
Select the Personalization category and Fonts.
Split the screen between File Explorer and Settings by dragging the windows to either the left or right edge of the screen. Select all the font files by pressing CTRL + A and drag them into the Add fonts box.
Valve has released a big update to its online store and distribution platform Steam. Among typical bugs fixing and making the user experience a little more fluid, we have received some major updates as well. Please take note that you need to update Steam itself to the latest version in order to get new features.
Storage management Page update
The storage management page has received a complete redesign and UX overhaul and it is now much easier to manage your game libraries and create new ones. The page itself looks and feels a little console more like but thanks to that it offers a much easier and clearer look and feel.
Another thing with the Steam store management page is the ability to move installation files from one location to another. Let’s say that you have two or more hard disk drivers in your machine and that you have SSD that you use for running stuff since it is fast and larger and slower one for storage. Now you can easily and quickly move one installation from one to another in order to take advantage of your faster SSD for quicker LOAD game times without making a new installation.
Steam Download page improvements
The download page has also received some love from Valve by enabling us to now see the installation progress. So far on the download page of Steam, you would only get download progress but it has been updated to show installation progress after download as well now making it more straightforward and giving you a general idea of how much more time there is to wait in order to start gaming.
Also, you can now drag and drop items in the download bracket to reorder download orders or place them as active downloads to start downloading right away.
If you are using File Explorer but suddenly encountered an error saying, “No such interface supported”, read on as this post will guide you on how to fix the problem. This kind of error occurs due to the corruption in the system files which supports several tasks in the system that works with the Windows File Explorer process or File Explorer. This kind of error can give you a hard time in browsing the files on your computer, or when you open important utilities like the Control Panel, or when you copy files and other inconveniences. Needless to say, it won’t bring you any productivity at all and can only leave you frustrated.
To fix this problem, there are several options you can try. You can try to run the System File Checker scan or the DISM tool. You could also try to re-register the potentially corrupted DLL files or fix the User Profile. For more details, refer to each one of the given options below.
Option 1 – Try to run System File Checker
System File Checker or SFC is a built-in command utility that helps in restoring corrupted files as well as missing files. It replaces bad and corrupted system files to good system files that might be the cause why you’re getting the errors 0x8024a11a and 0x8024a112. To run the SFC command, follow the steps given below.
Type “cmd” in the Start search and then right-click on the appropriate search result.
Next, select “Run as administrator” to open Command Prompt with admin privileges.
After opening Command Prompt, type in sfc /scannow
The command will start a system scan which will take a few whiles before it finishes. Once it’s done, you could get the following results:
Windows Resource Protection did not find any integrity violations.
Windows Resource Protection found corrupt files and successfully repaired them.
Windows Resource Protection found corrupt files but was unable to fix some of them.
Now restart your computer and see if the problem is fixed or not.
Option 2 – Try to fix the User Profile
The next thing you can do to fix the problem is to fix the User Profile. All you have to do is migrate to a new User Profile in Windows 10 by creating a new User Account and migrating all your personal files from the current user profile folder in the C:/Users location to the new user profile folder which is also located in the same folder.
Option 3 – Run the DISM tool
You can try running the Deployment Imaging and Servicing Management or DISM tool to fix the “No such interface supported” error. Using this built-in tool, you have various options such as the “/ScanHealth”, “/CheckHealth”, and “/RestoreHealth”.
Open the Command Prompt with admin privileges.
Then type in the following commands and make sure to hit Enter right after you type each one of them:
Dism /Online /Cleanup-Image /CheckHealth
Dism /Online /Cleanup-Image /ScanHealth
exe /Online /Cleanup-image /Restorehealth
Do not close the window if the process takes a while as it will probably take a few minutes to finish. Once it’s done, restart your computer.
Option 4 – Try to re-register the problematic DLL file
You may have to re-register the ntdll.dll file using the regsvr32.exe before you can successfully install the program and fix the error. The Regsvr32 tool is a command-line utility that can be used to register and unregister OLE controls like DLL and ActiveX (OCX) controls in the Windows operating system. Follow the steps below to use it.
Open Command Prompt as admin from the WinX menu.
Next, type the following command in the elevated Command Prompt and hit Enter to execute it. This will re-register the affected DLL file using the Windows operating system tool, regsvr32.exe.
regsvr32 c:windowssystem32actxprxy.dll
After you execute the given command, you should see a message saying, “DllRegisterServer in vbscript.dll succeeded” if the Regsvr32 tool was able to run successfully. If it didn’t work, you can try to execute this command instead: FOR /R C: %G IN (*.dll) DO "%systemroot%system32regsvr32.exe" /s "%G"
To understand the Xpcom.dll error better, first, you need to know what Xpcom.dll file is. Xpcom.dll is basically a typical DLL (Dynamic Link Library) file. It is associated with Firefox developed by Mozilla Foundation for the Windows Operating System.
DLL file contains small programs similar to exe (executable) files. Just like any other DLL file, Xpcom.dll helps loads and run programs smoothly. Xpcom.dll functions as a shared file that can be used to run multiple programs on your PC.
Xpcom.dll error code occurs when Windows cannot properly load the xpcom.dll file. The error may pop up on the screen in any one of the following formats:
"Xpcom.dll not found."
"The file xpcom.dll is missing."
"Cannot register xpcom.dll."
"Cannot find C:\Windows\System32\xpcom.dll."
"This application failed to start because xpcom.dll was not found. Re-installing the application may fix this problem."
"Xpcom.dll Access Violation."
"Cannot start Firefox. A required component is missing: xpcom.dll. Please install Firefox again."
The xpcom.dll error can occur during program installation or while rebooting your PC or when shutting it down.[/section]
Solution
Error Causes
It is difficult to narrow down a single cause of this error code simply because the Xpcom.dll error code may be triggered due to several reasons. Some of the common causes include:
Invalid or corrupt xpcom.dll registry entry
Viral infection
Outdated PC drivers
Another program overwrote the required version of xpcom.dll
Xpcom.dll file is accidentally deleted or uninstalled
Mozilla Foundation hardware failure
Further Information and Manual Repair
Here are the best, quick and easy DIY methods to resolve Xpcom.dll error code on your system within minutes:
Method 1: Update Window Drivers
To resolve the xpcom.dll error on your system, try updating Window drivers. To do this simply use the driver update wizard from within Device Manager.
The driver update wizard walks you through the entire drive update process, making it easy and hassle-free for you to update drivers.
Method 2: Download and Install Xpcom.dll File
Since DLL are shared files and used to run and load multiple programs, it is possible that you might have accidentally removed this file while uninstalling a program on your system. This is the reason why the Xpcom.dll file goes missing.
To retrieve the Xpcom.dll file simply go to the recycle bin. Reinstall the deleted program. However, if it still doesn’t resolve the error, then it is advisable to download and install the Xpcom.dll file from a trusted DLL file website over the internet.
Method 3: Scan for Viruses and Repair the Registry
If the error code occurs due to malware infection or is related to registry issues, then simply download Restoro. This is a user-friendly and multi-functional PC Fixer deployed with 6 scanners including a powerful antivirus and a registry cleaner.
It is compatible with all Windows versions. Simply run it to remove all types of viruses infecting your system and clean/repair the registry.
Click here to download Restoro and resolve the Xpcom.dll error on your PC.
Computer voice control has moved a long way from its beginning routes and in today's age controlling your PC with voice is truly a reality and fully possible. Voice control is taking up the steam in everyday life, from simple commands in cars, Alexa, smartphones, TVs, etc. to modern computers.
Windows 10 has introduced voice control into PC with Cortana even during the installation process but a lot has changed from having a virtual assistant in begging days and in today's modern Windows 11 OS. You can now freely open apps, move, copy delete files, and even dictate in order to create a word document.
However, in order to take this advantage, you will need to turn it off first since it is disabled by default. Of course, you will need a microphone and some spare time to train Windows in understanding you properly.
Setting up Voice Control
Just like in Windows 10, in Windows 11 voice control is also in accessibility options and the first step is to turn ON Windows Speech Recognition.
Click on the Start button and type Settings into the search bar, click on Open, or press ENTER. On the left side of the settings, window locate and click on Accessibility. On the right part once Accessibility is selected scroll down and find a section titled Interaction and click on Speech. Turn on the switch next to Windows Speech Recognition.
A pop-up will appear that will lead you through the rest of the setup and that's it.
Improving Voice Control
In order to make your voice control better, if you are not satisfied with the results, you can sample more of your voice into the algorithm to tune it more to your liking. Sadly this option is still deep in Control Panel.
Click the Start button and type in Speech recognition into the search bar, look for the search result with Control Panel displayed under it, and click on Open. Click on Train Your Computer to Better Understand You and follow the instructions.
The process will probably take a few minutes. The more data you provide to the speech recognition model, the more accurate it will be when interpreting your instructions. You can train the model multiple times, and each time you do, it should improve the accuracy.
To understand Kernel32.dll error properly, here’s what you need to know first: in the Windows operating system, the system32 directory plays a vital role. Inside this directory, there is an element called Kernel32.dll.
A DLL (dynamic link library) is a library that contains codes and data that are used by more than one program at the same time.
The role of the Kernel32.dll file is to handle memory management and I/O (input and output) operations.
Malfunctioning of this file results in a Kernel32.dll error message which leads to program or application failure.
Error Causes
Kernel32.dll files can be attributed to several reasons like:
Missing or damaged Kernel32.dll files
Registry corruption
.Dll files misconfiguration if programs are installed or uninstalled.
Viral infection or malware attack
It is advisable to repair the Kernel32.dll error immediately to avoid inconvenience and serious computer damages like program lockouts, system failure, freeze, and crash.
Further Information and Manual Repair
All causes for the Kernel32.dll error are linked with the registry.
The registry is the major database of your system that stores all the activities you perform on your system.
It saves both important data and unnecessary files in the RAM (Random Access Memory) including the junk files, temporary internet files, and obsolete files such as files of the deleted/uninstalled programs.
These files accumulate a lot of memory space. It leads to disk fragmentation, data overload, missing and damaged DLL files, and eventually registry corruption.
Other reasons for registry issues that trigger Kernel32.dll errors on your system could be malicious software like viruses, adware, and malware. These also corrupt the registry and damaged DLL files.
Kernel32.dll Error Solutions
There are two ways to resolve the Kernel32.dll error on your PC, one is to install two separate tools registry cleaner and an antivirus and run them individually to scan your system and repair it.
This option is time-consuming and besides if antivirus software is notorious for slowing down systems. So by downloading a separate antivirus you may have to sacrifice your system’s speed.
To develop a good understanding of the Sysdata.xml error code, it is first important to learn what is sysdata.xml file and its function. Sysdata.xml is a type of XML file. The .XML file extension is an Extensible Markup Language file.
XML-based formats have now become the default for many office productivity tools including Microsoft Office and LibreOffice. Furthermore, it has also come into common use for the interchange of data over the internet.
Sysdata.xml error code usually pops up when .XML based applications are unable to run and crash while loading. This is a type of BSoD (Blue Screen of Death) error code.
Common symptoms include:
System freeze
The screen turns blue
Sudden system shut down
Solution
Error Causes
The Sysdata.xml error code is triggered due to multiple reasons such as:
Faulty hardware
Malware or viral infection
Registry issues
No matter what the reason may be, it is advisable to fix this error code right away without any delays. This is a fatal error and can result in a system crash and loss of data. And recovering valuable lost data is the hardest.
Further Information and Manual Repair
Here are some of the effective and easy do it yourself methods to resolve this error on your system:
Method 1: Fix Faulty Hardware
Hardware issues may arise due to many reasons like manufacturing issues or voltage fluctuations. Electrical storms can cause power surges which may affect the hardware causing it to fail.
The best way to resolve this is to download the latest drivers for the problematic devices or alter the device configuration in the BIOS setup program.
To reconfigure the BIOS simply restart your PC and before Windows starts, press Del Key to access your BIOS.
Now find the factory reset option.
Select the option and press the button to load your factory defaults.
After that save changes and confirm your selection.
Reboot your PC to activate the changes.
Method 2: Scan for Viruses
Sometimes viruses and malware can disguise themselves in the .XML files which can cause them to get corrupted.
To resolve the issue, it is advisable to download a powerful antivirus and scan your entire PC for viruses. Remove the detected viruses to resolve the Sysdata.xml error on your system.
Method 3: Repair the Registry
If the registry is not cleaned frequently, it loads with unnecessary and obsolete files like the junk files and cookies.
These files clutter and damage the registry and eventually corrupt it and the important files like .XML files stored in it. To resolve the issue it is recommended to download Restoro.
It is a user-friendly and powerful PC Fixer embedded with a registry cleaner. It scans your entire PC for registry-related errors and removes them immediately. It cleans the cluttered registry and restores the damaged files thereby repairing the issue right away.
Click here to download Restoro.
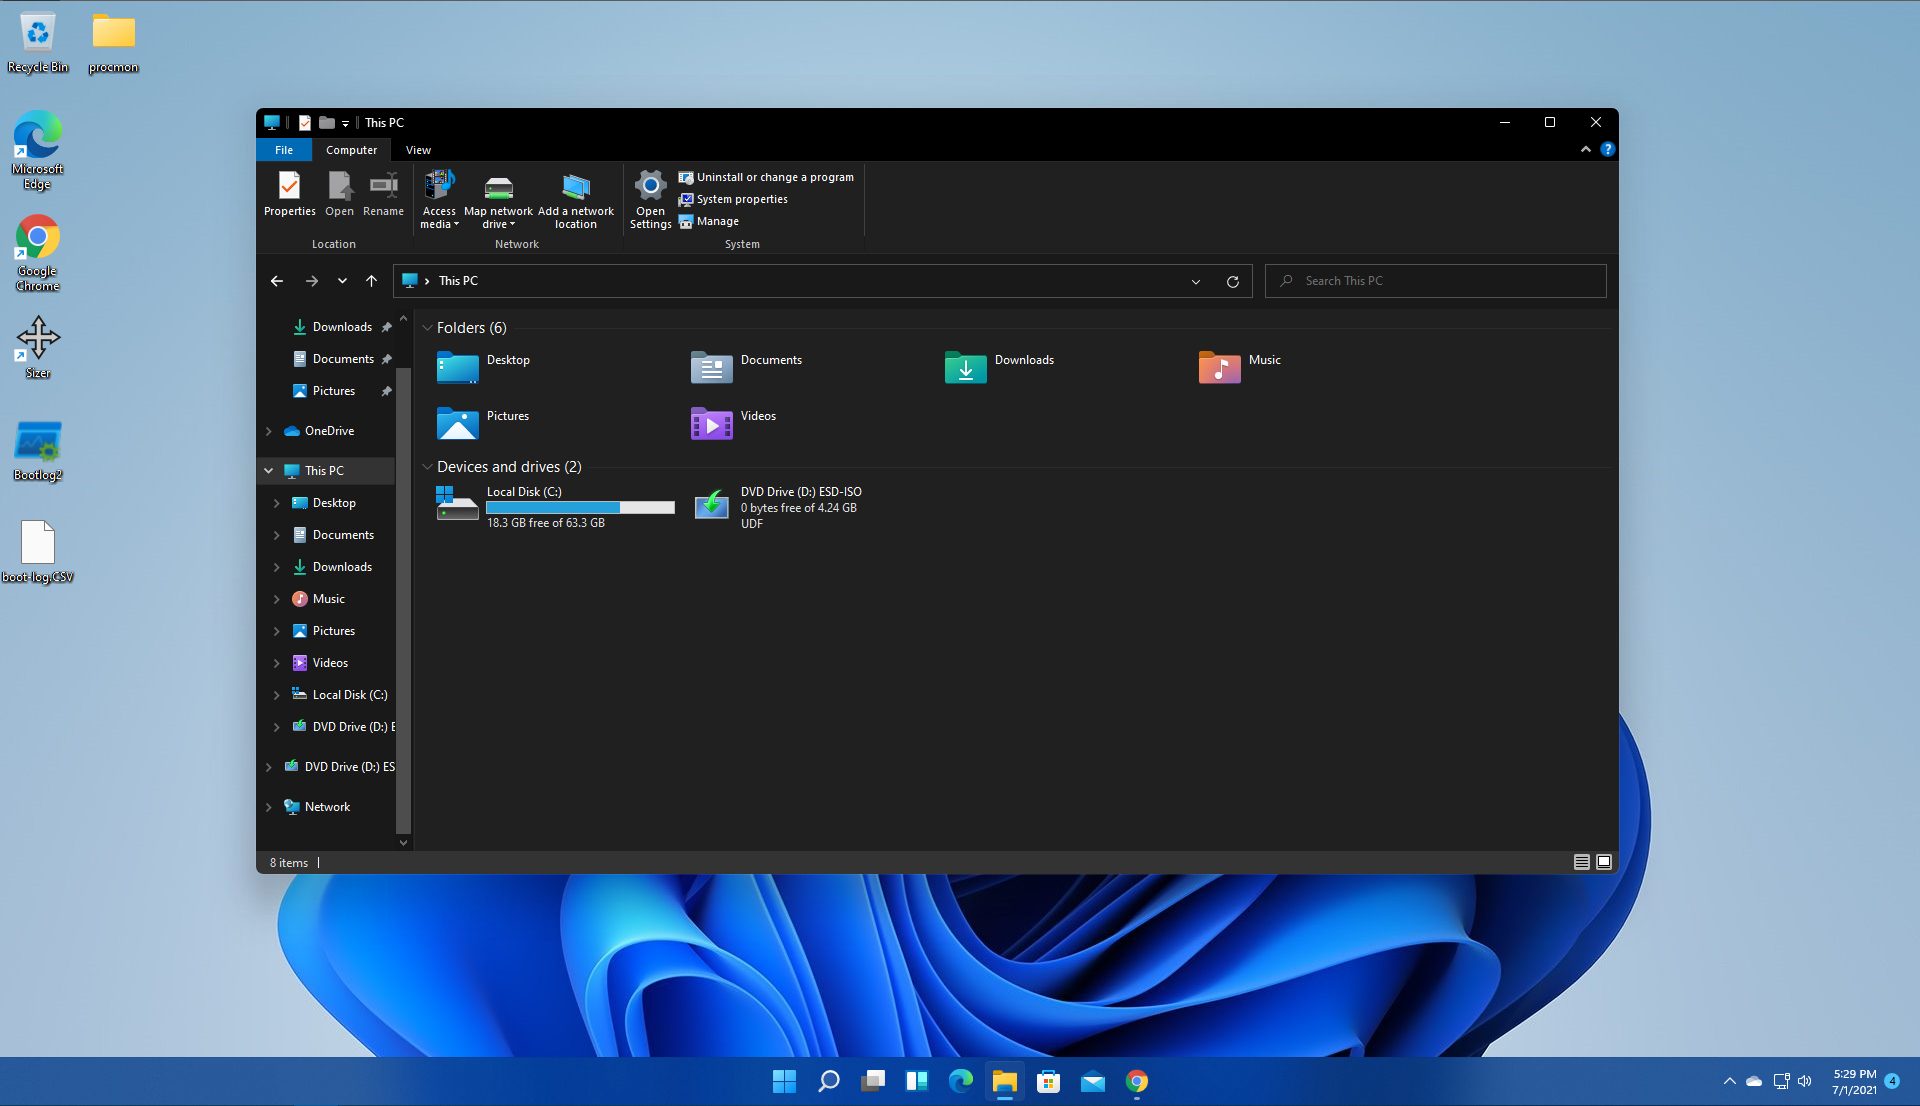
By default inside Windows 11 in File Explorer, once the file is selected, the small check box will appear beside it on left indicating visually that the file is selected. Older users will remember this feature from old Windows Vista and the feature itself is great if you are on some sort of touch device and need to select multiple files.
However, if you are working on a computer with a keyboard and mouse this feature might annoy you and seem like something that is not needed. Like many things inside Windows 11 this feature also can be customized and turned OFF if you do not want it.
In this guide, we will see how to turn these boxes off. Microsoft has somewhat hidden this feature but luckily it is not difficult to find it if you know where to look.
Turning check boxes OFF
Open File Explorer (if you do not have an icon on your Taskbar, right-click on the Start button and select File Explorer from the menu)
Click on View on the top toolbar
Select Show
Uncheck Item Check Boxes
That is everything that needs to be done, after the checkbox is unchecked all check boxes from File Explorer will disappear. If you wish to turn boxes back ON, just follow the steps and check the box beside Item Check Boxes.
If you suddenly find the Windows Recovery Environment not working and you see an error message saying, “Could not find the recovery environment”, then you’ve come to the right place as this post will guide you on how you can fix it. In times when you can’t boot into the Windows Recovery Environment, there could be several reasons behind it. However, have you ever wondered where exactly the Windows Recovery Environment is in your computer?
Windows initially places the Windows RE Image file in the installation partition during Windows Setup so if you have installed Windows in the C drive, you can find the Windows RE at the C:/Windows/System32/Recovery or C:/Recovery folder. Keep in mind that this folder is hidden and later on, the system copies the image file into the recovery tools partition to make sure that one can boot into recovery if there are any issues with the drive partition.
The “Could not find the recovery environment” error mostly occurs if the Windows Recovery Environment is disabled or if the “Winre.wim” file is corrupted. Thus, to fix this error, you need to refer to the given suggestions below.
Option 1 – Try to enable Windows Recovery Environment
In the Windows Start Search, type “PowerShell” and from the search results that appear, right-click on Windows PowerShell and then select the “Run as administrator” option to open it with admin privileges.
Next, type the “reagentc /info” command and tap Enter to execute it.
After that, if the output states that Status is enabled, then you’re all set.
Now type the “reagentc /enable” command and tap Enter to enable the Windows Recovery Environment. You will see a success message at the end signifying that Windows RE is available.
Option 2 – Try to fix the corrupted or missing “Winre.wim” file
If the Winre.wim file is either corrupted or missing, you need to get a new copy of this file from another computer where the Windows RE is working. Once you’re able to get a new copy of the Winre.wim file, you have to set the image path to a new location. For more details, refer to these steps:
First, type “Powershell” in Windows Start Search and right-click on Windows PowerShell from the results, and select Run as administrator.
Next, execute the given command below to change the path of the WIM file to the new location. Note that the steps should be used when the file path of the Windows Recovery Environment is different from the usual spot.
Reagentc /setreimage /path C:RecoveryWindowsRE
As mentioned, if the file is corrupted, you just have to get a new copy from another PC but before you do that, make sure that the WINRE on that computer is disabled (just enable it later on) and then place it in the C:/Recovery path and then set its path again using the command given above and then verify its path by executing the following command.
reagentc /info command
Note: Since the Recovery folder is hidden as well as the WINRE folder in it and you won’t be able to access them using the Windows File Explorer, you need to use the Windows PowerShell or Command Prompt so that you can access them.
Option 3 – Try checking and fixing the WinRE Reference in the Windows Boot Loader
The Windows Boot Loader is the one that determines if it has to load the Windows Recovery Environment. It could be that the boot loader is pointing to an incorrect location which is why you’re getting the error. To resolve it, you have to check and fix the WinRE Reference in the boot loader. How? Follow these steps:
In the Windows Start Search, type “PowerShell” and from the search results that appear, right-click on Windows PowerShell and then select the “Run as administrator” option to open it with admin privileges.
After that, execute the “bcdedit /enum all” command.
Next, look for an entry in the Windows Boot Loader identifier set as Current and look for “recoverysequence” in that section and take note of the GUID.
Ensure that the device and the osdevice items show the path for the Winre.wim file and that they are the same. If not, you need to point the current identifier to the one which has the same.
Once you’ve found the new GUID, execute this command: bcdedit /set {current} recoverysequence {GUID_which_has_same_path_of_device_and_device}
Now check if the error in the Recovery Environment is fixed or not.
Option 4 – Try creating a Recovery Media
You could also try creating a Recovery Media to resolve the error in the Windows RE. All you have to do is download the Windows 10 ISO file using the Media Creation tool and then create a recovery drive. Once you’re done, check if it fixes the problem or not.
As you know, you can find the number keys in two spots on your keyboard – one is above the letters while the second one is at the number pad. Recently, a number of users reported not being able to type any numbers on their keyboards while some reported that their keyboards only type numbers. This issue could occur on both sets of the number keys or on the one at the number pad. This is a rare situation and seldom happens to users. So if you are one of the few who experience the same problem then you’ve come to the right place as this post will guide you on what you can do to fix the keyboard issue.
This issue is most likely due to a switched-off number pad, outdated or corrupted keyboard drivers, turned on mouse keys or it might have something to do with the physical connections. Whatever the cause is, here are some options you have to try to resolve the problem.
Option 1 – Try to enable Numlock
The first thing you can do to fix the issue with the keyboard is to enable the Numlock since one of the most common reasons for this kind of problem is where the keyboard won’t type numbers because the Numlock key is disabled. Thus, you have to enable this key by pressing it once to enable the number pad.
Option 2 – Turn off the Mouse key
From the Start Menu, go to Control Panel.
Navigate to Ease of Access Center.
Then select the option “Make the keyboard easier to use”.
Navigate to the option “Control the mouse with keyboard” and then uncheck the “Turn On Mouse Keys” option to turn off the Mouse key.
Click on Apply and then on OK to save the changes made.
Note: The problem with the keyboard could stem down to a simple issue in its settings so if you have successfully followed the steps for this solution then you should be able to fix the problem.
Option 3 – Reinstall, update or rollback your keyboard driver
Once you’ve determined that the problem is in the software part of the keyboard, it is now time to try to reinstall, update or roll back your keyboard drivers. To reinstall the driver for your keyboard, refer to these steps:
From the WinX Menu, open the Device Manager.
In the Device Manager, you should find your laptop’s keyboard under the “Keyboards” option. Right-click on it and select the “Uninstall” option.
Note: If you’re not quite certain about your laptop’s keyboard, you can uninstall all the keyboards if there’s more than one.
After that, restart your PC and see if the keyboard driver is installing automatically. If not, open the Device Manager again and right-click on Keyboards, and select the option “Scan for hardware changes” to install it.
Once the keyboard driver is installed again, check if your keyboard is now working properly or not.
Option 4 – Try connecting the keyboard to a different USB port or another computer
The problem might have something to do with the USB port that’s currently in use by your keyboard. It could be that it’s not working so it makes sense to unplug it and attach it to another USB port. You can also clean the USB port on both ends to ensure that they are not affected by corrosion. In addition, you can also try connecting the keyboard to a different computer and see if the Shift key works there or not.
Option 5 – Try to check your connections
You can also try checking if the connection mode you are using for your keyboard is functioning properly. For instance, if you are using a Surface 2-in-device, you can clean the connection pins and see if it resolves the problem.
Option 6 – Run the Hardware and Devices Troubleshooters
The first thing you need to do is click on Start and then on the gear-like icon to pull up the window for Settings.
After opening Settings, look for the Update and Security option and select it.
From there, go to the Troubleshoot option located on the left-hand side of the list.
Next, select Keyboard from the list and open the Troubleshooter and run it. Once it is doing its job, wait for it to complete the process and then restart the system.
After the system restarts, check if the problem’s now fixed. If not, refer to the next option given below.
Windows 11 has some cool animations including fading effects which make working in it feels nice and futuristic but the cost of this is that there is a slight delay to certain actions performed. If you want the snap fast feature in Windows 11 and do not care about this eye candy there is an easy way to turn animations off inside it.
First, open Windows Settings by pressing ⊞ Windows + I on your keyboard
Alternatively, click on Start, search for Settings, and then click its icon.
When Settings appears, look in the sidebar and select Accessibility.
In Accessibility settings, click on Visual Effects.
In Visual Effects, switch Animation Effects to Off.
That’s it, changes will be applied automatically, you can close settings and continue working inside Windows 11 without animations and fades.
You can always switch animations back On via settings if you change your mind.


 Storage management Page update
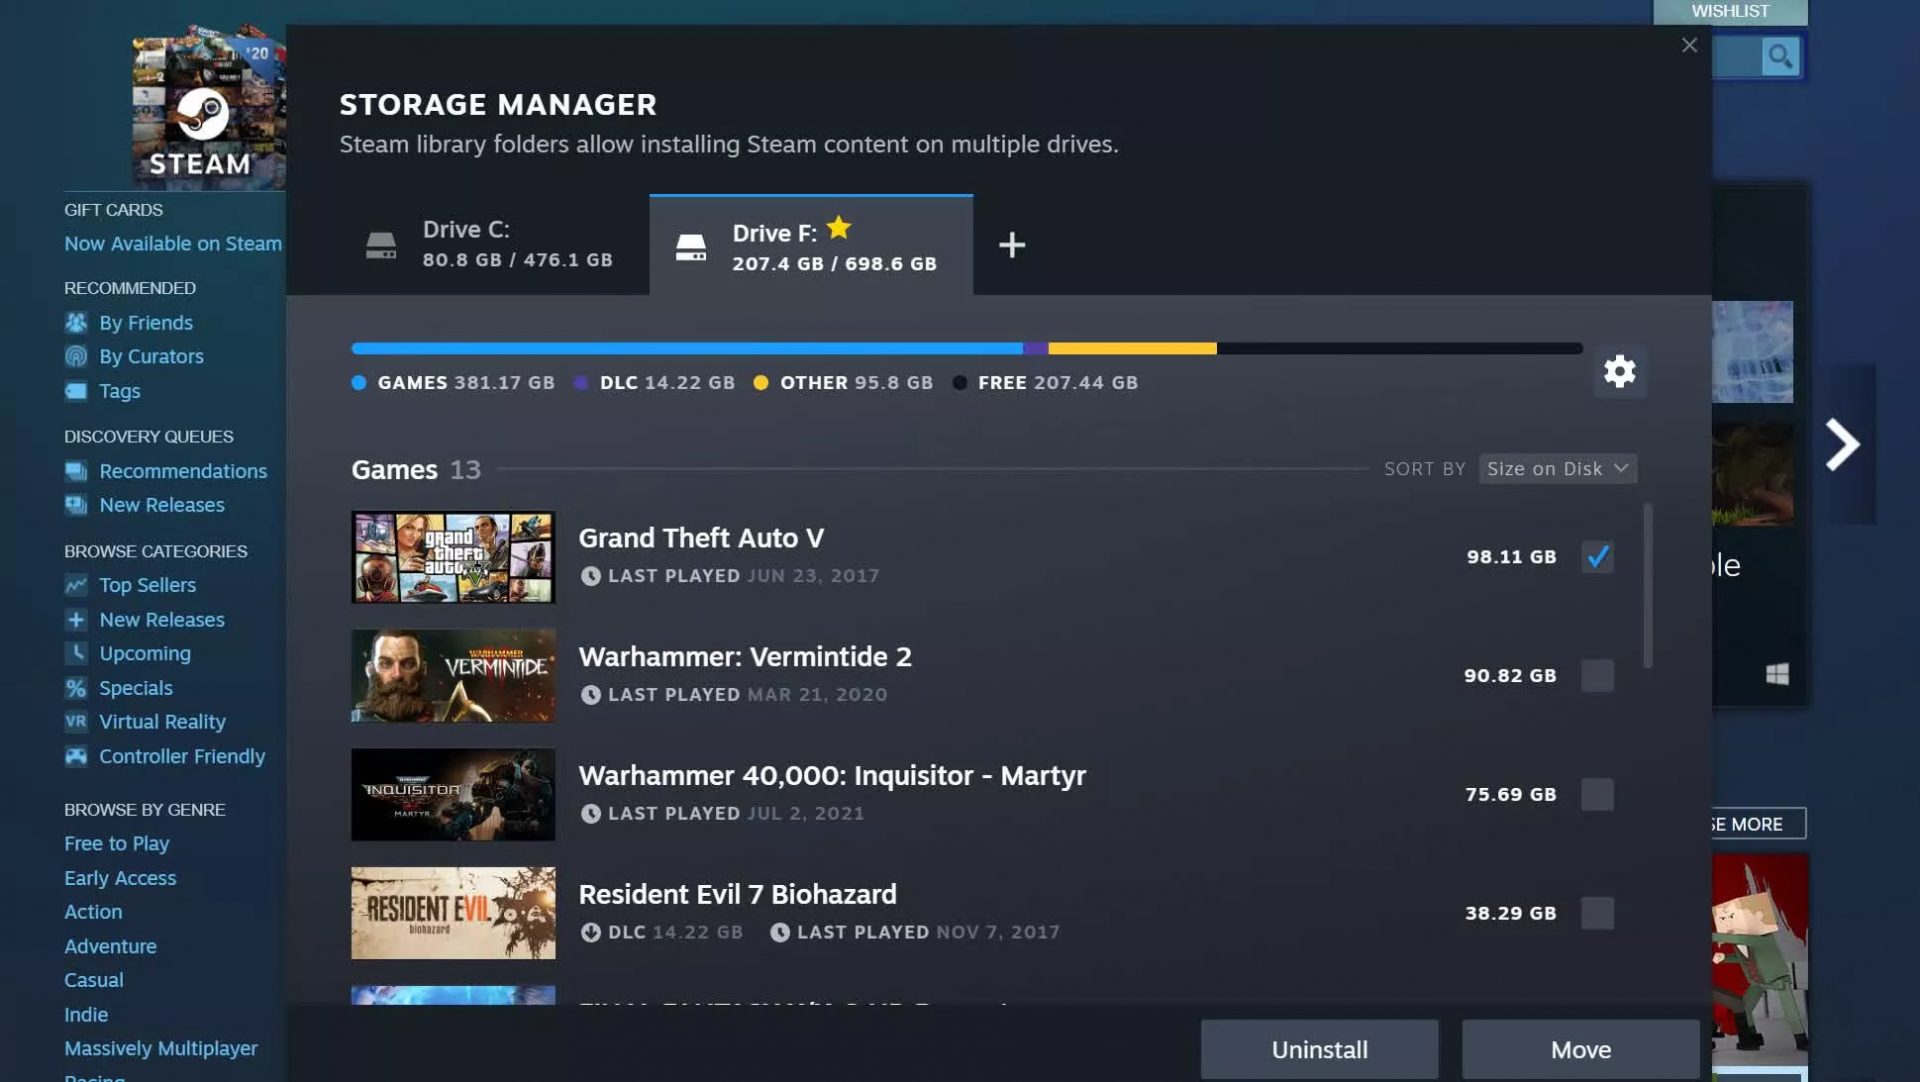 Another thing with the Steam store management page is the ability to move installation files from one location to another. Let’s say that you have two or more hard disk drivers in your machine and that you have SSD that you use for running stuff since it is fast and larger and slower one for storage. Now you can easily and quickly move one installation from one to another in order to take advantage of your faster SSD for quicker LOAD game times without making a new installation.
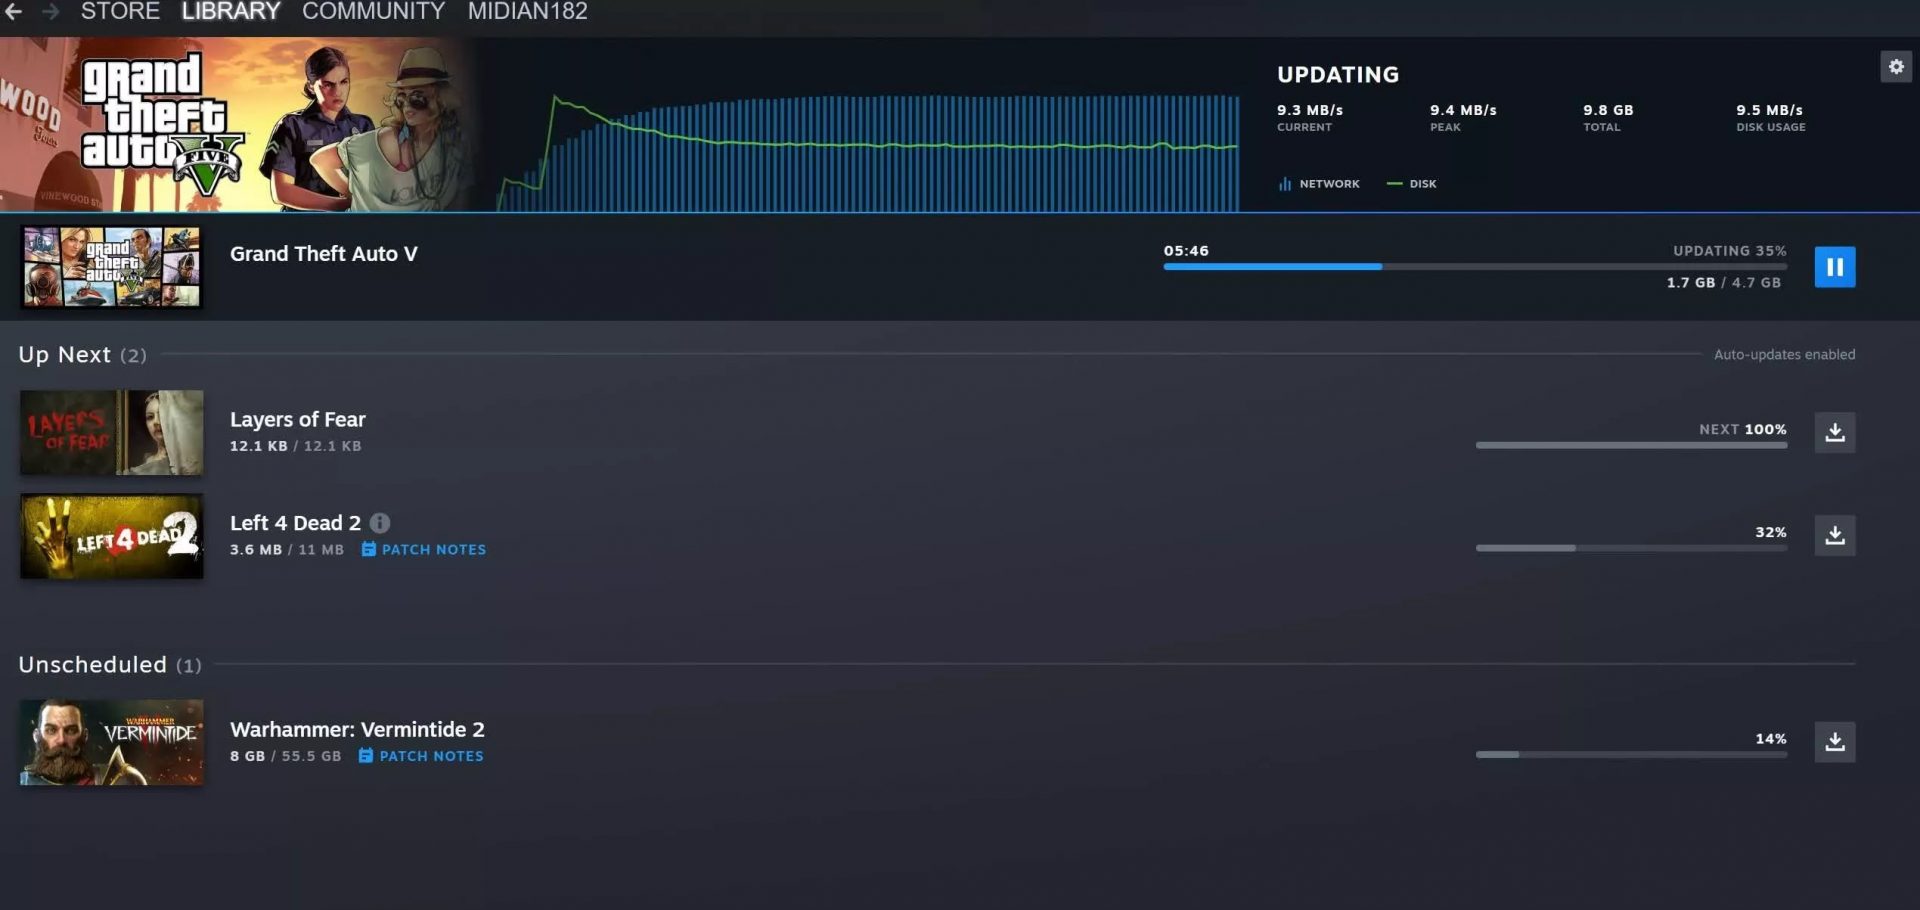 Also, you can now drag and drop items in the download bracket to reorder download orders or place them as active downloads to start downloading right away.

 However, if you are working on a computer with a keyboard and mouse this feature might annoy you and seem like something that is not needed. Like many things inside Windows 11 this feature also can be customized and turned OFF if you do not want it.
In this guide, we will see how to turn these boxes off. Microsoft has somewhat hidden this feature but luckily it is not difficult to find it if you know where to look.
However, if you are working on a computer with a keyboard and mouse this feature might annoy you and seem like something that is not needed. Like many things inside Windows 11 this feature also can be customized and turned OFF if you do not want it.
In this guide, we will see how to turn these boxes off. Microsoft has somewhat hidden this feature but luckily it is not difficult to find it if you know where to look.
 Windows 11 has some cool animations including fading effects which make working in it feels nice and futuristic but the cost of this is that there is a slight delay to certain actions performed. If you want the snap fast feature in Windows 11 and do not care about this eye candy there is an easy way to turn animations off inside it.