Setting up the Windows operating system in a computer can be quite a complicated task since there are a couple of things that take place in the background to ensure a full and protected setup of the operating system which includes a number of programs, scripts, and so on. They work together in the background to guarantee the integrity of the Windows operating system. However, there are times when this piece of code could also go wrong. As a result, you might encounter errors like the “There was a problem running preinstall.cmd scripts” error. “Preinstall.cmd” is a type of CMD file associated with Applications & Drivers developed by Gateway for the Windows OS.
To fix the “There was a problem running preinstall.cmd scripts” error, there are several things you can try. You can try to download a new Windows installation image or create a new bootable drive as well as uninstall conflicting or incompatible programs. In addition, you can also run the Windows Update troubleshooter or reset Windows 10.
Option 1 – Try to download a new Windows installation image
Your first option to fix the “There was a problem running preinstall.cmd scripts” error is to download a new Windows installation image. You can get the official ISO files for the latest release of Windows 10. After you’ve downloaded the ISO files, you can use them to upgrade to the latest Windows 10 version.
Option 2 – Try creating a new bootable drive
Insert your USB drive into your PC.
Tap the Win + R keys to open the Run dialog box and type in “cmd” and tap Enter to open the Command Prompt. Alternatively, you can also search for “cmd” in the Cortana search box to open Command Prompt.
Once you’ve opened CMD, type in this command to open the DISPART utility – diskpart
After that, you should see a new black and white window that would say, “DISKPART>”.
Next, type in “list disk” in the command line and tap Enter to see the list of all the Storage devices as well as your hard disk connected to your PC. Here, you have to identify your disk’s number.
Type in this command where “X” is the disk number you have identified and then tap Enter – disk X
Type in this command and hit Enter to clear the table records and all the visible data on the drive – clean
Now you have to recreate a new primary partition of the drive so you’ll have to type in this command and tap Enter right after – create part pri
A new primary partition has been created so you have to select it by typing this command and tapping Enter – select part 1
Now you have to format it to make it visible to normal users by typing – format fs=ntfs quick
Note: If your platform supports the Unified Extensible Firmware Interface or UEFI, replace the “NTFS” with “FAT32” in the command on Step 10.
After that, type in this command and tap Enter after – active
Finally, type this command and hit Enter to exit the utility – exit
After you prepare the image for the operating system, save it to the root of your USB Storage device.
Option 3 – Try to uninstall conflicting programs
If you are using a computer made by Dell and got Windows 10 preinstalled in it, then you can try to uninstall the programs listed below and see if it fixes the problem.
Dell Encryption Management service
Dell Digital Library service
Option 4 – Run the Windows Update Troubleshooter
You might also want to run the built-in Windows Update Troubleshooter in Windows that could help you in resolving the “There was a problem running preinstall.cmd scripts” error. All you have to do is go to Settings > Update& security > Troubleshoot > Windows Update. From there, click on the Run the troubleshooter button and follow the next one-screen instructions that appear. After that, restart your computer and check if the error is now fixed or not by trying to install the update once again.
Option 5 – Run Microsoft’s online troubleshooter
Running Microsoft’s online troubleshooter might also help you fix the error. This online troubleshooter is known to help in fixing Windows Update errors, it scans your computer for issues that might be causing the problem and then fixes them automatically.
Option 6 – Try to reset Windows 10
Tap the Win key or click on the Start button located in the Taskbar.
Then click on the Power button at the bottom right portion of the screen.
Next, press and hold the Shift key on your keyboard and then click on Restart. This will restart your Pc into the Advanced Startup options.
Note: Once you have access to the Advanced Startup options, you have to go to the setting which allows you to Reset your Windows 10 PC. All you have to do is select Troubleshoot > Reset this PC to reach the following screen
Afterward, select either the “Keep my files” option and then proceed to the next on-screen instructions that follow to reset your Windows 10 computer without losing your files.
Device drivers are needed in order for the hardware and software to communicate in an operating system. Some of these drivers are digitally signed. These kinds of drivers are drivers that are signed by their issuing authority in a way that the end-user or any third party won’t be able to modify them. And there are times when you encounter an error that says, “Windows requires a digitally signed driver” when you try to install or update device drivers.
Driver Signing is the process of associating a digital signature with a driver package. Digital signatures are used in Windows device installations to verify the identity of the vendor providing the driver packages as well as to verify the integrity of the driver packages.
All the drivers you usually install on your PC from Windows Update, Original Equipment Manufacturers, or some other third-party driver download software and so on must be verified digitally by Microsoft through the digital signature. A digital signature is an electronic security mark that verifies the publisher for the driver and all the relevant information related to it. That’s why Windows won’t run a driver if it isn’t certified by Microsoft, be it a 32-bit or 64-bit system – this is called the Driver Signature Enforcement.
The only Kernel-mode drivers that Windows 10 will load are the ones that are digitally signed by the Dev Portal. However, the changes only affect the new installations of the operating system with Secure Boot on while the non-upgraded fresh installations would require drivers that are signed by Microsoft.
The “Windows requires a digitally signed driver” error indicates that the driver you are trying to update or install hasn’t been signed digitally by the issuing authority, preventing you from installing or updating it. To resolve this issue, you can try to update the drivers directly from the manufacturer’s site. You could also disable driver signing via Group Policy Editor.
Option 1 – Update the device drivers directly from the manufacturer’s site
The reason why you’re getting the “Windows requires a digitally signed driver” error in the first place is that you might have downloaded the drivers from external media. It could also be that the drivers didn’t update for some time now and the issuing authority changed its policies. Thus, you can try to update the drivers straight from the manufacturer’s website and install them. If this option didn’t work, then you’ll have to disable the driver signing or its recognition in Windows 10. Keep in mind that doing so is not advisable if you have to use the concerned driver.
Option 2 – Disable driver signing via Group Policy Editor
Tap the Win + R keys to open the Run utility and type “gpedit.msc” in the field and tap Enter to open the Group Policy Editor.
After that, navigate to this policy setting: User configuration > Administrative templates > System > Driver installation
Next, double click on the “Code signing for device drivers” entry located on the right pane to open its properties where you’ll see the following description:
“This setting determines how the system responds when a user tries to install device driver files that are not digitally signed. It establishes the least secure response permitted on the systems of users in the group. Users can use the System in Control Panel to select a more secure setting, but when this setting is enabled, the system does not implement any setting less secure than the one the setting established.When you enable this setting, use the drop-down box to specify the desired response.“Ignore” directs the system to proceed with the installation even if it includes unsigned files.“Warn” notifies the user that files are not digitally signed and lets the user decide whether to stop or to proceed with the installation and whether to permit unsigned files to be installed. “Warn” is the default.“Block” directs the system to refuse to install unsigned files. As a result, the installation stops, and none of the files in the driver package are installed.To change driver file security without specifying a setting, use System in Control Panel. Right-click My Computer, click Properties, click the Hardware tab, and then click the Driver Signing button.”
Now select the radio button for “Enabled” and select Ignore from the drop-down menu under “When Windows detects a driver file without a digital signature”.
Then click on the Apply and OK buttons to save the changes made. This will get rid of the “Windows requires a digitally signed driver” error but take note that this will also make your system less secure.
22H2 update for Windows 11 will arrive later this year and although Microsoft is not releasing anything big there will be some interesting improvements and fixes. We take a look at some that caught our attention.
Phishing protection
One of the most interesting upcoming features is enhanced phishing protection. Microsoft Defender SmartScreen will be upgraded to alert users when they try to store passwords in plain text files and also if they accidentally type in a Microsoft account password on phishing sites.
"These enhancements will make Windows the world's first operating system with phishing safeguards built directly into the platform and shipped out of the box to help users stay productive and secure without having to learn to be their own IT department,"
Microsoft
File Explorer gets tabs, a modern sidebar, and contextual suggestions
Finally, Windows File explorer is getting tabs that will allow much easier management of folders and files inside it.
It is confirmed that Microsoft is also working on a new 'HOME' sidebar that should be modern in design and in features including OneDrive so you can find everything in one place.
Pinning of favorite files was also mentioned so you can easily pin favorites for quick access.
Full-screen widgets
Windows 11 has brought back widgets in a new way and from all the feedback users are loving them. Currently, you have a widget sidebar on the left part of the screen where you have your chosen store widgets but from the Microsoft teaser, we will have soon the option to have them in full screen.
If you are using a widget for reading news, blogs, etc. this feature will be very good since you will be able to use your whole screen for information and not just a part of it.
Suggested actions
Another new feature is 'suggested actions' which is going to be particularly useful in apps like Microsoft Teams. With this new feature, you can highlight a date in a Teams message and Windows will suggest actions.
For example, if you highlight a date, you'll see a recommendation to create an event in Microsoft Calendar for that day.
Windows 11 has some cool animations including fading effects which make working in it feels nice and futuristic but the cost of this is that there is a slight delay to certain actions performed. If you want the snap fast feature in Windows 11 and do not care about this eye candy there is an easy way to turn animations off inside it.
First, open Windows Settings by pressing ⊞ Windows + I on your keyboard
Alternatively, click on Start, search for Settings, and then click its icon.
When Settings appears, look in the sidebar and select Accessibility.
In Accessibility settings, click on Visual Effects.
In Visual Effects, switch Animation Effects to Off.
That’s it, changes will be applied automatically, you can close settings and continue working inside Windows 11 without animations and fades.
You can always switch animations back On via settings if you change your mind.
If you have been using Windows for quite some time now then you’re probably aware of the BIOS or UEFI password. This password lock is the one that ensures you enter the set password even before your Windows PC boots up. However, there’s just one downside with the BIOS or UEFI password – there is no recovery option, unlike your Microsoft account. Worry not though for this post will guide you on how you can set or recover a BIOS or UEFI password on your Windows computer.
The BIOS or UEFI passwords are stored at the hardware level which means that unless the OEM wants or has configured a way to recover the password, it is pretty much impossible to reset it. There are times when they are so strict that the only way to get through it by contacting customer care. Note that any Windows computer with this lock can’t be unlocked by trying to reinstall Windows.
In this post, you’re going to have to remove the CMOS battery temporarily, clear unknown BIOS/UEFI passwords using the bios-PW website as well as call customer care. For more details, refer to the options provided below.
Option 1 – Remove the CMOS battery temporarily
In case you didn’t know, every motherboard comes with a CMOS battery which helps the computer system to keep the clock ticking and in making sure that the BIOS settings are not lost when the computer is powered down. Every time a computer is turned on, the CMOS battery ensures that the information is available for the computer to boot up. So when you remove the CMOS battery temporarily, say about 30 seconds or a minute, the settings will be lost. There are some motherboards that are built-in ways that when you remove the battery for long, it will reset everything including the password for the BIOS or UEFI.
Option 2 – Clear the unknown BIOS or UEFI passwords using a bios-PW website
If the first option didn’t work, you can try using this BIOS Password website at http://bios-pw.org/ to clear the password.
When prompted by the BIOS, enter the wrong password a couple of times as doing so will lock you out of the system.
After that, you will see a new number or code on the screen which will include a message about System Disabled [XXXXX] Service TAG [YYYYY].
Next, open the BIOS Password website and enter the XXXXX code in it and make sure to tap the Shift + Enter keys or just enter.
Now it will open multiple unlock keys which you can use to clear out the BIOS or UEFI lock on your Windows PC.
Option 3 – Call the customer care
If the second option still didn’t work, you have to call customer care and follow their suggestions for they will walk you through fixing the problem using the service tag or might suggest that you visit a service center to make things easier for you.
Note: You also have the option to set a BIOS or UEFI password. Although it isn’t recommended, you still can do it if you really want to. Remember that the BIOS or UEFI interface varies from OEM to OEM so you must find something related to either PASSWORD or SECURITY. You will have the following similar options:
Supervisor password – it’s the same as the master password that can change important system settings.
User password – with this password, any user can change minor settings.
Master password – you can use this password for a hard drive or as a general password.
There are several OEMs that offer micro-control where you have to enter the BIOS password. For instance, you’ll have the option to skip for a normal restart, or when you select a boot device while you might have to enter the password for unattended reboots or when your PC is powered on, etc.
And if you are here to remove the password, you need to find a remove password option in the same section. You will be prompted to enter the set password once and if it’s correct, it will remove the BIOS password. After that, you have to save and exit the BIOS then restart your computer and check if the settings are properly applied.
Finally upgraded to Microsoft’s newest OS, but the performance is a bit sluggish? Here are a few useful tips you may not have thought about that could significantly transform your experience!
How to speed up Windows 11?
1. Disable startup programs
There are many programs that launch right on startup that really aren’t essential. This, in turn, causes your PC to launch and run more slowly.
To check which programs are enabled on startup, go into the Task Manager and select the Startup tab. Find every program that doesn’t need to launch immediately, right-click on it and press ‘Disable’.
This will not shut down the program in that instant. It’ll just prevent it from running automatically as you turn on your PC. You can always launch it manually when you need it.
2. Expand your memory and storage
If you want your PC to run super smoothly, you need to have enough memory to support that. This is especially significant for those of you who love to multitask. Upgrading your RAM gives your PC more space to store the temporary data it needs to complete processing tasks. In other words, processing takes a lot less time.
Your long-term storage is equally important. Hopefully at this point you’re already using SSD over HDD, since this type of storage offers a faster boot time.
Credit: Marc Pezin on Unsplash
In any case, we recommend expanding your storage capacity. The more files and data you store, the more there is to load, significantly influencing your PC’s speed. Larger storage capacity means new data and essential updates can be stored comfortably, preventing any strain on your PC’s performance.
3. Clean up disk space
If you aren’t willing to upgrade your storage just yet, the least you can do is clean up your storage right now.
Aside from manually deleting stuff you no longer need, you can also get rid of temporary files that clutter up your storage and eat up performance for no reason. To get to them, click Windows + X and select ‘Run’ (or just type it in the search bar).
A small window will pop up, where you need to type %temp%. This will take you to a whole folder full of all the temporary files you can remove without thinking twice.
For those who upgraded from Windows 10, there’s a neat trick to get rid of potential leftover files you don’t need on your brand new iteration. Only do this if you’re 100% sticking with Windows 11, though. Go to System > Storage > Temporary files. Make sure to only leave ‘Previous Windows Installation’ and ‘Windows Update Clean-up’ checked and click on ‘Remove files’.
Lastly, make use of Windows 11’s fantastic Storage Sense feature. Turning it on will enable your PC to constantly watch out for junk or unused files to optimize your PC’s performance to the maximum.
4. Install pending updates
This one should go without saying, but pending updates can be detrimental to your Windows 11 performance. The longer you leave them untouched, the more bugs the outdated programs and patches can cause. So, make sure to regularly check for updates and install them as soon as they’re available.
5. Disable visual effects
As cool as visual effects, animations, shadows and transparency are, they can also put quite a toll on your computer’s speed. On a newer setup this generally shouldn’t be a problem, but if you do notice a drop in performance, definitely consider turning off some of these settings.
To do this you can go to the Control Panel, System Properties and click the ‘Advanced’ tab. In the Performance section, choose Settings. If you’d like a quicker way to get to the dialog (Performance Options) with Visual Effects, you can also type sysdm.cpl in the search bar.
Once there, you can either have your PC choose what’s best, choose the best appearance or the best performance. The other option is to manually toggle the effects off and on. The biggest obstacles to speed are taskbar animations, window shadows, control/element animations and animations upon minimizing/maximizing.
Credit: Windows on Unsplash
In the same vein, you should go to Settings > Personalization > Colors and disable Transparency, to prevent your computer from doing overtime just to hit the aesthetic appeal.
6. Get rid of bloatware
Bloatware is one of the biggest culprits of slow computer speed.
Pre-installed software that’s pretty much useless but takes up valuable system resources has been around since day one. No matter which device or platform you’re talking about. Luckily, a lot of it is removable, making it easy to lighten the load on your device.
To boost your Windows 11 computer, go to Settings > Apps > Installed apps.You’ll probably see a bunch of apps you don’t want or need. Click on the three dots next to each one you want to remove and press ‘Uninstall’.
Aside from helping optimize performance, removing bloatware has another great benefit. Unfortunately, often this pre-installed software is quite vulnerable, exposing you to great risk of cyberattacks. So, removing it definitely improves your device’s security and gives you at least some peace of mind.
Summary
These are a few of our fastest tips for boosting performance. There are other, more complex and time-consuming ways, of course. If you’ve tried these quick ones and still need advice on how to improve your PC’s speed, feel free to reach out!
MSI.chm error is a common Windows Error code that occurs when the Windows OS becomes overloaded with invalid system references.
Solution
Error Causes
The MSI.chm error is normally triggered by the following causes:
Poor PC maintenance
You may experience the MSI.chm error if you don’t pay attention to its maintenance. This usually happens when you don’t run antivirus software or update programs and drivers frequently.
Registry files get corrupt and damaged
This error may also occur when the registry files of your PC get corrupt and damaged. This normally happens due to continuous writing, editing and deleting of information from your PCs registry over time as programs are installed, modified and deleted.
Other causes include: malware and system conflicts.
Further Information and Manual Repair
When you come across the MSI.chm error on your PC, it is advisable to repair it immediately without any delays. If you procrastinate in repairing this error, your PC is likely to be exposed to risks like:
Slow PC performance
System failure and crashes
Nonetheless, to resolve this error you don’t have to get the assistance of an IT professional. The MSI.chm is easy to repair and you can resolve it in no time even if you aren’t technically adept.
Here are some of the best ways to repair the MSI.chm error on your PC successfully in the shortest time:-
Cause: Corrupt and Damaged Registry Files
Quick Fix: If you think the MSI.chm Windows error on your system is related to Windows registry issues, then the best way to resolve this error is to download and install a Registry cleaner tool. A word of advice here is to always download such tools from a reliable and a trusted website.
Once you download the Restoro, run it on your PC to scan for errors. The scanning will usually take a couple of minutes. So, it is advisable to be patient. After the scanning is complete, you will see a detailed scanning report highlighting the registry errors on your PC.
Now to resolve the MSI.chm error that has occurred on your PC due to registry issues, click on the ‘Repair’ button to fix the error.
Once the repairing process is complete, restart your PC.
Restoro helps you not only fix the MSI.chm error but it also helps improve the speed of your PC, and protects it from failure and crashes.
Cause: Poor PC Maintenance
Quick Fix: If the cause of the MSI.chm error is poor PC maintenance, then the best way to resolve the error is to update the drivers. You can do this by installing the latest drivers for the devices that you think are now old and need to be updated.
Here’s what you need to do:
First find which devices don’t have drivers installed. For this go to the start menu and then click on the Control Panel. Now open the Device Manager. The Device Manager will list down all the devices that don’t have drivers installed with yellow exclamation point icons next to the device name.
As for the updates, the general rule of thumb if the driver does not support the program you are trying to run, then this means that you probably need to update the driver to ensure compatibility. For example your video card driver does not support a newly launched game, then you definitely need a driver update to play the game on your PC.
To install or update drivers on your PC, you can either get CDs from the market or you can download updated versions of the drivers from the main manufacturer’s website for free.
You can also use automated solution for all of your driver issues:So, next time when you or your friends encounter this problem, try these quick fixes to repair the error without any hassle.
Dynamic Wallpapers introduced with Mojave Update in macOS are pretty cool. Dynamic Desktop is a feature introduced in macOS Mojave (10.14), in which the desktop background changes according to the time of Mac's current location. If Location Services are turned off the Privacy pane of the System Preferences, then the time zone specified in the Date & Time preferences will be used.
To apply macOS Dynamic Wallpaper on Windows 10 we need to download & use WinDynamicDesktop, a free application that lets you apply macOS Dynamic Wallpaper.
After the installation, you will be asked to Configure the Schedule. While doing that you need to make sure that you enter your location correctly. You can even set specific sunrise and sunset timing by selecting “Use specific sunrise and sunset times” and changing the Sunrise and Sunset times manually.
Now, you will be greeted with some of the coolest dynamic wallpapers in the market. Select a theme of your choice, click on the Download button (file size can range between 20-200 MB), and click Apply to enjoy macOS Dynamic Wallpaper on Windows 10.
If for some reason you want to go back to the default Windows theme but not necessarily delete the application then right-click on the WinDynamicWallpaper icon from the taskbar, click Select Theme, select None (from the theme section) and click Apply.
One of the most useful built-in tools in Windows 10 is the Check Disk or CHKDSK utility. It is the one that maintains the integrity of the disk that’s connected to a computer which can be launched using the GUI or graphical user interface and using the command line.
There are a lot of things that warrant the running of this built-in utility and one of these things is the readability of the disk. Recently, a number of users reported that they encountered an error when they tried to run the CHKDSK utility – the error states, “Cannot open volume for direct access”. This kind of error in CHKDSK appears each time the command line is launched according to the affected users.
As per the users who encountered this issue, they receive the following error messages when they tried running a ChkDsk command:
“C:WINDOWSsystem32>chkdsk /f g:
Cannot open volume for direct access.C:WINDOWSsystem32>chkdsk /f f:
The type of the file system is NTFS. Volume label is 0529357401.”
To fix the “Cannot open volume for direct user access” error, here are some suggestions that might help. Follow them carefully.
Option 1 – Try running the CHKDSK utility on Boot
On the other hand, you can also try to run the CHKDSK utility on Boot so you can fix the error and recover any damaged segments of the drive.
Open an elevated Command Prompt and enter this command: chkdsk /x /f /r
After that, you will a message that says, “Chkdsk cannot run because the volume is in use by another process. Would you like to schedule this volume to be checked the next time the system restarts? (Y/N)”
Type Y and tap Enter to schedule a CHKDSK scan once your computer reboots next time.
Option 2 – Try to run the Primary Hard Disk Self Test
The next thing you can do to fix the problem is to run the Primary Hard Disk Self Test by following the steps below.
You need to boot your computer into the BIOS first.
After that, go to the Diagnostics tab and select the “Primary Hard Disk Self Test” option. Note that it may be different depending on the motherboard with different manufacturers but they should imply the same thing.
Now, wait until the test is completed, and then boot your computer normally.
Option 3 – Try to check the hard drive’s health
The next thing you can do to resolve the issue is to check the health of your hard drive using the WMIC utility in the Windows Command Prompt. This utility will check if your hard drive has any problems which resulted in the “Cannot open volume for direct user access” error.
Option 4 – Try to disable various restrictions on your hard drive
You might also want to disable the various restrictions on your hard drive since it is possible that it is encrypted or restricted which explains why you are unable to perform any operations in it and throws the “Cannot open volume for direct user access” error instead. For instance, if you have BitLocker, you can try to disable it and see if it fixes the error or not.
Option 5 – Try to uninstall or disable the Drive Locking feature on your hard drive
You could also look for any Drive Locking feature on your hard drive that tricks disk changes as it might be the root cause of the problem. Thus, if you find one, you need to either uninstall or disable it and then execute a check disk command to resolve the problem.
Option 6 – Try to disable the application service
Disabling the application service can also help you fix the problem. How? Refer to these steps:
Tap the Win + R keys to launch the Run utility and type “services.msc” in the field and then hit Enter to open the Services Manager.
Next, scroll down among the list of services and look for the service related to the security software or disk checker software.
Once you find it, right-click on that service and select Properties.
After that, change its Startup type to Disabled and click on the OK and Apply buttons to save the changes made.
Now restart your computer and don’t forget to enable the service back once the disk check is completed.
Option 7 – Try to use Repair Volume via Windows PowerShell
You could also try to use the Repair Volume using Windows PowerShell. All you have to do is open PowerShell as admin and type the “repair-volume -drive letter <DRIVE LETTER>” command and then tap Enter to run Repair Volume. This should resolve the error.
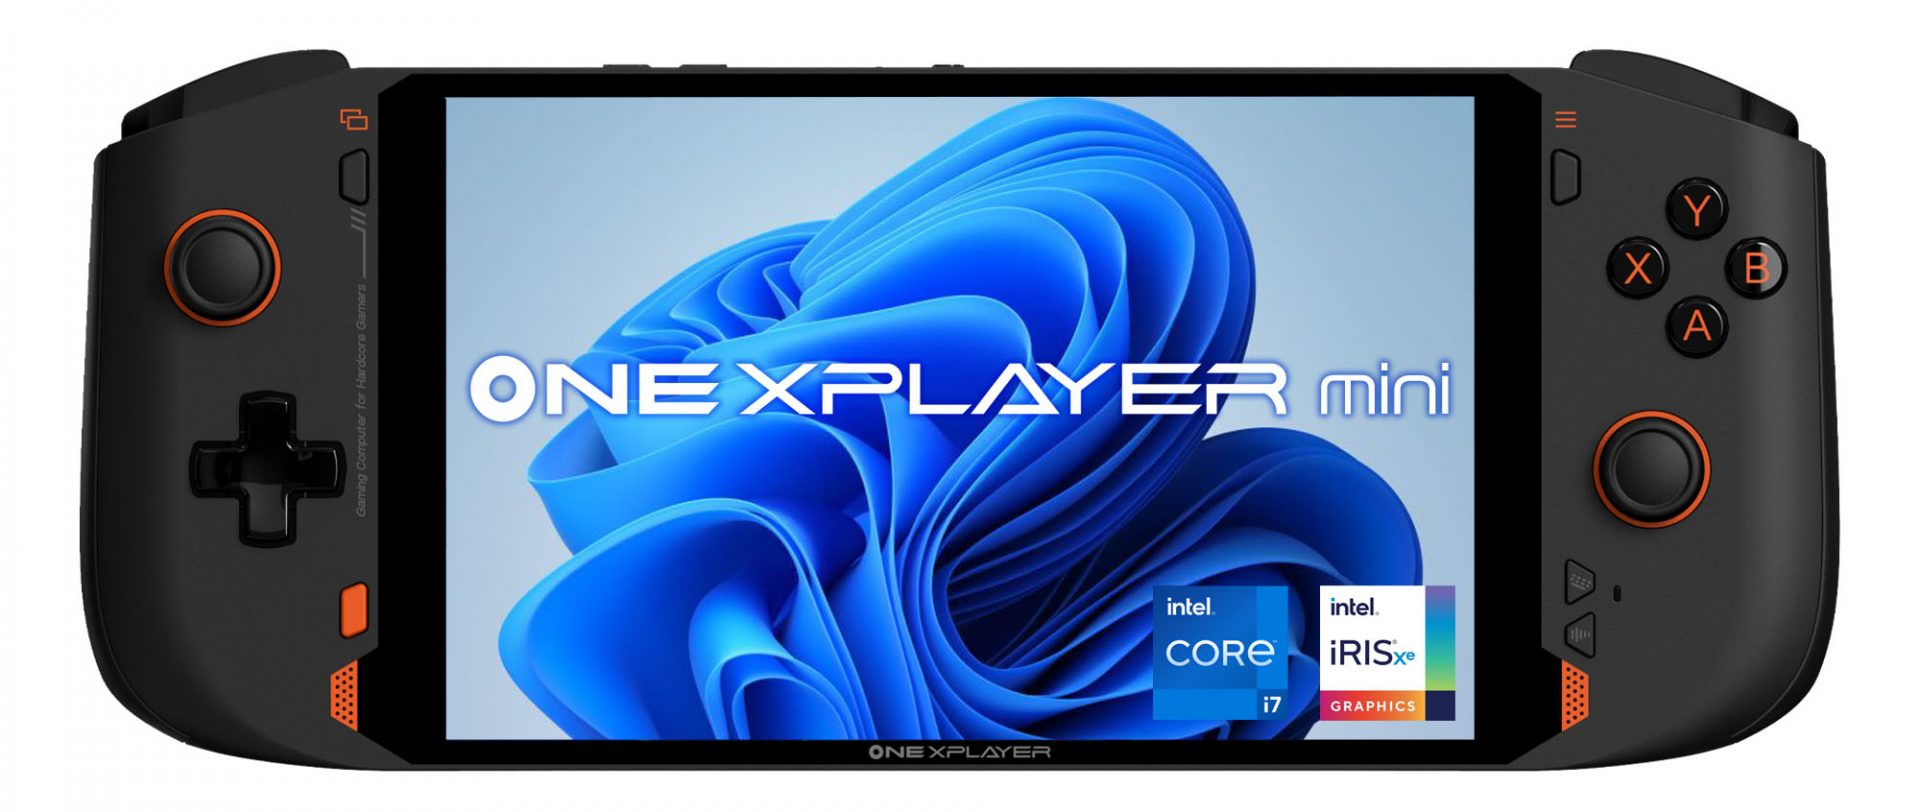
OneXPlayer is a direct competitor to Valve’s upcoming steam deck. This device is clearly inspired by Valve’s offering and it shows all over the place, from its looks to its purpose and aims to PC gamers as a handheld device.
Hardware under the hood
This device is packing a 7-inch 1080p display, 11th generation Intel Core i7-1195G7 CPU, stunning 16GB of RAM, 512GB SSD drive with the option to purchase 1TB or 2TB model. GPU of choice is Intel iris Xe Graphics that is in our opinion a bottleneck in the whole system and for more demanding games, we believe switching them to 720p would be a better option. Everything here is powered with a 10455 mAh lithium-ion battery.
OneXPlayer inputs and other stuff
Handheld is equipped with dual bumpers and dual linear triggers. The console comes with dual speakers on both sides of it. Inside the console, there is an aluminum heat sink with copper heat pipes and a fan in order to cool internal hardware. On the outside, we have two USB-C ports and one USB-A port for connections, and of course, a headphone jack for headphones. The console comes with Wi-Fi 6 and Bluetooth 5.0 for wireless connectivity.
Price
The base entry model will cost you a whopping $1.259, 1TB model $1.399 and 2TB one will go as far as $1,599. With this kind of price, I am not sure it can come up as a winner against Valve. Sure it is packing fully licensed Windows 11 that will for sure offer more options than Stem’s OS based on Linux but even with that advantage I do not think it justifies such a big price difference.
Conclusion
Of course, this kind of console or handheld PC will still find its customer base, many users will probably like it since it comes Windows ready out of the box. Sure, you can place Windows on Steam deck as well but you will need to know how, where everything is ready and you can run beside steam other launchers without issues like origin, uplay, gog, etc.
How this will be accepted by community time will tell but it is good to see that there is variety and competition in handheld PC space.
Error 1310 is a fairly common type of error encountered by Windows users.
Error 1310 usually generates while a user is attempting to install Adobe Photoshop or some Adobe product on Windows. The message displayed to the user usually states: ‘Error 1310. Error writing to file. Verify you have access to that directory’. Once the error message appears, the installation process will be terminated.
Solution
Error Causes
While there are different conditions that may trigger this error, most likely, they are generated because of the lack of privileges a user has on a Windows log-on.
When this happens, the operating system doesn’t allow the user to access the installation files. Another reason Error 1310 may occur is that often users attempt to log on to the system and choose the ‘Only for me’ option rather than the recommended ‘Anyone who uses this computer’.
Because of this reason, the data is locked for all the other users.
Since Error 1310 can easily disrupt your workflow on the system and may also lead to annoying consequences, it is best advised to treat it as quickly as possible.
Further Information and Manual Repair
There are different solutions to resolve these errors that are briefly listed below as follows.
First and foremost, restart the installation by logging onto your computer from the administrator account. This error will most likely disappear because there is often a lack of privileges that will trigger it. When you will log on from the admin account, you will have access privileges and such errors will be rectified.
Fix any corrupt system files that exist on your system. If the file resides in the Windows directory, this error will be generated. Check if any of your system files are corrupt or damaged. If yes, make sure you repair and return them back to their original position.
This error is sometimes caused because of incorrect registry entries. If the setup program shows errors, it is possible that it is because the system is having problems retrieving data stored in the system registry.
Another way, this error can be avoided is to run the setup in compatibility mode. Compatibility issues are a common occurrence. However, when an installation is performed in the compatibility mode, one can easily steer clear of such errors.
Implement any of the solutions listed above and protect your system against Error 1310.


 Windows 11 has some cool animations including fading effects which make working in it feels nice and futuristic but the cost of this is that there is a slight delay to certain actions performed. If you want the snap fast feature in Windows 11 and do not care about this eye candy there is an easy way to turn animations off inside it.


 Hardware under the hood