EverydayLookup is a browser extension for Google Chrome developed by Mindspark Inc. This extension allows users to find what mobile network a certain number belongs to, to find out an area code of a country/town, or locate a town by zip code. While these features look promising and interesting, this extension comes with a downside.
When installed, this extension will change your default search engine, the home page, and new tab to search from MyWay.com, it will monitor user browsing activity, log searches, visited links, opened websites, and other information. This information is forwarded to Mindspark ad servers, then later sold/used to better target ads.
While browsing the internet with this extension you will see additional injected ads and sponsored content throughout your browsing sessions (even if the ads do not match your search queries). It can inject banners to websites, and sometimes even put an ad above website content making it extremely annoying to deal with.
About Browser Hijackers
Browser hijacking means that a malicious code has taken power over and modified the settings of your web browser, without your permission. Browser hijackers are capable of doing many different things on your computer. Typically, browser hijacking is used for earning ad revenue that comes from forced advert mouse clicks and site visits. Even though it might seem naive, all browser hijackers are damaging and thus always classified as security threats. Browser hijackers can also permit other destructive programs without your knowledge to further damage the computer.
How one can determine if your browser is hijacked
Signs that a browser is a hi-jacked include:
1. your home page is reset to some unknown webpage
2. new bookmarks pointing to pornographic websites have been added to your favorite pages
3. the essential web browser settings are modified and unwanted or unsafe resources are added to the trusted sites list
4. find new toolbars that you simply did not add
5. you find lots of pop-ups on your screen
6. your web browser starts running slowly or presents frequent errors
7. Inability to navigate to certain websites, particularly antivirus and other security software webpages.
Exactly how browser hijacker finds its way to your computer
Browser hijackers can get into a computer in some way or other, for instance via file sharing, downloads, and e-mail too. Many web browser hijackings come from add-on programs, i.e., browser helper objects (BHO), toolbars, or extensions added to browsers to give them additional features. Sometimes you may have mistakenly accepted a browser hijacker as part of a software bundle (generally freeware or shareware). A good example of some well-known browser hijackers includes Conduit, Anyprotect, Babylon, DefaultTab, SweetPage, Delta Search, and RocketTab, but the names are continually changing.
Browser hijackers can record user keystrokes to gather potentially invaluable information leading to privacy concerns, cause instability on computers, severely disrupt user’s browsing experience, and eventually slow down the computer to a stage where it becomes unusable.
How to get rid of a browser hijacker
Certain browser hijacking could be simply stopped by discovering and removing the corresponding malware application through your control panel. Many times, it could be a tough job to find and delete the malicious program because the associated file will be running as part of the operating system process. Moreover, manual removal requires you to perform many time-consuming and tricky procedures that are very hard to conduct for new computer users.
Industry experts always suggest users eliminate any malware including browser hijacker by using an automatic removal tool, which is easier, safer, and faster than the manual removal solution. If you’d like to eliminate persistent hijackers effectively, install the award-winning anti-malware software Safebytes Anti-Malware. And employ a system optimizer, such as Total System Care, to erase all related files from the registry and fix browser issues.
Can't Install Safebytes Anti-malware because of a Virus? Try This!
Practically all malware is inherently harmful, but certain types of malware do a lot more damage to your computer than others. Some malware types modify browser settings by adding a proxy server or modify the computer’s DNS configuration settings. In such cases, you will be unable to visit some or all sites, and thus unable to download or install the required security software to remove the infection. So what to do if malicious software prevents you from downloading or installing Anti-Malware? There are some fixes you could try to get around with this problem.
Install in Safe Mode with Networking
In the event the malware is set to load at Windows startup, then booting in safe mode should avoid it. Since only the bare minimum applications and services launch in “Safe Mode”, there are rarely any reasons for issues to take place. To start your Windows XP, Vista, or 7 computers in Safe Mode with Networking, do as instructed below.
1) At power on, press the F8 key while the Windows splash screen starts to load. This will conjure up the Advanced Boot Options menu.
2) Choose Safe Mode with Networking with arrow keys and hit Enter.
3) Once you get into this mode, you should have an internet connection once again. Now, utilize your browser to download and install Safebytes Anti-malware.
4) After installation, run a full scan and let the program delete the threats it discovers.
Obtain the security software using an alternate browser
Malicious program code may exploit vulnerabilities on a specific browser and block access to all anti-malware software sites. In the event you suspect that your Internet Explorer has been hijacked by a computer virus or otherwise compromised by online hackers, the ideal approach would be to switch to a different internet browser like Mozilla Firefox, Google Chrome, or Apple Safari to download your chosen security software – Safebytes Anti-Malware.
Install and run anti-virus from your Thumb drive
Another way is to download and transfer anti-malware software from a clean PC to run a scan on the affected computer. Abide by these steps to run the anti-malware on the infected computer.
1) On a clean computer, install Safebytes Anti-Malware.
2) Insert the USB drive into the uninfected computer.
3) Double-click the executable file to open the installation wizard.
4) Pick the USB drive as the location when the wizard asks you exactly where you want to install the application. Follow the directions to complete the installation process.
5) Now, transfer the pen drive to the infected PC.
6) Double-click the EXE file to open the Safebytes software right from the pen drive.
7) Hit the “Scan Now” button to start the virus scan.
A Look at the Best AntiMalware Program
Today an anti-malware tool can protect your computer or laptop from different types of internet threats. But how to choose the right one amongst various malware protection application that’s available on the market? Perhaps you might be aware, there are numerous anti-malware companies and tools for you to consider. A few are well worth your money, but most aren’t. You need to be careful not to select the wrong application, particularly if you purchase a premium program. One of the highly recommended tools by industry leaders is SafeBytes Anti-Malware, the most dependable program for Windows computers.
SafeBytes anti-malware is a trustworthy tool that not only secures your computer permanently but is also quite easy to use for people of all ability levels. This program can easily identify, remove, and protect your personal computer from the latest malware attacks such as spyware, adware, trojan horses, ransomware, PUPs, worms, parasites along other potentially harmful software programs.
SafeBytes has excellent features when compared to various other anti-malware programs. Listed here are some of the great ones:
Anti-Malware Protection: Using its advanced and sophisticated algorithm, this malware elimination tool can detect and eliminate the malware threats hiding in your computer system effectively.
Active Protection: SafeBytes provides round-the-clock protection for your computer limiting malware attacks instantly. This software will constantly keep track of your computer for suspicious activity and updates itself continuously to keep current with the latest threats.
Web Protection: Through its unique safety rating, SafeBytes alerts you whether a website is safe or not to access it. This will assure that you’re always certain of your online safety when browsing the internet.
High-Speed Malware Scanning Engine: SafeBytes’s high-speed malware scanning engine lessens scan times and extends battery life. At the same time, it’ll effectively find and eradicate infected computer files or any internet threat.
Low Memory/CPU Usage: SafeBytes is renowned for its minimal influence on computer resources and great detection rate of diverse threats. It runs quietly and efficiently in the background so you’re free to use your computer or laptop at full power all of the time.
Premium Support: For any technical inquiries or product guidance, you can obtain 24/7 professional assistance via chat and e-mail.
To conclude, SafeBytes Anti-Malware is really great for securing your computer against all sorts of malware threats. Malware trouble will become a thing of the past once you put this software program to use. If you’re looking for the very best malware removal application out there, and when you don’t mind shelling out some dollars for it, go for SafeBytes Anti-Malware.
Technical Details and Manual Removal (Advanced Users)
If you’d like to manually get rid of EverydayLookup without using an automated tool, it might be possible to do so by removing the application from the Microsoft Windows Add/Remove Programs menu, or in cases of browser plug-ins, going to the browsers AddOn/Extension manager and uninstalling it. You will likely also want to reset your internet browser.
To be certain of complete removal, find the following registry entries on your computer and delete them or reset the values appropriately. However, this is a complicated task and only computer experts can perform it safely. Furthermore, certain malware is capable of replicating or preventing removal. It is recommended that you carry out the removal procedure in Windows Safe Mode.
Files:
%LOCALAPPDATA%\EverydayLookup_d9
%UserProfile%\Local Settings\Application Data\EverydayLookup_d9
%UserProfile%\Local Settings\Application Data\Google\Chrome\User Data\Default\Extensions\fpeepicldbpmefboahpolegllmiglnai
%LOCALAPPDATA%\Google\Chrome\User Data\Default\Extensions\fpeepicldbpmefboahpolegllmiglnai
%PROGRAMFILES%\EverydayLookup_d9
%PROGRAMFILES(x86)%\EverydayLookup_d9
%UserProfile%\Local Settings\Application Data\EverydayLookupTooltab
Registry:
HKEY_LOCAL_MACHINE\SYSTEM\ControlSet001\services\EverydayLookup_d9Service
HKEY_LOCAL_MACHINE\SOFTWARE\Microsoft\Windows\CurrentVersion\Run, value: EverydayLookup EPM Support
HKEY_LOCAL_MACHINE\SOFTWARE\Wow6432Node\Microsoft\Windows\CurrentVersion\Run, value: EverydayLookup EPM Support
HKEY_LOCAL_MACHINE\SOFTWARE\Microsoft\Internet Explorer\Toolbar, value: 0a7d3c2c-131d-4b0a-9c1b-2045f6bae42a
HKEY_LOCAL_MACHINE\SOFTWARE\Wow6432Node\Microsoft\Internet Explorer\Toolbar, value: 0a7d3c2c-131d-4b0a-9c1b-2045f6bae42a
HKEY_LOCAL_MACHINE\SOFTWARE\Wow6432Node\Microsoft\Internet Explorer\SearchScopes\3eb9a50f-f2ab-4d63-8e33-96d71f659640
HKEY_CURRENT_USER\Software\Microsoft\Internet Explorer\SearchScopes\3eb9a50f-f2ab-4d63-8e33-96d71f659640
HKEY_CURRENT_USER\Software\Microsoft\Internet Explorer\Approved Extensions, value: 0A7D3C2C-131D-4B0A-9C1B-2045F6BAE42A
HKEY_LOCAL_MACHINE\SOFTWARE\Wow6432Node\EverydayLookup_d9
HKEY_CURRENT_USER\Software\EverydayLookup_d9
HKEY_CURRENT_USER\Software\AppDataLow\Software\EverydayLookup_d9
HKEY_CURRENT_USER\Software\EverydayLookup

 Razer is a well-known brand among PC gamers and users, it started as a peripheral manufacturer focused on keyboards and mouse but after years passed Razer expanded its inventory offerings. It soon started offering headphones and lately has branched into wider product lines like gaming chairs and protection masks.
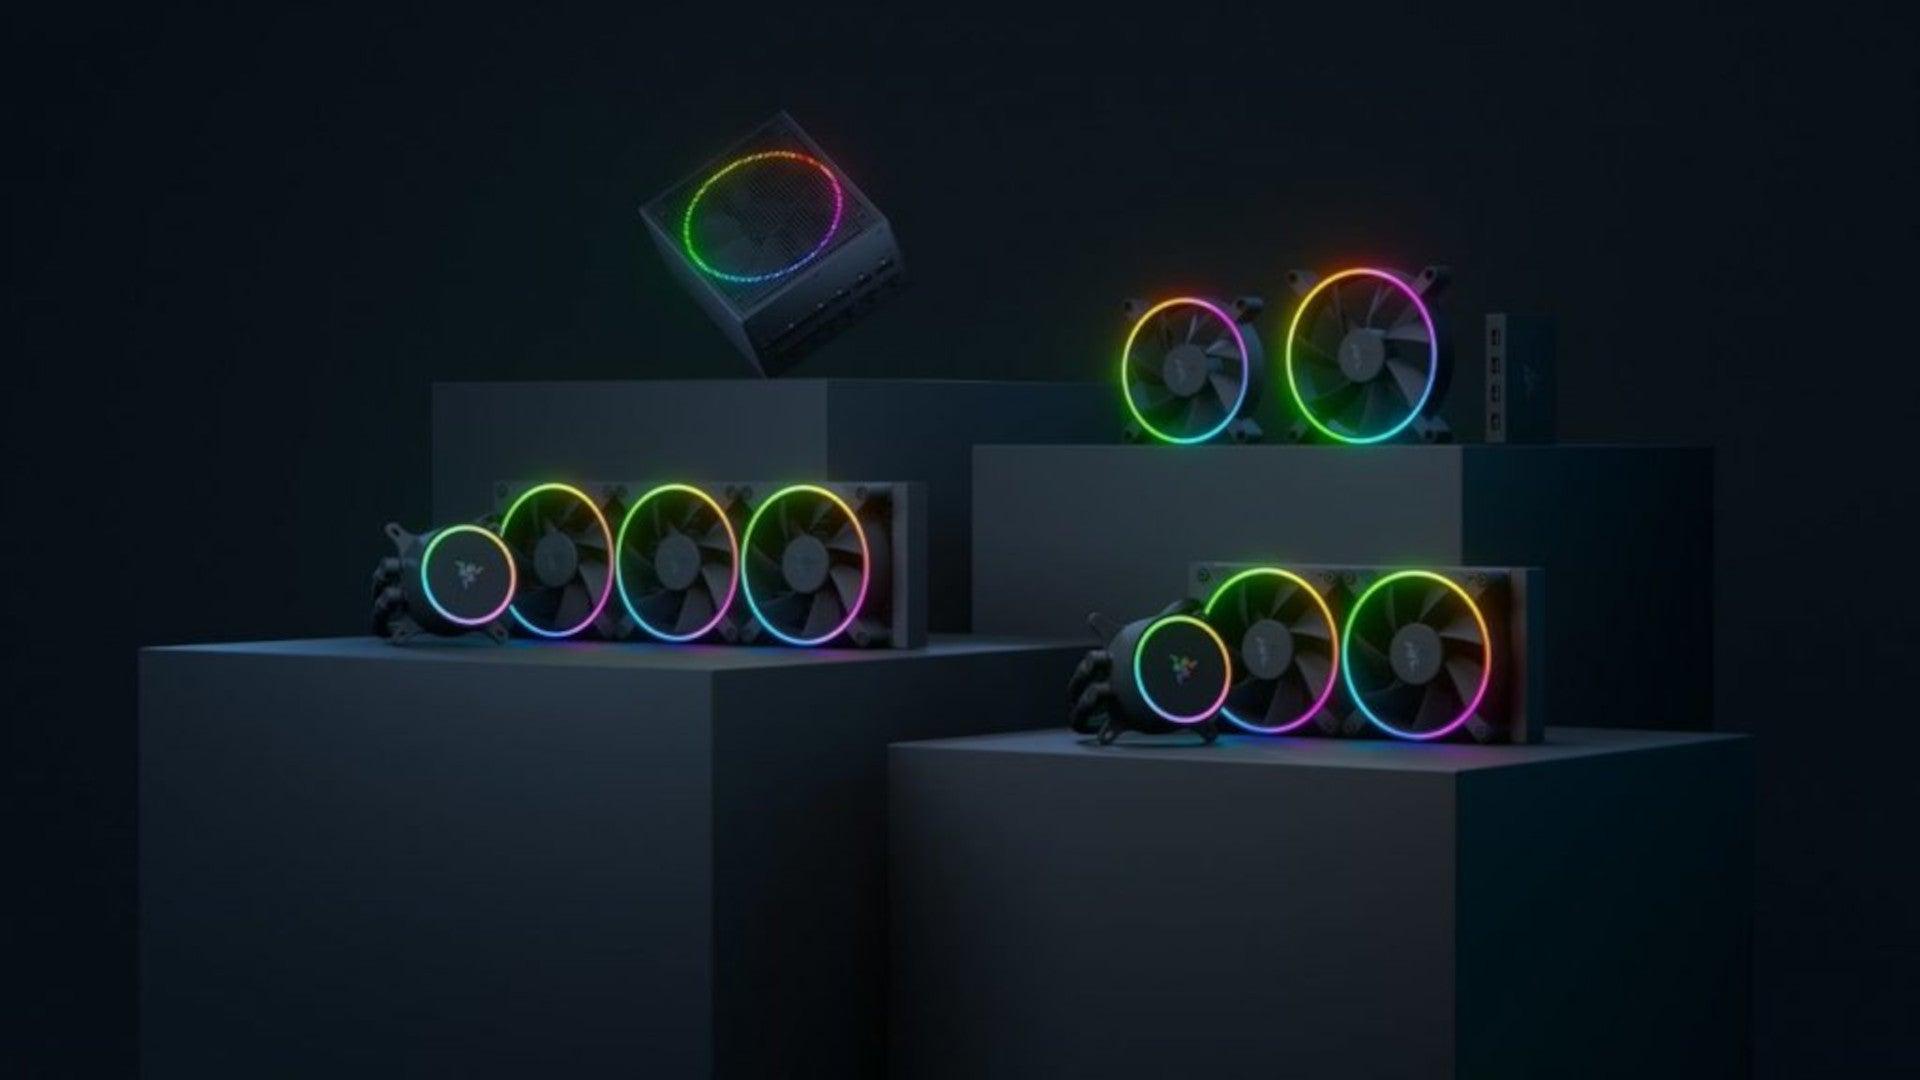
It is not a big surprise that Razer is expanding into other branches of the PC industry. This time, however, it has revealed not one but three new hardware for your PC. Case fans, all in one liquid cooler and power supply.
There are not many details about the products themselves but one thing is one hundred percent confirmed, they come with Razer Chroma, all of them, even the fans.
Razer is a well-known brand among PC gamers and users, it started as a peripheral manufacturer focused on keyboards and mouse but after years passed Razer expanded its inventory offerings. It soon started offering headphones and lately has branched into wider product lines like gaming chairs and protection masks.
It is not a big surprise that Razer is expanding into other branches of the PC industry. This time, however, it has revealed not one but three new hardware for your PC. Case fans, all in one liquid cooler and power supply.
There are not many details about the products themselves but one thing is one hundred percent confirmed, they come with Razer Chroma, all of them, even the fans.
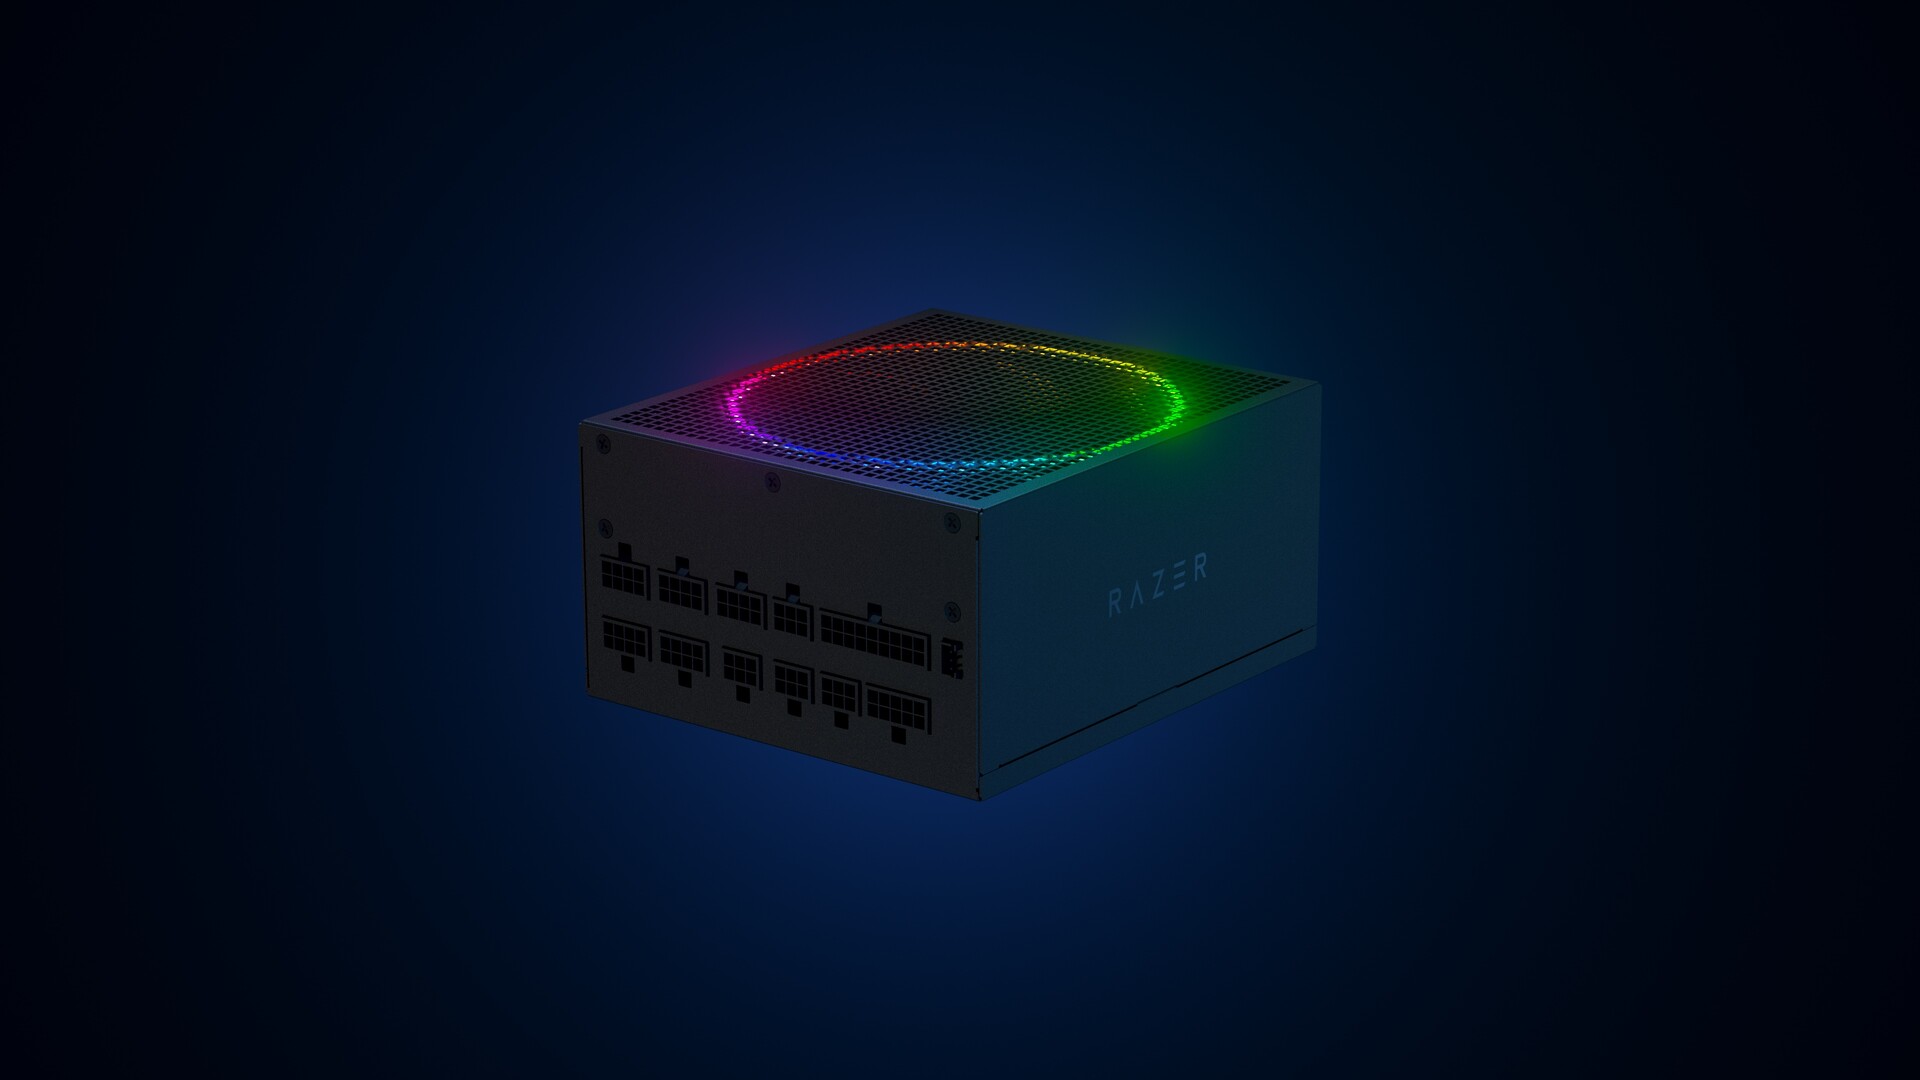 Most interesting for me personally is Razers Katana, the power supply unit. It is a modular power supply ranging from 750W to 1200W with the additional option of Titanium rated one with an impressive 1600W of power. Power supply will start shipping in early 2022 and at the time of writing this article no price range has been released.
 Hanbo liquid cooler will feature an optimized intake design so it can ensure greater heat transfer and fluid dynamic for improved reliability and silent operation. Radiator comes in 240mm size with two fans and a larger one of 360mm with three fans. The pump will be able to rotate in any direction of full 360 degrees so it can fit in any case. Hanbo will be released in November this year but no pricing has been released so far.
 Kunai fans will boast high static pressure performance with lowered noise. They will go as far as 2200rpm for the 120mm version where the 140mm version will go up to 1600rpm. They will come with addressable LEDs and up to eight fans will be able to be connected to Razer’s PWM fan controller that will come with a magnet at the back for easy attachment to any steel part of PC casing.
PWM will use Razer’s Synapse software to customize pulse width modulation in order to improve airflow and noise. PWM will be priced at $49.99 in the Razer Store and it is available for preorder. Fans are priced at $44.99 for one 120mm or $129.99 for a three-pack of 120mm. One 140mm will go for $49.99 and a three-pack will be $129.99.
Kunai fans will boast high static pressure performance with lowered noise. They will go as far as 2200rpm for the 120mm version where the 140mm version will go up to 1600rpm. They will come with addressable LEDs and up to eight fans will be able to be connected to Razer’s PWM fan controller that will come with a magnet at the back for easy attachment to any steel part of PC casing.
PWM will use Razer’s Synapse software to customize pulse width modulation in order to improve airflow and noise. PWM will be priced at $49.99 in the Razer Store and it is available for preorder. Fans are priced at $44.99 for one 120mm or $129.99 for a three-pack of 120mm. One 140mm will go for $49.99 and a three-pack will be $129.99. 
 Is There Any Deal
 Cheap Shark
 Humble Bundle
 Fanatical
 Slick Deals
 Green Man Gaming