Logo

Fix Windows 11 Black Screen Error

A black screen error inside Windows 11 is a typical screen turning to solid black without any error message. This can be very annoying since it can randomly appear out of nowhere and it will appear while you are using the computer. Worry not, this is not a serious error and we have several solutions for it, so please keep reading and try them as presented in order.

Black screenRestart graphic driver
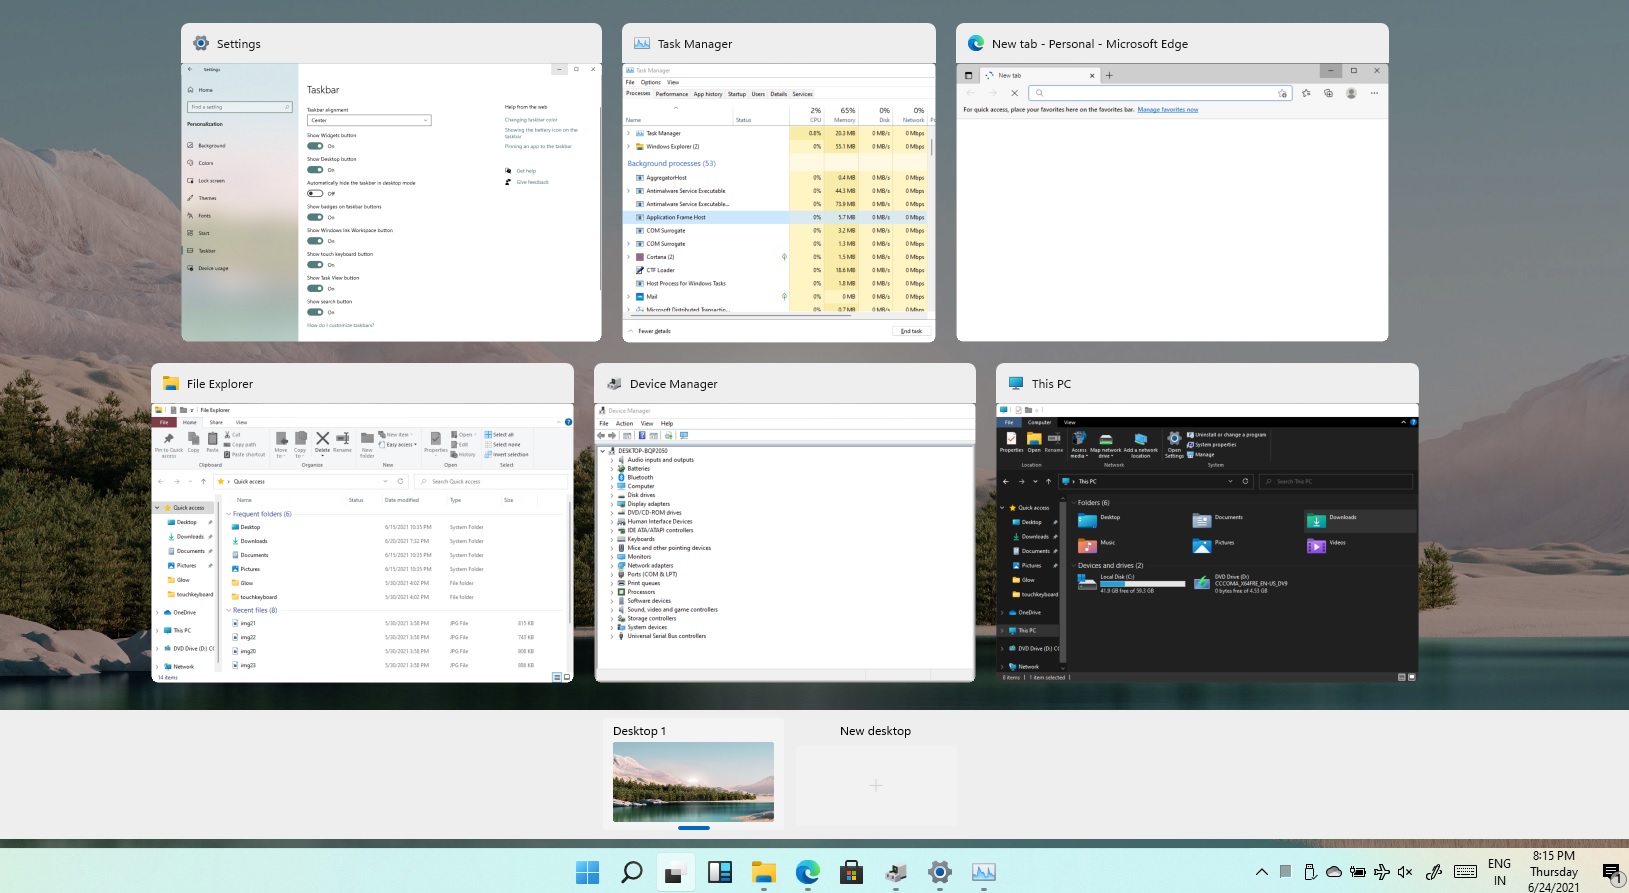
This is the first thing to check if the issue is due to software or driver malfunctioning, there is a shortcut for rebooting graphic driver inside Windows 11. Press WINDOWS + CTRL + SHIFT + B to reboot the graphic driver and see if this fixes the issue. A beep sound should be heard during this process and the screen should turn back to normal.

Check connections

Sometimes the screen can go black due to a faulty connection or cable. If you have it at your hand try a different cable or slightly and gently nudge the existing one to see will screen flicker. If you are on a laptop try gently moving the lid from back to front and pay attention to the screen. If screen flickers or picture returns with this method, cable or connector needs to be replaced.

Clean your computer

The black screen can be because the computer is overheating. If this is the case either fan inside is not working properly or there is a lot of dirt and dust that needs to be removed so airflow can be established again for proper cooling. We have an article on errortools.com on how to properly clean your PC but if you are not technical enough maybe the best solution would be to call someone who is or to take the PC to service for cleaning.

Change The Projection Settings

Press WINDOWS + P to open projection settings, check to see if PC is set to PC screen only. If any other option is selected change it to PC screen only since this can cause random black screen issues.

Uninstall latest updates

If this problem has started to manifest itself during the latest update, go to setting and roll back from the latest update to fix this issue.

Scan system for malware

The black screen can also be caused by various viruses and malware. IF you have anti-virus software, run a full system scan to check it for malware. If you do not have one, download a free one and run a system scan, we recommend Bitdefender.

Do You Need Help with Your Device?

Our Team of Experts May Help
Troubleshoot.Tech Experts are There for You!
Replace damaged files
Restore performance
Free disk space
Remove Malware
Protects WEB browser
Remove Viruses
Stop PC freezing
GET HELP
Troubleshoot.Tech experts work with all versions of Microsoft Windows including Windows 11, with Android, Mac, and more.

Share this article:

You might also like

Internet, best or worst thing ever

Started as an internal network and has slowly expanded since 1960 internet has taken over the world. In the beginning, it was a means of information change but in the modern age you can run applications and virtual machines over the internet, you can stream video and audio, and you can communicate in real-time with someone on the other side of Earth.

With the internet growing so fast in such a small amount of time it is only logical and wise to take a step back and take a good look at what it offers now, what are great things about it and what are some of the worst.

internet

Good sides of the internet

Information

There are a lot of advantages of the internet, first and foremost is information. Internet was made as an information exchange service and even today you can find a lot of various information about various topics that interest you. A site like Wikipedia is a completely free online encyclopedia and a lot of news companies have their own internet sites where you can find free information and news.

On the other hand, there are also websites like udemy, edx, Coursera, and many others that will offer you the education, some for free, some for money but you can get a glimpse and part of university quality education for just a fraction of price.

Online shopping

Sites like Amazon have used the internet and launched themselves as today's multi-billion companies. In today's world, there is not a single thing you can not buy online. Many sites today are going from the large online marketplace where you can find everything to small niche specialized ones. Also every major brand in the world today has its own online store.

Other shops will offer you music, movies, games, etc. Services like steam, xbox pass, sony pass etc, will let you buy games online, other music, movies, and many more.

Streaming services

Days, when you had to buy movies in order to watch them at home, are gone, thanks to the internet we have plenty of streaming services for movies and tv shows as well as ones for music. If you do not want to spend money on actually purchasing things then a good idea is to have a streaming plan set up when you want it.

Email and messaging

Communication is a great thing and since the dawn of mankind people have been talking and sharing with each other, the internet has made it possible to send mail electronically and instantly and modern chat communication is everywhere. We can not just talk with our friends and family that can be on the other side of the world, we can also talk in real-time with the sales representative, with technical service, or attend online classes with a group of people.

Cloud storage services

Saving your pictures in this digital media age on the hard drive can be risky but thanks to modern technologies you can save most of your precious files on cloud servers for safekeeping. From pictures to documents and even other files that you need and want to save. There are some of them that will offer you a free amount and some basic free plans as well.

Bad sides of the internet

Malware, viruses, and phishing

We could not talk about the bad side of the internet if we do not mention its greatest threat. Bad sites, infected software, phishing emails, and many more malicious threats. Problem is that these kinds of tricks and attacks have become more and more sophisticated and harder to detect and avoid.

Pornography

Pornography is bad, having it freely available to children is even worse. Sadly the only way to regulate this is on a computer-by-computer basis by turning on parent control on each one. There are many studies that go into detail about why this is bad, sadly currently there are no effective ways to isolate this content.

No privacy

When we say there is no privacy we do not mean by using social media and not setting your privacy settings altho that also fits in this point, what we are talking about is data mining of your habits and things you do. It is well known that today lot of websites are using some form of AI recommender system in order to tailor your internet experience to suit your needs better. Most of these AI systems are trained by mining your data and analyzing your habits.

If you have 2 google accounts there is a high probability chance that for the same query you will get different results, depending on your so far browsing habits. The same goes for other services as well.

Dark webshops

There are some great things in dark and deep WEB-like sites with true news and information. Even some legit libraries where you can find and download rare books. Sadly as goes with the internet dark and deep WEB also has its well, dark sides, from disturbing content to shops that sell stolen items to straight stealing your money by parading as legit shops but only to steal your money.

Dating sites

We all try to find someone that is perfectly matched with us but using the online dating site has many proven bad effects on psychology. It also devaluates interaction between people and can lower self-esteem.

Bad habits

Since the internet has become wildly available and popular on various devices like tablets and mobile phones more and more people are spending an unhealthy amount of time on it. Harvesting the benefits of the internet is great but find some time for other people as well.

Read More
Kernel Mode Heap Corruption Error in Windows
Kernel Mode Heap Corruption is the error message that the Windows operating system throws when it encounters a blue screen of death or BSOD error during PC startup or launching specific programs such as video games. It is mainly caused due to software conflicts, driver issues (especially graphics card driver), and computer hardware malfunctioning. The good news is that this error is easily fixable. Follow the next steps in order to fix the error:
  1. Rollback graphic card driver

    Press ⊞ WINDOWS + X to open Windows secret menu and click on device manager Expand Display adapters section Right-click on your GPU and choose properties In properties window go to the driver tab and click on Roll back driver Select the reason for operation and click on YES Reboot your PC
  2. Update corrupted and outdated drivers

    How is this error mostly driver issue, updating and fixing bad drivers can fix it very easily. As in the previous step, you will need to open the device manager and go through all drivers and manually check for updates for each one, update as necessary or reinstall ones you might think have gone rogue. If you are not experienced enough with this kind of task install some automatic solution for this task like DriverFix
  3. Check for software issues

    If this error started happening after the installation of new software it is very likely that the application is causing problems. Try uninstalling or disabling the application to see if it will fix the issue. You can also boot Windows in safe mode to see if the error will happen there, if Windows is working fine in safe mode, it is likely that issue is on the software side.
  4. Run SFC scan

    Press ⊞ WINDOWS + X and choose Command prompt (admin) In command prompt type in sfc /scannow and press ENTER Wait for the process to be finished and Reboot the system
Read More
Fix Error 0xe0434f4d

What is Error 0xe0434f4d?

Error 0xe0434f4d displays when a remote computer runs an instance of the SQL Server 2005 but it fails to initialize. When the plan is started, this error displays in a status window on the SQL Server. Also, when the Update-OffilineAddressBook cmdlet is started in Microsoft Exchange Server, this error can occur.

Solution

Restoro box imageError Causes

Error 0xe0434f4d can occur for possibly two main reasons. The first one is when the System Attendant Service is not properly running, and the second when you don’t have the permission to run the update. Other causes are when the .NET Framework 2.0 security does not allow sqlplanlaunch access to run from a shared network. Another cause is when the Offline Address Book (OAB) is not found in the Configuration Domain Controller server that the server of OAB generation uses.

Further Information and Manual Repair

In case you didn’t know, the Offline Address Book generation server is a mailbox server, and in order to resolve error 0xe0434f4d, you will have to replicate the OAB object to the Configuration Domain Controller server. In order to do so, follow steps:
  • Go to start and click on All Programs, then go and click on Microsoft Exchange Server 2010. Click on Exchange Management Console
  • In Exchange Management Console, go to Server Configuration and click on Mailbox
  • In the details, go to mailbox server that generates Offline Address Book and right-click it, then go to Properties
  • In the Properties, click on System Setting and locate the domain controller name in the box that reads Domain controller servers being used by Exchange
Make sure the OAB object is reproduced in the Configuration Domain Controller Server. Follow these steps to do that:
  • Go to Start and click on Run. Type Adsiedit.msc in Open box and press Enter. Right-click on ADSI Edit and click on Connect to
  • Locate a list reading Select a well-known naming context, and from there select Default naming context. In a Select or type a domain or server window, type FQDN (fully qualified domain name) of the Configuration Domain Controller server which was determined in step 1, and click OK
  • Expand Configuration [dc.domain.com], expand CN=Configuration, DC=domain, DC=com, expand CN=Services, expand CN=First Organization, and expand CN=Address Lists Container
  • Click on CN=Offline Address Lists and make sure the OAB object is listed on the details pane
When the OAB generation server receives this, then it will connect to the Configuration Domain Controller server and will locate the OAB object. If the OAB generation server is unable to find the OAB object, then the error will return on the cmdlet. On SQL Server, you should change the .NET permissions to allow sqlplanlaunch application access to run from shared administration. For that, follow these steps:
  • On ArchiveIQ Server, open System from the Control Panel and note down the computer name
  • On SQL Server, log in as administrator and open the command prompt
  • On the command prompt type, ‘C:windowsmicrosoft.netframeworkv2.0.50727caspol.ece –m –ag l – url file:\[Archive IQServer Computer Name]AlQRemote$*FullTrust and Press Enter. Type yes and press Enter again to confirm the permission changes.
Read More
Software review series: Tor Browser
Back in the mid-'90s, when the US Navy was looking into ways to securely communicate sensitive intelligence information, a mathematician and two computer scientists emerged from the Naval Research Lab with something called "onion routing." It was a new kind of technology that would protect your internet traffic with layers of privacy. By 2003, The Onion Routing project, acronym Tor, was in the hands of the public, where its vast network of users the engine enabling Tor has since continued to grow. Today, thousands of volunteers all over the world are connecting their computers to the internet to create the Tor network by becoming "nodes" or "relays" for your internet traffic.

What is Tor?

At a basic level, Tor is a type of internet-connected network with its own internet browser. Once you connect to the internet with the Tor browser, your internet traffic is stripped of its first layer of identifying information as it enters the Tor network and is then sent bouncing through those relay nodes, which serve to encrypt and privatize your data, layer by layer like an onion. Finally, your traffic hits an exit node and leaves the Tor network for the open web. Once you're in the Tor network, it's nearly impossible for others to track your traffic's manic pinballing path across the globe. And once you leave the Tor network via an exit node, the website you view (assuming it has HTTPS in front of its address) isn't sure which part of the world you're hailing from, offering you more privacy and protection. Because Tor is a volunteer-run network, speed can often be an issue. As your traffic moves from node to node, you're likely to notice more speed loss than you would, for instance, with most commercial virtual private networks. This becomes particularly noticeable if you try to watch streaming Netflix content over Tor or make voice-over-IP phone calls or video calls with an app like Zoom. Tor technology isn't necessarily built to provide seamless audio-video experiences.

Tor and plugins

Speaking of videos, there are also limits to the amount of privacy Tor can offer you if you enable certain browser media plugins like Flash. Likewise, your browser's JavaScript plug-in which enables you to view a lot of websites' embedded media can still leak your IP address information. Torrenting files with Tor also exposes you to privacy risks. Because of these risks, Tor's privacy settings have these kinds of plug-ins disabled by default. If you're just looking to do general, daily internet perusal using a browser that will better hide your traffic from spying eyes, Tor probably isn't the best choice due to its slow speeds and incompatibility with most embedded media. But if you're concerned enough about privacy around a particular topic of internet research (and you don't have a VPN), Tor is probably the best choice for you.
If you would like to read more helpful articles and tips about various software and hardware visit errortools.com daily.
Read More
0x800701e3, The request failed due ...
A lot of things can go wrong even when you’re only doing some simple operations or tasks on your computer and this is due to the fact that there are various small operations make up in order to perform the larger operations on your computer. So if any of these smaller operations are not properly working, it crashes the operation as a whole and it throws an error code instead. And one of these error codes is Error 0x800701e3. This particular error pops up when an error has occurred in the File Explorer when a transfer is initiated from one disk to another in your Windows 10 computer. When you encounter this error, you will get the following error message:
“Error 0x800701e3: The request failed due to a fatal hardware error.”
There are several methods you can check out to fix this error – you can try to run System Restore or Check Disk or format the destination drive or check the SMART attribute of the drive. For more details, refer to each one of the following options.

Option 1 – Try to run System Restore

Error 0x800701e3 might be due to some adjustments you’ve made in your computer’s settings. Thus, to fix this error, you can try undoing those changes using System Restore. How? Refer to these steps:
  • Tap the Win + R keys to open the Run dialog box.
  • After that, type in “sysdm.cpl” in the field and tap Enter.
  • Next, go to the System Protection tab then click the System Restore button. This will open a new window where you have to select your preferred System Restore point.
  • After that, follow the on-screen instructions to finish the process and then restart your computer and then check if your mouse is now back to its normal state.

Option 2 – Try running the Check Disk utility

You can also run the Check Disk utility in fixing Error 0x800701e3.
  • In the Windows Search box, type “command prompt” and from the search results, right-click on Command Prompt and select “Run as administrator”.
  • After opening Command Prompt, type this command and tap Enter: chkdsk <Partition Letter>: /f /r /x /b
  • The command you entered will start to check for errors and fix them automatically. Else, it will throw an error message saying, “Chkdsk cannot run because the volume is in use by another process. Would you like the schedule this volume to be checked the next time the system restarts? (Y/N)”.
  • Tap the Y key to schedule Disk Check the next time your computer restarts.

Option 3 – Try to format the destination drive

Formatting the destination drive could also help you resolve error 0x800701e3. To format your drive, follow these steps:
  • First, open File Explorer and then right-click on the drive where you encountered the error.
  • Next, select Format from the context menu. This will open a new mini window.
  • Then select the NTFS option from the drop-down menu for the File System menu.
  • After that, check the box labeled as Quick Format.
  • Now click on Start. Keep in mind that doing so will remove all the contents of your storage device.

Option 4 – Verify the hard drive using SMART attributes

In case you don’t know, Windows has a built-in feature of SMART analysis which analyzes the hard drive/SSD and checks all the parameters by performing some minor operations. To use it, follow these steps:
  • Tap the Win + S keys and type “command prompt” in the field then right-click on the related search result and select the “Run as administrator” option.
  • After opening Command Prompt as admin, type the “wmic diskdrive get status” command and hit Enter.
  • You should get a result after that, and if you see that it’s “normal”, proceed to the next option below
Read More
Windows Defender error code 0x80073afc
If you receive an error code of “0x80073afc” in Windows Defender after you boot your Windows 10 computer or when you try to manually run Windows Defender, then it could be that the Windows Defender files are corrupted. In such cases, this error could also occur if there is third-party security software that interferes with the smooth functioning of this Microsoft Security Client. If you are one of the users who are currently facing this issue, then here are some suggestions you can check out to resolve the Windows Defender error code 0x80073afc.

Option 1 – Try to check the status of all the Windows Defender-related services

  • In the Cortana search box, type “services” and click on the Services icon to open the Services Manager. Alternatively, you can also tap the Win + R keys to launch the Run prompt and then type “msc” in the field and hit Enter to open the Services Manager
  • After opening the Services Manager, look for the following services and make sure that their Startup type is set to their default values:
    • Windows Defender Advanced Threat Protection Service – Manual
    • Windows Defender Antivirus Network Inspection Service – Manual
    • Windows Defender Antivirus Service – Manual
    • Windows Defender Firewall Service – Automatic
  • You can right-click on each one of the listed services and then select Start to start them.
  • And if some of the services don’t have their default values, just double-click on the Services to change the Startup types and select the correct option from the drop-down menu of the Startup type under the Properties box.
  • Next, set up the Startup type of these services to Automatic and then click on the Start button if the services are not running yet.
  • Now click on the Apply and OK buttons to save the changes made and then see if it fixed the problem or not.

Option 2 – Try to re-register the concerned DLL files

You could also try to re-register some Dynamic Link Library or DLL files on your computer as this could also help in fixing the Windows Defender error.
  • In the Start search, type “cmd” and from the search results that appear, right-click on Command Prompt and select the “Run as administrator” option from the context menu.
  • After opening Command Prompt as admin, type the following commands one after the other:
    • regsvr32 dll
    • regsvr32 dll
    • regsvr32 dll
    • regsvr32 dll
  • Once you’ve entered the commands given above, it will re-register the concerned DLL files in your system.
  • Now restart your computer for the changes to take effect.

Option 3 – Try to use the Registry Editor

  • Tap the Win + R keys to open the Run dialog box,
  • Then type “Regedit” in the field and hit Enter to open the Registry Editor.
  • Afterward, navigate to this registry path: ComputerHKEY_LOCAL_MACHINESOFTWAREMicrosoftWindows NTCurrentVersionImage File Execution Options
  • Next, look for the DWORDs named “MSASCui.exe”, “MpCmdRun.exe”, “MpUXSrv.exe” and “msconfig.exe”.
  • If you can’t find these DWORDs, refer to the next given option below.
  • Restart your computer.

Option 4 – Check the Environmental Values

  • Type “View advanced system settings” in the Windows search box and select the appropriate result.
  • This will open a new mini window. From there, go to the Advanced tab and click on the “Environment Variables…” button located at the bottom part of the window.
  • Next, look for the “%ProgramData%” variable name and make sure that its value is set to C:/ProgramData.
  • Then click OK to save the changes made.

Option 5 – Run the System File Checker Scan

System File Checker or SFC is a built-in command utility that helps in restoring corrupted files as well as missing files. It replaces bad and corrupted system files to good system files. To run the SFC command, follow the steps given below.
  • Tap Win + R to launch Run.
  • Type in cmd in the field and tap Enter.
  • After opening Command Prompt, type in sfc /scannow
The command will start a system scan which will take a few whiles before it finishes. Once it’s done, you could get the following results:
  1. Windows Resource Protection did not find any integrity violations.
  2. Windows Resource Protection found corrupt files and successfully repaired them.
  3. Windows Resource Protection found corrupt files but was unable to fix some of them.
  • Restart your computer.

Option 6 – Perform a System Restore

Performing a System Restore on your computer can also help you fix the Windows Defender error. You can do this option either by booting into Safe Mode or in System Restore. If you are already in the Advanced Startup Options, just directly select System Restore and proceed with the next steps. And if you have just booted your PC into Safe Mode, refer to the steps below.
  • Tap the Win + R keys to open the Run dialog box.
  • After that, type in “sysdm.cpl” in the field and tap Enter.
  • Next, go to the System Protection tab then click the System Restore button. This will open a new window where you have to select your preferred System Restore point.
  • After that, follow the on-screen instructions to finish the process and then restart your computer and check if the problem is fixed or not.
Read More
FromDocToPDF Step by Step Removal Guide

FromDocToPDF Toolbar is a browser extension published by Mindspark InteractiveNetwork, that usually comes bundled with other potentially unwanted programs. The toolbar is distributed heavily through advertising networks.

This toolbar automatically sets your default search engine to MyWebSearch, it also sets your new tab to the DocToPDF welcome page. This toolbar ads startup registration tasks that allow it to start automatically with Windows, it gathers website traffic, clicks, data, and personal information and sends it to its ad network. Multiple anti-virus programs have detected FromDocToPDF as a browser hijacker and therefore is potentially unwanted and recommended for optional removal

About Browser Hijackers

Browser hijacking is actually a form of unwanted software, commonly a web browser add-on or extension, which causes modifications in the web browser’s settings. Browser hijacker malware is developed for numerous reasons. Often, hijackers will force hits to internet sites of their preference either to increase traffic producing higher advertisement earnings, or to gain a commission for every user visiting there. While it might seem naive, these tools were created by vicious individuals who always attempt to take full advantage of you, so that they could make money from your naive and distraction. Furthermore, hijackers could make the whole infected system vulnerable – other dangerous malware and viruses will seize these opportunities to get into your computer system very easily.

Key signs that your web browser has been highjacked

There are several signs that could indicate a browser hijacking: home-page is changed; you see new unwanted favorites or bookmarks added, typically directed to ad-filled or porn websites; the default online search engine is changed and your browser security settings have been cut down without your knowledge; unwanted new toolbars are added to your browser; your browser will display constant pop-up ads; your web browser starts running slowly or exhibits frequent errors; You can’t access specific sites, in particular anti-malware websites.

Precisely how browser hijacker infects PCs

A browser hijacker could be installed on your PC when you visit an infected website, click on an email attachment, or download something from a file-sharing website. Many browser hijackings originate from add-on applications, i.e., browser helper objects (BHO), toolbars, or plug-ins added to browsers to give them additional functionality. A browser hijacker could also come bundled up with some free software that you unknowingly download and install, compromising your PC security. Typical examples of browser hijackers include CoolWebSearch, Conduit, OneWebSearch, Coupon Server, RocketTab, Delta Search, Searchult.com, and Snap.do. The presence of any browser hijacker on your system might significantly diminish the browsing experience, track your online activities that lead to serious privacy concerns, degrade overall system efficiency, and lead to software instability also.

Tips on how to get rid of browser hijackers

Certain browser hijacking could be simply stopped by discovering and eliminating the corresponding malware application through your control panel. However, most hijackers will be more difficult to locate or eliminate as they might get themselves connected with some important computer files that enable it to operate as a necessary operating system process. Novice computer users should never try for the manual form of removal, as it demands comprehensive system knowledge to carry out fixes on the system registry and HOSTS file.

How One Can Get rid of a Virus that is Blocking Websites or Preventing Downloads

Malware could cause all kinds of damage if they invade your computer, starting from stealing your private details to deleting data files on your computer. Some malware sits in between your computer and the internet connection and blocks a few or all websites that you would like to check out. It might also prevent you from installing anything on your PC, particularly anti-malware software. If you are reading this now, you may have perhaps recognized that virus infection is the reason behind your blocked net traffic. So what to do if you want to download and install anti-malware software like Safebytes? Although this kind of issue will be harder to circumvent, there are some actions you can take.

Download the antivirus in Safe Mode with Networking

If the malware is set to load at Windows startup, then booting in Safe Mode should prevent it. Since just the minimum programs and services start-up in “Safe Mode”, there are seldom any reasons for conflicts to take place. You will have to do the following to get rid of malware in Safe mode. 1) At power on/start-up, tap the F8 key in 1-second intervals. This should bring up the Advanced Boot Options menu. 2) Select Safe Mode with Networking using arrow keys and press Enter. 3) When you are into this mode, you should have access to the internet once again. Now, make use of your web browser normally and go to https://safebytes.com/products/anti-malware/ to download Safebytes Anti-Malware. 4) After the application is installed, allow the scan run to eliminate trojans and other threats automatically.

Switch to some other internet browser

Some malware only targets particular web browsers. If this is your situation, employ another internet browser as it might circumvent the malware. If you’re not able to download the antivirus software using Internet Explorer, this means the virus is targeting IE’s vulnerabilities. Here, you need to switch over to another web browser such as Chrome or Firefox to download Safebytes software.

Create a portable USB antivirus for removing viruses

Another solution is to create a portable anti-malware program on your USB stick. To run anti-malware using a flash drive, follow these simple steps: 1) Download Safebytes Anti-Malware or MS Windows Defender Offline onto a clean computer system. 2) Plug the USB drive into the uninfected computer. 3) Double-click on the downloaded file to open the installation wizard. 4) Choose a USB drive as the place when the wizard asks you exactly where you intend to install the application. Follow the instructions on the screen to finish off the installation process. 5) Transfer the flash drive from the uninfected computer to the infected computer. 6) Double click the Safebytes Anti-malware icon on the thumb drive to run the program. 7) Click on “Scan Now” to run a scan on the infected computer for viruses.

Ensure the Safety of Your PC by Installing SafeBytes Anti-Malware Software

If you are planning to purchase anti-malware for your laptop or computer, there are lots of brands and packages for you to consider. A few of them do a good job in getting rid of threats while some will harm your PC themselves. You should look for a product that has obtained a good reputation and detects not just computer viruses but other kinds of malware as well. One of the recommended software programs is SafeBytes Anti-Malware. SafeBytes carries a superb track record of top-quality service, and customers are very happy with it. SafeBytes is a powerful, real-time anti-malware application that is designed to assist the everyday computer end user in safeguarding their computer from malicious internet threats. With its cutting-edge technology, this software will let you remove multiples types of malware including viruses, trojans, PUPs, worms, ransomware, adware, and browser hijackers. SafeBytes anti-malware comes with a plethora of enhanced features that sets it apart from all others. Let’s take a look at a few of them below: Live Protection: SafeBytes gives real-time active supervision and protection from all known viruses and malware. It’ll constantly monitor your laptop or computer for hacker activity and also provides users with superior firewall protection. World-class AntiMalware Protection: Built upon a greatly acclaimed antivirus engine, this malware removal application can find and remove many obstinate malware threats like browser hijackers, PUPs, and ransomware that other common antivirus applications will miss. Quick Multithreaded Scanning: SafeBytes’s very fast malware scanning engine reduces scan times and extends battery life. At the same time, it’ll effectively identify and eliminate infected computer files or any online threat. Web Protection: Safebytes allots all sites a unique safety ranking that helps you to get an idea of whether the website you’re about to visit is safe to view or known to be a phishing site. Lightweight: SafeBytes is a lightweight and easy-of-use antivirus and antimalware solution. As it utilizes very low computer resources, this application leaves the computer power exactly where it belongs to: with you. 24/7 Live Expert Support: You can get 24/7 technical support to immediately resolve any issue with your security software.

Technical Details and Manual Removal (Advanced Users)

If you wish to manually remove FromDocToPDF without the use of an automated tool, it may be possible to do so by removing the program from the Windows Add/Remove Programs menu, or in cases of browser extensions, going to the browsers AddOn/Extension manager and removing it. You will likely also want to reset your browser. To ensure the complete removal, manually check your hard drive and registry for all of the following and remove or reset the values accordingly. Please note that this is for advanced users only and may be difficult, with incorrect file removal causing additional PC errors. In addition, some malware is capable of replicating or preventing deletion. Doing this in Safe Mode is advised.

The following files, folders, and registry entries are created or modified by FromDocToPDF

Files: C:Users%USERAppDataLocalGoogleChromeUser DataDefaultLocal Storagehttp_fromdoctopdf.dl.tb.ask.com_0.localstorage C:Users%USERAppDataLocalGoogleChromeUser DataDefaultLocal Storagehttp_fromdoctopdf.dl.tb.ask.com_0.localstorage-journal C:Users%USERAppDataLocalGoogleChromeUser DataDefaultLocal Storagehttp_fromdoctopdf.dl.myway.com_0.localstorage C:Users%USERAppDataLocalGoogleChromeUser DataDefaultLocal Storagehttp_fromdoctopdf.dl.myway.com_0.localstorage-journal Registry: HKEY_CURRENT_USERSoftwareFromDocToPDF..Uninstaller HolidayPhotoEditTooltab Uninstall Internet Explorer
Read More
Fix CSGO Crashes in Windows 10
Counter strike has evolved from half-life mod into the full-featured game and has kept in popularity for years, even today game is wildly popular and has a huge player base. Sadly game can crash in Windows 10. Here in this article, we will address how to fix csgo crashing in Windows 10 so you can play it smoothly and crash-free as it was meant to be played.
  1. Update your display drivers

    Often in the gaming world having the latest display drivers can mean a world of difference. Counterstrike GO is no different, make sure that your drivers are updated to the latest version, if they are not, go to your manufacturer's website and download the latest version.
  2. Update Windows

    Just how much important is it to have the latest display drivers so it is to have the latest Windows update. Often problematic things are addressed in the update itself.
  3. Turn off compatibility mode

    Compatibility mode is most often the cause of crashes. Go to the game installation folder and search for csgo.exe. Once you locate it right-click on it and choose properties. Under properties, find the compatibility tab and turn off compatibility mode if it is ON. Uncheck run as administrator also
  4. Delete CSGO.EXE and add cl_disablehtmlmotd 1

    If disabling compatibility mode has not solved the issue do next: Pull up the installation directory folder, find csgo.exe, and delete it Pull up the Steam Library and locate Counter-Strike Global Offensive Right-click on it to select properties Find the local tab and click on verify integrity of game files When that is complete, go back into the Counter-Strike Global Offensive installation folder and search for cgo.exe Turn compatibility OFF like in the previous step Return to the Steam Library, right-click on Counter-Strike Global Offensive and click on properties again Go under the launch options settings In the new window, type in cl_disablehtmlmotd 1 Save the changes and restart the game
  5. Lower game settings

    If previous steps did not help and the game still crashes, try lowering game graphic settings. Crashes can happen if a game is heavy on the current system resources.
Read More
Fix Chrome ERR QUIC PROTOCOL ERROR in Windows
If you aren’t able to pull up any website and instead got the ERR QUIC PROTOCOL ERROR error message in Google Chrome then read on as this post will help you resolve the problem. When you encounter such an error in Chrome, you will see the following error message:
“This site can’t be reached, The webpage at [website URL] might be temporarily down or it may have moved permanently to a new web address, ERR_QUIC_PROTOCOL_ERROR”
This kind of error message pops up when the URL is down. However, if you are certain that the site is not down and you’re still seeing this error message, then troubleshoot further using the suggestions given below.

Option 1 – Try to disable the QUIC Protocol

QUIC is an experimental transport layer network protocol that is present in Google Chrome in order to establish a connection between two endpoints over UDP. So if there is any problem on the development side, you will most likely encounter ERR_QUIC_PROTOCOL_ERROR on your Google Chrome browser when you try to open any website. Thus, you have to disable the QUIC protocol in order to resolve the error. How? Simply follow the steps below.
  • Open your Google Chrome browser.
  • Now type in “chrome://flags/” in the address bar and hit Enter.
  • After that, look for the Experimental QUIC protocol which should be set by default.
  • Then expand the drop-down menu and select Disable.
  • Restart Google Chrome and see if the error is fixed or not.

Option 2 – Disable VPN

As mentioned, if you are using VPN, this could be the reason why you’re getting the Windows Update error 0x800F0922 so the most obvious thing to do is for you to turn off the VPN and try to run the Windows Update once more. And if you use a VPN software that works using their software, you can just completely exit or log-off from its account. On the other hand, if you are using a built-in Windows 10 VPN, you can simply turn it off or delete all the settings you have created there. Although it’s understandable that you might have to use a VPN connection to connect to the work network, you really have to disable it at least until the Windows Update is no longer stuck in the error 0x800F0922. It would be best if you do this when you are not working.

Option 3 – Disable the Proxy server

You can also try to disable the Proxy server to fix the ERR_QUIC_PROTOCOL_ERROR in Chrome. Refer to these steps to do so:
  • Tap the Win + R keys to open the Run dialog box.
  • Then type “inetcpl.cpl” in the field and hit Enter to pull up the Internet Properties.
  • After that, go to the Connections tab and select the LAN settings.
  • From there. Uncheck the “Use a Proxy Server” option for your LAN and then make sure that the “Automatically detect settings” option is checked.
  • Now click the OK and the Apply buttons.
  • Restart your PC.
Note: If you are using a third-party proxy service, you have to disable it.
Read More
Fixing Error 0xC1900208, 0x4000C in Windows
As you know, the Windows Update process takes compatibility seriously. The Windows Updates need to be compatible with the hardware as well as all the installed applications in the computer else the Windows Updates will only get stuck in the process. Two of the Windows 10 errors that shows up during this case is the error 0xC1900208, 0x4000C. These error codes are caused by incompatible applications which means that there might be an incompatible app installed in your computer that’s blocking the upgrade process and prevents it from finishing. That’s why you need to make sure that all the applications on your computer are updated to their latest versions and then check the compatibility. So if there are any incompatible apps, be sure to uninstall them and then try doing the upgrade once again. Take note that these error codes are just among many compatibility issues that the Windows Update throws up. Since the error is caused by a compatibility issue, you have three options – first, you can update the incompatible application to the latest version, second, uninstall the application or trick Windows and make it seem like it’s compatible.

Option 1 – Try updating the application or software

As mentioned, you can try updating the concerned application or software to its latest version to resolve the compatibility issue and in turn, fix the errors 0xC1900208 – 0x4000C. Note that depending on where you had installed the application, your steps will change. So if you have it installed directly from the website, refer to these steps:
  • Look for the built-in option to check the updates since the most application has this option.
  • You also have the option to go to the website of the application and check if there is a new version available. If there is, download and update the app.
On the other hand, if you have downloaded the app from the Microsoft Store, here’s what you have to do:
  • Open the Store and click on the three dots located at the top-right of the window.
  • Next, click the Download and Updates option.
  • From there, check if there is an update available for the store. If there is, update it.

Option 2 – Try to uninstall the application or software

If updating the app or software to its latest version didn’t help and you’re still getting the error 0xC1900208 – 0x4000C every time you attempt to install the Windows Updates, you may have to uninstall it. You will need to use the usual Program and Features to uninstall it if you have downloaded it from the website.
  • In the search box, type in “control” and then click on Control Panel (desktop app) among the search results.
  • After that, select Programs and Features from the list which will give you a list of all the programs installed on your computer.
  • From there, look for the concerned program and select it and then uninstall it.
Note: If you have downloaded the app from the Windows Store, you can simply right-click on it from the application list and then uninstall it.

Option 3 – Try bypassing the Upgrade Advisor

There are times when a software developer fails to pass the compatibility test for their apps. It could be that they work on Windows 10 upgraded version but just didn’t pass the compatibility check. So if you are pretty certain that the app really works on Windows 10, you can just bypass the Upgrade Advisor.
Read More
1 2 3 171
Logo
Copyright © 2023, ErrorTools. All Rights Reserved
Trademark: Microsoft Windows logos are registered trademarks of Microsoft. Disclaimer: ErrorTools.com is not affiliated with Microsoft, nor claims direct affiliation.
The information on this page is provided for information purposes only.
DMCA.com Protection Status