Error Code 0x8007000d is a common error code that can be found on the Windows 10 Operating system, although it can also appear in previous versions of the operating system, as well.
Common symptoms include:
There are four basic ways to try to resolve Error Code 0x8007000d on your Windows machine. Three of these are pretty simple for even the most basic users, while the final method requires some familiarity with running commands in the Command Prompt. If you don’t feel that you have the skill or confidence to complete the steps listed below, it is generally recommended that you get in touch with a qualified computer repair technician that can assist you in error resolution.
The main cause for the appearance of Error Code 0x8007000d on a Windows machine is that one of the files that the Update tool uses to run one or more updates cannot be found or has experienced damage. Fortunately, there are a few things that you can try on your machine that can be used to attempt to resolve the issues at hand.
Three primary methods exist for the resolution of Error Code 0x8007000d on a Windows machine. As mentioned above, two of these methods can usually be accomplished by basic users, while the third requires some degree of familiarity with the tools associated with the Command Prompt. If you don’t feel that you have the knowledge or skill necessary to follow these steps, contact a computer repair technician to aid you.
Here are the best ways to try to resolve Error Code 0x8007000d on your device:
From the Windows Update tool, you can attempt to run a scan using the Windows Update Troubleshooter, which can try to identify the specific issue that is occurring and to fix it automatically.
Not only will this tool often fix the problem at hand, but it can also help you to avoid other errors that you may have encountered later on in the Update process. This tool should always be your starting point when you encounter an error as you attempt to download or install updates for your Windows machine.
After the tool has been run, restart your computer to apply any changes and then reopen the Update tool to reattempt installation.
In some cases, the missing or corrupted files may be extensive enough that you need to restore your computer to an earlier point. If you create regular backups of your information or have a past version of the software that you can install, this can help you to resolve the issue. Otherwise, you may need to restore your device to its factory settings to resolve the error.
Always make sure to backup your important files and information before you perform a reset of your device, in order to ensure that you are able to return the computer to its original state when you have finished.
One of the ways that you can try to resolve this particular error code is the use a DISM tool. This is accessed through the Command Prompt. In order to use this method, follow the steps below:
If you have not been able to resolve the error code using the steps above or if you are unsure of your ability to follow these steps on your own, get in touch with a trusted computer repair professional that is familiar with the Update process and the errors associated with it.

cd "folder location address"Step 5: After that, enter the following script to disable the security questions:
Update-AllUsersQAOnce you’ve completed the steps above, the Security Questions should be disabled and you will be notified with a message stating that the feature has been disabled. On the other hand, if you have a change of heart and you want to enable the Security Questions back, here are some steps you need to take: Step 1: First, open the PowerShell window as admin. Step 2: Next, run the same script with one more parameter such as:
Update-AllUsersQA -answer SecretAnswerStep 3: And that’s about it. Do not forget to replace the Secret Answer with your preferred one and once you’re done, it will be set as the answer for all the Security Questions. Step 4: Now all that’s left to do is go to the Settings app to change the answer to the questions and you should be good to go.
Code 34 is one of the several Device Manager error codes. This error code indicates that a hardware device on your PC is not properly configured.
This usually occurs when the device installed on your system is a non-plug and play. Non-plug and play devices don’t configure automatically and require manual configuration from the users end.
Error code 34 is usually displayed in the following format:
“Windows cannot determine the settings for this device. Code 34”
 Error Causes
Error code 34 may be triggered due to several reasons like:
Device Manager error codes like code 34 are easy to fix. These error codes don’t indicate any serious PC problem, nor are they fatal like blue screen of death error codes.
Nonetheless fixing it immediately is advisable to ensure the proper functioning of the plugged-in hardware device. If you don’t resolve it, you may not be able to use the device.
When PC users experience error codes like code 34, they instantly think of hiring a professional for repair especially if they lack technical understanding.
If you are not a technical whiz and you are also thinking of hiring a professional for the repair job, then don’t! Here’s why, to begin with, Device Manager error codes can be resolved easily, better yet you can fix it by yourself without spending a dime even if you are not technically sound.
To help you, below is a list of easy and effective repair solutions for error code 34. Try them to resolve the issue.
This is one of the best ways to resolve error code 34 on your system. The procedure will take 5 to 7 minutes. Simply follow the steps illustrated below to configure the problematic device on your PC.
You may not be able to configure resource settings for some devices in such an event it is advisable to consult your hardware manufacturer. Your hardware manufacturer can provide you with specific resource settings. Follow the manufacturer’s instructions to repair error code 34.
If the error continues to persist even after device configuration, then the problem may be linked to driver corruption. In that case, try method 3.
Method 3 - Download DriverFIX to Update Drivers Automatically
Whether code 34 is caused by outdated or corrupted drivers, simply download DriverFIX to resolve. DriverFIX is an advanced and user-friendly software program deployed with an intelligent programming system.
The software scans your PC to detect all problematic drivers. It finds and matches the latest and compatible versions and then updates the drivers accordingly that too automatically and on a regular basis.
Click here to download DriverFIX to repair Device Manager error code 34 on your PC automatically.
Error Code 0x80072efe is a fairly common error code that generally occurs in Windows 10. It is most often associated with the process of performing updates using the Windows Update tool.
Common symptoms include:
While Error Code 0x80072efe can cause a number of frustrating issues on your device, the good news is that there are several methods that can be used to fix this error. The two most common methods are actually fairly easy to perform and do not require advanced tools or knowledge. However, if you don’t feel like you will be able to perform the necessary steps on your own, be sure to get in touch with a qualified computer repair technician to help you in the resolution of this particular error.
 Error Causes
Two things are generally behind the appearance of Error Code 0x80072efe on a Windows device. The first is that one or more of your registry keys are not available, have been corrupted, or are not installed properly. The second is that necessary DLL files aren’t working properly within your machine.
However, other things can mimic these causes, which is why the two methods listed below will resolve the issue in most cases.
Fortunately, there are two resolution methods that can be used quickly and easily when Error Code 0x80072efe arises on your Windows computer. Neither of these requires advanced knowledge or skill, but if you don’t feel comfortable with performing these steps on your own, it is recommended that you contact a qualified computer repair technician in order to get assistance.
Here are the best ways to resolve Error Code 0x80072efe on your computer:
If your time or date has been set incorrectly, it can make your system logs appear to have incorrect information, which can lead to the appearance of Error Code 0x80072efe. Because this is the easiest thing to fix if it is indeed the problem that is making the error code appear, this should always be the first thing that you try when this error code arises.
In order to check your time and date settings, follow these simple steps:
If method one has not successfully resolved Error Code 0x80072efe, you may need to attempt method two.
In some cases, your firewall can prevent your machine from accessing the information that it needs in order for the installation or update to go through correctly. If that is the case, you can follow a few simple steps to turn off your firewall, just while you install the update, and then turn it back on.
In order to do so, follow these steps:
Note that if this method allows you to successfully bypass the error code, you’ll need to make sure to turn the firewall back on when you are finished. Even though it can interfere with the Update process, your firewall is still very important to your computer.
If you wish to always have at your disposal a utility tool to fix these Windows 10 and other related issues when they do arise, download and install a powerful automated tool.
Error Code 0x80240001 usually occurs in Windows 10 and is specific to the process of updating your system. It is similar to an error code found in previous versions of the software during the update process. There are a number of steps that can be taken to solve this error code, most of which are fairly easy for the average user to undertake.
Common symptoms for this particular error code include:
While it can be frustrating to have this message appear during the update process, users can resolve the error in a number of ways. However, if you are not confident in your ability to follow the steps below or if the methods listed fail to resolve the problem, contact a certified Windows 10 repair technician to assist you in the process.
Error CausesError Code 0x80240001 occurs when the Windows Update tool is unable to complete its service successfully. This error occurs most often when users attempt to update to Windows 10 from older versions of the software, including Windows 7, 8, or 8.1.
This particular error code can also occur when your system has not been updated in a regular fashion. Stacked updates make it more likely for Error Code 0x80240001 to occur.
In most cases, when Error Code 0x80240001 appears on your screen, the update process will be halted. Sometimes, the screen may display a single color background, removing the appearance of all other windows and applications.
Fortunately, there are several methods that you can use to attempt to circumvent the problem and see the update process through to completion.
While it can be frustrating to deal with an error when you attempt to update your Windows software, there are several ways that you can seek to resolve the issue that causes Error Code 0x80240001. These steps are relatively simple to complete and do not require advanced techniques to be used. However, if you are not confident in your ability to complete the steps listed below, enlist the aid of a qualified Windows technician to help you.
Here are the most common ways that Error Code 0x80240001 can be resolved for Windows 10:
From the Windows website, you can download the Windows Repair tool, if it is not already installed on your computer. While there are other tools available through outside sites that claim that they can resolve this error, in many cases, they can be a carrier for viruses and other kinds of malware, so it is inadvisable to use non-Windows tools to fix this particular error code.
Once you have successfully added the Windows Repair tool to your computer, open it up and look for the option to run “Repair Windows Update.” Using this process, your system can search for and resolve the error, allowing you to successfully run the update tool through to completion.
In some cases, software that has been recently added to a non-updated computer can cause the update process to experience issues. If you believe that this may have occurred in your case, simply uninstall the software in question, then attempt to run the Windows 10 Update process again.
The best way to prevent this error from reoccurring when you seek to update your Windows 10 system is to apply updates within a short period of time from their release date. It is recommended that users update regularly, which can allow them to avoid a number of issues that are common to the update process.
If you have any difficulty in resolving Error Code 0x80240001 after you have attempted these steps, you may need to enlist the help of a qualified technician who is familiar with the specific errors related to the Windows 10 Update process. This can especially be helpful if you have recently installed a number of new kinds of software and are unsure of whether or not any specific one may be causing your issues. If you wish to always have at your disposal a utility tool to fix these Windows 10 and other related issues when they do arise, download and install a powerful automated tool.
 Check cables
get-hotfix KB1111111, KB2222222, KB3333333Note: In the command given above, you need to replace “KB1111111, KB2222222, KB3333333” with the actual update KB numbers.
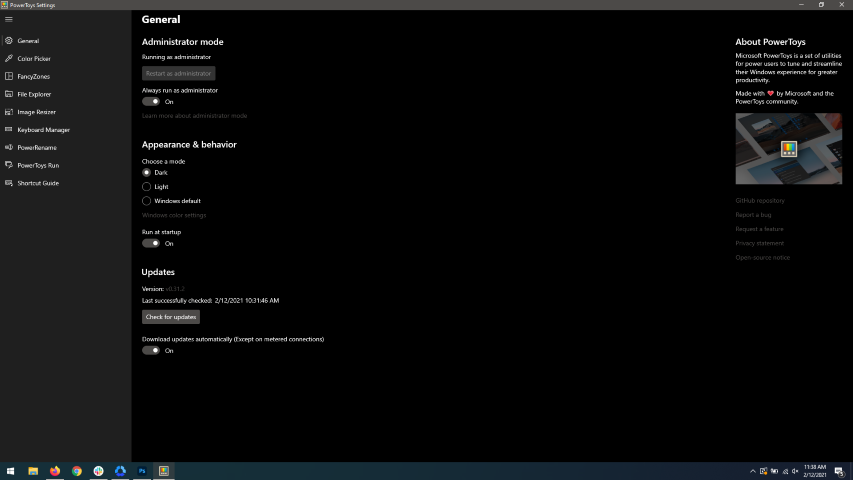 When opened you will be greeted with general settings window. These are settings for power toys themselves, Here you can check for updates, change the looks of power toys, run it on system startup and run them as administrator. Set them up so they best suit your needs.
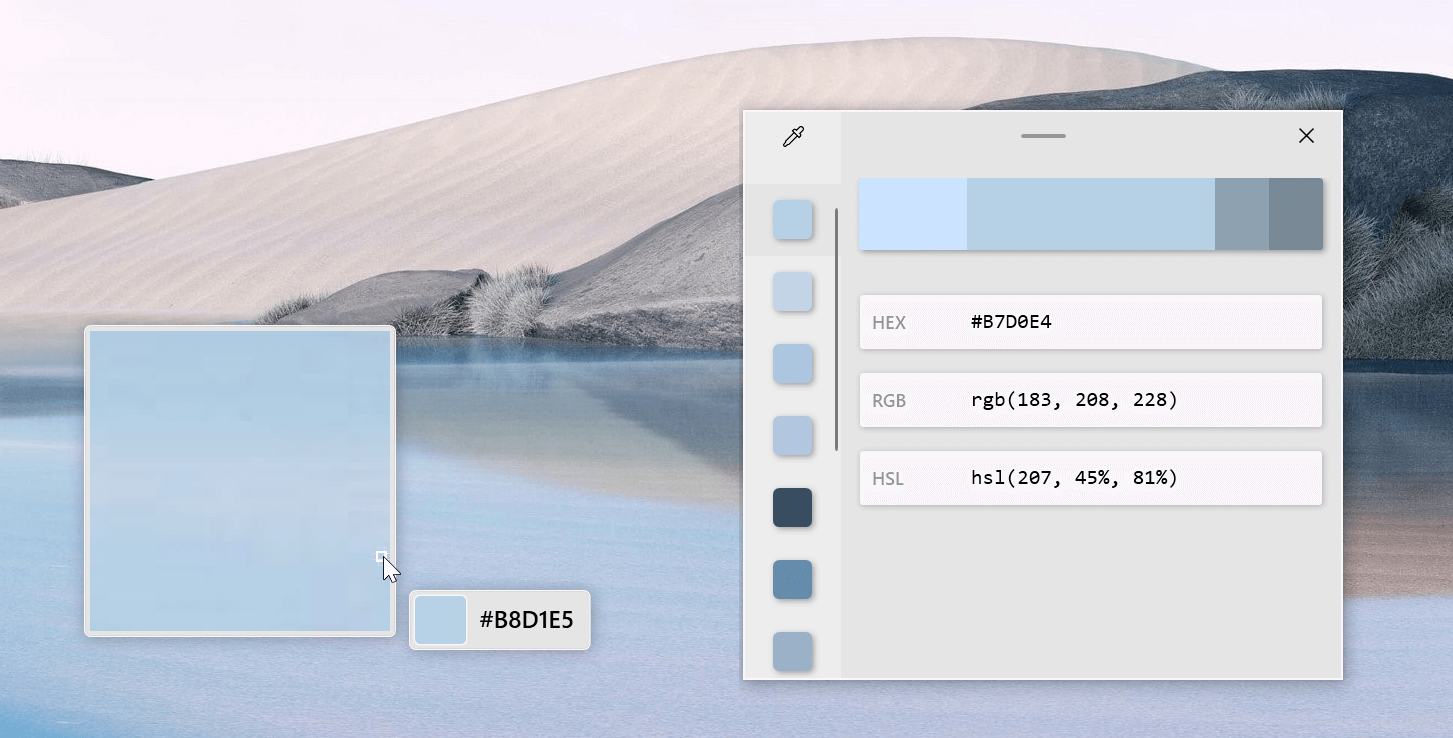 The color picker will let you as the name suggests pick colors, it will sample colors from running applications and windows, snap their values, and place them in the clipboard. A useful application if you are working as a graphic designer, want to create some cool word document, or just want to compare the difference between colors.
After the Color Picker is activated, hover your mouse cursor over the color you would like to copy and left-click the mouse button to select a color. If you want to see the area around your cursor in more detail, scroll up to zoom in. The copied color will be stored in your clipboard in the format that is configured in the settings (HEX by default). The editor lets you see the history of picked colors (up to 20) and copy their representation in any predefined string format. You can configure what color formats are visible in the editor, along with the order that they appear. This configuration can be found in PowerToys settings. The editor also allows you to fine-tune any picked color or get a new similar color. Editor previews different shades of currently selected color - 2 lighter and 2 darker ones. Clicking on any of those alternative color shades will add the selection to the history of picked colors (appears on the top of the colors history list). Color in the middle represents your currently selected color from the history of the colors. By clicking on it, the fine-tuning configuration control will appear, which will let you change the HUE or RGB values of the current color. Pressing OK will add newly configured color into the history of the colors.
The color picker will let you as the name suggests pick colors, it will sample colors from running applications and windows, snap their values, and place them in the clipboard. A useful application if you are working as a graphic designer, want to create some cool word document, or just want to compare the difference between colors.
After the Color Picker is activated, hover your mouse cursor over the color you would like to copy and left-click the mouse button to select a color. If you want to see the area around your cursor in more detail, scroll up to zoom in. The copied color will be stored in your clipboard in the format that is configured in the settings (HEX by default). The editor lets you see the history of picked colors (up to 20) and copy their representation in any predefined string format. You can configure what color formats are visible in the editor, along with the order that they appear. This configuration can be found in PowerToys settings. The editor also allows you to fine-tune any picked color or get a new similar color. Editor previews different shades of currently selected color - 2 lighter and 2 darker ones. Clicking on any of those alternative color shades will add the selection to the history of picked colors (appears on the top of the colors history list). Color in the middle represents your currently selected color from the history of the colors. By clicking on it, the fine-tuning configuration control will appear, which will let you change the HUE or RGB values of the current color. Pressing OK will add newly configured color into the history of the colors.
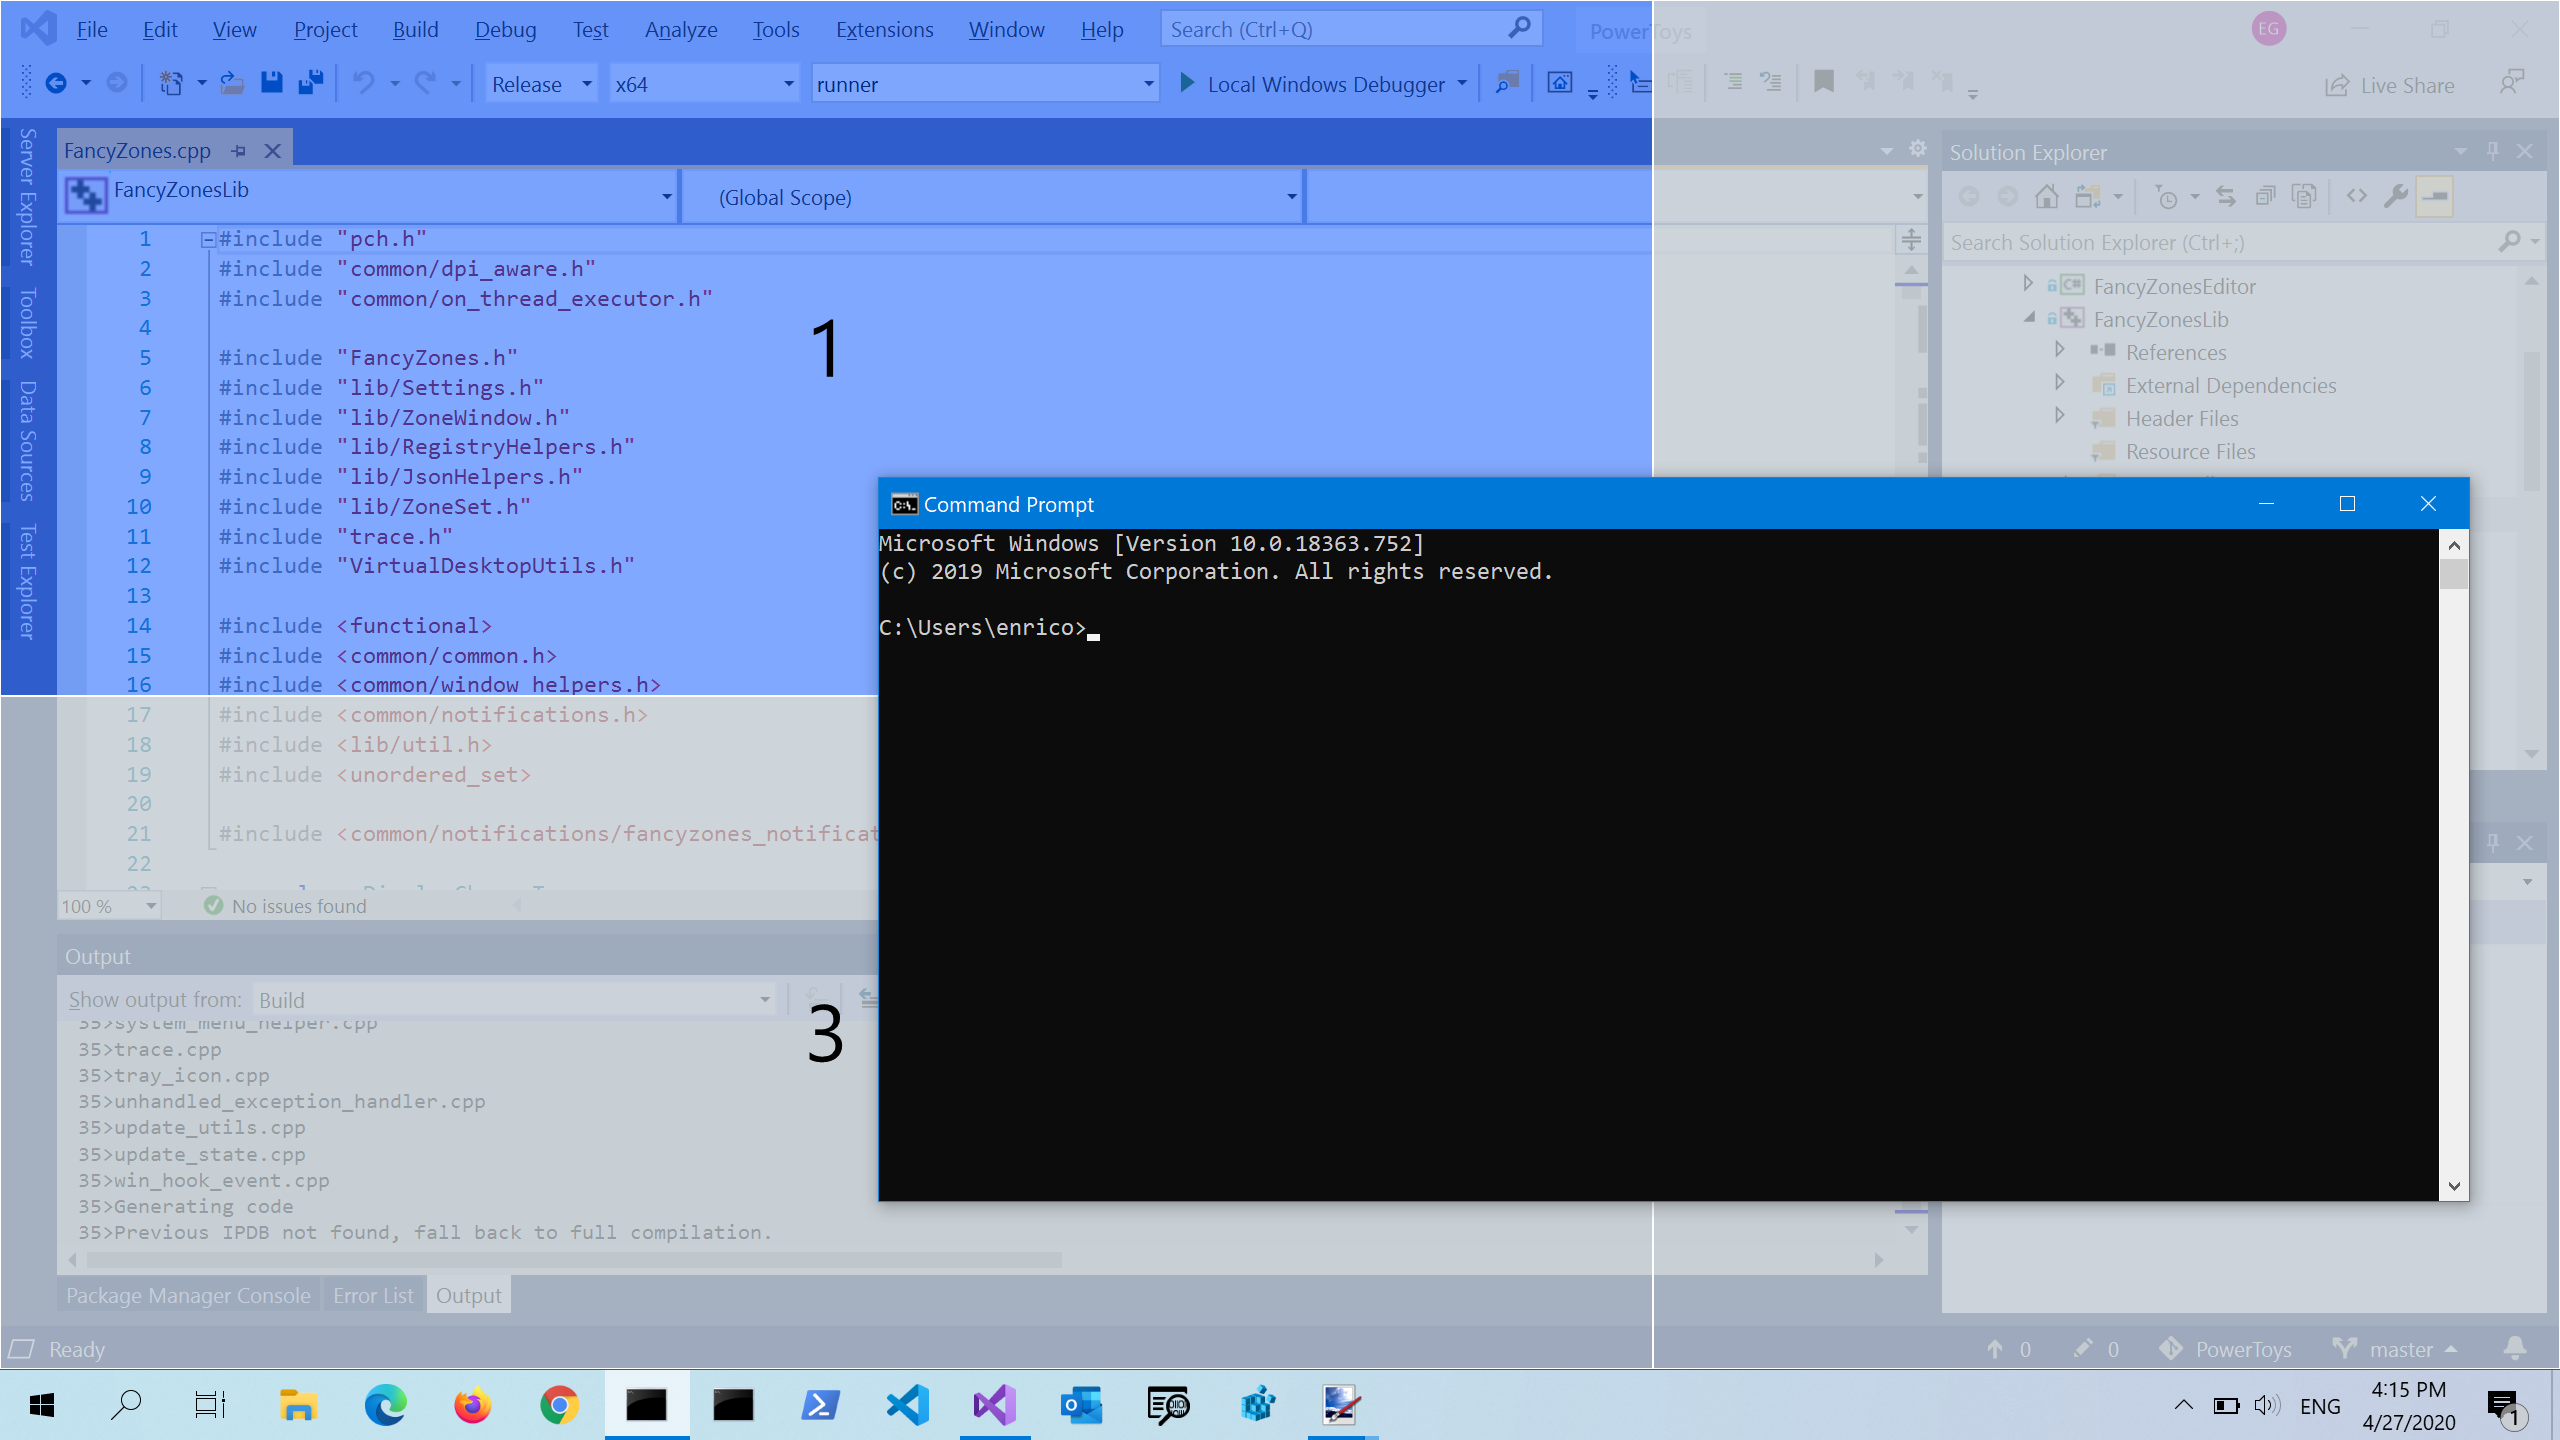 FancyZones is a window manager utility for arranging and snapping windows into efficient layouts to improve the speed of your workflow and restore layouts quickly. FancyZones allows the user to define a set of window locations for a desktop that are drag targets for windows. When the user drags a window into a zone, the window is resized and repositioned to fill that zone. When first launched, the zones editor presents a list of layouts that can be adjusted by how many windows are on the monitor. Choosing a layout shows a preview of that layout on the monitor. The selected layout is applied automatically.
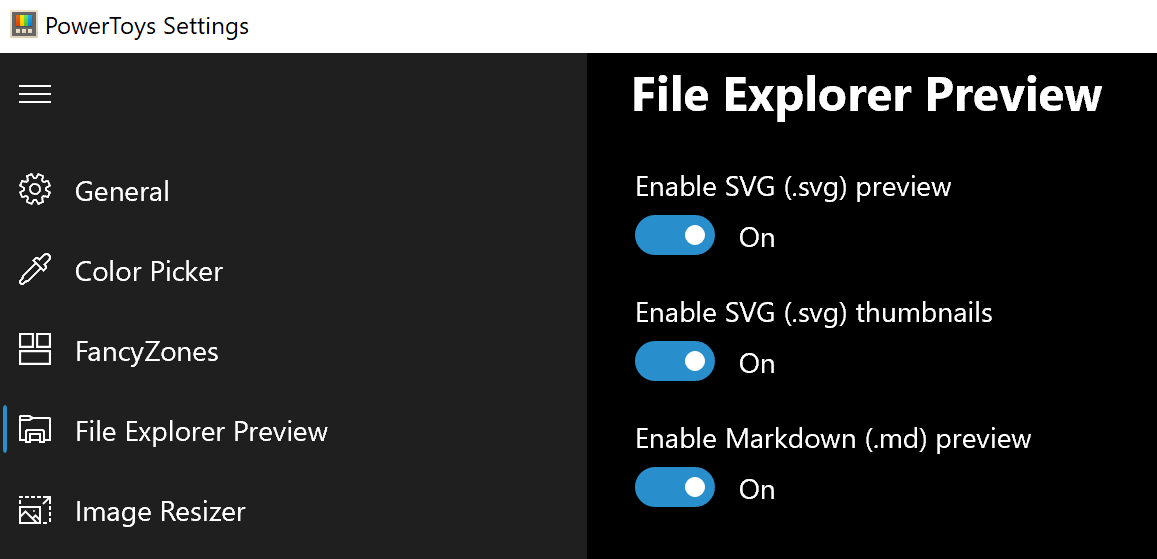 Only 3 options here but maybe some are important to you. This extension lets you enable SVG file preview in File Explorer, enable Markdown preview, and enable SVG thumbnails. Turn on each one you might need.
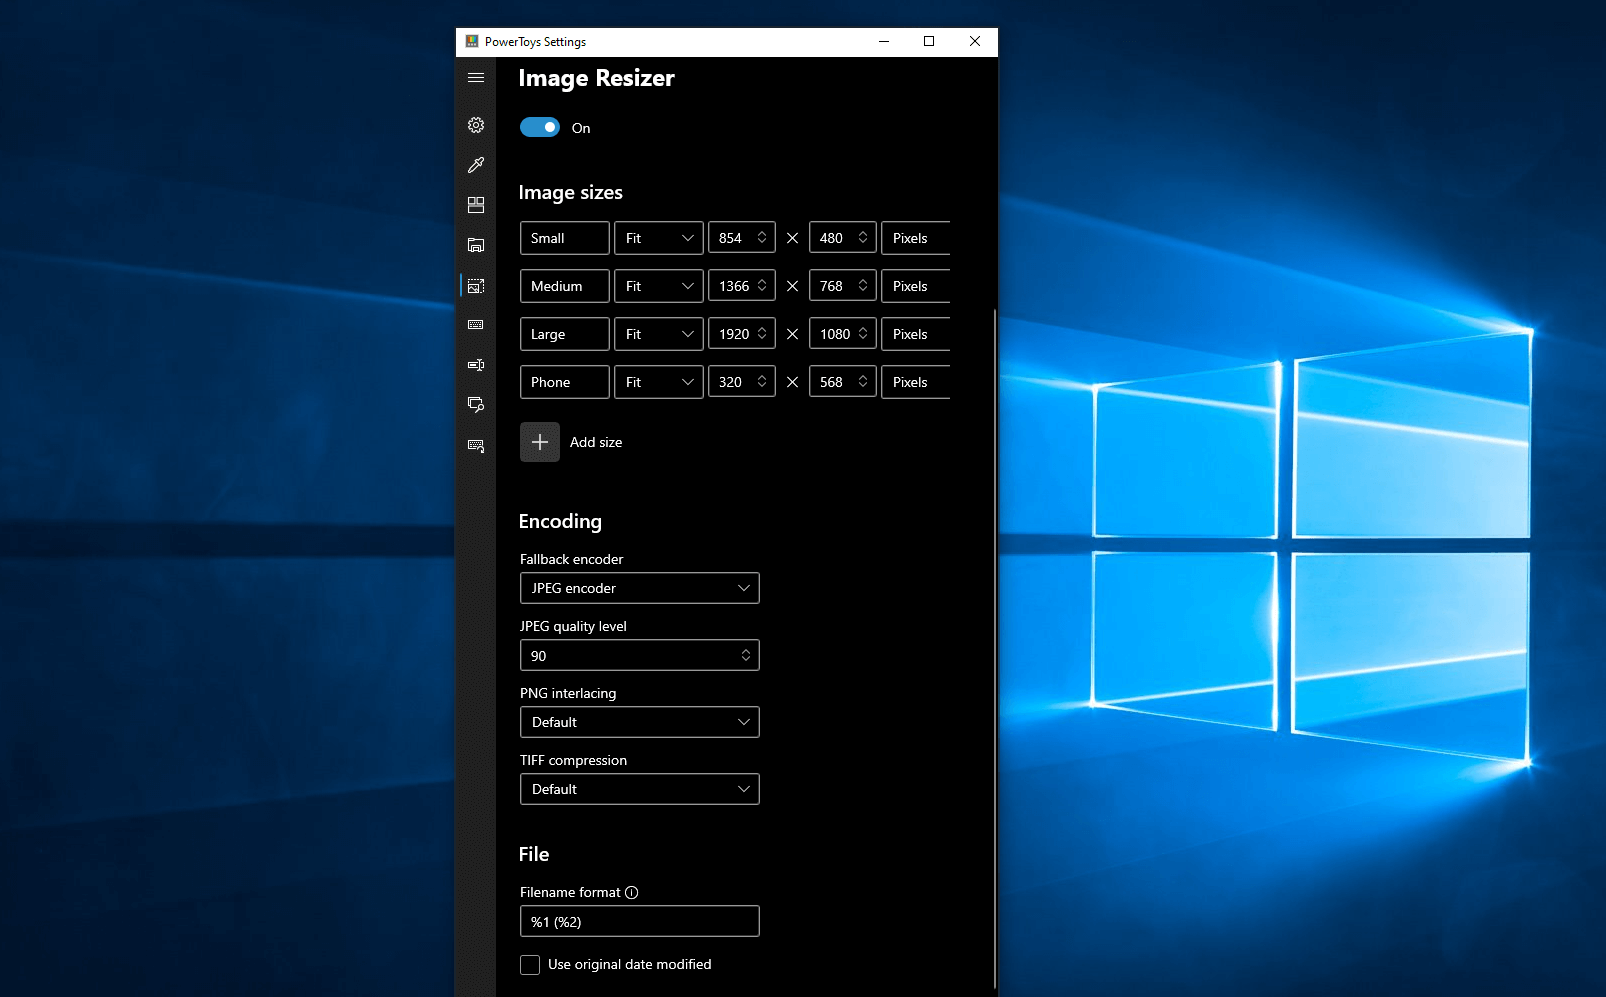 Image Resizer is a Windows shell extension for bulk image-resizing. After installing PowerToys, right-click on one or more selected image files in File Explorer, and then select Resize pictures from the menu. You can specify your own sizes if you want, you can resize when dragging files, you can overwrite files or make new copies of new sizes, and many more options. A very useful tool I am sure plenty of users can use since this eliminates the need for pictures or any other image application for common resizing tasks.
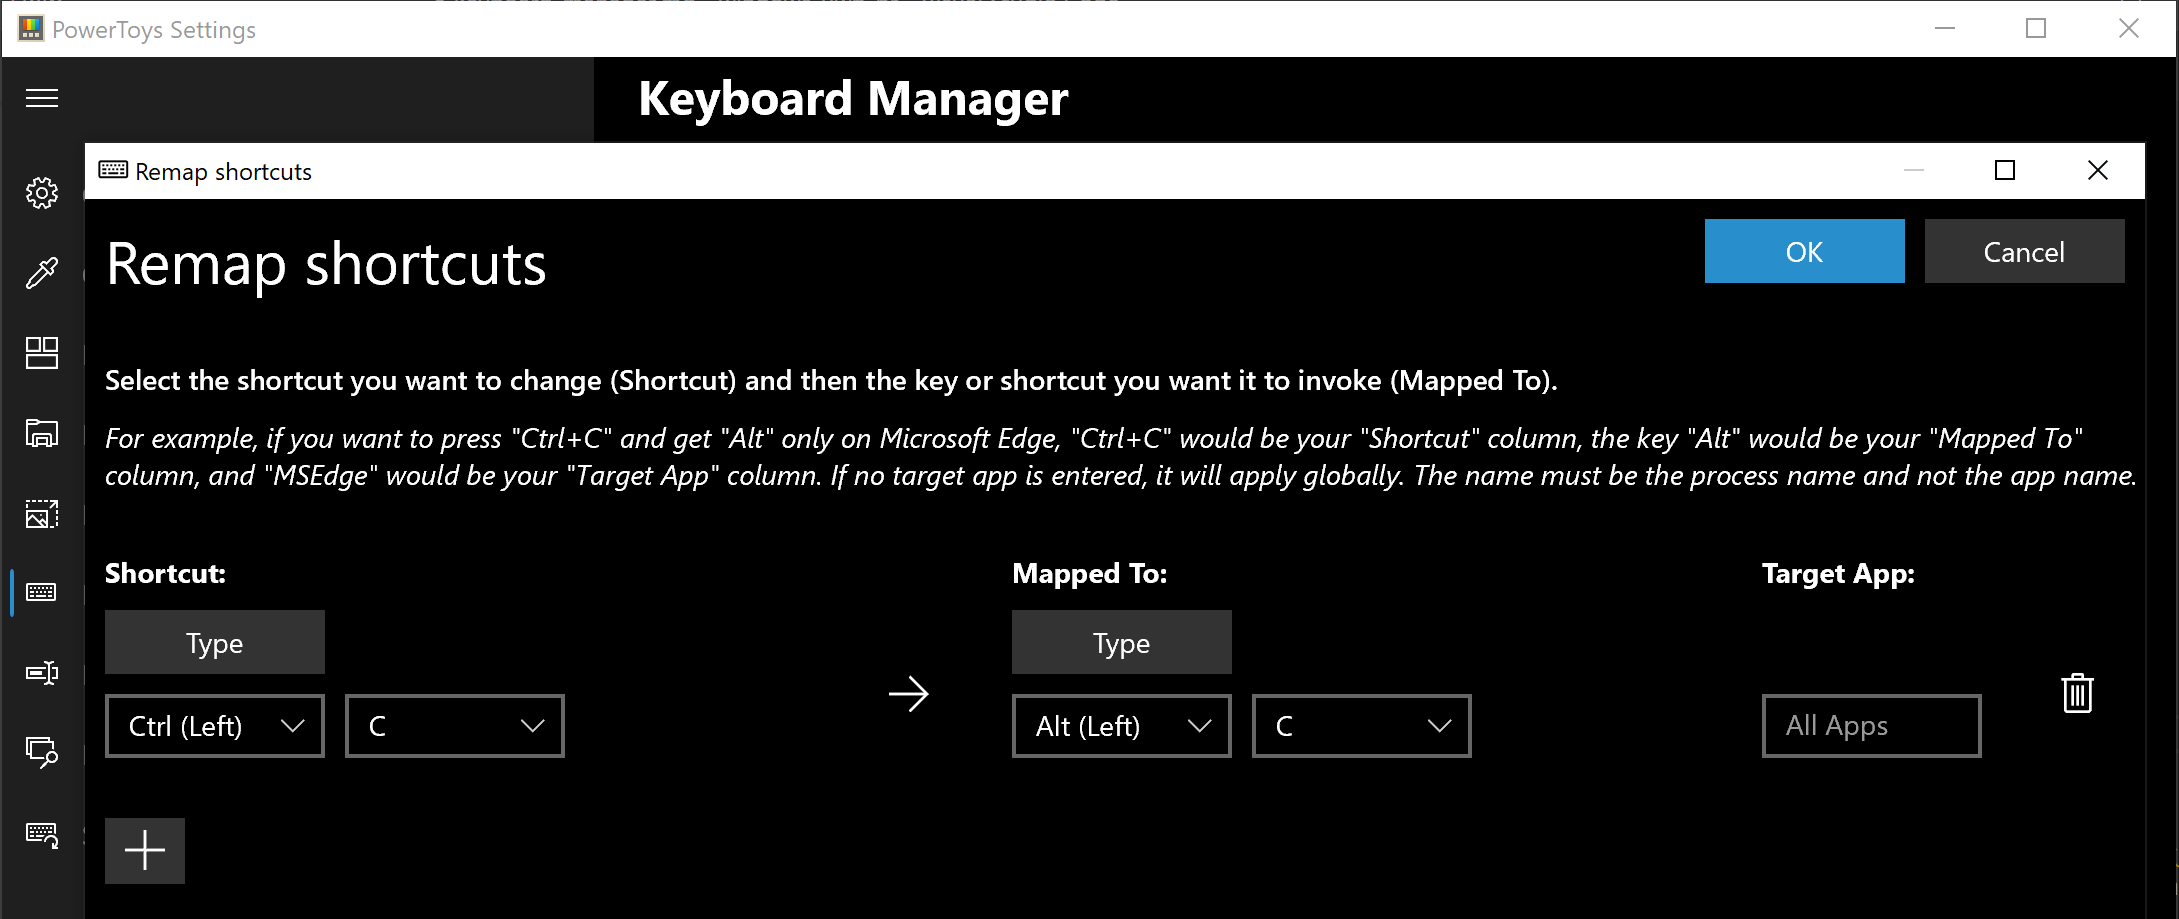 The PowerToys Keyboard Manager enables you to redefine keys on your keyboard. For example, you can exchange the letter A for the letter D on your keyboard. When you select the A key, a D will display. You can also exchange shortcut key combinations. For example, the shortcut key, Ctrl+C, will copy the text in Microsoft Word. With the PowerToys Keyboard Manager utility, you can exchange that shortcut for ⊞ Win+C). Now, ⊞ Win+C) will copy text. If you do not specify a targeted application in PowerToys Keyboard Manager, the shortcut exchange will be applied globally across Windows. PowerToys Keyboard Manager must be enabled (with PowerToys running in the background) for remapped keys and shortcuts to be applied. If PowerToys is not running, key remapping will no longer be applied.
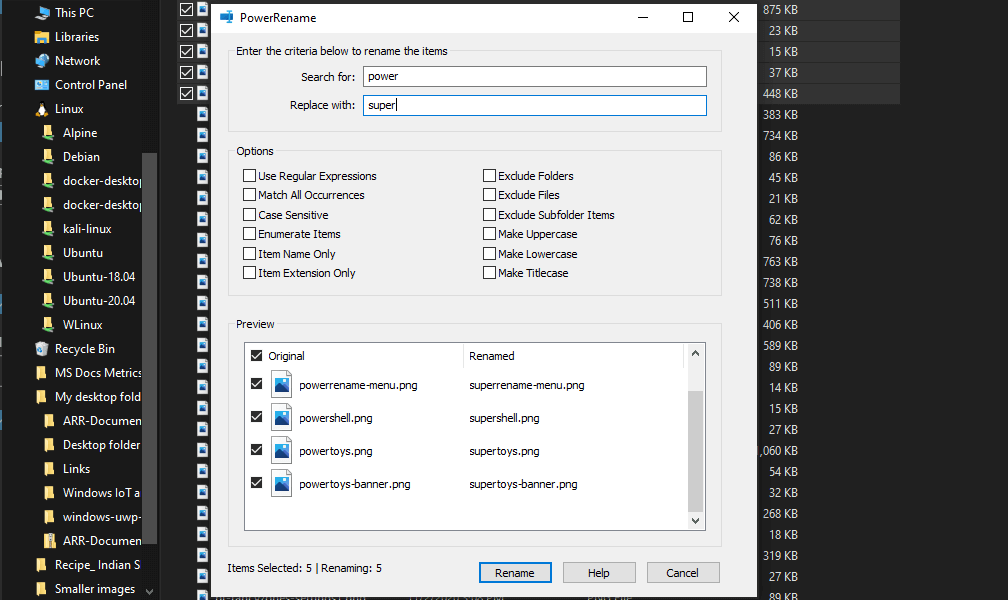 PowerRename is a bulk renaming tool that enables you to:
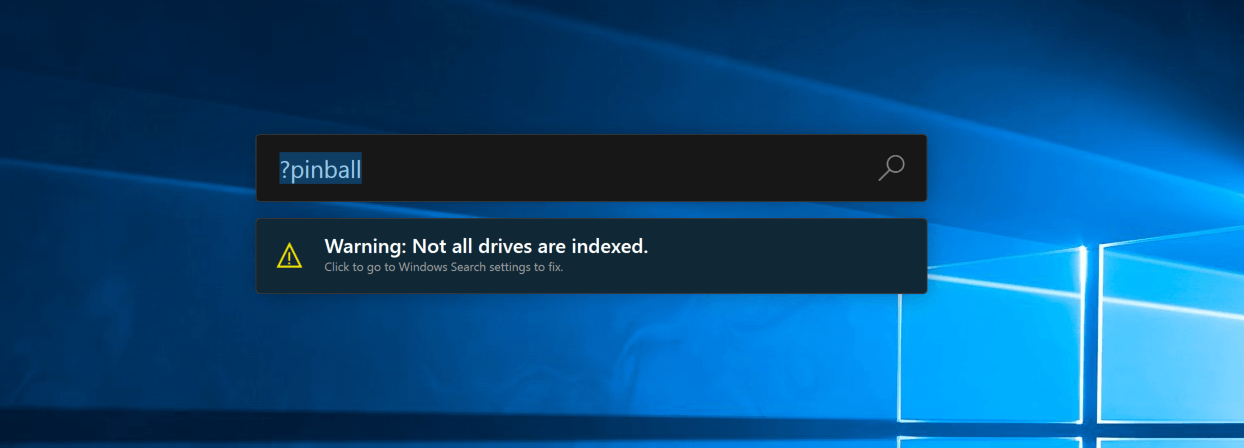 PowerToys Run is a quick launcher for power users that contains some additional features without sacrificing performance.
PowerToys Run features include:
PowerToys Run is a quick launcher for power users that contains some additional features without sacrificing performance.
PowerToys Run features include:
> (for example, > Shell:startup will open the Windows startup folder)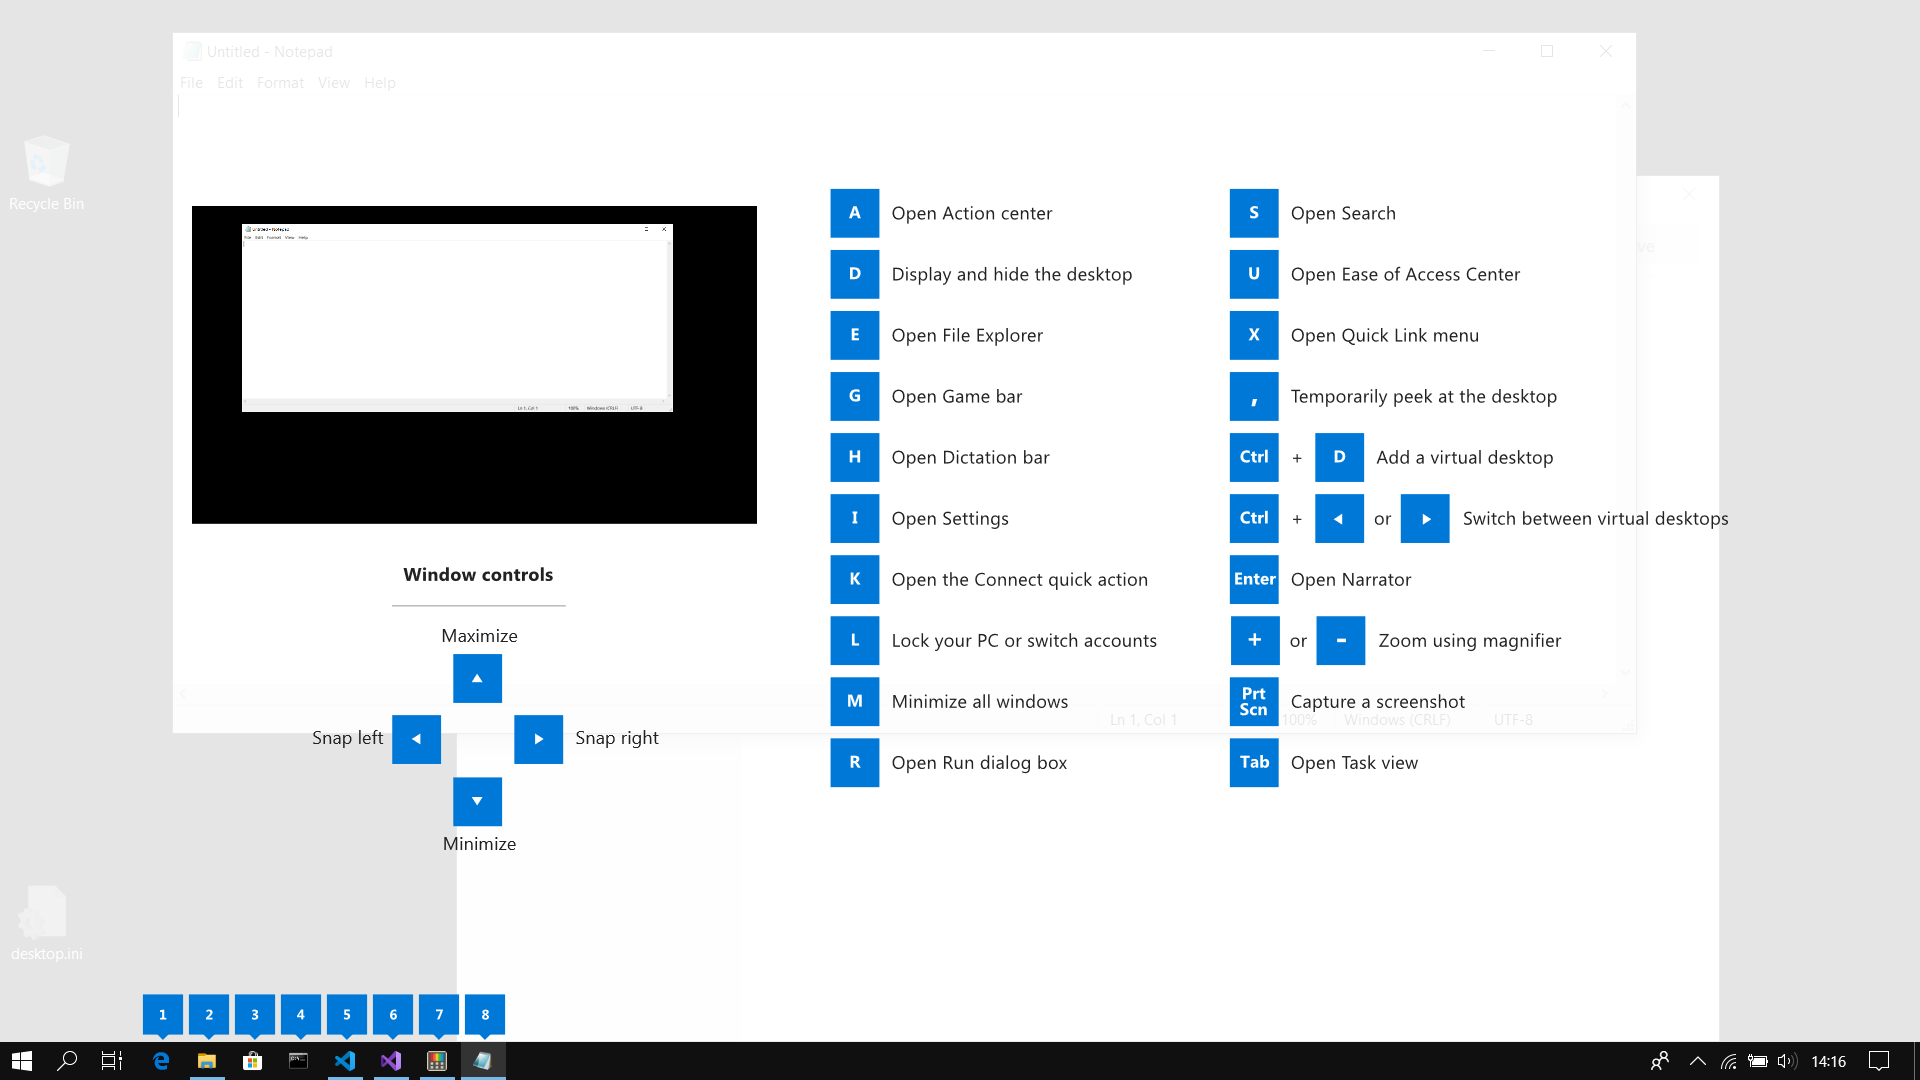 This guide uses PowerToys to display common keyboard shortcuts that use the Windows ⊞ key. Windows key keyboard shortcuts can be used while the guide is being shown and the result of those shortcuts (active window moved, arrow shortcut behavior changes, etc) will be displayed in the guide. Releasing the Windows ⊞ key will make the overlay disappear. Tapping the Windows ⊞ key will display the Windows Start menu.
Hey, you made it till the end, thank you for reading and I hope to see you soon.
This guide uses PowerToys to display common keyboard shortcuts that use the Windows ⊞ key. Windows key keyboard shortcuts can be used while the guide is being shown and the result of those shortcuts (active window moved, arrow shortcut behavior changes, etc) will be displayed in the guide. Releasing the Windows ⊞ key will make the overlay disappear. Tapping the Windows ⊞ key will display the Windows Start menu.
Hey, you made it till the end, thank you for reading and I hope to see you soon.