How to Repair Error Code 0xC190010, 0x30018 in Windows 10
Error Code 0xC1900101, 0x30018? - What is it?
Users, when upgrading to Windows 10 from Windows 7 or Windows 8/8.1, or when upgrading to a new version, build, service pack, or major update of Windows 10, can encounter error code 0xC1900101, 0x30018. Windows 10 installation fails and stops or hangs. During the installation process, it will reach a certain maximum limit (normally at 6% or 32%) then reverts back to the previous version of the operating system and displays the following message:
We couldn’t install Windows 10. We’ve set your PC back to the way it was right before you started installing Windows 10.
0xC1900101 – 0x30018
The installation failed in the FIRST_BOOT phase with the error during the SYSPREP operation.
Solution
Error Causes
In attempting to fix Error Code 0xC1900101-0x30018, it is vital to know what causes this issue. The most probable causes of this error are:
Incompatible hardware or driver
Incompatible security programs or antivirus or incompatible utility software
A device driver possibly stopped responding to setup.exe while on the installation process.
In some cases, you might be opened to other error messages when attempting to update to Windows 10, including error code 8007002c.
Further Information and Manual Repair
In fixing issues related to error codes, it is best to employ manual repair methods. Using these methods helps users pinpoint the root causes of the issue and apply solutions permanently to fix the issues.
While most manual repair methods can be done by every Windows user, even those without technical abilities, there are certain cases where help from a Windows professional is needed. If you’re not up to facing risks in implementing manual methods yourself, consider getting help from a professional Windows technician or you can use a powerful automated tool.
In fixing Error Code 0xC1900101-0x30018, you can repeat the same steps used for 0xc000021a (Method One) or you can try doing the following:
Disable or uninstall your Antivirus program before proceeding to upgrade the system
Ensure that the machine name is simple (having at least 8 characters) with no special characters like hyphens or dashes.
Restart the device a few times then try again.
Disable General USB Devices such as the Smart Card Reader.
If you use an SCSI hard disk, ensure that you have available drivers you can use for your storage such as a thumb drive and make sure that it is connected. During the Windows 10 setup, select the Custom Advanced Option and use the Load Driver command to be able to load the suitable driver for the SCSI drive. If this fails, try switching to an IDE-based hard disk.
You can now perform a clean boot. Restart your device then try again.
If you are using the .ISO file for upgrading the system, you need to disconnect from the Internet first before proceeding to the setup. If you are connected to Wi-Fi or by Ethernet (LAN), make sure to disable both connections then you can proceed to set up again.
If you’re performing the update through Windows Update, once the download reaches 100%, disconnect from the Internet, and then proceed with the installation.
NOTE: If this fails, if possible, you can try using the .ISO file in upgrading.
Switch to a local account if the device is connected to a domain.
Disconnect all external devices attached to the computer such as gaming controllers, printers, or USB keys.
Open the Command Prompt window by pressing Windows Key + X. Select Command Prompt (Admin) from the menu.
Stop the BITS, Cryptographic, MSI Installer, and the Windows Update Services. In order to do this, Type or Copy and Paste the following commands one at a time:
NOTE: Don’t forget to hit Enter after every command.
net stop wuauserv
net stop cryptSvc
net stop bits
net stop msiserver
Rename the Catroot2 and SoftwareDistribution In order to do this, Type or Copy and Paste the following commands one at a time:
NOTE: Don’t forget to hit Enter after every command.
Restart the BITS, Cryptographic, MSI Installer, and the Windows Update Services. In order to do this, Type or Copy and Paste the following commands one at a time:
NOTE: Don’t forget to hit Enter after every command.
net start wuauserv
net start cryptSvc
net start bits
net start msiserver
Type Exit in the Command Prompt then close the Command Prompt window then restart the computer.
Can’t seem to put up with the long and technical manual repair process? You can still fix this error by downloading and installing a powerful automated tool that will surely get the job done in a jiffy!
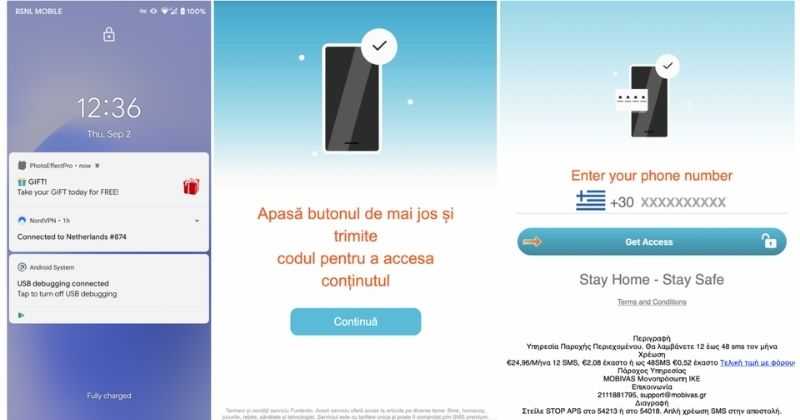
There has been recently discovered in the field of malware targeting Android devices. Affecting more than 10 million users of Android phones, the malware GriftHorse is doing its attacks via phishing and premium services scams. A lot of applications have been discovered that are hosts for this malware and many of them are inside the Google store and available for download.
According to Zimperium zLabs, this malware that was recently detected has been doing its scams and attacks even in November of 2020 and has thus far accumulated hundreds of thousands of dollars in its scam.
On the surface it looks very harmless, asking for typical permissions like internet access, calls, and other related needed functions, and then it waits. After few months the real attack happens when users get charged with premium service they never subscribed to in the first place.
List of Infected Applications that Carry GriftHorse Trojan
Zimperium zLabs listed out some of the apps with this malware. Users are advised to avoid installing them.
Amazing Video Editor
Bag X-Ray 100% Scanner
Bus – Metrolis 2021
Call Recoder Pro
Call Blocker-Spam Call Blocker
Cinema Hall: Free HD Movies
Coupons & Gifts: InstaShop
GPS Phone Tracker – Family Locator
Fingerprint Changer
Fitness Point
Free Calls WorldWide
Geospot: GPS Location Tracker
GPS Phone Tracker – Family Locator
Handy Translator Pro
Horoscope : Fortune
iCare – Find Location
iConnected Tracker
Instant Speech Translation
Lifeel – scan and test
My Chat Translator
My Locator Plus
Plant Camera Identifier
Racers Car Driver
Safe Lock
Screen Mirroring TV Cast
Slime Simulator
Smart Spot Locator
These are only some of the many infected apps available on the internet.
Zimperium zLabs also warned that GriftHorse Trojan exists in over 70 countries worldwide. The infected app quickly changes the language and displays content depending on the user’s IP address.
The previous Windows versions all came with Microsoft's browser Internet Explorer. A lot of users love it because not only that it is easy to use. It is also very fast. Users didn’t have to worry about compatibility because it is almost always compatible with its Windows Version.
When they introduced Windows 10, they changed the name of the browser from Internet Explorer to Microsoft Edge. It is faster and more user-friendly compared to its predecessors. But after the Creator Update, some experienced receiving the inet_e_resource_not_found error code.
In contrary to what everyone expects, you actually don’t have to uninstall and reinstall the Microsoft Edge App. What you can do is reset the browser in your Apps & Features Settings in your Microsoft Settings.
To reset the browser you can follow the steps below:
Click on the Windows icon and go to settings.
Click on Apps and this will bring you to the Apps & Features page. Look for Microsoft Edge from the list of Apps and click on it.
Choose Advance Option
Scroll down then Under Reset, click on repair or reset. When you repair it will fix the existing problem but the data that caused the problem may still be present and can still cause problems. If you click on reset, it will delete all the cache and cookies that are installed in your browser but it will save your Favorites as well as your bookmarks.
Another way to resolve this is by disabling the feature TCP Fast Open on Microsoft Edge. To disable this, go ahead and follow the steps below:
Open the Microsoft Edge browser.
Type in about: flags on the Address (URL) bar.
Under Networking, uncheck the Enable TCP Fast Open.
Close your Microsoft Edge browser and open a new one.
Flushing the DNS also worked for other Users. Sometimes, the error code the inet_e_resource_not_found is caused by a corrupted DNS cache. There are 2 ways to flush your DNS. The first option is to use the command prompt to run the command.
To access the Command prompt or CMD, you can search for it on Cortana or you can click on the Windows icon to access the Programs, scroll down to the Windows System folder and click on it.
A dropdown menu will show up, click on Command Prompt which is the first on the list.
Type in the code ipconfig /flushdns and press enter.
There will be a message that will show that says Windows IP configuration successfully flushed the DNS Resolver Cache
Exit the CMD by typing exit and press enter.
The easiest way to do this is to Press the keys Window + R on your keyboard. Type in ipconfig /flushdns in the search box and hit enter or click on OK.
These are only some of the ways to resolve the inet_e_resource_not_found. There are other ways to further troubleshoot this issue such as reinstalling your Wifi Adapter Driver or adjusting the DNS Server Address. But most of the time, users are able to resolve the issue with the steps provided above.
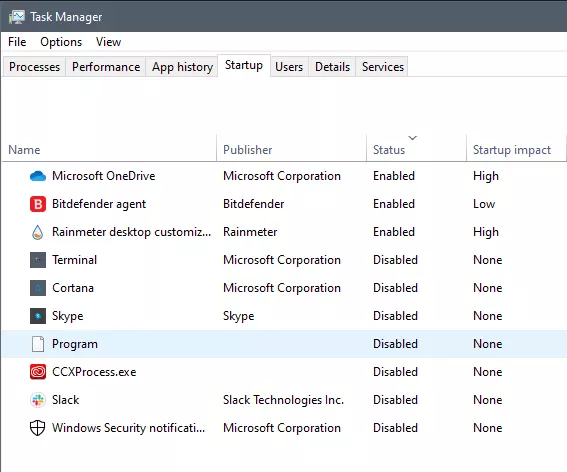
Instaling and removing applications from your Windows can sometimes leave some traces that are unpleasant and can cause annoyances. One of these annoyances is the program in the startup section of the task manager.
If you ever opened task manager and went into the startup section trying to disable some of the startup items on your Windows boot there might be a chance that you have experienced and seen a program without any icon or information about it just sitting there.
This is due to some applications being removed from the system but for some reason, it still shows itself in startup and it is quite annoying. So here we will show you how to get rid of this annoyance so your startup is clean again without junk in it.
Removing a program from startup
Locating the source of the issue
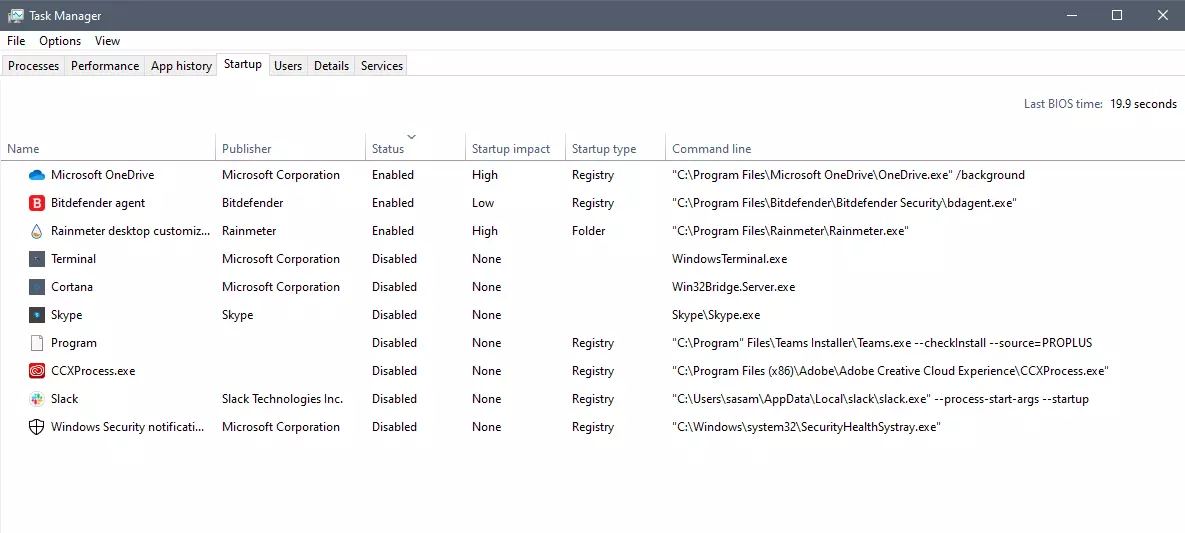
The first thing of course is to open the task manager itself and navigate to the startup tab. Inside the startup tab right-click on the column header and tick or enable Startup type and command line. Now you will see the location of the supposed file (that is missing or you could just go there by right-clicking on the item, but here it is greyed).
99% of the time startup type will be registry since the file is missing, if it was a file fix would be just to simply delete the file in the folder but since it was installed and not properly removed registry key is still present but the file cannot be found. After confirmation that the file is indeed missing and that the startup type is registry open the registry editor by typing Regedit in search and pressing enter.
Removing the key from registry
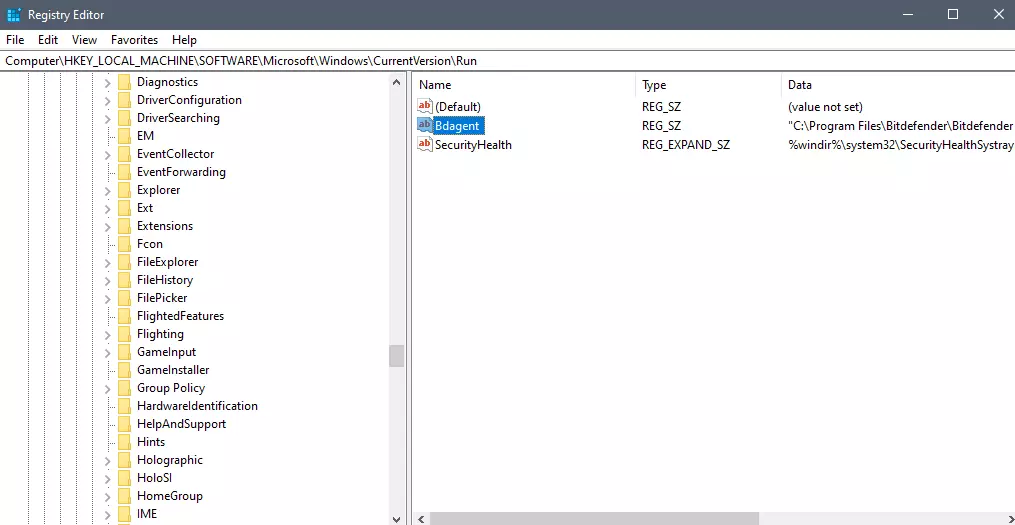
Inside Registry editor navigate to: HKEY_CURRENT_USER\SOFTWARE\Microsoft\Windows\CurrentVersion\Run. Inside on right part, you will see all auto-start entries added by installed applications.
Locate one that is causing issues by comparing its path with the path inside the task manager command line and delete the key. Once the key is deleted right-click on RUN on the left part and choose HKEY_LOCAL_MACHINE to quickly jump on that key location and repeat the process of key deletion if needed. HKEY_LOCAL_MACHINE will delete startup entry for all users and sometimes entry will not be present here since the application is not installed for all users or there are no other users on the machine.
After the procedure is finished, reboot your systems in order to apply changes.
Wondering if upgrading to Windows 11 will boost your gaming experience? We can’t give you a straightforward answer, sadly. But we can take you through the tweaks you can expect if you have all the right requirements and help you make a final decision.
Is Windows 11 good for gaming?
Essentially, the answer to this question is yes. Microsoft has definitely added a bunch of enhancements and features to its latest OS to give gamers the best possible experience. However, you have to keep in mind that this may not work out smoothly for every single user.
Whether you’ll be able to fully take advantage of the Windows 11 gaming features really depends on your setup. As expected, Windows 11 has more demanding system requirements than its predecessor.
Credit: Florian Olivo on Unsplash
So, unless your hardware can run the new OS comfortably, you might not be able to make the most of all these gaming perks. In that case, we recommend you first upgrade your hardware and then make the switch. Be prepared to be a little surprised by a few other interesting changes in comparison to Windows 10, though!
For some of the new gaming features to work, it’ll also be necessary for you to have an NVMe SSD and an HDR-compatible monitor. So let’s take a look at 4 big improvements you can expect if your setup is compatible.
Gaming enhancements on Windows 11
1. Enjoy faster loading speed with DirectStorage
For this powerful feature to work, you need a compatible graphics card and, as stated before, an NVMe SSD. It’s also important for your GPU to support the DirectX 12 graphics API at least. And since we’re on that subject, you’ll be happy to know that Windows 11 has also introduced a new version of the API called DirectX 12 Ultimate.
Now, what does DirectStorage do? It’s a new feature designed to make full use of the speedy storage of NVMe SSDs. It also transfers game data directly onto the graphics card, lightening the load on your CPU. Normally the CPU would have to decompress the data first, but DirectStorage helps bypass this. That’s how loading times are reduced and games run more smoothly.
2. Fully immerse yourself through Game Mode
Windows 11’s Game Mode is certainly a welcomed addition. When you turn on Game Mode, usage of background apps that aren’t essential to your game is reduced. This results in the game you’re running becoming a priority process. This way, it uses your hardware and system resources to the max. Ultimately, the Game Mode means less lag and higher frame rates so you can play undisturbed and fully enjoy your gaming session.
3. Vibrant visual experience thanks to AutoHDR
For this one you’ll absolutely need an HDR-compatible monitor. Basically, HDR (High Dynamic Range) means a wider range of contrasts and colors that can be displayed on a monitor.
Windows 10 has an HDR feature, but you have to turn it on and off manually (“Use HDR”). Plus, users have reported that, if left on, it results in an unappealing appearance of content other than movies and games.
Windows 11 fixes that problem with its AutoHDR feature. Toggling it results in the system automatically adjusting the color contrast, balance and brightness based on what you’re currently looking at. For gamers, this means vivid imagery in every single game, resulting in a supreme visual experience. You can check out Microsoft’s own video showcasing the power of AutoHDR.
Aside from AutoHDR, another way Windows 11 improves the visual aspect is through its support for refresh rates of up to 360Hz.
4. Xbox Game Pass & Game Bar
It’s no secret that Microsoft wants to integrate Windows and Xbox. We’ve seen some attempts with Windows 10, but they’re pretty wonky compared to the new OS.
Windows 11’s built-in Xbox Game Bar enables quite a few options all gamers desire. You can take screenshots and videos of your game and send them, for starters. Furthermore, you can use it to see audio settings and monitor your PC’s performance without having to leave the game or open the Task Manager.
Widgets are also a really cool part of the Game Bar. You can choose from a wide variety of widgets, such as Xbox Achievements, Spotify, Gallery, Xbox Social and more.
Moreover, the Xbox Game Pass has been streamlined on Windows 11. Game Pass is a subscription service that unlocks hundreds of awesome games and supports cloud streaming. Do keep in mind that the games are only unlocked for a certain period of time, as the selection rotates once in a while.
What can you do for a better gaming experience?
Windows 11 does offer tweaks that require zero input from you. However, there are a few things you can do manually to get even more out of your new OS while gaming.
Turn off enhanced pointer precision. Most games enhance precision by default, so having this feature on might interfere with that.
Make sure to select your high performance graphics card for each game. Go to Settings > Gaming > Game Mode and tap ‘Graphics’ from the ‘Related settings’ menu. Find the game you want to adjust, click on ‘Options’ and choose your high performance graphics card to be the default setting. While there, you can also turn on ‘Hardware-accelerated GPU scheduling’ at the top.
Disable unnecessary apps and programs. As long as they aren’t essential to running your game, they might take up valuable system resources, so disable them to make space for your gaming requirements.
Check for pending updates and install them. It’s well-known that out-of-date software causes bugs, latency and crashes. The same goes for your GPU drivers.
Use the High-performance power plan (Control Panel > Power Options > Additional plans) to maximize the use of resources for the best possible performance.
Summary
Windows 11 has done quite a bit for avid gamers. We hope your setup is compatible with all these new features and you can experience these enhancements ASAP!
Hello and welcome to our Increasing Virtual Memory tutorial. Before trying to raise the quantity of virtual memory in your pc system, it's important to get a comprehension of its goal and use.
This leads to the constant use of high-performing tasks in addition to keeping multitasking capability.
The downside to this process is the fact that relatively, the HDD accesses information slower than a RAM module.
Taking into consideration its use in a computer program and how virtual memory works, there isn't any amount of virtual memory allocation.
The quantity of virtual memory to be defined for a unique computer program would be determined by the kinds of programs that are started and the quantity of multitasking done. The Microsoft Windows operating system yet does supply a recommended baseline memory based on the number of RAM installed and storage space of the HDD.
Virtual memory allocation really indicates the upsurge in how big the paging file is. This file provides the pc program with all the essential instructions on the best way to act once all the installed RAM has been allotted to the running applications. In both Microsoft Windows XP (all variants) and Windows Vista environments, the method to control the paging file size is basically the same. To increase the quantity of virtual memory:
Click on the Start menu and choose the "Control Panel" alternative. When the Control Panel window is started, choose the "Operation and Maintenance" class.
Click on the "System" choice to create the Device Properties Window.
Click the "Advanced" tab and choose the "Settings" button under Operation. In the Operation alternative window, select the "Change" button under the Virtual Memory class.
Choose the hard disk where the Windows operating system is now installed. That can be the same place where in fact the paging file will be saved.
Test on the checkbox for the "Custom Size" to enable you to determine the number of virtual memory you need to use for your device.
Click the "OK" button thrice to shut all of the windows. Click the Start button and restart your machine to enable the upsurge in the number of virtual memory to be finished.
In establishing the number of virtual memory, you'll have to place a maximum value along with an initial. It is suggested that both values be equivalent in order to achieve the finest performance on your pc system.
In case you didn’t know, the new Windows 10 v1903 has brought tons of new features around Windows 10 Updates. One of these features is the ability to automatically adjust the Active Hours based on your computer activity. This feature is really useful as it tells the operating system when to install the Windows Updates.
A lot of users use the Active Hours feature to ensure that the Windows Update won’t force them to restart their PCs to install the update. So if your computer is turned on, it won’t apply the update during the active hours you’ve specified. In addition, the active hours change for many users and they are not that strict. For instance, if you set the active hours between 10 am to 5 pm, Windows Update won’t be forcing you to restart your computer to install the updates at those times.
Note that Windows Update allows enabling an option using where it can monitor the active hours in your computer and change it. To configure this setting, here’s what you have to do:
Frist, go to Settings > Update & security > Windows Update.
Next, take note of your current active hours and click on the “Change active hours” link.
Then toggle the option that says, “Automatically adjust active hours for this device based on activity”. This will change the active hours and if you match it with the previous one, it should be different.
As you can see on the image given above, the earlier active hours were between 8:00 to 17:00 and were changed to 11:00 to 19:00. If you have been using this feature for a while you’ll find how useful and handy it is especially when you’re using your computer and don’t want any notifications like the prompts for Windows Updates to bother you while working.
High Dynamic Range or HDR is a technique that’s used to create lifelike videos which have improved and better dynamic range, especially when it comes to details. And as you know, Windows 10 supports the steaming of HDR videos as long as the display supports it and it comes with the option to enable the HDR Playback for Windows 10 Video Streaming apps. However, before you can get the best viewing experience, you need to calibrate the display further for HDR video on your Windows 10 PC.
Take note that even when you have the HDR Playback feature enabled on your computer, you still need a display that supports it. To make sure that your display supports this feature, you can use the DirectX Diagnostic Tool to have the display correctly wired and have the latest WDDM 2.4 drivers installed as well as set the other settings properly.
Once you’ve made sure that your computer’s display really supports HDR and you’ve already enabled the HDR Playback feature, now it’s time for you to calibrate. Remember that when you calibrate the display, you should make an external monitor your primary display if you are using it for HDR and then adjust the settings to your liking. And if you are calibrating for primary display, you need to disconnect all other displays.
Follow the given steps below to calibrate the display of your PC.
Step 1: You need to open the Video Playback first. To do so, navigate to Settings > Apps > Video Playback.
Step 2: Under the Video Playback settings, uncheck the “Don’t increase display brightness when watching HDR video on battery” checkbox or plug in your PC.
Step 3: Next, click the “Change calibration settings for HDR video on my built-in display” link located on the right side.
Step 4: After that, click on the Play button located on the left side to play the video. Then move the sliders to the left or right so you can start to calibrate. Once you see that the quality of the image is to your preference, stop.
Note: Just a tip when calibrating – you just have to find the right balance between the details in the darker parts of a scene. For instance, you have Mountains in the background and buildings in the front – you need to drag the slider to the right to add more details to the snow on the mountain or drag the slider to the left to add more details to the buildings. After that, you can pause the video and exit the full-screen mode. Keep in mind that the quality of HDR depends on you as it is a personal choice. Some users might like a brighter shade while other ones want the darker shade so it really depends on your taste. If you are not satisfied with how your HDR turned out, you can just try calibrating the display again. Simply go back to the default HDR video calibration and click or tap the Reset calibration button.
Another thing to remember. First, you can only see HDR content on the full screen and if you’re using a laptop, you need to make sure to watch videos when plugged in and check that the battery settings won't’ lower the brightness.
The latest Windows 11 update has brought with it not so popular widget from Windows 10, the weather widget that will reside into the taskbar and constantly show stuff like temperature, weather conditions, etc. The weather widget is not a bad thing but most users found it a little annoying and turned it off in Windows 10. If you wonder how can you do the same but this time inside Windows 11 please keep reading.
The first step is to right-click anywhere on the taskbar (in empty space) and choose Taskbar settings
Once the taskbar settings are opened, find Widgets and click on the switch on the far right to turn it off, immediately no more information will be shown on the taskbar and it will be free again. And that is all there is to it.
In this post, you will be guided on how you can set up the USB tethering feature on your Windows 10 computer and share your mobile device’s mobile data so other devices can also access the internet. Tethering is usually known as Wi-Fi tethering which allows users to share mobile data to any device with Wi-Fi, laptops included. This is really useful especially when you have no other way to access the internet. For instance, if you are using a desktop computer and there is no way for you to connect to the Ethernet, and you have no Wi-Fi adapter that you can use to connect to a router as well, you can use USB tethering instead to access the internet. It is almost similar to Wi-Fi tethering except that it works over a USB connection instead of a Wi-Fi adapter.
USB tethering is almost quite the same as an Ethernet connection except that it’s faster compared to Wi-Fi tethering as well as Bluetooth tethering. Just like Wi-Fi tethering, USB tethering is free unless your network carrier has blocked it. Thus, it’s better if you make that clear with your operator. Once you have that covered,
Follow the instructions provided below to set up USB tethering on your Windows 10 computer.
Step 1: First, connect your mobile device to your Windows 10 computer using a USB cable.
Step 2: If it asks you to enable the file transfer feature, just cancel it. A prompt that says, “Tethering or Hotspot active—Tap to setup” should be available as soon as you get connected – tap on it.
Note: If there is no prompt, just go to Settings > Network and Internet > Hotspot and Tethering and from there, toggle on the USB tethering option.
Step 3: Afterwards, the setup will create a new network adapter in Windows 10 automatically and your computer should now be connected to the internet using USB tethering.
Note: You have to make sure that the Wi-Fi connection in your mobile device is turned off and if it is connected to an existing network, the USB tethering will be disabled but if you see its status as enabled, then the USB tethering setup is successfully done. In addition, keep in mind that the location of tethering can be different for every phone, especially on a customized operating system such as RealMe, Redmi, Samsung, and any other mobile device although they are clubbed in the section of Mobile and Data Network.
In case you encounter some problems when using USB tethering in your Windows 10 computer, there are troubleshooting tips you should follow. The NDIS-based Internet Sharing Device network adapter is what Windows 10 uses to make USB tethering possible so if it stops working, follow the options provided below.
Option 1 – Perform basic check
The first thing you can do if you encounter problems in USB tethering is to do a basic check like checking if Wi-Fi is enabled automatically as well as check if the USB cable is disconnected or if you’ve turned off USB tethering accidentally.
Option 2 – Try installing or updating the USB RNDIS adapter
RNDIS or Remote Network Driver Interface Specification can also help you resolve any USB tethering problem. If the pre-installed driver does not help you in connecting to the internet, then you can try installing the USB RNDIS driver that is, if it’s not installed yet. If it is already installed, you can try to update it instead.
Tap the Win + R keys to open Run and type “devmgmt.msc” in the field and hit Enter to open the Device Manager.
Next, expand the Network adapters section and look for the Remote NDIS based Internet Sharing Device. But if you are using a Samsung smartphone, you might see “Samsung” instead of under Network adapters.
Right-click on it and then select the “Update driver” option.
Then select the “Browse my computer for driver software” option.
After that, select the “Let me pick from a list of available drivers on my computer” option.
Now uncheck the checkbox for “Show compatible hardware”.
From the given list on your left-hand side, look for Microsoft and then select the Remote NDIS based Internet Sharing Device on your right-hand side.
Click on Next. A new popup will appear where you have to click on Yes. This will install the driver.
Now click on the Close button and restart your computer.
As you know, the NVIDIA Control Panel is the central control panel for all devices that run the graphics drivers manufactured by NVIDIA. This control panel comes bundled with the drive package itself which is why there is no need for users to download it or update it separately. However, recently, some users reported that when they tried to make changes to the configuration in the NVIDIA Control Panel, they were unable to do so and encountered an error message instead saying, “Access denied. Failed to apply selected settings to your system”. If you also got the same error message, then you’ve come to the right place as this post will walk you through fixing this error in the NVIDIA Control Panel.
There are several suggestions given in this article to fix the error. You can try to run the file named “nvcplui.exe” as an administrator or restore the most recent version of the folder where the aforementioned file is located. You could also try to restart NVIDIA’s process or restart the NVIDIA Display driver service or update the NVIDIA drivers in your computer. For more details, refer to each one of the options given below.
Option 1 – Try running the nvcplui.exe file as an administrator
Tap the Win + E keys to open File Explorer and navigate to this path: C:/Program Files/NVIDIA Corporation/Control Panel/Client
After that, look for the exe file and right-click on it, and then select the Run as administrator option.
Next, select Yes if a User Account Control or UAC prompt appears.
Option 2 – Try to restore the most recent version of the folder
The next thing you can do to fix the error is to restore the most recent version of the folder where the nvcplui.exe file is located. Keep in mind that this option is tricky so you have to be careful.
Tap the Win + E keys to open File Explorer.
Next, navigate to this path: C:/ProgramData/NVIDIA DRS
From there, right-click on the DRS folder and select Properties.
After that, go to the Previous Versions, System Protection, or System Restore tab in the Properties window.
Now restore the most recent version of the contents inside that folder. This will revert the old working configuration of DRS.
Option 3: Restart the process of the NVIDIA Control Panel
Tap the Ctrl + Shift + Esc keys to open the Task Manager.
After opening the Task Manager, look for the process named NVIDIA Control Panel Application.
Once you found it, expand it and right-click on the NVIDIA Control Panel sub-process, and click on End Task.
Now try opening the NVIDIA Control Panel from the Start Menu and see if it now works fine or not.
Option 4: Restart the NVIDIA Display Driver Service
Tap the Win + R keys to open the Run dialog box.
Then type “services.msc” in the field and hit Enter to open the Windows Services Manager.
After opening the Services window, you will see a list of services. From there, look for services named “NVIDIA Display Container LS” and double click on it to open its Properties.
Now make sure that the service is Started. If it isn’t, you need to start it, otherwise, you need to Stop it and Start It again. You also have to make sure that the Startup Type is set to Automatic.
Do the same for the NVIDIA LocalSystem Container service.
Restart your computer and check if the problem’s fixed.
Option 5– Try updating the drivers from the official site of NVIDIA
If both the first and second given options didn’t work, you can also try updating the drivers from the official NVIDIA website. And in case you don’t know the type of Nvidia graphics card that your computer is on, follow the steps below:
Tap the Win + R keys to open the Run dialog box.
Next type in “dxdiag” in the field and click OK or hit Enter to open the DirectX Diagnostic Tool.
From there, you can see what type of Nvidia graphics card that your system is on.
Take note of your graphics card information and then look for the best drivers for your operating system. Once you’ve downloaded and installed the file, restart your PC.


 According to Zimperium zLabs, this malware that was recently detected has been doing its scams and attacks even in November of 2020 and has thus far accumulated hundreds of thousands of dollars in its scam.
On the surface it looks very harmless, asking for typical permissions like internet access, calls, and other related needed functions, and then it waits. After few months the real attack happens when users get charged with premium service they never subscribed to in the first place.
According to Zimperium zLabs, this malware that was recently detected has been doing its scams and attacks even in November of 2020 and has thus far accumulated hundreds of thousands of dollars in its scam.
On the surface it looks very harmless, asking for typical permissions like internet access, calls, and other related needed functions, and then it waits. After few months the real attack happens when users get charged with premium service they never subscribed to in the first place.


 The first step is to right-click anywhere on the taskbar (in empty space) and choose Taskbar settings
Once the taskbar settings are opened, find Widgets and click on the switch on the far right to turn it off, immediately no more information will be shown on the taskbar and it will be free again. And that is all there is to it.
The first step is to right-click anywhere on the taskbar (in empty space) and choose Taskbar settings
Once the taskbar settings are opened, find Widgets and click on the switch on the far right to turn it off, immediately no more information will be shown on the taskbar and it will be free again. And that is all there is to it.