And here is the preview of them

One of the most common brands of GPUs that comes in a large number of computers is AMD’s Radeon Graphics processing units. AMD included the Radeon Settings panel so that users can control how the hardware functions. However, as of late, a lot of users reported that the Radeon Settings panel throws an error that says, “Radeon Settings are currently not available. Please try again after connecting AMD graphics” when they try to use it.
This kind of error in the Radeon Settings panel is most likely caused by either corrupted drivers or incompatible drivers. If you are one of the users who are facing this problem, worry not for this post will guide you in fixing this error. You can either use the Device Driver Uninstaller or change the driver version. For more details, make use of the options provided below.
The first thing you can do to fix the problem is to uninstall the AMD Radeon drivers by using the Device Driver Uninstaller software. After you’ve uninstalled the AMD Radeon drivers using this software, go to the official website of AMD to download the AMD Radeon drivers. Once you’ve downloaded them, you can install them by simply running the executable file. Once the installation of the new AMD Radeon drivers is done, try to open the Radeon Settings panel and see if the error is now fixed or not. If not, refer to the next given option below.
If you have followed the instructions in the first option then you can proceed to the next given steps below.
“This policy setting allows you to specify a list of Plug and Play hardware IDs and compatible IDs for devices that Windows is prevented from installing. This policy setting takes precedence over any other policy setting that allows Windows to install a device. If you enable this policy setting Windows is prevented from installing a device whose hardware ID or compatible ID appears in the list you create. If you enable this policy setting on a remote desktop server the policy setting affects the redirection of the specified devices from a remote desktop client to the remote desktop server. If you disable or do not configure this policy setting devices can be installed and updated as allowed or prevented by other policy settings.”

ChatZum is a Potentially Unwanted Program that installs a Toolbar into your browser. This program allegedly allows users to zoom in on photos without clicking on them, however, upon further research, it was discovered that this function does not work on the latest version of browsers.
From the Author: ChatZum is a Browser add-on (toolbar) that enables its users to hover over images in Major Social network's websites and view a larger version of an image.
While installing this toolbar will track user web browsing sessions and will record website visits, clicks, and sometimes even personal information. This information is later used to display targeted ads to the user. To allow easier user tracking, the program changes the browser home page and default search engine to Nation Search Advanced, which injects additional advertisements and tracks user activity.
Several anti-virus applications have marked this program as Potentially Unwanted, and it is not recommended to keep it on your computer, especially considering the fact it will most likely not work on your browser.
“Connapi.dll Not Found" "This application failed to start because connapi.dll was not found. Re-installing the application may fix this problem." "The file connapi.dll is missing." "Cannot start [APPLICATION]. A required component is missing: connapi.dll. Please install [APPLICATION] again." "Cannot find [PATH]connapi.dll"
 Error Causes
DISM.exe /Online /Cleanup-image /Restorehealth
sfc /scannow
findstr /c:"[SR]" %windir%LogsCBSCBS.log >"%userprofile%Desktopsfclogs.txt"The command you entered will open up the logs on your Desktop where you can look for files that are causing the error on your computer manually.
chkdsk /f /r
You probably heard about switches for LAN but not a lot of people heard about KVM switches. So what exactly is KVM switch?
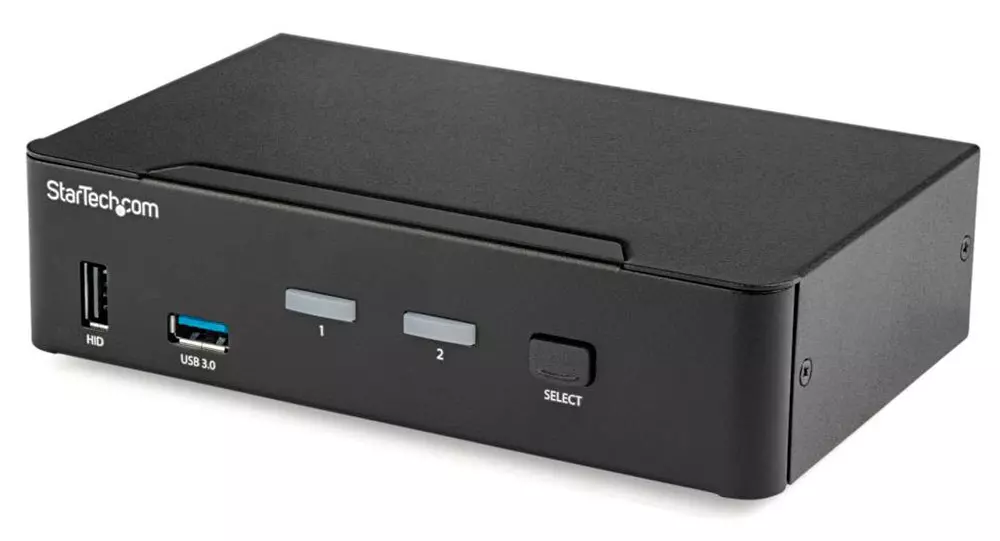
If we look at the name, it is a shortcut for Keyboard, Video & Mouse and the original idea was to have multiple computers but one keyboard, mouse, and monitor. These peripherals would be connected to the KVM switch and other computers could all use one set of these on the fly when needed.
The technology behind the switch is a little interesting since it will actively fake signals to other computers that are not using peripherals. Once they are switched to them the transition is smooth and not noticeable. In old days these switches were more important than today since on every mouse or keyboard disconnection you had to reboot the computer, and although today that is not the case CPU will still detect disconnection and on the next connection it will run through the ID of the device and try to use the existing driver and if peripheral was connected in other USB port, it will install the same driver but connect it to the new USB port.
This type of reconnection can slow down work and place unnecessary load on the CPU so that is why KVM will fake connection in order to make switching externals on the computer smooth and in nick of a time.
These days modern KVM switches will offer you more options than just being able to switch between keyboard, mouse, and monitor. Modern switches now offer Lan, audio, and many more various options.
There are also different kinds of switches offering you only one option, like for example just a Video switch that will let you use one monitor on three computers and many more other specialized options.
So far we talked about Hardware switches, a real device being able to take peripherals into it and switch computers on the fly. On the other line, we have software switch solutions that will have specific software installed on all computers and have it run at all times, and switching between them will be through specific software.
There are two very good and main advantages of using software solutions instead of a hardware one. First, of course, is the price, since the most popular Synergy is an open-source solution, completely free of charge. The second big advantage is that software switch is not limited to how many computers can you use. Hardware switches tend to go to a large number like 16 but if you have a large cluster of computers over a LAN, let's say 30 then the box solution might be difficult.
On the other hand software solution will switch only keyboard and mouse since each other computer will have to have some screen on it in order to work. Both solutions have their strong advantages and disadvantages and it is up to you to choose one that best suits you.
If you are multitasking with a lot of computers or just need your peripherals from time to time to connect to another machine then the KVM switch is something that you might find the use of. Just be aware that if you go for some cheap switch you might experience some lag on your peripherals, but if that is not a concern you can get hardware one for as low as $50 USD.
 When the Apps screen opens on the left click on Default apps.
 On right, you will get a list of Windows default applications for certain types of files. Click on any application you would like to change and choose from the drop-down list a new one. Click on it and you are done.
 PC Performer is a registry cleaner made by PerformerSoft. The purpose of this program is to remove redundant items from the Windows registry. Registry cleaners remove broken links, missing references within the Windows registry. PC performer is designed to automatically optimize your registry and clean it up.
PC Performer adds registry entries for the current user that allow it to run automatically each time the system is rebooted. It adds a scheduled task to Windows Task Scheduler in order to run at various times. The software connects to the internet, therefore it creates a Windows Firewall exception that allows it to connect without interference. Multiple anti-virus programs detected this software as Malware, it typically comes bundled with other software or is distributed through a pay-per-install bundle.