Disable or Enable App Launch Tracking

The Windows 10 operating system utilizes a variety of measures in order to track your app launches so that it can boost both your start and search results. It can personalize the start menu based on the apps that you use the most on the Start menu as well as the search results. This way, the App Launch Tracking is definitely useful especially when you want to access your favorite and frequently used apps quickly in the Start menu and search results on your Windows 10 computer.

On the other hand, Windows 10 provides users with the ability to control their privacy settings in order to protect the privacy of users. Windows 10 users can either opt to enable the app launch tracking to improve the start menu and search menu or opt to disable the app launch tracking in order to prevent the Windows operating system from tracking that you open if you really value your privacy that much. Whichever setting you prefer, you need to change the privacy control settings as well as make some tweaks in the Windows Registry in order to turn on or turn off the app launch tracking feature.

Option 1 – Turn off or turn on app launch tracking via Settings

  • Go to Settings and click on Privacy.
  • After that, toggle On the “Let Windows track app launches to improve Start and search results” option on the right side of the page under the General Settings to enable the app launch tracking feature.
  • And of course, if you wish to disable the app launch tracking feature, simply toggle Off the “Let Windows track app launches to improve Start and search results” option on the very same page under General Settings.
  • After that, close the Settings window.

Note: Keep in mind that when you disable the app launch tracking feature, the “Show most used app” setting will either be grayed out or labeled as “Disable” on your Windows 10 computer. Thus, if you want to keep viewing the most used apps, just re-enable the app launch tracking feature if you have disabled it.

Option 2 – Turn off or turn on app launch tracking via Windows Registry

Before you proceed, make sure to create a System Restore point

  • Tap the Win + R keys to open the Run dialog box.
  • Then type “Regedit” in the field and hit Enter or click OK to open the Registry Editor.
  • Next, navigate to the following path:

HKEY_CURRENT_USERSOFTWAREMicrosoftWindowsCurrentVersionExplorerAdvanced

  • After that, right-click on the Advanced folder and then click on New to create a new 32-bit DWORD value.
  • Name the newly created DWORD as “Start TrackProgs” and set its value to “1” to enable the app launch tracking feature.
  • If you want to disable the app launch feature, set “0” as the value instead of 1.
  • Now click OK and restart your computer.

Take note that you still have to create a 32-bit DWORD value even if you are using a 64-bit Windows computer.

Do You Need Help with Your Device?

Our Team of Experts May Help
Troubleshoot.Tech Experts are There for You!
Replace damaged files
Restore performance
Free disk space
Remove Malware
Protects WEB browser
Remove Viruses
Stop PC freezing
GET HELP
Troubleshoot.Tech experts work with all versions of Microsoft Windows including Windows 11, with Android, Mac, and more.

Share this article:

You might also like

0x80071771, The specified file could not ...
If you are tried encrypting or decrypting a file using the default EFS engine but you receive an error message instead saying, “Error Applying Attributes, An error occurred applying attributes to the file: The specified file could not be decrypted”, read on as this post will help you sort out the problem. If you encounter this error you can use the error code in it. You will most likely get error code 0x80071771. This kind of error occurs when the File Explorer’s copy and paste feature was not able to read the source file being encrypted or decrypted. It could also occur if you try to access a file that has been on another computer previously.

To fix error code 0x80071771 when decrypting or encrypting a file, refer to the instructions provided below.

Step 1: You need to check first if you can decrypt the files encrypted by EFS. However, if you can’t, just proceed and then take full control of the file. Step 2: To take control of the file, open File Explorer and right-click on the partition, and then click on Properties. Step 3: After that, click on the Edit button under the Security tab. Step 4: Next, make sure that “Everyone” is selected under the Group or user names section. Step 5: Afterwards, the Permissions for Everyone section will be activated. Just make sure that all the checkboxes for Allow are checked and then click on the Apply button. Step 6: Once you’re done, click on the Advanced button. This will open a new window labeled Advanced Security Settings. From there, click on the Change link under the Owner section. Step 7: Now type your account name in the field and click on Check Names to verify the account name and click OK. Step 8: After that, select the “Replace owner on sub-containers and objects” option and then click OK. Step 9: Next, select Administrators in the Group or User names list and select Full Control in the Permissions for Administrators panel and click OK.
Read More
How to do Disk cleanup in Windows 10
Disk cleanup is part of Windows 10 tools and it is essential in keeping your computer up and running in optimal settings and to free so much needed space as well as remove temporary files that can accumulate over time. Using disk cleanup from time to time is recommended and a very useful habit that will save you some headaches and optimize your computer running time, speed up boot sequence, etc. Think of it like cleaning up your desk, from time to time it can get too overwhelmed with junk and non-important things and if you are keeping it tidy all the time each time you need to find something it will be much faster and easier, same goes with computers, so if you do not have it, try to develop a habit that once per month you start disk clean up and remove trash from your hard drive. In order to do so, press ⊞ WINDOWS + E to bring File Explorer up Keyboard with windows and e markedOnce File Explorer is up and running right-click on the hard drive you wish to run disk cleanup on and click on properties. file explorer hd propertiesProperties Windows will open on the general tab, on that tab you have disk cleanup on the lower right part of properties, click on it. local disk properties cleanupWait for Windows to gather information about your hard drive and files on it. After it is finished you will be greeted with the next screen: disk cleanup section chooserHere you can thick and mark which items you would like to get rid of and which ones you would like to keep. Note that you can freely tick all of them and remove them since removing these files will not break WIndows in any way. make your choices and click on ok. You can also click on Clean up system files to run system files cleaner and get rid of junk there, you will not be able to choose any options there, Windows will alone clean up what is not needed. After disk cleanup is finished least thing you will have is more free disk space, but like mentioned, keeping your Windows and computer healthy goes a long way in its usability, speed, and performance.
Read More
How to Fix Windows 10 Error 0x8007001

Error Code 0x8007001 - What is it?

Error Code 0x8007001 occurs during installations that take place in Windows 10.  Various versions of this same error have also been present in previous editions of the software and the methods to resolve the error across these versions are the same

Common symptoms include:

  • Inability to complete the installation process for updates, programs, and system versions.
  • Installations quitting out in the middle of the process, particularly as the files are unpacked.

Several solutions for Error Code 0x8007001 require the user to complete semi-complex tasks. If you aren’t comfortable with the processes necessary to finish the methods below, make sure that you get in touch with a certified professional who is familiar with the Windows operating system to assist you in the resolution of the error code.

Solution

Restoro box imageError Causes

In many cases, Error Code 0x8007001 is caused by an installation disk that is not functioning properly or installation files that have been corrupted or changed. When this is the case, the operating system will not be able to begin actually installing the files and will instead hang up as the files are unpacked from the installation set.

Further Information and Manual Repair

For Error Code 0x8007001 to be repaired properly, the missing or corrupted installation files need to be repaired or the system needs to be able to recognize the files that it is missing. This can require some advanced computing knowledge. If you don’t feel comfortable with the idea of undertaking the methods below on your own, contact a computer repair technician who can assist you in following these steps.

Method One:  Load the Install Files on an Alternative Disk

In some cases, the operating system simply cannot recognize the installation files that are present on the disk in question, whether it is on a hard drive, a set of downloaded files, or files from a flash drive. If this is the case on your particular machine, the simplest way to work around the problem is to load the installation files onto an alternative disk source, whether it be a flash drive, CD, DVD, or secondary hard drive. After these files have been properly loaded onto that alternative disk, attempt to run the installation from the alternative source instead.

If this method is successful, it means that the system may have had trouble recognizing the files involved in the installation from the first source, but that the files themselves were not corrupted or changed.

Make sure that you save the alternative disk source after your installation is complete in case you ever need to do a fresh installation on your machine.

Method Two:  Clean Your Disc and Your Drive

If you are installing files from a DVD or CD, check to make sure that the back of the disc is free from scratches and dust. If there are no visible marks on the disc, you may need to open up your disk drive to see if there is a build-up of dust or debris inside of the drive. If this is the case, simply clean your drive and re-attempt your installation process from the included disk.

Method Three:  Run the Windows Update Troubleshooter and Update Your Programs

If the error code is still appearing on your machine, you can open up your Windows Update tool and run the troubleshooting wizard, which will then scan your machine to see if there are any potential problems that it can fix. Next, run the Update tool itself if there are any updates that need to be performed. Sometimes, this can resolve the error at hand. Make sure to restart your computer after any updates or changes have been made so that you can ensure that they are applied by the operating system appropriately.

Method Four: Use An Automated Tool

If you wish to always have at your disposal a utility tool to fix these Windows 10 and other related issues when they do arise, download and install a powerful automated tool.
Read More
T-Mobile Hack, 40 Million and more Impacted
T-MobileHacker group recently came up with claims that they have stolen data from 100 million T-Mobile customers. T-Mobile has responded with confirmation it has been compromised and that over 40 million records were stolen, among them are not just present customers, but anyone who has applied for T-Mobile service as well as past accounts.

What has been stolen?

Report from T-Mobile states that stolen records included first and last name, date of birth, social security number, driver’s license & ID information. The company said that it has “no indication that the data contained in the stolen files included any customer financial information, credit card information, debit or other payment information.” Not really a reassuring statement meaning that they really do not know, but even if the statement is true, already stolen information is as much if even not more damaging and devastating as payment information.

What T-Mobile is planning to do now?

It is stated that the hole used for the hack has been addressed and closed so no more data can be stolen. Considering people that had their personal information compromised, T-Mobile said it is planning to reach out to them and offer them two years of free identity protection through McAfee’s ID Theft Protection Service. Additionally, T-Mobile recommends postpaid customers change their PIN by going online into their T-Mobile account or calling T-Mobile customer service by dialing 611 on their phone. The company also recommends a feature called Account Takeover Protection that prevents unauthorized individuals from stealing a phone number and porting it out of T-Mobile. Finally, the company will publish a website “for one-stop information and solutions to help customers take steps to further protect themselves.”
Read More
Software review series: HWiNFO
HWiNFO (Hardware Information) is a professional hardware information and diagnostic tool supporting the latest components, industry technologies, and standards. It's targeted to recognize and extract the most possible amount of information about computer hardware which makes it suitable for users searching for driver updates, computer manufactures, system integrators, and technical experts too. Retrieved information is presented in a logical and easily understandable form and can be exported into various types of reports. System health monitoring and basic benchmarking available too. If you would like to read more helpful articles and tips about various software and hardware visit errortools.com daily.
Read More
Setting default applications in Windows 11
Setting default applications in Windows 11
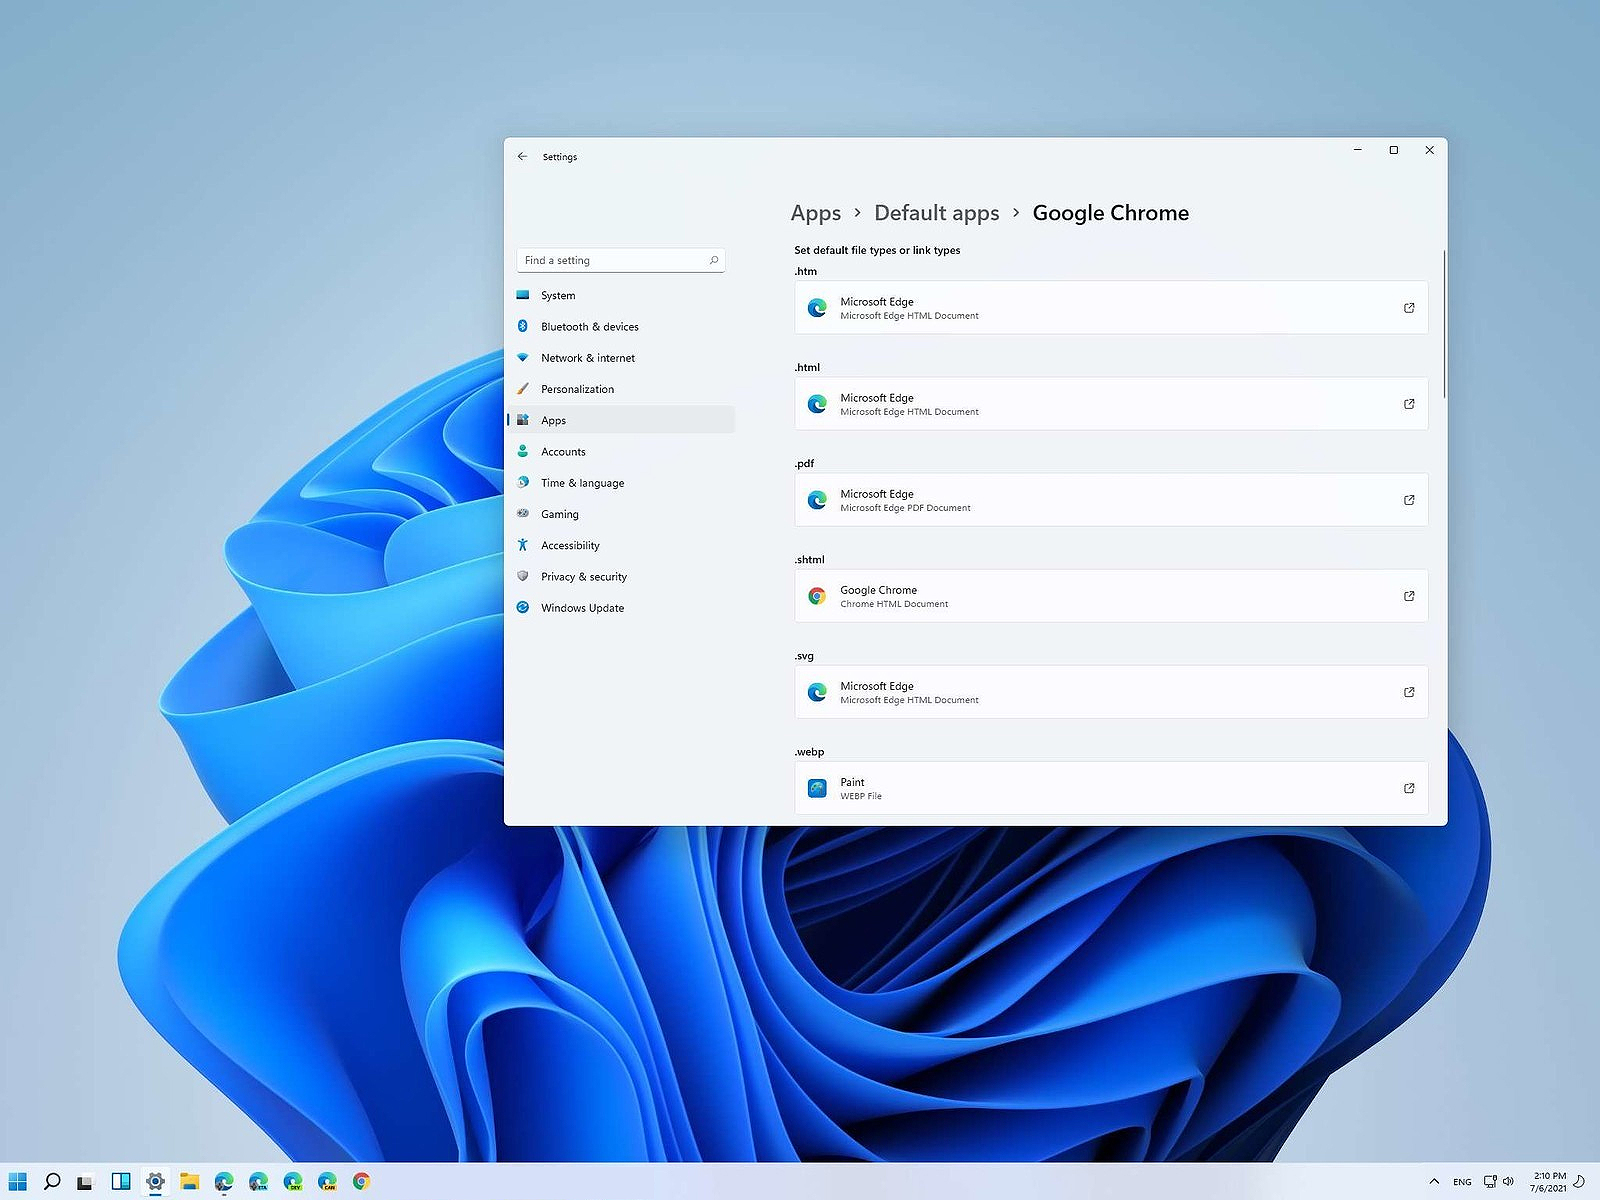
Same as in previous Windows versions, Windows 11 will also use certain applications as default ones for opening certain file types and file extensions. And yes, same as in previous versions it will come preconfigured for certain file types and associated applications like for example photos for pictures. Of course, users usually have their own favorite applications for certain file types and much more prefer to open them inside the application of their choice instead of the default one. We can change the default application like in previous Windows versions but this time there are two ways and overall more control of this process. Windows 11 has settings for choosing default file type applications and default file extension applications giving you more control of this process.

The opening setting for apps

Whatever you wish to change default application or default extension application you will need to open settings for default application. Follow steps to quickly go into it.
  1. Press ⊞ WINDOWS + I to open settings
  2. Select Apps on left
  3. On the right part select Default Apps
Now you are in settings for choosing default applications

Choosing default application by file type extension

This is considering by Microsoft as a typical way to set default applications inside Windows 11. Once you are inside the settings app there is a box labeled Enter a file type or link type. Inside the search box, type in file extension that you wish to associate the application with like .JPG, .TXT, or other. If the file extension is not associated with any application you will be presented with a Choose a Default button, if however, the file extension is already associated with the app, you will need to click on the app box itself. In any case, a pop-up will appear and ask How do you want to open YOUR FILE EXTENSION files from now on? Choose Application from the list of presented ones and click on OK.

Choosing default file type

Another method is to select the default application by file type selecting application for it. In the settings screen, under the search box, you will have a list of installed applications. Choose the application that you would like to associate a file type with and click on it. On the next details screen scroll down and select the file type that you want to associate with the selected application and click on OK.

Other/third method

There is also the third method for choosing the default application for file type but it includes some surfing on your hard drive and it can be more time-consuming for first-time settings. But it is fairly quick when you need to only use it once on some new file type (for example you have a new application installed and want to switch just one file type extension to that application). Locate the file that you want to associate with the application and right-click on it. Select Open With from the menu and then Choose Another App. Pop up will appear, select the application that you would like to use, and check the box beside Always use this app to open CHOOSEN EXTENSION files followed by clicking on the OK button.
Read More
GitHub introduction and explanation
If you are starting to get into the “wonderful” world of coding there is a high chance that you have heard of GitHub or Git for short and there is a slight chance that you might be confused about what exactly GitHub is. If this is the case, we are welcoming you to go through our article and find everything about it and why it is so popular and used all around the world.

githubWhat exactly is GitHub?

If we want to go all technical and just point the obvious we could say that GitHub is basically a WEB site and cloud service used for storing and managing code in all languages. But to truly understand why you should use GitHub and not Dropbox or any storage service instead you need to understand concepts like Version Control and Git.

Version Control

Version control is meant to help developers to work separately on different parts of codes and update is separately not breaking the original one. Take note that this option is meant when there is a big project and has more than one coder working on it. If you are a solo coder on your personal project this might not be anything groundbreaking for you personally. But let’s now assume that you are part of a team and that your task is to edit only one function of a project and other people working will also have their tasks. With version control, you could take only part of the code and work on it and once you are finished merge it back into the main repository. All changes in the main code are automatically tracked and can be easily reverted back if needed. The good stuff is that rolling back can be used only let’s say on a code you submitted and other changes made to the source can be kept. As you can see this makes a very good and efficient working space and a good coding environment.

Git

Git itself is a specific version control system, an open-source version control system to be more precise created by Linus Torvalds in 2005. It is a distributed version control system, which means that the entire codebase and history is available on every developer’s computer, which allows for easy branching and merging. Currently, over 87% of worldwide developers are using Git on a daily basis.

So GitHub is?

GitHub is a profit company that offers a cloud-based Git repository hosting service, in other words, it automates and makes it easy for everyone to use Git for version control and collaboration. It focuses on user interface and ease of use so even beginner coders can use it right away without any large confusion and using command lines and setting it themselves manually. GitHub also has a free personal plan in which you can host a public code repository completely free. This option placed GitHub very popular with open source projects. If you are a company you can purchase a plan to have a private code repository shared only to members of your team or company.

Conclusion

As stated almost every developer on a planet uses some version of Git, many of them are on GitHub and there is a lot of open source projects on it. Some employers even ask to see your GitHub repository when deciding if they want to employ you, think of it as a portfolio for coders. There is not a single disadvantage and not a single argument against using it, especially it has a personal free option. So if you want to look better and more professional in the coding world go, make an account and place some code on it, share it with the world, and see how it goes. You might even get some help on projects from other coders if you need it.
Read More
Fix Windows Error Code 0x80070017
If you suddenly encountered a Windows Error Code 0x80070017 during an Update, Installation or System Restore then it’s probably due to some missing or corrupted system files. This kind of error code can occur during an update, installation, or system restore and the only way out of it is to download the file once again and re-run the installation from the top. Before you start to troubleshoot the problem, you need to create a System Restore Point first. After you create a System Restore point, you can follow the troubleshooting options laid out below to fix the Windows Error Code 0x80070017. You just have to follow the troubleshooting option that applies to your situation and whether you got the error during an update, installation, or during System Restore. Whether you got the error 0x80070017 while updating Windows 10 or installing it or during a system restore, the first thing you must do is run the System File Checker. As pointed out early on, the Windows Error Code 0x80070017 might be caused by corrupted or missing system files so the first thing you can try is to run the System File Checker scan.
  • Tap Win + R to launch Run.
  • Type in cmd in the field and tap Enter.
  • After opening Command Prompt, type in sfc /scannow and hit Enter.
The command will start a system scan which will take a few whiles before it finishes. Once it’s done, you could get the following results:
  1. Windows Resource Protection did not find any integrity violations.
  2. Windows Resource Protection found corrupt files and successfully repaired them.
  3. Windows Resource Protection found corrupt files but was unable to fix some of them.
If you have encountered Windows Error Code 0x80070017 during an Update, then here are some options you need to try:

Option 1 – Delete the files/contents in the SoftwareDistribution Folder

The Software Distribution folder in the Windows operating system is a folder that can be found in the Windows directory and is used to store files temporarily which might be required to install the Windows Update on your PC. Thus, it is required by the Windows Update and maintained by WUAgent. A lot of users tried deleting the files in this folder to fix the problem and so far it has worked. Like them, you can try clearing the Windows Update cache by simply deleting the contents of the folder named “SoftwareDistribution” since Windows apparently can’t clear and re-download the update contents once they are corrupted. Thus, deleting the contents of this folder will make Windows download the contents again which will fix the problem. To do that, follow the steps below.
  • Open the WinX Menu.
  • From there, open Command Prompt as admin.
  • Then type in the following command – don’t forget to hit Enter right after typing each one of them.
net stop wuauserv net stop bits
  • After entering these commands, it will stop the Windows Update Service and the Background Intelligent Transfer Service.
  • Next, go to the C:/Windows/SoftwareDistribution folder and get rid of all the folders and files thereby tapping the Ctrl + A keys to select them all and then click on Delete. Note that if the files are in use, you won’t be able to delete them.
  • Once all the contents in the Software Distribution folder are deleted, restart your PC and then go back to Command Prompt and input the following commands again.
net start wuauserv net start bits
Since the folder has already been flushed, it will be populated afresh the instant your restart your computer and open Windows Update.

Option 2 – Run the Windows Update Troubleshooter

Running the built-in Windows Update troubleshooter could also help you resolve the Windows Update Error Code 0x80070017. To run it, go to Settings and then select Troubleshoot from the options. From there, click on Windows Update and then click the “Run the troubleshooter” button. After that, follow the next on-screen instructions and you should be good to go. On the other hand, if you got the error code 0x80070017 during a Windows 10 installation, then it’s because of bad media or corruption in ISO. Here are some troubleshooting steps for this kind of situation:

Option a – Try to create Windows 10 ISO media again

In this option, you will have to create a Windows 10 bootable media and use it to install the latest Windows 10 version. Most users reported that this option works and the reason why it does have something to do with the Windows Update client since the Windows Updates downloaded from the regular Windows Update client seem to create issues such as the error 0x80070017. However, issues like this one don’t occur when the very same Windows Updates are downloaded and installed via an ISO file. Take note that when using a Windows ISO file, you will be asked to choose what you want to do with the previous settings and apps. A lot of users opted for the “Not to keep the old Windows settings” option which has resolved the issue. So if you want to keep the previous settings then you must try to update Windows first while keeping the old settings. However, if it doesn’t work, you have to try installing the latest version of Windows without keeping the previous settings.
  • Click this link and then click the Download Tool Now button.
  • Next, click the “Use the tool to create installation media (USB flash drive, DVD, or ISO file)…” option and follow the next given instructions on the screen.
  • Now select the ISO file option in step 5.
  • After that, you should now have an ISO file.
  • Next, go to the location where you’ve downloaded the ISO file.
  • Then right-click on the Windows 10 ISO file and select the Open with the option and then select File Explorer.
  • Now click on “setup.exe” and follow the next instructions that appear on the screen. When asked, you have to select either Nothing (clean install) or Keep personal files only option. Take note that you must not select the “Keep personal files, apps, and Windows settings since it doesn’t really work.

Option b – Run Microsoft’s online troubleshooter

Running Microsoft’s online troubleshooter might also help you fix the Windows update error 0x80070017. This online troubleshooter is known to help in fixing Windows Update errors, it scans your computer for issues that might be causing the problem and then fixes them automatically. If you got the error during System Restore then this means that the files that are being copied from the disk are not making it to the hard drive. To resolve it, here’s what you can do:

Option 1 – Run System Restore in Safe Mode

You might want to run System Restore in Safe Mode and see if it works. Just reboot your PC into Safe Mode and then run System Restore.

Option 2 – Reset Repository

  • Boot your PC into Safe Mode.
  • Then open Command Prompt as admin.
  • Next, type the “net stop winmgmt” command and hit Enter to stop the Windows Management Instrumentation Service.
  • After that, go to C:/Windows/System32/wbem. From there, rename the repository folder to “repository-old”.
  • Restart your computer.
  • After your computer has restarted, open Command Prompt as admin again and then type the “net stop winmgmt” command and hit Enter.
  • Next, type the “winmgmt /resetRepository” and hit Enter to reset Repository.
  • Restart PC and check if System Restore now works.

Option 3 – Try resetting Windows 10

To fix the error 0x80070017, you can try resetting Windows 10. Doing so won’t get rid of any file in your system – instead of erasing all your media files and documents, it only resets all the system settings and files. Simply go to Settings > Recovery. From there click the Get started button under the Reset This PC section.
Read More
Fix Windows Update Error Code 0x8e5e0147
As you already know, the Windows Update mechanism in Windows 10 is a bit complex as it depends on thousands of files and services in order to properly function. There are DLL files and services that support this mechanism’s proper functioning. And so if there is any malfunction with any of these files or services, it will result in some errors when running Windows Update. One of these errors is the error code 0x8e5e0147 which has the following error message: “There was a problem installing some updates, but we’ll try again later. If you keep seeing this and want to search the web or contact support for information, this may help – Error 0x8e5e0147” To fix this error, there are several methods you can try. You can run the Windows Update troubleshooter or reset the Windows Update components manually or clear the SoftwareDistribution folder and install the update manually. You could also reset the Windows Update Agent to default using a command in PowerShell.

Option 1 – Try to run the Windows Update troubleshooter

The first thing you can do to fix the Windows Update error code 0x8e5e0147 is to run the Windows Update Troubleshooter. To run it, go to Settings and then select Troubleshoot from the options. From there, click on Windows Update and then click the “Run the troubleshooter” button. After that, follow the next on-screen instructions and you should be good to go.

Option 2 – Try to reset the Windows Update components

If by any chance that the third option didn’t work, you can also try resetting the Windows Update components as it could also help you resolve the Windows Update error. How? Refer to the following steps:
  • Open Command Prompt with admin privileges.
  • After that, type each one of the following commands and hit Enter after you key in one after the other.
    • net stop wuauserv
    • net stop cryptsvc
    • net stop bits
    • net stop msiserver
Note: The commands you entered will stop the Windows Update components such as Windows Update service, Cryptographic services, BITS and MSI Installer.
  • After disabling WU components, you need to rename both the SoftwareDistribution and Catroot2 folders. To do that, type each one of the following commands below and don’t forget to hit Enter after you type one command after the other.
    • ren C:/Windows/SoftwareDistribution/SoftwareDistribution.old
    • ren C:/Windows/System32/catroot2/Catroot2.old
  • Next, restart the services you’ve stopped by entering another series of commands. Don’t forget to hit Enter after you key in one command after the other.
    • net start wuauserv
    • net start cryptsvc
    • net start bits
    • net start msiserver
  • Close Command Prompt and reboot your PC.

Option 3 – Try downloading and installing the Windows Updates manually

Windows Update error code 0x8e5e0147 might be due to a Windows Update that has failed. So if it is not a feature update and only a cumulative update, you can download the Windows Update and install it manually. But first, you need to find out which update has failed, and to do so, refer to the following steps:
  • Go to Settings and from there go to Update and Security > View Update History.
  • Next, check which particular update has failed. Note that Updates that have failed to install will be displayed under the Status column which has a label of “Failed”.
  • After that, go to the Microsoft Download Center and look for that update using its KB number and once you find it, download and then install it manually.
Note: You can also use the Microsoft Update Catalog, a service from Microsoft that provides a list of software updates that can be distributed over a corporate network. With the help of this service, it can be easier for you to find Microsoft software updates, drivers as well as fixes. Option 4 – Try to reset the Windows Update Agent Since you can’t update the Windows Update Agent on your Windows 10 computer manually, you can try resetting it instead and you can do it using the Reset Windows Update Agent tool which you can download from the official Microsoft website. This tool allows you to:
    • Scan all protected system file and replace the corrupted one’s (sfc /scannow)
    • Scan, detect, and repair corruptions in Windows system image
    • Clean up superseded components
    • Reset Windows Update components
  • Change invalid values in Windows Registry
  • Delete temporary files
Moreover, this tool also allows you to carry out these operations:
  • Open Internet Explorer settings
  • Search for Windows Updates
  • Explorer for local or online solutions
  • Restart your computer
Read More
Fix 0xC03A0005 error in Windows 10
When performing a Windows Backup to the NAS device (backup to a network share) that is running Samba, fails with an error message The backup failed, The version does not support this version of the file format (0xC03A0005). The problem occurs because of a conflict with the VHD file that is created by Windows Backup and is mounted during the process. There are three types of VHD files:
  1. Fixed,
  2. Expandable
  3. Differencing
If the VHD file is a sparse file that is not supported by the native VHD driver, the mounting will fail, and you will get this error. An example VHD file is one that keeps expanding depending on the backup size. The problem occurs only in the case of  File Level backup (file/folders in a volume) but not on the block level backup as the vhd file is never mounted. However, in the case of File Level Backup, the vhd is mounted, created by Windows Backup, which does not support the mounting of sparse files.

The solution is to use Strict Allocate: option in the smb.conf file

Login to SMB using SSH. Open the configuration file using the VI editor located at /etc/samba/smb.conf. If the option is not there, you can manually add strict allocate = yes which will make sure there are no sparse file that is created.
Read More
1 2 3 171
Logo
Copyright © 2023, ErrorTools. All Rights Reserved
Trademark: Microsoft Windows logos are registered trademarks of Microsoft. Disclaimer: ErrorTools.com is not affiliated with Microsoft, nor claims direct affiliation.
The information on this page is provided for information purposes only.
DMCA.com Protection Status