Building your skill set could be a very important thing, especially in today’s world, and what’s the best way other than online learning classes. You are not exposing yourself to pandemics, staying safe in the warmth of your home and most of the courses are free.
Presented here are sites that I believe will and can help you with your goal of learning desired material whatever that might be. Sites are listed in no particular order with a description of what each has to offer.
Coursera was one of the pioneers when it comes to college education online. When it started all courses were free and offered certificates if the taker has done tasks with a passing grade. Today not everything is free but still, there are tons of free courses that can help you to learn something new and to advance in your work or hobby.
Google is using the Coursera platform to deliver its courses to the audience and besides google a lot of academic professors from Princeton, Stanford, John Hopkins and many more are presently offering their course material.
edX has evolved from MITx, MIT’s free initiative to place some free academic lectures from its classrooms free into the world. Since it was rebranded into edX it started including other big university names like Berkeley, University of Texas System, Harvard, and many more.
Since its infant days, edX has expanded and included many areas that it offers coursework from arts to science. Certificated today are mostly not free but course videos are, so if you care to learn and not wave certificates around this is a great place to do it.
Udemy has a little different approach to course material than previously mentioned websites. Teachers on Udemy are mostly people that are working in a given field. Programmers will teach programming, fitness instructors will teach training, etc.
There are vas variety of topics even on lifestyle, hobbies even gaming to more serious ones like software developing hardware, etc.
There are free courses but mostly are one-time purchases with unlimited access to course material and with frequent discounts udemy might be a good place to look if you can find anything interesting.
Alison is kind of Udemy if we are talking about course material and who is teaching, the difference however is that it has more free content and it is one of the rare websites on this list that has Language courses.
Courses vary from beginner level to more advanced ones.
Udacity was also one of the earlier websites to offer free courses, in today’s world it still has free material but there is also paying one.
The big difference from other competitors is that Udacity focuses mostly on programming, data science, and web development and it is very strong in this field. There are no courses about art. Music or similar, mostly IT stuff is covered here.
If this is something that interests you, make a free account and give it a go.
Codecademy is a website mainly focused on teaching you how to code. Pro plan is there but there are a lot of basic and free courses on the mentioned subject.
The curriculum is really wide covering Python, R, Java, JavaScript, SQL, Ruby, C#, C++, Swift, PHP, HTML, CSS and more so I am sure that if you are interested in coding this would be a pretty good place to find things.
Besides pure language coding courses site offers also, Cybersecurity, Web design, Data science, web development, Game Development, Mobile Development, and many more courses on provided subjects.
Academic Earth has been built with one simple premise: Everyone deserves access to education.
Lead by this kind of mindset on Academic Earth you will find well, academic courses similar to ones found on edX and Coursera, but from mentioned sites here all courses are free and you will find only academic ones, there are no entrepreneur or expert courses here, just pure academic ones.
If you wish to see and learn something the way it is taught in Harvard, Berkeley, MIT, etc this is the place for you.
Khan academy is completely free and it is offering courses matching certain grades for children. It is offering courses for all 8 years of elementary school, math courses for high school and college with some coursework on topics like science, arts & humanities, reading, life skills, etc.
Despite not being on the same level as some university courses presented on other mentioned websites Khan Academy is a good place to learn a lot of basic skills that you could build upon later.
Conclusion
I hope that I have helped you in some way to expand your skill set and learn something new with provided sources and I hope to see you again on errortools.com
Stumbling upon downloader.dll not found error is not pleasant to experience, usually, it means that desired application can not be started. There could be several reasons why this error happens from user mistakes, corrupted files, bad installation, and even bad RAM memory. Whatever the reason might be solutions provided are the same for all and offer a fix to this issue.
it is advisable to follow provided solutions from start to finish not skipping any one of them since they are tailored to address the simplest solutions and issues and move toward more complicated ones.
Reinstall application
If you are receiving Downloader.dll not found when trying to run just a single certain application, reinstall the application, there is the possibility that the application has somehow corrupted downloader.dll during the installation process. Reinstalling might fix the problem.
Run SFC scan
SFC scan is the tool meant to scan all files and fix any corrupted ones. To run this tool, open the command prompt in administrator mode by right-clicking on the windows start button and then left-clicking on the command prompt (admin). When you are in command prompt type in SFC /scannow and let the whole process finish.
Update device driver
If previous steps have not provided results, go to device manager and visually check is there a device with an exclamation or other sign next to it, if there is, right-click on it and choose update driver.
Google Chrome, Microsoft Edge, Mozilla Firefox are some of the leading browsers commonly used these days and they all include an embedded copy of the Adobe Flash Player. So if you are running a Windows 10 PC then you can have up to 4 copies of Adobe Flash Player; one for Microsoft Edge, one for Internet Explorer, one for Opera, one for Firefox. You might also experience cases wherein two flash players are simultaneously running, i.e. one installed in Chrome as a single plug-in and another one installed in Windows, trying to parse the data. And in such cases, you might consider removing or uninstalling one of the versions of Adobe Flash Player. If you do, then you’ve come to the right place as this post will guide you in disabling the embedded Adobe Flash Player in Windows 10.
Before you get started in removing the Adobe Flash Player in Internet Explorer & Microsoft Edge browser, you need to sign in with your administrative account even if don’t use it or set it as the default browser. After you’ve signed in to your administrative account, follow the steps below.
Step 1: Open your browser, if you are using Edge then open it.
Step 2: After opening your browser, go to its Settings and select Advanced Settings.
Step 3: Next, Move the slider against the “Use Adobe Flash Player” option to off.
Step 4: After that, open File Explorer and navigate to this address, “C:/Windows/servicingPackages” and from there, check on the following entries:
Adobe-Flash-For-Windows-Package~31bf3856ad364e35~amd64….(version number of the Flash Player)
Adobe-Flash-For-Windows-WOW64-Package~31bf3856ad364e35~amd64….(version number of the Flash player #)
Adobe-Flash-For-Windows-onecoreuap-Package~31bf3856ad364e35~amd64…(version number of the Flash Player)
Step 5: Take note of all the listed package names of Adobe Flash Player and tap the Win + R keys to open the Run dialog box and type “Regedit” in the field and hit Enter to open the Registry Editor.
Step 6: Next, right-click on the three keys which have the name of the packages you listed and select “Permissions” one after the other.
Step 7: Then check “Allow” to enable full control for the Administrators account and click OK to save the changes made.
Step 8: Select the three keys one after the other and select Visibility DWORD located on the right side and then right-click on Visibility and change the Value data from 2 to 1.
Step 9: Go over the same procedures again for the other keys. Once you’ve completed then you should now be able to remove packages using the DISM tool.
Step 10: Simply open an elevated Command Prompt and execute the following commands:
Keep in mind that the numbers at the end could be different on your computer due to the difference of version number so you have to use the numbers on your system. After that, reboot your computer.
Windows 11 has been rolling out for a while now so many PC users ask the question is it wise and good to upgrade your Operating System to the latest Microsoft incarnation.
No
Thank you for reading, cya tomorrow in next article.
Jokes aside, I truly believe that choosing to upgrade your System to Windows 11 at this point in time is a bad decision and I will explain why I do believe it.
Reasons to upgrade to the new OS
First of all, let me say what is good in Windows 11 and provide reasons why you should upgrade your computer.
The new fancy look made for modern computers.
New Windows new look, Microsoft has tried their best to bring a new modern look to its flagship operating system and I must say that they have managed it. I could argue that it is a little bit late since Apple had this kind of look in years but hey, better late than never I guess.
Increased security
This point is very valid but it will play a role only if you have all system requirements including TPM 2.0. If that is the case new security features of OS are really well done and are perhaps one thing that might nudge some people in installing W11 on their system.
New settings app
The New and redesigned settings app inside Windows 11 is really great and it provides a great workflow and easy management of system settings. This is not some radical change but it will save time and make life much easier.
It is better suited to the newest hardware
Windows 11 was made with the newest hardware in mind and its performances on it are great so if you are punching the latest tech this reason is sufficient to make a switch, however, if you are still on an older system you will not gain much by switching.
Reasons to avoid Windows 11 for now
Almost just a visual update to Windows 10
Some features of Windows 11 are great but they are not plenty of them to justify a new number and new version of OS. Considering what we really got new under the hood Windows 11 could have been just a patch and update to Windows 10 since the architecture is the same.
Bugs
Each day there are new bugs reporting for Windows 11, most of them are at the moment unsolvable and are caused because hardware manufacturers' drivers and software overall is not W11 ready. This hinders the stability of some systems and introduces headaches to others.
Runs poorly on unsupported hardware
Strange behavior has been reported on some older systems, granted systems are not officially supported but the point is OS is simply not working at the top of its game on older hardware.
No updates on non supported systems
Officially stated if you install Windows 11 on non-supported hardware you will not get any security updated on in. This is a deal-breaker as far as I am concerned.
It is still under development
When Windows 11 was released, Android native apps were not working on it, it later came with an update, this is just one example but there are more features that were promised but are not delivered on release and constant updates are fixing these things. It is obvious that Windows 11 is still under active development and not the final product that was promised.
Microsoft’s edge pushing
And not just edge, some other things as well but most notably is edge pushing to borders they are risking lawsuit similar as they did in the past pushing and disabling any other browser except internet explorer.
Conclusion
Firstly I want to point that this is my personal opinion but going through facts and taking into account the current state of Windows 11, at this point, it is not worth making a switch. I am sure that in time it will become a system that will be worth upgrading to but until that time comes, my advice would be to stay with Windows 10.
If you suddenly encounter a Blue Screen error that points out to either the mfewfpk.sys and epfwwfp.sys files, then this post might help. Both of these files are created by third-party software. The mfewfpk.sys file is created by the McAfee security software while the epfwwfp.sys is created by the ESET Antivirus. These files are residual files and sometimes it blocks upgrading Windows 10.
Aside from blocking Windows 10 upgrade/update, these files can also cause a Blue Screen error after an upgrade which leaves your Windows 10 computer useless. When you get a Blue Screen error caused by any of these files, you will see an accompanying error message that states, “DRIVER IRQL NOT LESS OR EQUAL”. To fix this Blue Screen error, you can check out the suggestions laid out below but before you do that, you need to create a System Restore point first as it can help you undo any unwanted changes. In addition, make sure to also boot your computer into Safe Mode with Networking before you troubleshoot.
Option 1 – Try to remove the epfwwfp.sys file
You can try to remove the epfwwfp.sys file using Command Prompt. To do so, refer to the following steps:
Right-click on the Start button and click on Command Prompt (Admin) from the menu to open Command Prompt with admin privileges.
Next, type the following command and hit Enter to delete the epfwwfp.sys file:
DEL /F /S /Q /A “%systemroot%System32driversepfwwfp.sys”
After the scan is completed, restart your computer and see if it fixed the Blue Screen error.
Note: You can also use the ESET AV Remover tool to uninstall Eset security software to remove the epfwwfp.sys file.
Option 2 – Try to remove the mfewfpk.sys file
The same with the first option, you can remove the mfewfpk.sys file using CMD.
First, right-click on the Start button and click on Command Prompt (Admin) from the menu to open Command Prompt with admin privileges.
After, type the following command and hit Enter to delete the epfwwfp.sys file:
DEL /F /S /Q /A “%systemroot%System32driversmfewfpk.sys”
Once the scan is completed, restart your computer and see if it fixed the Stop error.
Note: You also have the option to remove the mfewfpk.sys file using McAfee Product Removal tool to uninstall the McAfee security software. All you have to do is download the McAfee Product Removal tool and run it and then follow the onscreen instructions to install it. Once it is installed, click on Next. After you select the radio button to agree to the terms of use, click on Next once again. Finally, restart your computer and check if it is able to resolve the problem or not.
Option 3 – Run the Blue Screen Troubleshooter
Troubleshooting Blue Screen of Death errors wouldn’t be complete without the Blue Screen troubleshooter. As you know, it is a built-in tool in Windows 10 that helps users in fixing BSOD errors. It can be found on the Settings Troubleshooters page. To use it, refer to these steps:
Tap the Win + I keys to open the Settings panel.
Then go to Update & Security > Troubleshoot.
From there, look for the option called “Blue Screen” on your right-hand side and then click the “Run the troubleshooter” button to run the Blue Screen Troubleshooter and then follow the next on-screen options. Note that you might have to boot your PC into Safe Mode.
Option 4 – Try running the DISM tool
You can try running the Deployment Imaging and Servicing Management or DISM tool to fix the Blue Screen error. Using this built-in tool, you have various options such as the “/ScanHealth”, “/CheckHealth”, and “/RestoreHealth”.
Open the Command Prompt with admin privileges.
Then type in the following commands and make sure to hit Enter right after you type each one of them:
Dism /Online /Cleanup-Image /CheckHealth
Dism /Online /Cleanup-Image /ScanHealth
exe /Online /Cleanup-image /Restorehealth
Do not close the window if the process takes a while as it will probably take a few minutes to finish.
As you know, Excel sheet is frequently acclaimed as one of the most useful software that allows users to create spreadsheets, crunch numbers as well as prepare a business report. Usually, tapping the arrow keys to move from one cell to another. However, there are times when you might experience trouble in tapping them – for instance, they won’t work when you tap them.
This kind of problem can be quite frustrating since no matter what you do, especially when you tap the arrow keys, instead of a single cell, it moves the entire spreadsheet. If you are one of the users who experience this problem, worry no more for this post will guide you on what you can do to fix it.
When arrow keys won’t function as intended in Excel spreadsheets, it could be due to unintended behavior of the Scroll key or it could be related to some issues with the keyboard driver. Whatever the cause is, here are some suggestions you can check out to fix it.
Option 1 – Try to disable the Scroll Lock
The first thing you can do to fix this problem with arrow keys is to disable the Scroll Lock. Although doing this is easy, newer laptops don’t actually come with it so if your keyboard does not come with a scroll key, all you have to do is tap the Fn key and disable Scroll Lock. Aside from that, you could also use the on-screen keyboard to turn off the Scroll Lock. You will see its status on the Excel sheet which will help you to double-check. Moreover, you could also tap the Shift + F14 keys to toggle off the Scroll Lock. To use the on-screen keyboard to turn off Scroll Lock, follow the steps below.
Tap the Windows key and type “on-screen keyboard” and then tap Enter.
Once the on-screen keyboard is opened, you should see that the Scroll Lock is on the “On” position since the ScrLk keys are in blue.
Like pointed out earlier, you can utilize the Scroll Lock indicator located in the status bar as well as disable or enable the scroll key by using this feature on Microsoft Excel.
Option 2 – Try turning on the Sticky key
If disabling the Scroll Lock did not fix the problem, you can try turning on the Sticky Key instead. A lot of users reported that this option fixed the problem for them. So you should try to turn on the Sticky key and to do that, follow the steps below.
First, type “control panel” in the Start Search and click on Control Panel from the search results.
Next, select the “Turn On Sticky Keys” option and click on OK.
After that, go back and uncheck the “Turn On Sticky Keys” option. This should fix the malfunctioning arrow keys on Excel.
Option 3 – Try running the Hardware and Devices Troubleshooter
The first thing you can do to fix the problem is by running the Hardware Troubleshooter. Although it won’t make much of a difference, there’s still a possibility that it could automatically fix the problem with these function keys. To use it, refer to these steps:
The first thing you need to do is click on Start and then on the gear-like icon to pull up the window for Settings.
After opening Settings, look for the Update and Security option and select it.
From there, go to the Troubleshoot option located on the left-hand side of the list.
Next, select Hardware and Devices from the list and open the Troubleshooter and run it. Once it is doing its job, wait for it to complete the process and then restart the system.
After the system restarts, check if the problem’s now fixed. If not, refer to the next option given below.
Option 4 – Update the keyboard driver
You can also update the keyboard driver to fix the problem. There are cases when an outdated or corrupted driver can fix the problem. To do so, follow the steps below.
Tap the Win + R keys to open the Run dialog box.
Then type “devmgmt.msc” in the field and hit Enter to open the Device Manager.
From there, look for the keyboard driver and click on it.
Next, right-click on the keyboard driver and select the Update driver option.
After that, click the “Search automatically for updated driver software” option to proceed.
Option 5 – Reinstall the keyboard driver
If updating the keyboard driver didn’t help, then you might want to reinstall it. How? Follow the steps below.
Tap the Win + R keys to launch Run.
Type in MSC into the box and tap Enter or click OK to open the Device Manager.
After that, a list of device drivers will be displayed. Look for the keyboard driver, right-click on it and then select “Uninstall device”.
After that, unplug the device and restart your PC.
Then plug your device back in. Assuming your device is connected to your PC, open the Device Manager again.
Next, click on the Action button and click the Scan for hardware changes button. That should fix the problem
Note: You could also completely uninstall the driver and go directly to the manufacturer’s website and download the latest driver for your hardware and then install it.
What software are you using to keep your information and all your files and memories safe?
None? Yikes. Let’s hope no damage has been done to your data yet then. Because with how the digital world has evolved, your data might be getting leaked and you have no idea.
Why do you need to invest in security software?
There’s really no good excuse not to purchase a quality platform for PC protection. Especially since top security solutions are available at such affordable prices nowadays, your wallet would barely even notice it.
At this point, only people who barely use their PCs and have zero sensitive information on them can get away with simply using the built-in Windows 10/11 security software. But we guarantee that those people are extremely hard to find and that you’re not one of them, and here’s why.
Even if you don’t use your computer for things that are very obviously sensitive, such as internet banking, you still have some personal data at risk of being stolen. How so? Well, think about the data you enter into your social media profiles, for example. How devastating would it be if somebody got a hold of any of it? Yep, that’s what we thought.
Credit: FLY:D on Unsplash
In the hands of a skilled cybercriminal, your phone number alone could put you at risk of scams, ransomware, identity theft and more. Also think about the stuff you share in texts and social media chats. Think about the websites you visit and how many times you may have accidentally clicked on an ad, which could very well contain malicious software. Those all seem harmless until someone’s actually used them against you.
Now imagine the dangers involved when you actually store truly confidential data on your PC and browsers. Sends shivers down your spine, doesn’t it?
In the case of a successful cyberattack of whatever type (virus, phishing, worms, etc.), there’s so much that is at stake. Businesses/legal persons will suffer from financial loss and damaged reputation, at the very least. Natural persons may be threatened or exploited, get their banking or medical information and even their identity stolen, etc. And that’s just the tip of the iceberg.
These are our biggest reasons for investing in Windows PC protection software:
Cyberthreats are constantly evolving to the point where built-in or free software won’t cut it anymore.
Those working remotely can have peace of mind knowing both personal and business data is completely secure.
Businesses using top security solutions ensure their customers trust them.
Data breaches are a pain in the you-know-what to handle. Fighting a cyberattack and going back to normal is a demanding process, and not to mention the stress it’ll cause. We’d rather prevent all that by using trustworthy security products!
It helps parents worry a little less about their children’s safety in the online world.
Added bonus: with most products, you get an ad-free browsing experience!
Obviously, there are a lot more reasons to get your PC secured. But we think you get it. So let’s cut to the chase and take a look at our 6 favorite protection solutions and the wonders they can do for you.
*Note that in this article we’re looking at products primarily suited for households and home offices, some for small businesses. No enterprise solutions will make the list today, but stay tuned for a future article on those.
Top 6 best PC protection solutions
1. Bitdefender Total & Internet Security\
One of the biggest security product vendors out there, Bitdefender offers several awesome solutions. We want to introduce two of our favorites, Bitdefender Total Security and Bitdefender Internet Security.
Bitdefender Total Security is great for both households and smaller offices. You can choose to protect 5 or 10 devices, and not necessarily just Windows devices. It also works for macOS, Android and iOS. It offers a range of powerful features, such as:
Real-time data protection
Webcam and microphone protection
Device optimization options
Anti-phishing/-fraud/-spam technology
Ransomware protection
Anti-loss and anti-theft tools
VPN and privacy firewall
Anti-tracking technology
Parental controls
24/7 support
Bitdefender Internet Security shares almost all of these features, but there are a few important differences to note. Unlike Total Security, Internet Security has more options in terms of the number of protected devices: 1, 3, 5 or 10. However it’s only compatible with the Windows platform and it doesn’t offer device optimization tools or anti-theft options. Whether or not this is a deal-breaker depends on your needs alone - we still find it a great security tool.
Credit: Firmbee.com on Unsplash
2. ESET Internet Security
An award-winning Windows security product, ESET Internet Security is essential on this list. It has an outstanding protection rate of 99.9% and a range of amazing options you’ll definitely want to make use of. It can be installed on up to 10 devices, making it an awesome tool for your household, home office or a small business. It’s also compatible with macOS and Android.
These are ESET Internet Security’s best features:
Protection against ransomware and spyware
Protection against malware specifically designed to avoid detection
In-depth scans when the computer is not in use
Firewall to prevent unauthorized access to your PC
Anti-spam tool
Anti-phishing and botnet protection technologies
Tool to scan your router and smart devices for vulnerabilities
Special browser for secure internet banking
Parental controls
Prevention of unauthorized webcam access
If you ask us, ESET has it all!
Credit: rupixen.com on Unsplash
3. Kaspersky Total & Internet Security
Having a deja vu? Didn’t you just read Total Security and Internet Security somewhere? Oh, that’s right - the first entry on our list! But here we’re talking about Kaspersky, a vendor you’ve also definitely heard about before.
Just like Bitdefender, Kaspersky is another one of those renowned names in the cybersecurity world that always make it to every ‘best of’ list. And for good reason - its products really fulfill their purpose. So let’s take a closer look at the two we chose.
These are the features both Kaspersky Total Security and Kaspersky Internet Security have in common:
Real-time virus and spyware blocking
Webcam protection
Wi-Fi security notifications
Advanced identity theft protection
Free technical support on several channels
Remote security management
Multiple devices (up to 10)
The main difference between Kaspersky Total Security and Internet Security is that the former offers more capabilities. These are the features KTS offers that KIS does not:
System cleanup
File shredding
Password management
Data backup and encryption
Both are excellent security tools, though we do prefer KTS a little more because of these additional options.
4. Norton 360 Deluxe
Of course one of the industry-leading solutions makes the list. Norton 360 Deluxe can protect up to 5 devices, be it Windows, iOS, macOS or Android. It’s worth noting that its features are best developed for Windows. Here’s what you get with Norton 360 Deluxe:
Protection against viruses, hackers, malware
100% virus protection promise
VPN included for all devices
Unlimited VPN on Windows
Password manager
Parental controls
So is there anything aside from these standard protection features that makes it such a favorite among us techies? Let us tell you! Norton added a little bit of spice here with two really powerful capabilities. The Deluxe product offers 50GB of cloud backup and dark web monitoring. The latter means the software notifies you if any of your personal information is found on the dark web, which helps protect you against identity theft.
Credit: Luke Peters on Unsplash
5. McAfee Antivirus
Don’t be misled by the name of this product. Antivirus software may have started as protection against viruses only, but it’s developed quite a lot. The name simply stuck. All that to say that McAfee Antivirus - another award-winning security solution - protects you against several different threats.
The basic and essential plan allow 1 and 5 devices respectively, while McAfee+ Premium and Advanced work on an unlimited number of devices. The latter two also offer more capabilities, as you can imagine. Here’s what you can expect from all of them:
Secure unlimited VPN
File shredder to delete sensitive files completely
Ultimate safety while browsing
Protection against hackers
100% virus protection promise
Advanced firewall to block dangerous traffic
Online support from specialists
Protection score (shows how safe you are and detects vulnerabilities)
Identity monitoring (notifies you if any of your information is on the dark web)
Password management
Unlike the previous products, McAfee Antivirus does not offer parental controls. Otherwise it’s a pretty strong and comprehensive protection tool and might just be the right choice for you!
6. Trend Micro Maximum Security
Last but definitely not least, we’ve got Maximum Security by Trend Micro. And yes, you guessed it, Trend Micro is also an award winner in terms of cybersecurity. Its products have been recognized as industry-leading security solutions by AV-Test since 2003. Among all its fantastic solutions, our favorite for households or small offices is Maximum Security.
You can use Trend Micro Maximum Security to protect 3-5 devices for a year or two years before needing to renew your license. Aside from Windows, it’s compatible with iOS, Android, Mac and Chromebook devices. Here’s what you can expect from this protection software:
Powerful malware protection
Phishing detection and prevention (email)
Password management and protection
Maximum security for online banking and shopping
System optimization
Social media privacy protection
Parental controls
24/7 technical support
No notifications during gaming
It’s truly one of the most effective platforms out there dedicated to protecting your digital life. Using this product, ransomware, identity thieves and malicious websites don’t stand a chance.
The bottom line
If you’ve made it all the way here, congratulations, you’ve made the right choice: to invest in securing your valuable data! Now the question is: which one of these 6 awesome antivirus/antimalware products to select?
The paradox of choice is a very real thing - we feel you. As mentioned, it comes down to what your specific needs are. So before you go ahead and purchase your security software, make sure to explore all options.
And if you really can’t handle the decision-making anxiety, feel free to reach out. We’ll happily assist you in finding the right product to keep your digital life secure!
As you know, the Graphics Card in a computer is one of the important components in an operating system as they are responsible for rendering various objects in your computer. However, there are cases when the performance of this rendering can degrade and your computer can trigger a VIDEO_SCHEDULER_INTERNAL_ERROR Blue Screen of Death error instead.
The VIDEO_SCHEDULER_INTERNAL_ERROR bug check has a value of 0x00000119 which means that the video scheduler has detected a fatal violation in your computer. Before you troubleshoot the problem, you might want to perform System Restore first as it might help you fix the Stop error. To perform System Restore, refer to these steps:
First, press the Win + R keys to open the Run dialog box.
After that, type in “sysdm.cpl” in the field and tap Enter.
Next, go to the System Protection tab then click the System Restore button. This will open a new window where you have to select your preferred System Restore point.
After that, follow the on-screen instructions to finish the process and then restart your computer and check if the Stop error is fixed or not.
If the VIDEO_SCHEDULER_INTERNAL_ERROR BSOD error is still not fixed after System Restore, then follow the given options below to further troubleshoot the problem.
Option 1 – Try to manually check the Graphics Card hardware
You might also want to check the physical status of your Graphics card and you can do this by disconnecting the Graphics card or any other external device connected to your computer. Once you’ve removed the external device, check it for any damages. If there’s none, connect it back to your computer and check if the VIDEO_SCHEDULER_INTERNAL_ERROR Blue Screen error is fixed or not.
Option 2 – Try removing hardware or drivers that you’ve installed recently
If you have recently installed some hardware or drivers, you might want to disable or remove them since external devices are proven to be one of the factors that trigger Blue Screen errors like VIDEO_SCHEDULER_INTERNAL_ERROR. All you have to do is physically disconnect any external devices that are connected to your computer and then check if it fixes the BSOD error or not.
Option 3 – Try to rollback, update, or disable the Graphics card drivers
Since the VIDEO_SCHEDULER_INTERNAL_ERROR Blue Screen error has something to do with Graphics card drivers, you can either roll back, update or disable them depending on your preference in order to resolve the error.
First, boot your computer into Safe Mode.
After that, tap the Win + R keys to launch Run.
Type in devmgmt.msc into the box and tap Enter or click OK to open the Device Manager.
After that, a list of device drivers will be displayed. From there, look for the Display Adapters and click on them.
After that, right-click on each entry under the Display Adapters and select the “Uninstall Device” option from the menu.
Now restart your computer.
After restarting your computer, go to the Settings app and Check for Updates in the Windows Update section.
Note: You also have the option to go directly to the website of your graphics card manufacturers like NVIDIA, Intel, or AMD and go to the section called Drivers then check if there’s a new available update – if there is, download and install it.
Option 4 – Uninstall any faulty drivers
You can also uninstall any faulty drivers via Device Manager. How? Refer to these steps:
Tap the Win + R keys to launch the Run dialog box.
Then type “devmgmt.msc” in the field and tap Enter to open the Device Manager.
From there, look for any faulty drivers. You can identify them easily as they will be marked with a yellow exclamation point. And then check which entries would not affect the normal functioning of your PC.
Now click on the entries of every faulty driver and click on the Uninstall option.
Once you’ve uninstalled them, restart your computer to allow your computer to reinstall the faulty drivers you’ve just removed.
Option 5 – Run System File Checker at boot time
Once you get to the Welcome Screen part, click on Next.
Afterward, click on the Repair your computer option located on the bottom-left part of the window.
Then click on Troubleshoot.
Next, select the Advanced Options and then Command Prompt.
After opening Command Prompt, type the “sfc /scannow” command and hit Enter to run the System File Checker scan.
Wait until the process is completed and type “exit” to close Command Prompt and then restart your computer to successfully apply the changes made.
Option 6 – Try to run the Blue Screen Troubleshooter
As you know, the Blue Screen troubleshooter is a built-in tool in Windows 10 that helps users in fixing BSOD errors like the VIDEO_SCHEDULER_INTERNAL_ERROR error. It can be found in the Settings Troubleshooters page. To use it, refer to these steps:
Tap the Win + I keys to open the Settings panel.
Then go to Update & Security > Troubleshoot.
From there, look for the option called “Blue Screen” on your right-hand side and then click the “Run the troubleshooter” button to run the Blue Screen Troubleshooter and then follow the next on-screen options. Note that you might have to boot your PC into Safe Mode.
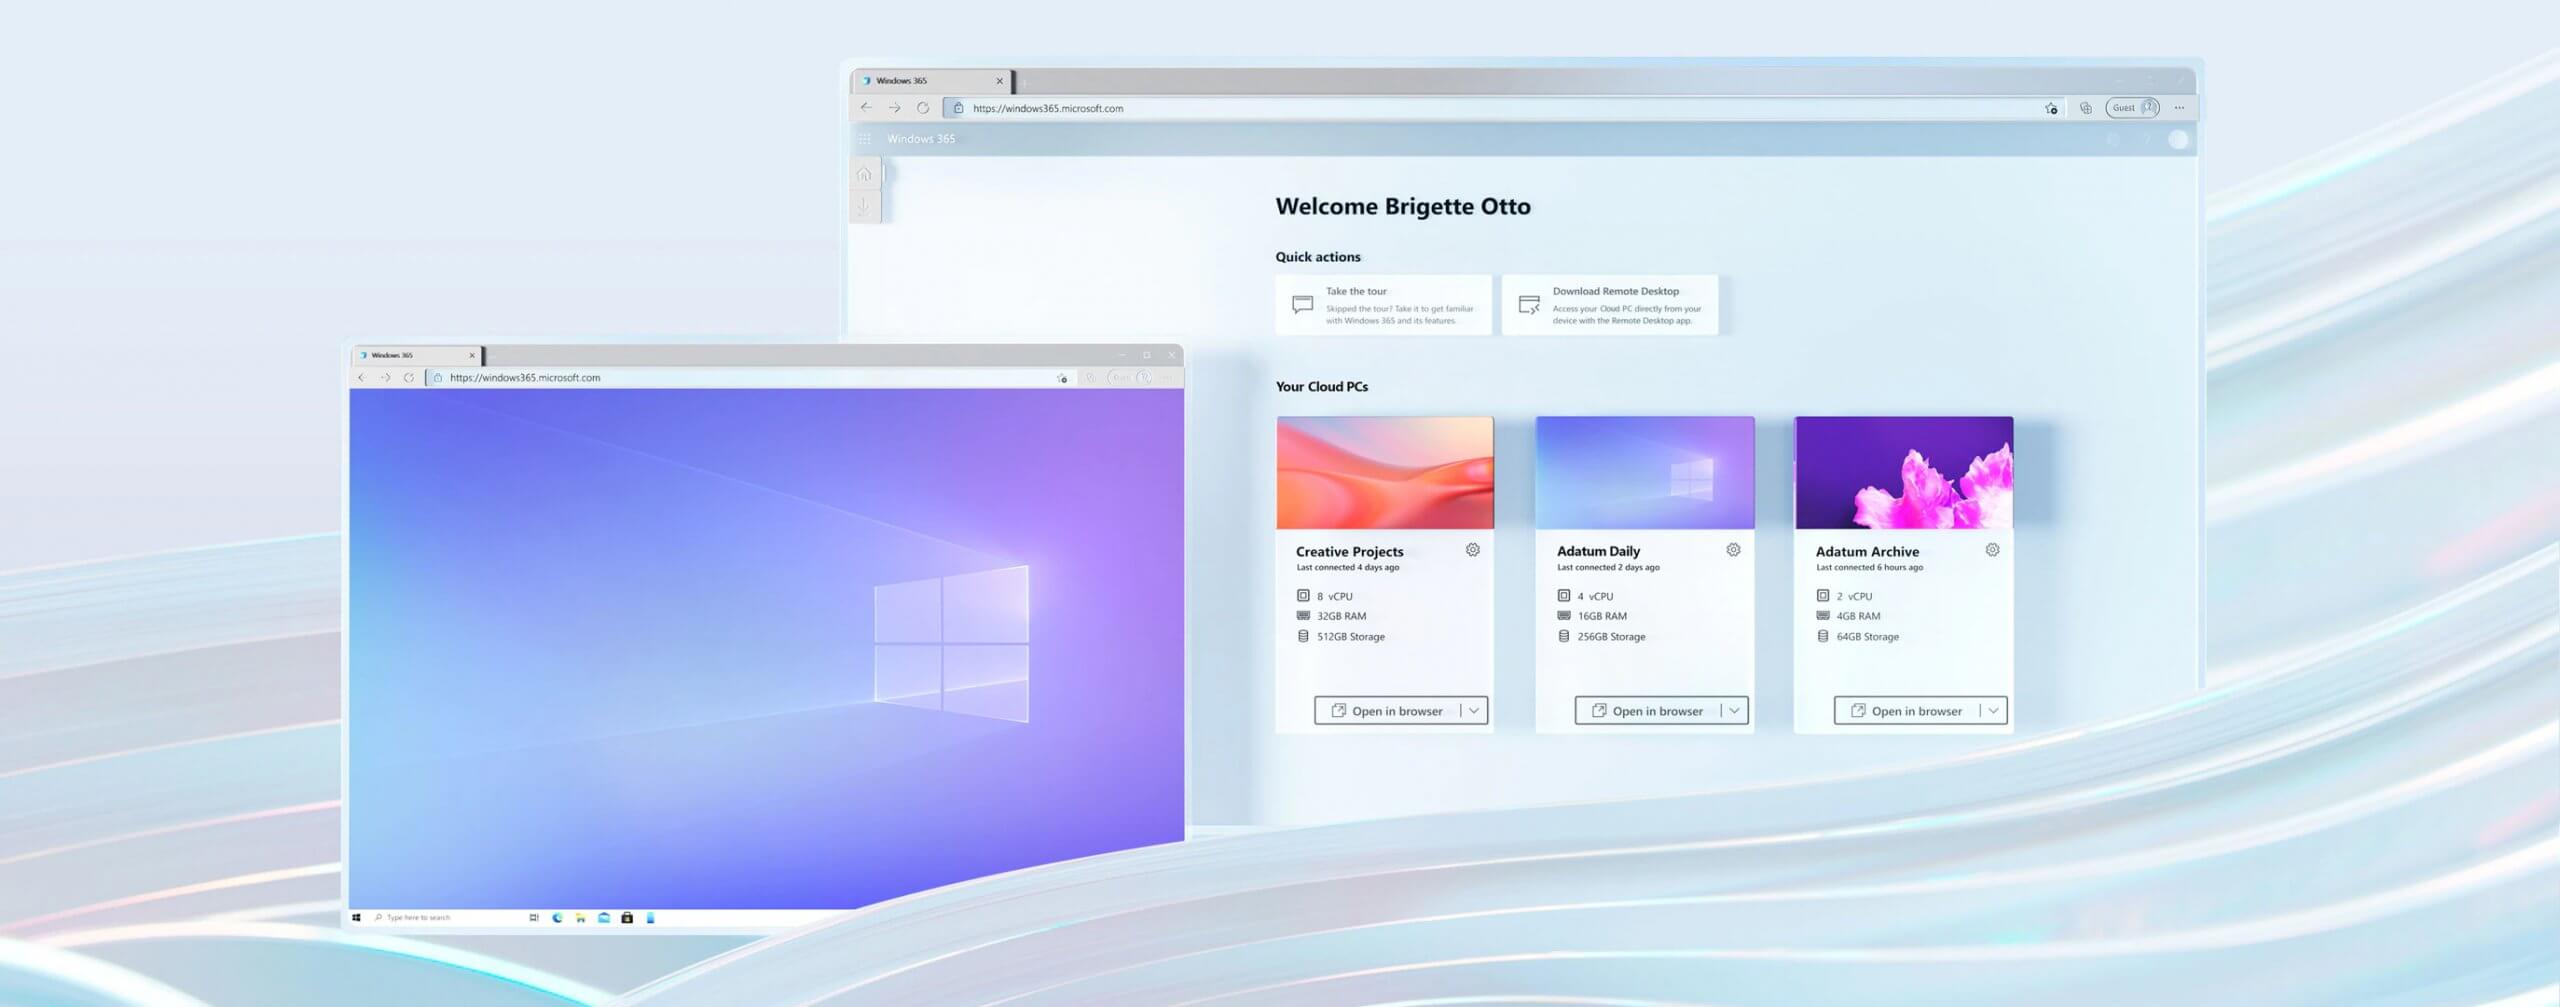
Microsoft has announced Windows 365, a new cloud-based operating system aimed mainly at businesses of all sizes.
Just after Windows 11 announcement and presentation, we are seeing another Windows announcement from Microsoft. Dive into the following text in order to find out what exactly is new Windows 365, its role in today's IT world, and do you need it?
What is Windows 365 and when it is coming out?
Windows 365 is planned to be released this year (2021) on August 2nd. It is the first Microsoft cloud-based operating system meaning that OS itself will be installed on the cloud server and it will be accessed by the user via a web browser.
Essentially you are accessing a remote PC with Windows on it, you can install whatever Windows application you want and use it as it was on your computer. When you disconnect from the cloud computing and reconnect again from the same or another device you will continue exactly where you left off.
Cloud PC will remember the state it was left off and will greet you in that same state once it is awakened again. This of course offers some great benefits like moving from laptop to desktop and continuing exactly where you left off.
How can I access Windows 365?
Any device which has a web browser will be able to access Windows 365 making it a really great solution for business on the move or for anyone who switches devices during the day.
That being said it is clear to see that Windows 365 can be accessed via Linux, macOS, iOS, Android, or any other operating system on any computer, tablet or phone.
Who is this OS made for?
Microsoft’s general idea is that Windows 365 is primarily made for business which in their minds can benefit most out of it.
So far it is not made for a single user although there is a possibility that even a one-man business can subscribe and create accounts for it.
Price and technical characteristic
Microsoft will bill Windows 365 on a per-user, per-month basis. In other words, businesses will pay a fixed amount per employee every month.
There will be two tiers: Windows 365 Business and Windows 365 Enterprise. Microsoft also said it will offer different performance tiers. Businesses can choose to pay for more CPU, RAM, and storage resources for certain cloud PCs depending on their needs.
Microsoft told me the smallest configuration would be one CPU, 2GB of RAM, and 64GB of storage. The largest will be eight CPUs, 32GB of RAM, and 512GB of storage.
After a business has chosen its plan tier and performance options, that business will pay a fixed amount every month. This is unlike Azure Virtual Desktop, which Windows 365 is built on. With Azure Virtual Desktop, companies pay on a usage model, depending on how much the remote system is used every month.
Conclusion
Windows 365 is around the corner and if you are a business no matter small or large with the need for software on the go, Windows 365 might be a worthwhile investment and a great asset to your business.
Virtual Reality is slowly becoming standard in gaming. More and more affordable headsets are coming out lowering entry prices and making them affordable for all. But in a sea of new VR headsets, it is important to at least purchase a decent one that will perform nicely and hopefully last longer.
Therefore in today’s article, we will address some of the best options currently available on the market,
Oculus Quest 2
With its Rift model, Oculus set itself as a big player in VR. Now the company is slowly bowing out of the dedicated, tethered VR headset with its latest Quest 2 designed to primarily be a standalone headset.
In case you do not know, tethered headset means that the headset itself is connected to your PC and is using its power to drive your VR experience.
Now technical specifications of Quest 2 are pretty OK and it can drive stuff pretty decently and if you want you can purchase the dedicated cable to connect it to your PC for the full experience of games requiring more capable hardware.
Oculus Quest 2 is the cheapest headset on this list and with its stable performance, is highly recommended.
Valve Index VR
Although the headset itself is nothing revolutionary or special its controllers are. They can track individual finger movements, making games (that take advantage of them) much more immersive than the standard trigger grips on other controllers.
The Index's higher refresh rate makes for smoother action, as well, which is another nice bonus. If you already have an HTC Vive or Vive Cosmos Elite, and their base stations (not the regular Cosmos), you can buy only the controllers.
Sony PlayStation VR
The PlayStation VR is compelling thanks to Sony backing its development, plus the PlayStation 4's affordability and availability compared with gaming PCs. All you need is the headset, a PlayStation 4, and a PlayStation Camera (now included with most PlayStation VR bundles).
Not really the best of the bunch but still one of the top ones for console gaming. Sony is working on a new PlayStation VR system for the PlayStation 5, with redesigned controllers. The new headset hasn't been revealed yet, but the company has released a preview of the new controllers.
HP Reverb G2 VR
HP headset is one which you get if you want the best image quality in VR headset, sadly controllers did not follow the same quality of headset itself. But this is still a pretty decent headset overall and worth the purchase.
HTC Vive Cosmos
HTC's Vive Cosmos is the upgraded version of the Vive. It features a higher resolution and replaces the external base stations with outward-facing cameras for motion tracking. It's a comprehensive package for whole-room VR.
HTC recently released the Vive Pro 2, a high-end VR headset targeting both enterprise users and consumers. This new headset features a 2,448-by-2,448 resolution display for each eye, making it the highest-resolution headset currently available. It's also more expensive than the Cosmos Elite.
Sadly one thing that is bringing this headset down is the price.
If you are a gamer, you might have encountered either the CID HANDLE CREATION or VIDEO TDR ERROR errors with an error code of 0x00000016 as you play a game. These kinds of Stop errors have something to do with the Graphics card driver. It could be that your Graphics card driver needs to be updated or it may be corrupted. Whichever the case is, you can try fixing this error using the given solutions below but before you proceed, make sure to create a System Restore Point first so that you can easily roll back to the previous state of your computer in case something does not go as expected.
Option 1 – Try checking if your graphics card is enabled and update it as well
Although the problem is quite massive, the fix could be as simple as enabling the graphics card if it turns out to be disabled. There might be some strange reason why your graphics card disables itself. Thus, the best and first option you can try is to check if the graphics card is enabled or not. To do so, follow these steps:
Tap the Win + R keys to open the Run dialog box.
Then type “devmgmt.msc” in the field and hit Enter to open the Device Manager.
After opening the Device Manager, look for your graphics card option among the list of device drivers. Once you found it, check if it is enabled or not. If it’s not enabled, you should see a gray arrow pointing downwards. Right-click on the card and select Enabled.
Next, right-click on the graphics card once more and click on the Update Driver Software option and then click on the “Search automatically for updated driver software” option.
Option 2 – Reinstall the Graphics card drivers
Tap Win + R to open Run then type “devmgmt.msc” in the field and hit Enter to open the Device Manager.
From there, look for the Display adapters and uninstall each one of the graphics card drivers by right-clicking on them and selecting the Uninstall device option.
After uninstalling the graphics card drivers, close the Device Manager and tap Win + R to open Run once again.
After that, type “appwiz.cpl” in the field and hit Enter to open Programs & Features in the Control Panel.
Next, look for any program that’s related to your GPU manufacturers like Nvidia, AMD, or Intel. Right-click on any GPU-related entry and click on Uninstall to uninstall them and then follow the next on-screen instructions that appear afterward.
Now restart your computer.
Once your computer has restarted, go to the GPU manufacturer’s website and download the latest driver version for your graphics card model and then install it.
Restart your computer once again. That should fix the problem.
Option 3 – Try reinstalling the game
If updating and reinstalling your Graphics card driver didn’t help, then you can try to reinstall the game where you’re getting the CID HANDLE CREATION or VIDEO TDR ERRORS.
Option 4 – Uninstall the programs you installed recently
Chances are, some programs that you just installed might be the one that’s causing the BSOD error. Thus, you need to uninstall the program to resolve the problem.
In the search box, type in “control” and then click on Control Panel (desktop app) among the search results.
After that, select Programs and Features from the list which will give you a list of all the programs installed on your computer.
From there, look for the concerned program and select it and then uninstall it.
Note: If you have downloaded the app from the Windows Store, you can simply right-click on it from the application list and then uninstall it. In addition, you might also want to check the hardware components of your computer that might not support the operating system itself. You can disconnect all the external devices like USB drives, scanners, printers, etc., and then reboot your PC. After that, add the devices again one after the other and check if the BSOD error is now fixed or not.
Option 5 – Try disabling your monitor’s Sleep functionality
There are times when the Sleep functionality of your monitor can also cause BSOD errors like CID HANDLE CREATION or VIDEO TDR errors. There are also times when the graphics card is running in the background and the display goes to sleep and then it’s turned back on but you encounter this kind of Blue Screen error. This is why you can try to disable your computer monitor’s Sleep mode.
Option 6 – Run the Blue Screen Troubleshooter
The Blue Screen troubleshooter is a built-in tool in Windows 10 that helps users in fixing BSOD errors like CID HANDLE CREATION or VIDEO TDR errors. It can be found on the Settings Troubleshooters page. To use it, refer to these steps:
Tap the Win + I keys to open the Settings panel.
Then go to Update & Security > Troubleshoot.
From there, look for the option called “Blue Screen” on your right-hand side and then click the “Run the troubleshooter” button to run the Blue Screen Troubleshooter and then follow the next on-screen options. Note that you might have to boot your PC into Safe Mode.
Option 7 – Try to run the Chkdsk utility
Running the CHKDSK utility might also help you resolve the CID HANDLE CREATION or VIDEO TDR errors. If your hard drive has issues with integrity, the update will really fail as the system will think that it’s not healthy and that’s where the CHKDSK utility comes in. The CHKDSK utility repairs hard drive errors that might be causing the problem.
Open Command Prompt with admin privileges.
After opening Command Prompt, execute the following command and hit Enter:
chkdsk /f /r
Wait for the process to be completed and then restart your computer.
 Coursera was one of the pioneers when it comes to college education online. When it started all courses were free and offered certificates if the taker has done tasks with a passing grade. Today not everything is free but still, there are tons of free courses that can help you to learn something new and to advance in your work or hobby.
 edX has evolved from MITx, MIT’s free initiative to place some free academic lectures from its classrooms free into the world. Since it was rebranded into edX it started including other big university names like Berkeley, University of Texas System, Harvard, and many more.
 Udemy has a little different approach to course material than previously mentioned websites. Teachers on Udemy are mostly people that are working in a given field. Programmers will teach programming, fitness instructors will teach training, etc.
 Alison is kind of Udemy if we are talking about course material and who is teaching, the difference however is that it has more free content and it is one of the rare websites on this list that has Language courses.
 Udacity was also one of the earlier websites to offer free courses, in today’s world it still has free material but there is also paying one.
 Codecademy is a website mainly focused on teaching you how to code. Pro plan is there but there are a lot of basic and free courses on the mentioned subject.
 Academic Earth has been built with one simple premise: Everyone deserves access to education.
 Khan academy is completely free and it is offering courses matching certain grades for children. It is offering courses for all 8 years of elementary school, math courses for high school and college with some coursework on topics like science, arts & humanities, reading, life skills, etc.
 Jokes aside, I truly believe that choosing to upgrade your System to Windows 11 at this point in time is a bad decision and I will explain why I do believe it.


 Microsoft has announced Windows 365, a new cloud-based operating system aimed mainly at businesses of all sizes.
Just after Windows 11 announcement and presentation, we are seeing another Windows announcement from Microsoft. Dive into the following text in order to find out what exactly is new Windows 365, its role in today's IT world, and do you need it?
Microsoft has announced Windows 365, a new cloud-based operating system aimed mainly at businesses of all sizes.
Just after Windows 11 announcement and presentation, we are seeing another Windows announcement from Microsoft. Dive into the following text in order to find out what exactly is new Windows 365, its role in today's IT world, and do you need it?
 With its Rift model, Oculus set itself as a big player in VR. Now the company is slowly bowing out of the dedicated, tethered VR headset with its latest Quest 2 designed to primarily be a standalone headset.
In case you do not know, tethered headset means that the headset itself is connected to your PC and is using its power to drive your VR experience.
Now technical specifications of Quest 2 are pretty OK and it can drive stuff pretty decently and if you want you can purchase the dedicated cable to connect it to your PC for the full experience of games requiring more capable hardware.
Oculus Quest 2 is the cheapest headset on this list and with its stable performance, is highly recommended.
With its Rift model, Oculus set itself as a big player in VR. Now the company is slowly bowing out of the dedicated, tethered VR headset with its latest Quest 2 designed to primarily be a standalone headset.
In case you do not know, tethered headset means that the headset itself is connected to your PC and is using its power to drive your VR experience.
Now technical specifications of Quest 2 are pretty OK and it can drive stuff pretty decently and if you want you can purchase the dedicated cable to connect it to your PC for the full experience of games requiring more capable hardware.
Oculus Quest 2 is the cheapest headset on this list and with its stable performance, is highly recommended.
 Although the headset itself is nothing revolutionary or special its controllers are. They can track individual finger movements, making games (that take advantage of them) much more immersive than the standard trigger grips on other controllers.
The Index's higher refresh rate makes for smoother action, as well, which is another nice bonus. If you already have an HTC Vive or Vive Cosmos Elite, and their base stations (not the regular Cosmos), you can buy only the controllers.
Although the headset itself is nothing revolutionary or special its controllers are. They can track individual finger movements, making games (that take advantage of them) much more immersive than the standard trigger grips on other controllers.
The Index's higher refresh rate makes for smoother action, as well, which is another nice bonus. If you already have an HTC Vive or Vive Cosmos Elite, and their base stations (not the regular Cosmos), you can buy only the controllers.
 The PlayStation VR is compelling thanks to Sony backing its development, plus the PlayStation 4's affordability and availability compared with gaming PCs. All you need is the headset, a PlayStation 4, and a PlayStation Camera (now included with most PlayStation VR bundles).
Not really the best of the bunch but still one of the top ones for console gaming. Sony is working on a new PlayStation VR system for the PlayStation 5, with redesigned controllers. The new headset hasn't been revealed yet, but the company has released a preview of the new controllers.
The PlayStation VR is compelling thanks to Sony backing its development, plus the PlayStation 4's affordability and availability compared with gaming PCs. All you need is the headset, a PlayStation 4, and a PlayStation Camera (now included with most PlayStation VR bundles).
Not really the best of the bunch but still one of the top ones for console gaming. Sony is working on a new PlayStation VR system for the PlayStation 5, with redesigned controllers. The new headset hasn't been revealed yet, but the company has released a preview of the new controllers.
 HP headset is one which you get if you want the best image quality in VR headset, sadly controllers did not follow the same quality of headset itself. But this is still a pretty decent headset overall and worth the purchase.
 HTC's Vive Cosmos is the upgraded version of the Vive. It features a higher resolution and replaces the external base stations with outward-facing cameras for motion tracking. It's a comprehensive package for whole-room VR.
HTC recently released the Vive Pro 2, a high-end VR headset targeting both enterprise users and consumers. This new headset features a 2,448-by-2,448 resolution display for each eye, making it the highest-resolution headset currently available. It's also more expensive than the Cosmos Elite.
Sadly one thing that is bringing this headset down is the price.
HTC's Vive Cosmos is the upgraded version of the Vive. It features a higher resolution and replaces the external base stations with outward-facing cameras for motion tracking. It's a comprehensive package for whole-room VR.
HTC recently released the Vive Pro 2, a high-end VR headset targeting both enterprise users and consumers. This new headset features a 2,448-by-2,448 resolution display for each eye, making it the highest-resolution headset currently available. It's also more expensive than the Cosmos Elite.
Sadly one thing that is bringing this headset down is the price.