A Quick Guide to Resolving Error Code 0x800ccc92 on Your PC

0x800ccc92 - What is it?

Do you come across this error message “Receiving’ reported error (0x800ccc92): “Your e-mail server rejected your login”? Verify your user name and password in your account properties. The server responded: - ERR invalid user names and password” when you try to send or open emails using your Outlook account?

If yes, then this article is a must-read for you as we explain why this error occurs and how you can resolve it.

To begin with, 0x800ccc92 is a common Microsoft Outlook error.

This error restricts your ability to send and receive emails on your Outlook email address. In other words, it locks you out and hampers your ability to use your account successfully causing a great deal of inconvenience especially if you use your Outlook account for communication in and across your office.

Solution

Restoro box imageError Causes

The 0x800ccc92 error message may occur due to numerous reasons so narrowing it down to one particular reason for occurrence is not easy. However, here we have listed down some of the most common causes of this error code:

  • Incorrect Outlook configuration settings
  • Invalid password or username
  • PST file crosses its fixed file size limit
  • Failure of POP3 and Protocol STMP in database server connection
  • Improper synchronization between Outlook and the server
  • Virus Infection
  • Invalid registry entries

Further Information and Manual Repair?

To fix the error code 0x800ccc92 on your system, here are some quick, effective, and easy DIY solutions that you can try:

Solution 1:

Sometimes the error code may occur due to an invalid password and usernames entry. Therefore, first, cross-check user ID and password. If you’ve entered the wrong password, try inserting the correct password to access your account.

Solution 2:

If the error still persists, then try installing the latest available Server Service Pack for Exchange. This solution works best if compatibility is the issue and the underlying reason for the error is improper synchronization between Outlook and the server.

Solution 3:

The presence of malware and viruses can also lead to such errors. Therefore, it is advisable to scan your entire PC for malware and viruses using a powerful antivirus.

Solution 4:

If the issue occurs due to bad and invalid registry entries, then it is important that you remove them right away. Due to such entries, you may experience the 0x800ccc92 error on your PC. To remove them, you need to download a registry cleaner.

Downloading two programs an antivirus and a registry cleaner separately may slow down the speed of your PC. Therefore, to ensure this does not happen it is recommended you install Restoro

Restoro is an advanced and multi-functional PC Fixer. This software is deployed with an intuitive algorithm and multiple powerful PC repair utilities including a registry cleaner, anti-virus, and a system optimizer. It is a one-stop solution for all PC-related issues.

Using this tool, you can scan your entire PC and remove all types of malicious software including malware, viruses, spyware, and Trojans corrupting your PC in seconds. Simultaneously, it also removes all bad registry keys and entries and files the damaged system file, thereby restoring the registry back to normal.

The system optimizer utility ensures your PC speed is not compromised due to the repair process.

This software is safe, bug-free, efficient, and user-friendly. It is compatible with all Windows versions.

Click here to download Restoro on your PC to instantly remove viruses and invalid registry entries to resolve the 0x800ccc92 error message on your system now!

Do You Need Help with Your Device?

Our Team of Experts May Help
Troubleshoot.Tech Experts are There for You!
Replace damaged files
Restore performance
Free disk space
Remove Malware
Protects WEB browser
Remove Viruses
Stop PC freezing
GET HELP
Troubleshoot.Tech experts work with all versions of Microsoft Windows including Windows 11, with Android, Mac, and more.

Share this article:

You might also like

Change position of Taskbar in Windows 10
Changing Taskbar location in your Windows 10 is an easy task but lately, Microsoft has removed the option to just drag it to one side of the screen and place it there, now in order to change location we need to do a little more work but do not worry it is not difficult at all. Right-click on the taskbar to open its properties menu taskbar settings menuin the menu, on the bottom choose taskbar settings. Once the settings dialog opens, on the right side locate the taskbar location on screen. taskbar location chooserClick on the dropdown menu and choose the desired location for the taskbar.
Read More
Fix Device requires further installation Error
If you are trying to connect an external device to your computer but you suddenly encounter an error that says, “Device requires further installation”, then you’ve come to the right place as this post will guide you on how exactly you can fix this error. In most cases, USB sticks, headphones, speakers, and other external devices, install drivers automatically once you connect them to your computer which means that the drivers are downloaded and installed in the system as soon as the external device is plugged in. However, if the driver has become corrupted or outdated, you might encounter an error like the
“Device requires further installation”
Aside from corrupted or outdated drivers, the error could also be caused by pending updates, an incorrect version of the Intel PROSet Wireless driver, or checking the wrong event. Whatever the cause is, this post will provide you with some potential fixes that can help you resolve the problem. But before you troubleshoot the problem, ensure that your Windows 10 computer is updated to its latest version and you must also not forget to check that you’re checking the correct event on the Event Viewer. Once you have these things covered, proceed to the instructions below.

Option 1 – Try to update the device drivers to the latest version

One of the most likely root causes of the “Device requires further installation” error is either outdated or corrupted drivers in your computer. This kind of problem is more common on several devices like scanners and printers for which the drivers are provided with them.
  • First, boot your computer into Safe Mode.
  • After that, tap the Win + R keys to launch Run.
  • Type in devmgmt.msc into the box and tap Enter or click OK to open the Device Manager.
  • After that, a list of device drivers will be displayed. From there, look for any outdated device drivers and click on each one of them.
  • After that, right-click on each entry of the device drivers and select the “Uninstall Device” option from the menu.
  • Now restart your computer.
  • After restarting your computer, go to the Settings app and Check for Updates in the Windows Update section.
Note: You also opt to download the latest versions of the device drivers directly from the website of the manufacturer. Once you’ve downloaded them, you can install them into your computer right away and then try connecting the external device again. On the other hand, you can also try to reinstall the device drivers.

Option 2 – Try to install the latest version of the Intel PROSet Wireless driver

A lot of users who experience the problem reported that their wireless driver wasn’t also working properly and it was then found that it was caused by the outdated Intel PROSet wireless driver. Thus, to fix the problem, you need to install the latest version of this driver from the intel.com website and install it on your computer. When you download the driver, make sure that your computer is running an Intel system and then download the correct driver depending on whether your computer is a 64-bit system or a 32-bit one.
Read More
Preventing installation of Removable Devices
In case you don’t know, Windows 10 supports installation and use of a number of removable devices which includes plug and plays mouse, keyboard, and other USB-based devices. But this could actually pose a threat to the integrity of a computer system and thus, some organizations pose a restriction in using these kinds of devices. the restriction on these devices is also useful especially if you keep on leaving your computer idle and someone tries to mess it up by plugging in a removable device. In such situations, the restriction will defend the user against data theft. Thus, in this post, you will be guided on how you can prevent the installation of removable devices on your Windows 10 computer. There are two options that can help you in preventing the installation of any removable devices on your computer – you can either try to use the Registry Editor or use the Group Policy Editor instead. Follow whichever option you want to use the instructions given below but before you start, don’t forget to create a System Restore Point first.

Option 1 – Prevent installation of Removable Devices via Registry Editor

  • Tap the Win + R keys to open the Run dialog box and type “Regedit” in the field and hit Enter to open the Registry Editor.
  • Next, navigate to this registry path: HKEY_LOCAL_MACHINESOFTWAREPoliciesMicrosoftWindowsDeviceInstallRestrictions
  • From there, look for a DWORD named “DenyRemovableDevices” and set its value to “0”. On the other hand, if you can’t find this DWORD, just simply create it and set its value to 0.
  • Once done, exit the Registry Editor and reboot your PC to apply the changes made.

Option 2 – Prevent installation of Removable Devices via Group Policy Editor

Keep in mind that the Group Policy Editor is not available in the Home Edition of the Windows operating systems. Thus, if you are using one, just stick to the first option, otherwise, proceed to the following steps.
  • Tap the Win + R keys to open the Run utility and type “gpedit.msc” and click OK or tap Enter to open the Group Policy Editor.
  • After that, go to this policy setting: Computer ConfigurationAdministrative TemplatesSystemDevice InstallationDevice Installation Restrictions
  • Next, look for the “Prevent installation of removable devices” entry and once you find it, set it as “Enabled”. From this window, you should see the following description of this policy setting:
“This policy setting allows you to prevent Windows from installing removable devices. A device is considered removable when the driver for the device to which it is connected indicates that the device is removable. For example, a Universal Serial Bus (USB) device is reported to be removable by the drivers for the USB hub to which the device is connected. This policy setting takes precedence over any other policy setting that allows Windows to install a device. If you enable this policy setting, Windows is prevented from installing removable devices and existing removable devices cannot have their drivers updated. If you enable this policy setting on a remote desktop server, the policy setting affects redirection of removable devices from a remote desktop client to the remote desktop server. If you disable or do not configure this policy setting, Windows can install and update device drivers for removable devices as allowed or prevented by other policy settings.”
  • Then click the Apply and OK buttons to save the changes made.
  • Now restart your computer to save the changes made. This should prevent the installation of any removable devices in your Windows 10 computer.
Read More
Transferring characters in diablo 2 remake
Diablo 2 resurrected has hit official release and servers seem to be finally taken care of and everything seems to be running smoothly now. The game also received great praise from gamers and attracted old players of the original Diablo 2 game. diablo 2 gameplay
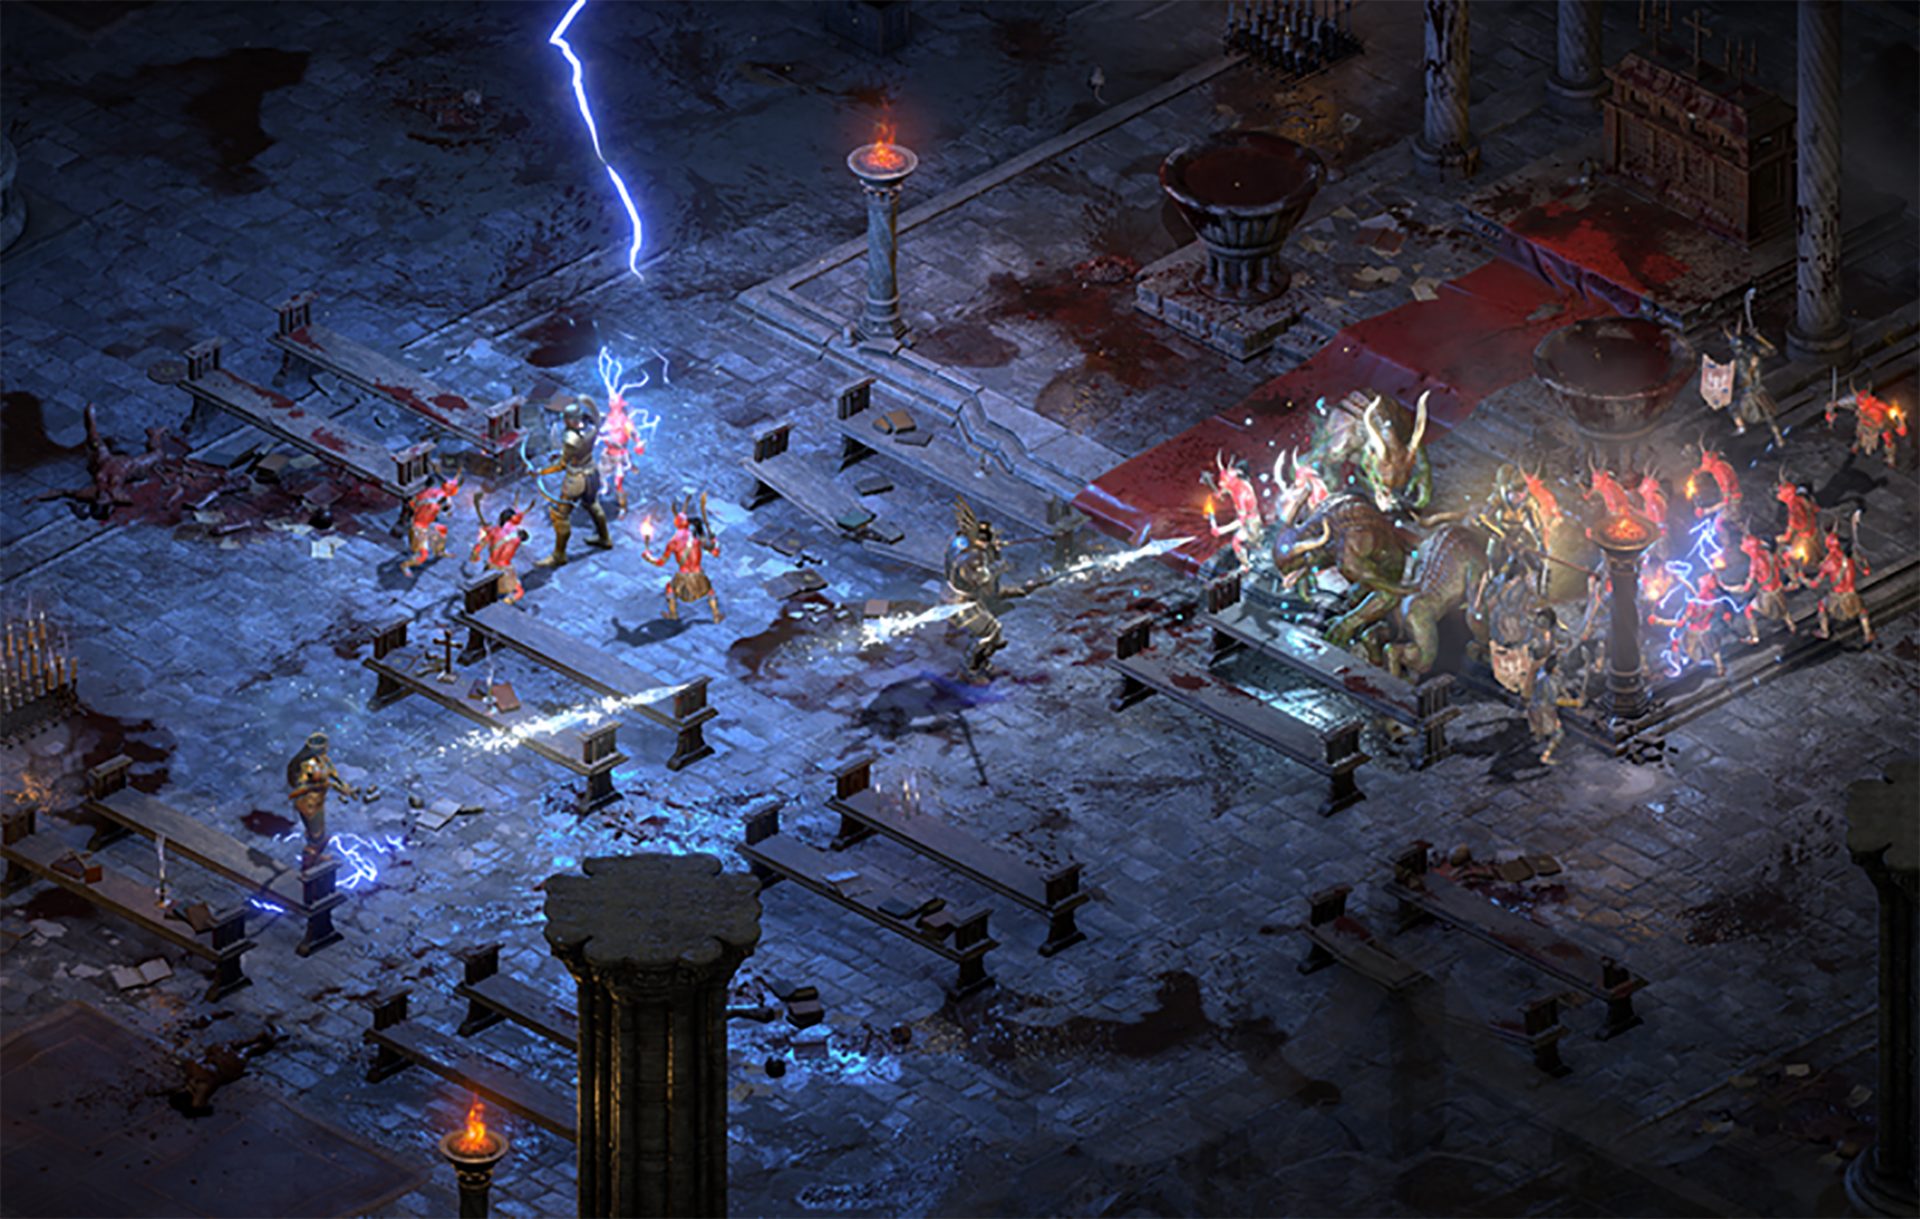
Speaking of old players of old Diablo 2, they can transfer their old characters into remaster and continue playing them within this new great HD environment. There are some steps and requirements but we are here to help and transferred characters will bring full stash, inventory, and equipped items with them.

Requirements

There are not many requirements for this transfer to occur but they must be respected in order to be successful. The first thing is a minor requirement and somewhat annoying but it needs to be done, firstly fire up Diablo 2 resurrected and create a character, any kind of character with any kind of name, any kind of class. This strange requirement is to actually create a character folder and register it inside D2 resurrected so we can copy old ones there. The second requirement will be that characters that you wish to be transferred must be offline characters. Old battle net online characters cannot be transferred at this moment and probably will not be in the future as well. So for all of you that wish to transfer online characters, bad luck, for the rest of us casuals playing offline single-player mode, we can enjoy our characters.

Process of diablo 2 character trasfer

The process itself of transferring characters when previously mentioned requirements are met is just a simple and copy operation. If you have somewhere backed your characters go into your backup folder and copy files in c:\users\*current user*\saved games\*diablo 2 resurrected folder* If you do not have characters backed up and just have old Diablo 2 installed and playing it, you can go to c:\users\*current user*\saved games\*diablo 2 folder* and just copy all characters files into c:\users\*current user*\saved games\*diablo 2 resurrected folder* Your old characters end with .d2s extension, grab all that you want to transfer, and copy them into D2R. Take note that copied characters cannot be brought back into Diablo 2, once they are copied into Diablo 2 resurrected all further progress on them will be tied to the new game.

Conclusion

That’s it about the transfer process and requirements for it. Fire up the new game version and enjoy.
Read More
How to get rid of CinematicFanatic

CinematicFanatic (by MyWay) is a browser extension for Google Chrome that may come bundled with other free software that you download off of the Internet. When installed CinematicFanatic will set the homepage and search engine for your web browser to http://search.myway.com

While browsing the internet with this extension installed, you will see additional ads, sponsored content, and even pop-up ads throughout your browsing sessions. While CinematicFanatic is active, it will log user information, visited websites, product categories. This information is later used/sold to better display targeted ads through your web pages as sponsored content and banner ads.

CinematicFanatic has been marked as a Browser Extension by several popular anti-malware scanners, and due to its information-gathering behavior, it is recommended to remove it from your computer.

About Browser Hijackers

Browser hijack is a very common type of internet fraud where your web browser configurations are modified to allow it to do things you never intend. Browser hijacker malware is developed for many different reasons. These are typically used to force visitors to predetermined sites, manipulating web traffic to generate ad revenue. Even though it may seem naive, all browser hijackers are dangerous and thus always regarded as security risks. They not only screw up your web browsers, but browser hijackers can even modify the computer registry to make your PC susceptible to other forms of hacking.

How to know if your internet browser is hijacked

There are several symptoms of browser hijacking. Here are a few of them: 1. home-page is modified 2. bookmark and the new tab are likewise changed 3. The default search page of your browser is altered 4. you’ll see multiple toolbars in your internet browser 5. you will find random pop-ups start showing regularly 6. websites load slowly and often incomplete 7. You simply can’t access particular sites, particularly anti-malware websites.

How they get into your computer or laptop

Browser hijackers could use drive-by downloads or file-sharing websites or perhaps an e-mail attachment in order to reach a targeted computer. Many web browser hijackings originate from add-on programs, i.e., browser helper objects (BHO), toolbars, or plug-ins added to browsers to provide them additional functionality. A browser hijacker could also come bundled up with some freeware which you unintentionally download to your PC, compromising your internet security. Some of the well-known hijackers are CinematicFanatic, Babylon Toolbar, Conduit Search, Sweet Page, OneWebSearch, and CoolWebSearch. Browser hijackers could disrupt the user’s web surfing experience greatly, keep track of the websites visited by users and steal financial information, cause difficulty in connecting to the net, and ultimately create stability issues, making applications and systems crash.

Browser hijacker removal

Certain browser hijacking could be easily reversed by discovering and removing the corresponding malware software through your control panel. Having said that, many hijackers are really tenacious and need specialized tools to eliminate them. Additionally, manual removals demand deep system understanding and thus can be a very difficult job for inexperienced computer users. You might opt for automatic browser hijacker removal by simply installing and running an efficient anti-malware program. One of the top tools for fixing browser hijacker infections is SafeBytes Anti-Malware. It assists you to get rid of any pre-existing malware on your system and gives you real-time monitoring and protection from new threats. Together with the antivirus tool, a system optimizer, such as SafeBytes’s Total System Care, will help you in removing all related files and modifications in the computer registry automatically.

What To Do When You Cannot Download Safebytes Anti-Malware?

Viruses could cause a lot of damage to your PC. Some malware is designed to interfere with or block things that you’d like to do on your personal computer. It may not allow you to download anything from the net or it will stop you from accessing a few or all of the sites, especially the antivirus sites. If you’re reading this, chances are you’re stuck with a malware infection that is preventing you to download and/or install the Safebytes Anti-Malware program on your PC. Refer to the instructions below to remove malware in alternate ways.

Install in Safe Mode

In Safe Mode, you can change Windows settings, uninstall or install some applications, and get rid of hard-to-delete viruses and malware. In case the malicious software is set to load automatically when the PC starts, shifting into this particular mode may prevent it from doing so. In order to get into Safe Mode or Safe Mode with Networking, press the F8 key while the computer is starting up or run MSCONFIG and look for the “Safe Boot” options under the “Boot” tab. Once you’re in safe mode, you can try to install your anti-malware software program without the hindrance of the virus. Now, you can run the anti-malware scan to remove viruses and malware without hindrance from another application.

Switch to an alternate browser

Web-based malware could be environment-specific, targeting a particular browser or attacking specific versions of the browser. If you appear to have a virus attached to Internet Explorer, then switch to a different browser with built-in safety features, such as Firefox or Chrome, to download your preferred antivirus program – Safebytes.

Install and run anti-virus from the USB drive

Another solution is to store and operate an antivirus software program entirely from a Thumb drive. Adopt these measures to use a USB drive to clean your corrupted PC. 1) Download the anti-malware on a virus-free PC. 2) Plug the Flash drive into the uninfected computer. 3) Double-click the Setup icon of the anti-malware software to run the Installation Wizard. 4) When asked, select the location of the pen drive as the place where you would like to put the software files. Follow the instructions on the computer screen to finish off the installation process. 5) Transfer the USB drive from the uninfected computer to the infected computer. 6) Double-click the EXE file to run the Safebytes program right from the pen drive. 7) Hit the “Scan Now” button to start the malware scan.

SafeBytes Anti-Malware - More Protection For You

If you’re looking to purchase anti-malware for your computer, there are various brands and utilities for you to consider. A few of them are excellent, some are ok types, and some will damage your computer themselves! While looking for antivirus software, choose one that provides reliable, efficient, and complete protection against all known viruses and malware. Amongst few good applications, SafeBytes Anti-Malware is the highly recommended software for the security-conscious user. SafeBytes can be described as a highly effective, real-time antivirus application that is created to assist the regular computer end user in protecting their computer from malicious threats. This tool can easily identify, remove, and protect your PC from the most advanced malware intrusions including spyware, adware, trojan horses, ransomware, worms, PUPs, parasites along other potentially harmful software applications.

SafeBytes carries a variety of features that can help you protect your PC from malware attacks and damage. A few of them are given as below:

Best AntiMalware Protection: By using a critically acclaimed malware engine, SafeBytes offers multilayered protection that is designed to catch and remove viruses and malware that are concealed deep inside your computer system. Real-Time Protection: SafeBytes gives round-the-clock protection for your computer limiting malware attacks instantly. This utility will always monitor your PC for suspicious activity and updates itself regularly to keep abreast of the latest threats. Safe Browsing: Safebytes allots all websites a unique safety score that helps you to get an idea of whether the website you’re about to visit is safe to view or known to be a phishing site. Fast Multi-threaded Scanning: SafeBytes’s virus scan engine is one of the fastest and most efficient within the industry. It's targeted scanning tremendously increases the catch rate for viruses that are embedded in various computer files. Light-weight Tool: SafeBytes is a lightweight and easy-of-use antivirus and anti-malware solution. As it uses minimal computer resources, this application leaves the computer’s power exactly where it belongs to: with you. Premium Support: You will get 24/7 technical support to quickly resolve any issue with your security tool. SafeBytes will keep your computer safe from most advanced malware threats automatically with hardly any input needed from you again. Now you may understand that this software does more than just scan and remove threats on your PC. If you’re trying to find a comprehensive anti-malware program that’s still simple enough to use, SafeBytes Anti-Malware is exactly what you will need!

Technical Details and Manual Removal (Advanced Users)

If you don’t want to use a malware removal software and prefer to get rid of CinematicFanatic manually, you may do so by going to the Windows Add/Remove Programs menu in the Control Panel and delete the offending program; in cases of web browser plug-ins, you could remove it by going to the browser’s Add-on/Extension manager. It is also recommended to factory reset your web browser settings to their default state. Lastly, check your hard drive for all of the following and clean your registry manually to get rid of leftover application entries after uninstallation. Please note that only professional users should try to manually edit the registry because removing any single critical system file leads to a serious problem or even a system crash. In addition, some malware is capable of replicating itself or preventing its deletion. It is advised that you do the removal process in Windows Safe Mode.
Files: %UserProfile%\Local Settings\Application Data\Google\Chrome\User Data\Default\Sync Extension Settings\bpkmogbhibhnpebcaipnknfkgibdheoc %LOCALAPPDATA%\Google\Chrome\User Data\Default\Local Extension Settings\bpkmogbhibhnpebcaipnknfkgibdheoc %UserProfile%\Local Settings\Application Data\Google\Chrome\User Data\Default\Local Extension Settings\bpkmogbhibhnpebcaipnknfkgibdheoc %LOCALAPPDATA%\Google\Chrome\User Data\Default\Extensions\bpkmogbhibhnpebcaipnknfkgibdheoc %UserProfile%\Local Settings\Application Data\Google\Chrome\User Data\Default\Extensions\bpkmogbhibhnpebcaipnknfkgibdheoc %LOCALAPPDATA%\CinematicFanaticTooltab %UserProfile%\Local Settings\Application Data\CinematicFanaticTooltab Registry: HKEY_LOCAL_MACHINE\Software\CinematicFanatic HKEY_LOCAL_MACHINE\Software\Wow6432Node\CinematicFanatic HKEY_LOCAL_MACHINE\Software\[APPLICATION]\Microsoft\Windows\CurrentVersion\Uninstall..Uninstaller CinematicFanaticTooltab Uninstall Internet Explorer
Read More
How to avoid errors in Windows

We have all experienced Windows errors over time and that can range from simple ones that will do very little to no harm and can be even system breaking making us lose our work or completely making the PC unusable. No one likes them but they happen, and usually, they happen once we least expect them.

No matter how frequent and unpleasant they might be there are ways to keep them at the minimum and even avoid them.

We will discuss steps that you can take in order to do this, simple tips and guides on how to keep your computer in top form and eliminate not just Windows, but any kind of errors altogether.

computer free of errors

Keep your hardware clean

Believe it or not, some serious Windows errors like the dreaded blue screen of death can come from hardware issues not from the software at all. It is very important to keep your computer clean and with enough air flow so it can function properly.

Not so far ago we had an article about cleaning your hardware detailing what and how to do it. Here is a link to the article: https://errortools.com/windows/cleaning-your-pc/

Do not keep applications you are not using

Keeping applications on the drive might seem harmless but sadly that is not the case. Some applications have a certain impact on the system itself after all most of them are tweaking registry entries in Windows and sometimes having too many applications means an increased possibility of conflict over certain resources even when they are not running.

Some applications like adobe creative suite, for example, will have certain services always running in the background, and more of these kinds of applications you have, more services, more places for unexpected errors when they collide. Some of them will also install certain dependencies that could be problematic.

The general idea is: if you are not using it, uninstall it and you will be safer and more resilient to errors inside OS.

Do not use pirated or cracked software

Besides moral and law implications that using pirated or cracked software might bring you there are also certain other things that might be problematic. Certain "free" software might come packet with some problematic malware, for example, it is not uncommon for attackers to use some popular software to pack their malicious application with it.

Other things might be wrong and incomplete tweaking with application in order to bypass security and thus bringing some instability due to scripts needed to run in order to achieve this goal.

Keep your drivers updated

Errors can also come from old drivers or bad drivers, device manufacturers are not all-knowing and perfect, and sometimes drivers can wreak havoc on the system. Having updated drivers can minimize any kind of unexpected behaviors inside the operating system making it more stable and reliable.

You can check your driver version in the control panel inside the Windows OS and then compare it to the ones found on the manufacturer's site, if there are newer available it is recommended to download and install them,

Keep software updated

Applications can have bugs, and bugs can lead to certain errors both in the system and when using the app as well. It is in your best interest to get the latest patch or newer version of the software in order to avoid these unpleasant experiences.

Also, certain codecs and extensions that are installed directly in Windows can also have some unpredictable behavior, updating is the best solution to keep them in line.

Keep Windows updated

Same as with drivers and applications, Windows itself is not immune from bugs and some unpredictable issues. Luckily Microsoft is always working on fixes and features of Windows but in order to actually have benefited from that work, you will need to keep Windows updated. Sometimes a bad update can introduce some errors but you can always roll back to the previous and wait for them to fix everything and then download them all.

Check the health of your hardware regularly

Hardware components have their life cycle, more quality ones tend to last longer but eventually, they will reach the end of their lifecycle. There are a lot of testers for various components in your computer that can check different things and provide you with information about the state of your components.

If you are on Windows 11, Microsoft has included a basic health app inside OS, just type PC health check in search and start the app. For some more detailed information and advanced checks, you will have to use a custom application. There are plenty of them specialized for single components like RAM, SSD, etc. A simple google search with providing you with top results and most of them are free for personal use.

Remember, a faulty component or component that is reaching its life cycle can produce many errors inside the operating system.

Read More
How to get rid of DailyBibleGuide

Daily Bible Guide is a browser extension developed by Mindspark Inc. for Google Chrome Browser. This extension offers users a fast and easy way to find Bible passages, view daily verses, study the Bible and view the current weather. When installed, this extension changes your default search engine and your home page to MyWay.

When installed this extension gathers user browsing information such as visited websites, search queries, clicked links, and other information. This information is later used to better target ads.

While active, you may encounter additional unwanted ads and sponsored links throughout your browsing sessions. Daily Bible Guide was marked as a Browser Hijacker by several anti-virus scanners, and due to its information mining behavior, it is considered a security risk and it is not recommended to keep on your computer; being flagged for optional removal.

About Browser Hijackers

Browser hijackers (sometimes known as hijackware) are a kind of malware that alters internet browser settings without the computer owner’s knowledge or approval. These kinds of hijacks are rising at a worrying rate around the globe, and it could be actually nefarious and sometimes dangerous too. There are plenty of reasons why you might experience an internet browser hijack; but commercial, advertising, and marketing are definitely the key reasons for their creation. Generally, the idea would be to force users to visit particular sites which are looking to improve their site visitor traffic and produce higher advertisement revenue. While it might seem harmless, these tools were created by malicious individuals who always attempt to take full advantage of you, so that they could make money from your naivety and distraction. Furthermore, hijackers can make the entire infected system vulnerable – other destructive malware and viruses will grab these opportunities to intrude into your computer effortlessly.

Signs of browser hijacker infection

The typical symptoms that signify having this malware on your computer are: home page is modified; you find new unwanted favorites or bookmarks added, typically directed to ad-filled or porn websites; the default search engine is modified; discover new toolbars which you did not add; you may see random pop-ups start occurring frequently; your internet browser has instability issues or exhibits frequent errors; you cannot visit specific websites like home pages of antivirus software.

So how does a PC get infected with a browser hijacker?

Browser hijackers attack computer systems via malicious email attachments, downloaded infected files, or by visiting infected sites. They sometimes are included with toolbars, add-ons, BHO, plugins, or browser extensions. A browser hijacker can also come bundled up with some free application that you inadvertently download to your computer, compromising your internet security. A good example of a popular browser hijacker is the most recent Chinese malware named “Fireball”, which has infected 250 million PCs throughout the world. It works as a hijacker but could be changed into a fully functioning malware downloader afterward. Browser hijackers will interrupt the user’s browsing experience significantly, keep track of the websites frequented by users and steal private information, cause difficulty in connecting to the net, and ultimately create stability problems, causing software programs and computers to crash.

Browser Hijacker Malware – Removal

Certain browser hijacking can be quite easily reversed by identifying and removing the corresponding malware program through your control panel. However, the majority of hijackers are extremely tenacious and need specialized tools to eradicate them. Additionally, manual removals require deep system knowledge and thus can be quite a difficult task for inexperienced computer users. Installing and running anti-malware programs on the affected computer could automatically delete browser hijackers and other malicious programs. Safebytes Anti-Malware features a cutting-edge anti-malware engine that will help you prevent browser hijacking in the first place, and clean up any pre-existing issues. In addition to anti-malware, a PC optimizer software, for example, Total System Care, will help you fix Windows registry errors, remove unwanted toolbars, secure online privacy, and stabilize software programs installed on the computer.

Malware Blocking Internet And All Antivirus Software? Do This!

Malware can cause a lot of damage to your PC. Some malware variants modify internet browser settings by including a proxy server or change the PC’s DNS settings. When this happens, you will be unable to visit some or all of the websites, and therefore not able to download or install the necessary security software to clear out the infection. If you’re reading this right now, you’ve perhaps recognized that virus infection is a reason behind your blocked internet connectivity. So how to proceed when you want to download and install an anti-malware program like Safebytes? Although this sort of issue will be difficult to get around, there are some steps you can take.

Install in Safe Mode

If the malware is set to run at Windows startup, then booting in safe mode should avoid it. Only minimal required programs and services are loaded when you start your PC into Safe Mode. You will have to do the following to remove malware in Safe mode. 1) At power-on/startup, press the F8 key in 1-second intervals. This will invoke the Advanced Boot Options menu. 2) Choose Safe Mode with Networking with arrow keys and press Enter. 3) As soon as this mode loads, you should have an internet connection. Now, obtain the malware removal program you want by using the browser. To install the software, follow the directions within the installation wizard. 4) Once the software is installed, let the scan run to eliminate viruses and other malware automatically.

Switch over to some other web browser

Web-based viruses could be environment-specific, aiming for a specific web browser or attacking particular versions of the web browser. If you are not able to download the security software using Internet Explorer, it means the virus may be targeting IE’s vulnerabilities. Here, you should switch to an alternate internet browser such as Chrome or Firefox to download the Safebytes application.

Create a portable USB antivirus for removing viruses

To effectively remove the malware, you should approach the issue of running an anti-malware program on the affected computer from a different perspective. To run anti-malware using a USB flash drive, follow these simple steps: 1) Download the anti-malware on a virus-free PC. 2) Mount the USB drive onto the same system. 3) Double-click the Setup icon of the anti-malware program to run the Installation Wizard. 4) Choose the drive letter of the USB drive as the location when the wizard asks you exactly where you would like to install the anti-virus. Do as instructed on the screen to finish off the installation process. 5) Now, transfer the flash drive to the infected PC. 6) Double click the Safebytes Anti-malware icon on the USB drive to run the application. 7) Run Full System Scan to detect and clean-up up all types of malware.

SafeBytes Anti-Malware - More Protection For You Personally

These days, an anti-malware tool can protect your computer from different kinds of online threats. But exactly how to select the best one among plenty of malware protection software that’s available on the market? You may be aware, there are many anti-malware companies and tools for you to consider. Some are worth your money, but many aren’t. You must be careful not to choose the wrong application, especially if you purchase a paid program. While thinking about the highly regarded software programs, Safebytes AntiMalware is undoubtedly the strongly recommended one. SafeBytes anti-malware is a powerful, very effective protection application designed to assist users of all levels of computer literacy in detecting and eliminating harmful threats out of their PC. Once you’ve got installed this tool, SafeByte's state-of-the-art protection system will make sure that absolutely no viruses or malware can seep through your computer.

SafeBytes anti-malware takes computer protection to a whole new level with its advanced features. Listed below are some of the great ones:

Anti-Malware Protection: This deep-cleaning anti-malware software goes much deeper than most antivirus tools to clean out your personal computer. Its critically acclaimed virus engine finds and disables hard to remove malware that hides deep inside your computer. Real-time Threat Response: Malware programs attempting to get into the computer are identified and stopped as and when detected by the SafeBytes real-time protection shields. It’ll inspect your personal computer for suspicious activity regularly and its unparalleled firewall shields your PC from illegal access by the outside world. “Fast Scan” Features: SafeBytes’s virus scan engine is among the fastest and most efficient in the industry. It's targeted scanning highly increases the catch rate for viruses which is embedded in various PC files. Web Protection: SafeBytes gives an instant safety rating to the web pages you are going to visit, automatically blocking dangerous sites and ensuring that you are certain of your safety while browsing the world wide web. Light-weight: SafeBytes is a lightweight and user-friendly antivirus and antimalware solution. As it uses very little computer resources, this tool leaves the computer’s power exactly where it belongs to: with you. 24/7 Guidance: SafeBytes provides 24/7 technical support, automatic maintenance, and software upgrades for the best user experience. To sum it up all, SafeBytes Anti-Malware offers great protection combined with very low system resource usage with both great malware prevention and detection. Malware trouble will become a thing of the past when you put this application to use. If you’re looking for the very best malware removal application out there, and when you don’t mind shelling out some money for it, opt for SafeBytes Anti-Malware.

Technical Details and Manual Removal (Advanced Users)

If you’d like to manually remove Daily Bible Guide without using an automated tool, it might be possible to do so by deleting the program from the Windows Add/Remove Programs menu, or in cases of browser extensions, going to the browsers AddOn/Extension manager and uninstalling it. You will probably also want to reset your internet browser. If you choose to manually remove the system files and Windows registry entries, utilize the following list to ensure that you know exactly what files to remove before performing any actions. Please remember that only experienced users should try to manually edit the system files simply because removing any single critical registry entry results in a major problem or even a PC crash. In addition, certain malicious programs have the capability to defend against its removal. It is advisable that you carry out the removal process in Safe Mode.
Files: Search and Delete: 2vauxstb.dll 2vbar.dll 2vbarsvc.exe 2vbprtct.dll 2vbrmon.exe 2vbrstub.dll 2vdatact.dll 2vdlghk.dll 2vdyn.dll 2vfeedmg.dll 2vhighin.exe 2vhkstub.dll 2vhtmlmu.dll 2vhttpct.dll 2vidle.dll 2vieovr.dll 2vimpipe.exe 2vmedint.exe 2vmlbtn.dll 2vmsg.dll 2vPlugin.dll 2vradio.dll 2vregfft.dll 2vreghk.dll 2vregiet.dll 2vscript.dll 2vskin.dll 2vsknlcr.dll 2vskplay.exe 2vSrcAs.dll 2vSrchMn.exe 2vtpinst.dll 2vuabtn.dll AppIntegrator64.exe AppIntegratorStub64.dll BOOTSTRAP.JS 2vffxtbr.jar CHROME.MANIFEST CREXT.DLL CrExtP2v.exe DPNMNGR.DLL EXEMANAGER.DLL Hpg64.dll LOGO.BMP NP2vStub.dll T8EXTEX.DLL T8EXTPEX.DLL T8HTML.DLL T8RES.DLL T8TICKER.DLL VERIFY.DLL s_pid.dat 2vEIPlug.dll 2vEZSETP.dll NP2vEISb.dll 00082350.exe files.ini Folders: %APPDATA%\DailyBibleGuide\ %PROGRAMFILES%\DailyBibleGuide\ %PROGRAMFILES%\DailyBibleGuideEI\ Registry: HKLM\SOFTWARE\Microsoft\Windows\CurrentVersion\Run\ Value: DailyBibleGuide Browser Plugin Loader Key HKLM\SOFTWARE\Microsoft\Windows\CurrentVersion\Run\ Value: DailyBibleGuide Search Scope Monitor Key HKCU\Software\DailyBibleGuide Key HKLM\SOFTWARE\DailyBibleGuide Key HKLM\SOFTWARE\MozillaPlugins\@DailyBibleGuide.com/Plugin Key HKLM\SOFTWARE\Microsoft\Windows\CurrentVersion\Uninstall\DailyBibleGuidebar Uninstall Internet Explorer Key HKLM\SOFTWARE\Microsoft\Windows\CurrentVersion\Uninstall\DailyBibleGuidebar Uninstall Firefox Key HKLM\SOFTWARE\Microsoft\Windows\CurrentVersion\Explorer\Browser Helper Objects\beea7fa9-d1f4-49a2-9b1f-6fb7a2d9bc2a Key HKLM\SOFTWARE\Microsoft\Windows\CurrentVersion\Explorer\Browser Helper Objects\0631bff0-6846-48ca-982d-d62d7f376e97 Key HKLM\SOFTWARE\Classes\DailyBibleGuide.XMLSessionPlugin Key HKLM\SOFTWARE\Classes\DailyBibleGuide.UrlAlertButton Key HKLM\SOFTWARE\Classes\DailyBibleGuide.ToolbarProtector Key HKLM\SOFTWARE\Classes\DailyBibleGuide.ThirdPartyInstaller Key HKHKLM\SOFTWARE\Classes\DailyBibleGuide.SkinLauncherSettings Key HKLM\SOFTWARE\Classes\DailyBibleGuide.SkinLauncher Key HKLM\SOFTWARE\Classes\DailyBibleGuide.SettingsPlugin Key HKLM\SOFTWARE\Classes\DailyBibleGuide.ScriptButton Key HKLM\SOFTWARE\Classes\DailyBibleGuide.RadioSettings Key HKLM\SOFTWARE\Classes\DailyBibleGuide.Radio Key HKLM\SOFTWARE\Classes\DailyBibleGuide.PseudoTransparentPlugin Key HKLM\SOFTWARE\Classes\DailyBibleGuide.MultipleButton Key HKLM\SOFTWARE\Classes\DailyBibleGuide.HTMLPanel Key HKLM\SOFTWARE\Classes\DailyBibleGuide.HTMLMenu Key HKLM\SOFTWARE\Classes\DailyBibleGuide.FeedManager Key HKLM\SOFTWARE\Classes\DailyBibleGuide.DynamicBarButton
Read More
How to Fix Windows 10 Error 0xC1900200, 0x20008

Error Code 0xC1900200, 0x20008 (Code 0xC1900202 – 0x20008)   – What is it?

Error Code 0xC1900200, 0x20008 (Code 0xC1900202 – 0x20008)  is an error that occurs when you attempt to upgrade to Microsoft Windows 10, but the minimum requirements have not been met by your computer. You will therefore be unable to upgrade to Microsoft Windows 10 until your computer is updated or upgraded to meet those requirements. Common symptoms include:
  • When attempting to upgrade a dialog box with Code 0xC1900200 – 0x20008 (Code 0xC1900202 – 0x20008) is displayed.
  • Your computer is unable to begin the Microsoft Windows 10 upgrade process.

Solution

Restoro box imageError Causes

Error Code 0xC1900200 – 0x20008 (Code 0xC1900202 – 0x20008)  occurs when you are unable to begin the Microsoft Windows 10 upgrade because your computer does not meet the minimum requirements to run Microsoft Windows 10.
  • You are unable to begin the upgrade because your computer does not meet the required system or hardware specifications.
  • You are not running the correct version of Microsoft Windows to be able to begin the upgrade.
  • You are not running the latest updated version of Microsoft Windows 7 SP1 or Microsoft Windows 8.1.
Error Code 0xC1900200 – 0x20008 (Code 0xC1900202 – 0x20008) as stated, simply means your computer does not meet the requirements to update and does not indicate a permanent problem or inability to continue to use your computer. This error only means that you will not be able to upgrade to Microsoft Windows 10 until your computer is made to meet these requirements.

Further Information and Manual Repair

There are several solutions that the user can complete at home that should fix the problem resulting in a manifestation of Error Code 0xC1900200 – 0x20008 (Code 0xC1900202 – 0x20008). Below are several options that should resolve this error.

Method 1:

Verify what version of Microsoft Windows you are currently running, older, outdated, or no longer supported versions of Microsoft Windows are not able to upgrade to Microsoft Windows 10. If you are not running one of the following versions you will have to update before being able to upgrade.
  • The most current version of Microsoft Windows 7 SP1
  • The most current version of Microsoft Windows 8.1

Method 2:

Your computer's system specifications do not meet the requirements to be able to upgrade to and run Microsoft Windows 10. To check your system specifications do the following.
  1. Click on the start button in the bottom left corner, then locate the control panel on the menu, click on it to open.
  2. Once it opens, locate system and security on the menu and click to open, click on system and this will show you your amount of RAM and processor speed.
  3. Find device manager on the left-hand side click this then select display adapter, and it will show you your current video card.
  4. Click on the start button again, then click on the computer in the menu, this will show you your hard drive size, and available space.
If you have the option available you can simply run the get Microsoft Windows 10 app to check compatibility. Once you have your system specs make sure they meet or exceed the following.
  • 1 GHz or higher processor or SoC
  • 1 gig of RAM for 32 bit and 2 gigs of RAM for 64 bit
  • 16 GB available hard drive space for 32 bit, 20 GB for 64 bit
  • Minimum of DirectX9 that has 1.0 WDDM
  • At least an 800x600display
If your computer does not meet these minimum requirements, upgrade the components necessary to meet them. If you do not possess the technical expertise required to accomplish this yourself or do not feel comfortable doing so, download and install a powerful automated tool to get the job done.

Method 3:

Your computer might not meet the aforementioned requirements to make an upgrade because of insufficient hard drive space or resources. Learn how to create or make space on your computer here.

Method 4:

Many people hold on to and use the same computer for a very long time. It is possible that your computer cannot be upgraded to meet the requirements, or that the cost to do so would be so high that a new computer would be cheaper. If that is the case, your only option may be to replace your computer.
Read More
Enable or Disable Optional Windows Features
As you know, Windows operating system comes with tons of features. Some of which are not intended to be used by normal customers or users directly which means that only a small percentage of the huge user base of the operating system leverages the use of such features. However, they’ve added some major value to the feature list of the operating system. You can find these features under the “Turn Windows Features on and off” option. This indicates that if you want to, you can just type in “Turn Windows Features on and off” in the search box and then enable any feature that you want to enable. Aside from that, there are other ways you can disable or enable the optional Windows Features in your Windows 10 computer.

Option 1 – via Control Panel

  • Open Control Panel and select Uninstall a Program.
  • After that, select the “Turn Windows features On or Off” option on the left side.

Option 2 – via Command Prompt

  • Tap the Win + X combination on your keyboard or right-click on the Start button and then click on Command Prompt (Admin). Alternatively, you can also type “cmd” in the Cortana search box and right-click on the Command Prompt icon, and select the “Run as administrator” option.
  • If a User Account Control or UAC prompt appears, click on Yes.
  • Next, type in the following command to see the list of the available features.
DISM /online /get-features /format:table | more
  • Now all you have to do is copy the name of the feature that you want to enable and for you to do that, you need to execute the following command:
DISM /online /enable-feature /featurename:[Enter the name of the feature here] –All
Note: Now if you want to disable a feature that’s already enabled in your computer, refer to these sub-steps:
  • First, you need to check what features are enabled, and for you to find out, enter this command: DISM /online /get-features /format:table | find “Enabled" | more
  • And if you want to check the detailed information about a particular feature, you can enter this command: DISM /online /get-featureinfo/featurename:[Enter the name of the feature here]

Option 3 – via Windows Powershell

As you know, the Windows Powershell is a very important tool in Windows 10, and a powerful one at that since you can do a lot of things using this command line. So while you use this tool you need to populate the list of available features first and then you have to download the feature your desired feature.
  • Search for PowerShell in the Cortana search box and then run it with administrator privileges.
  • Next, type in the following command to populate the list of available features:
Get-WindowsOptionalFeature –Online
  • After that, enter the following command to install any feature you want to enable from the list of available features:
Get-WindowsOptionalFeature -Online -FeatureName *Type feature name*
  • Now enter the following command to enable your desired feature:
Enable-WindowsOptionalFeature -Online -FeatureName “Type feature name” –all
  • And if you want to disable any enabled feature, just enter the following command:
Disable-WindowsOptionalFeature -Online -FeatureName “Type feature name”

Option 4 – via an external installation source

You also have the option to fetch the latest features from an updated offline source. The source could be an ISO any other type of image or just a folder. So you need to decide if you want to use Windows Powershell or Command Prompt.
  • If you want to use Command Prompt, just enter this command: exe /online /enable-feature /featurename:< /All /Source:<Enter the path of the feature here>
  • If you want to use Windows Powershell, use this command: Install-WindowsFeature –Source “<Enter the path of the feature here>”
Note: If you want to get the latest features, you need to get the latest version of the image of the operating system that you are trying to install the feature from.
Read More
Calculator is not working in Windows
As you know, one of the basic apps in the Windows 10 operating system is the calculator and it can even be extended to a scientific calculator which makes it really useful for users. However, there are instances when you might encounter some issues while using this app. One of the issues about the Calculator app that’s been reported recently is that the Calculator app is not working. If you encounter the same problem, then you’ve come to the right place as this post will guide you on what you can do to fix the problem. Based on the reports, users claimed that the issue with the Calculator app occurred right after they’ve installed a feature update, while other users claimed that the Calculator app never really worked on their computers and there are also cases where the app opens but it either freezes or crashes. According to researchers, the main causes of the problem include a feature update that could’ve altered the settings. It could also be due to problems with the login account or corrupted and missing files, or the problem could also with the calculate app itself. To resolve this problem, here are some suggestions you can follow.

Option 1 – Run the System File Checker Scan

System File Checker or SFC is a built-in command utility that helps in restoring corrupted files as well as missing files. It replaces bad and corrupted system files to good system files that might be the reason why the calculator app is not working properly. To run the SFC command, follow the steps given below.
  • Tap Win + R to launch Run.
  • Type in cmd in the field and tap Enter.
  • After opening Command Prompt, type in sfc /scannow
The command will start a system scan which will take a few whiles before it finishes. Once it’s done, you could get the following results:
  1. Windows Resource Protection did not find any integrity violations.
  2. Windows Resource Protection found corrupt files and successfully repaired them.
  3. Windows Resource Protection found corrupt files but was unable to fix some of them.
  • Reboot your computer.

Option 2 – Run the DISM tool

You can also run the DISM Tool as it helps in repairing the Windows System Image as well as the Windows Component Store in Windows 10. Using this built-in tool, you have various options such as the “/ScanHealth”, “/CheckHealth”, and “/RestoreHealth” that could help in fixing the Calculator app.
  • Open the Command Prompt with admin privileges.
  • Then type in the following commands and make sure to hit Enter right after you type each one of them:
    • Dism /Online /Cleanup-Image /CheckHealth
    • Dism /Online /Cleanup-Image /ScanHealth
    • Dism (.)exe /Online /Cleanup-image /Restorehealth
  • Do not close the window if the process takes a while as it will probably take a few minutes to finish.

Option 3 – Try logging into your computer using a different User Account

You might want to try logging into a different User Account since it is possible that the issue could have something to do with your log-in account. Thus, you can isolate this possibility by logging into a different user account. If you don’t have any other user account, simply create a new one by clicking on the Start icon and then go to Settings > Account > Family & other users. From there, go to the Other user's section and click on the Add someone else to this PC option, and then inputs all the needed information and restarts your computer. Once your computer has restarted, log into your computer using the newly created user account.

Option 4 – Try to reset or reinstall the Calculator app

If the first three given options didn’t work, you might want to reset or reinstall the Calculator app. To do that, follow these steps:
  • Click on the Start button and go to Settings > Apps > Apps and features.
  • Next, look for the Calculator app from the app list and click on it to see its other options.
  • After that, select the Advanced options and go to the Reset section and then click on the Reset button to reset the Calculator app.
Note: You also have the option to reinstall the Calculator app. All you have the option to visit Microsoft Store and from there, uninstall the Calculator app.
Read More
1 2 3 171
Logo
Copyright © 2023, ErrorTools. All Rights Reserved
Trademark: Microsoft Windows logos are registered trademarks of Microsoft. Disclaimer: ErrorTools.com is not affiliated with Microsoft, nor claims direct affiliation.
The information on this page is provided for information purposes only.
DMCA.com Protection Status