Error 0x800CCC90 is a typical Outlook error. This error indicates that Outlook has failed to connect to the mail server that handles and manages the incoming and outgoing emails. The error message is displayed in the following format:
“There was a problem logging onto your mail server. Your User Name was rejected.”
This error limits your ability to send and receive emails on Outlook. If you largely communicate at the workplace using your Outlook account, this error may slow down your work productivity and performance dramatically. Therefore it is advisable to fix it immediately.
Solution
Error Causes
The error 0x800CCC90 is triggered several reasons including but not limited to:
Authentication issues
Failure of POP 3 Server
PST File Corruption
Registry issues- Invalid Entries
Viral infection
Further Information and Manual Repair
To resolve error 0x800CCC90, try the methods given below:
Method 1 - Adjust the Authentication Settings
To resolve the error 0x800CCC90, adjust the authentication settings. Here’s what you need to do:
First, go to the ‘Tools’ tab and select the ‘Accounts’ option.
Once you select the account option, an internet accounts box will appear on the computer screen.
Simply double click on the account property box after that go to the server tab and click on it.
Check the box that says ‘My Server Requires Authentication’.
Click on apply to accept changes tab to save changes and close the window.
To activate changes made, restart Outlook and then try sending emails again.
Method 2 - Download a PST Repair Tool
If the error is triggered by PST file corruption, then the best way to resolve it is to download the PST repair tool. Download the PST repair tool from a trusted website. Run it on your system to fix PST file issues and resolve error 0x800CCC90.
Method 3 - Scan for Viruses
Another way to resolve this error is to scan for viruses. Viruses usually enter computer systems through phishing emails or while downloading attachments.
You may not know this but viruses may be affecting your PC. Due to viruses, errors like error 0x800CCC90 can also be triggered. Therefore install an antivirus to scan and remove errors on your PC.
Method 4 - Clean the Registry and Remove Invalid Entries
Due to poor PC maintenance, misconfigured and invalid registry entries may be stored in the registry. Such entries may lead to Outlook errors too. Thus to resolve you must clean the registry and remove these entries right away. Download a registry cleaner to fix the error.
Whether the error is triggered by viral infection or registry issues, it is recommended you download only Restoro. This is the one-stop solution to resolve all PC related errors. This software is deployed with 6 scanners including a registry cleaner, an antivirus, and a system optimizer.
It is user-friendly and has simple navigation. It is compatible with all Windows versions. In just a few clicks this software resolves practically all types of PC-related errors including error 0x800CCC90.
Connecting to Microsoft’s Windows Update servers does not always go smoothly since you could run into a number of errors. One of these errors is the error code 0x8024402c. You can see this error code when you check for Windows Updates. This kind of Windows Update error occurs when the proxy or the firewall settings are incorrectly configured. As a result, the client’s connection to the Windows Update servers fails.
There are two things you can do to resolve error code 0x8024402c. First, you can try to fix the Proxy Settings. Second, you can set up Automatically Detect the connection settings. In addition, you can also try to perform System Restore as it could also help in fixing the problem. Performing System Restore might help you in fixing the error code 0x8024402C. Refer to the steps below to use System Restore.
Tap the Win + R keys to open the Run dialog box.
After that, type in “sysdm.cpl” in the field and tap Enter.
Next, go to the System Protection tab then click the System Restore button. This will open a new window where you have to select your preferred System Restore point.
After that, follow the on-screen instructions to finish the process and then restart your computer and check if the problem is fixed or not.
If performing System Restore didn’t help in fixing the problem, then try the two given options below.
Option 1 – Try fixing the Proxy Settings
In the Cortana search box, search for Internet Explorer and then click on the related search result.
After that, tap the Win + T keys on your keyboard and click on Internet Options.
Next, navigate to the Connections tab and click on LAN Settings.
Then click on the Advanced button and delete all the entries in the list generated in the Exceptions section. And if the Advanced button is disabled because the “Use a proxy server for your LAN (These settings will not apply to dial-up or VPN connections)” option is disabled then you are good to go. Now proceed to the next step.
Tap the Win + X keys or right-click on the Start button and select Command Prompt (Admin) or you could also search for “cmd” in the Cortana search box and right-click on Command Prompt from the search results and select the “Run as administrator” option.
If a User Account Control appears, click on Yes to proceed. After that, type each one of the commands listed below, and don’t forget to hit Enter after you type each one of them.
netsh winhttp reset proxy
net stop wuauserv
net start wuauserv
Now restart your computer and check if the problem is fixed or not by checking for Windows Updates again.
Option 2 – Try setting up Automatically Detect the connection settings
Type in “internet options” in the Cortana search box and then click on the related search result.
After that, navigate to the Connections tab.
Next, click on the LAN Settings button located under the Local Area Network (LAN) settings section.
Then uncheck the “Use a proxy server for your LAN (These settings will not apply to dial-up or VPN connections)” option under the Proxy Server section and click OK.
Now restart your computer to apply the changes made successfully.
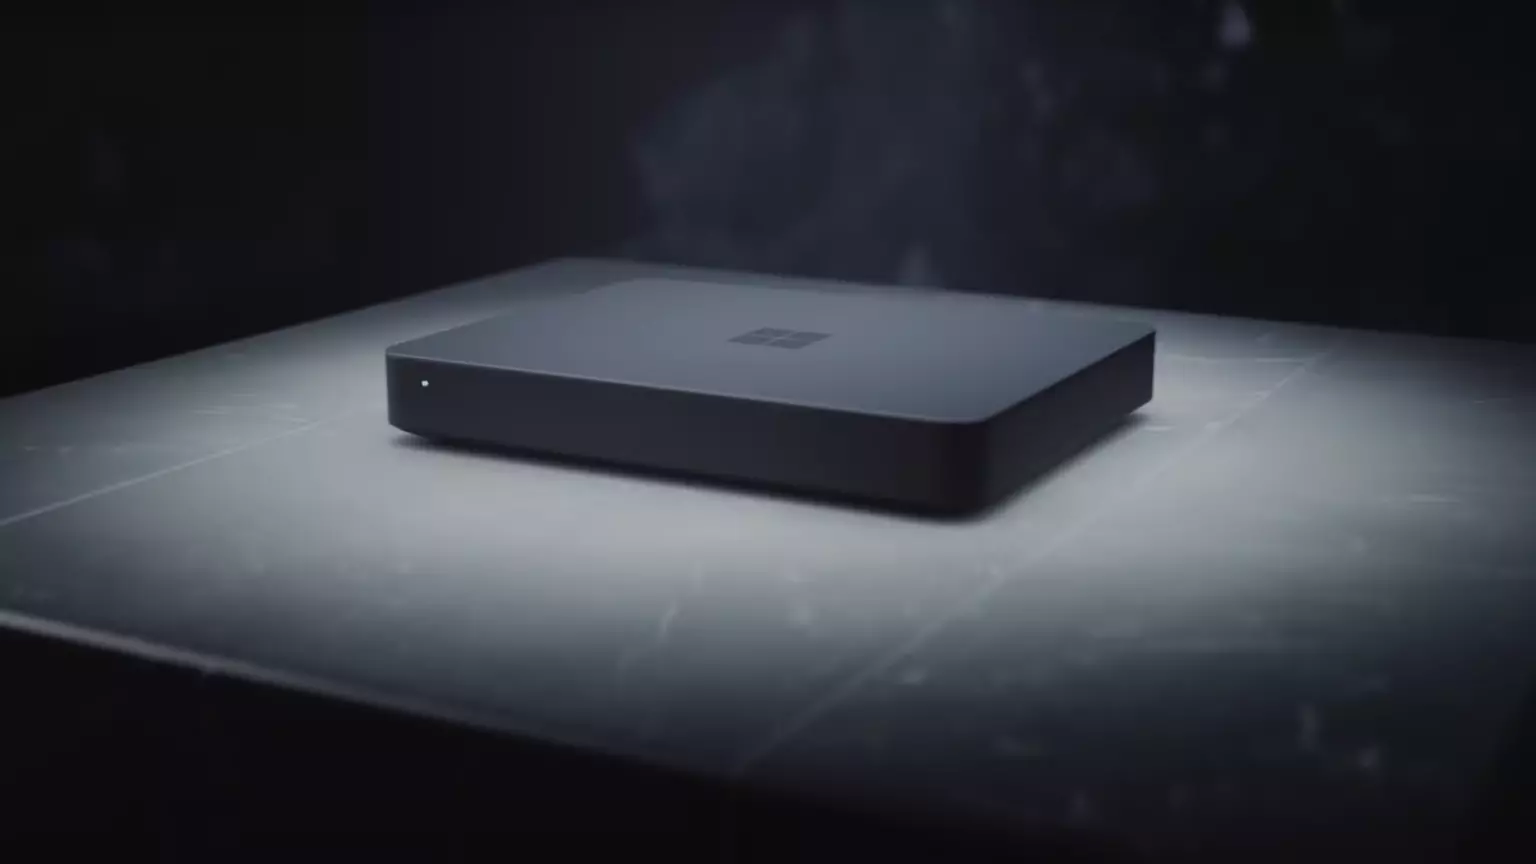
Microsoft will soon offer 4 CPU computer specifically aimed at developers and its name is Volterra. The machine as stated will come with 4 processors but the strange thing is that they will be ARM-based instead of x86.
CEO of Microsoft, mister Satya Nadella has introduced the product and Microsoft has released a youtube video promoting it.
https://youtu.be/yICVNta8jMU
The computer system will have Qualcomm's NPU or built-in neural processing unit to use AI's power to help developers write and produce better and faster code. The sad news is that besides processors used there is no other information on other components that will go into this system.
As seen in the video, the computer reminds me a lot of the apple MAC mini with its size and design, and as stated it is made from recycled plastic which in our opinion will bring the price under $1000.
Microsoft has not provided an official price tag for Volterra, but our hope is that it will be more affordable than building your own development PC. Also, there was nothing said about computer availability, we suspect that the selling model will be typical Microsoft one with first models available only in the USA and moving forward slowly opening it to other markets.
Volterra specifications
As previously said nothing except the number of CPUs and their type has been officially said but we managed to get some information about some other specific things not including its inside components.
The unit will have a fan inside of it for cooling purposes and better performance and that is what was officially stated by Microsoft. On the outside, it is known that the computer will have three USB-A ports, a mini DisplayPort, and an ethernet input. All of these will be positioned on the back of the device, on its left side there will be two USB-C ports.
The unit itself will be running on Windows 11 but it was not disclosed anything about the version, we presume since this is a model aimed for professional use that it will come with Windows 11 PRO version.
Currently available tools for ARM
Since this product is aimed at developers logically support for developing software is a must-have and at the time of this writing software that will come and that will run on Volterra is:
Visual Studio 2022
Visual Studio Code
Visual C++
Modern .NET 6 & JAVA
Classic .NET
Windows Terminal
Windows Subsystem for Android
Windows Subsystem for Linux
Conclusion
Once MAC studio has been released it showed that specific builds have their audience and can be sold for less of a price than full-fledged custom-made workstations. There is no doubt that Microsoft Volterra will find its audience but will that be enough to have more versions of this compact computer only time will tell.
The CoreFoundation dll error is a common error associated with Apple Software products. Most of the Apple Software products rely on this dll file to load and run. This dll file is Apple’s proprietary.
The error message is prompted in the following format:
“CoreFoundation.dll was not found”
or
“Apple Application Support is missing’.
Solution
Error Causes
The CoreFoundation.dll error message is triggered because of several reasons. These include:
Deleted CoreFoundation dll file
The CoreFoundation dll file has been overwritten
Poor installation of the Apple software
Corrupt software due to viral infection
Registry problems
Further Information and Manual Repair
It is advisable to fix CoreFoundation dll error code right away to avoid inconvenience. This error may stop you from accessing and running your desired Apple application.
Here are some of the best ways to resolve this error on your system:
1. Restore the Deleted CoreFoundation dll File
Since Dynamic Link Library is a shared program, if you happen to delete an Apple program on your PC, chances are you might have deleted that file too in the process.
Therefore, the easiest way to recover and restore the CoreFoundation dll file and resolve the error is to look for the file in the recycle bin. If you can’t locate it, then another way to restore the missing CoreFoundation dll file is to download the files from the internet.
2. Reinstall Apple Software
If the error still persists then it is advisable to re-install Apple software via iTunes or any other Apple Software that you have on your PC.
For example, if you have iTunes, then to reinstall it first go to the start menu and then the control panel. Now click on Add/Remove programs and locate iTunes software. Click the Uninstall button next to iTunes. Wait for a while until the program is completely uninstalled.
After the installation is complete, restart your PC and then download the latest version on iTunes and install it. Now try running the software again. Hopefully, this will resolve the issue.
3. Scan for Viruses
Another way to resolve CoreFoundation dll error on your system is to scan for viruses. Run an antivirus to detect viruses and remove them from your PC.
4. Clean Your Registry
Remember DLL file errors also indicate a corrupt registry. When you don’t clean the registry it overloads with unnecessary and obsolete files like junk files, cookies, temporary internet history, and bad /invalid registry entries.
When these files accumulate, they damage the registry, dll, and system files too. It also causes disk fragmentation. To repair the registry and fix dll files again, download a registry cleaner.
Whether you want to scan for viruses or clean the registry, it is advisable to download Restoro.
This is a multi-functional and advanced PC Fixer deployed with an intuitive algorithm and multiple powerful utilities. These include an antivirus, a registry cleaner, Active X controls, and class scanner, and a system optimizer.
The registry cleaner detects all registry issues and resolves them instantly. It wipes out the unnecessary files cluttering and damaging the registry. It fixes and restores the damaged dll files including CoreFoundation dll file thereby resolving the error. It takes a few clicks to resolve this error.
The antivirus feature scans your entire PC and removes all kinds of malicious software including spyware, malware, viruses, and Trojans.
To ensure the antivirus does not slow down the speed of your PC, Restoro also features a system optimizer that boosts the performance of your computer significantly.
It is powerful and bug-free software with a user-friendly interface that makes it quite easy to operate. You can download it on any Windows version as it is compatible with all.
Click here to download Restoro and resolve CoreFoundation dll error now!
The New and upcoming HAF 700 Evo from Coller master is a beast of a case, but so is its price. The case itself is still not released but as sources say it will be soon, well at least we hope so. The price will be around $500 which is a little on the expensive side of things but the features it is bringing are very impressive.
HAF 700 EVO Size and its advantages
HAF stands for High Airflow and with this case, you are going to get it but first let us talk about other characteristics of the case. Firstly case is ATX full tower, pretty big going 24.64 x 11.45. x 26.22 inches in size but like all full tower cases it can hold all motherboard types including Mini-ITX, Micro-ATX, ATX, E-ATX. The large case size also lets you place a pretty big GPU, going to 19.29 inches (490 mm) in its length covering currently all available Graphic cards on market.
Being a very big computer case is not just placing motherboard and big GPU, there are other great advantages of it, firstly that you can go wild with your CPU cooler, going all the way to 6.5 inches in cooler height will satisfy all users and having 12x 2.5 or 3.5-inch internal bays will. And if even that is not enough you have 8 expansion slots available.
Inside HAF 700 EVO
Inside the casing you will also find 2 front fans with 200mm diameter, 2 rear fans sized 120mm, and 1 bottom fan of 120mm. You can also manually mount standard 120mm fans on top of the case for maximum airflow.
Front panel and outsides
The front side is filled with 4x USB 3.2 Gen 1 Type-A (5 Gbps), 1X USB Type-C (up to 10Gbps), 3.5mm both headphone and audio jack along with a reset switch. Also, the circle in the very front is a hi-resolution LCD customizable display, you know, just to add more flavor and personal touch to the case. Fron is also filled with glass panels emitting RGB light.
Of course, you must also have a Tempered Glass Side Panel and well weight of 53.57 pounds (24.3 kg), yup you read that correctly, beside its hefty price tag this cooler master beast also is pretty heavy. Granted all of the weight comes from the glass front panel it is still a little hard on moving and taking out of the box.
This is also the case where you will not need a single screwdriver, everything is made to be assembled with your hands alone pushing easy assembly into the front row.
Conclusion
So in the end what are my thoughts about this expensive and heavy PC case? Would I recommend it? The answer to that question could depend really on your budget, let us be really honest here if you can afford it, YES, wholeheartedly I would recommend the case, it is great, it feels great, it looks great and the airflow is amazing. However, if you are tight on a budget, there are other great cases with excellent airflow and you might want to skip this one.
In trying to upgrade your Windows 10 computer, you might have come across the error 0x800F0923. This kind of Windows upgrade/update error is caused by an incompatible driver or software that’s installed on your computer. Thus, to fix the problem, you need a working fix which you can choose from below.
As mentioned, you can try updating the concerned application or software to its latest version to resolve the compatibility issue and in turn, fix error 0x800F0923. Note that depending on where you had installed the application, your steps will change. So if you have it installed directly from the website, refer to these steps:
Look for the built-in option to check the updates since the most application has this option.
You also have the option to go to the website of the application and check if there is a new version available. If there is, download and update the app.
On the other hand, if you have downloaded the app from the Microsoft Store, here’s what you have to do:
Open the Store and click on the three dots located at the top-right of the window.
Next, click the Download and Updates option.
From there, check if there is an update available for the store. If there is, update it.
Option 2 – Try to uninstall the application or software
If updating the app or software to its latest version didn’t help and you’re still getting the error 0x800F0923 every time you attempt to install the Windows Updates, you may have to uninstall it. You will need to use the usual Program and Features to uninstall it if you have downloaded it from the website.
In the search box, type in “control” and then click on Control Panel (desktop app) among the search results.
After that, select Programs and Features from the list which will give you a list of all the programs installed on your computer.
From there, look for the concerned program and select it and then uninstall it.
Note: If you have downloaded the app from the Windows Store, you can simply right-click on it from the application list and then uninstall it.
Option 3 – Try to disable your antivirus program
Disabling the antivirus program or any security software installed in your computer is always a good idea you can try when the Windows Update process does not go smoothly. So before you try updating your computer again, make sure to disable the antivirus or security program and once the Windows Update is done, don’t forget to enable the antivirus program back again.
Option 4 – Try to run the Windows Update Troubleshooter
Running the built-in Windows Update troubleshooter could also help you resolve the Windows Update error 0x80073712. To run it, go to Settings and then select Troubleshoot from the options. From there, click on Windows Update and then click the “Run the troubleshooter” button.
Option 5 – Try to do the Update in a Clean Boot state
Putting your PC in a Clean Boot state can also help you install Windows Updates or Upgrades without any trouble because, during this state, you can start the system with a minimum number of drivers and startup programs that will surely help you in isolating the root cause of the issue.
Log onto your PC as an administrator.
Type in MSConfig in the Start Search to open the System Configuration utility.
From there, go to the General tab and click “Selective startup”.
Clear the “Load Startup items” checkbox and make sure that the “Load System Services” and “Use Original boot configuration” options are checked.
Next, click the Services tab and select the “Hide All Microsoft Services” checkbox.
Click Disable all.
Click on Apply/OK and restart your PC. (This will put your PC into a Clean Boot State. And configure Windows to use the usual startup, just simply undo the changes.)
After that, try to install the Windows Updates or upgrade again.
MSASCui.exe is a digitally signed file from Microsoft located in folder C:\Program Files\Windows Defender.
It is a component of Microsoft Windows Defender Antispyware. This file is responsible for performing spyware scans. It is already installed in Windows Vista operating system. MSASCui.exe becomes an error code when it is found in another path. It is categorized as a Windows runtime error.
Solution
Error Causes
The cause of MSASCui.exe error is triggered by:
Corrupt or damaged registry entries
Virus Infection
The potential risks of MSASCui.exe error are:
Slow PC performance
Data loss
When this file becomes an error, it will display messages like:
“This application has failed to start to run on Windows because MSASCUI.exe cannot be found.”“Windows Defender cannot work properly and protect the Windows system effectively”
The message will keep popping up on your computer screen time and again.
Further Information and Manual Repair
When you experience an MSASCui.exe error on your PC, it is advisable to fix and repair it immediately before it causes serious damages to your system.
Here are some DIY quick solutions to repair MSASCui.exe error:
Solution 1:
If the speed of your PC reduces significantly and you also see MSASCui.exe error message pop on your screen, then in this case it is advisable to uninstall the Windows Defender program from your PC.
To do so, follow these instructions:
First, open the Windows Task Manager by pressing the “Ctrl, “Alt” and “Delete” keys on the keyboard.
Now click the ‘Processes’ tab. This will show the currently running processes on your system.
Scroll down and click on “MSASCui.exe” and then end the process. This will stop the program from running on your PC.
After this go to the start menu and double click on ‘My Computer’ and click on the C drive.
Choose the option ‘Program Files’ and then click on the ‘Windows Defender’ folder.
Now to delete this folder, right-click and select ‘delete’. This will uninstall the program, fix the MSASCui.exe error, and also improve the performance of your PC.
Solution 2:
If you find the MSASCui.exe file located in some other path, then this is an indication of a virus.
In this case, it is recommended to run an antivirus program on your PC to scan and delete all viruses.
If you don’t have an antivirus program already installed on your system, then you should download it. Once antivirus software is downloaded, simply run it to scan viruses and then click on delete to remove all the viruses on your system.
This will help you resolve the MSASCui.exe error caused by malware on your PC right away.
One of the most useful utilities for advanced users in Windows is the Windows command line or Command Prompt. It is efficient in fixing system files, checking the disk for errors as well as other intensive tasks that are made convenient using this.
One of the tasks you can carry out using Command Prompt is repairing the Windows bootup process if it encounters any issues. However, if you tried running the “bootrec/fixboot” command and you receive an error message saying, “Element not found”, read on as this post will guide you in fixing this error. This kind of error in the command line could be due to a damaged BCD or MBE, inactive system partition, or it could also be that there is no drive letter being assigned to the EFI partition. Whichever the case is, here are some possible fixes that should help you resolve the problem.
Option 1 – Try to repair BCD
As mentioned the error could be caused by a damaged BCD and so to fix the problem, you need to repair BCD by following these steps:
First, make sure that you have a bootable Windows 10 USB drive with you and use it to boot your computer.
Once you’re on the Welcome Screen, click on Next.
After that, click on Repair your computer located at the bottom-left portion of the window.
Then select Troubleshoot > Advanced Options > Command Prompt.
After you open the Command Prompt window, execute the following command:
bootrec /fixboot
Afterward, enter the next command below to rename the BCD file:
ren BCD BCD.bak
Next, type the following command and make sure to replace “b:” with the letter of your bootable drive attached to your computer.
bcdboot c:Windows /l en-us /s b: /f ALL
Now, wait until the process is completed and restart your computer to successfully apply the changes made.
Option 2 – Try assigning the drive letter to the EFI partition
Tap the Win + X keys or right-click on the Start button and click on Command Prompt (Admin) to open Command Prompt with admin privileges.
Then type the following command to start the Diskpart utility:
diskpart
After that, if you receive a UAC prompt, just click on Yes to proceed.
Next, type the following command to list all the volumes created on your PC including both types of partitions that are visible to a normal user in the File Explorer as well as the ones created by Windows 10 by default which helps it in storing the boot files and other important system files:
list volume
Now type the following command to select the desired volume:
select volume number
Then type the following command to assign a letter to the selected volume:
assign letter=<LETTER>
Note: Make sure to replace “<LETTER>” with the letter you want to allocate to that partition. Afterward, it will assign a letter to the selected volume.
Reboot your PC to apply the changes made.
Option 3 – Try setting the System Partition to Active
Like the first given option, you also have to make sure that you have a bootable Windows 10 USB drive before you proceed to set the System Partition to Active. Once you have it covered, refer to these steps:
Boot your computer using the bootable Windows 10 USB drive.
Next, click Next when you get to the Welcome Screen.
Then click on Repair your computer located at the bottom left part of the window and select Troubleshoot > Advanced Options > Command Prompt.
After opening Command Prompt, type the following command and hit Enter to start the Diskpart utility. It is a command line-based utility just like Command Prompt but has a UAC prompt once you provoke it. So if you encounter a UAC prompt, just click on Yes to proceed.
diskpart
Now type the following command:
list disk
From there, select your primary disk by typing the following command:
select disk number
After that, list all the partitions on the selected disk by entering the following command:
list partition
The command you just entered will list all the partitions created on your PC including both types of partitions that are visible to a normal user in the File Explorer as well as the ones created by Windows 10 by default which helps it in storing the boot files and other important system files.
Now type the following command to select the partition that is usually around 100 MB in size:
select partition number
Finally, type the following command to mark the partition active:
active
Then type the “exit” command to exit the disk part utility.
If you encounter the “Diskpart failed to clear disk attributes” error when you try to change the read-only state of a storage device using the Diskpart application and the request is denied, worry not for this post will give you a couple of fixes to resolve the problem. As you know, Diskpart is used for resolving read-only storage devices by changing their attribute via the command line. So if it is not able to change the attribute of the storage device, then you will most likely encounter an error such as this one. This kind of error is not uncommon and as long as there are no damaged physical attributes, you can resolve it right away.
There are tons of reasons why you’re getting this error while using Diskpart, it could be that the storage device has a physical write-protected switch or the disk is hidden or has bad sectors. It could also be because the storage drive might be in RAW format or that you are running the Diskpart application without admin privileges. Whatever the cause may be, here are some options you can try to fix the problem but before you proceed, make sure that you log on to your PC as an administrator.
Option 1 – Check if there is a physical switch on the storage device
There are some USB devices and SD card readers that have a write-protected physical switch that disables all the writable options on the storage device and so if it is turned on, Diskpart won’t be able to change the disk attribute to writable. To check, simply look for the physical switch on both sides of the device and once you found it, make sure that it is toggled off and then plug the storage device back in then try running Diskpart once again.
Option 2 – Modify the WriteProtected key in the Registry Editor
Before you proceed, you have to create a System Restore Point first.
Tap the Win + R keys to open Run and type “Regedit” in the field and hit Enter to open the Registry Editor.
After that, look for the “WriteProtect” registry entry which is located on the left side of the window, and then double click on it.
Change its value to “0” and click OK to save the changes made and exit the Registry Editor.
Option 3 – Run CHKDSK to check the drive for errors
When it comes to some issues concerning the hard drive or removable devices, there is a utility in Windows that might help which is called “chkdsk”. This error check utility can help with several issues in the system including the “Diskpart failed to clear disk attributes” error.
Tap the Win + S keys to open the Search box.
Then type “command prompt” in the field and from the search results that appear, right-click on Command Prompt and select “Run as administrator”.
After opening an elevated command prompt, copy and paste the following command and hit Enter:
Note: In the command given above, “[/F]” will try to fix the system errors while “[/R]” will be the one to fix the bad sectors.
Now if you are prompted to run CHKDSK after your reboot your PC, just tap Y and reboot your PC.
If CHKDSK is not able to find any errors, tap the Win + E keys and navigate the access window. From there, right-click on the concerned drive and click on Properties.
After opening Properties, click on the tab Tools and then click on the “Check” button under the Error-checking section.
Wait until the process is completed and then restart your computer.
Option 4 – Clear the attributes on RAW
Tap the Win + S keys then type “diskpart” in the field.
Click the Diskpart application and if a User Account Control dialog box pops up, click Yes to proceed.
After opening an elevated Command Prompt, type in the commands listed below and make sure to tap Enter right after you key in one command after the other.
list volume
select volume‘n’ (In this command, you have to replace ‘n’ with the volume number of the drive)
format fs=fat32 quick (In this command you also have the flexibility to change the format to ‘ntfs’ or ‘exfat’)
After executing the commands given, unplug the removable storage device and wait for a couple of seconds and then plug it back in.
Now try any normal write operations and see if the error no longer appears.
Option 5 – Try checking the hardware components
On the other hand, it is also possible that the issue has something to do with a hardware problem and so you need to check the hardware components on your computer to determine that.
As of late, users have been reporting about getting an error saying, SAFE_OS phase error during Replicate_OC operation when they tried to upgrade their Windows 7 or Windows 8.1 computers to Windows 10. Although the error code in this problem could vary, in this situation, it states:
0xC1900101 – 0x20017, The installation failed in the SAFE_OS phase error during Replicate_OC operation
To fix this issue, you need to follow the given options below. But before you do, you need to create a System Restore point first so that if anything goes wrong, you can always undo the changes you’ve made.
Option 1 – Try to change the Windows 10 installation
According to security experts, one of the main causes of this error is the KB3064209Windows Update. This particular update is the one responsible for updating the CPU Microcode for processors made by Intel. Thus, if you don’t use an Intel processor, you can skip this option and proceed to the next one. However, if you use Intel, make sure to follow the instructions in this option carefully. Take note that in this solution, C: partition is referred to as the OS Partition while H: partition is referred to as the USB Pen Drive.
First, you need to download the Windows 10 ISO from the Windows 10 Media Creation tool and then copy its contents to the Pen Drive H.
Next, tap the Win + X keys and click on the Command Prompt (Admin0 option. If a User Account Control appears, simply click Yes.
After opening Command Prompt, type the following command:
From there, right-click on the file named “mcupdate_GenuineIntel.dll and click on Properties.
Next, go to the Security tab and click on Advanced. In the Advanced section, change the Owner to your User Account and click OK.
And then back to the Security tab, click on the Edit button and check on Full control to make sure that your User Account has all the privileges.
Now click on Apply and then OK.
After that, delete the file you saw earlier which is named mcupdate_Genuine.dll.
Then close all the Windows File Explorer instances and go back to the Command Prompt window and unmounts the image you mounted before by typing the following command:
Afterward, repeat the steps from mounting up until here for these files:
wim /index:2
wim /index:1
wim /index:2
Now delete the mount folder and remove the USB Pen Drive and then boot with the installer.
Option 2 – Try to perform a Disk Cleanup
Chances are, some unnecessary files in your computer might be interrupting the installation process which explains why you’re getting SAFE_OS phase error during Replicate_OC operation instead so you need to perform a Disk Cleanup in order to fix the problem.
Option 3 – Try updating all your drivers
Every now and then, drivers get corrupted or outdated so it’s no surprise that they conflict with the operating system and cause errors like the SAFE_OS phase error during the Replicate_OC operation. To fix the problem, you need to update all your drivers. Follow the steps below to update your drivers.
Tap the Win + R keys to launch Run.
Type in devmgmt.msc into the box and tap Enter or click OK to open the Device Manager.
After that, a list of device drivers will be displayed. If you see a red or yellow sign that shows up against the driver, right-click on the driver’s name and select “Update Driver Software” or “Uninstall”. And if you find any “Unknown device”, you need to update it as well.
Select the “Search automatically for updated driver software” option and then follow the instructions to complete the process.
Restart your PC.
Note: You also have the option to go directly to the website of your graphics card manufacturer and check if there’s a new update – if there is, download it.
Option 4 – Try to update your system’s BIOS
Aside from outdated drivers, outdated BIOS could also be the reason why you’re getting the SAFE_OS phase error during Replicate_OC operation which is why you need to update your system’s BIOS in order to resolve the issue.
Option 5 – Try checking the Windows Services status
In the Cortana search box, search for “Services” and then click on the Services icon.
After that, the Services utility will be opened in a new window.
Next, look for the following services:
BITS (Background Intelligent Transfer Service)
Windows Update Service
Cryptographic Service
Then right-click on each one of the services and click on Properties. From there, select Automatic from the drop-down of the Startup Type menu.
Now click on OK for each one of them and restart your PC to apply the changes made.
Option 6 – Try to check the RAM modules
There are many times when all the components of the RAM weren’t able to be used by the computer so you need to check the RAM modules.
You need to first turn off your PC and then take out your RAM physically.
Next, clean it with a soft cloth and blow some air into the RAM slot in the motherboard.
If you open any program in your Windows 10 PC such as Outlook and suddenly get an error message saying, “Failed to register a VB Script dll. Reinstall or run Regsvr32.exe Vbscript.dll to self-register”, read on, as this post will guide you on what you can do to fix it. The obvious solution to this problem is by re-registering the “vbscript.dll” file on your computer.
Refer to the instructions given below to re-register the VB Script DLL file and to fix the error.
Step 1: Open the Command Prompt as an administrator from the WinX Menu.
Step 2: After opening Command Prompt, type in the following command and tap Enter on your keyboard.
regsvr32.exe vbscript.dll
Step 3: Once you enter the command, it will re-register the VB Script DLL file using the Windows OS tool called Regsvr32 or regsvr32.exe. This tool is a command-line utility used to register and unregister OLE controls such as DLL and ActiveX (OCX) controls in the Windows environment. After the execution of the command, you should see the following pop-up on your screen which means the re-registering of the concerned DLL file has succeeded.
On the other hand, if re-registering the DLL file didn’t work, then you can try logging in using an administrator account and then register the DLL file again or you could also use the System File Checker to figure out what the problem really is and automatically fix it.
System File Checker or SFC is a built-in command utility that helps in restoring corrupted files as well as missing files. It replaces bad and corrupted system files with good system files. To run the SFC command, follow the steps given below.
Tap Win + R to launch Run.
Type in cmd in the field and tap Enter.
After opening Command Prompt, type in sfc /scannow
The command will start a system scan which will take a few whiles before it finishes. Once it’s done, you could get the following results:
Windows Resource Protection did not find any integrity violations.
Windows Resource Protection found corrupt files and successfully repaired them.
Windows Resource Protection found corrupt files but was unable to fix some of them.