This is a typical MS Outlook error code. This error message may prevent you from sending and receiving emails via your Outlook account. The error message is displayed in the following format:
"An unknown error has occurred. 0x80040600"
If this is the primary source of your communication in the office, then this error can cause you a great deal of inconvenience as it may prevent you from running important business errands via your Outlook account efficiently.
Therefore, when you experience the 0x80040600 error on your PC, it is advisable to fix it immediately.
Solution
Error Causes
This error code is triggered due to multiple reasons. These include but are not limited to:
PST (Personal Storage Table) file reaches its file size limit
PST file corruption
Viral infection
Incorrect Windows registry settings
Improper shutdown of Outlook
This error code can lower your office productivity as you may be unable to send and receive emails on your Outlook account. Also, you may get locked out of your account and be unable to view your calendar entries and open email attachments saved previously in your account.
Further Information and Manual Repair
To resolve the error on your PC, you don’t have to wait for the network personnel to fix it or be a computer expert. Here is a list of easy and effective DIY methods to help you fix this error code right away.
Method 1: Download a PST File Repair
If the error occurs because your PST file has reached it maximum limit which is normally 2 GB or because of PST file corruption, then it is advisable to download a PST file repair tool. After downloading it, simply run it on your PC. This tool will immediately fix the damaged PST file and file the issue.
Method 2: Download an Antivirus
Deadly viruses like Trojans and spyware can penetrate into your PC if through downloads and opening phishing emails. Therefore, to remove such viruses it is important to install an antivirus and scan your entire PC.
Method 3: Install Restoro.
If the problem is associated with incorrect Windows registry settings or viral infection, it is advisable to download Restoro.
This software is multi-functional deployed with 6 different and powerful utilities including an antivirus, a registry cleaner, and a system optimizer to name a few.
The registry cleaner repairs the registry corrects the settings and fixes the damaged files.
The antivirus on the other hand simultaneously removes all types of viruses including Trojans, spyware, malware, and adware on the system. While the system optimizer feature ensures the PC performance and speed are not compromised during the scanning and cleanup process.
This software is safe, efficient, and compatible with all Windows versions. It has a user-friendly interface and simple navigations which makes it quite easy for all levels of users including novice and intermediate to operate.
Click here to download Restoro and resolve the 0x80040600 error code on your PC today!
Windows defender error 0x800700AA, service can not be started comes when the user is trying to run Windows defender scan on their system.
This kind of behavior happens for two reasons mostly, third-party application conflict or corrupted system files.
In this article, we will tackle both scenarios and provide you with solutions in both cases.
Third-party application conflict
In this rare scenario when Windows defender can not start scan due to conflict with installed service or application in the system solution is quite simple. Restart your PC into safe mode and run the scan from there. In a safe mode environment, minimum drivers and services are only loaded eliminating any conflicts that might occur when everything is booted. If Windows defender can not run the scan in safe mode and you get the same 0x800700AA error then you can eliminate application conflict as a reason and move to the next solution which will tackle corrupted system files. If you, however, managed to run a scan then you have a rare third-party application conflict, you can boot normally into windows and try to eliminate one by one to see which one is causing the issue. The safest bet would be to start with security software because most of the time that is what causes conflicts in running services and applications.
Corrupted system files
If the previous solution has not provided you with results then you have system file corruption that needs to be fixed. Move from one solution to another as presented below:
Run SFC scan
SFC scan is a built-in Windows tool for solving corrupted system files issues, it is fully automated and does not require from the user any kind of knowledge or information. To run it and scan the system do the following:
Press ⊞ WINDOWS + X to open the secret menu
Left-click on the command prompt (admin)
In command prompt type SFC /SCANNOW and press ENTER
Wait for the process to finish, do not interrupt it and once it is done, restart your computer
Run DISM scan
DISM scan is similar to SFC scan but it tackles different types of system file corruption and it is recommended to run it also after SFC has been completed. Please note that for DISM scan to be successful you will need a stable internet connection since DISM will replace corrupted files with new ones downloaded from Microsoft. To run it do the following:
Press ⊞ WINDOWS + X to open the secret menu
Left-click on the command prompt (admin)
inside command prompt type: exe /online /cleanup-image /scanhealth followed by ENTER, then type: Dism.exe /online /cleanup-image /restorehealth also followed with ENTER.
Leave scan to finish and reboot your PC
When we initiate the copy or move files command we get a dialog that shows us the progress of the current operation, under that bar we can click on the little arrow to expand the bar into so-called more details view where we get more information like which file is being copied, more detailed graph, etc.
Windows will remember the last option we had and next time when we start the same process it will open the last view.
But what if we want to only have one view always open as default, even if we change it? Let's say that we always want to have a detailed view opened always as our default even if we switch to a minimal one? Well with some tweaks in the registry of Windows we can.
Note that this guide will require changing things in the registry of Windows itself, it is always smart and recommended to make a safe backup of your registry, just in case.
FOR ALWAYS SHOW MORE DETAILS FOLLOW THIS GUIDE:
open notepad and paste the following code inside:
Windows Registry Editor Version 5.00[HKEY_CURRENT_USER\Software\Microsoft\Windows\CurrentVersion\Explorer\OperationStatusManager]"EnthusiastMode"=dword:00000001
Go to File > Save as... and once the file save dialog opens choose at the bottom all files under file type. Save the file with extension .REG naming it whatever you want.
Right-click on file and choose Merge, confirm with YES and you are done, now each time when you start copy or move operation details view will be open.
FOR ALWAYS SHOW FEWER DETAILS FOLLOW THIS GUIDE:
open notepad and paste the following code inside:
Windows Registry Editor Version 5.00[HKEY_CURRENT_USER\Software\Microsoft\Windows\CurrentVersion\Explorer\OperationStatusManager]"EnthusiastMode"=dword:00000000
Go to File > Save as... and once the file save dialog opens choose at the bottom all files under file type. Save the file with extension .REG naming it whatever you want.
Right-click on file and choose Merge, confirm with YES and you are done, now each time when you start copy or move operation minimal details view will be open.
A copy of Windows gets into a grace period when it is installed on a computer which means that you can use your Windows computer without any constraints on its feature. However, if you suddenly encounter an error code 0xC004F009 then this means that the grace period has already expired. In such cases, you will see the following error message on your screen:
“Error Code 0xC004F009, The Software Licensing Service reported that the grace period expired.”
One of the possible causes of this error is that it could be that the grace period has already expired way before the system was activated which is a result of which the system is in the Notifications state at this moment.
The error code 0xC004F009 has something to do with MAK-enabled computers in an enterprise when it comes to Volume Licensing. One of the reasons that this error pops up is due to the possibility that the computer was not activated yet even when it was already connected to the Enterprise. Another most likely cause of the error is when the system was never connected with the Enterprise at all and the given grace period has expired before your computer system is activated. Whatever the real cause of this error, this post will guide you in fixing it. Just refer to the instructions given below to fix it.
Option 1 – Try activating Windows using the command-line tool
First, you need to obtain your MAK key from the IT administrator.
Once you have it, tap the Win + R keys on your keyboard and then type “cmd” in the field and hit Enter to open an elevated Command Prompt.
After that, type this command and hit Enter to install the product key or replace the existing one: Slmgr.vbs –ipk <your mak key>
Next, type another command and hit Enter: slmgr.vbs –ato
Once you’ve executed the given commands, Windows should be activated after it connects to Microsoft servers and then gives it some time and try to check if error code 0xC004F009 is now fixed or not.
Option 2 – Try activating Windows using your mobile phone
Activating Windows 10 can also be done using your phone. Just note that you have to call Microsoft to do so.
In the Start Search box, type in “Slui 4” and tap Enter.
Next, select your country and click on Next.
Keep the window open and call the toll-free number of the country you’re from.
Afterward, a confirmation ID should be given by the automated system which you must take a note of.
Finally, in the box on the window, type in the confirmation ID and click on the Activate button. That should do it.
Option 3 – Try to prolong the grace period
On the other hand, it is also possible for you to prolong the grace period but you might have to get another genuine Windows key for that. Before you proceed, you need to create a System Restore point first afterwards, refer to the steps given below to increase the grace period of the Software Licensing Service on your Windows 10 computer.
Tap the Win + R keys to open the Run dialog box and type “Regedit” in the field then hit Enter to open the Registry Editor.
After that, navigate to this registry key: HKEY_LOCAL_MACHINESOFTWAREMicrosoftWindowsCurrentVersionSetupOOBEmediabootinstall
Next, change the value of the “mediabootinstall” key to “0”.
Now open Command Prompt with admin privileges and then type this command and hit Enter: slmgr –rearm
The command you just entered will add another grace period to your system activation. After that, you have to obtain a new key and then activate Windows.
Option 4 – Try running the Windows 10 Activation Troubleshooter
You can also try to run the Windows 10 Activation troubleshooter to help resolve the error code 0xC004F009.
Go to Settings and then select Activation.
After that, click on the Windows Activation and then troubleshoot. This will help you address most of the commonly found activation issues in Windows devices.
When it comes to downloading and installing games in the Windows operating system, Steam is one of the well-known sources. You can find many big titles in Streams such as PUBG, Heaven Vaults, and a whole lot more. It is undeniably a great source of getting games in the Windows operating systems. However, just like other software, Steam is not immune to errors as you could encounter errors while using it. This isn’t caused by a bad code but also due to reliance on various factors in both respects to the software and hardware. One of these errors is the Application Load Error 5:0000065434. This kind of error can appear when you launch numerous game titles on your Windows 10 computer like Skyrim, Oblivion, Bully, Morrowind, Vortex, and many more.
To fix this application error in Steam, you can try to copy the Steam executable file or use the Command Prompt. You could also try to verify the integrity of the game files feature or delete any conflicting files on your computer.
Option 1 – Try copying the Steam executable file
The first thing you can do to fix the error is to copy the executable file of Steam.
First, right-click on the desktop shortcut of steam located on your Desktop and click on the “Open file location” option.
After that, copy the executable file for Steam and navigate to the folder of the library of the games which is usually located in SteamSteamAppsCommon
Now paste the Steam executable file you just copied inside the folder of the game and see if it fixes the error or not.
Option 2 – Try to use the Command Prompt
In the Start Search, type “command prompt” and right-click on Command Prompt from the search results and then select the “Run as administrator” option.
After opening Command Prompt as administrator, execute the following command:
cd "C:Program Files (x86)Steamsteamappscommon"mklink "steam.exe" "C:Program Files (x86)Steamsteam.exe"
The command you entered will create a link between the executable file of Steam to the operating system. Once you see a message that states, “Operation completed successfully”, restart your computer.
Option 3 – Try to use the “Verify integrity of the game files” feature
The next thing you can do to get rid of the error is to use the “Verify integrity of the game files” feature. How? Refer to these steps:
Open Steam and right-click on the entry of the game where you encountered the error in the Library and then select Properties.
After that, navigate to the LOCAL FILES tab and click the “VERIFY INTEGRITY OF GAME FILES” button.
Wait for the process to be completed and see if the feature has helped in fixing the error or not.
Option 4 – Try to delete any conflicting files
The error might be caused by some conflicting files on your computer which is why you have to delete them. To do that, follow these steps:
Open the Documents folder and look for the folder created by the game that’s throwing the error. For instance, it could be stored in the “My Games” folder.
Next, delete the folder and then try to launch the game again and see if the error is now fixed.
Runtime Error 372 is one of the various types of runtime errors on Windows PC. This error code hampers your ability to access and run Microsoft Visual Basic applications on the system.
Solution
Error Causes
Runtime Error 372 can occur due to multiple reasons:
Corrupt application due to viral infection
Missing or damaged DLL file
Poor PC maintenance
Data overload
Registry damages
Delay in resolving the runtime error 372 exposes your PC to further problems like the inability to install new programs, Windows startup issues, slow PC performance, system hang-ups, and crashes, etc. Therefore, it is recommended to take measures to resolve the runtime error 372 immediately.
Further Information and Manual Repair
The registry is one of the most critical components of Windows PC. It stores every data and configuration of your computer. Every hardware and software on the system has to connect to the registry to function properly.
However, everyday and frequent PC usage keeps creating wasted, obsolete and invalid entries on your system and saves them in the registry.
And if not cleaned, these files dilate the registry and eventually cause the registry to malfunction. DLL files go missing and often get damaged or corrupt. This leads to runtime error pop-ups like the error code 372.
Furthermore, sometimes the registry also gets damaged due to malware attacks and viral infections. This malicious software damages the registry and exposes your system to serious PC threats like system failures, data loss, and data breaches.
Solutions To Runtime Error 372
To resolve the runtime error 372 on your system, clean and restore your registry. For this, you don’t have to hire a technician and spend hundreds of dollars when you can repair it for free.
All you have to do is download Restoro. This is a powerful one-stop solution for all your PC-related problems. It functions as a registry cleaner and a system optimizer.
Restoro is a user-friendly Windows PC repair tool that can be used by all levels of users. To run and operate this software on your system you don’t have to be a computer programmer or an expert. Its simple navigation and layout make it very easy to use.
It resolves disk fragmentation issues which lead to missing DLL files. It also repairs the damaged and corrupted registry thereby resolving runtime errors like the error code 372.
Restoro is a bug-free, reliable, and efficient tool. It is compatible with all Windows versions.
Click here to download Restoro to repair the runtime error 372 on your PC.
Valve has released a big update to its online store and distribution platform Steam. Among typical bugs fixing and making the user experience a little more fluid, we have received some major updates as well. Please take note that you need to update Steam itself to the latest version in order to get new features.
Storage management Page update
The storage management page has received a complete redesign and UX overhaul and it is now much easier to manage your game libraries and create new ones. The page itself looks and feels a little console more like but thanks to that it offers a much easier and clearer look and feel.
Another thing with the Steam store management page is the ability to move installation files from one location to another. Let’s say that you have two or more hard disk drivers in your machine and that you have SSD that you use for running stuff since it is fast and larger and slower one for storage. Now you can easily and quickly move one installation from one to another in order to take advantage of your faster SSD for quicker LOAD game times without making a new installation.
Steam Download page improvements
The download page has also received some love from Valve by enabling us to now see the installation progress. So far on the download page of Steam, you would only get download progress but it has been updated to show installation progress after download as well now making it more straightforward and giving you a general idea of how much more time there is to wait in order to start gaming.
Also, you can now drag and drop items in the download bracket to reorder download orders or place them as active downloads to start downloading right away.
Stable Diffusion is a machine learning model developed by Stability AI to generate digital images from natural language descriptions. The model can be used for different tasks like generating image-to-image translations guided by text prompts and upscaling images.
Unlike competing models like DALL-E, Stable Diffusion is open source and does not artificially limit the images it produces. Stable diffusion was trained on a subset of the LAION-Aesthetics V2 data set. It can run on most consumer hardware equipped with a modest GPU and was hailed by PC World as "the next killer app for your PC".
Since Stable Diffusion is run locally and not in the cloud, as mentioned there is no limit to the number of images that you can produce but in order to use it you will have to get down a little dirty with setting your PC environment for it since it is not really an application, it is a command line text based descriptor that will use python to generate your images, so there is no install nor GUI.
In this guide, we will show you how to both install and run Stable Diffusion on your local PC so you can start producing some cool images all by yourself.
Hardware and software requirements
Make no mistake, Stable Diffusion will not run on a potato PC, in order to harvest the power of AI-generated imagery this is what you will need:
A GPU with at least 4GB of VRAM
10GB of hard disk space
Python and libraries (Miniconda3 installer will install everything you need)
The Stable Diffusion files
Git
Any OS (Windows, Linux, macOS)
Installing components
For this tutorial, we are covering the installation and running of Stable Diffusion on Windows PC. The steps presented here are presented in a way that installation can be performed on any operating system but precise instructions will be for Windows OS.
GIT
The first thing to do is to install GIT. It is a tool that will let you easily maintain and install repos from the internet. to install it go to: https://git-scm.com/ and click on download. Follow the instructions for your version of the operating system. If you are a developer you are familiar with GIT and if you already have it installed you can skip this step.
One thing that is important when installing GIT locally is to select to use it via the command line (the second option that says "Git from the command line and also from 3rd-party software").
Miniconda3
Now when we have GIT installed, next thing is to use Miniconda3 to install python and all required libraries that are needed. Get the installer at: https://docs.conda.io/en/latest/miniconda.html
Miniconda3 is basically an easy installer so you do not have to install tons of stuff manually from different websites and sources, it is nicely packaged in the installer that will take care of everything.
Stable Diffusion
After the previous two steps, we are ready now to actually install Stable Diffusion. Go to https://huggingface.co/CompVis/stable-diffusion#model-access and install the latest library (as of the writing of this article currently it is stable-diffusion-v1-4-original, the last one on the right), the library is almost 5GB in size so be prepared for big download.
Once downloaded click on the Windows start button and type in Miniconda3 and click on open. Create a folder and name it how you want on a drive of your choice. For this example, we will install it all in disk C under folder AI_art, follow the instructions below but use your own names and destination instead. Do not close Minicoda3 after typing commands!!!
cd c:/
mkdir AI_art
cd AI_art
Extract GitHub files that you have downloaded into your new folder and get back to Minicoda3 and type the next commands:
Let the whole process finish, some files are large and it might take a while. After the whole process is finished and completed, copy the checkpoint file that you have downloaded into: C:\AI_art\stable-diffusion-main\models\ldm\stable-diffusion-v1
After the file is copied rename it to model.ckpt and you are finished.
Running Stable Diffusion
The created environment is needed in order to actually use Stable Diffusion to create images. Each time you want to use it you will have to run it, so go into Miniconda3, and inside it type:
conda activate ldm
cd C:\AI_art\stable-diffusion-main
after we are inside the folder call the script with the parameters:
python scripts/txt2img.py --prompt "TXT DESCRIPTION OF IMAGE THAT YOU WANT TO CREATE" --plms --n_iter 5 --n_samples 1
and that's it, your image is created and it is located in C:\AI_art\stable-diffusion-main\outputs\txt2img-samples\samples
When you encounter an error message that says, Chassis Intruded…Fatal Error…System Halted on your monitor then it indicates that the Chassis or the cabinet that holds the CPU, GPU, motherboard, and many more is open. It is a security feature offered by OEMs wherein a connector that is found in the motherboard can detect if the chassis component has been replaced or removed. There are a few OEMs that offer onboard speaker or PC chassis speaker which goes off in this kind of situation.
Obviously, the problem has something to do with the hardware and in most cases, you have to put the jumper back on the motherboard with the pin-labeled chassis signal and ground. There are times when some OEMs offer a simple switch that is armed automatically when you properly close the chassis. Thus, you need to check if this switch has something to do with the error. If there is no switch or if it doesn’t resolve the issue, although you may be able to get into Windows with a warm boot, the normal Windows boot won’t really work unless you fix the problem. It is rather false positive and has something to do with the RTC RAM state or the BIOS. You might need to completely disable the Chassis intrusion feature to fix the error.
Refer to the suggestions given below to try and fix the “Chassis Intruded, Fatal Error … System Halted” error.
Option 1 – Try to clear CMOS
You can easily clear CMOS by shorting two pins which can be found side by side on the motherboard. Keep in mind that it may vary from OEM to OEM although the basics are still the same to clear CMOS. In addition, you might also have to download the manual from the OEM’s website so that you’ll know its exact location.
Option 2 – Try booting into the BIOS
You can also try booting into the BIOS. All you have to do is tap either the DEL or F2 keys to get there. Note that everything will be set back to their default setting after you reset the CMOS.
Option 3 – Try disabling Chassis intrusion
In this option, you have to look for the Chassis intrusion feature in your BIOS. It might be located under security. From there, disable it and check if the problem’s fixed.
Option 4 – Try to reconfigure the BIOS
Once you have disabled the Chassis feature, you need to reconfigure the BIOS the way you expect it to be or to what it was before the reset.
Windows 11 has come a long way from its infant stage. Today it is incredibly good and stable operating system that also looks good and modern. Unfortunately, fancy animations and good graphics come with a price, in this case, slower performance on some little older and weaker computers.
Animations itself which include also fading effects can sometimes feel slugging and laggy and have a general overall feeling of delay. For a more old-school instant experience, you can turn off animations.
In order to turn animations inside Windows 11 follow this simple guide:
First thing is to open Settings by pressing Windows + i key combination or you could open Start and in the search box type in Settings and then click on its icon.
Once inside settings on the left side find Accessibility and click on it to select it. Once it is selected on the right side choose Visual effects. Inside the visual effects section click on the switch next to Animation effects to OFF. You can also turn off transparency effects in this section if you wish if you have an older GPU in order to speed it up a little.
That is all you need to do, settings will be automatically saved and all animations will be turned off for a quicker and more responsive feeling when working inside W11
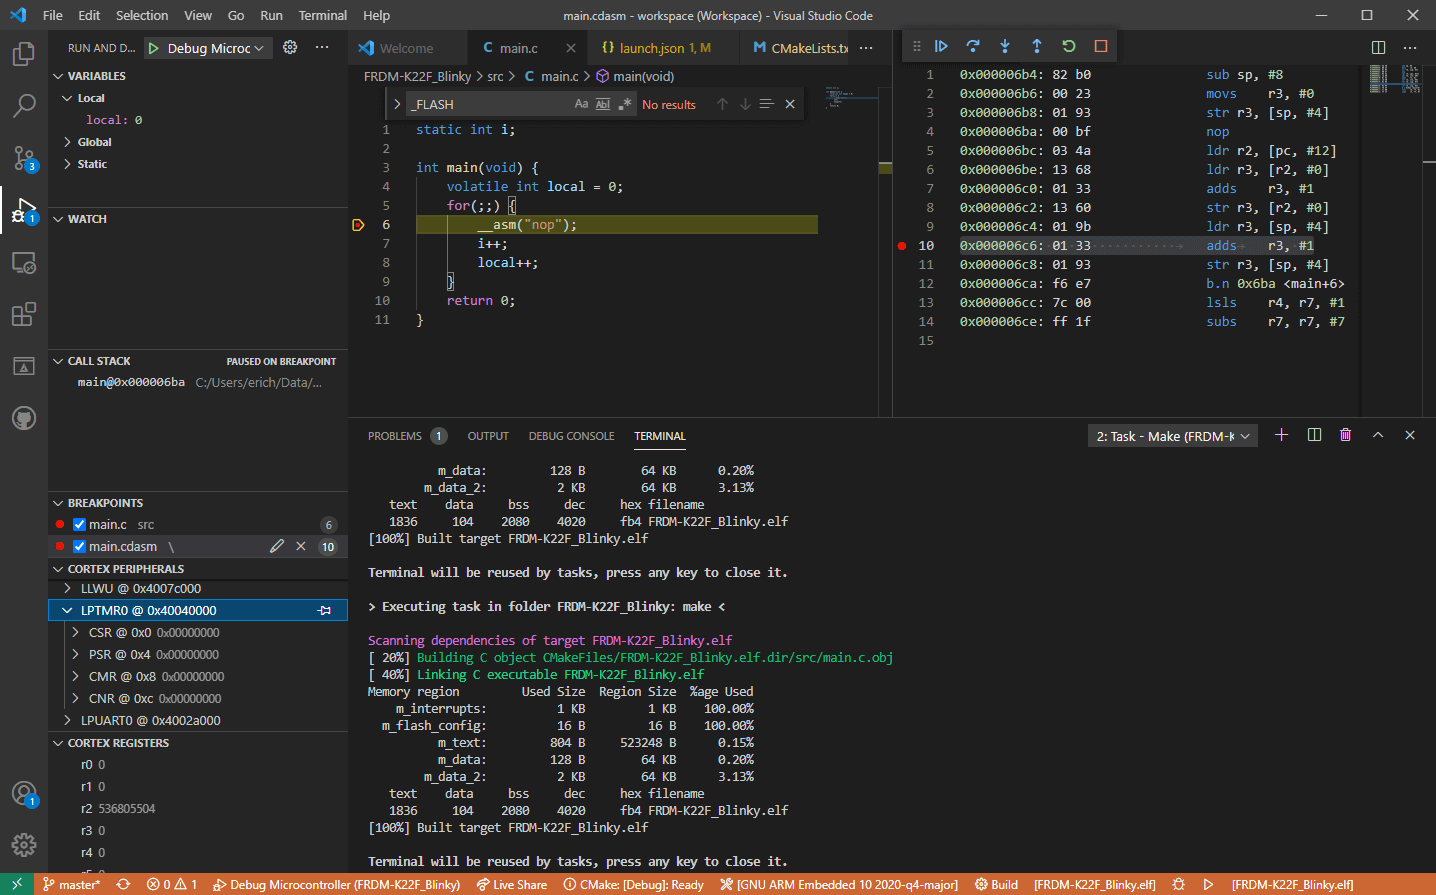
Visual studio code is a code editor available for Windows, Linux, and macOS. It is a completely free tool offering you to code in any language without the need to switch to another editor.
Visual Studio Code is part of Microsoft Visual Studio which is a complete integrated development environment (IDE). Take notice that Visual studio itself has more advanced tools for developing and testing, it has 24/7 support, training, and Azure for WEB apps.
Visual Studio Code is an editor lacking in some advanced features Visual Studio offers.
Visual Studio code Price and royalty
As mentioned Visual Studio code is completely free licensed under the MIT license agreement giving you the tool free to use and sell your product.
How it supports Linux, Windows, and macOS, all you need it to go to its official page https://code.visualstudio.com/, download it and start using it.
How this is free project backside is that there is no official support, you will have to rely on various articles and community in order to get needed information or problem solution.
Features
Syntax highlighting has become standard and norm for any editor but besides this function VS code offers us also IntelliSense option which goes a step further with code completion, code hinting, and parameter info.
This means that VS code is aware of many things going on inside your code and will offer you as you type a menu with options for autocomplete along with variables referenced, function names, etc.
VS code offers extensions inside its extensions marketplace where you can add extensions in order to implement new languages, add debuggers, change the layout, etc. This is one of the great features it allows you to easily switch from one project to another, one language to another not leaving your code editor.
Working with version control systems like Git is easy with VS Code. You’ll be able to stage files and make commits, then push and pull changes to your remote code repository of choice, right from the editor.
Conclusion about Visual Studio code
Visual Studio Code is one of if not the most flexible and extensible code editors currently on the market that I have ever tried and used. IT has become my code editor of choice simply for reasons that there is really not much it cannot do and it is constantly updated and taken care of.
You can really tune it to look and feels how you want with extensions and you really cannot beat the free price tag.
I would highly recommend this editor for daily use especially since its biggest competitors like Atom and sublime text have not seen many updates lately.


 Storage management Page update
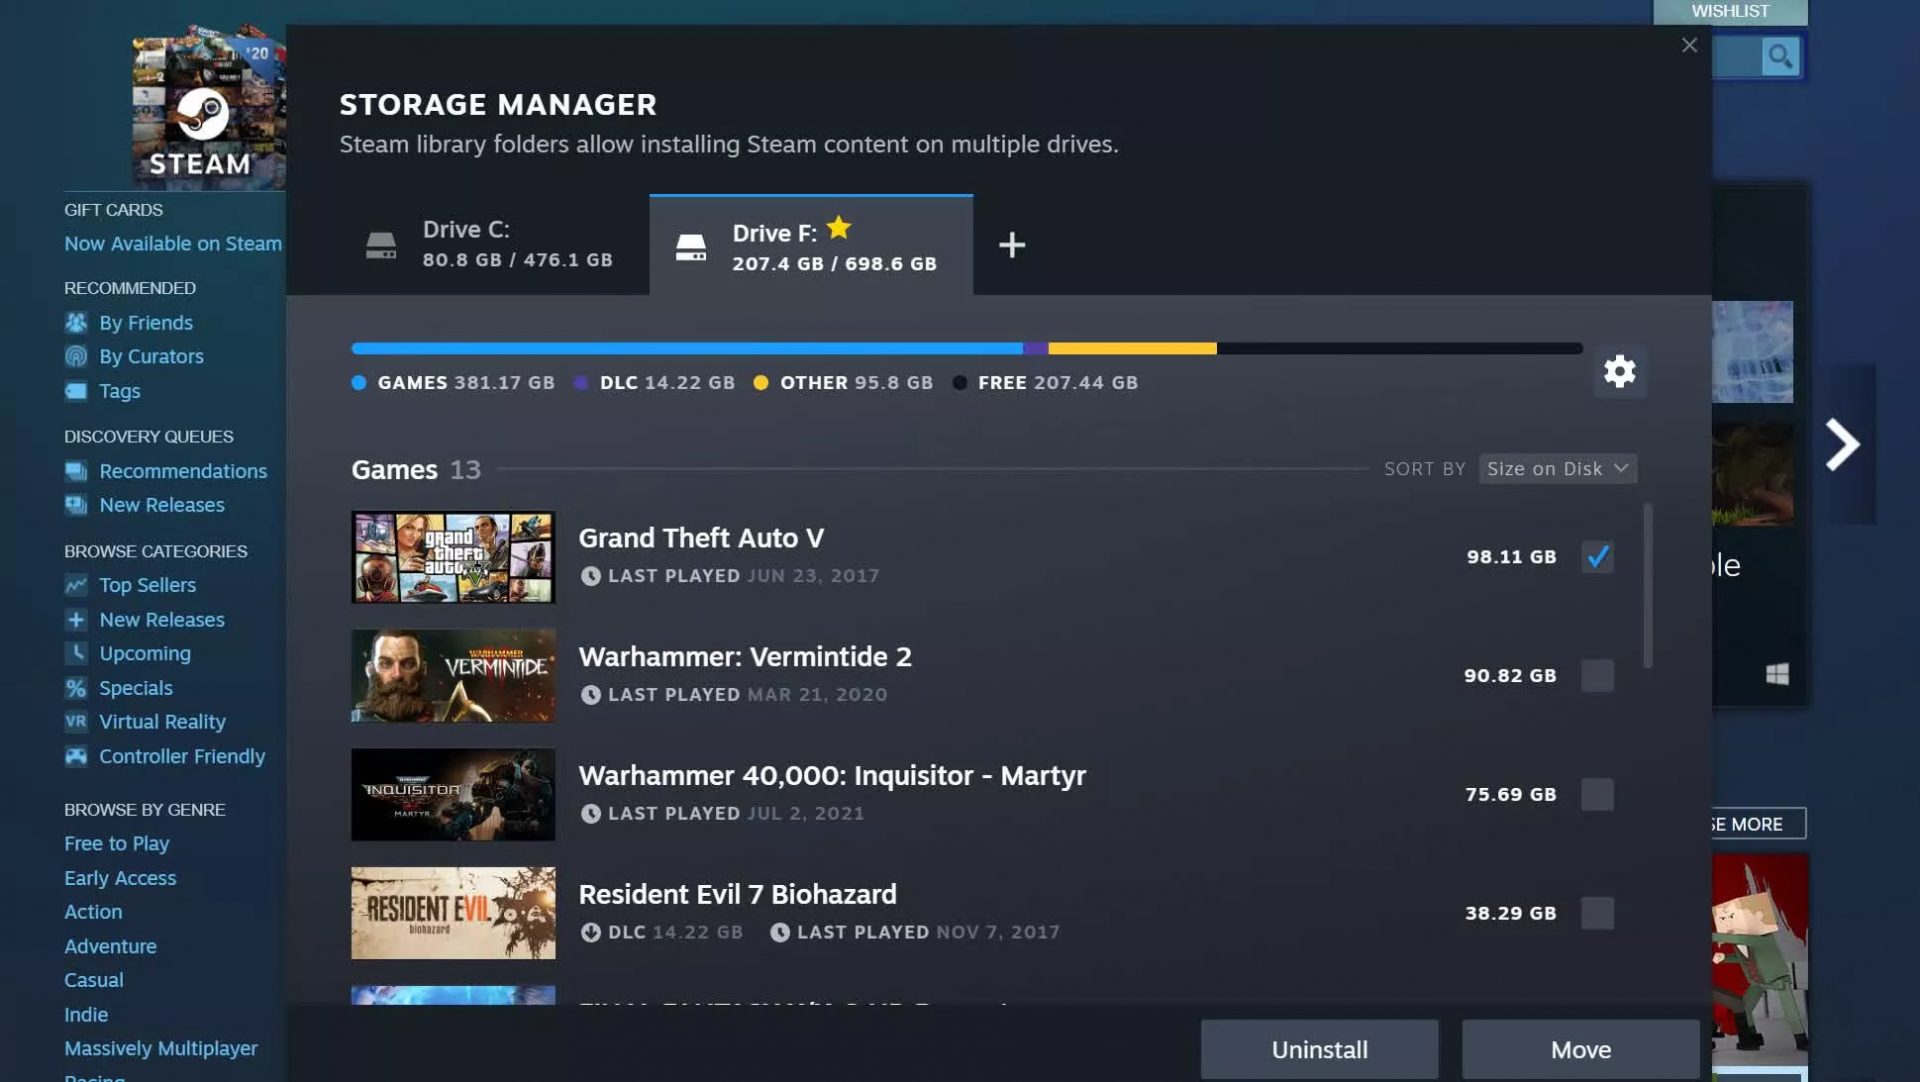 Another thing with the Steam store management page is the ability to move installation files from one location to another. Let’s say that you have two or more hard disk drivers in your machine and that you have SSD that you use for running stuff since it is fast and larger and slower one for storage. Now you can easily and quickly move one installation from one to another in order to take advantage of your faster SSD for quicker LOAD game times without making a new installation.
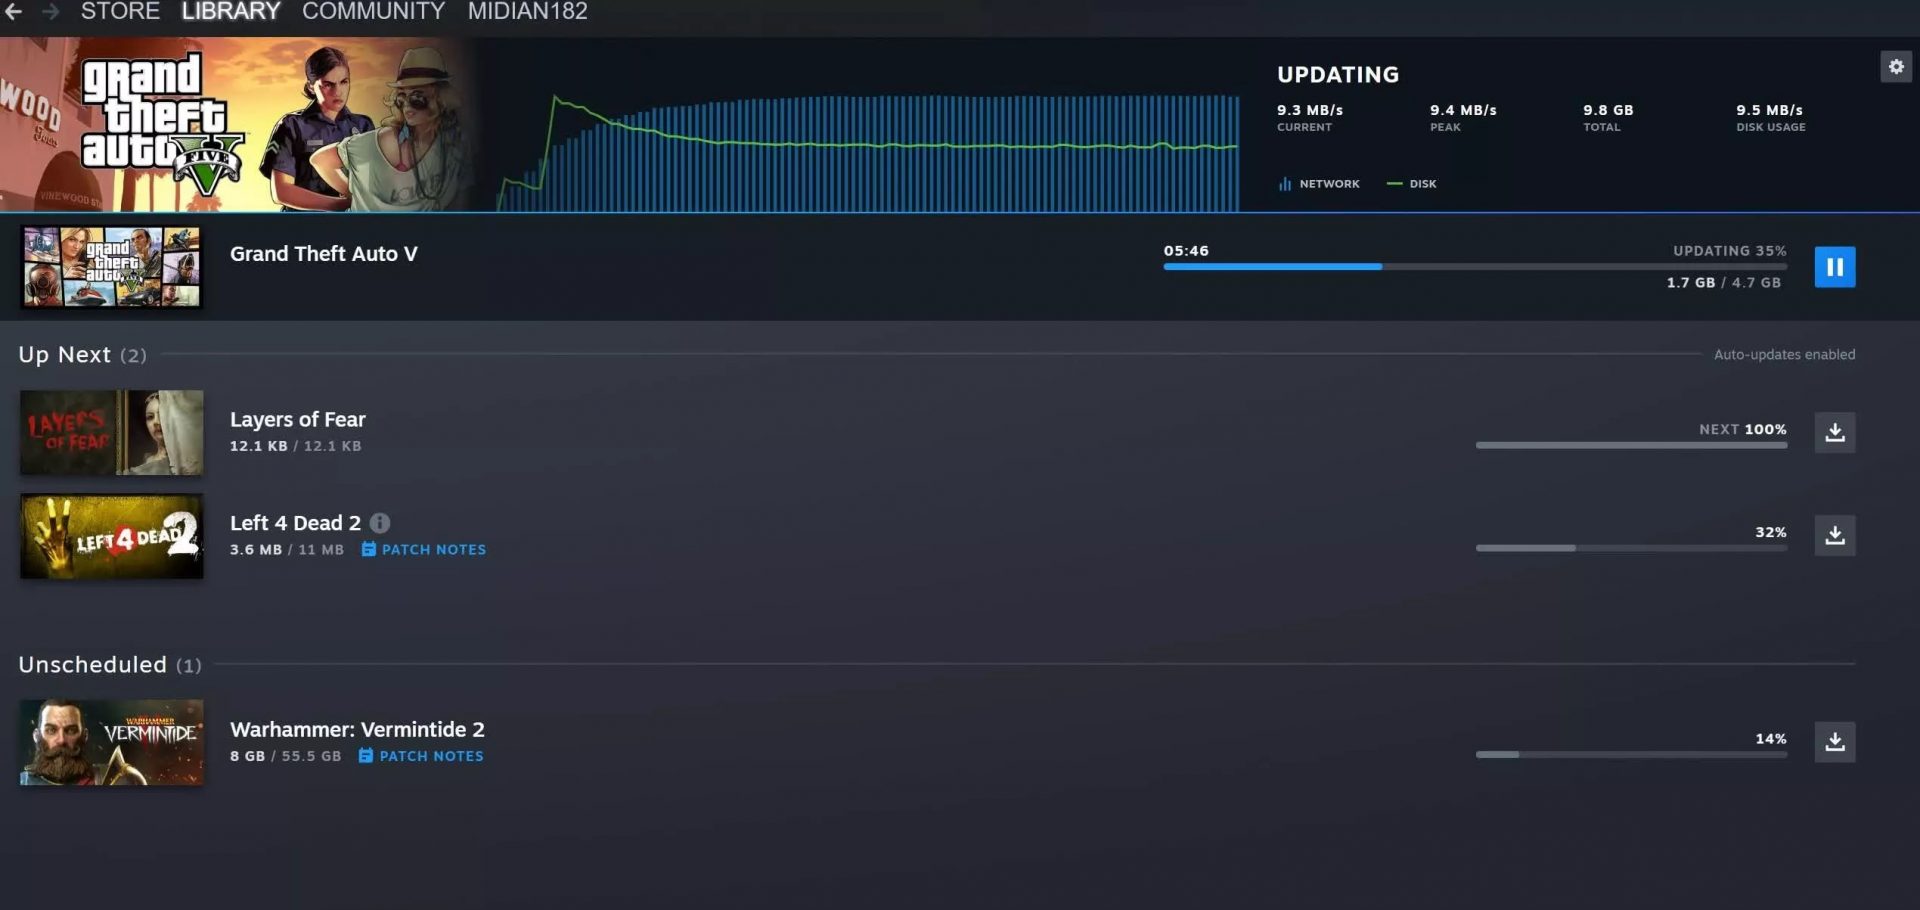 Also, you can now drag and drop items in the download bracket to reorder download orders or place them as active downloads to start downloading right away.

 Visual studio code is a code editor available for Windows, Linux, and macOS. It is a completely free tool offering you to code in any language without the need to switch to another editor.
Visual Studio Code is part of Microsoft Visual Studio which is a complete integrated development environment (IDE). Take notice that Visual studio itself has more advanced tools for developing and testing, it has 24/7 support, training, and Azure for WEB apps.
Visual Studio Code is an editor lacking in some advanced features Visual Studio offers.
Visual studio code is a code editor available for Windows, Linux, and macOS. It is a completely free tool offering you to code in any language without the need to switch to another editor.
Visual Studio Code is part of Microsoft Visual Studio which is a complete integrated development environment (IDE). Take notice that Visual studio itself has more advanced tools for developing and testing, it has 24/7 support, training, and Azure for WEB apps.
Visual Studio Code is an editor lacking in some advanced features Visual Studio offers.