Microsoft office has two major packages, an online one, and an offline version. The online version of the course is Office 365 that requires a monthly subscription and it is always regularly updated and maintained. Another version is more of a typical old school application, install it and use it, no constant internet connection is required and no monthly subscription is required, buy once and use it.
The last version of buying it once and use it was Office 2019 and after two years we are going to receive a new version soon. Microsoft has set its release date for October 5th of this year and as always it will feature the current latest version of office applications and one-time purchase.
The new office will support dark mode and other improvements tied to the new Windows 11 and some specific features tied to Office itself.
Hello everyone and welcome to another great tutorial from errortools.com I hope everyone is feeling great and that you are prepared to boost the performance of your computer. This time we will speed up Windows startup time and overall performance by eliminating startup programs that we don't need and do not use.
Microsoft itself and some application developers tend to have some applications or some services always active and set to be loaded on Windows startup. If you want to change which of these applications are starting up with your Windows and change them, follow this easy guide and you will be speeding up your Windows in no time.
First thing is to open a task manager, fastest and most direct way of doing this is with a keyboard combination of CTRL + SHIFT + ESCWhen Task Manager opens, click on the startup tab on top.
Once you click on startup you will get a list of applications that are set to be started when Windows is booted.
You can now click on the application and then click on disable on the bottom button, the application status will update in task manager to disabled and it will not be booted anymore when Windows starts. In this same manner, you can enable back some applications if you changed your mind about them.
Please note that some applications are using some services and must have them running or they will not work properly. The best practice is to disable applications you are positive you will not use or use rarely so you do not want them to slow down Windows.
Disk partitioning is a concept that’s been around for so long, but is still only familiar to few. If done right, it can help get your computer in perfect order.
Today we bring you a simple definition of disk partitioning, its pros and cons, and a quick tip on how to do it properly to reap its full benefit!
Definition and purpose
The simplest way to define disk partitioning would be: it’s exactly what it sounds like. It means taking a hard disk drive and separating it into different segments. These segments are called partitions. You can visualize it as cutting a cake into smaller pieces - not necessarily of the same size, though.
So what is the purpose of these pieces?
Well, when you first get a hard drive, it’s basically just a bunch of unallocated storage space. Until there’s at least one partition, this space is unusable to your operating system. Once you create a partition, your OS will recognize it as usable storage space.
You can choose to create a single partition and use it for all your files, from program files to personal data. A lot of off-the-shelf computers come with one primary partition like this and a small secondary one reserved for recovery purposes.
Whether or not you want to split your disk into more than one segment is up to you. We would generally recommend it, though. The whole point of partitioning is for each segment to have its own purpose.
So treating all your storage space as a single unit containing different file types would be like constructing an office building with only one massive room for everything - day-to-day work, conferences, interviews, etc. And all of this for different departments of the company. You can see how this might get a little messy.
Creating multiple partitions eliminates the task of running several different types of files from the same place. This takes a heavy load off the entire process of accessing data.
Disk partitioning also brings a ton of other benefits to the table. An important disclaimer, though: there are disadvantages too. We will walk you through both sides to help you get an objective idea and make an informed decision.
Source: Kina on Unsplash
What are the benefits of disk partitioning?
1. Better file organization
This is the most obvious and perhaps the biggest advantage of partitioning your hard drive.
As we already mentioned, partitioning allows you to create separate segments for different file and data types. You wouldn’t want to use the same partition for your system files and for games, would you?
If organization and time management are important to you, then multiple partitions are the right solution. Searching for specific files will be much easier overall. Say you have one hard drive, but three partitions: C for the system files alone, D for multimedia files and documents, and E for games and apps. Your computer loads the system from C without interference from the other two, and you know exactly where to look when searching for a file.
2. Easy reinstallation
File management isn’t the only thing made faster and simpler thanks to partitioning. If you opt for creating multiple segments on your drive, reinstalling Windows will be easy peasy.
That’s because all you need to do is format the partition your system is on. Then you reinstall the OS on it, and there you go. Now you have a clean installation, with all your files saved on other partitions intact. You can even make a copy of your system partition, so you can revisit the exact same installation in the future if you want. And the whole time your pictures, music, documents stay exactly where you left them.
Source: Andrew M on Unsplash
3. Possibility of using multiple file systems
By now you’ve understood that partitions function completely separately. This means that, if for some reason you need multiple file system capabilities, partitioning will allow that.
One segment could be used for, say, an NTFS file system, while another could run ext or APFS.
4. Running different OSes
You’re an avid Windows user but need to use Linux on the side? No problem. You don’t need to buy a separate computer or anything. The possibility of running different file systems also means you can use partitioning to run multiple operating systems.
Doesn’t that sound enticing? One machine for multiple totally different uses!
5. Backup and recovery made simple
Data loss can happen on any disk, partitioned or not. However, it’s much easier to get it back on a partitioned one. You know where you stored what, and each partition can be backed up exactly as it is. It’s also a lot faster to back up single partitions than entire hard drives.
Ultimately this also means a faster path to recovery. If you lose or accidentally delete important files and data, you might want to use a recovery tool like Recuva to scan for them and get them back. Recuva is even powerful enough to recover data from damaged hard drives. But no matter how powerful, scanning a whole drive is strenuous for any recovery tool. Scanning independent partitions is a lot more convenient than that, and will get you to your goal more efficiently.
6. Optimized performance
Now, let’s keep in mind that computer performance is influenced by a number of factors. Partitioning alone isn’t what makes it better or worse. However, it can contribute to optimization. It’s easier for your computer to scan, say, a 40 GB partition to fetch the system file it needs than scanning the entire capacity of your drive.
7. Improved security (possibly*)
Separate partitions can help make your system more secure. Firstly, they minimize file corruption. If one partition gets corrupted, the others should remain unaffected. And keeping in mind the previous point about backup and recovery, ‘fixing’ the damaged partition would be much easier than fixing the entire hard drive.
Partitioning also improves security in terms of malware protection. A malicious attack on one partition is easier to deal with than malware on the whole drive. If your system partition gets infected, you can simply reinstall your OS and that should do the trick.
*Do keep in mind that partitioning can’t defend you against more advanced attacks. So make sure not to give in to a false sense of security.
What are the disadvantages of partitioning?
1. Data is still vulnerable
Yes, it’s easier to back up and recover data from independent partitions. And yes, partitioning may help protect separated files and data to a higher degree. But remember: everything is still on a single physical drive. So while digital errors and issues may be easier to deal with on partitioned drives, physical damage obviously won’t be.
If your hard drive is destroyed in some way, all data on it will be gone. That’s why, if you have crucial files on your PC, it’s important to give them the proper backup treatment before it’s too late.
2. Disbalance of space
Allocating storage space on separate partitions may be a little more tricky than you think. You may fill up one partition a lot faster than another. So on one side you’re struggling with space, and on another you have too much of it to spare. Imagine nearly filling up your system partition and then it turns out you need a lot more space for its updates than you thought.
That’s why you really have to be sure you actually have enough files of different types that you need help managing efficiently. Otherwise you’ll just create a struggle and disbalance in terms of storage.
3. Increased risk of error
If done incorrectly, partitioning can lead to more harm than good. Aside from space disbalance, there is an increased risk of incorrect partition sizes and formatting. Plus, human error is also a factor: in a moment of distraction, you may erase one partition when you meant another. Undoing such mistakes will definitely be tedious and time-consuming.
4. SSDs eliminate the need of partitioning
SSDs (solid-state drives) don’t function in the same way that HDDs do. They have faster read times and can organize files on their own. This quite literally eliminates the need for organization on your part.
Partitioning: yes or no?
The bottom line is that multiple partitions might not be necessary for the average user. But if you’re planning on storing many file types or different file and operating systems on the same PC, then you should give it a shot. It’s also an excellent solution for businesses, of course.
And if our pros and cons list isn’t enough to help you decide, you can always send us a message and we’ll help you make the right choice.
Decided to partition your hard drive?
If you’ve decided to give it a go, you definitely should make sure to do it right.
The two most effective and reliable ways to partition are using the built-in options on Windows or investing in a dedicated partitioning tool, like the EaseUS Partition Master. Which one you'll opt for depends on your specific needs.
Option 1 may be more suitable for users with at least some level of experience. In this case, you’d have to know exactly which steps to take without making errors. This is done in Disk Management on Windows 10/11. From there, you can select the partitions you’d like to split into different volumes of selected sizes.
If this is your first time partitioning, we highly suggest you either consult professionals for this or move on to option 2. The EaseUS partitioning software is specifically designed for beginners, with an intuitive interface helping you succeed in the process. All you need to do is pick the Partition Master package tailored to your needs and follow their guide.
Each package offers technical support as well, and even free upgrades (to varying degrees based on your subscription). Plus, all of this is valid for not one, but two PCs.
It’s the perfect solution for a smooth and error-free partitioning process. If you want to organize your hard drives efficiently and make the most of all your space without doing irreparable damage, it’s definitely worth the investment.
To understand Logon.scr application error, it is first important to understand the function of logon.scr. Logon.scr is an important file that is located in the Windows\System32 folder. It guarantees Windows systems stability.
Logon.scr application error occurs when logon.scr file gets corrupt. It is a common system error that can happen in most Windows platforms. It usually pops up during system start-ups and when trying to launch certain programs.
Some of the common systems of this error code include: system halt, freeze, no application icons are visible on the desktop, random blue screen of death and system performance decreases dramatically.
Solution
Error Causes
Two of the most common causes of logon.scr application error is:
Corrupted and damaged logon.scr file
Viral infection
It is advisable to fix this error code immediately because it leads to serious damages. It is fatal and can result in a system crash; therefore resolve it right away.
Further Information and Manual Repair
To resolve this issue on your computer you don’t have to spend hundreds of dollars to hire a professional for the job. The good news is that it can be repaired easily and does not require any technical expertise.
Here are some of the most effective and easy DIY methods to resolve the error on your screens.
Method 1 - Replace the Damaged and the Corrupted Logon.scr File
Whether the file gets corrupted or is accidentally deleted, the best way to fix the issue is to download the Logon.scr file again from a reliable website and install in the following location C:\Windows\System32.
Alternatively you can also get the file copy form another proper functioning computer by using flash drive if you don’t have an internet connection to download the logon.scr file online.
Method 2 - Restore Points by Applying System Restore of Windows
Another way to resolve this is to restore points to bring back your system to the previous state before the error occurred. To do this, simply click the start button and type ‘System Restore’.
Now click System Restore in the result and click next. Select the restore point in the list and click the next button to proceed. To activate changes reboot your PC.
Method 3 - Scan and Remove Viruses
If Logon.scr application error still persists, then it could be due to viruses. To resolve, install a powerful anti-virus. Scan your entire PC and remove viruses.
Method 4 - Repair the Registry
Corrupt and damaged Logon.scr file also triggers issues with the registry. DLL files and other important files like Logon.scr application files may get damage due to too many bad and invalid registry entries.
Registry stores all the activities performed on the PC including unnecessary files like junk files and cookies. If these are not removed timely, these files accumulate and corrupt important files. Therefore, to fix the error it is advisable to clean and repair the registry.
The best way to go about is to download Restoro. This is a user-friendly and multi-functional PC Fixer deployed with a registry cleaner. It scans for all registry errors and removes all the invalid entries. It cleans the registry and repairs the damaged files thereby resolving the issue in seconds.
Click here to download Restoro and resolve the Logon.scr application error now!
The Microsoft Store error 0x80073d12 occurs when you try to download software from the store. In order to solve the issue follow the presented guide step by step in the order presented.
Check do you have enough hard drive space for installation
Store locates and assigned space on the hard drive before it installs the application, if there is not enough space available it will return the given error. Go to file explorer and check is there enough space available.
Check that game is not expansion
If you are trying to install expansion for the game without owning the required base game, you will receive the mentioned error. Check the store page to see if there are some prerequisites for the game like other games or packs.
Install the game from my library
Press Start.
Open the Microsoft Store App.
Click the See more… button at the top right of the MS Store app’s window.
Click Download and updates on the menu.
Click Downloads on the left to open My library.
Then click Ready to install to open a list of apps.
Click the Install button for the game app that you need to install.
Install on another partition
It was reported that an error vanishes if installation is placed on another partition instead of the default C drive.
AmmyyAdmin is a software developed by Ammy. This software allows you to manage network computers and servers remotely without complicated NAT settings adjustments or Firewall problems. The program is similar in marketed function to TeamViewer or LogMeIn. This software does not require installation and it lets you control other computers or share files over the software. It usually comes bundled with other software.
This software copes files into your computer and sometimes creates new startup keys that allow it to start each time your computer is restarted. AmmyAdmin might display additional ads in your browser as well as pop-up ads. Due to its ability to silently install and run remote administration, it could be used maliciously by those who intend to damage your computer or steal data. AmmyyAdmin is flagged for optional removal, and if you did not intentionally install it, removal is highly recommended
What is a Potentially Unwanted Program (PUP)?
If you’ve ever downloaded freeware or shareware, odds are high that your computer can get installed with a bunch of unwanted programs. A PUA / PUP (potentially unwanted application / potentially unwanted program) is a software program that comes bundled with freeware/shareware and you agree to install it on your computer system. These are programs you definitely don’t want on your system simply because it does not give any beneficial service.
PUP doesn’t involve malware in the traditional sense. One simple difference between malware and PUP is distribution. Malware is typically dropped through vulnerability exploitation and in contrast, PUP gets installed with the consent of the end-user, who consciously or unknowingly authorizes the PUP installation on their computer. A PUP might not be viewed as malicious or harmful but nonetheless, it is a common cause of clunky operating systems; some PUPs are a lot more aggressive by deliberately slowing down your PC.
How PUPs affect you?
Potentially Unwanted Programs appear in different forms and varieties, but most times, they are adware programs that exhibit irritating pop-up adverts and advertisements on web pages you explore. In addition, most free software nowadays comes with quite a few unwanted add-ons; in many instances a web browser toolbar or browser modification like a homepage hijacker. They’ll modify browser settings, change default search provider, substitute the default home page with their very own websites, decelerate internet speed, and will damage your computer as well.
They could look harmless but PUPs are usually spyware. Some might carry dialers, keyloggers, web browser hijackers, and tracking components that will collect system details, or tracks customer habits and relays these records to third-party organizations. Because of this unwanted program, your application might freeze, your security protections could get disabled which may leave the computer susceptible, your system may get damaged, and the list goes on and on.
Tips on protecting yourself from unwanted software
• When installing anything on your PC, always read the fine print, including the EULA. Do not accept terms of use that are for bundled programs.
• Select the “custom” install whenever downloading a software program. Particularly, pay attention to those small boxes which have been checked as default, where you might ‘agree’ to receive advertisements or install software bundlers.
• Use anti-PUP software. Security applications like Safebytes Anti-Malware offer the very best real-time protection from PUPs and also other malware.
• Be alert if you download and install freeware, open-source programs, or shareware. Avoid downloading and installing browser extensions and programs you are not knowledgeable about.
• Use only official product sites for downloading applications. Avoid download websites completely since the majority of websites force users to download the software using their own download manager, which is often bundled with some kind of unwanted program.
Safebytes Anti-Malware scans and detects malware for free. To complete removal, and ensure full PC protections, a paid license key is required.
Malware could potentially cause a lot of damage to your computer. Some malware sits in between the computer and the net connection and blocks a few or all internet sites that you would like to check out. It could also block you from installing anything on your computer, particularly anti-virus programs. If you are reading this article now, you’ve perhaps recognized that a malware infection is a reason behind your blocked net connectivity. So what do if you need to download and install an anti-virus application like Safebytes? There are a few solutions you can attempt to get around with this issue.
Boot Windows in Safe Mode
The Windows-based PC includes a special mode called “Safe Mode” where only the minimum required programs and services are loaded. In the event the malware is blocking internet connection and affecting your PC, running it in Safe Mode enables you to download antivirus and run a scan while limiting potential damage. To enter into Safe Mode or Safe Mode with Networking, press F8 while the system is booting up or run MSCONFIG and locate the “Safe Boot” options in the “Boot” tab. Once you’re in Safe Mode, you can try to download and install your anti-malware software program without the hindrance of the malicious software. Following installation, run the malware scanner to eliminate most standard infections.
Obtain the security program in an alternate web browser
Certain malware may target vulnerabilities of a specific web browser that obstruct the downloading process. If you seem to have a virus attached to Internet Explorer, then switch over to an alternate browser with built-in security features, such as Firefox or Chrome, to download your favorite antivirus program – Safebytes.
Create a portable anti-malware for removing malware
Here’s another solution which is utilizing a portable USB antivirus software that can check your system for malicious software without the need for installation. Adopt these measures to run the anti-malware on the infected computer system.
1) On a clean computer, install Safebytes Anti-Malware.2) Plug the Thumb drive into the uninfected computer.3) Double-click the exe file to run the installation wizard.4) Pick a USB flash drive as the location when the wizard asks you where you want to install the program. Follow the on-screen instructions to finish the installation process.5) Remove the flash drive. Now you can utilize this portable anti-virus on the affected computer system.6) Double-click the anti-malware program EXE file on the flash drive.7) Run Full System Scan to identify and clean-up up all sorts of malware.
These days, an anti-malware program can protect your computer from different forms of online threats. But how to select the right one amongst countless malware protection software that is available in the market? As you might be aware, there are numerous anti-malware companies and products for you to consider. Some of them are great, some are ok types, while some will ruin your computer themselves! You have to choose one that is reliable, practical, and has a strong reputation for its malware source protection. One of the strongly recommended software is SafeBytes AntiMalware. SafeBytes has a superb reputation for quality service, and customers appear to be very happy with it.
SafeBytes can be described as a highly effective, real-time anti-malware application that is created to assist everyday computer users in safeguarding their computers from malicious internet threats. Using its cutting-edge technology, this application will assist you to eradicate multiples types of malware like computer viruses, PUPs, trojans, worms, ransomware, adware, and browser hijackers.
There are many wonderful features you will get with this security product. Below are some typical features found in this software:
Robust, Anti-malware Protection: Built on a highly acclaimed anti-virus engine, this malware removal application has the capacity to find and get rid of various obstinate malware threats like browser hijackers, PUPs, and ransomware that other common antivirus software will miss.
Real-time Protection: Malware programs attempting to get into the system are identified and stopped as and when detected by the SafeBytes active protection shields. They are very effective in screening and eliminating different threats because they’re constantly improved with the latest updates and alerts.
Internet Security: Safebytes assigns all sites a unique safety score that helps you to get an idea of whether the webpage you’re going to visit is safe to browse or known to be a phishing site.
Light-weight: This software program is not “heavy” on the computer’s resources, so you’ll not notice any performance problems when SafeBytes is working in the background.
24/7 Online Support: Skilled technicians are at your disposal 24/7! They will promptly resolve any technical issues you might be experiencing with your security software.
SafeBytes has come up with a wonderful anti-malware solution that can help you conquer the latest malware threats and virus attacks. Once you’ve installed SafeBytes Anti-Malware, you will no longer need to bother about malware or other security worries. To ensure the complete removal, manually check your hard drive and registry for all of the following and remove or reset the values accordingly. Please note that this is for advanced users only and may be difficult, with incorrect file removal causing additional PC errors. In addition, some malware is capable of replicating or preventing deletion. Doing this in Safe Mode is advised.
Files:
%APPDATA%AMMYY
C:%DOCUMENTS%%%USER%%LocalTemp$inst.tmp
C:%DOCUMENTS%%%USER%%LocalTemp$insttemp_0.tmp
C:%DOCUMENTS%%%USER%%LocalTempAA_v3.exe
C:%DOCUMENTS%%%USER%%LocalTempencrypted.exe
C:Documents and Settings%USER%Application DataCasablanca
C:Documents and Settings%USER%Application DataBl 430 493 557.ADO
C:Documents and Settings%USER%Application DataDakar
C:Documents and Settings%USER%Application DataMegaloblast.a
C:Documents and Settings%USER%Application DataCrypto.dll
C:%DOCUMENTS%%%USER%%LocalTempnsh2.tmpSystem.dll
Key: HKUS-1-5-21-1801674531-413027322-2147225017-500SoftwareAmmyy
Key: HKLMSOFTWAREAmmyy
Computers viruses, worms, ransomware, etc. are kinds of malicious software that no user should take lightly. On several occasions, we have touched upon security steps that each user should take in order to protect its identity and data. Sadly sometimes even when all precautions are taken some malware can still slip through and wreak havoc. Today we are looking at some of the worst or the best, depending on your view that has indeed wreaked plenty of havoc.
10 worst computer viruses in history
In the list of the 10 most famous computer viruses below, we show the costs, dates, reach, and other key facts. First a note about terms: we use the words “virus” and “worm” interchangeably because most readers search for them that way. But there’s a subtle difference that we explain after the list.
1. Mydoom – $38 billion
The worst computer virus outbreak in history, Mydoom caused estimated damage of $38 billion in 2004, but its inflation-adjusted cost is actually $52.2 billion. Also known as Novarg, this malware is technically a “worm,” spread by mass emailing. At one point, the Mydoom virus was responsible for 25% of all emails sent.
Mydoom scraped addresses from infected machines, then sent copies of itself to those addresses. It also roped those infected machines into a web of computers called a botnet that performed distributed denial of service (DDoS) attacks. These attacks were intended to shut down a target website or server.
Mydoom is still around today, generating 1% of all phishing emails. That’s no small feat considering the 3.4 billion phishing emails sent each day. By that figure, Mydoom has taken on a life of its own, infecting enough poorly-protected machines to send 1.2 billion copies of itself per year, 16 years after its creation.
Though a $250,000 reward was offered, the developer of this dangerous computer worm was never caught.
Wondering what makes the world’s most secure computers so safe? See the Tech@Work guide: Upgrade to the World's Most Secure and Manageable PC
2. Sobig – $30 billion
The 2003 Sobig computer virus is actually another worm. It is second only to the Mydoom virus in its scope. The $30 billion figure is a worldwide total, including Canada, the U.K., the U.S., mainland Europe, and Asia. Several versions of the worm were released in quick succession, named Sobig.A through Sobig.F, with Sobig.F being the most damaging.
This cybercriminal program masqueraded as legitimate computer software attached to emails. It disrupted ticketing at Air Canada and interfered with countless other businesses. Despite its widespread damage, the creator of the successful bug was never caught.
3. Klez – $19.8 billion
Klez is a close third on the list of the worst computer viruses ever created. With nearly $20 billion in estimated damages, it infected about 7.2% of all computers in 2001, or 7 million PCs. The Klez worm sent fake emails, spoofed recognized senders and, among other things, attempted to deactivate other viruses.
As with other viruses and worms, Klez was released in several variants. It infected files, copied itself, and spread throughout each victim’s network. It hung around for years, with each version more destructive than the last.
Windows has come a long way since most of the computer viruses on this list hit the web. Thankfully, built-in protection with Microsoft Defender is always on the watch.
4. ILOVEYOU – $15 billion
The year 2000’s ILOVEYOU virus worked by sending a bogus “love letter” that looked like a harmless text file. Like Mydoom, this attacker sent copies of itself to every email address in the infected machine’s contact list. Shortly after its May 4 release, it had spread to more than 10 million PCs.
The virus was created by a college student in the Philippines named Onel de Guzman. Lacking funds, he wrote the virus to steal passwords so he could log into online services he wanted to use for free. He reportedly had no idea how far his creation would spread. This virus is also known as Loveletter.
Need to up your remote work security game before there’s another entry on the list of most deadly computer viruses? See our guide: How to Work Remotely and Securely
5. WannaCry – $4 billion
The 2017 WannaCry computer virus is ransomware, a virus that takes over your computer (or cloud files) and holds them hostage. The WannaCry ransomware ripped through computers in 150 countries, causing massive productivity losses as businesses, hospitals, and government organizations that didn’t pay were forced to rebuild systems from scratch.
The malware raged like wildfire through 200,000 computers worldwide. It stopped when a 22-year-old security researcher in the U.K. found a way to turn it off. Computers with out-of-date operating systems were hit especially hard. That’s why security experts always recommend updating your systems frequently.
Ransomware strikes again
In September 2020, one of the potentially largest computer virus attacks in medical history hit Universal Health Services. The U.S. hospital chain, which has more than 400 locations, was reportedly struck by damaging ransomware. The attack forced the cancellation of surgeries and made healthcare workers switch to paper records.
6. Zeus – $3 billion
The Zeus computer virus is an online theft tool that hit the web in 2007. A whitepaper by Unisys three years later estimated that it was behind 44% of all banking malware attacks. By then, it had breached 88% of all Fortune 500 companies, 2,500 organizations total, and 76,000 computers in 196 countries.
The Zeus botnet was a group of programs that worked together to take over machines for a remote “bot master.” It originated in Eastern Europe and was used to transfer money to secret bank accounts. More than 100 members of the crime ring behind the virus, mostly in the U.S., were arrested in 2010. It’s not as prominent today, but some of the virus’ source code lives on in newer botnet viruses and worms.
Zeus caused documented damage of $100 million. But the real cost in terms of lost productivity, removal, and undocumented theft is undoubtedly much higher. A $3 billion estimate, adjusted for inflation, puts this virus at a cost of $3.7 billion in today’s dollars.
7. Code Red – $2.4 billion
First observed in 2001, the Code Red computer virus was yet another worm that penetrated 975,000 hosts. It displayed the words “Hacked by Chinese!” across infected web pages, and it ran entirely in each machine’s memory. In most cases it left no trace in hard drives or other storage.
Financial costs are pegged at $2.4 billion. The virus attacked websites of infected computers and delivered a distributed denial of service (DDoS) attack on the U.S. White House’s website, www.whitehouse.gov. In fact, the White House had to change its IP address to defend against Cod Red.
Can your printer get a virus? See our cool infographic: The State of Printer Security
8. Slammer – $1.2 billion
The SQL Slammer worm cost an estimated $750 million across 200,000 computer users in 2003. This computer virus randomly selected IP addresses, exploiting vulnerabilities and sending itself on to other machines. It used these victim machines to launch a DDoS attack on several internet hosts, significantly slowing internet traffic.
The Slammer worm hit banks in the U.S. and Canada especially hard, taking ATMs offline in many locations. Customers of Toronto’s Imperial Bank of Commerce found themselves unable to access funds. The attack reared its ugly head again in 2016, launching from IP addresses in Ukraine, China, and Mexico.
9. CryptoLocker – $665 million
Thankfully, ransomware attacks like the 2013 CryptoLocker virus have dipped since their 2017 peak. This malware attacked upwards of 250,000 machines by encrypting their files. It displayed a red ransom note informing users that “your important files encryption produced on this computer.” A payment window accompanied the note.
The virus’ creators used a worm called the Gameover Zeus botnet to make and send copies of the CryptoLocker virus. According to a report by security firm Sophos, the average ransomware attack costs a business $133,000. If we estimate that CryptoLocker hit 5,000 companies, that would put its total cost at $665 million.
Where will cybersecurity go next? See our guide: The Future of Cybersecurity
10. Sasser – $500 million
The Sasser worm was written by a 17-year-old German computer science student named Sven Jaschan. He was arrested at the age of 18 in 2004 after a $250,000 bounty was posted for the computer virus’ creator. A friend of Jaschan’s tipped authorities that the youth had penned not only the Sasser worm but also the damaging Netsky.AC attack.
Jaschan was given a suspended sentence after it was found he was a minor when he wrote the malware. The Sasser worm crashed millions of PCs, and though some reports put damages at $18 billion, the relatively low infection rate suggests a more likely cost of $500 million.
Other notable viruses
The top 10 worst computer viruses above are just the ugly tip of a gargantuan digital iceberg. With a million new malware programs popping up every 3 years, we may miss the forest for a few outstanding trees. Here are just a few more viruses that have wreaked havoc over the years:
Mimail: This worm tried to harvest data from infected machines to launch a string of DDoS attacks, but was relatively easy to remove.
Yaha: Yet another worm with several variants, thought to be the result of a cyber-war between Pakistan and India.
Swen: Written in C++, the Swen computer worm disguised itself to look like a 2003 OS update. Its financial cost has been pegged at $10.4 billion, but not reliably.
Storm Worm: This worm showed up in 2007 and attacked millions of computers with an email about approaching bad weather.
Tanatos/Bugbear: A 2002 keylogger virus that targeted financial institutions and spread to 150 countries.
Sircam: A computer worm from 2001 that used counterfeit emails with the subject line, “I send you this file in order to have your advice.”
Explorezip: This worm used fake emails to spread to every machine on thousands of local networks.
Melissa: The most dangerous computer virus in 1999, Melissa sent copies of itself that looked like NSFW pics. The U.S. FBI estimated cleanup and repair costs at $80 million.
Flashback: A Mac-only virus, Flashback infected over 600,000 Macs in 2012 and even infected Apple’s home base in Cupertino, Calif. In 2020, there’s now more malware on Macs than on PCs.
Conficker: This 2009 virus still infects many legacy systems and could do significant damage if it ever activates.
Stuxnet: This worm is reported to have destroyed Iranian nuclear centrifuges by sending damaging instructions.
Quest 2 has been crowned as the best overall VR headset by many websites, and to be honest it is really a great piece of equipment deserving of every praise it gets. It seems that Meta feels that it can do better so the new upcoming Quest Pro is upgraded and a new line of VR sets from this company. The economic standard Quest line will not be shut down and it will still remain as an economic version of Meta's VR product line.
Quest Pro will be added as a new line of the better product line with better performance and better quality. It is the first VR headset that is packing Qualcomm Snapdragon XR3+ Gen 1 chipset, 12GB of RAM, 256GB of internal storage, and 10 high-resolution sensors. Of course, this much power and improvement come with a higher price tag, this time that price tag is $1,499.99.
The new VR headset promises industry-leading visuals with a new optical stack instead of Fresnel lenses in Meta Quest 2 with thin-layer pancake optics that fold light reducing the depth of the optical module by 40% and at the same provides clear and sharp visuals.
The headset will give display more vivid colors, richer colors, and higher contrast by incorporating local dimming and quantum dot technology. It composes of specialized backlight hardware accompanied by software algorithms that can control more than individual LED blocks independently.
The Quest Pro will also come packed with new Meta Quest Touch Pro controllers. They will feature three built-in sensors to track the controller's position completely independent of the headset which means that tracking and range of motion will be improved. These new controllers will also be sold separately at the cost of $299.99 and they can be used with Quest 2.
The headset is available for preorder and it will start shipping in late October on the Meta website
Computer voice control has moved a long way from its beginning routes and in today's age controlling your PC with voice is truly a reality and fully possible. Voice control is taking up the steam in everyday life, from simple commands in cars, Alexa, smartphones, TVs, etc. to modern computers.
Windows 10 has introduced voice control into PC with Cortana even during the installation process but a lot has changed from having a virtual assistant in begging days and in today's modern Windows 11 OS. You can now freely open apps, move, copy delete files, and even dictate in order to create a word document.
However, in order to take this advantage, you will need to turn it off first since it is disabled by default. Of course, you will need a microphone and some spare time to train Windows in understanding you properly.
Setting up Voice Control
Just like in Windows 10, in Windows 11 voice control is also in accessibility options and the first step is to turn ON Windows Speech Recognition.
Click on the Start button and type Settings into the search bar, click on Open, or press ENTER. On the left side of the settings, window locate and click on Accessibility. On the right part once Accessibility is selected scroll down and find a section titled Interaction and click on Speech. Turn on the switch next to Windows Speech Recognition.
A pop-up will appear that will lead you through the rest of the setup and that's it.
Improving Voice Control
In order to make your voice control better, if you are not satisfied with the results, you can sample more of your voice into the algorithm to tune it more to your liking. Sadly this option is still deep in Control Panel.
Click the Start button and type in Speech recognition into the search bar, look for the search result with Control Panel displayed under it, and click on Open. Click on Train Your Computer to Better Understand You and follow the instructions.
The process will probably take a few minutes. The more data you provide to the speech recognition model, the more accurate it will be when interpreting your instructions. You can train the model multiple times, and each time you do, it should improve the accuracy.
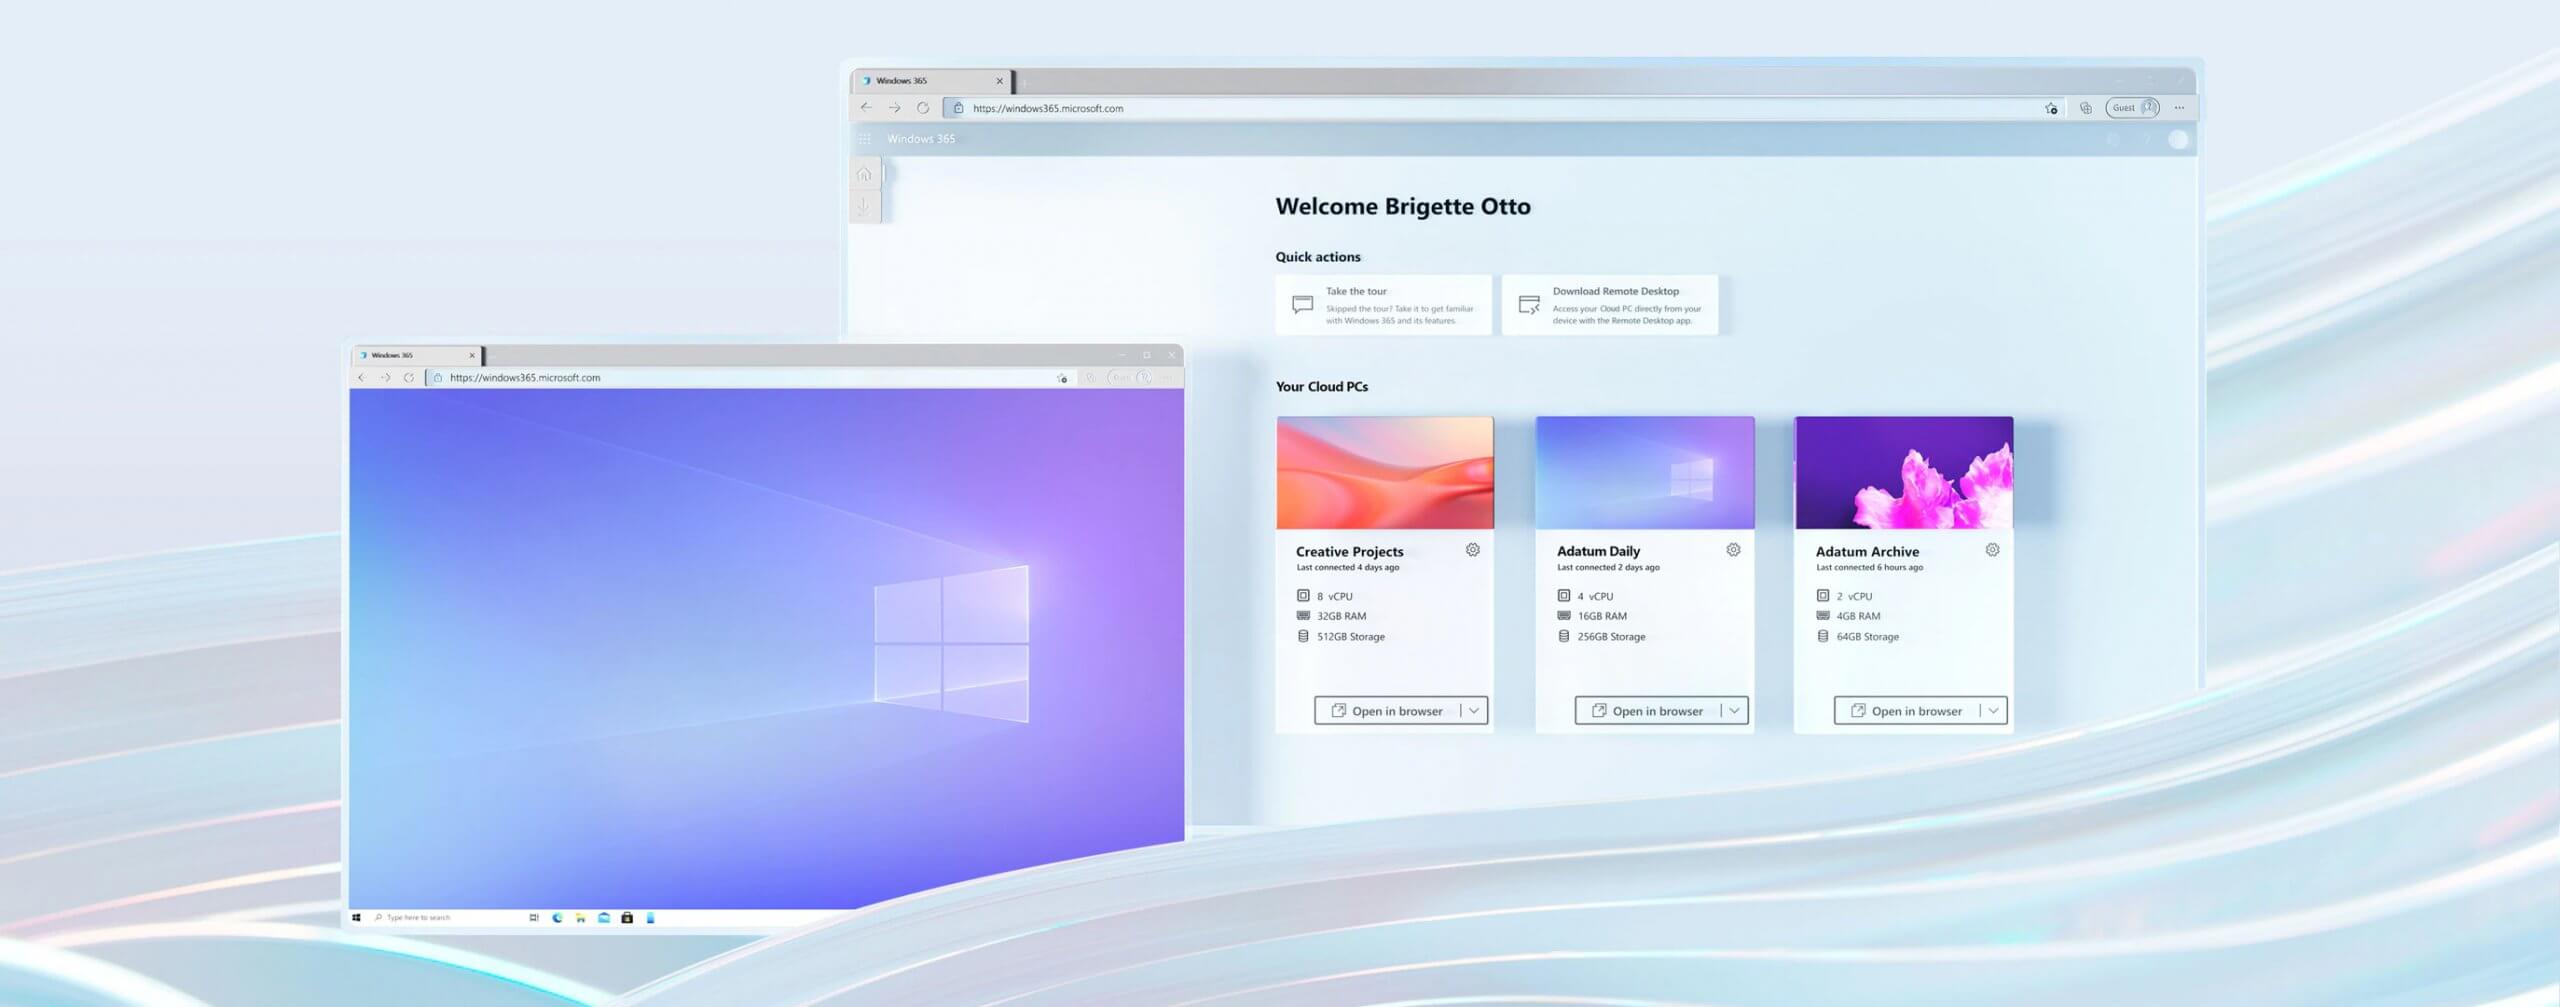
Microsoft has announced Windows 365, a new cloud-based operating system aimed mainly at businesses of all sizes.
Just after Windows 11 announcement and presentation, we are seeing another Windows announcement from Microsoft. Dive into the following text in order to find out what exactly is new Windows 365, its role in today's IT world, and do you need it?
What is Windows 365 and when it is coming out?
Windows 365 is planned to be released this year (2021) on August 2nd. It is the first Microsoft cloud-based operating system meaning that OS itself will be installed on the cloud server and it will be accessed by the user via a web browser.
Essentially you are accessing a remote PC with Windows on it, you can install whatever Windows application you want and use it as it was on your computer. When you disconnect from the cloud computing and reconnect again from the same or another device you will continue exactly where you left off.
Cloud PC will remember the state it was left off and will greet you in that same state once it is awakened again. This of course offers some great benefits like moving from laptop to desktop and continuing exactly where you left off.
How can I access Windows 365?
Any device which has a web browser will be able to access Windows 365 making it a really great solution for business on the move or for anyone who switches devices during the day.
That being said it is clear to see that Windows 365 can be accessed via Linux, macOS, iOS, Android, or any other operating system on any computer, tablet or phone.
Who is this OS made for?
Microsoft’s general idea is that Windows 365 is primarily made for business which in their minds can benefit most out of it.
So far it is not made for a single user although there is a possibility that even a one-man business can subscribe and create accounts for it.
Price and technical characteristic
Microsoft will bill Windows 365 on a per-user, per-month basis. In other words, businesses will pay a fixed amount per employee every month.
There will be two tiers: Windows 365 Business and Windows 365 Enterprise. Microsoft also said it will offer different performance tiers. Businesses can choose to pay for more CPU, RAM, and storage resources for certain cloud PCs depending on their needs.
Microsoft told me the smallest configuration would be one CPU, 2GB of RAM, and 64GB of storage. The largest will be eight CPUs, 32GB of RAM, and 512GB of storage.
After a business has chosen its plan tier and performance options, that business will pay a fixed amount every month. This is unlike Azure Virtual Desktop, which Windows 365 is built on. With Azure Virtual Desktop, companies pay on a usage model, depending on how much the remote system is used every month.
Conclusion
Windows 365 is around the corner and if you are a business no matter small or large with the need for software on the go, Windows 365 might be a worthwhile investment and a great asset to your business.
As you know, the Windows File Explorer is quite a responsive program and contains tons of features. It allows you to do various customizations by changing Settings or changing the value of a Registry key or Group Policy modification. Either way, you will be guided on how you can enable or disable the Status Bar in File Explorer on your Windows 10 computer.
The Status Bar is located at the bottom of the File Explorer and shows you how many items are inside the folder and how many items you’ve selected. In addition, it also shows you information about each item and can display items using large thumbnails with just a single click.
In order to enable or disable the Status Bar in File Explorer, you can use the two given options below as reference. You can either use the Folder Options or the Registry Editor.
Option 1 – Enable or Disable Status Bar via Folder Options
Tap the Win + E keys on your keyboard to open File Explorer.
Then tap the Alt + F keys and click on Options.
From there, make sure that you are in the View tab and look for the “Show Status Bar” option in the list that gets populated.
After that, check if the Show Status Bar option is enabled or disabled. It is supposed to be enabled by default so if it is enabled and you want to disable it, just simply uncheck its checkbox otherwise, leave it as it is.
Now click on Apply and then OK to save the changes made
Option 2 – Enable or Disable Status Bar via Registry Editor
Tap the Win + R keys to open the Run dialog box.
Then type “Regedit” in the field and hit Enter to pull up Registry Editor.
Next, navigate to this registry key: HKEY_CURRENT_USERSoftwareMicrosoftWindowsCurrentVersionExplorerAdvanced
Afterward right-click on Advanced and select New > DWORD (32-bit) Value and then input “ShowStatusBar as the name of the newly created DWORD.
Now double click on the new DWORD and change its value to “0” if you want to disable Status Bar and “1” if you want to enable it.
Then exit the Registry Editor and restart your computer to apply the changes made.
 Microsoft office has two major packages, an online one, and an offline version. The online version of the course is Office 365 that requires a monthly subscription and it is always regularly updated and maintained. Another version is more of a typical old school application, install it and use it, no constant internet connection is required and no monthly subscription is required, buy once and use it.
 When Task Manager opens, click on the startup tab on top.
 Once you click on startup you will get a list of applications that are set to be started when Windows is booted.
 You can now click on the application and then click on disable on the bottom button, the application status will update in task manager to disabled and it will not be booted anymore when Windows starts. In this same manner, you can enable back some applications if you changed your mind about them.
Please note that some applications are using some services and must have them running or they will not work properly. The best practice is to disable applications you are positive you will not use or use rarely so you do not want them to slow down Windows.
You can now click on the application and then click on disable on the bottom button, the application status will update in task manager to disabled and it will not be booted anymore when Windows starts. In this same manner, you can enable back some applications if you changed your mind about them.
Please note that some applications are using some services and must have them running or they will not work properly. The best practice is to disable applications you are positive you will not use or use rarely so you do not want them to slow down Windows. 


 10 worst computer viruses in history

 Microsoft has announced Windows 365, a new cloud-based operating system aimed mainly at businesses of all sizes.
Just after Windows 11 announcement and presentation, we are seeing another Windows announcement from Microsoft. Dive into the following text in order to find out what exactly is new Windows 365, its role in today's IT world, and do you need it?
Microsoft has announced Windows 365, a new cloud-based operating system aimed mainly at businesses of all sizes.
Just after Windows 11 announcement and presentation, we are seeing another Windows announcement from Microsoft. Dive into the following text in order to find out what exactly is new Windows 365, its role in today's IT world, and do you need it?