The holiday season is almost upon us and buying gifts for loved ones can sometimes present some headaches, especially if that loved one is a Gamer or PC enthusiast. We have all been there and how almost every household today has a console or PC struggles are infecting more and more people. But do not despair, we have made a nice list of potential gifts for you.
 The list contains some nice essential and good things but we gave our best not to break the bank so you will not find any large screens or 300$ keyboards here. Of course, you can always get expensive gifts and if you have money for it do it, it is just we want to have affordable stuff here.
A Steam gift card
For gamers, a good game is a great gift but most of the time when we are buying a game we can miss what the person wants. That is why a Steam gift card is a great gift for gamers. He can use it and buy whatever he or she wants for its value.
Xbox Game pass
This is another for those Gamers type. Xbox game pass is a great gift even if you do not own Xbox since all games will work on PC as well. Xbox Game Pass Ultimate includes the PC version, which will unlock somewhere between 300 and 350 games automatically. It’s a subscription service, so your PC gamer will have to keep up with it. The monthly price is worth it, though.
Pack of cable ties
Almost every PC user has tons of cables lying around, and most of the time they are not really tidy. Cable ties come to the rescue!!! Let us be honest, no one likes cables that are scattered all over the place, even the computer users so if they do not have this essential piece of equipment, we are sure they will like it.
Compressed air duster
Dust is enemy no.1 for computer users, it gets into the keyboard, into small spaces, etc. It is very difficult to get it out so an air duster for compressed air is a great cleaning gift for any kind of computer enthusiast. You can get it with a can of compressed air as well so everything is ready for cleaning.
New Headset
A headset is always a great gift. Over time earbuds can deteriorate and get damaged simply just by using them and when enough time passes even cables can start losing contact and overall sound quality may drop. Usually, computer users change headsets like keyboards so if your loved one has some old headsets showing their age, a new one is a perfect present.
New SSD drive
More hard disk space is always a welcome sight for any PC user and new SSD drives fueled with new technology are faster than ones of the same size in past years making them a perfect gift.
Large mouse pad
A good mouse pad can mean a lot to a gamer. Over time mouse pad deteriorates simply with its use so a new and fancy large pad is a great gift for any user. If you want a great gift, make it with RGB light.

 If we are to believe news from Intel, new series of processors based on Alder Lake architecture are about to be released somewhere in October. Alder Lake is the 12th Generation Core of Intel processors and it is meant to have all advantages of the current CPU structure.
I9 is aimed to pack a punch against its competitors with technology including eight high-performance Golden Cove cores (P-cores) with Hyper-Threading and eight energy-efficient Goldmont (E-cores) equipped with a 30MB L3 cache and operating at high clock speeds.
During the benchmark test, the new CPU outperformed all of Intel’s previous Rocket Lake structure processors which is logically expected but the big surprise came from results that indicate better performance than Apple’s new M1 processor even in single-threaded performance which is supposed to be best in that field.
Another surprise was really beating AMD Ryzen 9 in each field. If we take into account that i9 has 16 cores in total and can process 24 threads against Ryzen 9 with 16 Cores and 32 threads this is an impressive feature.
Now truth to be told Alder lake has massive L3 cache and microarchitectural advantages and consumes much more power but the results of performance are high. Also, note that this early CPU is not really a mass production one and maybe some things will still change but early results are very satisfactory.
We will see what will price tag be since in this age of shortage and competition that will also play a big role in its overall success. Speaking of competition I eagerly await AMD’s response to this, in any way it seems that the CPU market is for some turbulence which is always a good thing for the final customer and I welcome it.
If we are to believe news from Intel, new series of processors based on Alder Lake architecture are about to be released somewhere in October. Alder Lake is the 12th Generation Core of Intel processors and it is meant to have all advantages of the current CPU structure.
I9 is aimed to pack a punch against its competitors with technology including eight high-performance Golden Cove cores (P-cores) with Hyper-Threading and eight energy-efficient Goldmont (E-cores) equipped with a 30MB L3 cache and operating at high clock speeds.
During the benchmark test, the new CPU outperformed all of Intel’s previous Rocket Lake structure processors which is logically expected but the big surprise came from results that indicate better performance than Apple’s new M1 processor even in single-threaded performance which is supposed to be best in that field.
Another surprise was really beating AMD Ryzen 9 in each field. If we take into account that i9 has 16 cores in total and can process 24 threads against Ryzen 9 with 16 Cores and 32 threads this is an impressive feature.
Now truth to be told Alder lake has massive L3 cache and microarchitectural advantages and consumes much more power but the results of performance are high. Also, note that this early CPU is not really a mass production one and maybe some things will still change but early results are very satisfactory.
We will see what will price tag be since in this age of shortage and competition that will also play a big role in its overall success. Speaking of competition I eagerly await AMD’s response to this, in any way it seems that the CPU market is for some turbulence which is always a good thing for the final customer and I welcome it. 
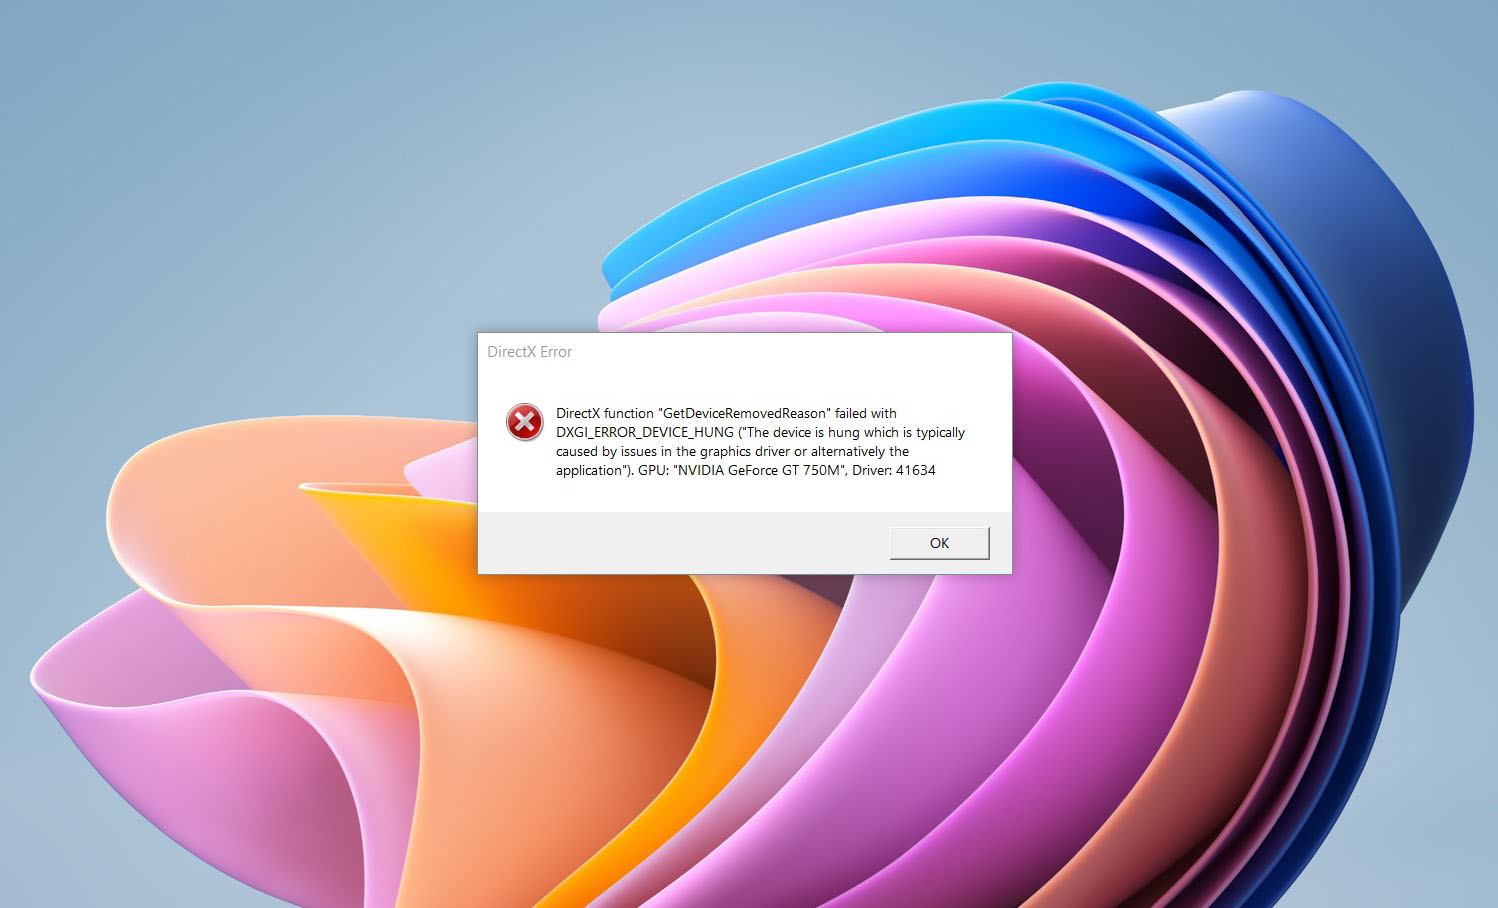 If you are one of the gamers affected by this error, fear not because we have a solution for you. Follow provided fix guide in order to correct this error and get back to gaming asap.