Logo

Applications you should remove from Windows

ApplicationsOver time Applications change, some for the better some for worse. Some of them even stop receiving updates and are old and vulnerable. Sometimes standards change and some file types are not used anymore. Software evolves along with technology and that is good.

Keeping old and useless applications inside your Windows is not so good. From various exploits to simply taking up space, maybe even slowing down OS it is always wise and good to clean your Windows from unwanted old applications.

In this article, we will be mentioning some relics of old and providing you with an explanation of why you should remove them from your system if by any chance you still have them on it.

Silverlight

Silverlight was meant to be a competitor for Adobe Flash, it is a WEB framework that enables rich media content inside your WEB browser. The issue is that it is not developed anymore and today's browsers do not support it.

The only browser that actually can support it is internet explorer which itself is not supported and how there is practically 0 content on today's modern WEB that will require Silverlight, it is safe and recommended to remove it.

Adobe Flash

Speaking of Adobe Flash, you should remove it as well. Flash has stopped receiving support as of January 2021 and browsers have dropped support for it and even blocked it due to security issues.

However, there still might be some local installation of Flash itself inside Windows along with the old Shockwave player that stopped receiving support in 2019. You should remove them both.

JAVA

Now this one is tricky, by itself JAVA does not present any security issues since browsers do not support it anymore and the desktop version is not really slowing down your computer. This one has simply put just another media runtime that is not used and simply takes up space and resources.

However if you have some applications that you do use that rely on it (I can really just think of JAVA Minecraft at this point) leave it of course but in any other case, it is just purely not needed.

Quicktime

While we are at media runtime and stuff that just simply is not needed, Quicktime is one of them. Now this Apple Video player and codec is still pretty developed and active in Apple’s iOS environment, Windows version has not been updated since 2016 and it was discovered that it contains some critical vulnerabilities.

Uninstall it and if you need a player that could play MOV files, just use a VLC player that can play them without any separately installed codec.

uTorrent

This one, the same as CCleaner was once a good application, as a matter of fact, it was the best torrenting application. Sadly it has fallen from its grace very low, from getting tons of ads in its interface to findings in 2015 that code of torrent client was packed with a crypto miner that used system resources of an installed computer to mine crypto without user’s awareness.

You should uninstall this torrent client if you would like to get your PC back and not provide it for cryptocurrency mining for the company that developed it. Use qBittorrent or TIxati, open-source and free ones that have everything needed for any torrenting needs.

Toolbars and Browser extensions

There are a lot of toolbars for browsers and extensions that are malicious in nature or simply not updated providing security issues. It is very advisable to remove this as soon as possible.

WinRAR

WinRAR has gained its large popularity solely for the reason that you could download it from the official site like shareware and use it forever. The license never expired and you could use it indefinitely. Sadly not much has been improved in the application itself and it is slowly falling out in its range of what it can do.

There are better open source and free options today like 7zip, PeaZip, ZIPvare, and more that are working the same as WinRAR if not even better.

Windows and manufacturers Bloatware

Yes, applications that come bundled with Windows and with some laptops that include manufacturers made software for different tasks like its own specific media players, calculators, etc.

It is known that these applications are not better than their open-source rivals and there are too many of them including some that you will probably never use. It is the same as buying a new phone bundled with tons of applications that you do not need, did not ask for, and do not use. Delete all of them.

Considering Windows there are also some Store application like Candy Crush Saga demo and other are safe to remove if not needed.

That’s it, our advice for old and not needed applications so you can keep your PC safe and fast.

Do You Need Help with Your Device?

Our Team of Experts May Help
Troubleshoot.Tech Experts are There for You!
Replace damaged files
Restore performance
Free disk space
Remove Malware
Protects WEB browser
Remove Viruses
Stop PC freezing
GET HELP
Troubleshoot.Tech experts work with all versions of Microsoft Windows including Windows 11, with Android, Mac, and more.

Share this article:

You might also like

Change Font Size in Sticky Notes in Windows
Sticky Notes is one of the useful programs and in the early days, the option is available for users to change the font size of the text a lot easier. However, for some unknown reason, Microsoft decided to get rid of this feature in the latest Windows Update. One would expect that the feature will be replaced by an even more useful feature but it’s not which makes the Sticky Notes app worse than before. Worry not though for it doesn’t have to stay that way as there is another thing you can try to change the font size in your Sticky Notes app and that’s what we’re going to cover in this post. As mentioned, Microsoft removing this font feature is quite strange and in the past, users asked for this feature and since it’s no longer available, you can try following the steps given below to bring it back. And for that, you need to go to the Ease of Access section in the Settings app. Refer to the steps given below for more instructions. Step 1: First, tap the Win + I keys to open Settings and then go to the Ease of Access section. Step 2: After going to the Ease of Access menu and select Display from the list of options. Step 3: From there, you should see an option that says “Make text bigger”. And then use your mouse to navigate to the slider to change the size of the font. Note: Take note that after doing all the steps above, it will change not just the Sticky Notes app but also everything in Windows 10. This method is actually the best since it only changes the size of the apps rather than a wholesale change in your Windows 10 computer. Step 4: Next, scroll under Display until you see the “Change the size of apps and text on the main display” option where you’ll see that the option is 100% but you’ll want to change that to 125%. Step 5: After that, click on the drop-down menu and select 125% and then restart your Windows 10 computer. Step 6: Now open the Sticky Notes app and check if you can now change the font size in the Sticky Notes app.
Read More
Rebuild Search Index in Windows 10
If by any chance your search result in Windows is misleading, missing, or incorrect then it is a high probability that your search index is out of date. To repair this issue follow this guide step by step. Please take note that rebuilding the whole search index can take a long time on some systems depending on the size of the index itself, CPU speed, HD speed, etc. Sometimes it can take even hours on large drives. First, press ⊞ WINDOWS + R to open the run dialog and type in it Control panel to open the control panel. keyboard with windows and r markedrun dialog with control panel typed in 
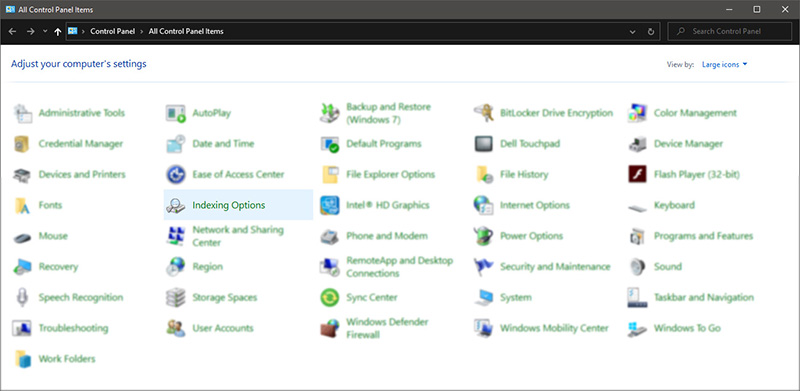
Once you are in the control panel, switch your view to large icons and locate Indexing options. Control panel with indexing options selected
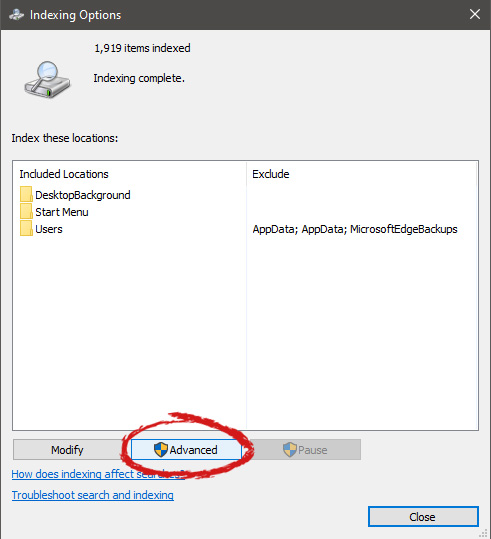
Inside indexing options, click on advanced. indexing options advanced button markedIn advanced options click on the rebuild and confirm. indexing options rebuild button marked
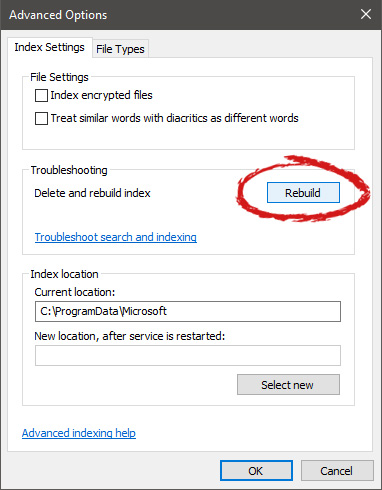
Leave your computer to finish and your searches should be working fine now.
Read More
Screen of death colors in Windows 10
Receiving a screen of death is not a pleasant experience at all and most users would agree that they would very much like not to face one during their work with the computer. Sadly PC is not a perfect machine and it is not working in a perfect environment so errors happen. The most famous and well-known death screen is blue which is also the most common one, my bet would be that there is not a user which has not been faced with this blue error screen. There is no simple explanation why these stop errors occur as several factors can be involved. However, it is known that the malfunctioning of hardware drivers or drivers that are installed by third-party software drive this unwanted change. But did you know that there is more colors for infamous death screens and not just blue one? Microsoft has coded different errors to different colors in the goal for the technical team to be aware right away of what type and kind of error they are dealing with. Color for screen errors are: Blue, Black, Pink, Brown, Yellow, Red, Orange, Green and White If you are interested in what color represents what keep reading.

BLUE

blue screen of deathA stop error or exception error commonly called the blue screen of death (BSoD) or blue screen, is an error screen displayed on Windows computers following a fatal system error. It indicates a system crash, in which the operating system has reached a condition where it can no longer operate safely. This is caused by many different problems, such as a general hardware failure or a crucial process terminating unexpectedly.

BLACK

black screen of deathOn Windows 10 systems, a Black Screen of Death can be caused by an unfinished Windows Update. To resolve this problem, simply hold the power button down on your PC or laptop to switch off the computer. A cold start should result in the system booting properly.

PINK

pink screen of deathIt is a diagnostic screen with a white type on a pink background. Pink Screen is mainly seen when the VMkernel of an ESX/ESXi host experiences a critical error, becomes inoperative, and terminates any virtual machines that are running. It is not fatal and generally considered more of a developer testing issue. When encountered, it can be fixed quickly by following the simple action of pressing and holding your computer’s power button to shut down the device.

BROWN

brown screen of deathThe Microsoft Windows 10 Operating System Brown Screen of Death is an on-screen fatal error notification with bug check codes which is seen when a computer crashes due to graphics hardware or software-related problems (failing graphics drivers).

YELLOW

yellow screen of deathIt affects the functioning of a browser, particularly Mozilla Firefox. The Yellow Screen of Death makes the appearance with a weird buzzing sound in the background when the XML parser refuses to process an XML document causing a parsing error and a weird buzzing sound. The issue persists unless the computer is manually rebooted.

RED

red screen of deathCommonly the Windows 10 red screen is caused due to the hardware error, particularly if you overclock your Windows PC/laptop. Despite this, sometimes the red screen of death is also caused by outdated or incompatible drivers or due to BIOS issues.

ORANGE

orange screen of deathThe Orange Screen of Death on Windows occurs due to fatal hardware errors. Multiple reasons have been reported for the Orange Screen of Death. Some had this issue when watching a YouTube video, some were not able to boot into Windows. It can even occur when waking up from Sleep.

GREEN

green screen of deathThe green screen of death only appears when you're running an Insider Preview version of Windows 10. It's the same as the blue screen of death, and it will show the same error messages. ... If you see a green screen of death (GSOD) on your PC, that's a sign you're using an Insider Preview build of Windows 10.

WHITE

white screen of deathThe White Screen on Windows is also an error where the screen of the computer just turns white and freezes. There can be several things that can cause the white screen to appear on the Windows laptop monitor. But the main issue could be because of malfunctioning of the graphics hardware.
Read More
Jailbreak Amazon Fire TV stick

Sometimes we need and want some apps that are not part of the official Amazon Appstore but having their Fire TV stick prevents us from installing anything that's not in their store, or does it?

amazon tv stick

You can quickly "jailbreak" given stick and unlock additional installations via different providers. Although the term jailbreaking is associated with illegal and hacker activities rest assured that in this case there is nothing illegal about this procedure and that you are entirely safe.

Jailbreaking process

In order to do this procedure firstly you will have to allow the installation of apps obtained from outside the Amazon Appstore. To do this open the settings menu on your Fire TV Stick and inside settings choose My Fire TV. On the My Fire TV page select Developer Options and inside select Apps From Unknown Sources. The prompt screen will open, choose Turn On to activate the option.

APK installation is enabled now and the next step is to download an app like Downloader that will allow you to get your favorite apps. Downloader is free to download manager fully available on the Amazon Appstore and with it, you can download any kind of file to your device including APKs.

Once installed open the Downloader app and type in the URL or search term in order to find your application of choice but please do get all of your APK from trusted sources in order to avoid exploits and getting malware.

Read More
Assigning Multiple IP Addresses to Adapter
There are times when an IT admin has to set up multiple IP addresses to the same network adapter. Setting up multiple IP addresses in scenarios like hosting various SSL sites, speed up traffic exchanges can help in avoiding being blacklisted in the SPAM filters, and so on. So in this post, you will be guided on how exactly you can assign multiple IP addresses to the network adapter in your Windows 10 computer. There are several ways to assign multiple IP addresses in a network adapter. You can do it using the Network Adapter settings or using the Netsh utility, as well as the Windows PowerShell utility. To get started, refer to each one of the options provided below.

Option 1 – Assign multiple IP addresses via Network Adapter settings

  • Go to Settings first and from there, select Network & Internet, and then click on the Change adapter options. This will show you a list of both the physical and virtual network adapters in your computer.
  • Next, double click on the Ethernet adapter where you want to assign the multiple IP addresses and then click on the Properties button.
  • After that, you should see the Ethernet properties where you have to select the “TCP/IPv4” or “TCP/IPv6”.
  • Once done, click on the Properties button and then select the “Use the following IP address” option under the General tab.
  • Now you have to add an IP address, subnet, and default gateway to the network adapter and then click on the Advanced button.
  • This will open the Advanced TCP/IP settings where you have to click on the Add button so you can add an IP address. From here, you can keep adding multiple IP addresses to the network adapter. You also have the option to add multiple gateways or DNS IP addresses.
  • Once done, if you execute the “ipconfig” command, you should see all the secondary IP addresses listed.

Option 2 – Assign multiple IP addresses using the Netsh command

Another way to assign multiple IP addresses to your network adapter is via the Netsh command.
  • In the Start Search, type “command prompt” and from the search results that appear, right-click on Command Prompt and then select the “Run as administrator” to open it with admin privileges.
  • If a User Account Control or UAC prompt pops up, just click on Yes.
  • After that, run this command: Netsh int ipv4 add address name="Local Area Connection" 192.168.100.100 255.255.255.0 SkipAsSource=True
Note: You have the option to set “SkepAsSource” since it depends on your needs using the Netsh command. When it is configured as true, the IP address won’t be used by the OS for outbound connections.

Option 3 – Assign multiple IP addresses via Windows PowerShell

  • Tap the Win + X key combination and click on the “Windows PowerShell (Admin)” option.
  • After opening Windows PowerShell as admin, use the NetIPAddress command so you can add more IP addresses. Execute this command: Get-NetIPAddress | ft IPAddress, InterfaceAlias, SkipAsSource
  • Next, assign an IP address to a network adapter by executing this command: New-NetIPAddress –IPAddress 192.168.100.100 –PrefixLength 24 –InterfaceAlias “vEthernet” –SkipAsSource $True
  • Now to modify the “SkipAsSource” parameter, use this command: Get-NetIPAddress 192.168.100.100 | Set-NetIPAddress -SkipAsSource $False
Read More
How to Fix Can’t start your Camera, 0xa00f429f
If you are using the Camera app on your Windows 10 computer but encountered an error code 0xa00f429f with an error message that says, “Can’t start your camera”, read on as this post will guide you in fixing this problem. This kind of error in the Camera app could be due to a recent update gone wrong or it could also be due to a corrupted driver. If you are certain that the camera is connected and is properly installed, you can try to check for updated drivers. The error code signifies that the drivers have to be updated. However, that isn’t always the case sometimes as the problem could also have something to do with corruption in the driver. The effective ways to troubleshoot this problem would be trying to reinstall or reset the Windows Camera app, or update, rollback or uninstall some device drivers as well as use the Registry Editor. Before you proceed with the instructions provided below, make sure that you have admin privileges and don’t forget to create a System Restore point.

Option 1 – Try to reset or reinstall the Windows Camera app

As pointed out earlier, you can also reset the Camera app to fix the error. To do so, follow the steps below.
  • The first thing you have to do is go to the My Pictures folder under the C: drive of the File Explorer and then delete the Camera Roll folder.
  • Once you’re done, right-click on an empty area on your screen and create a new folder and name it “Camera Roll”.
  • Then from the Start menu open the Settings app and select System.
  • From there, navigate to the Apps and features section.
  • Now go to Camera and click on the Advanced Options and click the Reset button.

Option 2 – Try to reinstall the Camera app

If resetting the Camera app didn’t help, you might want to reinstall it by following these steps:
  • Tap the Win + X keys and select the “Windows PowerShell (Admin)” option from the menu to open Windows PowerShell as admin.
  • Next, type this command to uninstall the Camera app: Get-AppxPackage *camera* | Remove-AppxPackage
  • Once done, exit the Windows PowerShell and restart your computer and then try to install the latest version of the Camera app from Microsoft Store.

Option 3 – Try to rollback, update or disable drivers

The next thing you can do to fix the error code 0xa00f429f in the Camera app is to roll back, or update, or disable device drivers. It is most likely that after you updated your Windows computer that your driver also needs a refresh. On the other hand, if you have just updated your device drivers then you need to roll back the drivers to their previous versions. Whichever applies to you, refer to the steps below.
  • Open the Devices Manager from the Win X Menu.
  • After opening the Device Manager, look for the device drivers which have a yellow exclamation mark.
  • Then right-click on each one of them. If you haven’t updated this driver in a while, select the “Update Driver” option. On the other hand, if you’ve just updated this driver, then select the Uninstall Device option.
  • Next, follow the screen option to update or uninstall it.
  • Finally, restart your computer. It will just reinstall the device drivers automatically if you have chosen to uninstall them.
Note: You can install a dedicated driver on your computer in case you have it or you could also look for it directly from the website of the manufacturer.

Option 4 – Try to use the Registry Editor

  • Tap the Win + R keys to open the Run dialog box and type “Regedit” in the field and then hit Enter to open the Registry Editor.
  • Next, navigate to this registry key: ComputerHKEY_LOCAL_MACHINESOFTWAREWOW6432NodeMicrosoftWindows Media FoundationPlatform
  • From there, right-click on any empty space on the right side part of the window and select New > DWORD (32-bit) Value.
  • Then name it as “EnableFrameServerMode” and double click on it.
  • Now set its value data to “0” and its base value as Hexadecimal and then click on OK.
  • After that, restart your computer and see if it helped in fixing the problem or not.
Read More
Backup all drivers in Windows 10
When Windows is installed on a clean hard drive it usually finds most of the needed drivers for our computer to run, but if we by any chance have any old unsupported hardware or some exotic one chance are very high that Windows will not be able to locate and install drivers for it. And sometimes we do not even have drivers from where to download them, let's say for example you have purchased a second-hand laptop with Windows on it, you wish to create a clean and fresh copy of new Windows installation but you do not have drivers, and let us say the model is not supported so you can not download them. In this case, this shown method will help you a ton and save you a lot of time and frustration. So, in order to back all of your drivers from your Windows follow this simple guide step by step. Note please that this method will backup drivers themselves, you will not backup installation packages of drivers or similar stuff, only drivers installed in Windows itself.

Backing up the drivers

First thing first, create a folder where you want your drivers to be backed up somewhere in your HD and give it any name. Second, press ⊞ WINDOWS + X to open the secret Windows menu. keyboard with windows and x markedFrom the menu choose Command Prompt (administrator) Windows menu command prompt adminWhen the command prompt is active type the next command in it: DISM /online /export-driver /destination:C:\DriverBackup where: C:\DriverBackup is the folder and the hard drive where you want to store your backed-up drivers. Press ENTER That's it, you have now successfully backed-up all of your installed Windows drivers. Now, save all of your drivers on USB and reinstall Windows.

In order to now return backed drivers do the following:

Press again ⊞ WINDOWS + X to open the secret Windows menu. keyboard with windows and x markedbut this time choose Device manager Windows menu device managerFrom decide, manager right-click on any device Windows has not been able to install appropriate driver and choose update driver
  • Click on the Browse my computer for driver software option.
  • Click the Browse button.
  • Select the folder with the driver backup.
  • Check the Include subfolders option.
  • Click the Next button.
  • Click the Close button.
Read More
Fix Windows Update Error 0x8007001E
This post will provide you a couple of fixes you can try to resolve the Windows Update Error 0x8007001E in Windows 10. So if you are one of the users who encountered this particular Windows Update error then you’ve come to the right place. The error code in this error message also happens to be linked to some random BSOD crashes. The error code 0x8007001E is related to a storage space error or out-of-memory-type error. On the other hand, there are also instances when this error has nothing to do with your computer’s space or shortage of memory – it could be that there are broken software components or corrupted system files that are causing this error. Whichever your case is, refer to the options given below to fix the Windows Update Error 0x8007001E.

Option 1 – Run the Windows Update Troubleshooter

Running the built-in Windows Update troubleshooter is one of the things you can first check out as it is known to automatically resolve any Windows Update errors like Error 0x8007001E. To run it, go to Settings and then select Troubleshoot from the options. From there, click on Windows Update and then click the “Run the troubleshooter” button. After that, follow the next on-screen instructions and you should be good to go.

Option 2 – Free up some space on your drive

As mentioned, storage space error or out-of-memory-type error might have something to do with this problem so you need to free up some space on your drive. Make sure that you have enough space on your drive (15GB or so should do) and then restart your computer. After your computer reboots, ensure that all the major RAM hoggers are closed before you try to install the update or upgrade again.

Option 3 – Run the SFC scan

The SFC or System File Checker scan could detect and automatically repair damaged system files that could be causing the Windows Update Error 0x8007001E to appear. SFC is a built-in command utility that helps in restoring corrupted files as well as missing files. It replaces bad and corrupted system files with good system files. To run the SFC command, follow the steps given below.
  • Tap Win + R to launch Run.
  • Type in cmd in the field and tap Enter.
  • After opening Command Prompt, type in sfc /scannow and hit Enter.
The command will start a system scan which will take a few whiles before it finishes. Once it’s done, you could get the following results:
  1. Windows Resource Protection did not find any integrity violations.
  2. Windows Resource Protection found corrupt files and successfully repaired them.
  3. Windows Resource Protection found corrupt files but was unable to fix some of them.

Option 4 – Run the DISM tool

Running the DISM Tool helps in repairing the Windows System Image as well as the Windows Component Store in Windows 10 which might be the reason behind the Windows Update error 0x8007001E. Using this built-in tool, you have various options such as the “/ScanHealth”, “/CheckHealth”, and “/RestoreHealth”.
  • Open the Command Prompt as admin.
  • Then type in this command: exe /Online /Cleanup-image /Restorehealth
  • Do not close the window if the process takes a while as it will probably take a few minutes to finish.
  • Once it’s done, restart your computer and then check if the issue is resolved or not on the next startup.

Option 5 – Perform a System Restore

You can also try to perform a System Restore as it can also help you fix the Windows Update error 0x8007001E. You can do this option either by booting into Safe Mode or in System Restore. If you are already in the Advanced Startup Options, just directly select System Restore and proceed with the next steps. And if you have just booted your PC into Safe Mode, refer to the steps below.
  • Tap the Win + R keys to open the Run dialog box.
  • After that, type in “sysdm.cpl” in the field and tap Enter.
  • Next, go to the System Protection tab then click the System Restore button. This will open a new window where you have to select your preferred System Restore point.
  • After that, follow the on-screen instructions to finish the process and then restart your computer and check if the problem is fixed or not.

Option 6 – Try running Microsoft’s online troubleshooter

You also have the option to run Microsoft’s online troubleshooter which could help you fix Windows Update errors including the Windows Update error 0x8007001E.
Read More
How to get rid of DailyProductivityTools

The DailyProductivityTools Toolbar is packed as a browser extension that claims to increase your productivity with access to free online tools and developed by Mindspark Inc. This extension may seem handy at first, however, while browsing the internet with it active you will experience additional ads, sponsored content, and pop-up ads throughout your browsing sessions and search results.

When installed DailyProductivityTools changed your default new tab page to Search.MyWay.com disguising as a ‘Enhanced Google Search Engine’. This extension monitors your browsing activity, visited websites and links, then uses this information to better target Ads.

DailyProductivityTools has been marked as a Potentially Unwanted Program, and is recommended for removal by many anti-virus applications.

About Browser Hijackers

Browser hijacking is a type of unwanted software, often a web browser add-on or extension, which causes modifications in the browser’s settings. Browser hijacker malware is designed for a variety of reasons. Generally, the idea is to force users visit certain sites that are aiming to increase their site visitor traffic and produce higher ad revenue. Many people believe that the browser hijacker is only a harmless website but that is incorrect. Almost every browser hijacker pose an actual threat to your on-line safety and it is important to classify them under privacy risks. What’s more, hijackers can make the entire infected system vulnerable – other harmful malware and viruses will grab these opportunities to intrude into your computer system very easily.

How one can identify a browser hijack

The following are some symptoms that suggest you have been hijacked: you find unauthorized modifications to your internet browser’s homepage; your internet browser is constantly being redirected to adult sites; the default web browser configurations have been modified and/or your default search engine is altered; you find many toolbars on the web browser; you see lots of pop-ups on your computer screen; your browser has become unstable or starts running slowly; you’re blocked to access those sites of antivirus solution providers.

So how does a PC get infected with a browser hijacker?

A browser hijacker can be installed on your computer if you check out an infected site, click on an email attachment, or download something from a file-sharing site. They could also come from add-on programs, also known as browser helper objects (BHO), browser plug-ins, or toolbars. Browser hijackers sneak into your pc along with free software downloads also that you unwittingly install alongside the original. Examples of popular browser hijackers are Fireball, Ask Toolbar, GoSave, CoolWebSearch, RocketTab and Babylon Toolbar. Browser hijacking can lead to severe privacy problems and even identity theft, disrupt your browsing experience by taking control of outbound traffic, considerably slows down your PC by consuming lots of resources, and lead to system instability also.

Browser Hijacker Malware – Removal

Certain browser hijacking can be easily corrected by finding and removing the corresponding malware program through your control panel. But, many hijackers will be more difficult to locate or remove since it might get itself connected with certain important computer files that enable it to operate as a necessary operating system process. Novice PC users shouldn’t ever attempt for the manual form of removal, as it demands comprehensive system knowledge to do repairs on the system registry and HOSTS file. Professionals always recommend users remove any malicious software including browser hijacker by using an automatic malware removal tool, which is better, safer, and faster than the manual removal method. Among the best tools for repairing browser hijacker malware is SafeBytes Anti-Malware. It can help you eliminate any pre-existing malware on your computer and provides you real-time monitoring and protection against new internet threats. Along with anti-virus software, a system optimizer program, similar to Total System Care, can help you repair Windows registry errors, eliminate unwanted toolbars, secure your internet privacy, and stabilize software programs installed on your computer.

Malware Blocking Access To Safebytes Site And Anti-Malware Downloads - What To Do?

Malware can cause many kinds of damage to computer systems, networks, and data. Some malware types modify internet browser settings by including a proxy server or modify the PC’s DNS settings. In such cases, you’ll be unable to visit certain or all of the websites, and therefore unable to download or install the necessary security software to eliminate the malware. If you are reading this article, chances are you’re stuck with a virus infection that is preventing you to download and install Safebytes Anti-Malware program on your PC. Although this kind of issue will be tougher to get around, there are a few actions you can take.

Install in Safe Mode

In the event the malware is set to run at Windows start-up, then booting in Safe Mode should prevent it. Since only the minimum applications and services start-up in safe mode, there are hardly any reasons for conflicts to take place. The following are the steps you should follow to remove viruses in Safemode. 1) After switching on the computer, hit the F8 key while the Windows splash screen begins to load. This would invoke the “Advanced Boot Options” menu. 2) Select Safe Mode with Networking with arrow keys and press ENTER. 3) When this mode loads, you should have the internet. Now, utilize your internet browser normally and go to https://safebytes.com/products/anti-malware/ to download Safebytes Anti-Malware. 4) Immediately after installation, run a full scan and allow the software to get rid of the threats it detects.

Switch over to an alternate internet browser

Certain viruses may target vulnerabilities of a specific browser that block the downloading process. In case you suspect that your Internet Explorer has been hijacked by a virus or otherwise compromised by online hackers, the best course of action is to switch over to a different web browser like Firefox, Chrome, or Safari to download your favorite security software – Safebytes Anti-Malware.

Run anti-malware from your USB drive

Here’s yet another solution which is using a portable USB antivirus software that can scan your system for malicious software without needing installation. Follow these steps to run the anti-malware on the infected computer. 1) On a clean computer, download and install Safebytes Anti-Malware. 2) Plug in the USB flash drive to a USB slot on the clean computer. 3) Run the setup program by double-clicking the executable file of the downloaded application, with an .exe file extension. 4) When asked, choose the location of the USB drive as the place where you would like to store the software files. Follow the instructions on the screen to finish off the installation process. 5) Now, transfer the flash drive to the infected PC. 6) Run the Safebytes Anti-malware directly from the pen drive by double-clicking the icon. 7) Run Full System Scan to detect and clean-up up all kinds of malware.

SafeBytes Anti-Malware: Light-weight Malware Protection for Windows Computer

Nowadays, anti-malware software can protect your computer from different types of online threats. But how to select the best one amongst many malware protection application that’s available in the market? Perhaps you might be aware, there are many anti-malware companies and tools for you to consider. Some of them are good, some are ok types, while some will affect your PC themselves! It is important to choose a company that creates industry-best anti-malware and it has attained a reputation as reliable. On the list of highly recommended software programs is SafeBytes Anti-Malware. SafeBytes carries a superb reputation for quality service, and clients seem to be happy with it. SafeBytes antimalware is a highly effective and user-friendly protection tool which is suitable for users of all levels of computer literacy. Using its cutting-edge technology, this software will help you eradicate several types of malware including computer viruses, PUPs, trojans, worms, adware, ransomware, and browser hijackers.

SafeBytes has got a variety of wonderful features that can help you protect your PC from malware attack and damage. Some of them are listed as below:

Antimalware Protection: This deep-cleaning antimalware software goes much deeper than most antivirus tools to clean your computer system. Its critically acclaimed virus engine finds and disables hard to remove malware that hides deep inside your personal computer. Real-time Active Protection: SafeBytes gives round the clock protection for your computer restricting the malware attacks instantly. This software will continuously monitor your PC for suspicious activity and updates itself continuously to keep current with the latest threats. Web Filtering: SafeBytes gives instant safety rating about the pages you’re going to check out, automatically blocking harmful sites and make sure that you’re certain of your online safety while browsing the internet. Low CPU Usage: SafeBytes is well known for its low influence on computer resources and great detection rate of diverse threats. It runs silently and efficiently in the background so you are free to use your computer at full power all the time. 24/7 Customer Support: SafeBytes provides you with 24/7 technical support, automatic maintenance and updates for best user experience. SafeBytes has come up with a wonderful anti-malware solution that can help you conquer the latest computer threats and virus attacks. There is no doubt that your computer system will be protected in real-time as soon as you put this software to use. So if you’re searching for the very best malware removal application out there, and if you don’t mind paying out some dollars for it, opt for SafeBytes Anti-Malware.

Technical Details and Manual Removal (Advanced Users)

If you’d like to carry out the removal of DailyProductivityTools manually instead of using an automated tool, you may follow these simple steps: Navigate to the Windows Control Panel, click the “Add/Remove Programs” and there, choose the offending program to uninstall. In case of suspicious versions of web browser plug-ins, you can actually get rid of it through your web browser’s extension manager. You will likely also want to reset your internet browser. If you opt to manually delete the system files and Windows registry entries, utilize the following checklist to make sure you know exactly what files to remove before carrying out any actions. But bear in mind, this can be a difficult task and only computer experts can perform it safely. Furthermore, certain malicious programs have the capability to defend against its removal. It is advisable that you carry out the removal procedure in Safe Mode.
Files: %UserProfile%\Local Settings\Application Data\DailyProductivityToolsTooltab %LOCALAPPDATA%\DailyProductivityToolsTooltab %UserProfile%\Local Settings\Application Data\Google\Chrome\User Data\Default\Sync Extension Settings\difcnlhbpohkmlhkpkimihocbagbijii %LOCALAPPDATA%\Google\Chrome\User Data\Default\Sync Extension Settings\difcnlhbpohkmlhkpkimihocbagbijii %UserProfile%\Local Settings\Application Data\Google\Chrome\User Data\Default\Local Extension Settings\difcnlhbpohkmlhkpkimihocbagbijii %LOCALAPPDATA%\Google\Chrome\User Data\Default\Extensions\difcnlhbpohkmlhkpkimihocbagbijii Registry: HKEY_LOCAL_MACHINESoftware\Wow6432Node\DailyProductivityTools HKEY_LOCAL_MACHINESoftware\DailyProductivityTools HKEY_LOCAL_MACHINESoftware\Microsoft\Internet Explorer\DOMStorage\dailyproductivitytools.dl.myway.com HKEY_LOCAL_MACHINE\Software\[APPLICATION]\Microsoft\Windows\CurrentVersion\Uninstall..Uninstaller DailyProductivityToolsTooltab Uninstall Internet Explorer
Read More
Tutorial for Removing RegCleanPro From Windows

RegClean Pro is a program developed by Systweak Inc. RegClean Pro cleans such invalid registry errors using its advanced scan engine. It not only fixes invalid registry entries, it also defragments the registry, keeping it streamlined for smoother system performance.

RegClean Pro defines auto-start registry entities that allow the program to run each time the system is restarted, it also adds various Scheduled tasks in Windows Task Manager in order to launch the application at various times. This application has been found bundled up with various other potentially unwanted applications, also several anti-virus programs have detected this application for optional removal.

About Potentially Unwanted Applications

What is a Potentially Unwanted Program (PUP)?

Have you ever detected an unwanted program on your computer system and pondered how it got there since you’re confident that you didn’t consciously download or never gave authorization to be installed? Potentially Unwanted Programs (PUP), also known as Potentially Unwanted Applications (PUA), are programs that you never wanted in the first place and sometimes come bundled with freeware software. Once installed, the majority of these applications can be hard to eliminate and become much more of a nuisance rather than a benefit. The term PUP was coined to outline this crapware as something other than malicious software. Similar to malicious software, PUPs cause problems when downloaded and placed on your PC, but what makes a PUP different is you grant consent to download it – the fact is very different – the software installation bundle actually tricks you into accepting the installation. No matter whether it is viewed as malware or otherwise, PUPs are nearly always harmful to a computer owner as they will bring on spyware, adware, keystroke logging, along with other nasty “crapware” features on the PC.

What do PUPs do on your PC, precisely?

PUPs come in many forms. Commonly, they will be seen in adware bundlers which are known to use aggressive and misleading advertising. Most bundlers install multiple adware applications from various vendors, each of which has its own EULA policy. Safebytes Anti-Malware totally eliminates this threat and safeguards the computer against unwanted programs or adware infection. They will also come in the form of web browser extension add-ons and toolbars. They may keep track of your online movements, redirect your search results to risky sites where spyware and adware can be downloaded, hijack your search page, and slow your web-browser down to a crawl. PUPs lie in the gray part of the software spectrum. Also in the large majority of the cases, people won’t be aware that they are installing an unwanted program. Even if the PUPs really aren’t inherently malicious, these software programs still do practically nothing good on your computer system – they will take valuable resources, slow your PC, weaken your computer security, making your PC more vulnerable to viruses.

How you can stop PUPs

• Read carefully before accepting the license agreement as it might have a clause about PUPs. • Do not accept standard, express, default, or any other installation settings which are recommended. Always select “custom” installation. • Install an advert blocker/pop-up blocker; Deploy anti-malware products like Safebytes Anti-Malware. These types of software programs could establish a wall between the computer and online criminals. • Be alert if you download and install freeware, open-source software, or shareware. Never install applications that seem suspicious or malicious. • Use official product websites for downloading software. Stay away from download portals altogether as most websites compel users to download the software using their own download manager, which is often bundled with some sort of unwanted programs.

Can't Install Safebytes Anti-malware due to the presence of Malware? Do This!

Practically all malware is bad, but certain types of malicious software do more damage to your computer or laptop than others. Some malware sits in between the computer and the internet connection and blocks a few or all websites which you want to check out. It might also prevent you from the installation of anything on your PC, particularly anti-virus programs. If you’re reading this article right now, you’ve perhaps recognized that virus infection is a reason for your blocked internet traffic. So what to do when you want to install an anti-malware application like Safebytes? There are a few actions you can take to circumvent this issue.

Download the software in Safe Mode with Networking

In Safe Mode, you are able to change Windows settings, uninstall or install some software, and remove hard-to-delete viruses and malware. If the virus is set to load immediately when the computer boots, switching to this mode may prevent it from doing so. To get into Safe Mode or Safe Mode with Networking, press the F8 key while the computer is booting up or run MSConfig and look for the “Safe Boot” options under the “Boot” tab. After you restart into Safe Mode with Networking, you can download, install, as well as update anti-malware software from there. Following installation, run the malware scanner to eliminate most standard infections.

Switch to an alternate web browser

Certain viruses might target vulnerabilities of a particular web browser that block the downloading process. If you seem to have a trojan attached to Internet Explorer, then switch to an alternate web browser with built-in security features, such as Chrome or Firefox, to download your preferred anti-malware program – Safebytes.

Install and run anti-malware from a USB drive

Another method is to download and transfer an anti-malware application from a clean PC to run a virus scan on the infected system. Follow these steps to run the antivirus on the infected computer. 1) On a clean PC, download and install Safebytes Anti-Malware. 2) Plug in the USB drive into the uninfected PC. 3) Double click on the downloaded file to open the installation wizard. 4) Choose a USB flash drive as the place when the wizard asks you where you wish to install the application. Follow activation instructions. 5) Remove the USB drive. You may now use this portable antivirus on the infected computer. 6) Double-click the antivirus software EXE file on the pen drive. 7) Run Full System Scan to identify and clean-up up all types of malware.

A Look at the Best Anti-Malware Program

These days, anti-malware software can protect your PC from different types of internet threats. But exactly how to decide on the right one among various malware protection application that is available out there? As you might be aware, there are numerous anti-malware companies and products for you to consider. Some are worth your money, but most aren’t. You have to purchase a product that has obtained a good reputation and detects not only viruses but other sorts of malware too. Amongst few good programs, SafeBytes Anti-Malware is the highly recommended program for the security-conscious end user. Safebytes is among the well-established computer solutions firms, which provide this all-inclusive anti-malware software program. With its cutting-edge technology, this application will let you eliminate several types of malware like computer viruses, trojans, PUPs, worms, adware, ransomware, and browser hijackers. SafeBytes has great features when compared to other anti-malware programs. The following are some of the features you will like in SafeBytes. Real-time Protection: Malware programs trying to enter the computer are identified and stopped as and when detected by the SafeBytes active protection shields. They are very efficient in screening and getting rid of various threats because they’re constantly revised with new updates and alerts. World-class AntiMalware Protection: This deep-cleaning anti-malware software goes much deeper than most anti-virus tools to clean out your computer. Its critically acclaimed virus engine locates and disables hard-to-remove malware that conceals deep within your personal computer. Internet Security: SafeBytes checks and gives a unique safety ranking to each and every site you visit and block access to web pages known to be phishing sites, thus protecting you against identity theft, or known to contain malware. Fast Scan: Safebytes Anti-Malware, with its advanced scanning engine, offers ultra-fast scanning which can immediately target any active on-line threat. Lightweight: This program is not “heavy” on your computer’s resources, so you will not notice any performance problems when SafeBytes is operating in the background. Premium Support: For any technical issues or product support, you can get 24/7 professional assistance via chat and email.

Technical Details and Manual Removal (Advanced Users)

If you wish to manually remove RegCleanPro without the use of an automated tool, it may be possible to do so by removing the program from the Windows Add/Remove Programs menu, or in cases of browser extensions, going to the browsers AddOn/Extension manager and removing it. You will likely also want to reset your browser. To ensure the complete removal, manually check your hard drive and registry for all of the following and remove or reset the values accordingly. Please note that this is for advanced users only and may be difficult, with incorrect file removal causing additional PC errors. In addition, some malware is capable of replicating or preventing deletion. Doing this in Safe Mode is advised.

The following files, folders, and registry entries are created or modified by RegCleanPro

Files: File %APPDATASystweakRegClean ProVersion 6.1ExcludeList.rcp. File %APPDATASystweakRegClean ProVersion 6.1German_rcp.dat. File %APPDATASystweakRegClean ProVersion 6.1log_06-13-2013.log. File %APPDATASystweakRegClean ProVersion 6.1results.rcp. File %APPDATASystweakRegClean ProVersion 6.1TempHLList.rcp. File %COMMONDESKTOPRegClean Pro.lnk. File %COMMONPROGRAMSRegClean ProRegClean Pro entfernen.lnk. File %COMMONPROGRAMSRegClean ProRegClean Pro.lnk. File %COMMONPROGRAMSRegClean ProRegister RegClean Pro.lnk. File %PROGRAMFILESRegClean ProChinese_rcp.ini. File %PROGRAMFILESRegClean ProCleanSchedule.exe. File %PROGRAMFILESRegClean ProCloud_Backup_Setup.exe. File %PROGRAMFILESRegClean ProCloud_Backup_Setup_Intl.exe. File %PROGRAMFILESRegClean Proisxdl.dll. File %PROGRAMFILESRegClean ProRCPUninstall.exe. File %PROGRAMFILESRegClean ProRegCleanPro.dll. File %PROGRAMFILESRegClean ProRegCleanPro.exe. File %PROGRAMFILESRegClean Prosystweakasp.exe. File %PROGRAMFILESRegClean Proxmllite.dll. File %WINDIRTasksRegClean Pro_DEFAULT.job. File %WINDIRTasksRegClean Pro_UPDATES.job. Directory %APPDATASystweakRegClean ProVersion 6.1. Directory %APPDATASystweakRegClean Pro. Directory %COMMONPROGRAMSRegClean Pro. Directory %PROGRAMFILESRegClean Pro. Registry: Key Distromatic at HKEY_CURRENT_USERSoftware. Key Systweak at HKEY_CURRENT_USERSoftware. Key Systweak at HKEY_LOCAL_MACHINESOFTWARE.
Read More
1 2 3 171
Logo
Copyright © 2023, ErrorTools. All Rights Reserved
Trademark: Microsoft Windows logos are registered trademarks of Microsoft. Disclaimer: ErrorTools.com is not affiliated with Microsoft, nor claims direct affiliation.
The information on this page is provided for information purposes only.
DMCA.com Protection Status