Error Code 0x8024001e is most commonly associated with the installation of apps from the Windows store, although versions of the error have been present in multiple versions of the Windows operating system. At its most basic level, the error says that a program has not been installed, even after the installation wizard has run through to completion.
Common symptoms include:
The solutions to Error Code 0x8024001e are somewhat complex, so it is a good idea to get in touch with a computer repair professional if you do not feel confident in your ability to follow the steps below to complete. However, most users should be able to follow the steps below and achieve the desired results.
 Error Causes
There are a couple of different causes that can lead to the appearance of Error Code 0x8024001e. In some cases, extraneous data left in the app cache can cause the problem. In other cases, particular processes may need to be manually reset to clear the problem. Last, but not least, unresolved updates may lead to Error Code 0x8024001e causing issues with downloaded and installed apps from the Windows Store.
There are three primary methods to address the appearance of Error Code 0x8024001e. These should work for all users, regardless of the specific cause for their machine. The methods below do require some advanced skills in computing, so be sure to contact a Windows repair technician if you have trouble following the instructions below.
Here are the top ways to repair Error Code 0x8024001e on Windows 10:
In many cases, simply clearing your app cache can resolve the errors that pop up when you are downloading, installing, or updating any apps that have come from the Windows store. This method may not perfectly resolve the problem every time, but it is a step that should always be done before any others.
Next, open up the Power User options by pressing both the Windows key and the X key at the same time. Choose “Command Prompt (Admin)” from the options that appear. Then type in the commands into the prompt, one at a time:
Restart your computer after these changes have been made so that all changes can take effect. You may be able to access the desired programs and apps after this is complete.
Sometimes, the best way to repair Error Code 0x8024001e is to simply open up the Window Registry tools and run the repair process. This will scan your registry for any errant entries, corrupted entries, or missing entries, repairing them automatically as the device is able to do. This process may take some time to complete, so plan accordingly.
After this process is complete, it is always a good idea to restart your computer to apply any changes that have been made. Reattempt to install or run the program in question one this is done.
Last, open up the Windows Update tools to check to see if any of your programs need to be updated or if your operating system needs to be updated. Install each of the updates, restarting your computer after the entire process has been completed so that they can fully take effect on your machine. You should be able to run the programs that had caused problems once this is complete.
It is important to keep up-to-date on your system and program updates to avoid future errors in installations and downloads from the Windows store.
In most cases, using the steps above should allow you to use the apps that you’ve downloaded from the Windows store without Error Code 0x8024001e popping back up. If the problem persists or if you have not been able to follow the steps listed above to remedy the error, it is a good idea to contact a qualified professional who is experienced in working with Windows 10 errors.
If you wish to always have at your disposal a utility tool to fix these Windows 10 and other related issues when they do arise, download and install a powerful automated tool.

“Bad Image – DLL file is either not designed to run on Windows or it contains an error. Try installing the program again using the original installation media or contact your system administrator or the software vendor for support.”According to security experts, the DLL files that are known to trigger this kind of error message are msvcr100.dll, msvcr110.dll, msvcp140.dll, lmirfsclientnp.dll, and so on. To fix this problem, you can try to update or reinstall the program that’s throwing the error to its latest version. You could also ask the vendor for the latest version of the DLL as well as run a System File Checker scan.
 Once the menu appears, click on Command Prompt (admin)
 Once the command prompt with administrator privileges comes on-screen type in it following string:
 This command will force Windows to show all devices in the device manager including old ones that are not used anymore, but since their drivers are still installed, devices will show up.
When you type command press ENTER.
Once again press WINDOWS + X to show the hidden menu but this time choose the device manager
This command will force Windows to show all devices in the device manager including old ones that are not used anymore, but since their drivers are still installed, devices will show up.
When you type command press ENTER.
Once again press WINDOWS + X to show the hidden menu but this time choose the device manager
 The device manager will open, go to view > snow hidden devices in order to show unused devices.

 Right-click on the device and click on uninstall device to remove it completely from your system.
 Please always be careful when removing devices so you do not remove the device which is being used by mistake and always double-check that you are removing something that you used to have on your system. This method will show all hidden devices even ones that are hidden but crucial to the system working properly. Error Causes
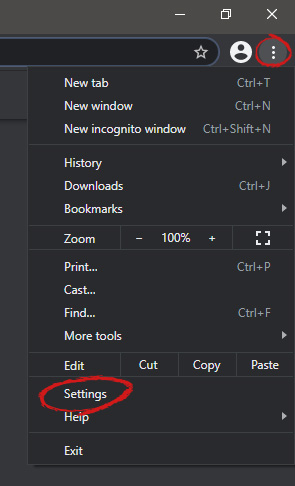 When you are in settings, on the left side move toward the bottom until you run into a tab that says On Startup and click on it. On right, a new section will open, click on Open a specific page or set of pages.
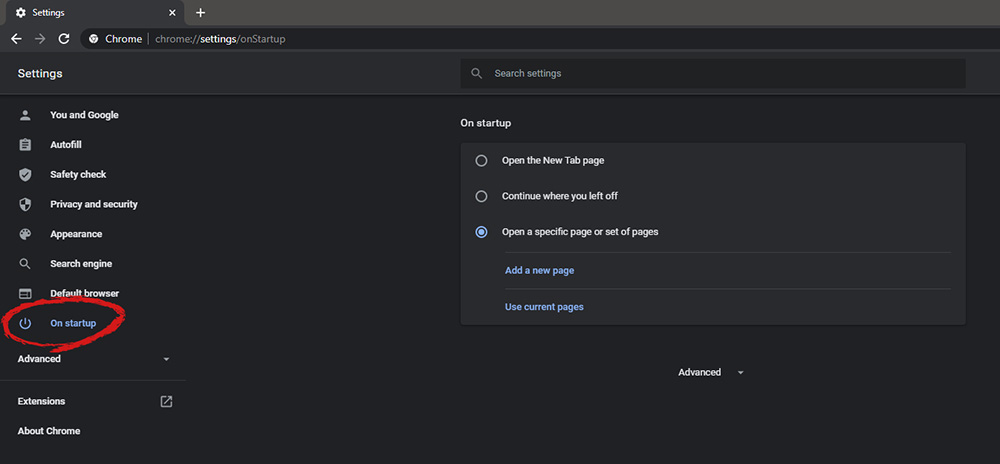 You will be presented with the option to add a new page by typing its URL or getting it from bookmarks or using a specific opened one. You can repeat this process until you have added all pages that you wish to be automatically opened once Chrome is opened for the first time.
Error 0xe06d7363 is displayed when a process or an operation is not launched, or completed by an application.
This error can prevent the user from performing some operations. It might close the application unconditionally. Sometimes a ‘GetLastError()’, a ‘GetExceptionCode()’, or a ‘GetExceptionInformation()’ is displayed with this error.
Error 0xe06d7363 can occur for a number of reasons. Damaged, corrupted, or missing files in the registry database are the main reasons why the error might occur. Another reason is when the system files are not configured correctly, thus they corrupt system files in applications. They can also affect the hardware devices.
All code-generated exceptions in the Microsoft Visual C + + compiler will contain this error. As this error is compiler-generated, the code will not be listed in Win32 API header files. This code is a cryptic device, with ‘e’ for exception while the final 3 bytes represent ‘msc’ ASCII values.
To resolve this error, you will have to debug an application. While using Microsoft Visual Studio, you can stop the program when the error 0xe06d7363 occurs. To start debugging, follow these steps:
Another fix for this issue is reverting back to an earlier copy or the last update of the same Windows. Error 0xe06d7363 can occur is when you try running a client application using Microsoft.SqlServer.Types.dll component on your computer that has Microsoft SQL Server 2008 Server Pack 2 installed. With the error, the following text can be seen:
“unable to load DLL ‘SqlServerSpatial.dll’ Exception from HRESULT 0xe06d7363".
A Cumulative Update 7 was initially released for SQL Server 2008 Service Pack 2 in order to fix this issue. Since the builds are cumulative, every new fix released contains hotfixes and all security fixes which were also included in the previous SQL Server 2008 fix release. This error can be found in all Microsoft products that are listed in the Applies to Category.
Microsoft SQL Server 2008 hotfixes are created to resolve errors like 0xe06d7363 on specific SQL Server service packs. This error is by design and has commonly occurred in the previous versions of Windows before Windows 7.
Congratulations, you have just fixed Error 0xe06d7363 in Windows 10 all by yourself. If you would like to read more helpful articles and tips about various software and hardware visit errortools.com daily. Now that’s how you fix Error 0xe06d7363 in Windows 10 on a computer. On the other hand, if your computer is going through some system-related issues that have to get fixed, there is a one-click solution known as Restoro you could check out to resolve them. This program is a useful tool that could repair corrupted registries and optimize your PC’s overall performance. Aside from that, it also cleans out your computer for any junk or corrupted files that help you eliminate any unwanted files from your system. This is basically a solution that’s within your grasp with just a click. It’s easy to use as it is user-friendly. For a complete set of instructions in downloading and using it, refer to the steps below Perform a full system scan using Restoro. To do so, follow the instructions below.
