Error Code 14 - What is it?
Generated due to temporary device and Window system conflicts, Error code 14 is a typical Device Manager error. This error code can pop up anytime and usually displayed in the following format:
“This device cannot work properly until you restart your computer. (Code 14)”
Though it is not a fatal error code like the infamous Blue Screen of Death and runtime error codes, nonetheless it is still advisable to repair it immediately before any delay to avoid inconvenience.
It can lower your PC’s performance and hamper you from using certain hardware devices as a result of driver problems.
Solution
 Error Causes
Error 14 is triggered when your system is unable to correctly read the files and settings which is important for running a certain piece of your PC hardware. Now this conflict may occur due to reasons like outdated, corrupted, or poorly installed drivers. Other causes may include corrupted registry entries.
Simply put, Error code 14 is a good reminder that PC users should pay attention to updating device drivers to ensure healthy systems and optimum PC performance.
Further Information and Manual Repair
The good news is that error code 14 is quite easy to resolve. You don’t have to spend hundreds of dollars to hire a professional programmer to get it fixed. To repair, simply follow the DIY methods listed below.
We have compiled some of the best, proven, and easy to perform solutions for PC users to resolve Device Manager error codes like error code 14. Follow the instructions here to resume the functionality of your PC.
Let’s get started:
Method 1 - Reboot Your System
Sometimes, an action as simple as rebooting your PC can also resolve technical problems like error code 14. So, before you try any other method, try giving this a shot.
The moment the error code pops on your screen, simply close all the programs running on your system and restart your PC. This refreshes your system settings, processes and services allowing it to run smoothly.
However, if the error still persists, then try other methods given below.
Method 2 - Delete the Corrupted Registry Entries
Corrupted registry entry can also trigger error code 14. To resolve delete the corrupted registry entries. For this, go to the start menu and type Regedit. A dialog box will open. Now navigate through the HKEY_LOCAL_MACHINE key. Expand further to locate HKEY_LOCAL_MACHINESYSTEMCurrentControlSetControlClass. Once located, now in the right pane click upper filters and then click delete on the edit menu. Click yes when prompted to confirm the deletion.
Now in the right pane, click lower filters. Repeat the same steps as performed to delete upper filters. Confirm deletion and then exit the registry editor. To activate changes, restart your PC. This will hopefully resolve the issue. If the error code pops up on your computer screen, then try method 3.
Method 3 - Update Corrupted/Outdated Drivers
Drivers are basically software applications that communicate and provide instructions to your system to operate hardware devices.
When these become corrupt or outdated, you start experiencing problems like error code 14. To resolve, locate corrupted drivers and update them. You can do it both manually and automatically. We’ll discuss both ways.
For a manual driver update, go to the start menu, control panel, and then Device Manager. Now go through all devices listed to locate problematic drivers. To identify problematic drivers, look for yellow exclamation marks next to each device. Devices with yellow exclamation marks indicate that driver issues. To repair, right-click on each hardware device and select update driver.
Method 4 - Install DriverFIX - Alternative to Manual Driver Update
Updating each driver separately and manually is a stressful and frustrating task. This can take a lot of your time. Sometimes, you may also have to download new driver versions from the internet to install perform updates. To avoid the hassle and save time, it is advisable to install a program like DriverFIX.
This user-friendly and intuitive software is based on sophisticated technology featuring an intelligent programming system that automatically detects all your PC drivers in seconds.
Once you install this software on your system, it instantly identifies problematic drivers and matches them to the latest versions. It updates PC drivers immediately thereby resolving the error code 14 problem in a few seconds. It enables accurate installations and ensures that your PC runs at its optimum level.
More importantly, with this software installed on your PC, you don’t have to worry about keeping track of your driver updates anymore. The software updates drivers on a regular basis with new and compatible versions ensuring that your PC functions properly and you don’t experience any type of Device Manager error code. It is easy to use and install. It is compatible with all Windows versions.
Click here to download DriverFIX to resolve error code 14 on your system right away.


 This is the second large game company acquisition by Microsoft, Acquiring Bethesda first and a big hit to Sony since Xbox will now have more games in its catalog and as exclusives.
Of course, the sale has to go through the standard closing conditions and completion of regulatory review and Activision Blizzard’s shareholder approval before it’s finalized. Assuming that all goes well, the deal is slated to be completed during the fiscal year 2023, which is July 1, 2022, through June 30, 2023.
This is the second large game company acquisition by Microsoft, Acquiring Bethesda first and a big hit to Sony since Xbox will now have more games in its catalog and as exclusives.
Of course, the sale has to go through the standard closing conditions and completion of regulatory review and Activision Blizzard’s shareholder approval before it’s finalized. Assuming that all goes well, the deal is slated to be completed during the fiscal year 2023, which is July 1, 2022, through June 30, 2023. 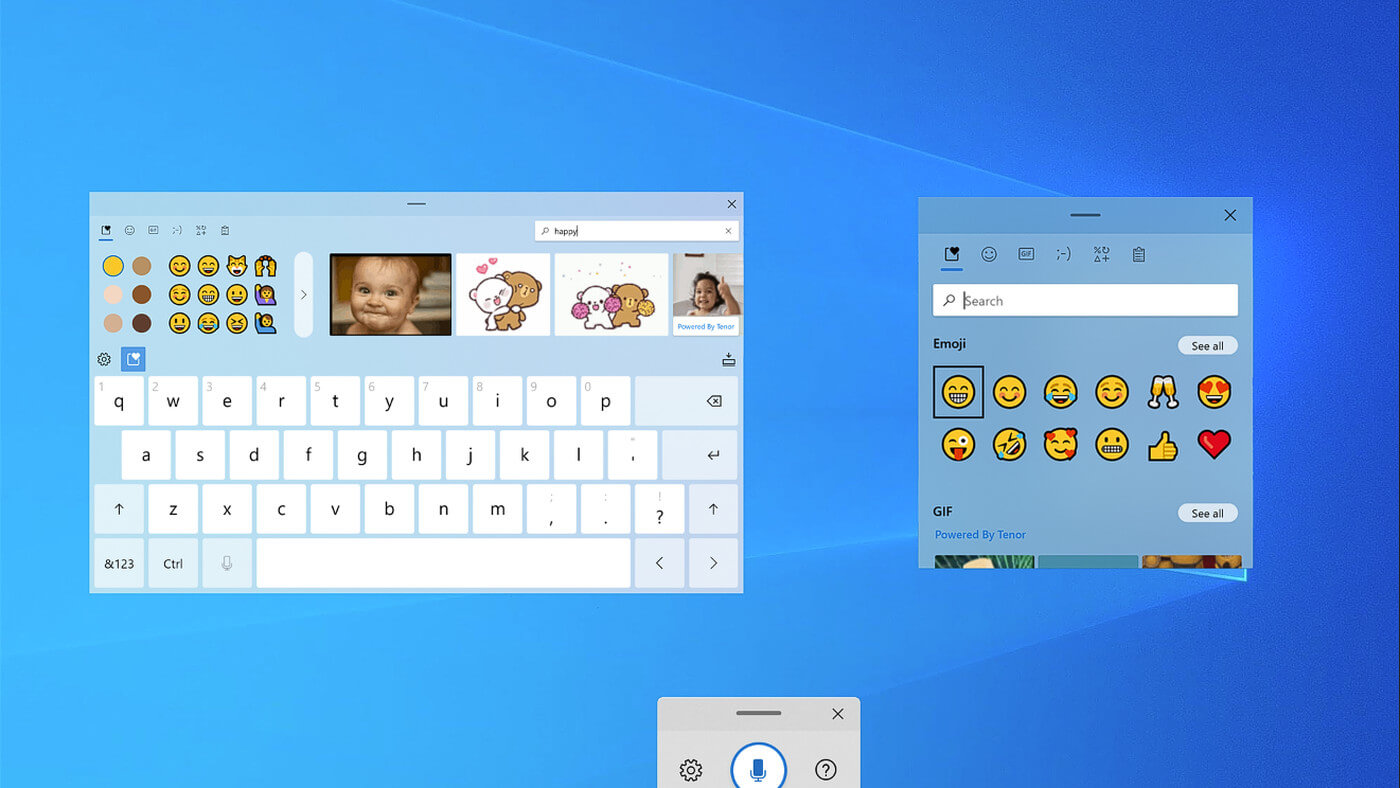 If by any chance you are working on a touchscreen PC, tablet, or any similar device and have no access to a hardware keyboard there is a way to place Touch Keyboard on your screen for easy typing, and you can enable icon on the taskbar for easy access.
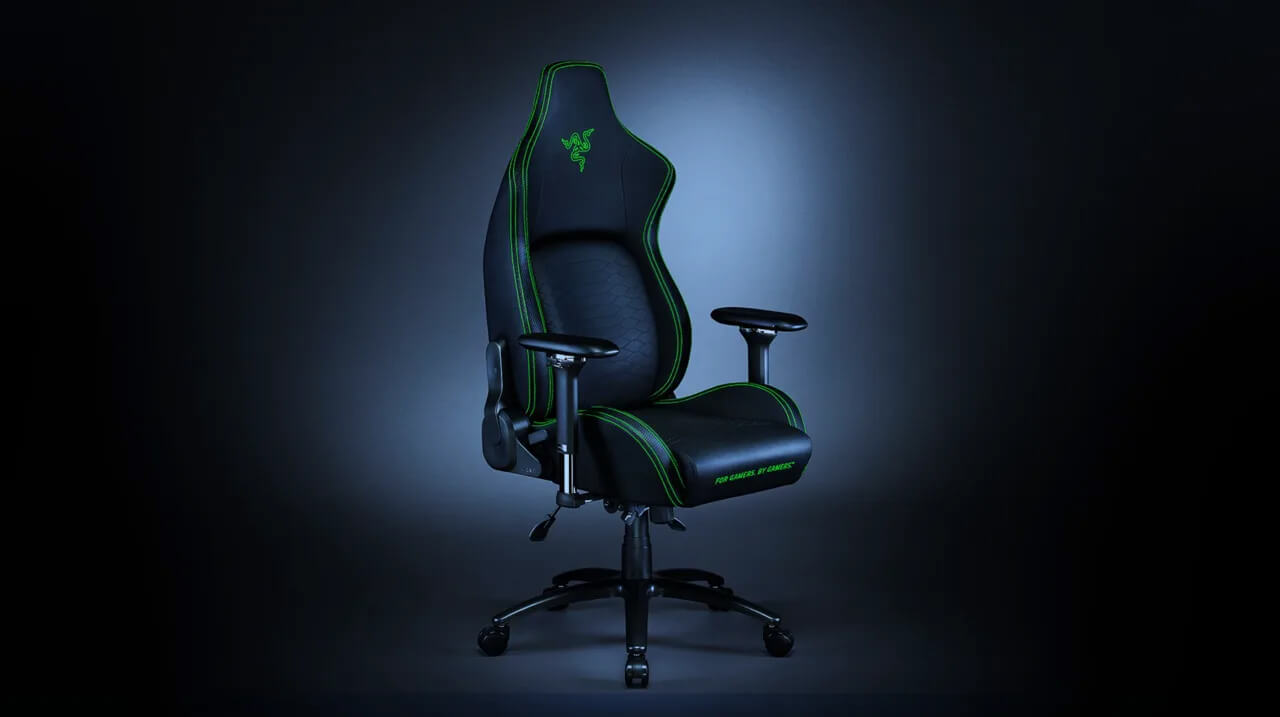 It seems that last few days we were riding some Razer bandwagon but rest assured that we are not sponsored by them in any way, truth is that simply they come up with some interesting accessories which I believe are worth covering.
Gaming Chair itself comes in two colors, fully black and green black combination and it is not really an entry-level chair if we are talking about price. The chair itself is around 600USD depending on the distributor and considering that price range it is placed in more top cream of gaming chairs but it is worth every dime.
It seems that last few days we were riding some Razer bandwagon but rest assured that we are not sponsored by them in any way, truth is that simply they come up with some interesting accessories which I believe are worth covering.
Gaming Chair itself comes in two colors, fully black and green black combination and it is not really an entry-level chair if we are talking about price. The chair itself is around 600USD depending on the distributor and considering that price range it is placed in more top cream of gaming chairs but it is worth every dime.