Logo

Advice when you have broken key on a keyboard

Having any kind of hardware malfunction is not a pleasant place to be. Even a minor malfunction like a broken key on a keyword can introduce certain bad feelings, frustration, and difficulty in working.

So, what are your options when the dreaded key on the keyboard breaks? From my point of view, there are three options that could be accomplished in order to continue working.

  1. Replace broken keyboard with the new one

    Yes, the best and most expensive solution, just bite the bullet and buy a new working one.

  2. Replace key with another key

    So you broke some key, if you can replace it with another key which you do not use, this option will work only tho if the broken key is not Space bar, enter or similar with specific shape and size.

  3. Remap key

    use Windows power tools to remap key function to another working key

There you go, three options to continue working with a broken key on the keyboard.

Do You Need Help with Your Device?

Our Team of Experts May Help
Troubleshoot.Tech Experts are There for You!
Replace damaged files
Restore performance
Free disk space
Remove Malware
Protects WEB browser
Remove Viruses
Stop PC freezing
GET HELP
Troubleshoot.Tech experts work with all versions of Microsoft Windows including Windows 11, with Android, Mac, and more.

Share this article:

You might also like

MS releases ISO for Windows 10 build 21354
On April 7th Microsoft has released Windows build 21354 for their flagship OS and updates are rolling. Alongside the new update builds Microsoft has decided to create and release Windows 21354 build as an installable ISO image for anyone who wishes to do a clean installation of Windows without the need to update it after the installation. We have not seen this move by Microsoft in a long time and honestly, we are welcoming it, it is always great to have updated ISO Windows build than to install the old version and sit through an hour or more of updates. If you are interested in getting this ISO image and you are part of the insider program you can download it from here. If you would like to read more helpful articles and tips about various software and hardware visit errortools.com daily.
Read More
My device used to work, but now it doesn’t
So you just have turned your computer ON only to find out that your device which was working perfectly yesterday is not working anymore. This situation can be very stressful and disappointing but do not despair, before you toss your device through the window know that this kind of behavior can be traced back to a software issue. In this article, we will give you hints on what to do and where to pay attention when something like this happens so you get the device back in working order.
  1. Check if it not a hardware malfunction

    To save yourself time and unnecessary frustration with juggling through Windows first inspect the device to be sure that indeed it is working properly, check all led lamps which could indicate that the device is working and receiving power, and if it is an internal device try opening the case and visually check if there are signs of working like rotating fans or led lamps on it.
  2. Check Cables

    If it is an external device that has stopped working try checking power cables and cables which go to your computer, see if they are tightly connected. If it is an internal device also check cables, nudge them and if possible disconnect and clean them.
  3. Disconnect and reconnect the device

    Try this solution to see will Windows register the device again and start it.
  4. Update Windows

    If there is a Windows update not installed, install it and see if the device will start working.
  5. Update device drivers

    Go to device manager and update the device driver to its latest version or go to the manufacturer's site and download the latest driver version.
  6. Reinstall the device

    In the device manager, uninstall the device driver and reboot Windows. When Windows boots it will recognize the device and install the necessary drivers for it.
  7. Disable antivirus and firewall

    Sometimes antivirus can prevent certain devices from working properly, especially if they rely on some system files to which antivirus or firewall has cut access. Try disabling your PC protection to see if this will resolve the issue.
  8. Use dedicated error software

    Use DRIVERFIX to automatically search and fix driver issues.
Read More
KVM switch and its usage

You probably heard about switches for LAN but not a lot of people heard about KVM switches. So what exactly is KVM switch?

KVM switch

If we look at the name, it is a shortcut for Keyboard, Video & Mouse and the original idea was to have multiple computers but one keyboard, mouse, and monitor. These peripherals would be connected to the KVM switch and other computers could all use one set of these on the fly when needed.

The technology behind the switch is a little interesting since it will actively fake signals to other computers that are not using peripherals. Once they are switched to them the transition is smooth and not noticeable. In old days these switches were more important than today since on every mouse or keyboard disconnection you had to reboot the computer, and although today that is not the case CPU will still detect disconnection and on the next connection it will run through the ID of the device and try to use the existing driver and if peripheral was connected in other USB port, it will install the same driver but connect it to the new USB port.

This type of reconnection can slow down work and place unnecessary load on the CPU so that is why KVM will fake connection in order to make switching externals on the computer smooth and in nick of a time.

Modern KVM switch

These days modern KVM switches will offer you more options than just being able to switch between keyboard, mouse, and monitor. Modern switches now offer Lan, audio, and many more various options.

There are also different kinds of switches offering you only one option, like for example just a Video switch that will let you use one monitor on three computers and many more other specialized options.

Software switches

So far we talked about Hardware switches, a real device being able to take peripherals into it and switch computers on the fly. On the other line, we have software switch solutions that will have specific software installed on all computers and have it run at all times, and switching between them will be through specific software.

There are two very good and main advantages of using software solutions instead of a hardware one. First, of course, is the price, since the most popular Synergy is an open-source solution, completely free of charge. The second big advantage is that software switch is not limited to how many computers can you use. Hardware switches tend to go to a large number like 16 but if you have a large cluster of computers over a LAN, let's say 30 then the box solution might be difficult.

On the other hand software solution will switch only keyboard and mouse since each other computer will have to have some screen on it in order to work. Both solutions have their strong advantages and disadvantages and it is up to you to choose one that best suits you.

Conclusion

If you are multitasking with a lot of computers or just need your peripherals from time to time to connect to another machine then the KVM switch is something that you might find the use of. Just be aware that if you go for some cheap switch you might experience some lag on your peripherals, but if that is not a concern you can get hardware one for as low as $50 USD.

Read More
Sandbox failed to start with error 0xc030106
If you suddenly encountered an error when you try to run the Windows Sandbox that says, “Windows Sandbox failed to start, Error 0xc030106, The virtual machine or container exited unexpectedly”, read on as this post will guide you on what you can do to resolve the problem. According to security experts, this kind of error in Windows Sandbox is due to some issues with the supporting virtualization component. It could also be caused by other factors and to fix it, there are several potential fixes you need to check out. You can try running the Windows Sandbox as an administrator. You should also make sure that all the supporting processes are running properly, as well as try to install any pending Windows Updates.

Option 1– Try to run Windows Sandbox as an admin

  • In the Start Menu, scroll down until you see the entry for the Windows Sandbox.
  • Then right-click on it and select More and then select the “Run as administrator” option to open it with admin privileges.
  • Next, if a User Account Control or UAC prompt pops up, just click on Yes to proceed.
  • You should now be able to open the Windows Sandbox without the error. However, if the error persists, proceed to the next given options below.

Option 2 – Ensure that all the supporting processes and services are running properly

If running Windows Sandbox as an administrator didn’t fix the error, you have to ensure that all related processes for Windows Sandbox are running properly. To do that, follow these steps:
  • Tap the Win + R keys to launch the Run utility and type “services.msc” in the field and hit Enter to open the Windows Services Manager.
  • Next, from the list of services, look for the following services in the given order:
    • Network Virtualization Service
    • Virtual Disk
    • Hyper – V Virtual Machine
    • Hyper – V Host Compute Service
    • Container Manager Services
  • After you find the aforementioned services, restart each one of them.
  • Once done, try to open the Windows Sandbox again and see if the error is fixed or not.

Option 3 – Try to install any pending Windows Updates

If the second option still didn’t work, then you might want to check Windows Updates on your computer and see if there are any pending Windows Updates you have to install. All you have to do is go to the Windows 10 Settings app and then go to the Windows Updates section and click on the “Check for updates” button to check if there are any pending updates that are needed to be installed. This could fix the Windows Sandbox error.
Read More
Choosing right LINUX distribution
LINUX has become more than just a dedicated server Operating system, more and more it is gaining ground in home computers as well and as services like Steam and Gog are offering their titles for LINUX it is gaining more and more ground daily.

Why LINUX?

So, what makes LINUX so good? First of all security, no other Operating system has that high level of security like LINUX and that is the reason why it is widely used as a server. Other advantages are it is less resource hungry and its architecture is made in such a way that it does not has applications remains and traces which remain in the system, once an application is deleted from OS, it is deleted and every trace is removed from OS. Apple OS is based on LINUX kernel but made specifically for their hardware.

LINUX popularity

So naturally, the question pops up why LINUX is not more popular? One of the reasons is its difficulty, to work in LINUX you need to have some level of computer knowledge, Windows is more user-friendly and a lot of people prefer the ease of use to features. This is somewhat been fixed sort of speak in last years since we have LINUX distributions which aim to be more simple and user friendly but it is far from easy of use of one Windows. Another big reason was software support. Altho some powerhouse software has its LINUX versions and works just fine, even better than on Windows, your typical user applications lack and games were almost non-existent making LINU users rely on Windows emulation software for simple applications, and often it did not work properly. This has also changed for the better in later years but as with the previous point, it is still far from being Windows wide.

What is LINUX distro?

Linux comes in different versions called distributions. What this means is that the basic core of the Operating system is the same though all LINUX versions and all LINUX drivers and software will work on anyone, they will visually and feature-wise be different. Also, they will be more complex for use or they will have different hardware requirements. Choosing the right LINUX distribution is no easy task and we are here to help you by offering you certain points and guides in hopes to direct you on the right path.

What Do You Need the Distro for?

This might be perhaps the most crucial question when trying to decide which LINUX distribution you want to install. Depending on your preferences and goal like work, games, security, media you will need to consider the best distributions in the field of your preference. A very good place to get this kind of information is on DistroWatch. When on-site, navigate to the Distribution category search filter and choose the option best suited to your needs.

What Kind of Software Will You Be Using?

Like the previous question, this one is also your personal preference but it will make difference if you are planning to use a different type of software. If your plans are gaming for example you will want the latest and greatest LINUX kernel version for maximum hardware compatibility. If you are a regular desktop user you will aim for a distro that is updated constantly so you are working with the latest versions of Chrome or Firefox. In some cases, depending on your software you might want to run older but faster distribution.

What Kind of Hardware Will You Be Using?

If your computer is up to date you can run any distribution that you like but if it is an older rig your options might be a little limited. Now depending on the technical characteristics of your computer and its age it may come down to just a few available distributions which are specially tailored to run on old hardware. These kinds of distributions are lightweight and do not take much space but sadly can not offer you the latest and greatest in software but for usual everyday tasks like web browsing, word processing, email viewing, etc they work perfectly fine. You can have a great office machine with proper lightweight distribution offering you all that you need to be able to work.

How Much do you know about computers?

As stated before, LINUX is not as user-friendly as WIndows and your overall technical knowledge can play a big role in deciding which LINUX you want to adapt. If you are more of a casual user then avoid technical distributions which will require to manually tweak tons of stuff, go for more automated ones. If you are a power user however and enjoy wrestling with each detail then perhaps some distro with more command-oriented nature.

What Kind of Community Are You Looking For?

Now you might ask what does community has to do with the operating systems but the same as Windows, LINUX also can have some issues, and sometimes installing drivers will require certain steps to be taken. How it is much easier to find a solution when having a great community surrounding the project I suggest not dismissing this part when choosing your distro. Every community is helpful, but they’re all helpful in different ways. If you would like to read more helpful articles and tips about various software and hardware visit errortools.com daily.
Read More
What to do if Windows 10 PC turns on by itself
A PC that turns on by itself every so often can get quite annoying. Many users have faced this problem countless times. There are lots of possible reasons why your Windows 10 PC turns on by itself, wakes up from sleep, standby, or even when it’s shut down. To find out what exactly woke your computer, simply open Command Prompt as admin and type the following command:
powercfg –lastwake
Once you enter the command given above, it will show you the last device that woke your PC up. After that, you need to type in the next command:
powercfg –devicequery wake_armed
After entering the command, it will show you a list of all the devices that could wake your PC up. The goal in running these commands is to understand the reason what’s really causing your PC to turn on and see the reason is on the hardware level or not. Here are a couple of options you can try if your Windows 10 PC turns on by itself.

Option 1 – Try disabling Fast Startup

As you know, Windows 10 comes with a mode called Fast Startup which does not turn off the computer in the usual manner. This mode keeps your computer in a mixed state so that when you turn it on again, it will be a lot faster. However, as useful as this feature appear to be, some security experts find this an issue, for numerous reasons – for one, it can turn on your Windows 10 PC by itself. Thus, you need to disable this feature to fix the problem.

Option 2 – You need to stop the Task Scheduler from waking up your computer

There are times when the issue has something more to do with the software than hardware. It could be that you are using a Scheduled Task to get some work done on your computer at a particular time of the day or many times a day. That’s why if you really are using Task Scheduler, you need to change the Power settings of Windows to make sure that it ignores those tasks rather than deleting them instead when your computer is either on Hybrid or Standby mode.
  • Open the Power Options and then click on “Change Plan Settings”.
  • After that, make sure to choose the correct power plan and then select the “Change advanced power settings” option.
  • Next, look for the Sleep tree and expand it to view the “Allow Wake Timers” option and then disable it. Disabling this option will make sure that none of the program that could wake your PC up when it’s either on shutdown or sleep mode. However, this only applies to laptops.

Option 3 – Try to disable Automatic Restart

There are instances when the computer crashes and the system restarts itself. This is actually by design – when your computer has been left on standby, the computer will restart and if the program repeats, it will keep on waking your PC up.
  • In the Search bar, type in “system”.
  • Once it appears from the search results, click on it.
  • Next, select Advanced system settings on the left side and then go to the Advanced tab.
  • From there, click on Settings under Startup and Recovery.
  • Then unmark “Automatically Restart” and click on OK.

Option 4 – Adjust the Power Management option of both the Keyboard and Mouse

As you know, two of the culprits in waking your PC up are the keyboard and the mouse. If they’re slightly moved or hit, your PC turns on. To prevent these two from waking your computer up, you need to make some adjustments to their power management option since they have one. You can disable this option to ensure that they won’t wake your PC up unless you really want it to.
  • Tap the Win + X keys and then tap M to open the Device Manager and list all the hardware on your computer. From there, select your keyboard or mouse.
  • Next, right-click and then go to Properties and go to the Power Management tab.
  • In this tab, uncheck the “Allow this device to wake the computer” box.
Note: Aside from the keyboard and mouse, if you are also using any gaming rig to play games on your computer, then you might have to disable their power options as well as they could also wake your computer. Just make sure that either the keyboard or the mouse has the ability to wake your computer up at the very least as it can be quite inconvenient to tap the Power button every time you want to turn on your computer.

Option 5 – Modify Wake On Lan

The Wake On Lan feature can bring back your computer online if it is connected to a network. This feature is useful especially when a computer wants to communicate or to send data or files to a network computer which should come online only when it’s requested. Wake On Lan is built into the hardware, i.e. network adapter so it is one of the possible reasons why your PC turns on by itself.
  • Tap the Win + x keys then hit M to open the Device Manager and then under the Network adapters, look for the one that was listed above. Take note that you must not change anything with the ones that are listed as Miniport.
  • Next, right-click and select Properties and then go to Power management and from there, uncheck the “Allow this device to wake up the computer” option. This will ensure that no PC on the network can ever wake your computer up.

Option 6 – Prevent any scheduled Windows Update and Automatic maintenance

It is also possible that the Windows Update has restarted your PC to complete the update. This depends on your active hours or a predefined schedule. AS you know Windows has a built-in Automatic Maintenance mode which wakes the computer up at the scheduled time and performs the system update. This could be one of the possible reasons why your computer turns on by itself. so to prevent any scheduled updates and maintenance, you can simply change the time for Automatic maintenance. How? Follow these steps:
  • Open Settings then go to Windows Update and Security >Windows Update and select Active Hours.
  • After that, type in “Automatic maintenance” in the search bar to change the time for Automatic maintenance.
  • From there, you can adjust the timing or just uncheck the “Allow scheduled maintenance to wake up my computer at the scheduled time” box.
Read More
Could not configure one or more components
If you are trying to install or upgrade your Windows 10 computer but suddenly encountered an error message saying, “Windows could not configure one or more system components”, read on as this post will show you how you can fix the problem. You are not alone in experiencing this problem as other users also reported having the same scenario. Some of them reported getting the following error message:
“Windows could not configure one or more system components. To install Windows restart the computer with error code 0xc1900101-0x30018.”
When you check on the Windows 10 rollback log, you will see a part with the “iisetup.exe” that’s related to the abort. Usually, the upgrade process completes over 50% and gets stuck and then rolls back later on and generates the error logs. This kind of error, in most cases, appears during the upgrade of Windows 10 and is related with the Internet Information Services or IIS in Windows 10. For some unknown reason, it restricts the installation or the upgrade which causes the error to appear. To fix the “Windows could not configure one or more system components” error, you can try to remove the IIS from the Windows Features or rename the “inetsrv” folder. You could also move all the folders related to IIS to another drive. For more details, refer to the options provided below.

Option 1 – Try to remove the IIS from Windows Features

The IIS is installed from the Windows Features and you can find it at Control Panel > Programs. From there, uncheck the checkbox for the Internet Information Services. Once done, click on the OK button to save the changes. Note that this process will get rid of all the related programs, services, and folders from Windows 10. So if you want to, you can just install them later on or use an offline installer from the official site of Microsoft.

Option 2 – Try renaming the inetsrv folder

The next option you can check out to resolve the problem is to rename the “inetsrv” folder. If you have uninstalled IIS from the Windows Features, this should remove the folders as well, however, it didn’t remove the folder then you have to delete the folders that are related to the IIS by following these steps:
  • First, you have to boot into the Advanced Recovery Mode and from there, open Command Prompt.
  • Next, execute this command to rename the folder from this location, C:Windowssystem32inetsrv: rename C:/Windows/system32/inetsrv/inetsrv.old
  • Once done, boot into your computer normally and try to upgrade Windows 10 again, and check if the problem is fixed or not.

Option 3 – Try to move the folders related to IIS to a different drive

  • Tap the Win + R keys to launch the Run utility and type “services.msc” in the field and hit Enter to open the Windows Services Manager.
  • Next, look for the Application Host Helper Service from the list of services and stop it.
  • Once done, take ownership of the “WinSxS” folder and then move the *windows-iis*.*” folders to another drive. You can just search using the “*windows-iis*.*” keyword in the Start Search.
  • Next, tap the Ctrl + X keys and paste the folders to another drive.
  • After that, start the update process for Windows 10 again.
Read More
Printer not activated, error code 30
If your printer has been working just fine and you suddenly get an error message saying, Printer not activated, error code 30”, then something is definitely wrong and it’s not good especially if you have lots of things to do. Worry not, as this post will help you resolve the printer issue. Simply follow each one of the given options below carefully.

Option 1 – Try running the Printer Troubleshooter

The first thing you can to resolve the printer issue is running the Printer Troubleshooter. This built-in troubleshooter can detect and automatically fix the problem for you. To use it, follow these steps:
  • Tap the Win + R keys to open the Run dialog box.
  • Next, type “msdt.exe /id PrinterDiagnostic” in the field and click OK or hit Enter to open the Printer Troubleshooter.
  • Then click the Next button and follow the next on-screen instructions to fix the issue with the printer.

Option 2 – Check if the concerned printer is set as the default one

It could be that the printer you are trying to use is not set as the default printer. This is mostly the case so to fix the issue, you need to set the concerned printer as default. To do that, follow the steps below.
  • Tap the Win + I keys to open the Settings app.
  • After opening Settings, select Devices from the menu and then click the Printers and scanners option.
  • From there, look for the printer you are using among the list of options. After you find it, click on it and select the Manage option.
  • Now click on the “Set as Default” option to set the printer as default.

Option 3 – Try updating the driver for USB Composite Device

The problem with your printer might also be caused by the USB Composite Device. It could be that the USB Composite Device is acting up. Thus, you need to remove and reinstall it. How? Follow the steps below.
  • First, click the Start button and type “device manager”.
  • Then click on the “Device Manager” from the search results to open it.
  • From there, look for the USB Composite Device option and right-click on it, and select the Update Driver from the options.
  • Restart your PC and then click the “Search automatically for updated driver software” option.
  • Now uninstall and remove the printer driver software and reinstall it then refresh.

Option 4 – Try updating all the drivers for your Printer

  • Tap the Win + R keys to launch Run.
  • Type in devmgmt.msc into the box and tap Enter or click OK to open the Device Manager.
  • After that, a list of device drivers will be displayed. Look for Print queues from the list of drivers displayed and click on it to see all the Printer drivers.
  • Next, right-click on each one of the drivers and select “Update driver” to update the driver. Do it for all the Printer drivers
  • After that, select the “Search automatically for updated driver software” option and then follow the instructions to complete the process.
  • Restart your PC and try printing a document again and see if the “Printer not activated, error code -30” no longer pops up.
Note: You also have the option to go directly to the website of your printer manufacturer and check if there’s a new update – if there is, download it.
Read More
How to Fix: Not a Valid Win32 Application Error

Not a Valid Win32 Application Error - What is it?

Not a Valid Win32 Application error code that indicates either the file or the program you are attempting to run missing or corrupt. And because of this error, Windows is unable to open your desired file or run the program successfully.

Error Causes

The ‘Not a Valid Win32 Application’ is triggered due to multiple reasons such as:
  • Unsuccessful program installation due to damaged disc/CD
  • Corrupted or incompatible file
  • The hard drive is loaded with bad and invalid entries
  • Malware invasion or viral infection
When you come across this error code on your PC, it is advisable to resolve it as it will cause you a great deal of inconvenience hampering program and file accessibility. Furthermore, if the error code occurs due to malware or viruses, then it can lead to severe data security threats and privacy issues.

Further Information and Manual Repair

To resolve the Not a Valid Win32 Application error on your PC, you don’t need to be a technical expert or hire a professional. Though this error might be crucial it is easy to fix. Here are some of the many methods that you can try to resolve this error code on your PC:
  • Check for File Compatibility
If you downloaded a file that is not compatible with your Windows version then you will come across this error. In this case, it is advisable to download the file version that is compatible and can run easily on the Windows version installed on your system. Nonetheless, if the file is compatible but still doesn’t run on your PC, then it’s possible that the file became corrupt during the download. Try downloading the file again.
  • Check if the CD is Clean
You may also come across the Not a valid Win32 application error code if the program installation from the CD is unsuccessful. This happens when the CD is dirty or it is scratched. The program does not copy properly onto the computer from the damaged CD. So, if the CD is scratched and dirty, buy a new CD and try installing the program again.
  • Verify the Program You Want to Run is Still on the Computer
If you are running the program from a shortcut, then verify that the program is still installed on your PC. This error may occur if the program is no longer installed on the computer. If you find the program is not installed on your system, then reinstall and try running the program again.
  • Wrong File Name Issue
Make sure the program or the file you are attempting to run on your system does not contain the same name as the long filename directory it is saved in. For example, running a file named ‘program’ in the ‘program files’ directory can cause errors in some Windows versions. If this is the issue, then try installing the program in a different directory.
  • Repair Hard Drive
If the hard drive is bad or corrupted, it can also generate the not a valid Win32 application. And because of this error files and programs fail to execute successfully as not all data can be read from the hard drive. To repair this issue first you need to run defrag and ScanDisk Microsoft built-in tools. These tools check for errors on the hard drive.
  • Run an Antivirus
If the error code occurs due to a viral infection or malware attack on your system, then you must download an antivirus, scan, and remove such malicious software. However, antivirus may slow down the speed of your PC. So, to resolve speed issues and boost the performance of your system, you may have to download a system optimizer.
Read More
The Steam Autumn sale is coming!

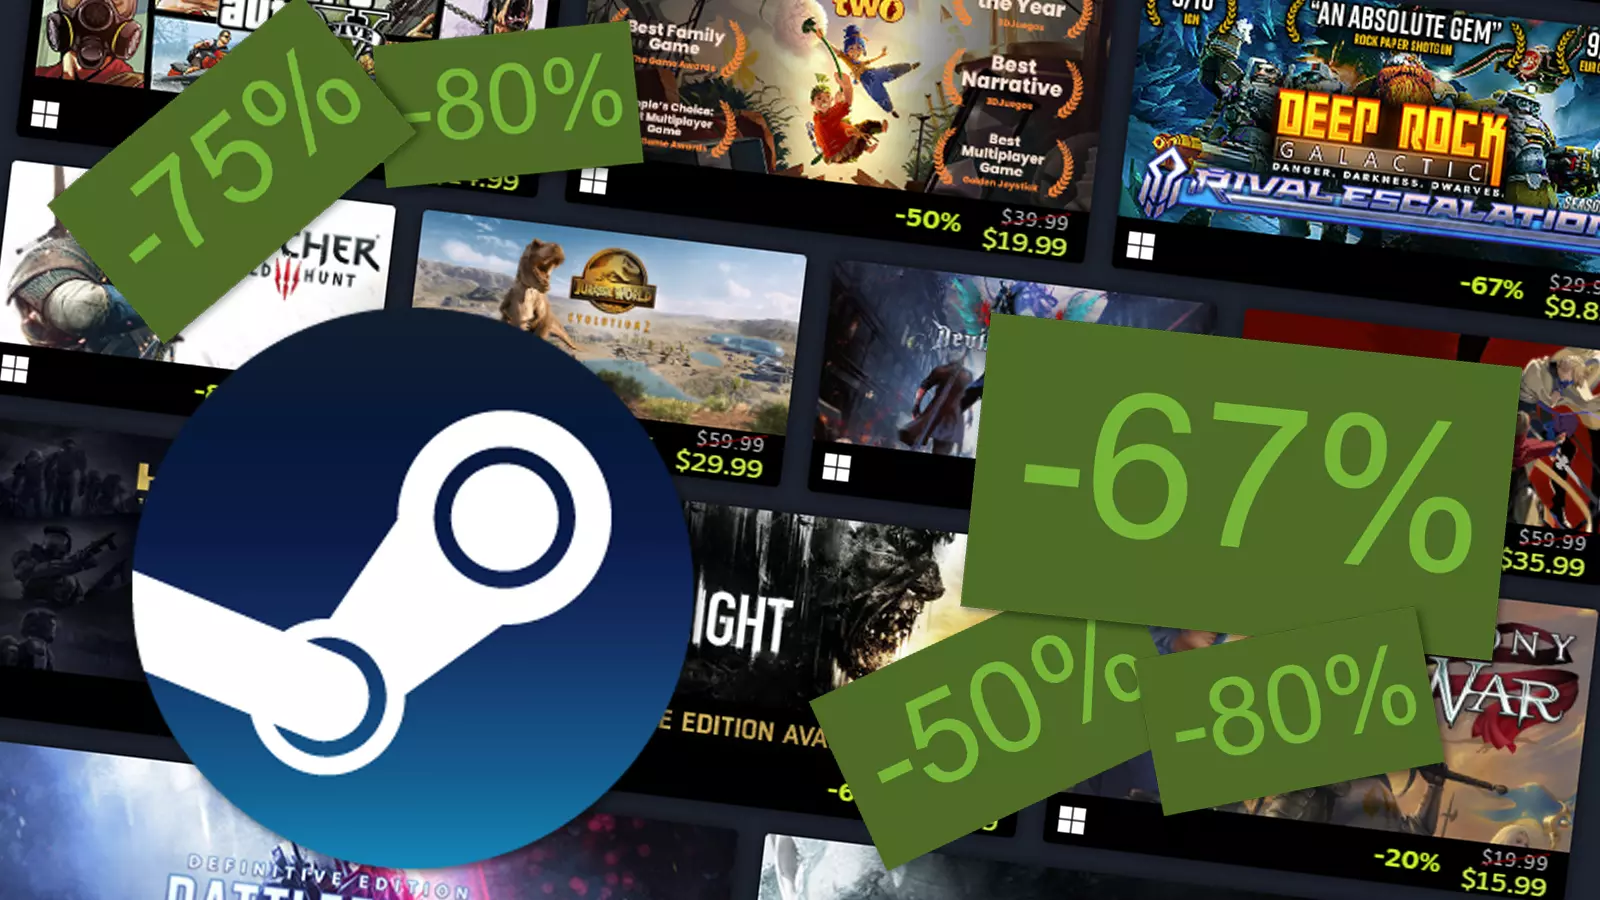
Oh, gamers rejoice, the Steam autumn sale is just around the corner!!!

The sale starts on November 22nd and lasts until November 29th. A great deal for any gamer, especially for ones that have plenty on their wishlist. Speaking of wishlists now would be a good time to place some interesting titles on them so you can be notified about discounts on them.

If you by any chance are unavailable to participate in the Autumn sale, do not worry, Steam winter sale is coming on December 22nd and it will last until January the 5th so you can save for it.

The best tactic for sale is not to jump on the train right away, it is best to wait until a few days, maybe even until the last 2 days since some games can go even lower on discount in the last days of the sale. Also, there might be also some packages that include games you wish to buy but are packed with other ones in a bundle and even with a higher discount.

So get prepared for the upcoming sale and treat yourself to something nice!

steam sale
Read More
1 2 3 171
Logo
Copyright © 2023, ErrorTools. All Rights Reserved
Trademark: Microsoft Windows logos are registered trademarks of Microsoft. Disclaimer: ErrorTools.com is not affiliated with Microsoft, nor claims direct affiliation.
The information on this page is provided for information purposes only.
DMCA.com Protection Status