Windows 10 has a lot of several useful features and one of them is the Nearby Sharing feature. You can access this feature by going to Start > Settings > System > Shared experiences. From there, switch on the Nearby Sharing option and select the folder where you want to download the files to. This feature is really useful as it allows you to share files. However, there were reports from a number of users recently stating that Nearby Sharing is not working on their Windows 10 computers.
If you are one of the users facing this problem, you might want to try checking if the Windows 10 v1803 Update is installed on your computer or not. You could also try to check if Bluetooth supports low energy mode or you could also try bringing the device closer or check if the adapter has Bluetooth version 4.0 or later. For more information, refer to each one of the given options below.
To check if the Windows 10 v1803 Update is installed on your computer, go to Start > Settings > System > About. From there, scroll down to the Windows specifications and check the Version. If it is 1803 or above, then the Nearby Sharing feature should be active on your computer. However, if you find that Windows 10 v1803 Update is not installed yet, then you need to update your computer to its latest version and then see if it fixes the problem or not.
Although low energy mode is not really necessary in using Nearby Sharing, there are some Bluetooth terminals that support low energy mode which makes a lot of difference. Thus, you need to check if Bluetooth in your computer supports low energy mode by following these steps:
Nearby Sharing might not work if your devices are not close enough. Thus, you need to bring your devices closer together and see if it fixes the problem. And when you do, make sure that Network Sharing is switched on for all the concerned devices.
For you to use the Nearby Sharing feature, you have to make sure that the adapter for all the concerned devices is using Bluetooth version 4.0 or later. So if one of the devices or if all the devices are not using this version or later versions, then you must buy an external Bluetooth adapter for you to enjoy the Nearby Sharing feature.

DriverPro is a program developed by PC Utilities Pro. This program is often found bundled in other installations.
From the author: PC Utilities Pro is a leading software development company founded in 2009. As a group of young enthusiastic programmers, we constantly strive in creating powerful, yet easy-to-use solutions that would enable even the most basic computer users to keep their PCs running like new.
When installed, DriverPro will add registry entries for the current user that allow it to run each time to computer is started. It will also add a scheduled task in Windows, that allows it to run at various times. The optimizing nature of the application allows it to access any file and information on your computer without your knowledge.
Multiple anti-virus programs have marked this application as a Potentially Unwanted Program, and it is not recommended to keep it on your computer.In 2014 Proton mail started as an end-to-end encrypted email service offering secure and private email services. Proton mail is still live and going with the same dedication to privacy and security but the company has expanded its offering into cloud storage drive services.
Starting as a public beta at the end of 2020, Proton Drive is keeping its privacy and security policy philosophy with the new service. Proton Drive is the newest service besides Proton Calendar, Proton VPN, and Proton Mail.
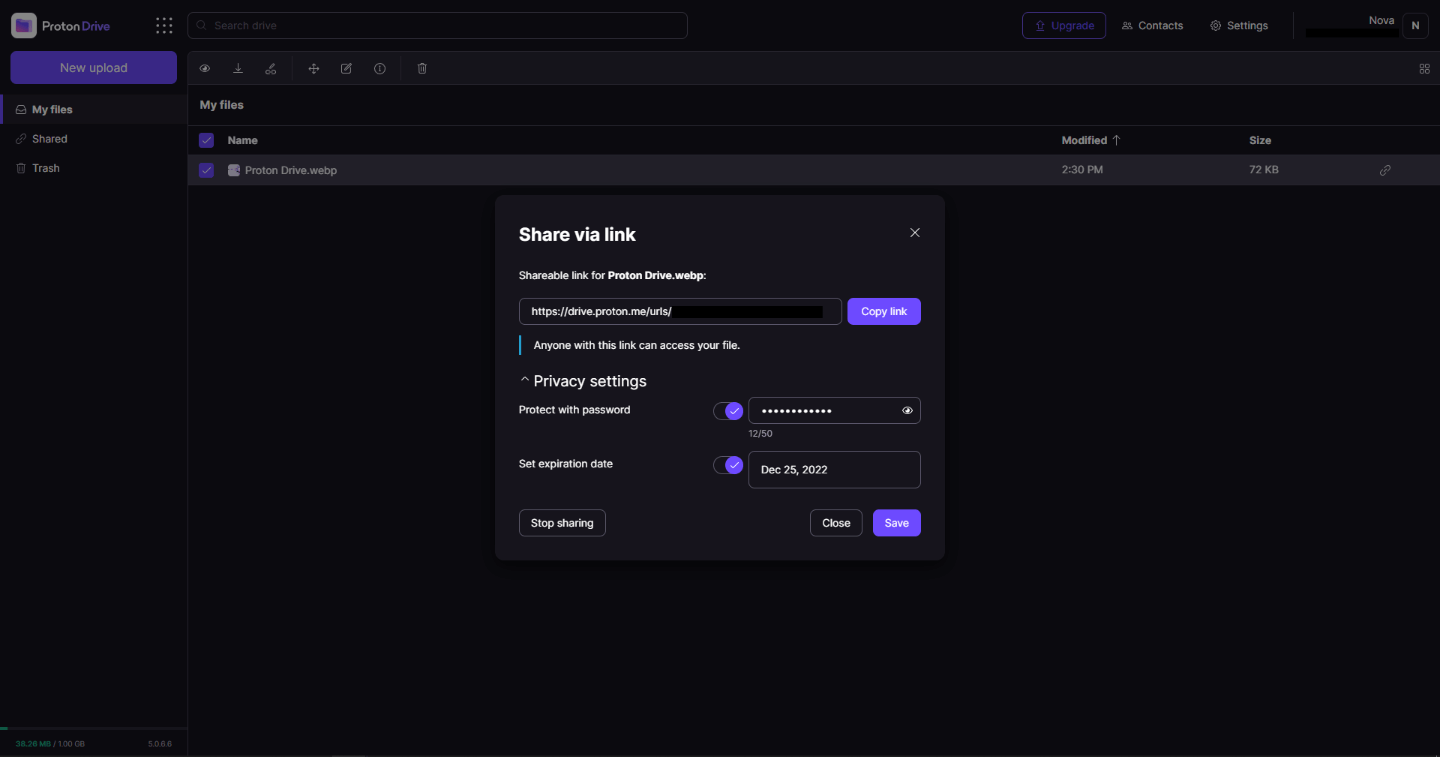
Drive has end-to-end encryption for everything on it including files themselves, filenames, folder structure, folder names, extensions, and file sizes. This means that you and only you can access your files. Servers are located in Geneva, Switzerland and they are under Swiss privacy laws making sure that your files are protected. Proton services in general are all open source so anyone can take a look at them to be sure that nothing is lurking under the hood. For now, sync is done either via the android app or web interface but the desktop client will come soon since currently, it is under development.
Sadly free plan of Proton Drive will give you only 1GB of storage which is much less than other services and sadly payments plans are also not so jaw-dropping going for $4 USD per month for a 200GB plan or with Proton ultimate subscription that will set you $10 behind but you will get 500GB of drive storage. Of course, if you value privacy for your files these options are good but if you do not mind that part other services have much better options.
All in all Proton Drive is a great cloud storage solution if you need privacy and well worth the investment. With the ultimate subscription, you will get enough space for most people and company needs with other services and guaranteed privacy and security, on the other hand, if you just need a large amount of cloud storage not caring too much about privacy other options are better.
"Libvlc.dll not found." "The file libvlc.dll is missing." "Cannot register libvlc.dll." "Cannot find C:WindowsSystem32\libvlc.dll." "Libvlc.dll Access Violation." "Cannot start Third-Party Software. A required component is missing: libvlc.dll. Please install Third-Party Software again." "This application failed to start because libvlc.dll was not found. Re-installing the application may fix this problem."Though Libvlc.dll error is not a fatal error code but nonetheless it is advisable to resolve it immediately to avoid any inconvenience.
 Error Causes
Error Code 45 is a common device manager problem that users encounter on any Windows 2000 and later operating system versions.
The error occurs when your Windows system fails to acknowledge the connected device by either stating that the device is not present or that it was previously attached to a computer.
The error pops up and appears on your computer screen with the following message:
“Currently, this hardware device is not connected to the computer” (Code 45)
 Error Causes
The error is prompted either due to a temporary system file malfunction or a problem in the Windows registry system files. In the latter case, it could be due to a damaged or corrupted Windows registry.
While it may appear that Error Code 45 is a serious threat to your computer, it cannot be farther from the truth. Error Code 45, unlike other error codes, is the easiest one to fix. Here is how you can do it.
Unplugging and plugging the USB cable of the device into the computer is the easiest way to solve the error.
Doing this will help refresh the system and increase the likelihood of the device driver files loading and function properly.
It is often only a case of reconnecting the device back to your computer which helps eliminate the error and does not require any particular resolution other than this.
Although reconnecting the disconnected device is all you need to fix the error code, it is always safer to fix your Windows registry system files by using a program like DriverFIX.
DriverFIX, with its user-friendly approach to help you fix your PC issues, comes with an integrated database that detects which drivers you need to reconfigure within just a few seconds and downloads it automatically.
It further ensures that your drivers are installed in their entirety leaving no room for any corrupted or damaged registry.
It also has the added advantage of being able to backup and restores your files should there be the slightest possibility of system file damage.
Thus, registry damage can be averted by letting the software roll back the system files to an earlier healthy checkpoint. DriverFIX is the answer to fixing your PC error codes accurately and quickly.
Click here to download DriverFIX now!
C00D1199: Cannot play the file
Error Causes in the command prompt you need to type the next command:
dir \search term* /swhere search term* is well, what are you searching for. Now if you are looking for a specific file this command is straightforward, you just change search term* with file_name.extension and there you go, but know that this command can be used to be more powerful, for example, you can find all JPG files in your drive by typing dir \*.jpg /s or all files named work by typing dir \work.* /s " * " is a so-called joker sign, it replaces several characters with any in a given string, meaning that dr*s will give you all results with the first 2 letters dr and last one s. Use this to specify better search results and you will get your files in no time.