Coming in October for insiders and in November for all in the update, Microsoft has prepared a series of updates which they call an "additional set of experiences"
These updates are looked upon by Panos Panay, a vice executive president at Microsoft & chief product officer for Windows and devices as sort of makeup tests. They will consist of new additions with the biggest one being a tabbed version of File Explorer.
File Explorer received a UI makeover in the last update but the tabbed interface was missing which was expected by many users so it will come in following the next update.
The rest of the features that we will receive are an updated Photos application, Suggested Actions in the Windows Shell, Overflow menu for the taskbar, and improved Nearby Share.
The tabbed File Explorer interface is essentially File Explorer’s version of Sets, the tabbed window interface that Microsoft tested out several years ago. In testing, the tabbed interface proved handy for moving and copying files, and we’d expect the same once the feature formally goes live. The difference between Sets and the tabbed File Explorer interface is Sets allowed for multiple applications to be clustered together via tabs.
Photos app will include a “new photos-managing experience that brings a gorgeous gallery, simplifying browsing, finding, management and consumption of your collection of photos.” It will allow “easy backup to OneDrive” and a “delightful Memories experience.”
As for other features, nothing specifically was said except giving just some tips on what will they bring, it is obvious that File Explorer and the photos app were the main focus for MS in this upcoming update.
Most scrollbars are hidden by default if they are not used in Windows 11. If you are not ok with this feature and want scrollbars to be always visible and available do not worry, turning them ON is very easy.
Press ⊞ WINDOWS + I to open Windows settings
Click on Accessibility in the sidebar
Select Visual Effects
Inside visual effects settings find Always show scrollbars and switch it ON
Windows 11 will save settings automatically and apply setting right away. Close settings and continue with work.
This Unresponsive Script problem information is most frequent on Firefox, which is among the top browsers worldwide.
Firefox might show you these errors with the information, "Warning: Unresponsive Script". It is going to subsequently inform you that software to the web page you're trying to open is unresponsive, or has quit reacting.
This means that the script has ceased functioning and may freeze or hang Firefox if not immediately resolved. You can easily solve this problem.
Solution
Error Causes
Before you can fix this error, you need to understand its primary cause.
The biggest risk is that if left unchecked, Unresponsive Scripts will hang your browser and to an extension of your computer thus limiting your productivity. You may have to uninstall and re-install Firefox if the problem persists.
Listed here are several of the very most typical reasons for unresponsive script:
Programming Errors
Interference by other Softwares
Using an older outdated version of the program.
Further Information and Manual Repair
Most times, you have to do very little to fix this problem. Furthermore, a lot of the remedies supplied here do not require the assistance of a qualified professional technician. You can easily perform them and completely solve the error.
If you wish to stop the error, keep your browser and add-ons up to date.
It's easy to update your browser and any add-ons therein. In most cases it's free. By upgrading your browser and add-ons frequently, you are effectively eliminating the risk of Unresponsive Script occurring and interfering with your work.
Check for a poorly functioning background process
The sorts of background procedures that might result in the Unresponsive Software error include Javascript code, media plugin, and browser extension.
You can stop the script from running while using Firefox thus eliminating the Unresponsive script error.
Shutting the dialog box is just another easy way of eliminating the unresponsive script error information. Firefox offers you two choices in case of this malfunction. Either "Continue" or "Stop Script". Whatever alternative you pick, you can be certain the dialog box shuts, thus allowing you to continue browsing.
The final solution. Contact Firefox about these errors on your browser. Oftentimes, these errors occur when you attempt to visit particular websites. Mark the offending websites' URLs and include them in your communications with Firefox.
Sometimes you can also contact the website owner yourself and request them to check their website's code.
Following are additional measures you can take to resolve the Unresponsive Script error.
Waiting longer for the error to resolve itself automatically
Blocking the offending script
Yanking the guilty add-ons
Disabling the hardware acceleration tool.
With one of these few steps, you won't have to worry about the Unresponsive Script error, can continue enjoying your browsing activities on Firefox.
A lot of users connect to the internet are using VPN on their Windows 10 computers which means that their regions could be different from the actual region of their Windows 10 computers. Thus, if you are facing some issues in updating your computer in this kind of environment, specifically the Windows Update error 0x800F0922, you need to follow the tips given in this guide to help you resolve the issue.
When you encounter this kind of Windows Update error, you might see either of the following error messages on your screen:
“Windows could not search for updates, Code 0x800F0922 Windows Update encountered an unknown error”
Or:
“Windows failed to install the update with error 0x800F0922”
This issue might be caused by two possible reasons such as:
VPN issues
Not enough space on the System Reserved partition
To resolve the problem, here are some tips that might help:
Option 1 – Try disabling the VPN
As mentioned, if you are using VPN, this could be the reason why you’re getting the Windows Update error 0x800F0922 so the most obvious thing to do is for you to turn off the VPN and try to run the Windows Update once more. And if you use a VPN software that works using their software, you can just completely exit or log-off from its account. On the other hand, if you are using a built-in Windows 10 VPN, you can simply turn it off or delete all the settings you have created there. Although it’s understandable that you might have to use a VPN connection to connect to the work network, you really have to disable it at least until the Windows Update is no longer stuck in the error 0x800F0922. It would be best if you do this when you are not working.
Option 2 – Try to free up space in the System Reserved partition
The System Reserved partition is a part of the hard disk created when Windows is first installed on it. It is where the Boot Configuration Database, Boot Manager Code, Windows Recovery Environment, and the reserves space for the startup files are stored. And as mentioned early on, the error might be due to some insufficient space in the System Reserved partition so the next thing you can do is to increase the space in this partition. Note that it is a complex process so you need to make sure that you have made backups to all your data on the computer. So if ever something goes out of hand, at least you have copies of your important files in case you aren’t able to boot into the system at all.
One of the most important User Interface elements in a Windows 10 operating system is the Start Menu. Not too long ago, Microsoft has added some new features and redesigned the Start Menu a couple of times as well. Thus, it is not uncommon for Windows 10 users to use several monitors. That’s why in this post, you will be guided on how you can move the Start Menu to your second monitor in Windows 10.
There are a lot of advantages in using more than one monitor like a better and widescreen as well as help in improving and increasing productivity. Usually, the Start Menu and the taskbar is present in the original monitor only. In most cases, it helps users in moving the Start Menu to the second monitor and helps users in segregating tasks, and uses separate monitors for each kind of task.
There are two simple steps to move the Start Menu to the second monitor. You have the option to unlock and drag the taskbar, as well as make adjustments in the settings. To get started, refer to each one of the following options to move the Start Menu to the second monitor.
Option 1 – Move the second monitor by unlocking and dragging the taskbar
The first option you can try to move the Start Menu to the second display is to simply unlock and then drag the taskbar. To do so, follow these steps:
First, click on the Taskbar and unlock it.
Next, uncheck the Lock the taskbar feature in the menu of the Taskbar Settings. This will free the taskbar so you can move or drag it around.
After that, push the Start Menu to the furthermost corner of the screen and then transfer it to the second monitor.
Option 2 – Move the second monitor using the keyboard
The first thing you have to do is to tap the Windows key to open the Start Menu.
Next, close the Start Menu by tapping the Esc key.
After that, the controls will shift back to the taskbar.
Now open the context menu of the taskbar by tapping the Alt + space bar together. This will move the Start Menu to the second monitor.
Option 3 – Move the Start Menu to the second monitor via Settings
If you find that the Taskbar is moving to the wrong monitor automatically or if the program does not start on the same monitor as the taskbar, then you can try this option.
Click on Start first and click Run.
Then type “desk.cpl” in the field and click OK.
Alternatively, you could also right-click on the desktop and select the Screen Resolution option from the drop-down menu.
After that, click on the monitor that you want to use as the primary monitor and select the checkbox labeled “Make this my main display”.
Once done, you have to choose the “Show desktop” on only 1 from the drop-down menu of Multiple displays.
Now click the Keep Changes option and select the Extend these displays from the Multiple displays drop-down menu and then click on the Apply button to save the changes made.
Afterward, click the Keep changes option once the dialog box pops up.
Have you been feeling anxious in the digital space? Feeling like you have a million eyes on you each time you visit a website? It can definitely make you uneasy. Luckily there’s an easy fix, and it’s called a VPN.
In this article we’ll take you through the basics of what a VPN does and some of the biggest benefits you can reap from buying one.
VPN: definition and how it works
VPN stands for Virtual Private Network, so its name already says a lot about what it does.
A VPN is specialized software that keeps your browsing private and secure. Essentially it hides your identity, preventing possible cyberattacks and data theft. This is especially important in cases of public network use, where you’re highly exposed to potential threats.
To be more specific, this software encrypts your Internet Protocol (IP) address by filtering it through a server hosted by the VPN provider first. That way, it prevents your Internet service provider, third parties and lurking online thieves from tracking the actual you.
Credit: FLY:D on Unsplash
Some providers, such as Surfshark VPN with its IP Rotator feature, even make it a habit to frequently change your IP address to further protect your identity. With most VPN providers, you can also appear to be in a completely different country, adding to your disguise.
There are tons of advantages you can look forward to if you decide to use a VPN. Take a look at some of the crucial ones.
Benefits of using a VPN
When choosing a VPN, you can find both free and paid options. We recommend you go with the paid ones, since they have stronger security, encryption and data protection, as well as more advanced features. Free VPNs come with limitations and risk of malicious attacks on the software itself.
You can choose to buy a singular VPN service or opt for antivirus software that has a VPN built in, for example Bitdefender’s Ultimate Security plan. That depends on what you use your computer for and how much.
When you pick one, here’s what it can do for you.
1. Access region-specific content
When we said you could change your location, we meant it. Say you’re using a streaming service and a show you desperately want to watch isn’t available in your country. You can use your VPN to make it look like you’re browsing from a country where it’s unlocked.
This option is also convenient for gamers who want to access maps, skins and other in-game items unavailable in their location.
In addition, you can use this powerful feature when you’re traveling to a region where some of your favorite content may not be accessible.
Do keep in mind that you need to read the Terms and Conditions (yeah, we know - who does that?) of your games and services before doing this, since you could end up getting a penalty. It’s also important to remember that there are entire countries that have strict regulations or even bans on VPNs, for example Belarus, Russia and China. So make sure to be very cautious with your VPN use, friends.
2. Browse like no one’s watching
VPNs shield your browsing habits from prying eyes on the web. Those can be malicious hackers or just third-party cookies tracking your every move to later bombard you with targeted ads. For example, Surfshark VPN features a Cookie blocker that blocks all cookie-related pop-ups and lets you browse in peace (and secret). It works even when the VPN is turned off, which is also pretty neat.
In addition, their CleanWeb 2.0 technology makes sure ads and especially malware don’t stand a chance at all, since they’re blocked before they can even load.
The inability of sites to track your browsing means they can’t collect and analyze any of your data. So, your personal information - or your company’s information in case that’s what you’re using your computer for - is entirely hidden and secure.
3. Save money
It’s well-known that the prices of certain items and services vary based on your location, browsing time, age and many other factors. This most commonly goes for airline tickets and hotel stays.
You can use your VPN to avoid high prices and surcharges. Clear all cookies, turn on your VPN and visit an online shopping site to check out their prices. Then compare your findings with the offers you see when your VPN is off, when you spend a long time on the site or have an active account with the company.
Sometimes this can really help you find the best deals and avoid breaking the bank. But again, check the Terms and Conditions before you purchase something using a VPN.
4. Secure your smart home
The more smart devices you have connected to your network, the more exposed you are to potential cyberattacks. Phones and computers are generally designed to be decently secure even without a VPN or antivirus, but smart home devices leave a lot to be desired in that regard.
Protecting your home network with a VPN software means all devices connected to it are secure, be it an air purifier or Alexa.
Credit: Bence Boros on Unsplash
5. Prevent connection slowdown
Your ISP can intentionally slow down your internet speed based on how much data you’ve consumed (data throttling) or your activities online (bandwidth throttling).
But with a VPN, what kind of data you send and receive and how much is entirely hidden. Therefore, if your ISP can’t see you, they can’t control you and they can’t throttle down your speed.
The bottom line
You can never be too safe online. So definitely think about getting yourself a solid VPN to pump up your privacy and security as much as you can. And if you have any questions or need help choosing the perfect software for you, feel free to reach out to us.
Although the Windows Updates do bring in new features and improvements, there are times when they also introduce issues as well. The main cause for these arising bugs is the incompatibility between the old and new software components. One of the issues brought in by such bugs is Clock is missing, invisible or black
This problem was experienced by users after they recently installed a feature update. This particular bug can make the Windows clock in the taskbar appear to be black or invisible which makes it hard for users to read the time on their computers. According to experts, this bug has something to do with the Windows Themes and Aero styling. To fix this issue, here are some suggestions that could help but before you get started, you have to restart Explorer first and see if it can help in resolving the problem – if it didn’t, follow the options given below carefully.
Option 1 – Try to disable Custom Theme
It could be that the reason behind the black or invisible Windows Clock can be an old or an incompatible theme. You might have a custom theme in place and it became incompatible after an update. Thus, you can try switching to one of the default themes and then recreate your custom theme afterward. To do so, follow the steps below.
Right-click on your desktop and select Personalize.
Next, select Themes from the left menu and then select Windows 10 as your theme.
After that, you can delete all the other custom themes and create them again from scratch. This should fix the black or invisible Windows 10 Clock.
Option 2 – Try to edit your existing themes
If you don’t want to get rid of your existing themes, there is an alternative solution you can try to fix the missing Windows 10 Clock albeit it’s a bit of a complex one. Follow the given steps below to modify the existing themes and fix the missing or black Windows Clock.
First, you need to save your existing theme. Just simply right-click on your desktop and select Personalize and select Themes from the left menu.
Next, click on the Save Theme button below your custom theme to save it. You can name the theme anything.
After that, you can now modify the saved theme by going to C:/Users/UserName/AppData/Local/MicrosoftWindowsThemes.
From there, look for the file with the theme name you just saved, and then right-click on the file and open it with notepad or any other text editing app.
Now you have to look for the line that says, “Path=%SystemRoot%resourcesthemesAeroAeroLite.msstyles” and change it to “Path=%SystemRoot%resourcesthemesAeroAero.msstyles” and then save the file and rename it with some other name.
Afterward, go back to themes and select the new theme you’ve created. This should resolve the Windows Clock issue as well as other Themes and Taskbar issues.
Option 3 – Try disabling the small icons in Taskbar
This option should help you fix any Windows Clock cases. So if your Windows Clock is nowhere to be found, you can try to disable small taskbar icons on your Windows 10 PC.
Go to Settings > Personalization > Taskbar.
From there turn off the toggle button for the “Use small taskbar buttons” option. Note that this solution is only a temporary one and it may or may not work in some cases.
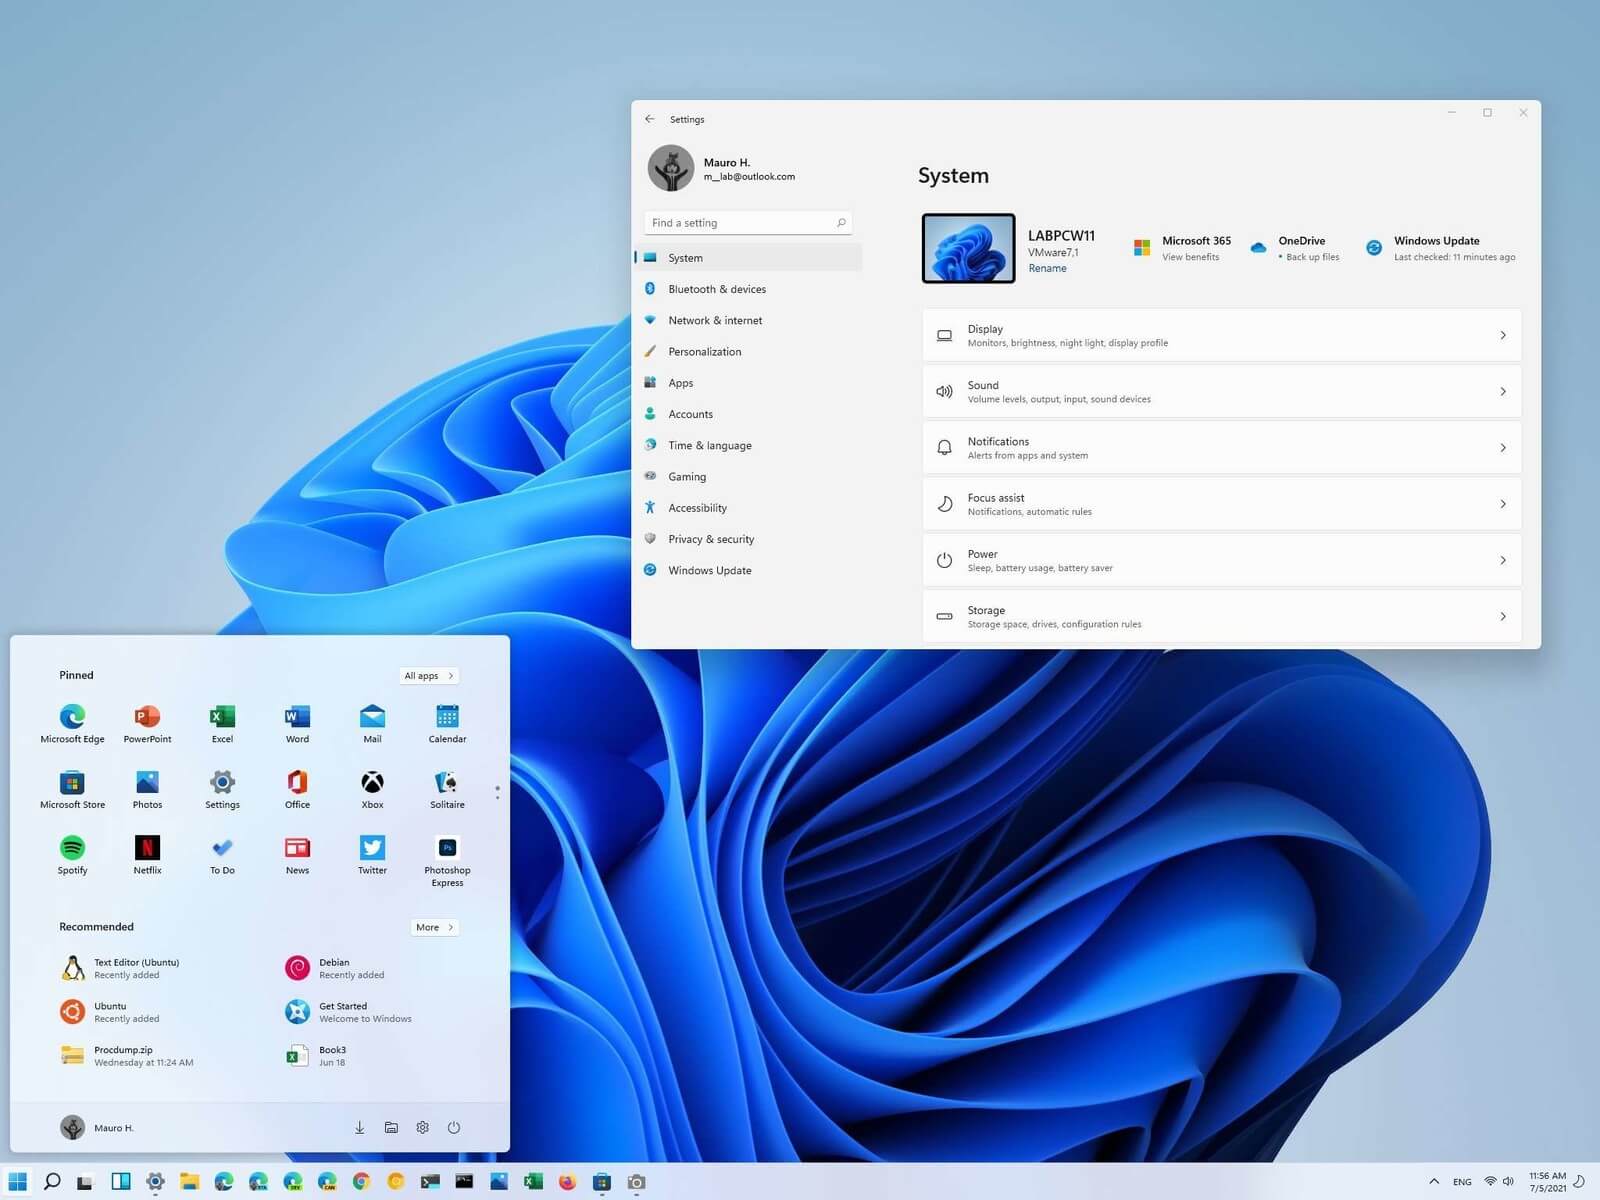
Windows 11 is released and its adoption goes slower than Microsoft would like but nevertheless, it is slowly getting adopted, especially among new computers. Windows 11 has brought us a new modern look of OS but if you would like to personalize it a little more you can. Follow the guide on various things that you can change inside Windows 11.
Personalize list of recently added apps, opened items, folders
The recommended section that shows recently added apps and recently open items can be turned off and hidden now to be shown. In order to do this follow these steps:
Open Windows Settings by pressing WINDOWS + I
Click on personalization in the sidebar
Click on START and go through the options
Turn OFF switch beside recently accessed files
Additionally, you can also change which folders appear on the Start menu.
Remove apps or change app order on the Start Menu
To remove application not to be shown in the Start menu at all follow this simple guide:
Right-click on app
Choose unpin
To place the application on Start click on All Apps, right-click on the app and choose Pin to Start
To drag and rearrange apps, simply click on them and drag them to the new place.
Change the Start Menu location
When Windows 11 was first released Start Menu could only be located in the middle of the screen but thanks to plenty of backlash from users now it is possible to move it on a more traditional left side.
Press WINDOWS + I to open the settings app
Click on Personalization
Look for taskbar behaviors
Inside taskbar behaviors look for Taskbar alignment
Change alignment to left
Change the Start Menu color
In order to change the color of the Start Menu follow the next steps:
Open Settings app
Go to personalization settings
Go to Colors
Switch to custom
Under accent color pick a color you like or make your custom one.
As you know, any software needs sufficient CPU power when it downloads, updates and installs so if you encounter an error code 0x80200070 when you tried to install or update the Microsoft Edge browser on your Windows 10 computer, then read on as this post will guide you on how to fix it.
This kind of error occurs when the Edge browser installation does not get enough CPU power to update or install and the only way to fix it is to kill programs that are consuming a lot of PC resources as well as stop or remove any unnecessary programs that are running in the background. This kind of error can also be encountered in the new Microsoft Edge Chromium. For more details, follow each one of the options provided below.
Option 1 – Try to kill applications that consume high resources
Tap the Ctrl + Shift + Esc keys to open the Task Manager.
Go to the Performance tab and sort by CPU usage.
Next, close a few additional programs that are consuming maximum CPU power.
After that, try to update or install Microsoft Edge again and check if the error is fixed. If not, try to restart your computer and then start the installation or update again.
Option 2 – Try to remove or stop unnecessary programs and services
If the applications or processes that are consuming a lot of CPU resources reappear even after you kill them or end their processes, then you can try the following suggestions to remove or stop these unnecessary programs and processes.
The first thing you can do is to stop the Service. If the program happens to be a service, then you have the option to disable the Windows Service. All you have to do is open the Services Manager and stop the service. How? Refer to these steps:
Tap the Win + R keys to launch the Run utility and type “services.msc” in the field and tap Enter to open the Services Manager.
After that, identify which service is consuming a lot of power and then stop it temporarily.
The next thing you can do is to uninstall the problematic program. If the one that consumes a lot of resources is not a service but a program, then you can try to uninstall the program for the meantime until you’ve updated or installed the Edge browser. Once you’ve uninstalled the program, try to update or install Edge again.
You can also try booting your computer into Safe Mode and then update or install Microsoft Edge. This will make sure that all the unnecessary programs and services won’t consume a lot of CPU resources as well as memory.
We tend to move and copy tons of files on our PCs and mostly, the process of copying or moving files, especially if the file has the size of 1GB or up, tends to take quite long. This may be caused by some issues which is why you face slow copy or move speed. So if you are experiencing this issue on your Windows 10 computer, then read on as this post will give you a couple of solutions you can try to increase the speed in copying or moving files. Follow the given instructions below.
Option 1 – Try to change the USB port
You might want to change the USB port since modern computers have a variety of USB ports. So if your USB drive supports USB 3.0 or 3.1, make sure that you plug it inside a USB 3.0 or 3.1 ports. If you’re not sure which port, just keep in mind that the USB 3 port is usually blue or you can also use your computer’s documentation or manual as a reference to locate it. It may sound nothing but changing the USB port can actually improve the copying or moving speeds drastically so this should be the first thing you can try to speed up the process of copying or moving files.
Option 2 – Update the USB Controller Drivers
First, click the Start button and type “device manager”.
Then click on the “Device Manager” from the search results to open it.
From there, look for the “Universal Serial Bus controllers” option and then right-click on each one of the USB drivers and select the Update Driver from the menu.
Restart your PC and then click the “Search automatically for updated driver software” option.
You also have the option to update the motherboard and the USB driver from the manufacturer’s official website.
Option 3 – Check for any hard disk errors
On your desktop, right-click on the “This PC” or computer icon and then select Manage to open the Disk Management. Here you get to check your drive’s health.
Next, click on Disk Management on the left side panel.
From there, check the state of your drives. If it shows that all your partitions are healthy then it means all is good and that the problem may have something to do with some physical issues with your hard drive.
You might also want to run the CHKDSK utility to help you fix any issues with your hard disk. If your hard drive has issues with integrity, the update will really fail as the system will think that it’s not healthy and that’s where the CHKDSK utility comes in. The CHKDSK utility repairs hard drive errors that might be causing the problem.
Open Command Prompt with admin privileges.
After opening Command Prompt, execute the following command and hit Enter:
chkdsk /f /r
Wait for the process to be completed and then restart your computer.
Option 4 – Try to disable Windows Auto Tuning
Disabling Windows Auto-Tuning can also help in increasing the copying or moving of files in your computer. It is said that this feature improves the performance of programs that receive TCP data over a network by adjusting the receive buffer size dynamically throughput and latency of the link. Thus, if you are trying to copy some data over the network, then the Auto Tuning feature is playing a role here. And in some cases, disabling this feature completely resulted in a lot faster copy speeds over the network.
Option 5 – Try changing the USB Removal Policy
First, plug your USB drive or external device into your PC and then open This PC.
Next, right-click on your device and select Properties.
After that, go to the hardware tab and select the storage media that you want to enhance and then click on the Properties button.
From there, you can select the Better performance option if you wish for your device to have a better performance. Once you select this option, it will enable write caching in your Windows 10 computer but you need to use the “Safely Remove Hardware” option from the notification area to safely disconnect the device otherwise it may result in data corruption.
Option 6 – Format your drive
To get started formatting your drive, tap the Win + E keys and then go to the access page of the drive.
Next, right-click on the drive and select Format.
After that, uncheck the “Quick Format” option and then format your drive properly.
Now once the formatting process is finished, unplug the drive and plug it back in afterward.
Check if the error is already fixed. If the drive is not initialized, tap the Win + R keys and hit Enter.
After opening the Run dialog box, type “diskmgmt.msc” and hit Enter to open Disk Management.
From there, right-click on the drive volume and select initialize disk.
Next, select the correct partition type and proceed.
PST file is the acronym for Private Storage Table. It is a proprietary file structure utilized in the ms-outlook program shop and to preserve attachments as well as e-mails, notifications, scheduled calendar events, and even more.
This structure can also be called a Personal Folder File. The storage limit or the size varies today with respect to the Outlook version you've got installed.
The PST file size limit depends on the edition you have installed. Outlook 2002 and earlier versions have a memory limitation of 2GB while later versions such as Outlook 2013 have up to 50GB memory limit.
Error Causes
You will be amazed to discover there is not a single cause behind this problem. The File can be damaged due to a number of reasons including:
Virus infection
Incorrect file system recovery
Data storage device failure
Storage size limit exceeds
Sometimes due to power failure when accessing the PST files
Once this File becomes corrupted and broken, it places you in danger of losing your important e-mails and attachments.
Moreover, this stops you from getting or sending e-mails to and from your own associates. And in case you would like to add new contacts, you are greatly hindered. It reduces your productivity.
For individuals relying completely on the Outlook program for communicating via e-mails and maintaining a track of important dates that they have set reminders for and scheduled in their calendars, the PST file problem is a nightmare.
It decreases productiveness and performance.
Further Information and Manual Repair
To regain the damaged File without removing old e-mails Install a PST File Repair Tool. The latter one is probably the best way to resolve this issue without compromising on your old important emails and contacts.
There are a number of repair resources out there. Each device provides a distinct degree of characteristics and performance. We urge you to use Stellar Phoenix Outlook PST Repair Tool.
Not only does this repair tool aid work out PST file error that is damaged, but it also helps with data recovery. With this particular tool, it is possible to recover even the erased files you've removed from your Outlook Installation before the PST file got corrupted.
Wait there is more! It is also possible to raise the memory limit by installing this repair tool on your computer.
What this means is in the event the PST file corruption's cause was associated with the storage size limit, it is easily worked out. With an increase in memory, you can keep your older emails and continue storing new mail from associates.
To begin, Click here to Download Install Stellar Phoenix Outlook PST Repair on your personal computer and run it to restore the PST files.


 Most scrollbars are hidden by default if they are not used in Windows 11. If you are not ok with this feature and want scrollbars to be always visible and available do not worry, turning them ON is very easy.
 Check for a poorly functioning background process
 The final solution. Contact Firefox about these errors on your browser. Oftentimes, these errors occur when you attempt to visit particular websites. Mark the offending websites' URLs and include them in your communications with Firefox.
Sometimes you can also contact the website owner yourself and request them to check their website's code.
Following are additional measures you can take to resolve the Unresponsive Script error.
The final solution. Contact Firefox about these errors on your browser. Oftentimes, these errors occur when you attempt to visit particular websites. Mark the offending websites' URLs and include them in your communications with Firefox.
Sometimes you can also contact the website owner yourself and request them to check their website's code.
Following are additional measures you can take to resolve the Unresponsive Script error.


